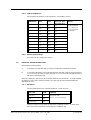
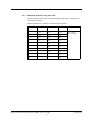
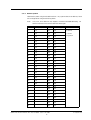
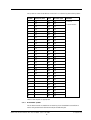
1
JTL SYSTEMS LIMITED
COMPRESSOR PACK
INSTALLATION MANUAL
(FOR ALL CONTROLLER TYPES)
JTL Systems Limited
41 Kingfisher Court
Hambridge Road
NEWBURY, Berkshire RG14 5SJ
Tel: (01635) 263646 Fax: (01635) 263647
After Sales Support Line: 0870 321 HELP (4357)
TABLE OF CONTENTS
1.
INSTALLATION PRACTICE . . . . . . . . . . . . . . . . . . . . . . . . . . . . . . . . . . . . . . . . . . . . . . . . . . . . . . . . . . . . . . . .
1.1
CABLE INSTALLATION REQUIREMENTS . . . . . . . . . . . . . . . . . . . . . . . . . . . . . . . . . . . . . . . . . . . . . .
1.1.1
Cable Segregation . . . . . . . . . . . . . . . . . . . . . . . . . . . . . . . . . . . . . . . . . . . . . . .
1.1.2
Signal Cables . . . . . . . . . . . . . . . . . . . . . . . . . . . . . . . . . . . . . . . . . . . . . . . . . . .
1.1.3
Power and Control Cables . . . . . . . . . . . . . . . . . . . . . . . . . . . . . . . . . . . . . . . .
1.1.4
High Voltage Testing . . . . . . . . . . . . . . . . . . . . . . . . . . . . . . . . . . . . . . . . . . . .
1.1.5
Cable Installation Within Enclosures . . . . . . . . . . . . . . . . . . . . . . . . . . . . . . . .
1.1.6
External Cable to JTL Control Equipment (site wiring) . . . . . . . . . . . . . . . . .
1.2
CABLE SPECIFICATION . . . . . . . . . . . . . . . . . . . . . . . . . . . . . . . . . . . . . . . . . . . . . . . . . . . . . . . . . .
1.2.1
Pressure Transducer Cable . . . . . . . . . . . . . . . . . . . . . . . . . . . . . . . . . . . . . . .
1.2.2
Temperature Sensor Extension Cable . . . . . . . . . . . . . . . . . . . . . . . . . . . . . .
1.2.3
JTL Controllers to JTL Comms Unit . . . . . . . . . . . . . . . . . . . . . . . . . . . . . . . . .
1
1
1
1
2
2
2
2
3
3
3
3
2.
ELECTRICAL NOISE SUPPRESSION & EMC REQUIREMENTS . . . . . . . . . . . . . . . . . . . . . . . . . . . . . . . . . . . . .
2.1
PRINCIPLES . . . . . . . . . . . . . . . . . . . . . . . . . . . . . . . . . . . . . . . . . . . . . . . . . . . . . . . . . . . . . . . . . . .
2.2
OUTPUTS . . . . . . . . . . . . . . . . . . . . . . . . . . . . . . . . . . . . . . . . . . . . . . . . . . . . . . . . . . . . . . . . . . . . .
2.3
SEGREGATION . . . . . . . . . . . . . . . . . . . . . . . . . . . . . . . . . . . . . . . . . . . . . . . . . . . . . . . . . . . . . . . . .
2.4
HEAT RECLAIM AND LIQUID DIFFERENTIAL VALVES . . . . . . . . . . . . . . . . . . . . . . . . . . . . . . . . . . .
2.5
SUPPRESSOR TYPE . . . . . . . . . . . . . . . . . . . . . . . . . . . . . . . . . . . . . . . . . . . . . . . . . . . . . . . . . . . . .
2.6
CABLE SCREENING . . . . . . . . . . . . . . . . . . . . . . . . . . . . . . . . . . . . . . . . . . . . . . . . . . . . . . . . . . . . .
2.7
EARTH CONNECTION . . . . . . . . . . . . . . . . . . . . . . . . . . . . . . . . . . . . . . . . . . . . . . . . . . . . . . . . . . .
2.8
SIGNAL GROUNDS . . . . . . . . . . . . . . . . . . . . . . . . . . . . . . . . . . . . . . . . . . . . . . . . . . . . . . . . . . . . . .
4
4
4
4
4
4
4
5
5
3.
PACK COMMISSIONING . . . . . . . . . . . . . . . . . . . . . . . . . . . . . . . . . . . . . . . . . . . . . . . . . . . . . . . . . . . . . . . . . 6
3.1
INTERFACE CARD ADDRESSING . . . . . . . . . . . . . . . . . . . . . . . . . . . . . . . . . . . . . . . . . . . . . . . . . . . 6
3.1.1
Compressors . . . . . . . . . . . . . . . . . . . . . . . . . . . . . . . . . . . . . . . . . . . . . . . . . . . 6
3.1.2
Condensers . . . . . . . . . . . . . . . . . . . . . . . . . . . . . . . . . . . . . . . . . . . . . . . . . . . . 7
3.1.3
Defrost . . . . . . . . . . . . . . . . . . . . . . . . . . . . . . . . . . . . . . . . . . . . . . . . . . . . . . . . 8
3.2
WATCHDOG DEFAULT SETTINGS . . . . . . . . . . . . . . . . . . . . . . . . . . . . . . . . . . . . . . . . . . . . . . . . . . . 9
3.3
INITIAL SETTINGS . . . . . . . . . . . . . . . . . . . . . . . . . . . . . . . . . . . . . . . . . . . . . . . . . . . . . . . . . . . . . . 10
3.4
DISPLAY TEST . . . . . . . . . . . . . . . . . . . . . . . . . . . . . . . . . . . . . . . . . . . . . . . . . . . . . . . . . . . . . . . . 11
3.5
PRESSURE TRANSDUCERS TEST . . . . . . . . . . . . . . . . . . . . . . . . . . . . . . . . . . . . . . . . . . . . . . . . . . 12
3.6
TEMPERATURE SENSORS . . . . . . . . . . . . . . . . . . . . . . . . . . . . . . . . . . . . . . . . . . . . . . . . . . . . . . . 12
3.7
AUTO INPUT . . . . . . . . . . . . . . . . . . . . . . . . . . . . . . . . . . . . . . . . . . . . . . . . . . . . . . . . . . . . . . . . . 13
3.8
LOW LIQUID OR REFRIGERANT LEAK INPUT . . . . . . . . . . . . . . . . . . . . . . . . . . . . . . . . . . . . . . . . . 13
3.9
PACK COMMUNICATIONS . . . . . . . . . . . . . . . . . . . . . . . . . . . . . . . . . . . . . . . . . . . . . . . . . . . . . . . 14
3.10
INSTALLATION SET-UP . . . . . . . . . . . . . . . . . . . . . . . . . . . . . . . . . . . . . . . . . . . . . . . . . . . . . . . . . 15
3.10.1 Condenser . . . . . . . . . . . . . . . . . . . . . . . . . . . . . . . . . . . . . . . . . . . . . . . . . . . . 15
3.10.2 Number of steps per compressor . . . . . . . . . . . . . . . . . . . . . . . . . . . . . . . . 15
3.10.3 Type of Compressor . . . . . . . . . . . . . . . . . . . . . . . . . . . . . . . . . . . . . . . . . . . . 16
3.10.4 Defrost System Set Up . . . . . . . . . . . . . . . . . . . . . . . . . . . . . . . . . . . . . . . . . . 16
3.11
ELECTRICAL TESTING WITHOUT LOAD . . . . . . . . . . . . . . . . . . . . . . . . . . . . . . . . . . . . . . . . . . . . . 16
3.11.1 Condenser . . . . . . . . . . . . . . . . . . . . . . . . . . . . . . . . . . . . . . . . . . . . . . . . . . . . 16
3.11.2 Compressor Type CPxS, CP2x, CP3x, CPSA . . . . . . . . . . . . . . . . . . . . . . . . . 17
3.11.3 Compressor type CP4x, CP5x, EP6x, CPLT, CPST, EPLx . . . . . . . . . . . . . . . 18
3.11.4 Defrost System . . . . . . . . . . . . . . . . . . . . . . . . . . . . . . . . . . . . . . . . . . . . . . . . 19
3.11.5 Drain Down System . . . . . . . . . . . . . . . . . . . . . . . . . . . . . . . . . . . . . . . . . . . . . 20
COMP-PACK-INSTALL-MANUAL.WPD Doc No. 00948 Issue 7 Nov 2004
JTL Systems Ltd
1.
INSTALLATION PRACTICE
1.1
CABLE INSTALLATION REQUIREMENTS
When installing JTL Systems controllers into equipment it is essential that the following
requirements are observed:
1.1.1
Cable Segregation
All JTL controllers are fitted with plugs and sockets for all connections so that units
may be unplugged for servicing.
Connections are divided in to two groups:
(i) Power/Control
(ii) Signal
It is essential that the cable connections to these groups be segregated. For full
information about which connection is which see the relevant wiring diagram which,
if is not supplied with the controller, may be obtained from JTL Systems or your
supplier.
As a guide the following applies:
Circular DIN Audio connectors are always signal.
2 part Klippon connectors are generally power connections but not always.
Exceptions to this rule are the voltage free inputs to coldstore and cabinet
controllers and monitors in the product ranges RC and EC.
1.1.2
Signal Cables
Low voltage signals should be run in multicore cable to minimise EMC problems and to
avoid any confusion with power cables during installation or subsequently.
Signal cables should have a minimum insulation voltage of 250 V ac.
Signal cables must have a minimum cross section of 0.2 mm and be flexible with a
minimum of 7 strands.
Telephone cable is not permitted under any circumstances.
Flexible cables connected to JTL screw connectors and other connectors connected
to JTL equipment within the enclosure should be bootlace ferruled with the correct
ferrule using an appropriate crimp tool.
Signal cables should be identified if possible.
JTL manufacture cables for all DIN connectors in various lengths to the above
standards.
Signal cables are separated in to 2 groups, common ground and RS485
communication cables.
Common ground cables must obey the above rules totally.
RS485 communication cables are more tolerant of problems so some relaxation may
be allowed.
No signal cable should be run in trunking with power cables.
COMP-PACK-INSTALL-MANUAL.WPD Doc No. 00948 Issue 7 Nov 2004
1
JTL Systems Ltd
1.1.3
Power and Control Cables
All JTL controllers which drive electrical equipment have specified ratings. For full
details see appropriate manuals.
Generally however the following rules apply:
Max
Max
ac
dc
ac/dc
voltage 230 V
voltage 50 V
current 1 A continuous resistive
All ac outputs are suppressed internally on the controller. This is done by the use of a
resistor/capacitor network connected from the LOAD to the neutral. It is ESSENTIAL
that the relays are wired correctly and all relay terminals are marked:
LN
LD
C
NO
NC
for
for
for
for
for
line
load
line (common)
load (normally open)
load (normally closed)
As suppressors are internally connected to neutral it is ESSENTIAL that LINE (L) NEUTRAL
(N) polarity is observed on all power connections.
If this polarity is not observed data corruption or processor mis-operation may occur.
1.1.4
High Voltage Testing
No JTL controllers should be connected in circuit during high voltage "flash" testing.
1.1.5
Cable Installation Within Enclosures
Within the enclosure separation must occur with a minimum of 150 mm between
parallel runs of power and signal cables. These must not be run in common trunking.
1.1.6
External Cable to JTL Control Equipment (site wiring)
A minimum spacing of 350 mm must be maintained between parallel runs of power
and signal cables. These must not be run in common trunking.
Where separation of 350 mm is not possible the signal cable should be screened and
run in conduit or separate section steel trunking.
All external cables should be clearly identified as to destination.
COMP-PACK-INSTALL-MANUAL.WPD Doc No. 00948 Issue 7 Nov 2004
2
JTL Systems Ltd
1.2
CABLE SPECIFICATION
1.2.1
Pressure Transducer Cable
The recommended cable for the purpose is a 4 core cable with overall Screen.
Equivalent to BICC type 7-2-4C to DEF STAN 61-12-4.
Posssible Suppliers
FES
Order Code
030701X
Farnell Order Code
140-481
RS
367-454
Order Code
Note: Telephone cable and other low voltage insulated cables are not permitted.
1.2.2
Temperature Sensor Extension Cable
The recommended cable for the purpose is a twin core cable.
Equivalent to BICC type 7-2-2A to DEF STAN 61-12 part 4.
Possible Suppliers
1.2.3
FES
Order Code
030704E
RS
Order Code
362-897
Note:
Telephone cable and other low voltage insulated cables are not permitted.
JTL Controllers to JTL Comms Unit
The recommended cable for the purpose is a twin core cable.
Equivalent to BICC type 7-2-2A to DEF STAN 61-12 part 4.
Possible Suppliers
FES
Order Code
030704E
RS
Order Code
362-897
Note:
Telephone cable and other low voltage insulated cables are not permitted.
COMP-PACK-INSTALL-MANUAL.WPD Doc No. 00948 Issue 7 Nov 2004
3
JTL Systems Ltd
2.
ELECTRICAL NOISE SUPPRESSION & EMC REQUIREMENTS
2.1
PRINCIPLES
All JTL controllers have built in suppressors to suppress electrical interference that is generated
by relays, solenoids and contactors when power to such devices is removed.
The suppressor provides a path for the stored energy in the coil and thus prevents high
voltages and sparks which generate the interference.
2.2
OUTPUTS
The JTL pack controller comprises 2 fundamental parts, the main pack controller and the
interface cards. With the exception of the liquid differential pressure valve, all power outputs
are driven by the interface cards.
Where the valves are driven directly by the JTL cards the built in suppression is adequate.
Problems arise where the JTL output indirectly drives the valves which are therefore
unsuppressed.
Where these indirectly driven valves are controlled by equipment mounted in the same section
as the JTL pack controller then extra suppression is required. This should be applied across
each coil.
2.3
SEGREGATION
Ideally the JTL pack controller should be in a different section to the interface cards. This
requirement is satisfied by the use of the JTL enclosure for the pack controller, however, it is
still recommended that the interface cards are mounted with the control equipment and not
with the main controller.
2.4
HEAT RECLAIM AND LIQUID DIFFERENTIAL VALVES
Specific care should be taken with the heat reclaim and liquid differential valves. If these are
not directly driven by JTL control equipment they must be suppressed.
2.5
SUPPRESSOR TYPE
Suppressors should be series resistor - capacitor type. JTL can provide information on
procurement or supply suitable parts from stock.
2.6
CABLE SCREENING
EMC guidlines indicate in some circumstances that screens of cables should be earthed at both
ends to ensure EMC capability. This should only be done when the earth is guaranteed to be
perfect (low independance to all frequences) at both ends of the screened cable. If the earth
is not perfect then connection of the screen at both ends will cause severe problems.
Connections of the screen should be made to the earth terminals shown or specified on the
installation documents.
COMP-PACK-INSTALL-MANUAL.WPD Doc No. 00948 Issue 7 Nov 2004
4
JTL Systems Ltd
2.7
EARTH CONNECTION
Earth connections must be copper or aluminium to earth. Steel plates, trunking, armouring
forming part of the earth system are not acceptable.
2.8
SIGNAL GROUNDS
Signals and signal grounds must be run in the same cable. Under no circumstances should the
ground be run in a seperate cable to the signal.
COMP-PACK-INSTALL-MANUAL.WPD Doc No. 00948 Issue 7 Nov 2004
5
JTL Systems Ltd
3.
PACK COMMISSIONING
3.1
INTERFACE CARD ADDRESSING
The main controller communicates with the interface cards via a 4-wire serial data bus, 2 wires
are for transmit and 2 wires for receive. Each interface card has an address which is specified
by switches or item numbers on the interface card. These settings must be correct position
for the pack to work.
3.1.1
Compressors
ALL TYPES EXCEPT CPLT & EPLx
LEGACY INTERFACE TYPES IF1 & IF2
PROGRAMMABLE INTERFACE IF11 & IF12
COMPRESSOR
SW1
SW2
ITEM 30
1
1
XC00
2
2
3
3
4
4
X = don't care
c = closed
o = open
SW2 May use wire links
ITEM 31
ITEM 32
ITEM 33
3
See
note
0
1
2
3
4
Dot showing = closed
5
5
5
6
6
6
7
7
7
8
8
8
9
9
9
10
0
0
TYPE CPLT, EPLx
LEGACY INTERFACE TYPE IF1
PROGRAMMABLE INTERFACE IF11
COMPRESSOR
SW1
SW2
ITEM 30
1-7
1
XC00
8-10
X=don't care
c=closed
o=open
Dot showing = closed
2
ITEM 31
ITEM 32
3
See
note
ITEM 33
1
1
2
Note: For true legacy support, set item 32 to 0. For the recommended enhanced control strategy, set
item 32 to 1 (see relevant product manual/interface user guide).
COMP-PACK-INSTALL-MANUAL.WPD Doc No. 00948 Issue 7 Nov 2004
6
JTL Systems Ltd
3.1.2
Condensers
ALL TYPES EXCEPT EP6x, EPLx, CP5H, CPLT, CPST
LEGACY INTERFACE IF1 (IF4)
PROGRAMMABLE INTERFACE IF11 (IF14)
FUNCTION
SW1
SW2
ITEM 30
ITEM 31
ITEM 32
ITEM 33
CONDENSER
1
X0CC
1
4
0
X
Note:
x = don't care
c = closed
o = open
SW2 May use wire links
TYPES CP5H, CPLT, CPST
LEGACY INTERFACE IF1 (IF4)
PROGRAMMABLE INTERFACE IF11 (IF14)
FUNCTION
SW1
SW2
ITEM 30
ITEM 31
ITEM 32
ITEM 33
CONDENSER
0
XOCC
0
4
0
X
X = don't care
c = closed
o = open
SW2 May use wire links
Dot showing = closed
TYPES EP6x, EPLx
PROGRAMMABLE INTERFACE IF11 (IF14)
FUNCTION
ITEM 30
ITEM 31
ITEM 32
ITEM 33
CONDENSER OUTPUTS 1 - 7
0
4
0
X
CONDENSER OUTPUTS 8 - 14*
0
5
0
X
* Available on later firmware enhancements
Note: IF4 and IF14 are for use with variable speed condenser fan controllers.
COMP-PACK-INSTALL-MANUAL.WPD Doc No. 00948 Issue 7 Nov 2004
7
JTL Systems Ltd
3.1.3
Defrost
ALL TYPES EXCEPT EP6x, EPLx, CP5H, CPLT, CPST
LEGACY INTERFACE IF3
PROGRAMMABLE INTERFACE IF13
FUNCTION
SW1
SW2
ITEM 30
Defrost system 1-7
2
X0CC
Defrost system 8-14
3
Defrost system 15-21
4
Defrost system 22-28
5
Drain down valve 1-7
6
6
Drain down valve 8-14
7
7
Drain down valve 15-21
8
8
Drain down valve 22-28
9
9
Note:
x = don't care
c = closed
o = open
2
SW2 May use
wire links
5
ITEM 31
ITEM 32
ITEM 33
4
0
X
3
4
TYPES EP6U & CP5H
LEGACY INTERFACE IF3
PROGRAMMABLE INTERFACE IF13
FUNCTION
SW1
SW2
ITEM 30
Defrost system 1-7
1
X0CC
Defrost system 8-14
2
Defrost system 15-21
3
Defrost system 22-28
4
Drain down valve 1-7
1
Drain down valve 8-14
2
Drain down valve 15-21
3
3
Drain down valve 22-28
4
4
X = don't care
c = closed
o = open
SW2 May use
wire links
X00C
Dot showing =
closed
ITEM 31
ITEM 32
ITEM 33
4
0
X
1
2
3
4
1
2
Note: EPLT, EPLA, EP6A, CPLT and CPST do not support defrost & drain down interfaces.
COMP-PACK-INSTALL-MANUAL.WPD Doc No. 00948 Issue 7 Nov 2004
8
JTL Systems Ltd
3.2
WATCHDOG DEFAULT SETTINGS
All interface cards have a built in watchdog which checks the communications link. If no
messages are received after 90 seconds then the watchdog times out. When the power is first
applied the red LED indicator on the card is on and the watchdog is healthy.
When the power to the card is on and the indicator is off the watchdog has timed out. In this
mode the default switches SW1 (programmable interface) or SW3 (legacy interface) active.
There is a switch on SW3 equivalent to every relay. When the switch is closed the relay is
energised.
This mode can be used to check the full electrical connections to the output relays from the
JTL equipment prior to the full sequence testing.
To do this set all the default switches on all interface cards, to open. Disconnect the power to
the main controller and power up all the interface cards. Use the appropriate bit of default
switch to operate the appropriate relay.
After commissioning these switches should be left in the appropriate position for operating
the equipment in the event of a main controller failure.
COMP-PACK-INSTALL-MANUAL.WPD Doc No. 00948 Issue 7 Nov 2004
9
JTL Systems Ltd
3.3
INITIAL SETTINGS
Once the electrical tests are complete the main controller should be set up, if necessary. Care
should be taken to see if the data has already been set up for this installation. If the data is
sensible do not erase it and start again as this may involve a lot of unnecessary work.
Note:
If the controller has been despatched direct from JTL Systems it will contain the
standard default data.
To check if the data is sensible, check the following using the hand unit on items as shown:
CPxS,CP2x,CPSA
CP3x
EP6x, CP5x, CP4x, EPLT, CPLT,
CPST
No. of compressors
100
100
200
No. of fans
190
290
390
No of defrost systems
200
300
400
If the items are in agreement with the actual equipment, it is reasonably safe to assume that
the data has already been set up sensibly.
If it has not been, set up the bitswitches on the main controller as follows:
PACK TYPE
SWITCH POSITION
FUNCTION
x = don't care
CPCS, CPRS, CPSA
XXXC
LT pack
c = closed (dot showing)
XXXO
HT pack
XCCC
LT pack gas
XXCO
HT pack gas
XXOC
LT pack electric
XXOO
HT pack electric
XOCC
LT pack migros
xxxx
all types
CPLS
All other controllers
o = open
Perform an initiation sequence with the maintenance unit, as follows:
COMP-PACK-INSTALL-MANUAL.WPD Doc No. 00948 Issue 7 Nov 2004
10
JTL Systems Ltd
3.4
DISPLAY TEST
Check the JTL displays are functioning sensibly. If there is "garbage" on displays check the
display type on the maintenance unit.
When there is a display splitter for up to 4 displays or a 4 way display panel then the display type
selected should be LED2. If there is a display splitter for only 2 displays then the display type is
LED1. The display type is selected using the maintenance unit by setting the following items:
PACK TYPE
ITEM
FUNCTION
CPxS,CP2x, CP3x, CPSA
39
CP4x, CP5x, EP6U
139
0 = LED1
1 = LED2
CPLT, CPST, EPLx, EP6A
-
LED2 ONLY
Once the display is selected correctly, it can be tested by setting item 99 to 1.
COMP-PACK-INSTALL-MANUAL.WPD Doc No. 00948 Issue 7 Nov 2004
11
JTL Systems Ltd
3.5
PRESSURE TRANSDUCERS TEST
There are four types of pressure transducer associated with the JTL equipment:
PT1-G (PT1)
PT2-G (PT2)
PT3-G (PT3)
PT1A-G (PT1A)
0 - 100
0 - 200
0 - 300
–15 - + 85
psi
psi
psi
psi
gauge
gauge
gauge
gauge
The discharge pressure is always a PT3-G (PT3)
The HT suction pressure is always a PT1-G (PT1)
The LT and satellite suction pressures can use either PT1-G (PT1) or PT1A-G (PT1A).
The LT and satellite suction pressure transducers can thus be selected by the maintenance unit
item numbers.
PACK TYPE
LT
SATELLITE
FUNCTION
CPxS, CP3x, CPSA
26
29
CP4x, CP5x, EP6x, CPST, CPLT, EPLx
126
129
0 = PT1-G
1 = PT1A-G
Connect the transducers or transducer simulators one at a time to the pack wiring. The correct
pressures should be indicated on the displays.
The supply voltage of 8 ± 0.2 Vdc should be checked from the "+" to the "–". The output from
the transducer should be checked to the "–".
3.6
TYPE
ATMOSPHERIC
PRESSURE
FULL SCALE
FULL SCALE
PRESSURE
V/psi
PT1A-G
1.75 V
6V
85 psi
20
PT1-G
1V
6V
100 psi
20
PT2-G
1V
6V
200 psi
40
PT3-G
1V
6V
300 psi
60
TEMPERATURE SENSORS
The 7 temperature sensor readings are indicated on items 31-37 respectively.
Unused sensors can be de-selected.
PACK TYPE
ITEM
FUNCTION
CPxS, CP2x, CP3x
103-109
CPSA (4 only)
103-106
0 = Disable
1 = Enable
All other types
131-137
COMP-PACK-INSTALL-MANUAL.WPD Doc No. 00948 Issue 7 Nov 2004
12
JTL Systems Ltd
3.7
AUTO INPUT
To enable full operation of the pack the auto input must be enabled. A contact closure must be
made on I/P1 of the main controller. This may be a simple wire link as auto/manual changover
is not often fitted.
PACK TYPE
ITEM
DISPLAY
CPxS, CP2x, CPSA, CP3x
71
All other types
171
"OFF" = Manual
"AUTO" = Auto
It should display auto when the input is closed.
3.8
LOW LIQUID OR REFRIGERANT LEAK INPUT
Check the input on IP2 of the main controller. A closed input is OK. An open input is an alarm
condition after 30 minute time delay.
PACK TYPE
ITEM
DISPLAY
CPxS, CP2x, CPSA, CP3x,
72
All other types
172
CLr = No alarm
Lo.Li = Open input
173
CLr = No alarm
reF.L = Open input
COMP-PACK-INSTALL-MANUAL.WPD Doc No. 00948 Issue 7 Nov 2004
13
JTL Systems Ltd
3.9
PACK COMMUNICATIONS
All interface boards communicate with the main JTL controller. If the main controller was
initialised above using the Item 9 function then program in the number of compressors, fans
and defrost systems as listed in that section.
On some pack types defrost stub and drain down interfaces can be de-selected using the
following item numbers:
PACK TYPE
ITEM
DISPLAY
CPSA
209
CP4x, CP5x, EP6x
409
"On" Defrost Interface fitted
"Off" Defrost Interface not fitted
CPSA
208
CP4x, CP5x, EP6x
408
"On" Drain Down Interface fitted
"Off" Drain Down Interface not
fitted
Each of the interface cards should now be communicating with the main controller. The red
LED indicators on each interface board should be on, and stay on, continuously. This indicates
that each board is receiving the message. The reply communications status is indicated on the
alarm status function on the maintenance unit.
INTERFACE TYPE
ITEM
DISPLAY
Defrost
95
CLR = no fault
Compressor
96
Condenser
98
88 (CPSA only)
COMP-PACK-INSTALL-MANUAL.WPD Doc No. 00948 Issue 7 Nov 2004
14
JTL Systems Ltd
3.10
INSTALLATION SET-UP
3.10.1
Condenser
The condenser can be sequenced in 7 simple steps or a more complex sequence for up
to 12 fans.
If simple steps up to 7 are required set the number of fans to the number of steps.
For 8, 10 or 12 fans with summer / winter solenoid set 8, 10 or 12 OR 9, 11 or 13.
The sequence varies depending on the value set. Output 7 is used to control the
summer/winter solenoid. When half the selected fans are running the summer/winter
output is energised and the fan control outputs revert to 1 or 0 fans depending on
whether 8, 10, 12 or 9, 11, 13 are selected (see the CP4X manual for details).
3.10.2
Number of steps per compressor
The JTL controller supports up to 4 steps per compressor using 3 unloading stages.
For each compressor set the number of steps using the item no. in the table as
follows:
COMPRESSOR
CPxS, CP2x
CPSA
CP3x
CP4x, CP5x, EP6x, CPLT, EPLx
1
110
110
110
210
2
120
120
120
220
3
130
130
130
230
4
140
140
140
240
5
150
150
250
6
160
160
260
7
170
170
270
8
180
180
280
9
190
290
10
200
300
Note:
CPxS, CP2x, CP3x and CP4x support up to 3 steps/compressor
CP5x and EP6x support up to 4 steps/compressor
CPLT and EPLx support 1 step/compressor
CPSA supports 2 steps/compressor
CPST has an analogue (4-20mA) output per compressor
COMP-PACK-INSTALL-MANUAL.WPD Doc No. 00948 Issue 7 Nov 2004
15
JTL Systems Ltd
3.10.3
Type of Compressor
Set the type of compressor using the item no. in the table as follows:
3.10.4
COMPRESSOR
CP2x
CP3x
CP4x, CP5x, EP6x,
CPLT, CPST, EPLx
DISPLAY
1
115
115
215
2
125
125
225
3
135
135
235
0 = Not Controlled
1 = LT Compressor
2 = HT Compressor
3 = Satellite
4
145
145
245
5
155
155
255
6
165
165
265
7
175
175
275
8
185
185
285
9
195
295
10
205
305
Defrost System Set Up
No further set up is required for setting
3.11
ELECTRICAL TESTING WITHOUT LOAD
Before electrical testing check:
a)
All commons to interface card fault inputs are definitely connected to neutral
b)
All line and load outputs from interface and main controller cards have correct polarity.
LN or LINE must be to the ac supply side and LD or LOAD must be connected directly or
indirectly to the output load.
Remove all necessary output fuses or isolate any necessary circuit breakers. Arrange to defeat
any electrical fault circuits, pressure switches, etc. that may not allow the equipment the
equipment to "run".
3.11.1
Condenser
Use the forced function to stage the condenser 1 stage at a time.
PACK TYPE
ITEM
FUNCTION
CPxS, CP2x
192
CP3x
292
Set to 0 for Auto
Set to 1-13 for forced stages
All other types
392
Check the outputs on the electrical equipment sequence correctly. At each stage
check the confirmation back to each input on condenser card.
COMP-PACK-INSTALL-MANUAL.WPD Doc No. 00948 Issue 7 Nov 2004
16
JTL Systems Ltd
3.11.2
Compressor Type CPxS, CP2x, CP3x, CPSA
If there is an auto manual switch for each compressor then select 1 compressor at a
time and turn it to auto.
Check the compressor is ready to run with the following items.
COMPRESSO
R
CPSA
CPxS, CP2x
CP3x
DISPLAY
1
113
113
113
2
123
123
123
"rdy" = ready
"0" = not ready
3
133
133
133
4
143
143
143
5
153
153
6
163
163
7
173
173
8
183
183
9
193
10
203
COMP-PACK-INSTALL-MANUAL.WPD Doc No. 00948 Issue 7 Nov 2004
17
JTL Systems Ltd
3.11.3
Compressor type CP4x, CP5x, EP6x, CPLT, CPST, EPLx
Use the forced number of stages item 102 to sequence up stages on that compressor
1 at a time.
Check the outputs sequence correctly and repeat for each compressor.
Select auto on any auto manual switch for all compressors.
Check the compressors are ready to run.
COMPRESSOR
ITEM
DISPLAY
1
213
"rdy" = ready to run
2
223
"0" = Off
3
233
4
243
5
253
6
263
7
273
8
283
9
293
10
303
Use the forced number of stages for each compressor to sequence the compressors.
COMPRESSOR
FORCED
STAGES
FORCED OFF
DISPLAY
1
217
218
"O" = Auto
2
227
228
"CP.En" = Enabled
3
237
238
4
247
248
5
257
258
6
267
268
7
277
278
8
287
288
9
297
298
10
307
308
"C.OFF" = Disabled
Check the outputs sequence correctly for each compressor.
Note:
CPST has an analogue output for minimum stages set 1 and maximum set 127.
COMP-PACK-INSTALL-MANUAL.WPD Doc No. 00948 Issue 7 Nov 2004
18
JTL Systems Ltd
3.11.4
Defrost System
Check each system using the forced functions. Any systems that are on defrost, force
off to refrigeration using the following items:
Note:
CPST, CPLT, EP6A and EPLx only support JTL network initiated defrosting. No
defrost interface cards can be used with these types.
SYSTEM
CPSA,CPxS, CP2x
CP3x
All other types
FUNCTION
1
214
314
414
0 = Normal
2
224
324
424
3
234
334
434
1 = Forced
Refrigeration
4
244
344
444
5
254
354
454
6
264
364
464
7
274
374
474
8
284
384
484
9
294
394
494
10
304
404
504
11
314
414
514
12
324
424
524
13
334
434
534
14
344
444
544
15
354
454
554
16
364
464
564
17
374
474
574
18
284
484
584
19
394
494
594
20
404
504
604
21
514
614
22
524
624
23
534
634
24
544
644
25
554
654
26
564
664
27
574
674
28
584
684
COMP-PACK-INSTALL-MANUAL.WPD Doc No. 00948 Issue 7 Nov 2004
19
JTL Systems Ltd
One system at a time force defrosts on and off 1 at a time using the following items:
SYSTEM
CPSA,CPxS, CP2x
CP3x
All other types
FUNCTION
1
213
313
413
o = Normal
2
223
323
423
1 = Forced Defrost
3
234
333
433
4
243
334
443
5
253
353
453
6
263
363
463
7
273
373
473
8
283
383
483
9
293
393
493
10
303
403
503
11
313
413
513
12
323
423
523
13
333
433
533
14
334
443
543
15
353
453
553
16
363
463
563
17
373
473
573
18
383
483
583
19
393
493
593
20
403
503
603
21
513
613
22
523
623
23
533
633
24
543
643
25
553
653
26
563
663
27
573
673
28
583
683
Check all the outputs as appropriate.
3.11.5
Drain Down System
If drain down boards are used then on returning from forced defrost condition to
normal refrigeration each drain down output should energise.
COMP-PACK-INSTALL-MANUAL.WPD Doc No. 00948 Issue 7 Nov 2004
20
JTL Systems Ltd