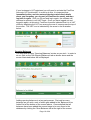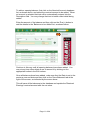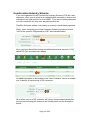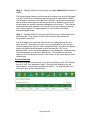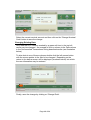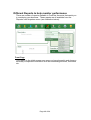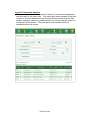
1
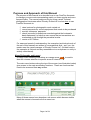
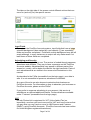
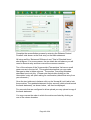
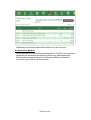
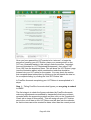
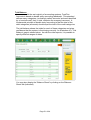
FreePlus Accounts User Manual Table of Contents Introduction........................................................................................................3 Accounting Tasks......................................................................................................3 Purpose and Approach of this Manual...............................................................4 Menu Philosophy and Layout....................................................................................4 Input Fields................................................................................................................5 Advertising and Security...........................................................................................5 VAT...........................................................................................................................5 Year End Reports.......................................................................................................6 Registering to use FreePlus Accounts...............................................................7 Starting to Use FreePlus Accounts....................................................................9 Entering Initial Company Details........................................................................9 Opening Balances....................................................................................................10 Construction Industry Scheme.........................................................................12 Adding a New Customer (or Supplier).............................................................14 Add New Customer.................................................................................................14 How to Save new Customer Details........................................................................15 Raising an Invoice............................................................................................16 Method A - Use ‘Raise Invoice’ icon......................................................................16 Method B – Select from ‘Sales’ dropdown menu..................................................17 Raising an invoice for a unlisted customer..............................................................18 Method C – create from existing similar invoice....................................................19 Next Steps – Applicable to All Methods – Entering invoice header and item........19 Amending or deleting an item on a draft invoice....................................................21 Recording invoice as (already) paid........................................................................21 Next Step Options:...................................................................................................22 Finalise the Invoice..................................................................................................22 Print as Quotation....................................................................................................23 Preview and Save as a Draft Invoice.......................................................................23 Start Again...............................................................................................................24 Delete Invoice..........................................................................................................24 Invoice List..............................................................................................................24 Raising a Credit Note.......................................................................................25 Receiving a one-off, casual payment...............................................................26 Tracking payments of Invoices........................................................................27 Receiving Payment for one or more invoices..................................................28 Partial and Full Payment(s) of a Single Invoice......................................................28 Multiple Invoice Payment........................................................................................30 Making a Refund.....................................................................................................31 Creating Statements........................................................................................32 Page 1 of 64 Recording Payments to Suppliers...................................................................33 Payment at time of order .........................................................................................33 Creating a Purchase Invoice............................................................................34 Payment for purchases made ‘on account’ / on credit ...................................36 Recording and Paying Expenses.....................................................................37 Record Expense.......................................................................................................37 Pay Expenses...........................................................................................................37 Transferring Money..........................................................................................38 Putting Money Into your Bank Account..................................................................38 Getting Money out of your Bank Account..............................................................39 Transferring Money between Accounts...................................................................39 Checking Your Bank Statements (Reconciliation)...........................................41 An Alternative Method............................................................................................43 VAT Returns.....................................................................................................44 VAT Schemes..........................................................................................................44 Making a VAT Return.............................................................................................44 Previous Returns......................................................................................................46 Correcting Mistakes.........................................................................................47 Deleting Sales Invoices............................................................................................47 Deleting Other Entries.............................................................................................47 Altering Incorrect Nominal Accounts.....................................................................47 Changing Existing Data...........................................................................................48 Different Reports to help monitor performance...............................................49 Front Page................................................................................................................49 Invoice/Transaction Analysis..................................................................................50 Trial Balance............................................................................................................51 Year End Reports.....................................................................................................52 Miscellaneous Functions..................................................................................53 Preferences...............................................................................................................53 Test System..............................................................................................................53 Reminders................................................................................................................53 Feedback..................................................................................................................53 Audit trail.................................................................................................................54 Menu Bar Search.....................................................................................................54 Subscriptions....................................................................................................55 Additional Nominal Accounts.................................................................................55 Designing your own Invoices..................................................................................57 How to Perform Common Tasks in FreePlus Accounts..................................62 Invoicing a Customer...............................................................................................62 Record Payment for a single Invoice.......................................................................62 Record a Payment for Multiple Invoices.................................................................62 Record a Casual Receipt of e.g. Daily Takings.......................................................62 Record a Purchase....................................................................................................63 Finally – How do we, Corunna Systems Ltd, use FreePlus Accounts?..........64 Page 2 of 64 Introduction The efficient management of financial accounts is vital for every business, and key to this is a suitable accounting software system. FreePlus Accounts is a reliable, easy-to-use, on-line (web based) accounting system that provides the business owner manager with the means to efficiently carry out the following functions: Raise invoices Track payments from customers Record payments to suppliers Make sure that bank statements tally with payments received (called bank reconciliation) and (Where applicable) make VAT Returns Generally monitor the financial health of the business through the use of various (analytical) reports. Generate various Year End reports to make it as easy as possible (and therefore as cheap as possible!) for an accountant to carry out the necessary year end procedures. Most accounting software systems are complex to use and require some knowledge of accounts and accounting practice. FreePlus Accounts is different because it has been designed from the perspective of the busy small business owner manager; it provides the needed functionality but keeps the complexity hidden in the background where it belongs. Accounting Tasks The tasks for which the business owner manager uses an accounting system typically fall into four broad categories: Once-only type functions such as entering company details; Occasional functions such as entering details of a new customer; Regular functions such as carrying out bank statement reconciliation on a monthly cycle; Frequent functions such as raising invoices and recording payments to suppliers. This manual will focus on those regular and frequent tasks that form the bulk of the work of maintaining an accurate accounting system. Page 3 of 64 Purpose and Approach of this Manual The purpose of this manual is to describe how to use FreePlus Accounts to manage your accounts concentrating mainly on those regular and more frequent tasks. The manual achieves this by using a small, fictional, photographer’s business called ‘Phunky Photos Ltd’ to show how to use FreePlus Accounts to: raise invoices for photographic work carried out record payments for various equipment that needs to be purchased monitor customers’ payments check (reconcile) transactions recorded against the business’s bank statements, to help the user ensure that no transactions are overlooked or slip through the proverbial cracks. create a VAT Return For ease and speed of understanding, the examples (and indeed much of the rest of this manual) are written in conversational style - as if you, the reader were the owner manager of Phunky Photos Ltd. (All data used in the examples is fictional and any resemblance to a real person or entity is entirely coincidental). Menu Philosophy and Layout In many of the following illustrations an orange arrow draw the viewers attention to specific areas of interest. is used to The main menu buttons along the top of the screen (see illustration below) give access to the main accounting functions. These are functions that need to be accessed from any screen. Many of these menus have dropdown sub-menus which become visible when the mouse is hovered over the menu icon. Page 4 of 64 The tabs on the right side of the screen control different actions that can occur for (and only for) the specific screen. Input Fields Throughout the FreePlus Accounts system, input fields that have a beige coloured background (also marked by a red asterisk [*]) are mandatory fields and must be completed. Fields with a white background may be left empty although, in many instances, an output will only make sense if at least some of these fields are completed. Advertising and Security FreePlus Accounts is free to use. The service is funded through sponsors, advertisers and affiliates. They pay to have a presence on the FreePlus Accounts website. Advertisements may appear in different parts of the screen but, mostly, will be below the tabs on the right hand side. Parts of such advertisements are visible in the screen shot illustrations in this manual. As described in the FAQs (accessible from the login page), your data is safe. It is not accessible to sponsors, advertisers or affiliates. Any user of the site can also choose to advertise their business on FreePlus Accounts. For information on how to advertise your business on FreePlus Accounts, please see the FAQs? If you prefer to suppress advertising to your account, this service is available as an optional additional feature. Further details are available under ‘’Features’ (accessible from the login page). VAT Phunky Photos Ltd is registered for VAT (Value Added Tax) so, importantly, we show you how to account for VAT and how to ensure that you pay what you owe (and no more) to HM Revenue and Customs (HMRC), using FreePlus Accounts. (FreePlus Accounts has been written for United Kingdom registered businesses). Page 5 of 64 If you are unfamiliar with VAT you can find a description of what it is and which would be the best Scheme for you on the HMRC website. At the time of writing this manual, the appropriate page of the HMRC website was: http://www.hmrc.gov.uk/vat/index.htm). If your business is VAT registered you will need to activate the FreePlus Accounts VAT functionality. The process for activating the VAT functionality is described below under ‘Entering Initial Company Details (including VAT registration and any Opening Balances)’. Year End Reports This manual also shows you how to generate year end reports for your accountant (if you have one) or for Companies House and HMRC. Finally we show you how you can use some of the reports to ensure that your business is moving in the right direction. Page 6 of 64 Registering to use FreePlus Accounts Before you can start using FreePlus Accounts you must register for a user account. This is very easy and only takes a few moments and, once completed, means that only you can gain access to your information. Registration is a two-part process. In the Registration screen, illustrated below, complete each field and confirm that you accept the Terms & conditions. Page 7 of 64 Once you have completed this part you will receive an activation email, sent to the email address you have just supplied, to enable you to activate the account you have created. Once your account is activated you can start using it and benefit from the many features and benefits of FreePlus Accounts. Page 8 of 64 Starting to Use FreePlus Accounts The next section of the manual describes how to begin using FreePlus Accounts once you have registered as a user. Do not worry about making mistakes! There is an option on the 'Company' menu that will enable you to delete all data other than Company details and, optionally, customer records. Therefore, in the early stages, you can experiment as much as you like until you feel that you have got everything just right. Entering Initial Company Details Once you have completed the registration process, the first thing that you need to do is to enter details about your company. These details include the company address, registration number, financial year end (month), VAT details if the company is registered for VAT (see below), and a number of other pieces of information that will enable FreePlus Accounts to be used in managing your accounts. You must also select the type of business that you are running so that FreePlus Accounts knows how to best set up your accounts. Although not mandatory, it would be a good idea, at this stage, to enter your bank details as, if they are there, they are printed on invoices. Important: Account Activation for VAT Registered Businesses Page 9 of 64 If your business is VAT registered you will need to activate the FreePlus Accounts VAT functionality. In order to do this, it is important that immediately after you have entered the above-described details about your company, you log out (of FreePlus Accounts) and then log back in again. Until you log out and log in again, the software will continue to operate in non-VAT mode. Once you have logged out and logged in again, at this point, FreePlus Accounts indicates that it is in VAT mode by displaying the VAT icon among the row of icons across the top of the screen. The VAT icon is indicated by the arrow in the illustration below. Opening Balances You may add as many 'Opening Balances' entries as you wish. In order to do so, click on the 'Set Opening Balances' tab as shown above and the screen illustrated below will be displayed. Adding opening balances is a two part process. First add as many balances as you wish, each of which gets added to the 'Balances to be Added' list at the bottom of the screen above. Once satisfied that all balances have been added the second stage is to save them to the database by clicking the 'Save Balances tab at the right of the screen. Page 10 of 64 To add an opening balance, first click on the Nominal Account dropdown list, as shown above, and select the nominal account to be added. When an account is selected that text will be automatically entered into the Description field. You may change that text to better reflect detail being added. Enter tha amount of the balance and then click on the Plus(+) button to add the details to the 'Balances to be Added' list, as shown below. Continue in this way until all opening balances have been added. You may at any time either delete a row or amend it by clicking on the appropriate button in the Edit column. Once all balances have been added, make sure that the Date is set to the previous year end date and then click on the 'Save Balances' tab at the right of the screen, as indicated by the arrow above. This will save all the balances to the database and update the 'Retained Earnings' nominal account with the net value. Page 11 of 64 Construction Industry Scheme If you are registered for the Construction Industry Scheme (CIS) as a subcontractor, when you do work for a contractor that contractor is required to withhold cis tax and account for it to HMRC. Thus any invoices presented to such contractors will only ever be paid less this tax. FreePlus Accounts makes it very easy to correctly record these payments. Firstly, when completing the Initial Company Details (see above) select 'Yes' to the question 'Registered for CIS?' as illustrated below. Once you have saved this change an additional nominal account (1150) called CIS Tax is created (see below). An additional option is also added to the 'New Customer' screen to enable you to identify a customer as a CIS contractor. All invoices sent to a CIS customer will have a remark added beside the invoice total showing the amount to be actually paid, see the illustration below. Page 12 of 64 When this amount is recorded as having been paid the invoice will be marked 'paid'. If you need to send both CIS and normal invoices to the same customer you should create 2 customer records, one with 'CIS Customer?' set to 'Yes' and the other with 'CIS Customer?' set to 'No' and then just invoice as appropriate. Page 13 of 64 Adding a New Customer (or Supplier) You may add as many sets of customer details as you wish. These details are primarily used for invoice creation and customer account management and so are best entered for those customers with whom you have repeat dealings. You can record payments for ‘one-off’ customers without needing to first enter any details. If, having raised a number of invoices for a 'one-off' customer, you decide to create a dedicated customer record you can link those invoices to that record by using 'Assign Unlisted Invoices' located on the 'Admin' dropdown menu. The customer details to be entered include the name, address, contact name and email address to whom invoices can be emailed plus additional information such as credit limits (not yet functional) and terms of payment. Entering details for new suppliers follows exactly the same procedure as for customers and, indeed, in some instances a customer can also be a supplier. Add New Customer To add the details of a new customer, you need to select the action ‘Add New Customer’. This action is located on the dropdown menu accessed by placing the mouse pointer over the ‘Sales’ icon which is located at the top left hand side of the screen, as indicated by the arrow in the illustration below. Once the dropdown menu has appeared , select (left mouse click) ‘Add New Customer’. This will open a blank ‘Customer Details’ page. Page 14 of 64 Next, fill in the details of the new customer in the fields provided. An illustration of a completed new Customer Details page is shown above. (Ignore the orange coloured arrow at this stage). How to Save new Customer Details Once you have filled in the details they will need to saved. To save the details, hover the mouse pointer on the ‘Save Details’ tab (indicated by the orange coloured arrow in the illustration above), and left click the mouse. FreePlus Accounts will save the details and, to confirm it has done so, will show the ‘List of Customers’ page, which will include the customer whose details you have just saved. An illustration of the List of Customers page showing the example customer, ‘St Mary's School’ is provided below. Page 15 of 64 Raising an Invoice FreePlus Accounts provides a number of ways for you to raise an invoice, most of which will pre-populate the main fields of the invoice, such as customer name and address. Three different methods (A, B and C) are described below. Following any of the three methods will take you to a point after which the steps are the same. These common steps are described below, under the heading, ‘Next Steps – Applicable to All Methods – Entering invoice header and item’, after the description of Method C. Method A - Use ‘Raise Invoice’ icon From the ‘List of Customers’, left click on the ‘Raise Invoice’ icon of the relevant customer. (The ‘Raise Invoice’ icon is indicated by the arrow in the illustration below). This will display the ‘New Invoice’ screen with many details already filled out. Alternatively you can click anywhere (other than the action column) on the row of the selected customer, display the 'Customer Details' screen and then click on the 'Create New Invoice' tab. An example of the ‘New Invoice’ screen with these customer details already filled out is shown on the next page. Page 16 of 64 Method B – Select from ‘Sales’ dropdown menu From the ‘Sales’ dropdown menu, select ‘Create New Invoice’ (indicated by the arrow in illustration below). Typically this option is used for unlisted customers. Page 17 of 64 This will display the ‘New Invoice’ page (see illustration below). Next, if creating an invoice for an existing customer, enter at least one letter into the ‘Select Customer’ field. This will trigger a dropdown menu of customers from which you select the relevant customer name. (In the illustration below, to keep things simple, the letter ‘S’ has been entered into the ‘Select Customer’ field, triggering a dropdown menu containing only the customer, ‘St Mary's School’. See arrow. Raising an invoice for a unlisted customer You can also use Method B when creating an invoice for a customer not in the existing customer list. When saved you are given the option of saving the customer details as a new customer record. Choosing this option will create a new customer record and save the invoice under that customer. Otherwise the invoice is saved under the generic 'unlisted' customer entry. Page 18 of 64 Method C – create from existing similar invoice Where you wish to create a new invoice that is substantially the same as a previous one, select the invoice that you wish to copy from the list of invoices displayed either by clicking on 'List Invoices' (illustrated by one arrow) below) or by selecting the relevant invoice from the 'Customer Details' screen and, finally, click on the ‘Copy to New’ tab at the right (illustrated by a second arrow below). Next Steps – Applicable to All Methods – Entering invoice header and item Once the ‘New Invoice’ screen is displayed you can enter the relevant details. These details effectively break down into three sections (see illustration on the next page): an invoice header section which shows details of the customer to whom you are sending, or will send, the invoice (many of these details may already have been entered by FreePlus Accounts) the invoice item section where details for items or services for which you are charging are entered (Description, price, Quantity, VAT Rate). The invoice footer section which includes any general remarks and the invoice totals. These sections are indicated on the illustration below. Page 19 of 64 In the invoice header section, ensure that at least the Company Name is entered. You may also want to complete other details such as the address and email address. To enter items, begin by entering the ‘Description’ in the white box provided in the item section of the invoice (indicated in the illustration above), and then enter the item ‘Price’ (for a single item if you are selling more than one) in the box provided. If you are selling a quantity that is greater than one enter the total ‘Quantity’. Make sure that the correct rate of VAT (where applicable) is displayed. Finally, click on the ‘Add’ (also indicated) button to the right of the item input section. FreePlus Accounts will then calculate the VAT and ‘Total’ item price and add the details to the list of items already entered onto the invoice (if any). It will also update the 'Sub Total', 'VAT' and ‘Invoice Total’ totals at the bottom of the invoice. Page 20 of 64 In the illustration below, three items are visible. Note that there is space for movement downwards of the scroll bar, located to the right of the ‘Delete’ buttons. By sliding the scroll bar downwards, further item(s) would show. You may continue adding as many line items as you wish. Line items may be re-ordered by clicking on the up and down arrows next to the Edit/Delete icons. You may also enter free text into the items section by putting the word 'text' into the Category field (if no Category is displayed you may enable this from 'Preferences'). Amending or deleting an item on a draft invoice If you wish to make any amendments to items already entered, just click on the ‘Edit’ button (see illustration above) of the relevant item and the details will be copied back in to the item input section where you can make whatever changes are necessary and then re-add it to the item list. Similarly, if you wish to delete an item just click on the ‘Delete’ button of the relevant line item. Recording invoice as (already) paid If your customer has already paid you, you can record this by selecting the ‘No’ or ‘Yes’ radio buttons located by the ‘Paid in Full?’ question. If you select the ‘Yes’ radio button, a window to a dropdown list will appear to the Page 21 of 64 right of ‘Yes’. By selecting the arrow in the window, you can select the method of invoice payment (Cash, Cheque, or Bank Transfer). FreePlus Accounts will mark the invoice as ‘Paid’ once the invoice is saved. However, before saving the invoice, see Next Step Options below. The ‘Remarks’ box is provided for your convenience to allow you to communicate with your customer on the invoice, as you see fit. Next Step Options: Once you have entered all the details in your invoice, you have a number of options: Finalise the Invoice If you wish to save and/or send (email) the invoice, click on the ‘Save & Lock’ tab. Once you do that the invoice is allocated an invoice number and displayed (on the ‘Print/Email Invoice’ page – see illustration below) in a form that can either be printed or emailed to your customer. Instructions on how to print or email the invoice are given on the ‘Print/Email Invoice’ page under the invoice number, as shown below, and are repeated as follows: “The above invoice is ready to be printed and/or Emailed To print the invoice click on the print button below. To email the invoice enter a message in the Message Space below, change the Subject and/or email address if you wish and then click on the 'Email' tab on the right” The invoice will be immediately sent to your customer. Page 22 of 64 Print as Quotation You can convert the invoice to a quotation by clicking on the 'Print as Quotation' tab. The quotation is given it's own reference number and saved in the same way as if it were a finalised invoice. At a later time you can then select the quotation from the list of invoices and very simply convert it to an invoice by clicking on the 'Finalise Invoice' tab. When converted to an invoice, the quotation number is used as a reference number. Preview and Save as a Draft Invoice If you want to preview what the finished invoice will look like click on the ‘Preview / Save Draft’ tab. As well as displaying the invoice as a pdf file (if you have Adobe Reader installed), this will save it in a Draft form. To close the preview, select the ‘Close’ tab on the right. (If you do not have Adobe Reader installed and wish to install it, visit the Adobe official website for further information, at: http://www.adobe.com/uk/ Page 23 of 64 Start Again Clicking on the 'Start Again' tab reverts the invoice back to its original state on fist being displayed. Delete Invoice Clicking on this tab gives you the opportunity to completely remove it from the system. As it has not yet been sent to a customer it does not need to be recorded within the accounting system. Invoice List This tab will display the list of invoices for this customer. Page 24 of 64 Raising a Credit Note Creating a Credit Note is very similar to creating an Invoice. The only difference is that you must select ‘Credit Note’ from the ‘Invoice Type’ on the ‘New Invoice’ page (see illustration below). Alternatively you may select 'Create New Credit Note' from the 'Sales' dropdown menu. If this credit note is a refund for an earlier invoice you may automatically apply the refund total to the invoice by entering 'Refund for Invoice <invoice no>' into the remarks field where <invoice no> is the invoice to be credited. It is important that, for the value to be correctly allocated, the invoice number is the last 'word' in the remarks field. Page 25 of 64 Receiving a one-off, casual payment To enter a casual payment, select ‘Record Money In’ under the ‘Sales’ dropdown menu as shown below. This will open a dialogue box headed ‘Receive Money In’ (see illustration below). Next, enter the details required into the fields provided, including the full amount, including any VAT, add a description, and then, to record the money received, click on ‘Record Receipt’ at the bottom of the dialogue box. If you enter 'Invoice <invoice no>' into the Description field the payment will be allocated to that invoice, otherwise a new invoice will be created. Page 26 of 64 Tracking payments of Invoices When creating a new customer record you have the opportunity of entering your standard payment terms. Generally speaking those payment terms will determine the date by which a payment is due, based on the date that the invoice was created. FreePlus Accounts monitors all invoices and, where a payment is overdue, flags it up as ‘Overdue’. You can list all invoices that are Overdue (for payment) plus those which are still to be paid by selecting ‘List Unpaid Invoices’ from the ‘Sales’ dropdown menu (see illustration below). This will produce the ‘Invoice List’ page. In the ‘Invoice List’ page illustration below, two invoices are listed, pertaining to St Mary's School, each of which are overdue because they have not been paid by the due date. Page 27 of 64 Receiving Payment for one or more invoices Payments against invoices can be received in one of three different ways: A partial payment Payment of the full invoice amount A single payment covering several invoices Partial and Full Payment(s) of a Single Invoice To record receipt of a payment which relates to a single invoice, select ‘List Unpaid Invoices’ from the ‘Sales’ menu as described in the previous section. This will take you to the ‘Invoice List’ page. Next, click on the ‘Pay’ icon (indicated in the illustration below). A small payment window will open with the relevant invoice details being displayed (see illustration below). Just enter the total being paid, the correct payment date and any additional remarks and then click on the ‘Record Payment’ button. Page 28 of 64 If the amount being paid is equal to or less than the total, FreePlus Accounts will automatically allocate the (partial) payment to the invoice. If it is more than the total the balance will be held 'on account'. As an alternative, you can display the invoice details as described above and click on the ‘Record Payment’ tab at the right of the screen. See illustration below. Page 29 of 64 Multiple Invoice Payment To record receipt of a payment which relates to more than one invoice, select ‘List Customers’ from the ‘Sales’ menu to display the ‘List of Customers’ (see illustration below – listing one customer). Click on the ‘Receive Payment’ (coins) icon of the appropriate customer (located on the right in the ‘Actions’ column (indicated by the arrow above). This will display the ‘Multiple Invoice Payments’ page (see illustration below). Next, select the invoices that are being paid by checking the ‘Select’ box at the right of the invoice details (see close up illustration below ) for each invoice to be paid. A running total of the value of the selected invoices is displayed in the ‘Selected Invoices Total’ field above the list of invoices. Page 30 of 64 If, having selected all of the invoices being paid, the total value equals the amount being paid, just click on the ‘Amount being Paid’ text and the value will be automatically entered into the field. Otherwise enter the amount being paid and then click on the ‘Record Payment’ tab at the right of the screen. FreePlus Accounts will then mark all the invoices as ‘Paid’ except that, where the total being paid does not cover the full value of an invoice that invoice will be marked as ‘Partially Paid’. Making a Refund Sometimes you may want to offer a refund, for instance when offering a discount for early payment. Recording refunds is easily achieved in FreePlus Accounts by just selecting a Payment Type of 'Refund' in the 'Receive Payment' window (see the illustration below). It is only possible to refund the full amount still outstanding for the invoice, if there is a need to make a partial refund a credit note must be raised as described in 'Raising a Credit Note' above. When a refund is made in this way FreePlus Accounts will: automatically create a credit note for the balance bring the outstanding total of the invoice to zero mark it as 'Paid' add a note to the Remarks box identifying the related credit note Page 31 of 64 Creating Statements There are occasions when customers will ask for a statement of money owed. If Statement printing has been enabled for your account, select ‘List Customers’ from the ‘Sales’ menu and then click on the relevant customer details. In the customer screen, click on ‘Print Statement’ as shown below. You may then print or email the resulting statement to your customer. Page 32 of 64 Recording Payments to Suppliers FreePlus Accounts offers two ways to record purchases. Payment at time of order For most small businesses payment will have to be made at the time that goods are ordered or purchased. In order to record such a purchase select ‘Record Money Out’ from the ‘Purchases’ menu. This will open a ‘Pay Money Out’ form (see illustration below), into which you then enter the supplier’s name (or select from the drop down list if the supplier details have already been recorded), enter the total amount being paid including any VAT, the VAT rate (where applicable), the date of the transaction, what category (account) the payment should be allocated to and a remark describing the payment. Finally click on the ‘Record Payment’ button. Page 33 of 64 Creating a Purchase Invoice When purchasing 'on account' you are, essentially, re-creating the purchase invoice, received from the supplier, into FreePlus Accounts. To do this select ‘New Purchase Invoice’ from the ‘Purchases’ dropdown (see illustration below). A blank ‘New Purchase Invoice’ page, as shown below, is displayed. Page 34 of 64 The ‘New Purchase Invoice’ page provides tabs (on the right hand side) to allow you to ‘Save’, ‘Print’, ‘Start Again’ or select a ‘Purchase Invoice List’. When creating a purchase invoice the company name is the name of the supplier. If you type a character into the 'Select Supplier' box above it will list existing suppliers starting with that character you have typed, and you can select one of those, in which case the details are carried through to the ‘Company Name’ , ‘Address’, etc. boxes. (See ‘New Purchase Invoice’ illustration above). Generally, there should never be a need to print off a ‘Purchase Invoice’ because one should have been received from the supplier, which is why the ‘Save & Print’ tabs on the ‘New Purchase Invoice’ page are separate. If the 'Save' tab on the ‘New Purchase Invoice’ page is clicked then: (a) details of the finalised Purchase Invoice are displayed, and (b) there is an option to print off the invoice as either an Invoice or a Purchase Order. If printed as an invoice, the supplier address will be at the top right, that is, will be 'from' the Supplier. If it is printed as a Purchase Order, the FreePlus Accounts User Company name will be top right, and the Supplier's details appear on the left (that is, it is 'from' the Company and 'to' the Supplier). Page 35 of 64 Payment for purchases made ‘on account’ / on credit When recording payment for purchases made on 'on account' / on credit, the user should raise a ‘Purchase Invoice’ as described above. It can then be 'paid' in the same way that a Sales Invoice is marked as paid. Select 'List Purchases' from the 'Purchases' dropdown menu and then click on the 'Record Payment' icon of the purchase invoice to be 'paid off' (as shown below). A payment window similar to that shown below will be displayed with the majority of fields pre-filled. Make any changes necessary and then click on 'Record Payment' to save the payment details. Page 36 of 64 Recording and Paying Expenses FreePlus Accounts makes it very easy for you to record your expenses and then pay yourself. Essentially the process is similar to 'Record Money Out' as far as raising the initial purchase invoice is concerned but, whereas with 'Record Money Out' the system will then automatically create a transaction, when recording expenses the two actions are separate. You can, of course, combine both the raising of a purchase invoice and the payment of that invoice for your expenses by using the 'Record Money Out' option. Record Expense To record an expense select 'Record Expense' from the 'Purchases' icon dropdown menu. Enter the total amount paid, any VAT details (if applicable), the date of the purchase and a descripton and then click on the 'Record Payment' button. FreePlus Accounts will then create the purchase invoice and, as confirmation, display a list of all expenses invoices, including the one just created. Pay Expenses At some later point, when you are going to reimburse yourself for this expenditure. Select 'Pay Expenses' from the 'Purchases' icon dropdown menu, select, in the same way as that described above for 'Multiple Invoice Payments', the invoices you wish to pay off . Enter the total to be paid either by clicking the 'Amount being Paid' text or enter the total manually and then click on the 'Record Payment' tab. The screen will be updated to show the selected invoices as 'Paid'. Page 37 of 64 Transferring Money It is easy to record transfers of money into your accounts, out of your accounts and between your accounts using FreePlus Accounts. All of these tasks are accessed from the 'Money' dropdown menu, as shown below. Putting Money Into your Bank Account Click on the 'Put Money In' option of the 'Money' dropdown menu. The screen shown below will be displayed. Enter the amount of cash to be taken to the bank into the 'Cash Total' box. If there are any cheques to be banked, they will be listed in the 'Cheques' section. You may select those to be banked. Page 38 of 64 If you are only banking cheques, enter 0.00 into the Cash Total box (do not enter the cheques total into the cash box). Finally, click on the 'Record Transaction' tab at the right of the screen to save these details. Getting Money out of your Bank Account Select 'Get money Out' from the 'Money' dropdown menu, enter the amount being taken out into the 'Amount' box and click on the 'Record Transaction' tab, as shown below. Transferring Money between Accounts When using this option, you are either transferring money into your current account or out from your current account. Select 'Transfer Money' from the 'Money' dropdown menu. Select whether you are transferring From or To the non-current account and select the account you are transferring from/to (See the illustration below). Page 39 of 64 Enter the amount to be transferred and then click on the 'Record Transaction' tab to save the transaction. Page 40 of 64 Checking Your Bank Statements (Reconciliation) An important part of managing any business is to keep track of the entries in the business’s bank statements and to check that they match the entries in FreePlus Accounts. This process is called bank statement reconciliation. In order to carry out a bank statement reconciliation in FreePlus Accounts first select the 'List Accounts' option from the 'Accounts' dropdown menu (see illustration below), then click on the reconciliation icon of the account to be reconciled, in the ‘Reconcile’ column on the ‘List of Accounts’. A new page is displayed in two parts. (In the illustration below, this page is headed ‘Reconcile Standard Bank Account 54936678). The top part of the page contains fields to capture information about the statement as a whole, the lower part shows all transactions not yet reconciled to earlier statements. The idea is to match off all the entries in the bank statement against entries listed in the 'Unreconciled Transactions' part of the reconciliation screen. The total of the entries selected (shown in the 'Total of Checked Items) should match the 'Statement Difference', see the illustration below.. Many times there will be entries in the bank statement that have not yet been entered into FreePlus Accounts; it is very easy to fix that. For bank interest and/or charges, just enter the amounts in the 'Total Interest' or 'Total Charges' boxes, enter the date that these entries appeared on the bank statement and then click on the 'Add' icon (you can add both interest and charges in one action). If you are expecting a VAT refund/payment there will be a similar set of boxes for those entries. For other receipts and payments just complete a 'Record Money In' or Record Money Out' transaction as described in earlier sections of this manual. Page 41 of 64 Complete the reconciliation process by entering the 'Balance Carried Forward' total shown as the final entry on the bank statement. All being well the 'Statement Difference' and 'Total of Checked Items' should agree, if, for some reason, the two totals do not balance you will need to discover why and then correct the erroneous entries. Two of the columns of the 'Unreconciled Transactions' list have a small green mouse in the top left. This symbol denotes that you can make changes to data in these columns. The section 'Correcting Mistakes' describes how to do this. (Please note that double-clicking on the 'description' entry will (after asking for confirmation) delete that entry from your accounts.) Once the two totals are in balance click on the 'Accept & Lock' tab to lock those entries. The updated statement for this account (which should match the bank statement), as shown below, will then be displayed. For accounts that are configured to allow upload you may upload a copy of the bank statement. You may reverse the order in which the entries are listed by clicking on one of the column headers. Page 42 of 64 Statement reconciliation should be carried out for all accounts. An Alternative Method As an alternative to the method described above, FreePlus Accounts has developed an alternative process that utilises your bank statements. Please read the separate guide 'An Alternative Metod to Reconcile Accounts' if you wish to use this method. Page 43 of 64 VAT Returns VAT Schemes For those companies registered for VAT, completing the VAT return accurately and on time is an important task, HMRC issue fines for late submissions. At the time of writing this manual, there were two main VAT schemes recognised by HMRC. The first, called the 'Standard Accounting' scheme requires that VAT is owed to HMRC at the point that an invoice is raised for sales, and VAT is due at the point that a purchase invoice is received. In the second, the 'Cash Accounting' scheme, VAT is payable to HMRC only when payment has been received from the customer but VAT is only claimable when the supplier is paid. In practice, for a small company, credit is unlikely to be extended in any meaningful way by suppliers and it is therefore best to opt for the cash accounting scheme. However, you should speak to your accountant to determine what is best for you. A variation of both of these schemes is the 'Fixed Rate Scheme' (FRS). In this scheme the VAT on sales is calculated as a percentage (laid down by HMRC depending on your type of business) but no VAT can be reclaimed on purchases. Again, you should speak to your accountant to determine whether this option is favourable to you. Although there are other VAT schemes FreePlus Accounts only handles those mentioned (in effect, Standard Accounting, Cash Accounting, Fixed Rate Standard Scheme, Fixed Rate Cash Scheme) If in the future you wish to check which VAT Accounting Scheme has been selected by your Company within FreePlus Accounts, select the ‘Company Details’ option from the ‘Company’ icon. The ‘VAT Accounting Scheme’ selected will be the one visible on the ‘Company Details’ page. Making a VAT Return Although you can view the totals (and the entries that make up those totals) for your VAT Return at any time you can only actually do anything with it once the VAT quarter has passed. It is only at that point that additional tabs, as shown in the illustration below, become visible. Page 44 of 64 Once you have passed the VAT quarter to be ‘returned’, to begin the process of creating your VAT Return, place your mouse pointer on the VAT icon (illustrated earlier in this manual under the section, ‘Important: Account Activation for VAT Registered Businesses’), then select 'VAT Form 100' from the dropdown menu. This will show the ‘VAT Return’ page (see the illustration above) which contains the totals that should be entered into your VAT return for the quarter. You may check the entries that comprise these totals either by clicking on the text beside the total or, for a complete listing, by clicking the 'List VAT Entries' tab. In FreePlus Accounts completing your VAT Return is accomplished in 3 steps. Step 1 – Telling FreePlus Accounts what figures you are going to submit to HMRC The first stage is to check the figures calculated by FreePlus Accounts, make any adjustments necessitated by transactions that have not been recorded within the accounting system and then click on the 'Complete & Close' tab to close off this quarter. This will assign all open VAT entries prior to the cut off date to this VAT Return and will also lock the calendar so that invoices cannot be created for dates other than the current period. Page 45 of 64 Step 2 – Telling FreePlus Accounts that you have submitted this return to HMRC The second stage (which may be done at the same time as the first stage) is to tell FreePlus Accounts what figures have been submitted to HMRC. You do this by clicking on the 'Mark as Filed' tab. At this point the system knows what is either going to be deducted from or added to your current account and can create a notional transaction to that effect. This notional transaction will then appear in the top half of the reconciliation screen for your current account. In appearance it is very similar to the Bank interest/charges fields. Step 3 – Telling FreePlus Accounts that the payment or refund has been paid/received. (This is part of the current account bank statement reconciliation process) The final stage is to record the fact that the VAT payment has hit your bank account. Whenever you carry out a reconciliation of your current account statements after you have completed Step 2 a section will appear above the Bank interest/charges section showing the VAT to be paid/refunded. Once this figure appears in your statement, enter the date of the transaction and click the 'Add' button. The transaction will then appear in the transactions section of the screen in the same way as other transactions. Previous Returns You may view previous returns at any time by selecting 'List VAT Returns' from the 'VAT' icon dropdown menu. Doing this will display a list, as shown below , summarising all previous returns. To view the detail of a return just click on the relevant entry. Page 46 of 64 Correcting Mistakes Although FreePlus Accounts is particularly easy to use, inevitably there will be occasions when mistakes are made that need to be corrected. Unlike many other systems, FreePlus Accounts takes the view that once a Sales invoice has been raised and probably sent to a customer, it should not be deleted from the system. Doing so disrupts the sequential nature of invoice numbers and can make it very difficult to easily audit the accounts. Deleting Sales Invoices In consequence, Sales invoices can only be deleted, that is, removed from the system, in very limited circumstances. There are two such circumstances. The first is whilst the invoice is still in a Draft form and the second is immediately after it has been saved in its 'Final' form and provided there are no later invoices. Other than that, they can only be 'Voided' where they remain on the system but totals are reduced to zero or 'Written Off' where the invoice becomes 'paid up' and the outstanding balance is added to the 'Bad Debts' nominal code. Except as described above, the only way to correct an incorrect Sales Invoice is to carry out a 'reversing' entry by creating a credit note for the incorrectly issued sales invoice. Deleting Other Entries Mistakenly entered Purchase Invoices, transactions and transfers, on the other hand, can be very easily corrected provided they are still 'open', that is not locked to a bank statement or, if applicable, a VAT Return. Correcting these mistakes is simply a matter of deleting the entry whilst in the 'List Transactions' screen. To delete such an entry first select 'List Transactions' from the 'Money' icon dropdown menu. The screen will now display a paged list of all transactions, most recent first. Those transactions that may be changed or deleted are displayed in bold red. Hover the mouse pointer over the Detail description of the entry to be deleted and then double click the left mouse button. You will be asked to confirm the deletion by clicking 'OK'. Once you click on 'OK' the transaction and, if it relates to a purchase invoice, the purchase invoice, will be deleted. Altering Incorrect Nominal Accounts There are times when you inadvertently assign a transaction to the wrong nominal account. Fixing these mistakes by re-assigning to the correct account is very easy. Select 'Chart of Accounts' from the 'Company dropdown menu and click on the nominal account that holds the incorrect entry. A list of all of the entries for this account is displayed. Double click on the date of the wrong entry and a small window will open as shown by the orange arrow in the illustration below. Page 47 of 64 Select the correct nominal account and then click on the 'Change Nominal Code' button to save the change. Changing Existing Data Only data that is in columns marked by a green edit icon in the top left corner may be changed. An example of such a column is the Date column in the 'Unreconciled Transactions' listing described earlier (see illustration below). To alter data in one of these columns double click the left mouse button with the mouse pointer in the field to be changed. Depending on the nature to the data a screen will be displayed (as shown below) into which the new information may be entered. Finally, save the change by clicking on 'Change Date'. Page 48 of 64 Different Reports to help monitor performance There are number of reports available in FreePlus Accounts that assist you in monitoring your business. These reports are all available from the 'Reports' icon dropdown menu (see illustration below). Front Page This 'report' is the initial screen seen once you have logged in and shows a summary of important information such as outstanding invoices, reminders etc. Page 49 of 64 Invoice/Transaction Analysis These two reports provide a summary listing of invoices and transactions and both work in the same way. You may easily select subsets of the total number of invoices/transactions by entering filtering criteria such as date ranges, customer names (or partial names) etc into the analysis section in the top part of the screen. The total value of all selected entries is displayed above the entries. Page 50 of 64 Trial Balance In common with the vast majority of accounting systems, FreePlus Accounts is based on double entry accounting standards. This standard defines many categories, (confusingly called 'accounts' and each identified by a 'nominal code') that, in total, comprise the company's account. A fundamental principle of double entry accounting is that the total of the debit categories (accounts) should equal the total of the credit categories. The trial balance shows the totals for each of these categories and gives confidence that the system is functioning correctly. An illustration of a ‘Trial Balance’ page is shown below. As with the other reports, it is possible to specify different ranges of dates. You may also display the 'Balance Sheet' by clicking on the 'Balance Sheet' tab (indicated). Page 51 of 64 Year End Reports FreePlus Accounts has a number of Year End reports, including: Profit & Loss Nominal Ledger Aged Debtors Aged Creditors VAT Report Invoice Report Transactions Report These reports are more for the benefit of the accountant rather than the business owner and so are not described in this manual. Page 52 of 64 Miscellaneous Functions There are a number of functions within FreePlus Accounts that do not fall naturally into any of the preceding sections. These functions are documented here. Preferences You may set a number of system wide preferences to suit the way you work. To do this hover the mouse over the Admin menu icon and select 'Preferences'. Test System All registered users have access to a test system which is a copy of their own account as at the previous day and which is re-initialised daily. To switch to the test system, select 'Switch to Testbed' from the 'Admin' icon dropdown menu. Once in the test system, users may try out different aspects of FreePlus Accounts without fear of corrupting their own accounts. To switch back to the live system just click on 'Switch to Live System' from the 'Admin' dropdown. Reminders FreePlus Accounts has a 'scratchpad' area that users may use to add reminders for themselves. The system, also, uses this area to remind users when certain events such as VAT returns become due. To add a reminder, select 'Add Reminder' from the 'Reminders' icon dropdown menu add a note of the event you wish to be reminded about and then click the 'Save' button. Once saved the reminder will be visible in the 'Reminders' section of the Front Page and also by selecting 'View Reminders' from the 'Remindors dropdown menu. Only reminders added by the user may be deleted (the system will automatically delete system generated reminders). This is achieved by clicking on the little trash can icon to the right of the reminder note. Feedback There is a facility for users to leave feedback for the developers. It works in a similar way to Reminders, select 'Add New Feedback' from the 'Admin' icon dropdown, enter the feedback you wish to pass on to the developers and then click 'Save'. Existing feedback form other users may be viewed by selecting 'View Feedback' from the 'Admin' dropdown. Page 53 of 64 Audit trail FreePlus Accounts records all actions that cause a change in the accounts along with a record of who made that change. This audit trail may be viewed by selecting 'Audit Trail' from the 'Admin' icon dropdown menu. Menu Bar Search There is a very powerful search facility to the right of the main menu bar. Using this you can very quickly display sets of invoices that meet certain search criteria. The search processing starts as soon as there is a short pause in the characters being entered thus it is very easy to search on partial data. Entering just an invoice number (or partial invoice number) will display all invoices (both sales and purchase) that match the input. Entering alphabetic characters (plus, optionally, numeric characters) will display all invoices for customers/suppliers matching the input. Entering a currency amount (both pounds and pence, eg 100.00) will display all invoices for that total amount (ie including VAT). Entering an equals sign (=) followed by a currency amount will display all invoices with a net total (ie excluding VAT) of the input. Entering a hash sign (#) followed by any text will search for invoices with a customer reference matching the input. All invoices that match the input are displayed in a summary listing. Page 54 of 64 Subscriptions Although FreePlus Accounts is a complete and comprehensive accounting system that will meet the needs of the vast majority of small businesses there are, nevertheless, some additional functions that some users may wish to avail themselves of. These functions include: Removal of advertisements Design your own invoices and other documents Additional Nominal Accounts Additional user login ids The ability to upload documents and attach them to purchase invoices and statements Automatic Statement generation Automatic generation of recurring invoices Additional levels of support Promotion of your own company services/products This additional functionality is available to users who pay a small monthly subscription as described in the 'Features' page of the main website. Additional Nominal Accounts An additional optional feature available to those who have a subscription is the ability to add new nominal accounts to the Chart of Accounts. Up to 20 additional accounts may be added to each of the following Account Groups:• • • • 4300 – Other Income 5000 – Cost of Sales 6000 – Other Expenses 7000 – Fixed Overheads To add additional accounts, select 'Chart of Accounts' from the 'Company' menu icon and then click on the 'Add Nominal Accounts' tab at the right. This will display the 'Add nominal Accounts', page as shown below, listing all existing accounts in the groups that may be increased. Page 55 of 64 To add an account ensure that the correct nominal account group, indicated by the arrow above, is selected, enter the text describing the account and then click the 'Plus' button to the right of the description. This will add that account to the list of 'Nominal Accounts to be Added along with a Delete button to enable you to delete it if required. The Page 56 of 64 illustration below show a number of accounts to be added to the Chart of Accounts. It is important to recognise that, at this stage, these accounts have only been added to the screen, they are not yet in your Chart of Accounts. Once you are satisfied with the accounts to be added, the final step is to save them. To do this, click on the 'Save Nominal Accounts' tab at the right of the screen. Designing your own Invoices FreePlus Accounts gives you compplete freedom to design up to 5 of your own invoices and other documents. This process consists of 3 steps:1. Designing your invoice template 2. Selecting the template and variable data elements 3. Positioning the data elements on the template Designing your Invoice Template This is done outside of FreePlus Accounts using, for instance, Microsoft Powerpoint or similar. The end result must be a .pdf file of A4 size named layout<n>.pdf where <n> is a number from 1 to 5. Selecting the Template and Variable Data Elements To start the process within FreePlus Accounts hover the mouse over the 'Sales' menu icon and select 'List Invoice Layouts'. To add a new layout then click on the 'Add New Layout' tab. The screen shown below will be displayed. Enter a description for this layout and select the date format that you wish to use. Click on the 'Select Layout' button to select a template file to use. Ideally this should be a .pdf file but you may be able to use a .jpg or .png file instead. To complete step 2 of the process click on the 'Save Layout' tab. This will save the details and display the template, as shown below, ready to start posiitoning the data elements you wish to use. Page 57 of 64 All available data elements are listed to the right of the invoice template file. Each element has a red border on one side which denotes whether that data will be left justified or right justified. To design your invoice layout simply drag each element that you wish to use and drop it where you want that particular data to be printed. The image below shows a number of elements that have been placed. As you drag each element its current co-ordinates are displayed to help with alignment. The arrow below points to the lower,right co-ordinates of the description block. Page 58 of 64 The 'desc' (description) and 'remarks' elements are both area elements and, as well as positioning them they need to be expanded by dragging the bottom right corner of the element so that it covers the whole area available for that text. You may change various attributes of an element or make a copy of it by double clicking the left mouse button with the cursor over the element in question. A small window opens up, as shown below, to enable you to make some changes. Page 59 of 64 When you are satisfied with your design click on the 'Save Layout' tab and an example using your most recent invoice will be displayed, aas illustrated below. Page 60 of 64 You may change your design by clicking on the 'Change Layout' tab. You may set your new design as the default layout by selecting 'Company Details' from the 'Company' menu icon and then selecting from the dropdown list of layouts towards the bottom of the screen. Similarly you can select a default layout for a specific customer and also for a specific invoice when creating it. Page 61 of 64 How to Perform Common Tasks in FreePlus Accounts This section describes how to use FreePlus Accounts to carry out various common tasks. Invoicing a Customer In general it is best to first create a customer record for those customers to whom invoices are to be sent. If the invoice is a repeat of a previous invoice: Click on 'Sales' and select 'List Invoices' (or 'List Unpaid Invoices') Click on the invoice to be repeated Click the 'Copy to New' tab Make whatever changes are necessary Click the 'Finalise Invoice' tab Print or email the resultant invoice If this is a new invoice: Click on 'Sales' and select 'List Customers' Click on the customer to be invoiced Enter details of each line item to be invoiced, clicking on the 'Plus' button to add the item to the list When finished, click on the 'Finalise Invoice' tab Print or email the resultant invoice Record Payment for a single Invoice Click on 'Sales' and select 'List Unpaid Invoices' Click on the 'Pay' icon of the invoice to be paid. Enter the amount and date of the payment Click on 'Record Payment' Record a Payment for Multiple Invoices Click on 'Sales' and select 'List Customers' Click on the 'Receive Payment' icon of the relevant customer Click the Select box of the invoices to be paid Click 'Amount Being Paid' text to copy the total amount being paid Click the 'Record Payment' tab Record a Casual Receipt of e.g. Daily Takings It is suggested that a customer called 'Daily Takings' is first created. Click on 'Sales' and select 'Record Money In' Enter the first few characters of the customer name and select the full name from the drop down list Enter the amount received and, if applicable, the VAT rate Enter a brief description of the payment Click on 'Record Receipt' Page 62 of 64 Record a Purchase Click on 'Purchases' and select 'Record Money Out' Enter the name of the Payee Enter the total purchase price Where applicable, enter the VAT rate Enter a description of the payment Click on 'Record Payment'. Page 63 of 64 Finally – How do we, Corunna Systems Ltd, use FreePlus Accounts? As we describe on our website, FreePlus Accounts was developed for our own use and has been designed to work the way that we do. The nature of our business is that we have a number of very similar invoices that we send out on a monthly basis, some invoices that we send out on an ad hoc basis and purchases that we make throughout the month. We also need to send out statements to some customers at the end of each month. So, At the beginning of each month we raise and send out our regular invoices. We do this by 'Copying to New' the most recent invoice for that customer and making sure that it becomes due for payment on or before the end of the month. At the end of each month, once we have received our bank statements, we carry out a reconciliation on both our current and deposit accounts. At this time, as we run through our statement we add any purchases that appear (and for which we have a supplier invoice!) using the 'Record Money Out' option on the 'Purchases' icon dropdown menu. We update all sales invoices for which we have received payment and add any bank interest/charges and any outstanding VAT payment/refund. When the difference is zero we 'Accept & Lock' the reconciliation. Once the bank statements have been reconciled and all our customer accounts are up-to-date, we then send out any customer statements. Ad hoc invoices we raise as and when required and, on the rare occasions where we need to send a purchase order (and we know that we are going to make the purchase), we create a Purchase Invoice and print it off as a Purchase Order. Finally, at the end of each VAT quarter, when the system reminds us, we create our VAT return and send it to HMRC. Whenever we do log in to our account we always check to see what invoices are still outstanding and, if necessary, chase up payments. Page 64 of 64