1
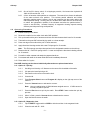
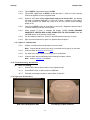
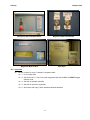
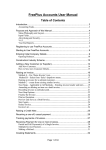
Marvell NanoLab
Member login
Lab Manual Contents
MercuryWeb
Berkeley Microlab
Chapter 10.02
CMP Cleaning
(sinkcmp - 190 Cory)
1.0
T i t le
Post CMP clean sink (sinkcmp)
2.0
Purpose
Methods to clean CMP polished wafers are provided in this chapter manual.
3.0
Sc ope
This document describes the PVA sponge clean, megasonic bath clean, water rinse in QDR, spin dry
on Laurell spin dryer and piranha clean options to clean the wafers after CMP polish.
4.0
Ap p lic ab le Do cu me nts
Revision History
There are softcopy and hardcopy manuals for the megasonic bath and the spin dryer available upon
request in the Microlab office.
5.0
4.1
The PCT Systems, Inc. Series 6000 Hyper Clean Megasonic System User Manual.
4.2
The Laurell WS-400 series Controller Operation Manual.
4.3
Refer to Chapter 2.9 for QDR operation.
De f in it ions & Proc es s T er mino log y
Wang A. or SC1 – Hydrogen peroxide, ammonium hydroxide and water mixture is a popular cleaning
solution.
6.0
Safety
Put on chemical gloves, face shield and apron when mixing chemicals and cleaning wafers in
megasonic chemical bath.
7.0
S t a t i st ic a l/ P r oce ss D a t a
N/A
8.0
A v a i lab l e P r oc ess es, G ase s , & P r oce ss N o t es
8.1
8.2
Available Processes
8.1.1
Process # 01 cleaning in the megasonic bath with D. I. water or SC1 after CMP polish is
one option.
8.1.2
Program A on the Laurell spindryer spins dry individual wafer at 3000 R.P.M. for 30 sec.
Process Notes
8.2.1
Always keep wafer wet after CMP polish. When slurry is dry on wafer, it is almost
impossible to remove.
sinkcmp
9.0
Chapter 10.02
8.2.2
One of the SC1 mixture ratio is 10 ml hydrogen peroxide, 10 ml ammonium hydroxide &
1000 ml H2O and the PH = 10.
8.2.3
A force of attraction holds particles on substrates. The natural force favors the adhesion
of the water molecule over particles. This reduces particle adhesion and inhibits
depositing particles again. However, the air gap interferes with the wetting action and
reduces particle wetting. Cleaning with SC1 on bare silicon wafer will form an oxide layer
to reduce the hydrophobic qualities of the substrate and allow the particles above 1
micron to wet efficiently. Increase frequency in megasonic cleaning improves wetting
efficiency and helps removing small particles.
O pe rat ing Pr oc edu re
9.1
Enable sinkcmp on the Wand.
9.2
Remove the wafer from the wafer chuck after CMP polished.
9.3
Pick up the wafer with a pair of tweezers and rinse well with the water deck hose for 10 seconds.
9.4
Take wafer to the post CMP sink and lay the wafer on a clean texwipe.
9.5
Press one edge of the wafer with a pair of Teflon tweezers.
9.6
Apply directional cleaning strokes with a wet PVA sponge for 15 seconds.
Note:
This PVA sponge must kept clean and wet in the designated container on the sink top.
9.7
Rotate wafer 90°, rinse PVA sponge with D. I. water and repeat the directional cleaning strokes
for 15 seconds.
9.8
Put wafer in wafer cassette and attach the cassette handle on.
9.9
Put cassette with wafer in the water filled QDR tank immediately afterward.
9.10 Rinse wafer for 2 cycles.
Post CMP cleaning can be chosen individually afterward as an option shown below:
9.11 Option A – Spin dry
9.11.1
Use N2 gun to blow dry a 2” diameter on the center of the backside of the wafer.
9.11.2
Lift opens the Laurell spin dryer lid.
9.11.3
Place wafer on the center of the wafer chuck.
9.11.4
Close the lid.
9.11.5
Press Program Select button until Program A is display on the right top corner of the
read out.
9.11.6
Press the Vacuum button to activate the vacuum.
Note:
Vacuum reading below 20 IOM indicates marginal vacuum. 15 IOM vacuum is
normally required to operate.
9.11.7
Press the Run button to spin dry the wafer. Press STOP if want to abort the spin dry
process.
9.11.8
After it is finish, press the Vacuum button to deactivate the vacuum.
9.11.9
Open the lid and remove the wafer.
9.12 Option B – Megasonic clean
9.12.1
Flip the EMPTY toggle switch to OPEN to drain the solution in the megasonic bath.
9.12.2
Clean the tank with D. I. H2O.
-2-
sinkcmp
Chapter 10.02
9.12.3
Flip the EMPTY toggle switch back to CLOSE.
9.12.4
Flip the FILL toggle switch to OPEN to fill the tank with D. I. H2O or mix SC1 cleaning
solution as appendix A for the megasonic bath.
9.12.5
When the LCD panel displays Hyper-Clean ready to run Process # 01, put cassette
with wafer in megasonic bath with D. I. H2O or SC1. (Note: If display is not in ready to
run mode, press F2 key, PROG key & enter 01 or ALT key until the correct message
display is on.)
9.12.6
Press green START button on the sinkcmp control panel. Megasonic clean will start a
10 minute cleaning cycle and at 100% power.
9.12.7
When process is finish, a message will display HYPER CLEAN PROCESS
COMPPLETE, WAFERS ARE CLEAN, PRESS STOP TO STOP ALARM. Press the
red STOP button on the sinkcmp control panel.
9.12.8
Pull the cassette of wafer out. Place it in the QDR tank and rinse it for 2 cycles.
9.12.9
Spin dry as the instruction on option A or piranha clean as option C.
9.13 Option C – Piranha clean
9.13.1
Prepare a container with enough water to cover the wafer.
Note:
Prepare ahead of time so the slurry on the wafer will not get dry on the wafer.
9.13.2
Clean the wafer as steps 9.2 to 9.7 or 9.11.
9.13.3
Put wafer in the water container and bring it up to the Microlab.
9.13.4
Clean the wafer with the standard piranha cleaning procedure in sink8.
Note:
Refer to Chapter 2.8 for details.
1 0 .0 T ro ub l es ho ot i ng G u id e l in es
10.1 Alarm is sounding
10.1.1
Press STOP button to silence alarm on the megasonic bath.
10.1.2
Press RESET button to silence alarm for QDR bath.
10.1.3
Press big red emergency button to silence alarm for the sink.
1 1 .0 F igu re s & Sc he mat ics
QDR Tank and Megasonic Bath
PVA Sponge in Water Container
-3-
sinkcmp
Chapter 10.02
Emergency Stop and QDR Control
Megasonic Bath Fill and Drain
Megasonic Bath Control
Spin Dryer
12.0 Ap pe nd ix
12.1 Mix SC1 solution to cover 6” cassette in megasonic bath:
12.1.1 Put on safety attire.
12.1.2 Add 15,000 ml D. I. H2O in the clean megasonic tank with the FILL and EMPTY toggle
switches close.
12.1.3 Add 150 ml hydrogen peroxide.
12.1.4 Add 150 ml ammonium hydroxide.
12.1.5 Stir mixture with empty Teflon cassette and handle attached.
-4-