1
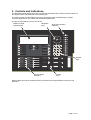
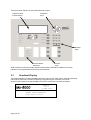
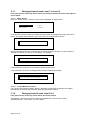
Manual
Mx-5000 Series
User Manual for
MX-5100, MX-5200, MX-5400
Fire Alarm Control Panels
The operation and functions
described in this manual are
available from Software Version
Mx5000-050-04 onwards.
This page is intentionally blank
Page 2 of 42
Table of Contents
1
INTRODUCTION __________________________________________________________ 5
1.1
Standards ____________________________________________________________
1.2
Cautions and Warnings _________________________________________________
1.3
General Description ____________________________________________________
1.3.1
Mx-5000 Series ____________________________________________________
1.3.2
Mx-5000N Series___________________________________________________
2
CONTROLS AND INDICATIONS _____________________________________________ 7
2.1
2.2
2.3
2.4
2.5
2.6
2.7
3
5
6
6
6
6
Graphical Display ______________________________________________________ 8
LED Status Indicators ___________________________________________________ 9
Zone LED Status Indicators ______________________________________________ 9
Control Buttons _______________________________________________________ 10
Navigation Buttons ____________________________________________________ 10
Number and Letter Buttons______________________________________________ 11
Buzzer______________________________________________________________ 11
OPERATION ____________________________________________________________ 11
3.1
Access Levels________________________________________________________ 11
3.1.1
Changing from Access Level 1 to Level 2 _______________________________ 12
3.1.1.1
3.1.1.2
Menu Access___________________________________________________________ 12
Control Buttons at Level 1 _________________________________________________ 12
3.1.2
Changing from Access Level 2 to 1 ____________________________________
3.2
Fire Alarm Condition ___________________________________________________
3.2.1
Detailed Fire Alarm Information _______________________________________
3.2.2
Investigation Delays _______________________________________________
3.3
Fault Condition _______________________________________________________
3.4
Disablement Condition _________________________________________________
3.4.1
Disabled Inputs ___________________________________________________
3.4.2
Disabled Outputs __________________________________________________
3.5
Alarm Condition ______________________________________________________
3.6
Supervisory Condition__________________________________________________
3.7
Multiple Conditions ____________________________________________________
3.8
Menu Functions ______________________________________________________
3.8.1
Using the Buttons to Navigate Menus __________________________________
3.8.1.1
3.8.1.2
Selecting Menu Options __________________________________________________ 20
Selecting Individual Zone Numbers _________________________________________ 20
3.9
Viewing _____________________________________________________________
3.9.1
View - Fires ______________________________________________________
3.9.2
View - Faults _____________________________________________________
3.9.3
View - Alarms ____________________________________________________
3.9.4
View - Disabled ___________________________________________________
3.9.5
View - Inputs _____________________________________________________
3.9.6
View - Outputs ____________________________________________________
3.9.7
View - Panel _____________________________________________________
3.9.7.1
3.9.7.2
3.9.7.3
3.9.8
12
13
14
14
15
16
16
17
17
18
18
19
20
21
21
21
21
21
22
22
23
Software ______________________________________________________________ 23
Local Hardware _________________________________________________________ 24
Network Hardware_______________________________________________________ 25
View - Log _______________________________________________________ 25
3.9.8.1
3.9.8.2
Event Log _____________________________________________________________ 25
Alarm Counter __________________________________________________________ 26
3.9.9
View - Network ___________________________________________________
3.9.10 View - Warnings __________________________________________________
3.9.11 View - Supervisory_________________________________________________
3.10 Disabling ____________________________________________________________
3.10.1 Disable - Zones and Inputs __________________________________________
3.10.2 Disable - Outputs__________________________________________________
3.10.2.1
3.10.2.2
3.10.2.3
3.10.2.4
3.10.2.5
3.10.2.6
All Sounder Outputs _____________________________________________________
All Beacon Outputs ______________________________________________________
Fire Routing Outputs _____________________________________________________
Fire Protection Outputs ___________________________________________________
Fault Routing Outputs ____________________________________________________
All Other Relay Outputs___________________________________________________
26
26
26
27
27
28
28
28
28
28
28
29
Page 3 of 42
3.10.2.8 Pager _________________________________________________________________ 29
3.10.2.9 Only Selected Outputs ____________________________________________________ 29
3.10.3 Disable - Controls__________________________________________________ 29
3.10.4 Disable – User ID __________________________________________________ 30
3.10.5 Disable – Groups __________________________________________________ 30
3.11 Enabling ____________________________________________________________ 31
3.11.1 Enable - Zones and Inputs ___________________________________________ 31
3.11.2 Enable - Outputs __________________________________________________ 31
3.11.3 Enable - Groups ___________________________________________________ 31
3.11.4 Enable - Remote __________________________________________________ 31
3.12 Delays ______________________________________________________________ 32
3.12.1 Turn Off Delay Mode _______________________________________________ 32
3.12.2 Turn On Delay-Mode _______________________________________________ 32
3.12.2.1 Extend Delays __________________________________________________________ 33
3.12.2.2 Holiday / Inhibit__________________________________________________________ 33
3.13 Testing______________________________________________________________ 34
3.13.1 Test - Zones ______________________________________________________ 34
3.13.2 Test - Display _____________________________________________________ 35
3.13.3 Test - Buzzer _____________________________________________________ 35
3.13.4 Test - Printer _____________________________________________________ 36
3.13.5 Test - Outputs ____________________________________________________ 36
3.14 Tools _______________________________________________________________ 37
3.14.1 Printing __________________________________________________________ 37
3.14.1.1
3.14.1.2
3.14.1.3
3.14.1.4
3.14.1.5
3.14.1.6
3.14.1.7
3.14.1.8
3.14.2
Page 4 of 42
Printer Communications Settings____________________________________________ 37
Set-up Printer ___________________________________________________________ 37
Print Inputs _____________________________________________________________ 38
Print Outputs ___________________________________________________________ 38
Print Faults _____________________________________________________________ 38
Print Disabled ___________________________________________________________ 39
Print - Log______________________________________________________________ 39
Print - Feed Paper _______________________________________________________ 39
Change-Time _____________________________________________________ 40
1 Introduction
1.1
Standards
Advanced Electronics Ltd declare that the products identified below conform to the essential
requirements specified in the Construction Products Directive 89/106/EEC:
0786-CPD-20952
EN54-2: 1997 +A1:2006
Control and indicating equipment for fire detection and fire
alarm systems for buildings
Provided options:
Outputs to Fire Alarm Devices
Output to Fire Routing Equipment
Output to Fire Protection Equipment
Output to Fault Routing Equipment
Investigation Delays to Outputs
Dependency on more than one alarm signal
Fault Signals from Points
Disablement of Points
Alarm Counter
Test Condition
Standardised Input / Output
EN54-4: 1997 +A1:2002 +A2:2006
Power supply equipment for fire detection and fire alarm
systems for buildings
Mx-5100, Mx-5200, Mx-5400
Mx-5100N, Mx-5200N, Mx-5400N
In addition, the products comply with the following:
Low Voltage Directive 2006/95/EC
BS EN60950-1: 2006
Safety of information technology equipment
Electromagnetic Compatibility Directive 2004/108/EC
BS EN55022: 1998
Emissions, Class B
BS EN50130-4: 1996 +A2: 2003
Immunity, Product Family Standard
Page 5 of 42
1.2
Cautions and Warnings
Before commencing with installation or operation of the panel, please read this
manual carefully. If you are unclear on any point DO NOT proceed. Contact the
manufacturer or supplier for clarification and guidance.
STOP
Only Trained service personnel should undertake the Installation, Programming and
maintenance of this equipment.
This product has been designed to comply with the requirements of the Low Voltage
Safety and the EMC Directives. Failure to follow the installation instructions may
compromise its adherence to these standards.
This Fire Alarm Control Panel is compliant with the requirements of EN54 parts 2
and 4 (1998).
Where appropriate, reference is made in this manual to the relevant sections of the
EN54 standard for clarification and to ensure that the installation is compliant with
the requirements of EN54.
1.3
General Description
This manual covers the use and operation of the Mx-5000 & Mx-5000N Series Fire Alarm Control
Panels. Refer to the Installation and Commissioning Manual (Document No. 680-165) for details of
how to install and program the panel.
1.3.1
Mx-5000 Series
The Mx-5100 is a Single Loop, Analogue Addressable Fire Alarm Control Panel.
The Mx-5200 is a Two Loop, Analogue Addressable Fire Alarm Control Panel.
The Mx-5400 is a Multiple Loop, Analogue Addressable Fire Alarm Control Panel with provision for
up to four loops.
All above models are designed for use with the Apollo (Discovery, Explorer, XP95 and Series 90),
Hochiki (ESP) and Argus (VEGA) fire detection devices.
1.3.2
Mx-5000N Series
The Mx-5100N is a Single Loop, Analogue Addressable Fire Alarm Control Panel.
The Mx-5200N is a Two Loop, Analogue Addressable Fire Alarm Control Panel.
The Mx-5400N is a Multiple Loop, Analogue Addressable Fire Alarm Control Panel with provision for
up to four loops.
All above models are designed for use with the Nittan Evolution fire detection devices.
All panel models are available in a range of enclosure sizes and with a range of alternative optional
features.
Page 6 of 42
2 Controls and Indications
The Mx-5000 and Mx-5000N series are provided with indications and control functions as shown in
the diagram below and described in the following text.
The LED functions and BUTTON functions may be assigned and used differently in specific
countries dependent on the market and standards requirements.
The layout shown below is for the UK version.
Graphical Liquid
Crystal Display
Navigation
Keys
FIRE
MUTE
FAU LT
Zone LED Indicators
(Optional)
!
ABC
DEF
GHI
JKL
MNO
PQRS
TUV
WXYZ
SILENCE
D ISABLE
MORE ALARMS
RESET
TEST
LED TEST
POWER
ESC
FIRE ROUTING
A CTIVATED
FIRE PROTECTION
ACTIVATED
FIRE ROUTING
FAU LT
SOUN DER
SILEN CED
FIRE ROUTING
D ISABLED
SOUN DER
FAULT
PRE-ALARM
SOUN DER
DISABLED
D ELAYED
SYSTEM FAULT
MENU
Number
Keys
RESOUND
EVACUATE
General Status
Indicators
Control
Keys
Slide-in labels are used to annotate Function Indicators and Programmable Control Keys and
Indicators.
Page 7 of 42
The layout shown below is for the PENTA German version.
Graphical Liquid
Crystal Display
Navigation
Keys
DIN EN 54-2: 1997
DIN EN 54-4: 1997
RESET
1
2
3
SUMMER AUS
4
5
6
AKUSTIK AUS
7
8
9
Esc
0
Menü
F EU ER
STÖRUNG
ABSCHALTUNG
NÄCHSTER ALARM
REVISION
BETRIEB
AKUSTIK AN
ERKUNDEN STARTEN
Number
Keys
AKUSTIK AUS
STÖRUNG
AKUSTIK
AKUSTIK
ABGESCHALTET
SYSTEMSTÖRUNG
General Status
Indicators
Control
Keys
Slide-in labels are used to annotate specific General Status Indicators in addition to Function
Indicators and Programmable Control Keys and Indicators.
2.1
Graphical Display
The graphical display provides detailed information of the source of fire alarms, faults and warnings.
It also shows menus for use when inspecting or programming the operation of the panel.
Under normal conditions the panel display shows the access level, time, date and status: -
Mx-5000
LEVEL 2
16:05
04 MAR 2008
NORMAL PANEL OPERATION
(Press Menu to View)
Page 8 of 42
2.2
LED Status Indicators
The LED Status Indications show the basic operational state of the panel and whether the panel is
in a fire alarm, fault, disabled or test condition.
Function
Colour
Description
FIRE
Red
Indicates that the system has detected a fire alarm condition
MORE ALARMS
Red
Indicates that the system has detected a fire alarm condition (on
steady) in more than one zone.
Fault
Yellow
Indicates that the system has detected a fault condition
Disable
Yellow
Indicates that part of the system has been disable (i.e. isolated)
Test
Yellow
Indicates that part of the system is in a test condition
Power
Green
Indicates the presence of power
Fire Routing Activated
Red
Indicates that the output to call the Fire Brigade has been Activated
Fire Routing Fault
Yellow
Indicates that there is a fault condition in the Fire Brigade signalling
equipment.
Fire Routing Disabled
Yellow
Indicates that the output signal to the Fire Brigade is Disabled
Pre-Alarm
Yellow
Indicates that a smoke or heat detector has detected a change in
the environment that may develop into a possible fire alarm
condition.
Delayed
Yellow
Indicates that one or more output circuits are in a delayed operating
condition
Fire Protection Activated
Red
Indicates that the circuit to fire extinguishing or other fire protection
equipment has been activated or that the fire protection equipment
itself has been activated.
Sounder Silenced
Yellow
Indicates that the sounders have been silenced
Sounder Fault
Yellow
Indicates the presence of a fault in one or more sounder wiring
circuits
Sounder Disabled
Yellow
Indicates that one or more sounders have been disabled (i.e.
isolated)
System Fault
Yellow
Indicates the presence of a system fault
Function 1
Red
Spare function LED
Function 2
Yellow
Spare function LED
Function 3
Yellow
Spare function LED
Function 4
Yellow
Spare function LED
Function 5
Yellow
Spare function LED
The function LED Indicators are programmable and will have been configured and labelled
accordingly during installation and commissioning of the system.
The arrangement and definition of the Status LED Indicators depend on the country and market
requirements. The functions described are the same and the most common layout is shown.
2.3
Zone LED Status Indicators
The Zone LED Status Indications can be included on the main display (up to 20 zones – fire alarm
indication only) or can be included as plug in modules below the main display. These show the basic
operational state of the zone and can indicate whether the zone is in a fire alarm, fault, disabled or
test condition depending on the module installed.
Page 9 of 42
2.4
Control Buttons
The following table contains a list of all of the control button functions available. The buttons
available on each product depend on the country of installation and specific market requirements.
Button
!
Description
Access Level
More Alarms
Press to scroll through Zones in Alarm. The LED
indicator turns on to indicate if more than one zone
is in alarm.
Available in both
Level 1 and Level 2
Reset
Press to reset the panel from a fire alarm or
latched fault condition.
Only available with
Level 2 Access.
Mute
Press to mute the internal buzzer.
Available in both
Level 1 and Level 2
Silence
Only available with
Level 2 Access.
Press to silence the sounders.
Resound
Press to re-activate the sounders.
2.5
Only available with
Level 2 Access.
Evacuate
Press to initiate a manual evacuation and sound
the alarms.
Only available with
Level 2 Access.
LED Test
Press to illuminate ALL LED indicators
Available in both
Level 1 and Level 2
Disable
Press to disable the zone or device in a fire alarm
condition (Australia only).
Only available with
Level 2 Access.
Function Button
Programmable function – an associated LED
indicator can also be programmed
Depends on
Programming
Navigation Buttons
ÍÏÐÎ
Press to scroll through Menu Options.
Press to display more information.
Press to scroll through lists of zones or devices.
Page 10 of 42
Press to confirm entry of numeric or letter information entry.
Press to confirm selection of a menu option.
Press to change some of the configuration options.
2.6
Number and Letter Buttons
G HI
ABC
D EF
JKL
MN O
Used to enter numbers or letters.
P Q RS
TUV
ESC
WXYZ
MENU
Esc
Press to return to a previous menu.
Press to exit the menu functions and return to the normal display.
Menu
Press to show or return to Menu Functions.
2.7
Buzzer
The buzzer produces two different sounds to differentiate between fire alarm conditions and fault
conditions.
Condition
Operation
Fire Alarm
The buzzer operates with a continuous tone.
Fault
The buzzer operates intermittently.
3 Operation
3.1
Access Levels
The panel operation is protected from inadvertent and erroneous misuse by means of four access
levels. These levels are as follows:
Level 1
Level 2
Level 3
Level 4
•
Untrained user
Authorised User
Service and Maintenance Engineer
Service and Maintenance Engineer – Special Tools required
A Level 1 Untrained User can view the current operational condition of the system and may
MUTE the internal buzzer.
NOTE: Depending on the configuration settings, a Level 1 user may also be permitted to EVACUATE
and/or SILENCE and/or RESET the system by pressing the appropriate button and entering a password.
•
A Level 2 Authorised User can view the operational condition of the system and may MUTE the
internal buzzer. In addition, the EVACUATE, SILENCE and RESET buttons are enabled and
access to the Level 2 Menu functions is available.
NOTE: There are up to 10 User ID codes available, each with its own password, which can be configured
with varying permissions to specific menu function options.
•
A Level 3 User has access to program and configure the operation of the panel. This is
described in detail in the Installation and Commissioning Manual (Part Number 680-165).
Page 11 of 42
3.1.1
Changing from Access Level 1 to Level 2
If the panel has an access key switch fitted, use the key in preference to the menu options
shown below.
3.1.1.1 Menu Access
Press the ‘MENU’ button. The level 1 menu will be displayed as shown below:
[ CONTROLS DISABLED ]
ENABLE CONTROLS
LED-TEST
VIEW
STATUS
To enable the controls, ensure the “Enable Controls” option is highlighted and then press the button. The display then requests entry of the Level 2 or 3 passwords as follows:
[ CONTROLS DISABLED ]
Please Enter Your Password
Enter the password using the number buttons and then press the button. As each number is
entered, an asterisk (*) is shown on the display. For example:
[ CONTROLS DISABLED ]
Please Enter Your Password
**
If the password is correct, the Level 2 Menu options will be shown.
If the password is incorrect, the display briefly shows the following message.
[ CONTROLS DISABLED ]
Please Enter Your Password
Password Not Recognised !
3.1.1.2 Control Buttons at Level 1
If any of the control buttons (Reset, Silence / Resound or Evacuate) are pressed, the display
automatically prompts for the password. Enter the password as above.
3.1.2
Changing from Access Level 2 to 1
If the panel has an access key switch fitted, use the key switch.
Alternatively, if passwords are used, select the “Disablement” menu and then select
“Disable/Controls” – see section 3.10.3 for details.
Page 12 of 42
3.2
Fire Alarm Condition
When the system registers a fire alarm condition the Red Fire Indicator illuminates, the internal
buzzer sounds (continuously) and the display shows the zone in which the fire originated. The
sounders, relays and other outputs will be turned on depending on the programming in the panel. An
example of the display is shown below: FIRE STARTED IN ZONE
BASEMENT WEST
KITCHEN
[
1 Zone in Fire.
BASEMENT WEST
.
< Header – Zone № / Device №1
>
< Location Text for First Zone
< Location Text and Type of Device
1/1
<CALL POINT
Zone 0001]
< No. of Zones in Fire & Last Zone
< Zone Description for Last Zone
The upper part of the display shows the origin of the fire. The lower part of the display shows the
number of zones in a fire alarm condition and the last zone to enter the fire alarm condition.
If more than one fire alarm condition occurs, the total number of zones in an alarm condition and the
last zone in an alarm condition will be updated on the display. If the sounders were silenced, they
will sound again whenever the fire spreads to a new zone.
FIRE STARTED IN ZONE
1/1
BASEMENT WEST
KITCHEN
<CALL POINT
[
2 Zones in Fire
BASEMENT EAST
.
< Header – Zone № / Device №
< Location Text for First Zone
< Location Text and Type of Device
>
Last Zone 0005]
< No. of Zones in Fire & Last Zone
< Zone Description for Last Zone
Press the ‘MUTE’ button to silence the internal buzzer (the FIRE LED will change from flashing to
steady illumination).
Press the ‘MORE ALARMS’ button to view an scroll through a full list of zones in a fire alarm
condition.
When the panel is enabled for Level 2 Access or, if configured, by entering a password at Level 1,
the following functions are available.
Press the ‘SILENCE’ button to silence the sounders.
Press the ‘RESOUND’ button again to re-activate the sounders.
Press the ‘RESET’ button to clear the alarm condition and restore the panel to normal operation.
Press the ‘EVACUATE’ button to initiate a manual evacuation and to activate the sounders. The
display will show this fire alarm condition. For example:
FIRE STARTED IN ZONE
100
MAIN RECEPTION
Evacuation Key
<SWITCH
[
1 Zone in Fire.
MAIN RECEPTION
.
>
Zone 0100]
< Location Text for First Zone
< Confirmation of Evacuation
< No. of Zones in Fire & Last Zone
< Zone Description for Last Zone
1
The Device Number is only shown on products for the German market – this is the number specifically assigned to the
device to denote its number within the associated meldergruppe (Mld).
Page 13 of 42
3.2.1
Detailed Fire Alarm Information
Press the ‘MORE ALARMS’ button to view the list of zones in a fire alarm condition. Press the
‘MORE ALARMS’ button again or use the ÏÐ buttons to scroll through the list. Each press
highlights the next zone in the list and scrolls the zone list upwards.
Zone
0001
0005
FIRE-LOCATION
BASEMENT WEST
BASEMENT EAST
Scroll ↓
More>
< List of Zones in Alarm including
< Zone No. and location text
If more detail regarding the source of any fires is required, press the ‘MORE ALARMS’ button or the
ÏÐ buttons to highlight the required zone in alarm and press the Î button to show further
information. For example:
[ FIRES IN ZONE 0001]
Mld Device Text
/29 KITCHEN
/32 Corridor
Scroll ↓
More>
< List of devices within the Zone
< that are in Alarm
This shows that the device(s) in a Fire Alarm condition in the zone. If there are more devices in
alarm, these will be shown in the list (as shown above). Press the ÏÐ buttons to scroll through the
devices. Press the Î button to show further information including state, type, value, loop, address,
sector and node.
Press the Í button or the ‘Esc’ button to return to the previous display. If no button is pressed
within 15-seconds, the display automatically reverts to the main display.
3.2.2
Investigation Delays
The Investigation Delay Function can be disabled or enabled as required by EN54: 2.
Refer to Section 0.
If the Investigation Delay Function (Stage 1 / Stage 2 Investigation Delay) is enabled, a fire alarm is
registered at the panel but does not immediately activate the sounders. On registering the alarm, the
display shows:
FIRE STARTED IN ZONE
1/12
.
BASEMENT WEST
KITCHEN
<TEMPERATURE>
OUTPUT DELAY
30 s (Press 0 to extend)
[
1 Zone in Fire.
Zone 0001]
BASEMENT WEST
< Header – Zone № / Device №
< Location Text for First Zone
< Location Text and Type of Device
< Delay Timer (Stage 1)
The Output Delay Timer shows the amount of time left for investigation. If the alarm is not
acknowledged before the Stage 1 timer elapses, the panel will enter a full alarm condition and will
activate the sounders.
Pressing the ‘0’ button acknowledges the alarm. This extends the time allowed to investigate the
source of the fire.
FIRE STARTED IN ZONE
1/12
.
BASEMENT WEST
KITCHEN
<TEMPERATURE>
OUTPUT DELAY 120 s
[
1 Zone in Fire.
Zone 0001]
BASEMENT WEST
Page 14 of 42
< Header – Zone № / Device №
< Location Text for First Zone
< Location Text and Type of Device
< Delay Timer (Stage 2)
The cause of the alarm can now be investigated. If the alarm is a false alarm, pressing the ‘RESET’
button will clear the alarm condition. This must be done before the Stage 2 timer has elapsed or the
panel will enter a full alarm condition and will activate the sounders.
Note: The EVACUATION button will terminate the investigation delays and activate all programmed
sounders.
3.3
Fault Condition
When the system registers a fault condition the Yellow Fault Indicator is illuminated, the internal
buzzer sounds intermittently and the display shows the cause of the fault in more detail.
An example of the display is shown below:
ZONE 0001
BASEMENT WEST
RESTAURANT
1 Zone
DEVICE MISSING
(MULTI.SENSOR)
In Fault
More>
< Location Text for First Zone
< Location Text and Type of Device
< No. of Zones in FAULT
If more than one fault condition occurs, these will be shown on the display. If the internal buzzer was
muted, it will sound again when a new fault condition is registered.
When the fault condition is corrected, the panel automatically clears the appropriate fault Status
Indicators and Display information.
Press the ‘MUTE’ button to silence the internal buzzer The display then shows the current time and
date and service centre telephone number along with the indication of the fault.
FOR SERVICE CALL
01234 567890
1 Zone
LEVEL 2
16:05
04 MAR 2008
In Fault
More>
< Panel access level
< Service Call Number
< and Time / Date
< No. of Zones in FAULT
To obtain more detailed information about the faults, press the Î button. The display then presents
a list of all of the zones in a fault condition with the first fault highlighted. For example:
[
2
ZONE
1
100
Zones in Fault]
LOCATION
BASEMENT
RECEPTION
More>
< Number of zones in fault
< Zone #, Location Text for each
< zone
Press the ÏÐ buttons to highlight the required fault and then press the Î button to show further
information. For example:
[
Faults in Zone 0001 ]
Mld Device Text
/32 Room 112
More>
< Device № (if applicable) &
device text description
Press the Î button to show further information on device state, type, analogue/digital values and
loop, address, sector and node, etc.
Press the ‘ESC’ key to return to the previous display.
If no button is pressed within a minute, the display automatically reverts to the main display.
Page 15 of 42
3.4
Disablement Condition
If any zones, input devices or output devices have been disabled, the DISABLE Indicator is
illuminated. In addition, the SOUNDER DISABLE Indicator is illuminated if one or more sounder
circuits or devices have been disabled. The display indicates the presence of zone disablement
conditions in the lower half of the display as follows:
Mx-5000
LEVEL 2
16:05
04 MAR 2006
4 Zones with Disablements
More>
When the disablement conditions are removed, the appropriate indications are cleared from the
display and from the Indicators. When all disablement conditions are removed, the DISABLE
Indicator is also turned off.
To obtain more detailed information about the disablement conditions, press the Î button. The
display will then present the disablement conditions in the following sequence:
♦
♦
Zone / Individual Inputs.
Outputs
[DISABLEMENTS]
[
[
2 ZONE(s)with INPUTS DISABLED] More>
2 ZONE(s)with OUTPUTS DISABLED] More>
< Zone, disablement condition and
< location text
Press the ÏÐ buttons to highlight the required option and then press the Î button to view further
information.
3.4.1
Disabled Inputs
The display presents a list of all of the zones in a disabled condition with the first disablement
highlighted. For example:
[
2 Zones with Inputs Disabled]
ZONE MODE
LOCATION
0001 PART DISABLED BASEMENT WEST
0002 ALL DISABLED BASEMENT EAST
More>
< Zone, disablement condition and
< location text
The display shows the status as ALL DISABLED if every input device within the zone has been
disabled and shows the status as PART DISABLED if there is at least one input device within the
zone still active.
Press the ÏÐ buttons to highlight the required zone and then press the Î button to view the
location text assigned to the zone in full. For example:
Press the Î button again to view the inputs within the zone and their status. For example:
[ Inputs in Zone 0001 ]
Mld Mode
Device Text
/32 Disabled Room 244
<More>
The display shows the Device Number, current disablement condition (mode) and the device text.
Press the ÏÐ buttons to scroll through the inputs.
Page 16 of 42
Press the Î button to show further information on the state, type, analogue/digital values, the
detection loop (LP) and address (ADRS), etc.
Press the ‘ESC’ key to return.
3.4.2
Disabled Outputs
The display presents a list of all of the zones in a disabled condition with the first disablement
highlighted. For example:
[ 2 Zone(s)with Outputs Disabled]
Zone Mode
Location
0001 ALL DISABLED BASEMENT WEST
0100 ALL DISABLED RECEPTION
More>
< Zones with location text where
< outputs are disabled
Press the ÏÐ buttons to highlight the required zone and then press the Î button to view the
individual outputs and their disablement condition. For example:
[ Outputs
Mode
Disabled
Disabled
Disabled
Disabled
in Zone 0100]
Device Text
Sounder A
Sounder B
Sounder C
Sounder D
More>
The above example shows that the panel sounder circuits are disabled.
Press the Î button to view further information including type, value and state, etc.
[ Outputs in Zone 0100]
<More>
Mode
Disabled
Disabled
Disabled
Disabled
Type
SOUNDER
SOUNDER
SOUNDER
SOUNDER
Press the ÏÐ buttons to scroll through the list of individual outputs within the selected zone. Press
the ‘Esc’ button to return to previous views and the main display.
3.5
Alarm Condition
When the system registers a pre-alarm or plant alarm condition, the internal buzzer sounds
intermittently and the display shows the cause of the fault in more detail. An example of the display
is shown below:
ZONE 0001
BASEMENT WEST
RESTAURANT
1 Zone
In Alarm
PRE-ALARM
(MULTI.SENSOR)
More>
< Location Text for First Zone
< Location Text and Type of Device
< No. of Zones in Alarm
To obtain more detailed information about the alarms, press the Î button. The display then
presents a list of all zones in an alarm condition.
Page 17 of 42
3.6
Supervisory Condition
When the system registers a supervisory condition, the internal buzzer sounds intermittently and the
display shows the cause of the fault in more detail. An example of the display is shown below:
ZONE 0011
PLANT ROOM
SPRINKLER SHUT OFF
1 Zone
SUPERVISORY
(INPUT MON)
In Supervisory
More>
< Location Text for First Zone
< Location Text and Type of Device
< No. of Zones in Supervisory
To obtain more detailed information about the alarms, press the Î button. The display then
presents a list of all zones in an alarm condition.
Supervisory conditions are typically (although not exclusively) used to indicate the presence of
operating conditions that could prevent the operation of sprinkler valves such as; frozen water, valve
shut-off, low pressure, etc.
3.7
Multiple Conditions
When the system registers alarm, pre-alarm, fault, disablement, warning, security and supervisory
conditions simultaneously, the display shows these in the lower half in priority order. The detail of
the most recent unacknowledged condition to occur, however, is shown at the top of the display. An
example of the display is shown below:
ZONE 0011
PLANT ROOM
SPRINKLER SHUT OFF
1 Zone In Alarm
1 Zone In Supervisory
1 Zone In Fault
SUPERVISORY
(INPUT MON)
↓ More>
More>
More>
< Location Text for First Zone
< Location Text and Type of Device
< No. of Zones in Supervisory
An arrow is shown on the display to indicate the scroll options. ↓ (first row), ↕, ↑ (last row) are shown
depending on the row highlighted.
Press the ÏÐ buttons to scroll through the list to highlight the required condition and then press the
Î button to view more detail as described for each condition.
If the system registers a fire alarm condition, the display is totally devoted to the indication of the fire
alarm. Use the View Menu option to display these other conditions.
Page 18 of 42
3.8
Menu Functions
The following Menu Functions are available at Level 2. The display shows the primary Level 2 Menu
and the Level 2 User as follows:
[Level 2 Menu]
VIEW
TEST
User 1 Node
DISABLE
DELAY
STATUS
1
ENABLE
TOOLS
The following table gives a list of the Level 2 Menu Functions, the sub-functions available within
each main function and a brief description for each function.
Main Menu Option
Sub Menus
Comments
VIEW
Fires
View Zones and Inputs that are reporting a fire alarm condition.
Faults
View Zones and Inputs that are reporting a fault condition.
Alarms
View Zones and Inputs that are reporting an alarm condition.
Disabled
View Zones, Inputs and Outputs that are disabled.
Inputs
View the current state of Inputs.
Outputs
View the current operational condition of all output circuits / devices.
Log
View the Event Log / Alarm Counter
Panel
View the operational state, voltage and current loading of the panel input and
output circuits.
Network
View Network diagnostics
Warnings
View Zones and Inputs that are reporting a warning condition
Supervisory
DISABLE
Zone / Inputs
Controls
ENABLE
Disable a complete zone or an individual input.
2
Outputs
User ID
View Zones and Inputs that are reporting a supervisory condition
2
Disable sounder outputs or other devices.
3
Cancel Level 2 access.
3
Return Level 2 access to the default User 1
Groups
Disable a user-defined disablement group
Zone / Inputs
Enable a complete zone or an individual input.
Outputs
Enable sounder outputs or other devices.
Groups
Enable a user-defined disablement group
Remote
TEST
Zones
Permits remote access controls
2
Configure one or more zones for walk test.
Display
Test the Graphics Display, Status Indicators and Keyboard.
Buzzer
Test the Internal Buzzer
Printer
Test the connection to the Printer
Outputs
Test Output Devices
DELAY
--
Turn ON / OFF Investigation delays
TOOLS
COMMISSION
Enter the Level 3 Commissioning and Panel Programming Functions
PRINT
Inputs
Print the status of inputs
Ouputs
Print the status of outputs
Faults
Print the fault conditions
Disabled
Print the disabled conditions
Log
Print the Event Log. (All Events of Fire Only Events Selectable).
Feed Paper
Set-up
2
CHANGE TIME
2
3
2
Advance the paper in the printer
Configure the printer connection and automatic print options
Allows authorised level 2 users to change time.
This option can be configured per Level 2 User ID. User 1 does not have permission to change these options.
Not required if a key switch is fitted to change access levels.
Page 19 of 42
3.8.1
Using the Buttons to Navigate Menus
Press the ‘Menu’ button to bring up the display menu.
3.8.1.1 Selecting Menu Options
The Level 2 Menu is shown below:
[Level 2 Menu]
VIEW
TEST
User 1 Node
DISABLE
DELAY
STATUS
1
ENABLE
TOOLS
Press the ÍÏÐÎ buttons to highlight the required menu option and then press the button to
select it.
For example, press the Î button followed by the Ð button to highlight the DELAY option (as shown
below) and then press the button to select this option.
[Level 2 Menu]
VIEW
TEST
User 1 Node
DISABLE
DELAY
STATUS
1
ENABLE
TOOLS
Press the ‘Esc’ button from within a menu option to return to the previous menu.
Press the ‘Esc’ button from the Main Level 2 Menu (shown above) to return to the normal operating
display.
If a button is not pressed for one minute (15-seconds if the panel is in a fire alarm condition) the
display will automatically revert to the normal operating display. Press the ‘Menu’ button to return
directly to the Level 2 Menu display previously shown.
3.8.1.2 Selecting Individual Zone Numbers
When the display is showing a list of Zone Numbers, it is possible to select a specific zone number
by using the number keys. For example, if the display is showing a list of zones:
[ Inputs]
Zone
Mode
0001
Enabled
0002
Enabled
0008
Enabled
0009
Enabled
More>
Location
BASEMENT WEST
BASEMENT EAST
GROUND FLOOR
MAIN RECEPTION AREA
To select a particular Zone, move to the zone number column. The existing zone number will then
be highlighted.
Enter the required Zone Number using the number buttons, for example 12.
[ Inputs]
Zone
Mode
# 12 Enabled
0002
Enabled
0008
Enabled
0009
Enabled
More>
Location
BASEMENT WEST
BASEMENT EAST
GROUND FLOOR
MAIN RECEPTION AREA
Finally press the button to confirm. The display will then show a new list of Zones with the
selected Zone highlighted at the top of the list.
If the number is entered incorrectly, press the ‘Esc’ button.
Page 20 of 42
3.9
Viewing
The View menu is available on two pages. Highlight the “Next Menu” option and pres the button
to select the next page.
[View Menu 1]
FIRES
DISABLED
User 1 Node
FAULTS
INPUTS
Next Menu
[View Menu 2]
PANEL
SUPERVISORY
ALARMS
OUTPUTS
User 1 Node
NETWORK
LOG
Next Menu
1
1
WARNINGS
Note that Fires, Faults, Alarms, Disablements and Supervisory conditions are all normally shown
without having to select the view menu. If, however, you wish to manually View any of these, they
can be selected from this menu as required.
3.9.1
View - Fires
This function shows the Zones and Inputs that are currently in a Fire Alarm condition.
The operation of the panel and the information that can be shown is identical to the views available
from the main operating display. Refer to Section 3.2 for further information.
If there are no Zones or Inputs in a Fire Alarm condition, the display automatically reverts to the
Main View Menu.
3.9.2
View - Faults
This function shows the Zones, Inputs and Outputs that are currently in a Fault condition.
The operation of the panel and the information that can be shown is identical to the views available
from the main operating display. Refer to Section 3.3 for further information.
3.9.3
View - Alarms
This function shows the Zones and Inputs that are currently in an Alarm condition. These may occur if:
♦
♦
The Zone or Input is currently in a Fire Test condition and / or
Inputs that are configured to generate an alarm or pre-alarm condition when operated are active.
The operation of the panel and the information that can be shown is identical to the views available
from the main operating display.
3.9.4
View - Disabled
This function shows only Inputs and Outputs that are currently in a Disabled condition.
The operation of the panel and the information that can be shown is identical to the views available
from the main operating display. Refer to Section 3.4 for further information.
If there are both Inputs and Outputs in a Disabled condition, the display presents the inputs first
followed by the outputs.
If there are no Inputs or Outputs in a Disabled condition, the display does not change and continues
to show the Main View Menu.
Page 21 of 42
3.9.5
View - Inputs
This function shows the current operational condition for all Zones and Individual Inputs. The display
presents a list of all of the zones containing input devices, with the first zone highlighted. For example:
[Inputs]
Zone Mode
0001 Enabled
0002 Disabled
0013 Enabled
0014 Enabled
Location
Kitchen
Reception
Lobby
Corridor
More>
Press the ÏÐ buttons to highlight the required zone and then press the Î button to view the
individual inputs. For example:
[ Inputs in Zone 0001]
Mld Mode
Device text
/ 1 Enabled
Kitchen
/ 2 Disabled Reception
3.9.6
<More>
View - Outputs
This function shows the current operational condition for all Outputs.
[Outputs]
Zone Location
0002 Reception
0003 Ground Floor
0013 First Floor Corridor
0014 First Floor
More>
Press the ÏÐ buttons to highlight the required zone and then press the Î button to view the
individual outputs. For example:
[ Outputs in Zone 0003]
Mld Mode
Device text
Enabled
Kitchen
Disabled Reception
<More>
Press the Î button to view further information on each point, for example:
[ Outputs in Zone 0003]
Mld Mode
State
Enabled
Off
Disabled
<More>
Type
SOUNDER
RELAY
A * symbol preceding the state (e.g. *On) indicates the device has been configured as an inverted
output (e.g. a fault relay that is designed to de-energise when a fault occurs).
The state of an output that is disabled is not shown, as it will inherently be in the off condition.
Page 22 of 42
3.9.7
View - Panel
The View Panel Option provides three items to view diagnostic on the panel.
[Panel Information]
LOCAL-HARDWARE
NETWORK-HARDWARE
SOFTWARE
Press the ÍÏÐÎ buttons to highlight the required menu option and then press the button to
select it.
•
Local hardware provides information on the circuits of this panel.
•
Network hardware provides information on the circuits of other panels / nodes on the
network.
•
Software provides information on the operating software of this panel and its optional
interface cards.
3.9.7.1 Software
[Software]
PANEL
NETWORK
DISPLAY
PSU
PRINTER
LOOP CARDS
PERIPHERAL
Panel Software:
[Software]
PROGRAM ID
CHECKSUM
: MX5000-050-04
: 92879016
Other Software:
Select the other options and the display shows the software version incorporated into these circuit
cards / functions and the hardware build variant. An number of peripheral modules may be installed
(up to 32) – press the ÏÐ buttons to scroll through the list if required.
[Software]
ADRS.CARD TYPE
1 Display Card
VERSION
1.03
BUILD
00
If there are no devices installed of the type selected, the display shows:
[Software]
ADRS.CARD TYPE
VERSION
BUILD
NO DEVICES
Page 23 of 42
3.9.7.2 Local Hardware
The Local Hardware Option provides a diagnostic readout of the operational condition and readings
for the internal panel electronic circuits of this panel. When the option is selected, the display shows
a list of the circuits. For example:
[Panel Circuits]
DESCRIPTION
VALUE
Sounder A
5.6V
Sounder B
5.6V
Sounder A Load
0mA
Sounder B Load
0mA
STATE
Normal
Normal
Normal
Normal
The following table lists the internal panel circuits and indicates the values that can be displayed.
Description
Value Range
Normal
Possible States
0V – 14V
5.5V
Normal
Open Circuit, Short Circuit
0mA – 1000mA
5
Normal
Too High
Battery
0V – 30V
27.6V
Normal
Too High, Too Low
Charger
0V – 30V
28.0V
Normal
Too High, Too Low
Charger Current
0mA – 2000mA
5
Normal
Charger Temp (C)
0C – 50C
5
Normal
Earth Volts
0V – 30V
2.5V /
6
14.5V
Normal
System Volts
19V – 30V
28.0V
Normal
0mA – 500mA
5
Normal
Too High
0mA – 500mA
5
Normal
Open Circuit, Too High, Short Circuit
24V – 32V
5
Normal
24V – 32V
5
Normal
L/H
L
Normal
Sounder A
Sounder B 4
Sounder A Load
Sounder B Load 4
Aux Load
st
1 Loop Load
st
7
1 Loop V.Out
st
1 Loop V.In
7
7
Panel Switch Inputs
1-9
Relay 1
Relay 2
Programmable inputs
Normal
L/H
L
Normal
–
–
Normal
–
–
Normal
8
–
–
Normal
8
Relay 4
–
–
Normal
Main Supply
–
–
Normal
Pager
–
–
Normal
Relay 3
Too High, Too Low
Press the ÏÐ buttons to scroll through the panel internal circuits. Press the ‘Esc’ button to return to
the main view menu.
NOTE: Additional panel circuits may be shown depending on the system configuration and installed
options.
4
The MX-5400 also displays Sounders C and D.
Depends on the panel configuration, installation and current operating condition (i.e. fire alarm).
Depends on configuration of the panel.
7
Loop Load, V.Out and V.In displayed for each loop driver (2 on MX-5200, 4 on Mx-5400).
8
Requires the installation of the 2-Way Relay card option.
5
6
Page 24 of 42
3.9.7.3 Network Hardware
The Network Hardware Option provides a diagnostic readout of the operational condition and
readings for the internal panel electronic circuits of other nodes / panels on the network. When the
option is selected, the display shows a list of the nodes indexed by their assigned zone number. For
example:
[HARDWARE]
Zone Location
1700 Ground Floor Panel
1701→ Reception Panel
1702→ First Floor Panel
1703→ Second Floor Panel
More>
Press the ÏÐ buttons to scroll through the panels to highlight the required panel.
Press the Î button to view the individual circuit information for the panel selected. The information
includes the circuit text and current value as per the local hardware option. Press the ÏÐ buttons to
scroll through the circuits on the selected panel. Additionally, the sector, node, circuit number and
address information are also available.
3.9.8
View - Log
After selecting to view the log option the display presents a pop-up window to allow selection
between a view of all of the event history, a view of only the fire alarms that have occurred or a view
of the fire alarm counter.
ALL EVENTS
FIRE EVENTS ONLY
ALARM COUNTER
.
Press the ÏÐ buttons to highlight the required menu option and then press the button to select it.
The display then shows the appropriate list of events.
3.9.8.1 Event Log
The display will always show the most recent event to have occurred, e.g.
[View Fire Events]
Time/Date Node Lp:Addr
10:54:23
1
1:001.0
14/03/06 FIRE ALARM
BASEMENT
ROOM 10
Entry 0076
Zone
001
64
< Number of Highlighted Event
<
<
<
<
Time, Origin and Zone
Date, Event and Analogue Value
Zone Text Description
Device Location Description
In the above example, the latest fire occurred (Event No. 76) at 10:54 am on March 14, 2006. This
fire alarm originated at the device at address 001(Addr) on Loop 1 (Lp) on Panel No. 1 (Panel). The
device was in Zone 001. The analogue value registered by the device (64) has also been recorded.
The lower two lines show the zone and device location texts descriptions for ease of identification.
Press the ÏÐ buttons to scroll through the fire alarm events logged in the system. Press the Ï
button to show more recent events and press the Ð button to show earlier events.
To view the details for a specific Log Entry Number, it is possible to select the record by typing in the
required number using the number keys.
Press the button to confirm. The display will then display the required record.
Press the ‘Esc’ button to return to the main view menu.
Page 25 of 42
3.9.8.2
Alarm Counter
Alarm Counter.
Section 7.13
The Panel records the number of times that the fire alarm condition has
occurred at the panel.
[View Alarm Counter]
0000000033
In the above example, the panel has entered the fire alarm condition 33 times since it was installed.
The panel increments the count by one each time it changes from the normal condition to indicate a
fire alarm condition. Whilst in the fire alarm condition, and until it is reset, further fire alarm events do
not increment the counter.
Press the ‘Esc’ button to return to the main view menu.
3.9.9
View - Network
This Option can be used to obtain diagnostic information when a network is used to connect other
panels or remote terminals. The access level of all panels on the network can be checked from this
display:
[NETWORK – Press 0 to Clear]
Node Status
1 LOCAL
2 Level-2
3 Level-1
4
-
More>
Additional network diagnostics are available by selecting the “More>” option.
For further information, refer to the Ad-Net network manual (Document No. 680-502).
Pressing '0' allows the stored network status information to be cleared.
3.9.10
View - Warnings
This Option can be used to obtain information about warning conditions on the panel.
A warning condition is created whenever a detector device reaches its limit drift of compensation.
This does not affect the performance or operation of the panel in detecting and responding to fire
alarm conditions from the device. It will mean the device is more sensitive and could react to lower
levels smoke stimuli resulting in false alarms. This function is normally used by the service engineer
to view which devices need to be cleaned and no indication is given of this condition on the normal
displays. A fault condition will occur when the device becomes dirty.
3.9.11
View - Supervisory
This Option can be used to obtain information about supervisory conditions on the panel.
The operation of the panel and the information that can be shown is identical to the views available
from the main operating display. Refer to Section 3.6 for further information.
If there are no Zones or Inputs in a Supervisory condition, the display automatically reverts to the
Main View Menu.
Page 26 of 42
3.10
Disabling
On selecting the Disable Menu, the display shows five possible options. For example:
[Disable]
User 1 Node
ZONE/INPUTS
CONTROLS
OUTPUTS
USER-ID
1
GROUPS
Press the ÍÎ buttons to highlight the required menu option and then press the button to select
it.
3.10.1
Disable - Zones and Inputs
This option provides the means to disable a complete zone, disable all input devices except call
points or disable individual input devices.
If the current User ID does not have the necessary permission, the display prompts for entry of a
password to guard against inadvertent changes.
On selecting this option, the display shows a list of the current zones and their current disablement
status. For example:
[
0 Zones with Inputs Disabled] More>
Zone
Mode
Location
0001
Enabled
BASEMENT WEST
0002
Enabled
BASEMENT EAST
0008
Enabled
GROUND FLOOR
0009
Enabled
MAIN RECEPTION AREA
Press the ÏÐ buttons to scroll through the available zones, or key in a specific zone number.
To disable the entire zone, move over to the Mode column and highlight the existing mode. Press
the button and a pop-up window appears showing the possible options: ALL INPUTS
SELECTED INPUTS
.
Press the ÏÐ buttons to scroll through and highlight the required option and then press the button to select it.
If ALL INPUTS is chosen, the pop-up window disappears and the State of the Zone is changed to
ALL DISABLED.
If SELECTED INPUTS is chosen, the pop-up window disappears and a list of the input devices
within the selected zone is presented. For example:
[ Inputs in Zone 0001]
Mld Mode
Device Text
/ 1 Enabled
Room 151
/ 2 Disabled
Room 152
/ 3 Enabled
Kitchen
/14 Enabled
Lobby
More>
Press the Î button for more information on the inputs, including full state, type, analogue value etc.
Press the ÏÐ buttons to scroll through and highlight the required input and then press the button
to disable it.
Press the ‘Esc’ button to return.
Page 27 of 42
3.10.2
Disable - Outputs
The Disable Outputs Option enables the isolation of some or all of the outputs. If disabled, the
outputs will not activate in the event of a fire alarm or other programmed event.
If the current User ID does not have the necessary permission, the display prompts for entry of a
password to guard against inadvertent changes.
[Disable]
Please Enter Your Password
Enter the password as normal. Once a valid password has been entered, a pop-up window is shown
on the display to select the type of outputs to disable. Scroll down to view / select the available
options. The list below details all of the possible options – the available options will have been
configured by the installation engineer.
ALL OUTPUTS
ALL SOUNDERS
ALL BEACONS
FIRE ROUTING OUTPUTS
FIRE PROTECTION OUTPUTS
FAULT ROUTING OUTPUTS
ALL OTHER RELAY OUTPUTS
ONLY SELECTED OUTPUTS
PAGERS
↓
3.10.2.1 All Sounder Outputs
Press the ÏÐ buttons to scroll through and highlight the ALL SOUNDERS Option and then press
the button to disable them. The display automatically reverts to the Main Disable Menu.
The ‘Sounder Disabled’ Indicator will be illuminated.
3.10.2.2 All Beacon Outputs
Press the ÏÐ buttons to scroll through and highlight the ALL BEACONS Option and then press the
button to disable them. The display automatically reverts to the Main Disable Menu.
NOTE: This only applies to individually addressable beacons. For some combined sounder/beacon
devices, the beacon follows the operation of the sounder and it is only possible to disable both the
sounder and the beacon together.
3.10.2.3 Fire Routing Outputs
Press the ÏÐ buttons to scroll through and highlight the FIRE ROUTING OUTPUT Option and then
press the button to disable all fire routing outputs. The display automatically reverts to the Main
Disable Menu.
The ‘Fire Routing Disabled’ Indicator will be illuminated.
3.10.2.4 Fire Protection Outputs
Press the ÏÐ buttons to scroll through and highlight the FIRE ROUTING OUTPUT Option and then
press the button to disable all fire protection outputs. The display automatically reverts to the
Main Disable Menu.
3.10.2.5 Fault Routing Outputs
Press the ÏÐ buttons to scroll through and highlight the FAULT ROUTING OUTPUT Option and
then press the button to disable all fault routing outputs. The display automatically reverts to the
Main Disable Menu.
Page 28 of 42
3.10.2.6 All Other Relay Outputs
Press the ÏÐ buttons to scroll through and highlight the ALL OTHER RELAY OUTPUTS Option
and then press the button to disable them. The display automatically reverts to the Main Disable
Menu.
3.10.2.8 Pager
Press the ÏÐ buttons to scroll through and highlight the PAGER OUTPUT Option and then press
the button to disable all pager outputs. The display automatically reverts to the Main Disable
Menu.
3.10.2.9 Only Selected Outputs
Allows selection of a single output.
3.10.3
Disable - Controls
Disabling Controls will cancel Level 2 access and return the panel to Level 1 operation.
If the panel has an access key switch fitted, use the key switch in preference to the menu
option shown below.
[Disable]
User 1 Node
ZONE/INPUTS
CONTROLS
OUTPUTS
USER-ID
1
GROUPS
Press the ÍÎ buttons to highlight the Controls option and then press the button to select it.
The display then prompts for password entry. Enter the password as normal.
When a valid password has been entered, the control button functions and menu functions are
disabled and the level 1 menu display will be shown: [ CONTROLS DISABLED ]
ENABLE CONTROLS
LED-TEST
VIEW
STATUS
The display will automatically revert to the normal operating display after a few seconds.
Page 29 of 42
3.10.4
Disable – User ID
This operation will cancel the current User ID and return to the default User 1. User 1 can perform
all actions except those defined as programmable (refer to the menu table).
[Disable]
User 5 Node
ZONE/INPUTS
CONTROLS
OUTPUTS
USER-ID
1
GROUPS
Press the ÍÎ buttons to highlight the User-ID option and then press the button to select it.
[Disable]
User 1 Node
ZONE/INPUTS
CONTROLS
OUTPUTS
USER-ID
1
GROUPS
NOTE: If configured to operate with a timeout and if there has been no user activity after the
programmable period of time (default “No Timeout”), the panel will automatically cancel a User ID
and return the panel to User 1 ID access. This is to ensure that access to restricted options is
automatically cancelled.
3.10.5
Disable – Groups
Disablement Groups are a means of disabling / enabling custom groups of devices. The commands
are command across the network of panels and can be invoked from any panel. The installer will
have configured these groups.
If no groups exist, selection of this option will show a NOT CONFIGURED message.
Some typical examples are:
Stage Smoke Detectors
Floor 2 Sounders
ALL Sounders
The display will show, for example:
[Disable Group]
User 5 Node
Group Invoke Description
1 . Stage Smoke Detectors
2
Floor 2 Sounders
3
ALL Sounders
1
Press the ÏÐ buttons to scroll through and highlight the required option and then press the button to disable it. The display will show that the command has been invoked (activated).
[Disable Group]
User 5 Node
Group Invoke Description
1 . ok
Stage Smoke Detectors
2
Floor 2 Sounders
3
ALL Sounders
1
The GENERAL DISABLE and any specific disable indicators will be illuminated on the panel(s).
Page 30 of 42
3.11
Enabling
On selection of the Enable Menu Option, the display shows the available Enable Functions.
[Enable]
User 1 Node
ZONE/INPUTS
REMOTE
OUTPUTS
1
GROUPS
Press the ÍÎ buttons to highlight the required menu option and then press the button to select
it.
3.11.1
Enable - Zones and Inputs
Selecting this option will show a list of zones containing disabled input devices. Either the complete
zone, or individual devices within the zone can then be enabled (Display format is virtually identical
to the Disable displays).
3.11.2
Enable - Outputs
When this option is selected, a pop-up menu appears asking if you want to enable ALL
SOUNDERS, ALL BEACONS, FIRE ROUTING OUTPUTS, FIRE PROTECTION OUTPUTS,
FAULT ROUTING OUTPUTS, ALL OTHER RELAY OUTPUTS, ONLY SELECTED OUTPUTS or
the PAGER OUTPUT. If ONLY SELECTED OUTPUTS is selected, the display will list only zones
containing outputs that have been disabled. The individual outputs within the zone can then be
enabled.
(The display format is virtually identical to the Disable displays).
3.11.3
Enable - Groups
This option allows the re-enabling of User-defined Disablement Groups. The display is identical to
the disable option.
3.11.4
Enable - Remote
Information on the detectors connected to the panel and on the condition of all zones can be
obtained with an ipGateway interface.
In addition, the user can be assisted with operations such as disabling / enabling a detector from
external commands over a TCP/IP system. In order to ensure this only happens with the consent of
the user the REMOTE option must be enabled by the user.
If the current User ID does not have the necessary permission, the display prompts for entry of a
password to guard against inadvertent changes.
After selecting the option, a selection list is presented on the display as follows:
[Remote Access Options]
DISABLE REMOTE ACCESS
ALLOW REMOTE ACCESS
.
Use the ÏÐ buttons to highlight the required option and then press the button to confirm.
Page 31 of 42
3.12 Delays
[Level 2 Menu]
VIEW
TEST
User 1 Node
DISABLE
DELAY
STATUS
1
ENABLE
TOOLS
Press the ÏÐÍÎ buttons to highlight the Delay-Mode option and then press the button to select
it. If the current User ID does not have the necessary permission, the display prompts for entry of a
password to guard against inadvertent changes.
If the delays are configured in the panel, the display shows the following pop-up window when the
Delay-Mode Option is selected. (Note: This delay function can only be configured using the PC
Programming Tool).
NO INVESTIGATION DELAY
ONCE ONLY
AUTOMATIC
EXTENDED
↓
If the delays are not configured in the panel, the display briefly shows “NOT CONFIGURED” before
returning to the Disable Menu Options.
3.12.1
Turn Off Delay Mode
This operation will cancel the Investigation Delay mode.
With the option highlighted, press the button to select NO INVESTIGATION DELAYS and disable
the operation of the Stage 1 / Stage 2 Investigation Function. Otherwise, press the ESC to cancel
and keep the investigation delays in operation.
If the investigation delays are in operation then the “Delayed” LED Indicator is illuminated. When the
investigation delays are turned off, the “Delayed” LED Indicator is turned off.
Press ‘Esc’ to cancel and make no change to the current operational setting.
3.12.2
Turn On Delay-Mode
This option allows the operation of Investigation Delays and other related functions.
The Investigation Delays can be invoked as manual operation delays (Once Only), Automatic delays
(configured to run with a time clock) and Extend delays. A further option is provided to Inhibit delays
for holiday periods. The options that appear in the menu depend on the installation configuration
programmed by the installer.
On selection of the DELAY option, the display will show a pop-up menu list. For example:
NO INVESTIGATION DELAY
ONCE ONLY
AUTOMATIC
EXTENDED
.
↓
Press the ÏÐ buttons to scroll through and highlight the required option and then press the button to enable it.
The display will confirm the selection and indicate WORKING whilst it performs the operation. On
completion, it reverts to the pop-up menu.
For Extended and Holiday/Inhibit, further menus are presented.
Page 32 of 42
3.12.2.1 Extend Delays
To extend any current automatic delays (for example overtime working).
Extend Delays for : ..0 hour(s)
Use the number keys to enter the required number of hours beyond the current configured end time.
3.12.2.2 Holiday / Inhibit
The panel can be enabled to prevent any pre-programmed daily automatic delays from activating
during holiday periods. On selection, the display shows:
[Inhibit Delay End Date]
TIME = 15:49
DATE = 02/07/08
WED 02 JUL 2008
Press the ÏÐ buttons to select the time / date fields. Enter the required time and date using the
number buttons.
Any pre-configured automatic delays or manual delays will be immediately suspended and the panel
will operate without any investigation delays.
On reaching the time / date programmed, the panel will automatically revert to use any investigation
delays as programmed and configured.
Page 33 of 42
3.13 Testing
[Test Menu]
ZONES
DISPLAY
OUTPUTS
User 1 Node
BUZZER
1
PRINTER
Press the ÍÎ buttons to highlight the required menu option and then press the button to select
it.
3.13.1
Test - Zones
The Test Zones function provides the means to implement a one-person walk test in order to test
specific call points or detectors in one or more zones.
If the current User ID does not have the necessary permission, the display prompts for entry of a
password to guard against inadvertent changes.
When the Test Zones option is selected, a pop-up window is shown on the display to select whether
the sounders will activate (for about 10-seconds) when an input device is activated. For example:
WITHOUT SOUNDERS
WITH SOUNDERS
.
Press the ÏÐ buttons to scroll through and highlight the required option and then press the button to select it.
Note that the panel will have been programmed during commissioning to define which of the
sounders are activated during a test.
The display then shows a list of the available Zones and their current test status. For example:
[
0 Zones in Test ]
Zone
Test State
Location
>0001
BASEMENT WEST
0002
BASEMENT EAST
0100
MAIN RECEPTION
Press the ÏÐ buttons to scroll through and highlight the required zone and then press the button
to change the Test State. For example:
[
1 Zone in Test ]
Zone
Test State
Location
0001
IN TEST
BASEMENT WEST
0002
BASEMENT EAST
0008
GROUND FLOOR
0009
MAIN RECEPTION AREA
When one or more Zones are placed in a Test State, the Test Indicator will be illuminated. When an
input device is activated (i.e. break glass test on a call point or introducing test smoke into a smoke
detector), the bells will ring (if selected) and the display will indicate that a zone is registering a test
condition by showing an exclamation mark (!) on the display.
[
2 Zones in Test
Zone
Test State
0001
IN TEST
!
0002
0008
0009
IN TEST
Page 34 of 42
]
Location
BASEMENT WEST
BASEMENT EAST
GROUND FLOOR
MAIN RECEPTION AREA
When the activating test key is removed from the call point or the smoke clears from the detector
chamber, the panel will automatically reset and clear the test condition.
As an alternative to scrolling, a specific zone number can be entered by using the Í button to move
to the zone number column, and then typing in the required number, followed by the button.
If several consecutive zones are to be tested, an alternative to selecting them all individually is to
specify a range of zones as follows: Move to the zone number column and highlighting the first zone to test, then
Press the button – the display will then ask for the last zone to be tested.
Individual zones can then be toggled in or out of test by pressing the button.
To leave the Zone Test menu, press the ‘Esc’ button. If there are still any zones in a test condition
a pop-up window with the following options: FINISHED TEST
KEEP ZONES IN TEST
.
Selecting the FINISHED TEST option will cancel all zone tests. The Test LED will then extinguish.
Alternatively, it is possible to leave the Zone Test Function with one or more Zones still in Test by
selecting the KEEP ZONES IN TEST option. This will enable the inspection or use of other menu
functions and return the display to the normal operating mode. The Test LED will stay illuminated if
this option is selected.
3.13.2
Test - Display
The Test Display option checks the operation of all the Indicators and the Graphic Display. All of the
Indicators are turned on and the entire display is shown in reverse.
During this test, it is possible to test the operation of the Í,Ï,Ð,Î, and 0-9 buttons. When a
button is pressed, it is indicated on the display. For example:
LCD & KEY TEST
←
Press the ‘Esc’ button to return to the Test Menu. If no button is pressed for 1-minute, the display
will automatically revert to the normal operating display.
3.13.3
Test - Buzzer
[Test Menu]
ZONES
DISPLAY
OUTPUTS
User 1 Node
BUZZER
1
PRINTER
When the Test Buzzer option is selected, the internal buzzer will sound for about five seconds.
Page 35 of 42
3.13.4
Test - Printer
To invoke the printing of a test print sequence, highlight the Test Print Option and press the button to confirm. The panel transmits 16 lines of test characters to the printer. The information sent
is echoed on the display.
When the test print is completed, the display automatically reverts to the Test Options Menu.
Press the ‘Esc’ button at any time to cancel the test print.
3.13.5
Test - Outputs
Output devices can be individually tested for operation.
To test an individual output device (sounder or relay), highlight the Test Outputs Option and press
the button to confirm. The display will present a list of the zones that contain output devices.
If the current User ID does not have the necessary permission, the display prompts for entry of a
password to guard against inadvertent operation.
[Outputs]
Zone
Location
0001
BASEMENT WEST
0002
BASEMENT EAST
0037
EAST PLANT ROOM
0100
MAIN RECEPTION
Press the ÏÐ buttons to scroll and highlight the required zone (or key in the required zone number)
and then press the Î button to show the output devices in that zone. For example:
[ Outputs in Zone 37]
Mode
Device Text
Enabled Room 151
Enabled Room 152
<More>
Press the ÏÐ buttons to scroll and highlight the required output and then press the button to test
the output. The display will prompt to confirm the “Test this device”. Press the button again to
accept. The output device will turn on and this will be confirmed on the display by the status
changing from OFF to ON. Press the Î button to show further information on the output.
The general “TEST” LED will illuminate whenever an output is in test. The test is cancelled by either
pressing the ESC button or by scrolling to the next / previous device in the list. If the display is left
for one minute without pressing any buttons, the output will revert to its quiescent state.
On networked systems, the Test – Outputs option also supports testing of outputs connected to
other panels.
Page 36 of 42
3.14
Tools
[Tools]
User 1 Node
COMMISSION
PRINT
1
CHANGE TIME
The TOOLS menu presents three options. Press the ÍÎ buttons to highlight the required menu
option and then press the button to select it.
The COMMISSION Menu is only available to Level 3 Service Users.
3.14.1
Printing
[Print Menu]
INPUTS
LOG
User 1 Node
1
OUTPUTS
FAULTS
DISABLED
FEED-PAPER
SETUP PRINTER
3.14.1.1 Printer Communications Settings
The information is sent to the printer in a serial form. If an external printer is used, ensure that the
communications settings in the printer are set as follows:
Interface Type: RS232
Baud Rate:
9600
Parity: None
Data Bits:
8
Stop Bits:
1
3.14.1.2 Set-up Printer
To enable or set-up the operating characteristics of the printer, highlight the Set-up Printer Option
and press the button to confirm.
If the current User ID does not have the necessary permission, the display prompts for entry of a
password to guard against inadvertent changes.
Enter the password as normal. The display then shows a pop-up window giving programming
options as follows:
[FIRES] [ALARMS]
[FAULTS] [TESTS]
-
( Printer: Internal External/Wide )
The upper line of options determines whether the panel shall automatically print specific events as
they occur.
The lower line of options determines whether a printer is connected and its type.
Use the Í,Ï,Ð,Î and buttons to highlight the required option and change its setting. Pressing
the button turns the option on ( is shown) or off (- is shown) accordingly.
In the above option, an external printer is selected, with automatic printing of fires and alarms.
Setting the wide option will change the printing from the default 40 characters per line to 80
characters per line.
Note: Only faults registered on this panel are printed.
Page 37 of 42
3.14.1.3 Print Inputs
To print information on any input, highlight the Inputs option and press the button to confirm. The
display will show the following:
[Inputs]
First Zone
Last Zone
:
:
98
98
(Press → to Start Print)
The display will prompt the zones in use on this panel. For networked systems, it is possible to
select any zones used in the system. Use the arrow (ÏÐ) buttons to highlight the first and last zone
number and use the number keys to change the zone number required.
Press the Î key to start printing.
The display will show the following whilst information is sent to the printer and printed.
WORKING ...
(Press Esc to Stop)
After all information has been printed, the display will automatically revert to the Print Menu. Press
the “Esc” key to stop printing if required.
The printout will show all input points for the zones selected. Information printed includes Device
Text, Zone Number, Loop and address, current status and analogue value.
3.14.1.4 Print Outputs
To print information on any output, highlight the Outputs option and press the button to confirm.
The display will show the following:
[Outputs]
First Zone
Last Zone
:
:
98
98
(Press → to Start Print)
The display will prompt the zones in use on this panel. For networked systems, it is possible to
select any zones used in the system. Use the arrow (ÏÐ) buttons to highlight the first and last zone
number and use the number keys to change the zone number required.
Press the Î key to start printing.
The printout will show all output points for the zones selected. Information printed includes Device
Text, Zone Number, Loop and address, current status and analogue value.
3.14.1.5 Print Faults
To print information on any faults, highlight the Faults option and press the button to confirm. The
display will show the following:
[
2 Zones in Fault]
First Zone
Last Zone
:
:
98
99
(Press → to Start Print)
The panel analyses the network and the display will prompt the zones in a fault condition.
Page 38 of 42
Use the arrow (ÏÐ) buttons to highlight the first and last zone number and use the number keys to
change the zone number as required.
Press the Î key to start printing.
The printout will show the location and state of all input and output points in a fault condition for the
zones selected.
Note: If no fault conditions are present then selecting this menu option will no effect.
3.14.1.6 Print Disabled
To print information on any disablement, highlight the Disabled option and press the button to
confirm. The display will show the following depending on the disabled conditions present:
If there are zones with inputs disabled:
[
2 Zone(s) with Inputs Disabled]
First Zone
Last Zone
:
:
98
99
(Press → to Start Print)
If there are zones with outputs disabled:
[
1 Zone(s) with Outputs Disabled]
First Zone
Last Zone
:
:
98
98
(Press → to Start Print)
The panel analyses the network and the display will prompt the zones in a disabled condition.
Use the arrow (ÏÐ) buttons to highlight the first and last zone number and use the number keys to
change the zone number as required.
Press the Î key to start printing.
The printout will show the location and state of all input and output points in a disabled condition for
the zones selected.
The display always present the zones with inputs disabled first (if any exist). After printing the inputs
the display will present the information on disabled outputs (if any exist).
Note: If there aren’t disabled conditions present then selecting this menu option will no effect.
3.14.1.7 Print - Log
To print information from the History Log, highlight the Print Log Option and press the button to
confirm. A pop-up window will be shown asking if all events, or just fires should be printed.
Highlight the required option using the ÏÐ buttons and press the button to confirm.
When the Log Print is completed, the display automatically reverts to the Print Options Menu.
Press the ‘Esc’ button at any time to cancel the log print.
Note: The pop-up window also allows selection of the Fire Alarm Counter. On selection, this is
shown on the display but is not printed.
3.14.1.8 Print - Feed Paper
Highlight the Feed Paper Option and press the button to confirm. The display does not change
but a command is sent to the printer to advance the paper.
Page 39 of 42
3.14.2
Change-Time
Allows the clock time to be changed.
If the current User ID does not have the necessary permission, the display prompts for entry of a
password to guard against inadvertent changes.
For example:
[SET TIME/DATE]
TIME = 15:28
DATE = 05/01/09
MON
5 JAN 2009
To change the settings, use the ÏÐ buttons to highlight the required option. Directly enter the new
time or date using the number buttons. As soon as a number button is pressed, the display will
clear the current setting and show the new value as it is entered. For example:
[SET TIME/DATE]
TIME = 1-:-DATE = 05/01/09
MON
5 JAN 2009
If this panel is connected to a network, ALL panels on the network will assume this new value.
Page 40 of 42
USER NOTES:
Page 41 of 42
Doc Number
Revision
First Issued
680-166
03
2010-01-19
Advanced Electronics Limited
34 Moorland Way
Nelson Park
Cramlington
Northumberland
NE23 1WE
Tel: +44 (0)1670 707 111
Fax: +44 (0)1670 707 222
Web: www.Advel.co.uk
Email: [email protected]