1
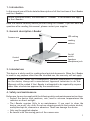
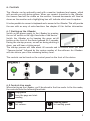
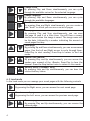
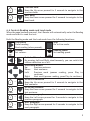
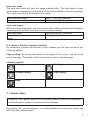
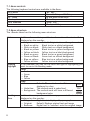
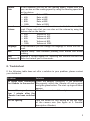
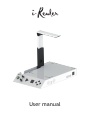
i-Reader
User manual
Table of contents
1.
2.
3.
4.
5.
Introduction...............................................................................1
General description i-Reader...........................................................1
Intended use...............................................................................1
Safety and maintenance.................................................................1
Installing the i-Reader...................................................................2
5.1 Power supply..........................................................................2
5.2 i-Reader+ battery....................................................................2
5.3 Camera arm...........................................................................2
6. Controls ...................................................................................3
6.1 Starting up the i-Reader............................................................3
6.2 Controls Live mode..................................................................3
6.3 Load mode............................................................................4
6.4 Controls Reading mode and Load mode..........................................5
6.5 Keyboard controls (requires monitor)............................................6
6.6 Mouse controls (requires monitor)...............................................7
7. i-Reader Menu.............................................................................7
7.1 Menu controls.........................................................................8
7.2 Menu structure.......................................................................8
8. Troubleshoot...............................................................................9
9. Specifications............................................................................ 10
10. Regulations............................................................................. 10
11. Warranty information................................................................. 11
1. Introduction
In this manual you will find a detailed description of all the functions of the i-Reader
and the i-Reader+.
Unless otherwise stated, the mentions of “i-Reader” in this manual also apply
to the i-Reader+.
Read this manual carefully before you start using the i-Reader. If you still have any
questions after reading this manual, please contact your supplier.
2. General description i-Reader
Camera arm
LED setting
reading
surface
Control
panel
On/off
switch
Speakers
Headphone jack
3. Intended use
This device is solely used for reading aloud printed documents. When the i-Reader
is used for any purpose other than the intended use, the warranty will not apply.
Caution: do not, under any circumstances, perform maintenance or repairs
on the device; always ask a manufacturer approved technician to do this.
Warranty will be voided if the i-Reader is attempted to be repaired by anyone
other than a technician approved by the manufacturer.
4. Safety and maintenance
Before use, be sure to comply with the following safety and maintenance instructions:
• Protect the device from moisture, rain, sand or extreme temperatures like
radiators or direct sunlight.
• The i-Reader requires little to no maintenance. If you want to clean the
device, use a soft, dry cloth. Do not use cleaning products that contain alcohol,
methylated spirits, ammonia or abrasives. These can damage the device.
• Only use the supplied adapter.
• Be careful with the moving parts of the camera arm.
1
5. Installing the i-Reader
Remove the i-Reader from its case and place it on a stable surface and connect the
power cable.
Power supply
VGA port (monitor)
USB ports
(keyboard and/or mouse)
5.1 Power supply
Connect the supplied power cable to the i-Reader according to the above image.
Note: when the i-Reader+ is switched on while you (dis)connect the power cable,
the i-Reader+ will give a notification of this.
5.2 i-Reader+ battery
The i-Reader+ contains an internal battery making the i-Reader+ suitable for mobile
use. However, for your comfort it is recommended to connect the i-Reader+ to its
power supply whenever possible.
When the battery has less than 10% power left, a notification of this will sound
every 3 minutes indicating that the battery is almost empty.
When the battery has less than 5% power left, the i-Reader+ will switch itself off.
5.3 Camera arm
Rotate the camera arm up (1), fold out the camera (2) and extend it (3).
1
2
2
3
6. Controls
The i-Reader can be optionally used with a monitor, keyboard and mouse, which
will provide you with extra options. When you connect a monitor to the i-Reader,
the camera feed will be visible on the monitor. Scanned documents will then be
shown on the monitor and a highlighting box will indicate which word is spoken.
It is also possible to connect a keyboard and a mouse to the i-Reader. This will provide
the user with an array of extra functions. See chapter 6.5 for further information.
6.1 Starting up the i-Reader
Switch on the power supply to the i-Reader by pressing
the on/off switch on the right hand side of the device.
Switch the i-Reader on by keeping the green on/off
button on the front of the device pressed for 2 seconds.
During the startup process, as well as during shutting it
down, you will hear a ticking sound.
The startup process will take about 60 seconds and is finished when you hear
“Camera started” followed by the version number of the software. An i-Reader+
will also inform you of the remaining battery level.
The controls can be found on the control panel on the front of the device.
6.2 Controls Live mode
When starting up the i-Reader, you’ll be placed in the Live mode. In the Live mode,
the controls have the following functions:
Play/pause
Scan the page and start
reading.
Volume
Set volume.
Reading speed
Set reading speed.
3
+
+
+
+
+
+
+
Change voice
By pressing Play and Down simultaneously, you can cycle
through the available voices for the selected language.
Change language
By pressing Stop and Down simultaneously, you can cycle
through the available languages.
Create book
By pressing Stop and Right simultaneously, you can create a
new “book” in which you can save a series of pages.
Save page
By pressing Play and Stop simultaneously, you can save
the page to read it at a later time. You will hear a camera
shutter sound when the image is saved. The image name will
be the date, followed by a number indicating the amount of
saved pages that day.
Load page
By pressing Up and Down simultaneously, you can access saved
pages. Use the Left and Right arrows to cycle through them.
Press Play to start reading. Press Stop to return to the Live
mode.
Spoken user manual
By pressing Play and Up simultaneously, you can access the
spoken user manual of the i-Reader. Press Play to hear the
manual. Press the Stop button twice to return to Live mode.
Battery status (i-Reader+ only)
By pressing Stop and Up simultaneously, you can hear the
current battery status.
6.3 Load mode
In the Load mode you can manage your saved pages with the following controls:
Next saved page
By pressing the Right arrow, you can access the next saved page.
Previous saved page
By pressing the Left arrow, you can access the previous saved page.
+
4
Remove page
By pressing Play and Up simultaneously, you can remove the
seleced page.
+
2 sec.
+
2 sec.
Previous book
Keep the Up arrow pressed for 2 seconds to navigate to the
previous book.
Next book
Keep the Down arrow pressed for 2 seconds to navigate to the
next book.
6.4 Controls Reading mode and Load mode
When the page has been scanned, the i-Reader will automatically enter the Reading
mode and start to read the text.
Both the Reading mode and the Load mode have the following functions:
Play/pause
Stop
Pause reading.
Go to Live mode.
Start reading (when paused).
Volume
Set volume.
+
+
2 sec.
+
2 sec.
+
2 sec.
+
2 sec.
Reading speed
Set reading speed.
Switch off/on column detection
By pressing Left and Right simultaneously, you can switch the
column detection on or off.
Directional arrows
Up:
Previous sentence
Down: Next sentence
Left:
Previous word (pauses reading, press Play to
continue)
Right: Next word (pauses reading, press Play to continue)
Go to first sentence
Keep the Up arrow pressed for 2 seconds to navigate to the
first sentence.
Go to last sentence
Keep the Down arrow pressed for 2 seconds to navigate to the
last sentence.
Previous paragraph
Keep the Left arrow pressed for 2 seconds to navigate to the
previous paragraph.
Next paragraph
Keep the Right arrow pressed for 2 seconds to navigate to the
next paragraph.
5
6.5 Keyboard controls (requires monitor)
By connecting a keyboard and a monitor to the i-Reader you will have access to
many extra options to make reading and navigating more efficient.
Reading
Scan page and start reading
Pause / play
Stop reading, return to Live mode
Stop reading, return to Live mode
When in Live mode, go to Menu, exit
menu’s
Navigating whilst reading
Previous word
Next word
Previous sentence
Next sentence
Next paragraph
Previous paragraph
Go to beginning
Go to end
Spell word
Image
Change view
Toggle high contrast color
Zoom in/out
Image shortcuts
Save image
Load image mode
Delete image
Next image
Previous image
6
Spacebar
Spacebar
“Esc” key
“Alt” key
Left arrow key
Right arrow key
Up arrow key
Down arrow key
“Page down” key
“Page up” key
“Home” key
“End” key
“CTRL” key on the word
“V” key
“C” key
“+” to zoom in
“-” to zoom out
“S” key
“L” key
“Delete” key
Right arrow key
Left arrow key
Auto save mode
The auto save mode will save the image automatically. The time taken to save
these images corresponds to the setting of the Capture Delay in the menu settings.
This mode can only be accessed via Live mode.
Start auto save mode
Hold “S” key for 3 seconds
Stop auto save and return to Live mode “Esc” key, or “Alt” key
Auto read images
Whilst in Load image mode, you can automatically read previously saved images in
ascending order by date from the currently selected image.
Start auto read
Hold spacebar for 3 seconds
Stop auto read and return to Load image “Esc” key, or “Alt” key
mode
6.6 Mouse controls (requires monitor)
By connecting a mouse and monitor to the i-Reader you will have access to the
following options.
Page scrolling: by moving the mouse to the edges of the screen, you can scroll
across the page. This works in both Live mode as well as scanned pages.
Clickable symbols
Scan page
Resume reading
Reading paused
Stop reading
Menu
7. i-Reader Menu
Attention: the i-Reader Menu is only available when a monitor in combination
with keyboard or mouse is connected to the i-Reader.
By pressing “Alt” on your keyboard, or clicking the Menu icon with your mouse, you
will enter the i-Reader Menu.
7
7.1 Menu controls
The following keyboard controls are available in the Menu.
Go to Menu
“Alt” key
Exit Menu
“Spacebar” key or “Alt” key
Up / Down
Up and down arrow keys
Select option
“Enter” key
Enter submenu
“Enter” key
Previous menu
“Backspace” key
7.2 Menu structure
The i-Reader Menu has the following menu structure:
Color
Reading
Highlight
Reading
View
8
In this submenu it is possible to choose how the text will be
displayed on the monitor.
• Original: Default. Original colors with regular contrast
• Black on white: Black text on a white background
• White on black: White text on a black background
• Black on yellow: Black text on a yellow background
• Yellow on black: Yellow text on a black background
• Black on green: Black text on a green background
• Green on black: Green text on a black background
• Blue on yellow: Blue text on a yellow background
• Yellow on blue: Yellow text on a blue background
In this submenu you can set the color and type of highlighting you
want to use in the Reading mode.
Color
• Red
• Green
• Blue
• Yellow
Type
• Box: Default. The marked word will be
TEXT
displayed in a box • Underline: The marked word is underlined
TEXT
• Background: The marked word will have a different TEXT
background color
In this submenu you can set the way you want the text to be
displayed on the monitor.
• Wrapped: Digital text is displayed by paragraph
• Original:
Default. Displays original text and image
• Redrawn:
Digital text is ‘redrawn’ onto the original image
Speech
Rate
In this submenu you can set the reading speed. Please note that
you can also set the reading speed by using the Reading speed dial
on the device.
• 20%:
Rate at 20%
• 40%:
Rate at 40%
• 60%:
Rate at 60%
• 80%:
Rate at 80%
• 100%:
Rate at 100%
Speech
In this submenu you can set the volume at which the text will be
Volume
read. Please note that you can also set the volume by using the
Volume dial on the device.
• 20%:
Volume at 20%
• 40%:
Volume at 40%
• 60%:
Volume at 60%
• 80%:
Volume at 80%
• 100%:
Volume at 100%
Language
In this submenu you can change the language in which the text is
read.
Misc
Capture Delay. Time between pressing Start button and actual
reading.
Help
Displays a 16-digit support ID. Selecting this function will exit the
Hardware ID Menu and return you to Live mode.
8. Troubleshoot
If the following table does not offer a solution to your problem, please contact
your distributor.
Problem
Solution
No image after connecting Check the adapter connector. If the connector
the i-Reader to the monitor. fits properly, switch the i-Reader off and on again
using the green button. The start-up logo will soon
appear.
No sound from speaker more Check the connector of the adapter.
than 1 minute after the
i-Reader has been switched
on.
No LED lighting.
Turn the wheel for LED setting at the top right
of the camera arm (See figure at 2. General
description i-Reader).
9
The startup ticking sound is
still active after 3 minutes
and the i-Reader has not
started up.
Switch off the i-Reader by pressing the green
on/off button. Wait until the ticking sound has
finished. Now switch off the power to the i-Reader
by flipping the power switch at the side of the
device to “0”, then back to “1”. Start up the
i-Reader with the green on/off button.
If this does not fix the issue after 3 times, please
contact your supplier.
9. Specifications
Main specification
Measurements
Weight
Power supply
Adapter i-Reader
Adapter i-Reader+ Battery usage
Battery charge time
Conditions of use
Temperature
Air humidity
410 x 260 x 60 mm (l x w x h)
410 x 260 x 340 mm (with camera setup)
2430 grams (i-Reader)
2600 grams (i-Reader+)
12V/3A
19V/3,4A
3 hours
2,5 hours approx. (Note: charge time will increase
when the device is switched on)
+5 °C to +35°C / 50 °F to 95 °F
<70% (no condensation)
Package contents
i-Reader
Adapter
Travel case
Manual
Headphones
10. Regulations
WEEE Notice
The WEEE logo (shown left) on the product or its box indicates that the
product must not be disposed of or dumped with your household waste.
For more information about electronic and electrical waste equipment
disposal, recovery and collections points, please check local regulations.
10
RoHS Compliance
This product is in compliance with Directive 2002/95/EC of the European
Parliament and of the Council of 27 January 2003, on the restrictions of the use of
certain hazardous substances in electrical and electronic equipment (RoHS) and its
amendments.
European Union Notice
Products with the CE marking comply with EMC Directive (2004/108/EC) and Low
Voltage Directive (2006/95/EEC) issued by the European Community.
Compliance with these directives implies conformity to the following standards:
EN55022
ENB55024
EN60950-1
FCC
FCC part 15 Class B
11. Warranty information
For all queries regarding warranty of your device, please contact your supplier for
further information.
11
i-Reader
The i-Reader logo is a trademark of
Rehan Electronics Ltd.
User manual V2.0