1
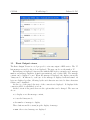
CAVIAR
Context Aware Vision using Image-based Active Recognition
D35
Software for Federation Assembly
User Manual
CAVIAR
Date
Author(s)
Work package
Document status
Usage
Keywords
:
:
:
:
:
:
:
D35 Software for federation assembly (BipTool) : User manual
1 September 2005
Sebastien Pesnel
2
Version 1.0
Internal
Software architecture, components
CAVIAR
WorkPackage 5
Deliverable D35
Abstract
Bip Tools is a GUI to manipulate BIP service. It displays the service registered
as ” bip. tcp” on DNS-SD. It enables to consult the control server, and view the
service description : the variable, the input/outputs. It offers the possibility to view
outputs or manipulate input with basic tool, or with specific tool. It displays a
graphical view of the components connections.
Contents
1 Service Browser
1
2 Control Frame
2.1 DNS-SD Data . . . . . . .
2.2 Data From Control Server
2.2.1 Variables . . . . . .
2.2.2 In/Outputs . . . .
2.2.3 Subscribe panel . .
2.2.4 Graph panel . . . .
.
.
.
.
.
.
2
2
2
4
4
7
7
.
.
.
.
7
8
9
9
10
.
.
.
.
.
.
.
.
.
.
.
.
.
.
.
.
.
.
3 In/Output Viewer/Manipulator
3.1 Basic Output viewer . . . . . .
3.2 Basic In/Output manipulator .
3.3 Module loading . . . . . . . . .
3.4 Module implementation . . . .
.
.
.
.
.
.
.
.
.
.
.
.
.
.
.
.
.
.
.
.
.
.
.
.
.
.
.
.
.
.
4 Menu
.
.
.
.
.
.
.
.
.
.
.
.
.
.
.
.
.
.
.
.
.
.
.
.
.
.
.
.
.
.
.
.
.
.
.
.
.
.
.
.
.
.
.
.
.
.
.
.
.
.
.
.
.
.
.
.
.
.
.
.
.
.
.
.
.
.
.
.
.
.
.
.
.
.
.
.
.
.
.
.
.
.
.
.
.
.
.
.
.
.
.
.
.
.
.
.
.
.
.
.
.
.
.
.
.
.
.
.
.
.
.
.
.
.
.
.
.
.
.
.
.
.
.
.
.
.
.
.
.
.
.
.
.
.
.
.
.
.
.
.
.
.
.
.
.
.
.
.
.
.
.
.
.
.
.
.
.
.
.
.
.
.
.
.
.
.
.
.
.
.
.
.
.
.
.
.
.
.
.
.
.
.
.
.
.
.
.
.
.
.
.
.
.
.
.
.
.
.
.
.
11
i
CAVIAR
1
WorkPackage 5
Deliverable D35
Service Browser
The service browser tree presents the BIP service.
The service browser tree lists the service registered on DNS-SD with the type ” bip. tcp”.
Each child of the root node is an active service. The name of the node is the service name.
When a service is lost, the node for this service is removed from the tree.
For each service, there is two nodes used to display the data extracted from DNS-SD :
• the hostname and the port associated to the service,
• the text records, with the list of records presented as ” key = value ” or key when
there is no value.
The service browser enables only few actions:
• The service can be sorted in three different ways : by name (display by default), by
host name or by owner name (this last data is extracted from the text records). In
case of sorting by host name or owner, the service node are not the child of the root
node. There are a new levels of node with the name of the host or the owner. These
nodes have the service node as child .
By default, the service are only sorted by name. That can be changed by using the
BipTools menu. In the menu Tools, in the part for the service browser, the method
used to sort the services can be chosen. (see 4)
• A double-click on the node associated to a service creates a new control frame. This
frame is associated to the BIP service, and display data available from the control
1
CAVIAR
WorkPackage 5
Deliverable D35
server. (see 2) Note : if a control frame is already opened for a service, this frame is
moved in the foreground instead of opening a new frame.
2
Control Frame
2.1
DNS-SD Data
This part displays the data provided by DNS-SD. These data are already displayed in the
service browser tree. We can find the name, the host name and the port number on which
the control server listens, and also the text records.
When the service is lost, a message is displayed in red on this panel.
2.2
Data From Control Server
This panel displays the data provided by the control server of the BIP service. The data
are divided in several tabs :
• one for data about variables
• one for data about inputs/outputs
• others to display variable modification when the user asks to subscribe to the variable
modification.
The connection to the control server is established when the frame is opened. The state
of the connection is displayed at the top of this panel.
The button ’lock’ enables to lock the control server to avoid concurrent modification
on variables. If the query to lock the service succeeds, the button is rename as ’unlock’.
Then it enables to release the control server.
The button ’update’ enables to update the displayed data. Use this button implies new
queries to the control server to obtain the current description of the service.
2
CAVIAR
WorkPackage 5
3
Deliverable D35
CAVIAR
2.2.1
WorkPackage 5
Deliverable D35
Variables
The tab for the variables is the tab presented on the previous image. On the left, we have
the list of the variables. Select one of these variables enables to display the information
about this variable on the right panel.
The right panel displays information for the current selected variable. It enables also
some action on this variable according to the variable properties. The following paragraphs
give information about possible actions.
For all the variables, the user can subscribe or unsubscribe to the modification of this
variable. After subscribing to the variable modification, the control server sends events
each time the variable is modified. In the GUI, a new tab is opened in the control frame.
The modification are displayed in this tab. The ’unsubscribe’ button sends a query to the
control server to stop the event about the modification of this variable. It also closes the
subscribe panel (see 2.2.3).
When a variable can be modified by the user (: variable with a read-write access), a
text field and a button ’change’ are provided. The user can enter a new value for the
variable, and send it to the control server by clicking on the button ’change’. After this
query, the variable description is updated. If the modification is accepted, the new value
of the variable appears as current value.
2.2.2
In/Outputs
This panel displays on the left all the inputs, outputs and in/outputs declared in the service.
These elements are divided in three independent list according to the kind of I/O. Select
one of this elements enables to diplay the available data in the right part of the panel. The
last field on the panel (named ’peer’) displays the id of each connection established on this
input/output. This id is displayed in hexadecimal.
On the right, the available data about a selected input are displayed. We found the
port number, the descriptions, the ids of connected peer. Moreover, at the bottom of the
panel, tools to manipulate or view the input/output are proposed. A list of available tool
for the selected input/output enables the user to choose what he wants to use. Then the
user can start the tool by clicking on the button beside the list. (see 3)
4
CAVIAR
WorkPackage 5
5
Deliverable D35
CAVIAR
WorkPackage 5
6
Deliverable D35
CAVIAR
2.2.3
WorkPackage 5
Deliverable D35
Subscribe panel
The name of the tab is the name of the variable. On this tab, we found a table. This
table displays the successive modification of the variable since the opening of the subscribe
panel, or since the last click on the ’clear’ button. The modifications are displayed in the
right column. The left column presents a timestamp associated to the instant when the
GUI has received the event of modification.
At the bottom, there are three buttons.
• The button ’clear’ reset the table.
• The button ’export’ save the successive modification in a file.
• The button ’unsubscribe’ send a request to stop the reception of event about the
modification of this variable.
2.2.4
Graph panel
This panel offers a graphic representation of the connections to the service. For each input
or output, an arrow links this input or output to the connected service represented by a
box.
The service associated to the control panel is represented by a box with all its inputs
and outputs. The connected services are represented by a box with a name. This name is
the service name if there is a service registered on DNS-SD with the good id, else the name
is the id written in hexadecimal format. If the connection is created by the GUI, the name
is ”This GUI”. There is no details about the input or output implied in the connection for
the connected service.
3
In/Output Viewer/Manipulator
The In/Output Viewer/Manipulator are tools to view output or to manipulate input. Basic
tools are implemented and can be used in the GUI. But other tools can be implemented
and then loaded by the user to be added to the basic tools.
7
CAVIAR
3.1
WorkPackage 5
Deliverable D35
Basic Output viewer
The Basic Output Viewer is a tool proposed to view any output of BIP service. The ’N’
last messages received by the tool are displayed. The user can choose the number ’N’.
Each message is displayed between a line with the BIP header content (peer id, message
number and message length in decimal representation), and a dashed line. The message
content can be displayed or not. When the message is displayed, the display can use the
’binary mode’. In this mode, each byte of the message is displayed in hexadecimal. 20
bytes are displayed per line, following by the ascii character associated to these characters
if there can be visualized.
At the top of the panel, the state of the connection is displayed. It displays if the
connection failed, is established or is lost.
At the bottom of the panel, there are the options that can be changed. The user can
choose
• to display or not the message content,
• to use the binary mode,
• the number of message to display
Three buttons enable to starts/stop the display of message.
• run : the received message are displayed.
8
CAVIAR
WorkPackage 5
Deliverable D35
• pause keep : the received message are not displayed any more. The received message
are stored and will be displayed when the user will click on the button ’run’.
• pause lose : the received message are not displayed any more. But contrary to
’pause keep’, the received message are lost.
A last button (’export’) enables to export the messages displayed in a file. The file created
contains a line that gives the source of the messages, then the message are written by using
the syntax of BIP messages.
3.2
Basic In/Output manipulator
This tool is used to manipulate input, that is to say to send message on service input. In
case of in/output, the answer are displayed.
This is divided in three areas. The upper area enables the user to write the message
to send. This message will be sent after a click on the button ’send’. Then the first area
is erased. The message is sent to the service and copied if the lower left area. This area
contains the message sent by the user. The last area (the lower right area) is used to
display the message received from the service. For example, it can be answer to query.
3.3
Module loading
New modules to visualize output or to send message on input can be implemented. It
enables to create to tools to manipulate particular service. For example, for a service with
9
CAVIAR
WorkPackage 5
Deliverable D35
an output that sends audio data, a module can be implemented to play the audio instead
of displaying the data as the ’Basic Output Viewer’. The implementation is the subject of
the following section.
After the implementation of module, the user needs to load these modules to be able
to use them in the GUI. There are several ways to load these modules. In each case, the
user needs to give the name of the two classes that correspond to the modules :
• the name of class that implements BipGui.inoutput.IOViewerManipulator,
• the name of the class that implements BipGui.inoutput.InOutputViewerData.
To load the module, open the window by clicking on ’Load Modules’ in the menu ’Tools’.
The module can be loaded by giving the name of the two classes and then by clicking on
the button ’load’. Another mean is to give a file name that contains the names of the
classes. This file is an XML file with the following format :
<modules>
<module>
<viewer> name of class implementing BipGui.inoutput.IOViewerManipulator </viewer>
<viewerData>name of class implementing BipGui.inoutput.InOutputViewerData</viewerData>
</module>
<module> ... </module>
...
</modules>
Note : The classes, given for the module, need to be in the class path.
3.4
Module implementation
To create a new module, two classes need to be implemented : one to extend the abstract class BipGui.inoutput.InOutputViewerData, the other to extend the abstract class
BipGui.inoutput.IOViewerManipulator.
The class that extends BipGui.inoutput.InOutputViewerData provides the data about
the module : the name, a description, and also the type of input/output for which the
module can be used.
The class that extends BipGui.inoutput.IOViewerManipulator offers a panel to complete with a specific implementation. For the implementation of module to visualize outputs, the class can extends the abstract class BipGui.inoutput.OutputViewer. This class
extends BipGui.inoutput.IOViewerManipulator, and manages the creation of the connection to an output port.
The classes BasicOutputViewer and BasicInOutputManipulator can be used as example
for the implementation of module.
10
CAVIAR
4
WorkPackage 5
Deliverable D35
Menu
• File
– Exit Quit the application.
• Tools
– Bip Service Browser
Enables to choose the way to sort the service in the BIP service browser. (see 1)
∗ by name Sort the services according to their name
∗ by host Group the services according the host name given in the dns-sd
description
∗ by owner Group the services according the owner name given in the text
records.
– Load Modules Enables to load module to view output,or send message on inputs.
(see 3)
– Log Display the log message created during the execution of the application,
according to the user action.
• Views Presents existing window sorted according to their content. The items enable
to move the window to the front.
– Control List the control frames. (see 2)
– Output List the window containing tool to view output.(see 3.1)
– Input List the window containing tool to send data on input. (see 3.2)
– In/Output List the window containing tool to send data on in/output and view
message received. (see 3.2)
• Settings/Help
– Organization
∗ Use Independent Frame The different elements of the GUI are created in
independent window.
∗ Use Internal Frame The different elements of the GUI are created in internal
window. The GUI is composed of only one window that contains multiple
window (for the different elements).
– About Bip Tools
– User Manual Open the user manual (in a new frame).
11