1
LEAP User Guide
LEAP USER GUIDE
USAGE RESTRICTED ACCORDING TO LICENSE AGREEMENT.
last update: 30-June-2008. LEAP 3.7
Authors:
Giovanni Caire (TILAB ex CSELT)
Federico Pieri [.NET customization]
Copyright (C) 2003 TILAB
The LEAP add-on, when combined with JADE, provides a modified run-time
environment for enabling FIPA agents to execute on
on lightweight devices running Java
(Java version)
on devices running Microsoft .NET Framework v1.1 (.NET version)
Copyright (C) 2001 The LEAP Consortium.
GNU Lesser General Public License
This library is free software; you can redistribute it and/or modify it
under the terms of the GNU Lesser General Public License as published
by the Free Software Foundation, version 2.1 of the License.
This library is distributed in the hope that it will be useful, but
WITHOUT
ANY
WARRANTY;
without
even
the
implied
warranty
of
MERCHANTABILITY or FITNESS FOR A PARTICULAR PURPOSE.
See the GNU
Lesser General Public License for more details.
You should have received a copy of the GNU Lesser General Public
License along with this library; if not, write to the Free Software
Foundation, Inc., 59 Temple Place - Suite 330, Boston, MA 02111-1307,
USA.
Pag 1
LEAP User Guide
Table of Contents
1
Introduction................................................................................................................. 4
1.1
Target audience................................................................................................... 4
1.2
Rationale ............................................................................................................. 4
1.3
The JADE-LEAP runtime environment.............................................................. 5
1.4
JADE and JADE-LEAP...................................................................................... 6
1.5
Downloading....................................................................................................... 6
2
Using JADE-LEAP..................................................................................................... 6
2.1
Executing JADE-LEAP on PCs and Servers ...................................................... 6
2.1.1
Specifying options in a configuration file................................................... 7
2.1.2
Executing JADE-LEAP in Microsoft .NET environment .......................... 7
2.2
Executing JADE-LEAP on handheld devices..................................................... 7
2.2.1
The split execution mode ............................................................................ 7
2.2.2
PDAs and smart-phones running J2ME CDC/PersonalJava ...................... 9
2.2.3
Cell phones running MIDP ....................................................................... 10
2.2.4
An example ............................................................................................... 11
3
Creating JADE-LEAP based MIDlet........................................................................ 12
3.1
Minimization..................................................................................................... 14
4
Compiling JADE-LEAP ........................................................................................... 14
4.1
Getting the software.......................................................................................... 14
4.2
Preliminary steps............................................................................................... 15
4.2.1
Extra preliminary steps for the .Net version only ..................................... 15
4.2.2
BuildLEAP.properties file (All versions) ................................................. 15
4.3
Building JADE-LEAP ...................................................................................... 16
4.3.1
Build process details ................................................................................. 16
4.3.2
Create Visual Studio 2003 solution (Only .Net version) .......................... 18
4.4
The demo (Only Java versions) ........................................................................ 19
4.4.1
Building the demo..................................................................................... 19
4.4.2
Running the demo ..................................................................................... 19
5 APPENDIX 1 - Summary of the differences between JADE and JADE-LEAP for
j2se 22
6
APPENDIX 2 - Summary of the limitations in JADE-LEAP for pjava, midp and
dotnet................................................................................................................................. 22
6.1
PJAVA .............................................................................................................. 22
6.2
MIDP................................................................................................................. 22
6.3
.Net.................................................................................................................... 23
7
APPENDIX 3. Hints for programmers ..................................................................... 23
7.1
Ad-hoc startup (Only Java versions)................................................................. 23
7.2
Agent GUI (Only Java versions)....................................................................... 24
7.3
Printouts ............................................................................................................ 24
7.4
Handling connection related events .................................................................. 24
7.5
JADE Gui and .Net ........................................................................................... 25
8
APPENDIX 4. Examples for .NET version.............................................................. 25
8.1
Compile all examples (J# and C#) .................................................................... 25
8.2
C# examples...................................................................................................... 25
Pag 2
LEAP User Guide
8.2.1
DummySender & DummyReceive ........................................................... 25
9
APPENDIX 5. Running JADE-LEAP on a Windows Mobile 2003 device with the
J9 Virtual Machine............................................................................................................ 26
9.1
J9 Installation .................................................................................................... 26
9.2
Running JADE-LEAP....................................................................................... 28
9.3
Running the JADELEAP Demo ....................................................................... 28
Pag 3
LEAP User Guide
1 Introduction
This document describes how to use JADE-LEAP (“JADE powered by LEAP”), a
modified version of the JADE platform that enables FIPA agents to execute on
lightweight devices such as cell phones running Java and on devices running Microsoft
.Net Framework.
JADE-LEAP is obtained by combining JADE with LEAP, a JADE add-on mainly
developed within the scope of the LEAP IST project (http://leap.crm-paris.com) and
available for download from the JADE web site since March 2005.
1.1 Target audience
This document is intended for JADE users who are interested in developing multi-agent
applications that have to be deployed on lightweight devices such as mobile phones and
PDAs.
The reader is therefore assumed to be already familiar with
• JADE. For people new to JADE we recommend to read the JADE Tutorial for
beginners, or the Administrators Guide and Programmers Guide available on the
JADE web site (http://jade.tilab.com).
• The Micro Edition version of the Java platform and in particular (for the sections of
this document dealing with MIDP) with the Java Micro Edition SDK (formerly
called J2ME Wireless ToolKit). For people new to the Java Micro Edition we
recommend to visit http://java.sun.com first.
• The Microsoft .NET framework (only for those programmers wishing to run JADE
over .NET). For people new to .NET technology we recommend to visit
http://www.microsoft.com/ first.
1.2 Rationale
As a consequence of the introduction of always-connected wireless networks (GPRS,
UMTS, WLAN) and of the continuous growth in power and resources of handheld
devices such as PDAs and cell phones, the wireless and wire-line environments are
progressively integrating together. In this scenario the need of deploying applications
distributed partly in the fixed network and partly on handheld devices is becoming more
and more important.
JADE, unfortunately, cannot run, as it is, on small devices for the following reasons:
1. The complete JADE runtime environment has a memory footprint of some
Mbytes that cannot fit the (often strong) limitations of handheld devices.
2. JADE requires JDK1.4 (or later) while the majority of handheld devices only
support CDC, PersonalJava, or more typically MIDP.
3. Wireless links have different characteristics with respect to fixed network such as
high latency, low bandwidth, intermittent connectivity and dynamic IP address
assignment that must be taken into account properly.
The LEAP add-on was created to solve these problems and allows deploying JADE
agents on handheld devices as described in the followings.
Pag 4
LEAP User Guide
1.3 The JADE-LEAP runtime environment
The LEAP add-on, when combined with JADE, replaces some parts of the JADE kernel
forming a modified runtime environment that we will identify as JADE-LEAP (“JADE
powered by LEAP”) and that can be deployed on a wide range of devices varying from
servers to Java enabled cell phones. In order to achieve this, JADE-LEAP can be shaped
in three different ways corresponding to the three main types of Java environments that
can be found on the considered devices:
• j2se: to execute JADE-LEAP on PC and servers in the fixed network running
JDK1.4 or later.
• pjava: to execute JADE-LEAP on handheld devices supporting J2ME CDC or
PersonalJava such as most of today PDAs. It should be noticed that in 2003 the
Personal Java specification was declared obsolete and was substituted by the CDC
configuration of the J2ME edition. From the point of view of running JADELEAP there are no differences however. Throughout this document therefore with
the term “PersonalJava” we mean both the actual obsolete Personal Java
specification and the J2ME CDC configuration.
• midp: to execute JADE-LEAP on handheld devices supporting MIDP1.0 (or later)
only, such as the great majority of Java enabled cell phones.
In addition a dotnet version of JADE-LEAP exists to execute JADE-LEAP on PC and
servers in the fixed network running Microsoft .NET Framework version 1.1 or later.
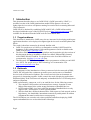
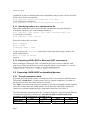
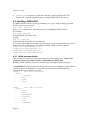
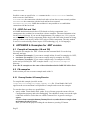
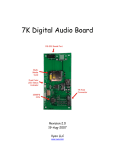
Though different internally, the four versions of JADE-LEAP provide the same set of
API to developers thus offering a homogeneous layer over a diversity of devices and
types of network as depicted in Figure 1.
Only a few features that are available in JADE-LEAP for j2se, pjava and dotnet are not
supported in JADE-LEAP for midp as they are intrinsically related to Java classes that are
not supported in MIDP (see 6 for a summary of MIDP unsupported features).
Distributed agent application
Homogeneous layer: the JADE APIs
JadeLeapJ2se
Container
JadeLeapJ2se
Main Container
JadeLeapPjava
Container
JadeLeapMidp
Container
JADE “powered by LEAP”
J2SE/.Net
J2SE/.Net
Internet
PersonalJava
Wireless environment
Figure 1. The JADE-LEAP runtime environment
Pag 5
CLDC MIDP
LEAP User Guide
1.4 JADE and JADE-LEAP
From the point of view of application developers and users JADE-LEAP for j2se and for
dotnet are almost identical to JADE both in terms of APIs and runtime administration
(see 5 for a summary of the differences). Therefore in general developers can deploy their
JADE agents on JADE-LEAP and vice versa without changing a single line of code.
Moreover there is no need for a JADE-LEAP programmers guide or API documentation
as those provided with JADE apply to JADE-LEAP too.
On the other hand it should be kept in mind that JADE containers and JADELEAP containers cannot be mixed within a single platform!
A JADE-LEAP platform and a JADE platform can of course communicate as specified by
FIPA e.g. by using the HTTP MessageTransportProtocol.
1.5 Downloading
JADE-LEAP for j2se, pjava, midp and dotnet can be directly downloaded in binary form
from the “Download” area of the JADE web site (http://jade.tilab.com).
People interested in modifying/compiling JADE-LEAP have to download (besides the
JADE sources) the LEAP add-on from the “Add-ons” area of the JADE web site and
follow the instructions included in 4.
2 Using JADE-LEAP
2.1 Executing JADE-LEAP on PCs and Servers
When working on PCs and Servers running JDK1.4 or later, the j2se version of JADELEAP must be used. As mentioned in 1.4, JADE-LEAP for j2se are almost identical
(from the users point of view) to pure JADE. As a consequence starting a JADE-LEAP
main container or normal container is done, like in JADE, by typing (assuming JADELEAP classes are in the classpath):
java jade.Boot
[options] [agents specification]
where valid options are those listed in chapter 2.3.2 of the JADE Administrator’s
guide (except for the differences listed in 5) and agents specification is a list of
semicolon-separated (‘;’) specifiers of the following form
<local-name>:<agent-class>[(<arg1>,<arg2>…)]
Note the difference with respect to JADE where agent specifiers are separated by
spaces. Moreover, unlike in JADE, there must be no spaces between agent arguments.
As an example typing
java jade.Boot –gui –nomtp
Peter:myPackage.MyClass1;John:myPackage.MyClass2(anarg)
would launch a Main container with no MTP and activate the RMA GUI plus an agent
called Peter of class myPackage.MyClass1 (with no argument) and an agent called
John of class myPackage.MyClass2 (with an argument whose value is “anarg”).
Similarly, typing
java jade.Boot –container –host myHost
would launch a peripheral container (with no agent on it) that will register to a main
container running on host myHost.
Pag 6
LEAP User Guide
In addition, in order to maintain backward compatibility with previous versions of JADELEAP, the old style command line
java jade.Boot <bootstrap properties file name>
is still valid and is equivalent to
java jade.Boot –conf <bootstrap properties file name>
2.1.1 Specifying options in a configuration file
Most of the options that can be specified in the command line can equivalently be
specified in a property file. As an example launching
java jade.Boot –host myHost –port 2000 –container-name cont
is equivalent to launching
java jade.Boot –conf conf.txt
Where the conf.txt file is as below
host = myHost
port = 2000
container-name = cont
As an exception, the –container option has no equivalent when using a property file
and is replaced by the
main = <true or false>
property.
2.1.2 Executing JADE-LEAP in Microsoft .NET environment
When working in a Microsoft .NET environment, the dotnet version of JADE-LEAP
must be used. The only difference between using the dotnet version and the j2se version
is that, being the former an executable, it must be launched typing
JADEBoot.exe [options] [agents specification]
2.2 Executing JADE-LEAP on handheld devices
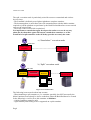
2.2.1 The split execution mode
In general the JADE-LEAP runtime environment can be executed in two different modes.
The normal “Stand-alone” execution mode where a complete container is executed on
the device/host where the JADE runtime is activated.
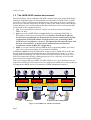
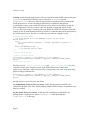
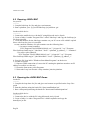
The “Split” execution mode where the container is split into a FrontEnd (actually running
on the device/host where the JADE runtime is activated) and a BackEnd (running on a
remote server) linked together through a permanent connection (see Figure 2).
The following table summarizes how the 2 execution modes are supported in the different
environments targeted by JADE-LEAP. Note that the split execution mode is the
mandatory in midp and strongly suggested in pjava.
j2se
.NET
pjava
midp
Suggested
Suggested
Supported
Not supported
Stand-alone
Supported
Supported
Suggested
Mandatory
Split
Pag 7
LEAP User Guide
The split execution mode is particularly suited for resource-constrained and wireless
devices since:
- The FrontEnd is definitely more lightweight than a complete container.
- The bootstrap phase is much faster since all communications with the Main container
required to join the platform are performer by the Back End and therefore are not carried
out over the wireless link.
- The usage of the wireless link is optimized.
It is important to remark that agent developers do not have to care in any way
about the fact that their agents will run on a stand-alone container or on the
FrontEnd of a split container as the APIs they provide are exactly the same.
a) “Stand-alone” execution mode
JADE APIs
JADE-LEAP
Container
JADE-LEAP
Main Container
b) “Split” execution mode
JADE APIs
JADE-LEAP
FrontEnd
JADE-LEAP
BackEnd
JADE-LEAP
Main Container
“Split container”
Figure 2. Execution modes
The following issues must be taken into account:
- When launching a split container, a j2se container (possibly, but NOT necessarily the
Main Container) must already be active on the host where the BackEnd has to be created.
In the followings we will refer to this container as Mediator.
- A Main Container cannot be split.
- Agent mobility and cloning is never supported on a split container.
Pag 8
LEAP User Guide
When running JADE-LEAP on a PersonalJava/CDC device and mobility features
are needed, we recommend to try the split execution mode plus the dynamic
behaviour loading mechanism supported by the
jade.core.behaviours.LoaderBehaviour class first. Only if this does not
fit your needs, then try the stand-alone execution mode.
2.2.2 PDAs and smart-phones running J2ME CDC/PersonalJava
When working on PDAs and smart-phones running J2ME CDC or PersonalJava, the
pjava version of JADE-LEAP must be used.
Split execution
A pjava split container is started by typing (assuming JADE-LEAP classes are in the
classpath):
java jade.MicroBoot [options]
where the agents specification has the format described in 2.1 and the following options
are available.
-host <host-name/address> Indicates the host where the mediator j2se container
is running and the BackEnd will be created (Default = localhost).
-port <port-number> Indicates the port where the mediator j2se container is
listening for commands (Default = 1099).
-agents <agents specification> Activates the specified agents.
-exitwhenempty <true|false> When this option is set to true the container
automatically exits as soon as there are no more agents living on it.
-conf <filename> Read the configuration properties from the specified file
It should be noticed that in the split execution mode the –host and –port options
specify the host and port of the Mediator container that may not be the Main Container.
Note also that, unlike the stand-alone mode, agents to be activated at bootstrap time are
specified using the -agents option.
Stand-alone execution
A pjava stand-alone container is started, exactly as for a j2se container, by typing
(assuming JADE-LEAP classes are in the classpath):
java jade.Boot [options] [agents specification]
where the same options and agents specification valid for j2se apply (see 2.1) except for
the –gui option, since the JADE tools (including the RMA) require JDK1.4 or later to
run, and the –backupmain, -smhost and –smport options since the
MainReplicationService is not supported in PersonalJava/CDC .
In addition, in order to maintain backward compatibility with previous versions of JADELEAP, the old style command line
java jade.Boot <properties file name>
is still valid and is equivalent to
java jade.Boot –conf <properties file name>
Pag 9
LEAP User Guide
2.2.3 Cell phones running MIDP
When working on cell-phones running MIDP1.0 (or higher), the midp version of JADELEAP must be used.
In order to be deployed on MIDP devices, JADE-LEAP for midp is configured as a
MIDlet Suite including the following MIDlets:
jade.MicroBoot. Load this MIDlet to start a split container.
jade.util.leap.Config. Load this MIDlet to manually edit configuration properties
jade.util.leap.OutputViewer. Load this MIDlet to view the output printed out
during the previous JADE-LEAP execution session.
As for the pjava version, the midp version of JADE-LEAP supports the host, port,
agents, exitwhenempty and conf configuration options. These can be set in two
ways:
- As properties set in the JAD or MANIFEST.
- By means of the jade.util.leap.Config MIDlet.
2.2.3.1 Setting configuration options as properties in the JAD or
MANIFEST
In order to make JADE-LEAP read configuration properties from the JAD or
MANIFEST set the LEAP-conf key1 in the JAD or MANIFEST to “jad” (default) and
specify configuration options as
LEAP-<key>: <value>
As an example the following lines in the JAD or MANIFEST would start (when
JADEsplit is selected) a FrontEnd that tries to create its BackEnd on host host1 and
launches agents Peter of class MyClass1 and John of class MyClass2.
MIDlet-1: JADEsplit, , jade.MicroBoot
…
LEAP-conf: jad
LEAP-host: host1
LEAP-agents: Peter:MyClass1;John:MyClass2
…
This way of setting configuration options is quite simple, but must be done before
uploading a JADE-LEAP-based MIDlet on the cell phone and cannot be changed unless
the MIDlet is uploaded again.
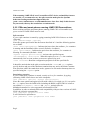
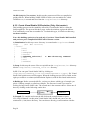
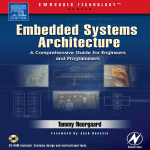
2.2.3.2 Setting configuration options using the Config MIDlet
In order to make JADE-LEAP read the configuration properties previously set through
the Config MIDlet set the LEAP-conf key in the JAD or MANIFEST to “conf”. Follow
the process depicted in Figure 3 to specify configuration properties through the Config
MIDlet.
1
N.B.: Since JADE 3.4 (26/5/05) we changed the key name from MIDlet-LEAP-conf to LEAPconf. Infact, Markus Becker reported that in JSR 118 it is not allowed to use attributes starting with
MIDlet- even if not all devices enforce this rule.
Pag 10
LEAP User Guide
Load the JADE MIDlet suite
and select the Config MIDlet.
Press the Set button to
activate the Set property
form and set a new property
specifying its key and value.
Press the Exit button to leave
the Config MIDlet and save
the configuration.
Figure 3. Setting properties through the Config MIDlet
This way of setting configuration options is more flexible as configuration options can be
changed without the need of uploading a JADE-LEAP-based MIDlet again.
In order to reset a configuration property, set its value to an empty string (“”).
2.2.3.3 The OutputViewer
Since a MIDP device in general does not allow you to view logging printouts produced
by calls to System.out.println, in case of problems during JADE-LEAP
execution, it is possible to review JADE-LEAP logging printouts by launching the
jade.util.leap.OutputViewer MIDlet.
See 7.3 and the documentation of the jade.util.Logger class to know how to use this
facility from your code too.
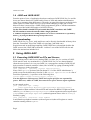
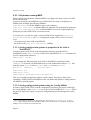
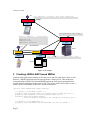
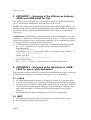
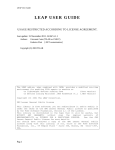
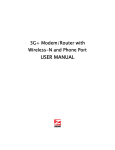
2.2.4 An example
Figure 4 depicts, as an example, a scenario including, among others, a stand-alone
container running on a Personal Java PDA and a split container running on a MIDP
phone and shows the configuration properties to execute each container.
Pag 11
LEAP User Guide
A2
java jade.Boot –container –host host1 A2:A2class
Container-2
CDC
java jade.Boot –gui –nomtp
MIDlet-1: JADEsplit, , jade.MicroBoot
…
LEAP-conf: jad
LEAP-host: host2
LEAP-agents: A1:A1class
…
A1
Main Container
J2SE
manifest/JAD
host1
FrontEnd
Container-3
BackEnd
MIDP
Container-1
(Mediator)
J2SE
java jade.Boot –container –host
host1
host2
Figure 4. An example
3 Creating JADE-LEAP based MIDlet
Unlike normal applications running on PC and servers that can load classes from several
libraries, a MIDP application must be packaged into a single jar file. This means that,
when packaging a JADE-LEAP based MIDP application, Jade classes and application
specific classes must be put in the same Jar file. The typical ANT build script to create a
JADE-LEAP based MIDlet is therefore similar to that below.
<project name="JADE-based sample MIDlet">
<!-- Where to find MIDP classes -->
<property name="j2mewtk.home" value="Micro Edition SDK home dir."/>
<property name="midplib" value="${j2mewtk.home}/lib"/>
<property name="boot-midp-classes"
value="${midplib}/midpapi10.jar;${midplib}/cldcapi10.jar"/>
<!-- Where to find JADE-LEAP -->
<property name="jadeMIDP" value"JADE-LEAP jar file for MIDP" />
Pag 12
LEAP User Guide
<!-- Local directories and files -->
<property name="src" value="src" />
<property name="classes" value="classes" />
<property name="unverified" value="unverified" />
<property name="lib" value="lib" />
<property name="jar-file" value="${lib}/sample.jar" />
<property name="manifest-file" value="sample.manifest" />
<property name="jad-file" value="sample.jad" />
<!-- Additional ANT tasks
Require the StampysoftAntTasks.jar in the ANT lib directory -->
<!-- Preverifier -->
<taskdef name="preverify"
classname="com.stampysoft.ant.j2me.PreverifyTask">
</taskdef>
<!-- Jad Updater -->
<taskdef name="updatejad"
classname="com.stampysoft.ant.j2me.UpdateJARSizeTask">
</taskdef>
<!-- Targets -->
<target name="init">
<tstamp />
<mkdir dir="${classes}" />
<mkdir dir="${unverified}" />
<mkdir dir="${lib}" />
</target>
<target name="compile" depends=”init”>
<javac srcdir="${src}"
destdir="${unverified}"
classpath="${jadeMIDP}"
bootclasspath="${boot-midp-classes}"
source="1.1"
target="1.1"/>
</target>
<target name="jar" depends="compile">
<!-- Mix JADE classes and application-specific classes -->
<unjar src="${jadeMIDP}" dest="${unverified}" />
<!-- Preverify the whole -->
<preverify unverified="${unverified}" verified="${classes}" />
<!-- Create the JAR -->
<delete file="${jar-file}" quiet="true" />
<jar jarfile="${jar-file}"
basedir="${verified}"
manifest="${manifest-file}" />
Pag 13
LEAP User Guide
<!-- Update the JAD -->
<copy file="${manifest-file}"
toFile="${jad-file}"
overWrite="yes" />
<manifest file="${jad-file}" mode="update">
<attribute name="MIDlet-Jar-URL" value="${jar-fileMIDP}" />
</manifest>
<updatejad jad="${jad-file}" />
</target>
</project>
3.1 Minimization
Even in the midp version JADE-LEAP includes a lot of library classes that are useful
only when the programmer actually uses them. For this reason a JADE-LEAP based
MIDlet jar file produced by the ANT build script presented in previous section, is
typically quite big even for very simple applications. In MIDP, however, it is desirable to
remove all unused classes and reduce the size of the MIDlet suite jar file as much as
possible. This can be done by means of the minimize target of the ANT build script
included in the LEAP add-on (available for download from the JADE web site in the
“Add-ons” area). This target prompts the user for
- The MIDlet suite jar file to be minimized.
- The .dlc file that specifies the dynamically loaded classes; these are used as starting
point for the minimization process.
- The manifest file to be included in the minimized jar file
The result of the minimization process is a new jar file placed in the same directory of the
original jar file and called as the original jar file plus the “-min” suffix. This new jar file
will include only those classes that are referenced starting from the classes listed in the
.dlc file.
The syntax of the .dlc file is just one fully qualified class per line with no blank lines
and no comments. Here follows an example:
jade.MicroBoot
jade.imtp.leap.JICP.BIFEDispatcher
sample.SampleAgent
The first two classes are required by JADE. Then, since agents are loaded dynamically,
all application specific agent classes must be listed in the .dlc file.
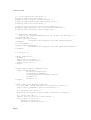
4 Compiling JADE-LEAP
4.1 Getting the software
In order to compile JADE-LEAP for a given environment (see 1.3) it is necessary to
download the JADE sources from the “Download” area of the JADE web site and the
LEAP add-on from the “Add-ons” area of the JADE web site.
The LEAP add-on must be unzipped in the JADE root directory. Once this has been
done your JADE directory structure should look like:
Pag 14
LEAP User Guide
jade/
|
|-leap/
|
|- …
|
|-demo/ includes a simple demo application
|
|-dotnet/ includes files required for dotnet version
|
|-resources/ includes build resources
|
|-src/ includes the leap add-on source files
|- …
|-src/ includes the JADE source files
Note that, unlike other add-ons that are un-packaged under the jade/add-ons/
directory, the LEAP add-on is un-packaged directly under the jade root directory.
We will refer to the jade/leap directory as the “LEAP root directory” and we will
indicate it simply as leap/.
4.2 Preliminary steps
As for JADE, building JADE-LEAP can be done using the program ‘ant’ (version 1.6 or
later), a platform-independent version of make. ‘ant’ uses the file ‘build.xml’, which
contains all the information about the files that have to be compiled, and that is located
into the LEAP root directory . The ‘ant’ program must be installed on your computer,
and can be freely downloaded from the Jakarta Project at the Apache web site:
http://ant.apache.org.
Using ant requires you to set the following environment variables (see the ant
documentation for details).
• JAVA_HOME must point to your JDK1.4 or later.
• ANT_HOME must point to where you installed ant.
4.2.1 Extra preliminary steps for the .Net version only
Before you can build JADE-LEAP for dotnet you have to download and install the
following software:
• .NET Framework SDK v1.1 from Microsoft site (it require the installation of .NET
Framework 1.1 Redistributable also).
• Supplemental UI Library for Visual J# .NET v1.1 at this page (required to
compatibility with Java Swing classes).
4.2.2 BuildLEAP.properties file (All versions)
Before building JADE-LEAP it is typically necessary to edit the
buildLEAP.properties file included in the LEAP root directory. This property file
includes the properties that depend on the local environment such as
• j2me-wtk-home property to point to the directory where the Sun Java Micro
Edition SDK (formerly called J2ME Wireless ToolKit) is installed (required only to
compile JADE-LEAP for midp and pjava).
Pag 15
LEAP User Guide
•
dotnet-home property to point to the directory where the Microsoft .Net
Framework is installed (required only to compile JADE-LEAP for dotnet).
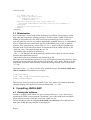
4.3 Building JADE-LEAP
To build JADE-LEAP for a given environment (j2se, pjava, midp or dotnet) go in the
LEAP root directory and type
ant <env> rebuild
where <env> indicates the environment you are compiling JADE-LEAP for.
For instance
ant midp rebuild
will build JADE-LEAP for midp.
Typing
ant all rebuild
will build JADE-LEAP for all environments.
As a result of the build process three new directories (one per environment) are created
under the LEAP root directory. The produced JADE-LEAP jar files are named
leap/j2se/lib/JadeLeap.jar
leap/pjava/lib/JadeLeap.jar
leap/midp/lib/JadeLeap.jar
leap/dotnet/lib/JadeLeap.dll
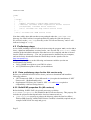
4.3.1 Build process details
This informative section provides some details about the build process. You are not
required to be aware of these details to build and use JADE-LEAP.
Building JADE-LEAP for a given environment goes through the following steps.
1) Initialization. In this step the directory for the selected environment is deleted and recreated to ensure the build process starts from a clean situation. In particular the
following directory structure is created:
leap/
(for Java versions)
|-<env>/
|
|-classes/
|
|-doc/
|
|-lib/
|
|-src/
leap/
(for .Net version)
|-<env>/
|
|-bin/
|
|-doc/
|
|-examples/
|
|-extras/
|
|-lib/
|
|-src/
|
|-VS2003S/
Pag 16
LEAP User Guide
2) Setup. In this step the proper source files are copied from the JADE sources (directory
jade/src) and the LEAP add-on sources (directory leap/src) into the
leap/<env>/src directory. Then all copied files are preprocessed by means of the
LEAP preprocessor. In order to adapt to different Java, hardware and network
environments in facts, some JADE-LEAP source files need to be modified “on the fly”
before compilation. In order to achieve this we adopted an approach similar to the
#ifdef directives of the C language. More in details the JADE-LEAP source files that
require on-the-fly modifications include special Java comments that can be interpreted by
the LEAP preprocessor. The piece of code below provides an example for this.
//#MIDP_EXCLUDE_BEGIN
// For some reason the local address or port may be in use
while (true) {
try {
sc = new Socket(ta.getHost(), Integer.parseInt(ta.getPort()));
break;
}
catch (BindException be) {
// Do nothing and try again
}
}
//#MIDP_EXCLUDE_END
/*#MIDP_INCLUDE_BEGIN
String url = "socket://"+ta.getHost()+":"+ta.getPort();
sc = (StreamConnection) Connector.open(url, Connector.READ_WRITE,
false);
#MIDP_INCLUDE_END*/
The lines such as //#MIDP_EXCLUDE_BEGIN and /*MIDP_INCLUDE_BEGIN are just
comments for the Java compiler, but are well defined directives for the LEAP
preprocessor. Therefore, with reference to the example above, the same code after midp
preprocessing would look like
String url = "socket://"+ta.getHost()+":"+ta.getPort();
sc = (StreamConnection) Connector.open(url, Connector.READ_WRITE,
false);
Similar directives exist for pjava and dotnet.
3a) Compilation (Only for Java versions). In this step the preprocessed files are
compiled to produce class files. When building JADE-LEAP for midp, compiled files are
also pre-verified.
4a) Jar (Only for Java versions). In this step all compiled/pre-verified files are
packaged into a single jar file called JadeLeap.jar and stored into the
leap/<env>/lib directory.
Pag 17
LEAP User Guide
3b) Dll (Only for .Net version). In this step the preprocessed files are compiled to
produce dll file. When building JADE-LEAP for dotnet, an executable file, called
JADEBoot.exe, is created and saved into the leap/dotnet/bin directory.
4.3.2 Create Visual Studio 2003 solution (Only .Net version)
This building process use the capability offered by Visual Studio 2003 to create the
JadeLeap.dll file. The process has three steps: create the solution, register the dll into
GAC and finally create the executable file. To obtain this type, in LEAP root directory,
ant dotnet solution
Note: this building option is to be used only if you have Visual Studio 2003 installed
and you have prior compiled JADE-LEAP for dotnet version.
1) Initialization. In this step a new directory is created under leap/dotnet branch:
leap/
(for .Net version)
|-<env>/
|
|-bin/
|
|-doc/
|
|-examples/
|
|-extras/
|
|-JadeLeap_Solution/
<- New directory created
|
|-lib/
|
|-src/
|
|-VS2003S/
2) Setup. In this step the source files are copied from the leap/dotnet/src directory
into the leap/dotnet/JadeLeap_Solution directory.
3) VS. You can open Visual Studio 2003 by clicking on
leap/dotnet/JadeLeap_Solution/JadeLeapDotNet.vjsproj file. Visual
Studio 2003 splash screen will be appear. When the loading process will be ended, on the
right you could see a column (called Solution Explorer) with all files listed in directories.
4) Build type. Before create the dll file, you have to choose which type of compile you
prefer: if Debug compile or a Release compile. The first one is used if you want to
looking for bugs inside JADE code. The second one is the common choice. Select one of
these by clicking on the following combo box:
compile button
combo box
5) Compile. To compile and create the dll click on the compile button or press
Ctrl+Shift+B buttons. At this point Visual Studio 2003 should ask you to save the
solution file (*.sln) into a directory. You can choose directly yes and continue with the
Pag 18
LEAP User Guide
building process. The result is the creation of JadeLeap.dll file. It will be placed in
leap/dotnet/lib/ directory .
6) Registration. Next step is register the dll into the Global Assembly Cache (called
GAC) of you computer. Simply type from
/leap/dotnet/JadeLeap_Solution/bin/<build type>/ directory
gacutil.exe /i JadeLeap.dll (parameter i means install)
7) Executable. Now you have the dll registered and you can use it inside your projects. If
you want to obtain an executable file to run the agent container like Java version you
have to type:
ant dotnet executable
The above command will create the JADEBoot.exe file in /leap/dotnet/bin
directory.
4.4 The demo (Only Java versions)
The LEAP add-on also includes a simple demonstrative application that allows you to try
JADE-LEAP and that is located in the leap/demo directory. This demo is a simplified
chat application by means of which a group of participants exchange textual messages.
Each message sent by a member of the group is received by all participants.
4.4.1 Building the demo
In order to compile the demo go to the LEAP root directory and type
ant <env> demo
where <env>, as usual, indicates the environment you want to compile the demo for
(j2se, pjava, midp). Note that the only part of the demo that depends on the environment
is the GUI that is based on AWT for j2se and pjava and on the
javax.microedition.lcdui package for midp.
Typing
ant all demo
compiles the demo for all environments.
As a result of the compilation three files are created (one per environment) into the
leap/demo directory called
demoJ2se.jar
demoPjava.jar
demoMidp.jar
Note that, unlike demoJ2se.jar that only includes the demo classes, demoPjava.jar
and demoMidp.jar include both the demo classes and the JADE-LEAP classes so that
they are ready to be uploaded on a handheld device.
4.4.2 Running the demo
In order to run the demo the following utility files are provided.
Pag 19
LEAP User Guide
startPlatform.bat - Batch file to execute the platform plus the
ChatManagerAgent, i.e. the agent that acts as a presence server informing each
participant when other participants join/leave the chat.
startChatParticipant.bat - Batch file to start a ChatClientAgent (i.e. the agent
that allows a user to take part to the chat) on the PC. You can activate as many of these
agents as you like.
demo.jad - JAD descriptor file to execute the demo on a MIDP device (refer to your
MIDP device documentation to see how to upload this file plus the demoMidp.jar file to
your MIDP device). Assuming the Java Wireless Toolkit is correctly installed on your
PC, double-clicking on this file should activate the wireless device emulator and load the
demo MIDlet suite as shown in Figure 5.
Pag 20
LEAP User Guide
Figure 5. Starting the demo on the wireless emulator
Selecting JADE-Chat activates a ChatClientAgent on the wireless emulator.
Selecting View-output allows you to review logs (see 2.2.3.3) in case of problems.
Pag 21
LEAP User Guide
5 APPENDIX 1 - Summary of the differences between
JADE and JADE-LEAP for j2se
This appendix provides a summary of the differences between JADE and JADE-LEAP
for j2se from both the administrator and programmer point of view.
Jar files. The JadeLeap.jar jar file that is produced when building JADE-LEAP for j2se
includes also the classes related to the administration tools (that in JADE are included in
the jadeTools.jar file) and to the default IIOP MTP (that in JADE are included in the
iiop.jar file).
Command line. In JADE-LEAP agent specification (as already highlighted in 2.1) the
semicolon (‘;’) character is used as separator instead of a space (‘ ‘). Moreover, unlike in
JADE, there must be no spaces between agent arguments. As for command line options
the following differences should be taken into account.
• If only agents specification must be put in the command line (without any option),
the –agents option must be used instead since, when using JADE-LEAP, a
command line like
java jade.Boot xxxx
is interpreted as if xxxx represented the name of a configuration file. Therefore e.g.
java jade.Boot john:MyClass
will not work and
java jade.Boot –agents john:MyClass
•
must be typed instead.
The –nomobility and –dump options are not available in JADE-LEAP
6 APPENDIX 2 - Summary of the limitations in JADELEAP for pjava, midp and dotnet
This appendix provides a summary of JADE-LEAP limitations that you have to take into
account when working in pjava and midp with respect to a j2se environment.
6.1 PJAVA
•
•
•
All JADE administration tools have GUIs based on Swing. As a consequence they
cannot be executed on a pjava container. The same applies for the jade.gui package.
It is not possible to “sniff” (by means of the Sniffer agent) or “introspect” (by means
of the Introspector agent) an agent running on a pjava stand-alone container. Note
that, on the other hand, it is possible to sniff an agent running on a pjava split
container.
The MainReplication and PersistentDelivery services are not supported.
6.2 MIDP
•
•
The limitations described for pjava in the previous section also apply to midp.
Agent mobility and cloning is not supported.
Pag 22
LEAP User Guide
•
•
•
The reflective introspectors (jade.content.onto.ReflectiveIntrospector
and jade.content.onto.BCReflectiveIntrospector) are not supported in
midp as they make use of Java reflection. The JADE support for content languages
and ontologies can still be used by either working with abstract descriptors or using
the jade.content.onto.MicroIntrospector.
The jade.wrapper package and the methods of the jade.core.Runtime class that refer
to classes in that package are not available in midp. A simplified in-process interface
is still available through the startUp() and shutDown() methods of the
jade.core.Runtime class (when executing a standalone container) and the
jade.core.MicroRuntime class (when executing a split container).
The Threaded behaviours are not supported.
6.3 .Net
•
•
•
•
•
•
•
•
•
JADE-LEAP for dotnet is derived from JADE-LEAP pjava version and there isn’t
any graphical interface (except for Sniffer agent GUI).
At the moment, it is not possible to “introspect” (by means of the Introspector agent)
an agent running on a dotnet container.
The MainReplication and PersistentDelivery services are not supported.
The HTTPS service is not supported.
The Mobility service is supported with the following limitation:
o If you would transfer an agent with a GUI, the GUI have to be written in J#
language using the Java Swing components available with the Supplementary
UI packages from Microsoft (see 1.3)
RMI is not supported.
It is not possible to monitor .NET agents with Java RMA agent GUI.
Communication between .NET agents and Java agents is possible using HTTP
Message Transport Protocol.
To use the Sniffer agent just type:
JADEBoot –agents sniffer0:jade.tools.sniffer.Sniffer
7 APPENDIX 3. Hints for programmers
As already mentioned in 1.4, JADE-LEAP provides the same APIs to applications
developers with respect to JADE (except for the differences described in 5 and 6). As a
consequence there is no need for a specific JADE-LEAP programmers guide or API
documentation since those provided with JADE are still valid. When working on MIDP
devices however there are issues that should be taken into account that are not covered in
JADE documentation. This appendix provides proper hints to address these issues
properly.
7.1 Ad-hoc startup (Only Java versions)
In some cases programmers might need to perform specific operations before starting up
the JADE-LEAP runtime or, more in general, they might need to start the JADE-LEAP
runtime from within another MIDlet. This can be done by means of the
jade.core.MicroRuntime (split execution) and jade.core.Runtime (standalone
execution. This is discouraged however) classes that provide a minimal “in-process
Pag 23
LEAP User Guide
interface”. A possible (but not mandatory) approach is to create an ad-hoc startup class
by extending jade.MicroBoot (for split execution) and redefining the startApp()
method as needed. The MIDP part of the chat.client.Start class included in the
chat demo provided with the LEAP add-on shows an example for this.
7.2 Agent GUI (Only Java versions)
Agents typically have GUIs to interact with a user. The base element for all MIDP GUIs
is the javax.microedition.lcdui.Displayable class. In order to show whatever Displayable
object it is necessary to have a reference to the current MIDlet.
When starting JADE-LEAP for midp using the built-in startup classes jade.MicroBoot
(split execution) and jade.Boot (standalone execution) a pointer to the current MIDlet
is made available by means of the public static variable midlet of the
jade.core.Agent class.
A code similar to that below can therefore be used (e.g. within the setup() method of
an agent) to show a Form that acts as a GUI.
Form f = new Form(“My Gui”);
// Append proper items to the form
Display.getDisplay(Agent.midlet).setCurrent(f);
When starting JADE-LEAP by means of an ad-hoc startup class, as described in 7.1,
programmers should take care that the Agent.midlet variable is properly set or make
available to agents a pointer to the current MIDlet in a different way.
7.3 Printouts
In general a MIDP device does not show logging printouts produced by calls to
System.out.println(). Especially during the development phase this can be quite
unconvenient. To partially overcome this limitation the println() static method of the
jade.util.Logger class can be used. When running on a j2se , pjava or dotnet
environment this method just calls System.out.println(). When running on a midp
environment, on the other hand, logging printouts written by means of this method are
redirected so that they can later be viewed by means of the
jade.util.leap.OutputViewer MIDlet.
7.4 Handling connection related events
As described in Figure 2, when using the split container execution mode a permanent
connection is used to link the front end (running on the mobile terminal) with its back end
(running on a server in the fixed network). This connection is completely managed by
JADE that detects disconnections (e.g. due to lack of coverage) and restores it as soon as
possible. In some cases however it is useful to properly react to connection related events
such as a disconnection at the application level. This can be done by specifying a
ConnectionListener among the configuration properties passed to the MicroRuntime
in the startJADE() method. The ConnectionListener interface (included in the
jade.imtp.leap package) provides a single method handleConnectionEvent(int
event) that is called by the JADE runtime whenever a connection related event happens.
Pag 24
LEAP User Guide
Possible events are specified as int constants in the ConnectionListener interface;
main events are listed below:
DISCONNECTED: the connection with the back end was lost due to some network problem.
RECONNECTED: the connection with the back end has been restored.
RECONNECTION_FAILURE: JADE detected that it is not possible to re-establish the
connection with the back end.
7.5 JADE Gui and .Net
All JADE administration tools have GUIs based on Swing components. As a
consequence they couldn’t be executed on a dotnet container. The same limitation exists
for the jade.gui package. If you use the Supplementary UI packages (see 3.2.1) you can
use a large part of the Swing components inside dotnet code. But some element of Swing
package cannot work anyway inside .NET such as JTable component. The only method
to run it is rewrite missing classes in pure .NET technology (e.g. in C# language).
8 APPENDIX 4. Examples for .NET version
8.1 Compile all examples (J# and C#)
To compile all examples for .NET version start the command shell. Go to the leap
directory and type
• ant dotnet all-examples, if you want to compile all the J# and C# examples for .NET;
• ant dotnet J#-examples, if you want to compile only J# examples for .NET;
• ant dotnet C#-examples, if you want to compile only C# examples for .NET;
At the end you’ll find your .NET examples inside leap/dotnet/examples
directory.
Note: the J# examples are the same of those distributed with JADE-LEAP for Java.
8.2 C# examples
In this section you can see some example made with C#.
8.2.1 DummySender & DummyReceive
To compile this example just click on the
leap/dotnet/examples/dummy/dummy.sln file. Visual Studio 2003 will
appear on the screen and than it will possible to compile and execute the example.
To start the demo you have two possibilities:
• start it within Visual Studio 2003: under Project/Dummy properties menu click on
Configuration property and select Debugging. You should see many rows on the right
of the little windows. Select the row called Command Line Arguments and type –
agents
receiver:dotnet.examples.dummy.DummyReceiver;sender:dotnet.examples.dum
my.DummySender(receiver)
Now you can run the project clicking the run button or pressing F5 button.
Pag 25
LEAP User Guide
•
start it from command shell. Go to the leap directory and type
ant dotnet C#-examples (as say above)
You should find in the leap/dotnet/examples/dummy directory a file called
Dummy.exe
There are two different usage of this example: you can run it in the same computer or in a
network. In the first case you can type Dummy.exe –agents
receiver:examples.dummy.DummyReceiver;sender:examples.dummy.DummySende
r(receiver) and observe the result.
If you create two different agent container in two different pc you have to specify, for the
DummySender agent, the name of the receiver’s computer.
E.g. if you create container A on pc host1 with DummyReceiver agent and container B in
pc host2 with DummySender you have to type the following commands in
leap/examples/dotnet/dummy:
on pc A: Dummy.exe –agents receiver:examples.dummy.DummyReceiver –mtp
jade.mtp.http.MessageTransportProtocol
on pc B: Dummy.exe –agents
sender:examples.dummy.DummySender(receiver,host1) –mtp
jade.mtp.http.MessageTransportProtocol
In this way you activate the communication on HTTP MessageTransportProtocol and
specify to the DummySender agent where is the DummyReceiver agent.
9 APPENDIX 5. Running JADE-LEAP on a Windows
Mobile 2003 device with the J9 Virtual Machine
9.1 J9 Installation
- Download from IBM web site (http://www-306.ibm.com/software/wireless/wsdd/)
WebSphere Everyplace Micro Environment 5.7.2 - Personal Profile 1.0 for Windows
Mobile 2003 2nd Ed.
- From the IBM web site: Follow these steps to install a runtime environment on your
development computer:
1. Run the installer that is appropriate for your operating system:
* weme-wm2003-arm-ppro10-5.7.0.exe for a Windows environment
* weme-wm2003-arm-ppro10-5.7.0.bin for a Linux environment
Note: You must be logged in as "root" on a Linux system.
Result: The installer launches. The first window displays information about the
installer package.
2. Click Next.
Pag 26
LEAP User Guide
Result: The second installer window displays the license agreement.
3. Accept the license agreement and click Next.
Result: The third installer window prompts for the location to install the runtime files.
4. Accept the default location, or enter an alternate location, and click Next.
Result: The installer displays a verification prompt.
5. If the information is correct, click Next.
Result: A "successful installation" dialog box displays.
6. At this point, there are 2 different options to choose from:
* If Finish is selected, it will display a verification that the program should exit.
The runtime has been installed on the development machine. You will need to manually
Active Sync the CAB files at a later time.
* If Continue is selected, it will try to detect the Microsoft ActiveSync software to
sync to your mobile device. If Microsoft ActiveSync software is not found, the dialog
box displays instructions on finding the CAB files and performing the synchronization
manually.
7. Click Next.
8. Click Finish to close the installer.
Manually installing the runtime on your mobile device
If the CAB file was not automatically synchronized with your device, follow these steps
to install the runtime environment:
Note: These instructions are for Windows only. Contact your mobile device manufacturer
for Linux instructions.
1. To install the runtime environment:
* On a Windows operating system, browse to the C:\Program
Files\IBM\WEME\57\wm2003\arm\PPro10\cab directory.
* On a Linux operating system, browse to the
/opt/IBM/WEME/57/wm2003/PPro10/cab directory
2. Copy weme-ppro10-wm2003-arm_22.CAB to your mobile device.
3. Click on the CAB file or, on the Settings tab, select Add/Remove Software to run the
installer.
At this point try the example provided with the J9 runtime.
Pay attention: if Windows Mobile 2003 has been installated on the mobile device in a
language different from English the J9 runtime might not work, in these cases
create a "Program Files" folder at root level (at the same level of the "Windows" folder)
and move the J9 folder, now the runtime and the example should work fine.
Pag 27
LEAP User Guide
9.2 Running JADE-LEAP
On your PC
---------1- Compile JadeLeap for j2se and pjava environment.
2- Start a platform: java -cp j2se\lib\JadeLeap.jar jade.Boot -gui
On the mobile device
------------1- Connect the mobile device with the PC using Microsoft Active Synch
2- Create a folder i.e under "Program Files" called "JadeLeap" and copy the JadeLeap.jar
file from pjava\lib.
3. Create the shortcut for the JadeLeap container: on you PC create a file called Leap.lnk.
Since with Leap for pjava it is possibile
to start a normal container or a split container use the following lines:
3.1 to start a normal container:
255#"\Program Files\J9\PPRO10\bin\j9.exe" "-jcl:ppro10" "-cp" "\Program
Files\JadeLeap\JadeLeap.jar" "jade.Boot" "-host" "<platform_ip_address_>" "-container"
3.2 to start a split contaienr:
255#"\Program Files\J9\PPRO10\bin\j9.exe" "-jcl:ppro10" "-cp" "\Program
Files\JadeLeap\JadeLeap.jar" "jade.MicroBoot" "-host" "<platform_ip_address_>"
4- Copy the file Leap.lnk in "Windows/Start Menu/Programs" on the device.
5- For the execution:
5.1 Open a GPRS connection (of course the PC running the platform must have an IP
address accessible over the net).
5.2 From the Start menu, select Programs.
5.3 Select the Leap icon. Result: a leap container joins the platform.
9.3 Running the JADELEAP Demo
On the PC
---------1- Compile the leap demo for j2se and pjava enviroment as specified on the Leap User
guide
2- Start the platform using the batch file "demo\startPlatform.bat"
3. Start a chat participant using the batch file "demo\startChatParticipant.bat"
On the mobile device
-------------1- Connect the device with the PC using Microsoft Active Synch
2- Create a folder i.e. under "Program Files" called LeapDemo and copy the
demoPjava.jar file.
Pag 28
LEAP User Guide
3- Create the shortcut for the JadeDemo: on your PC create a file called LeapDemo.lnk
and write the following line (according to your paths on the device):
255#"\Program Files\J9\PPRO10\bin\j9.exe" "-jcl:ppro10" "-cp" "\Program
Files\LeapDemo\demoPjava.jar" "chat.client.Start" "-host" "<platform_ip_address_>"
4- Copy the file LeapDemo.lnk on the device into "Windows/Start Menu/Programs".
5- To start the demo:
5.1 Open a GPRS connection (of course the PC running the platform must have an IP
address accessible over the net).
5.2 From the Start menu, select Programs.
5.3 Select the Leap Demo icon. Result: The LeapDemo application will run and you
can chat with the other chat participant launched on your PC.
Pag 29