1
LEAP User Guide
LEAP USER GUIDE
USAGE RESTRICTED ACCORDING TO LICENSE AGREEMENT.
last update: 15-December-2003. LEAP3.1
Authors:
Giovanni Caire (TILAB ex CSELT)
Copyright (C) 2003 TILAB
The LEAP add-on, when combined with JADE, provides a modified run-time
environment for enabling FIPA agents to execute on lightweight devices
running Java.
Copyright (C) 2001 The LEAP Consortium.
GNU Lesser General Public License
This library is free software; you can redistribute it and/or modify it
under the terms of the GNU Lesser General Public License as published
by the Free Software Foundation, version 2.1 of the License.
This library is distributed in the hope that it will be useful, but
WITHOUT
ANY
WARRANTY;
without
even
the
implied
warranty
of
MERCHANTABILITY or FITNESS FOR A PARTICULAR PURPOSE.
See the GNU
Lesser General Public License for more details.
You should have received a copy of the GNU Lesser General Public
License along with this library; if not, write to the Free Software
Foundation, Inc., 59 Temple Place - Suite 330, Boston, MA 02111-1307,
USA.
Pag 1
LEAP User Guide
Table of Contents
1
Introduction................................................................................................................. 3
1.1
Target audience................................................................................................... 3
1.2
Rationale ............................................................................................................. 3
1.3
The JADE-LEAP runtime environment.............................................................. 3
1.4
JADE and JADE-LEAP...................................................................................... 4
1.5
Downloading....................................................................................................... 5
2
Using JADE-LEAP..................................................................................................... 5
2.1
Executing JADE-LEAP on PCs and Servers ...................................................... 5
2.1.1
Specifying options in a configuration file................................................... 5
2.2
Executing JADE-LEAP on handheld devices..................................................... 6
2.2.1
Execution modes......................................................................................... 6
2.2.2
PDAs and smart-phones running PersonalJava .......................................... 7
2.2.3
Cell phones running MIDP1.0 .................................................................... 8
2.2.4
An example ............................................................................................... 10
3
Compiling JADE-LEAP ........................................................................................... 11
3.1
Getting the software.......................................................................................... 11
3.2
Preliminary steps............................................................................................... 12
3.3
Building JADE-LEAP ...................................................................................... 12
3.3.1
Build process details ................................................................................. 13
3.4
The demo .......................................................................................................... 14
3.4.1
Building the demo..................................................................................... 14
3.4.2
Running the demo ..................................................................................... 14
3.5
Minimization..................................................................................................... 15
4
APPENDIX 1 - Summary of the differences between JADE and JADE-LEAP for
j2se 16
5
APPENDIX 2 - Summary of the limitations in JADE-LEAP for pjava and midp ... 16
5.1
PJAVA .............................................................................................................. 16
5.2
MIDP................................................................................................................. 17
6
APPENDIX 3. Hints for programmers ..................................................................... 17
6.1
Ad-hoc startup................................................................................................... 17
6.2
Agent GUI......................................................................................................... 17
6.3
Printouts ............................................................................................................ 18
Pag 2
LEAP User Guide
1 Introduction
This document describes how to use the LEAP add-on to obtain JADE-LEAP (“JADE
powered by LEAP”), a runtime environment for enabling FIPA agents to execute on
lightweight devices such as cell phones running Java.
The LEAP software was mainly developed within the scope of the LEAP IST project
(http://leap.crm-paris.com) and has been made available as a JADE add-on since the
release of JADE3.0.
1.1 Target audience
This document is intended for JADE users who are interested in developing multi-agent
applications that have to be deployed on lightweight devices such as mobile phones and
PDAs.
The reader is therefore assumed to be already familiar with
• JADE. For people new to JADE we recommend to read the JADE Administrators
Guide and Programmers Guide first available on the JADE web site
(http://jade.cselt.it).
• The Micro Edition version of the Java 2 platform (J2ME) and in particular (for the
sections of this document dealing with MIDP) with the Java Wireless Toolkit. For
people new to J2ME we recommend to visit http://java.sun.com first.
1.2 Rationale
As a consequence of the introduction of always-connected wireless networks (GPRS,
UMTS, WLAN) and of the continuous growth in power and resources of handheld
devices such as PDAs and cell phones, the wireless and wire-line environments are
progressively integrating together. In this scenario the need of deploying applications
distributed partly in the fixed network and partly on handheld devices is becoming more
and more important.
JADE, unfortunately, cannot run, as it is, on small devices for the following reasons:
1. The complete JADE runtime environment has a memory footprint of some
Mbytes that cannot fit the (often strong) limitations of handheld devices.
2. JADE requires JDK1.4 (or later) while the majority of handheld devices only
support PersonalJava or MIDP.
3. Wireless links have different characteristics with respect to fixed network such as
high latency, low bandwidth, intermittent connectivity and dynamic IP address
assignment that must be taken into account properly.
The LEAP add-on was created to solve these problems and allows deploying JADE
agents on handheld devices as described in the followings.
1.3 The JADE-LEAP runtime environment
The LEAP add-on, when combined with JADE, replaces some parts of the JADE kernel
forming a modified runtime environment that we will identify as JADE-LEAP (“JADE
powered by LEAP”) and that can be deployed on a wide range of devices varying from
servers to Java enabled cell phones. In order to achieve this, JADE-LEAP can be shaped
Pag 3
LEAP User Guide
in three different ways corresponding to the three types of Java environments that can be
found on the considered devices:
• j2se: to execute JADE-LEAP on PC and servers in the fixed network running
JDK1.2 or later.
• pjava: to execute JADE-LEAP on handheld devices supporting PersonalJava such as
most of today PDAs.
• midp: to execute JADE-LEAP on handheld devices supporting MIDP1.0 only such
as the great majority of Java enabled cell phones.
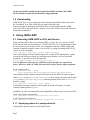
Though different internally, the three versions of JADE-LEAP provide the same set of
API to developers thus offering a homogeneous layer over a diversity of devices and
types of network as depicted in Figure 1.
Only a few features that are available in JADE-LEAP for j2se and pjava are not
supported in JADE-LEAP for midp as they are intrinsically related to Java classes that are
not supported in MIDP (see 5 for a summary of MIDP unsupported features).
Distributed agent application
Homogeneous layer
JadeLeapJ2se
Container
JadeLeapJ2se
Main Container
JadeLeapPjava
Container
JadeLeapMidp
Container
JADE “powered by LEAP”
J2SE
J2SE
Internet
PersonalJava
CLDC MIDP
Wireless environment
Figure 1. The JADE-LEAP runtime environment
1.4 JADE and JADE-LEAP
From the point of view of application developers and users JADE-LEAP for j2se is
almost identical to JADE both in terms of APIs and runtime administration (see 4 for a
summary of the differences). Therefore in general developers can deploy their JADE
agents on JADE-LEAP and vice versa without changing a single line of code. Moreover
there is no need for a JADE-LEAP programmers guide or API documentation as those
provided with JADE apply to JADE-LEAP too.
Pag 4
LEAP User Guide
On the other hand it should be kept in mind that JADE containers and JADELEAP containers cannot be mixed within a single platform!
1.5 Downloading
JADE-LEAP for j2se, pjava and midp can be directly downloaded in binary form from
the “Download” area of the JADE web site (http://jade.tilab.com).
People interested in modifying JADE-LEAP have to download (besides the JADE
sources) the LEAP add-on from the “Add-ons” area of the JADE web site and follow the
instructions included in 3
2 Using JADE-LEAP
2.1 Executing JADE-LEAP on PCs and Servers
When working on PCs and Servers running JDK1.2 or later, the j2se version of JADELEAP must be used. As mentioned in 1.4, JADE-LEAP for j2se is almost identical (from
the users point of view) to pure JADE. As a consequence starting a JADE-LEAP main
container or normal container is done, like in JADE, by typing (assuming JADE-LEAP
classes are in the classpath):
java jade.Boot [options] [agents specification]
where valid options are those listed in chapter 2.3.2 of the JADE Administrator’s guide
(except for the differences listed in 4) and agents specification is a list of semicolonseparated (‘;’) specifiers of the following form
<local-name>:<agent-class>[(<arg1>,<arg2>…)]
Note the difference with respect to JADE where agent specifiers are separated by
spaces. Moreover, unlike in JADE, there must be no spaces between agent arguments.
As an example typing
java jade.Boot –gui –nomtp
Peter:myPackage.MyClass1;John:myPackage.MyClass2(anarg)
would launch a Main container with no MTP and activate the RMA GUI plus an agent
called Peter of class myPackage.MyClass1 (with no argument) and an agent called
John of class myPackage.MyClass2 (with an argument whose value is “anarg”).
Similarly, typing
java jade.Boot –container –host myHost
would launch a normal container (with no agent on it) that will register to a main
container running on host myHost.
In addition, in order to maintain backward compatibility with previous versions of JADELEAP, the old style command line
java jade.Boot <bootstrap properties file name>
is still valid and is equivalent to
java jade.Boot –conf <bootstrap properties file name>
2.1.1 Specifying options in a configuration file
Command line options can have two different forms:
Pag 5
LEAP User Guide
-<key> <value>
-<switch>
Each option expresses a configuration property. Unless explicitly mentioned options of
the first form express configuration properties that can equivalently be set within the
bootstrap properties file as
<key> = <value>
On the other hand options of the second form do not have any equivalent in the bootstrap
properties file.
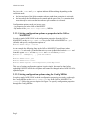
2.2 Executing JADE-LEAP on handheld devices
2.2.1 Execution modes
The JADE-LEAP runtime environment can be executed on a handheld device in two
different ways.
The “Stand-alone” execution mode where a complete container is executed on the
handheld device.
The “Split” execution mode where the container is split into a FrontEnd (actually running
on the handheld device) and a BackEnd (running on a J2SE host) linked together through
a permanent connection (see Figure 2). This execution mode is particularly suited for
resource-constrained and wireless devices since:
- The FrontEnd is definitely more lightweight than a complete container.
- The bootstrap phase is faster.
- Less bytes are transmitted over the wireless link.
It is important to remark that the developer does not have to care in anyway about the fact
that an agent will run on a stand-alone container or on the FrontEnd of a split container as
the APIs they provide are exactly the same.
Pag 6
LEAP User Guide
a) “Stand-alone” execution mode
JADE APIs
JADE-LEAP
Container
JADE-LEAP
Main Container
b) “Split” execution mode
JADE APIs
JADE-LEAP
FrontEnd
JADE-LEAP
BackEnd
JADE-LEAP
Main Container
“Split container”
Figure 2. Execution modes
The following issues must be taken into account:
- When launching a split container, a j2se container (possibly, but NOT necessarily the
Main Container) must already be active on the host where the BackEnd has to be created.
- A Main Container cannot be split.
- Agent mobility and cloning is never supported on a split container.
As a good practice we suggest to always use the split execution mode on a MIDP device
and to choose the stand-alone or split execution mode on a PersonalJava device
depending on whether or not your application requires agent mobility.
2.2.2 PDAs and smart-phones running PersonalJava
When working on PDAs and smart-phones running PersonalJava, the pjava version of
JADE-LEAP must be used.
Stand-alone execution
A pjava stand-alone container is started, exactly as for a j2se container, by typing
(assuming JADE-LEAP classes are in the classpath):
java jade.Boot [options] [agents specification]
Pag 7
LEAP User Guide
where the same options and agents specification valid for j2se apply (see 2.1) except for
the –gui option, since the JADE tools (including the RMA) require JDK1.2 or later to
run, and the –backupmain, -smhost and –smport options since the
MainReplicationService is not supported in Personal Java .
In addition, in order to maintain backward compatibility with previous versions of JADELEAP, the old style command line
java jade.Boot <properties file name>
is still valid and is equivalent to
java jade.Boot –conf <properties file name>
Split execution
A pjava split container is started by typing (assuming JADE-LEAP classes are in the
classpath):
java jade.MicroBoot [options] [agents specification]
where the agents specification has the same format as in pjava stand-alone execution and
in j2se and the following options are available.
-host <host-name/address> Indicates the host where the BackEnd has to be
created (Default = localhost).
-port <port-number> Indicates the port where the j2se container active on “host” is
listening for commands (Default = 1099).
-beaddrs1 <be-addrs-list> Provides the Front-End container with a list of
additional Back-End addresses; each address is a host:port string, and multiple addresses
are separated by semicolons. These addresses must not include the default address given
with the –host and –port options.
-agents <semicolon-separated list of agent specifiers> Activates the
specified agents.
-exitwhenempty <true|false> When this option is set to true the container
automatically exits as soon as there are no more agents living on it.
-conf <filename> Read the configuration properties from the specified file
2.2.3 Cell phones running MIDP1.0
When working on cell-phones running MIDP1.0 (or higher), the midp version of JADELEAP must be used.
In order to be deployed on MIDP devices, JADE-LEAP for midp is configured as a
MIDlet Suite including the following MIDlets:
jade.Boot. Load this MIDlet to start a stand-alone container.
jade.MicroBoot. Load this MIDlet to start a split container.
jade.util.leap.Config. Load this MIDlet to manually edit configuration properties
jade.util.leap.OutputViewer. Load this MIDlet to view the output printed out
during the previous JADE-LEAP execution session.
Since neither starting a Main container nor activating MTPs is supported in MIDP, only
the host, port, agents and exitwhenempty (only for split execution) configuration
options can be specified when starting JADE-LEAP for midp. It has to be noticed that, as
1
This feature is still in experimental state
Pag 8
LEAP User Guide
for pjava, the –host and –port options indicate different things depending on the
execution mode:
• the host and port of the Main container when a stand-alone container is activated;
• the host where the BackEnd must be started and the port of the j2se container that
must already be active on that host when a split container is activated.
Configuration options can be set in two ways:
- As properties set in the JAD or MANIFEST.
- By means of the jade.util.leap.Config MIDlet.
2.2.3.1 Setting configuration options as properties in the JAD or
MANIFEST
In order to make JADE-LEAP read configuration properties from the JAD or
MANIFEST set the MIDlet-LEAP-conf key in the JAD or MANIFEST to “jad”
(default) and specify configuration options as
MIDlet-LEAP-<key>: <value>
As an example the following lines in the JAD or MANIFEST would start (when
JADEsplit is selected) a FrontEnd that tries to create its BackEnd on host host1 and
launches agents Peter of class MyClass1 and John of class MyClass2.
MIDlet-1: JADEsplit, , jade.MicroBoot
…
MIDlet-LEAP-conf: jad
MIDlet-LEAP-host: host1
MIDlet-LEAP-agents: Peter:MyClass1;John:MyClass2
…
This way of setting configuration options is quite simple, but must be done before
uploading JADE-LEAP on the cell phone and cannot be changed unless JADE-LEAP is
uploaded again.
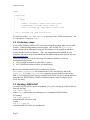
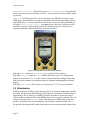
2.2.3.2 Setting configuration options using the Config MIDlet
In order to make JADE-LEAP read the configuration properties previously set through
the Config MIDlet set the MIDlet-LEAP-conf key in the JAD or MANIFEST to
“config”. Follow the process depicted in Figure 3 to specify configuration properties
through the Config MIDlet.
Pag 9
LEAP User Guide
Load the JADE MIDlet suite
and select the Config MIDlet.
Press the Set button to
activate the Set property
form and set a new property
specifying its key and value.
Press the Exit button to leave
the Config MIDlet and save
the configuration.
Figure 3. Setting properties through the Config MIDlet
This way of setting configuration options is more flexible as configuration options can be
changed without the need of uploading JADE-LEAP again.
In order to reset a configuration property, set its value to an empty string (“”).
2.2.3.3 The OutputViewer
Since a MIDP device in general does not allow you to view logging printouts produced
by calls to System.out.println, in case of problems during JADE-LEAP
execution, it is possible to review JADE-LEAP logging printouts by launching the
jade.util.leap.OutputViewer MIDlet.
See 6.3 and the documentation of the jade.util.Logger class to know how to use this
facility from your code too.
2.2.4 An example
Figure 4 depicts, as an example, a scenario including, among others, a stand-alone
container running on a Personal Java PDA and a split container running on a MIDP
phone and shows the configuration properties to execute each container.
Pag 10
LEAP User Guide
A2
java jade.Boot –container –host
host1 A2:A2class
Container-2
PJAVA
java jade.Boot –gui –nomtp
MIDlet-1: JADEsplit, , jade.MicroBoot
…
MIDlet-LEAP-conf: jad
MIDlet-LEAP-host: host2
MIDlet-LEAP-agents: A1:A1class
…
A1
Main Container
J2SE
JAD
host1
FrontEnd
Container-3
BackEnd
MDP1.0
J2SE
Container-1
java jade.Boot –container –host
host2
Figure 4. An example
3 Compiling JADE-LEAP
3.1 Getting the software
In order to compile JADE-LEAP for a given environment (see 1.3) it is necessary to
download the JADE sources from the “Download” area of the JADE web site and the
LEAP add-on from the “Add-ons” area of the JADE web site.
The LEAP add-on must be unzipped in the JADE root directory. Once this has been
done your JADE directory structure should look like:
Pag 11
host1
LEAP User Guide
jade/
|
|-add-ons/
| |- …
| |-leap/
|
|- …
|
|-demo/ includes a simple demo application
|
|-resources/ includes build resuorces
|
|-src/ includes the leap add-on source files
|- …
|-src/ includes the JADE source files
We will refer to the jade/add-ons/leap directory as the “LEAP root directory” and
we will indicate it simply as leap/.
3.2 Preliminary steps
As for JADE, building JADE-LEAP can be done using the program ‘ant’ (version 1.5.1
or later), a platform-independent version of make. ‘ant’ uses the file ‘build.xml’,
which contains all the information about the files that have to be compiled, and that is
located into the LEAP root directory . The ‘ant’ program must be installed on your
computer, and can be freely downloaded from the Jakarta Project at the Apache web site:
http://ant.apache.org.
Using ant requires you to set the following environment variables (see the ant
documentation for details).
• JAVA_HOME must point to your JDK1.2 or later.
• ANT_HOME must point to where you installed ant.
Before you can build JADE-LEAP you still need to edit the
buildLEAP.properties file included in the LEAP root directory and set the
java-1.1-home and j2me-wtk-home properties to point to the directory where
JDK 1.1.8 is installed (required only to compile JADE-LEAP for pjava) and the directory
where the Sun J2ME Wireless ToolKit is installed (required only to compile JADELEAP for midp).
3.3 Building JADE-LEAP
To build JADE-LEAP for a given environment (j2se, pjava or midp) go in the LEAP root
directory and type
ant <env> rebuild
where <env> indicates the environment you are compiling JADE-LEAP for.
For instance
ant midp rebuild
will build JADE-LEAP for midp.
Typing
ant all rebuild
will build JADE-LEAP for all environments.
Pag 12
LEAP User Guide
As a result of the build process three new directories (one per environment) are created
under the LEAP root directory. The produced JADE-LEAP jar files are named
leap/j2se/lib/JadeLeap.jar
leap/pjava/lib/JadeLeap.jar
leap/midp/lib/JadeLeap.jar
3.3.1 Build process details
This informative section provides some details about the build process. You are not
required to be aware of these details to build and run JADE-LEAP.
Building JADE-LEAP for a given environment goes through the following steps.
1) Initialization. In this step the directory for the selected environment is deleted and recreated to ensure the build process starts from a clean situation. In particular the
following directory structure is created:
leap/
|-<env>/
|
|-classes/
|
|-doc/
|
|-lib/
|
|-src/
2) Setup. In this step the proper source files are copied from the JADE sources (directory
jade/src) and the LEAP add-on sources (directory leap/src) into the
leap/<env>/src directory. Then all copied files are preprocessed by means of the
LEAP preprocessor. In order to adapt to different Java, hardware and network
environments in facts, some JADE-LEAP source files need to be modified “on the fly”
before compilation. In order to achieve this we adopted an approach similar to the
#ifdef directives of the C language. More in details the JADE-LEAP source files that
require on-the-fly modifications include special Java comments that can be interpreted by
the LEAP preprocessor. The piece of code below provides an example for this.
//#MIDP_EXCLUDE_BEGIN
// For some reason the local address or port may be in use
while (true) {
try {
sc = new Socket(ta.getHost(), Integer.parseInt(ta.getPort()));
break;
}
catch (BindException be) {
// Do nothing and try again
}
}
//#MIDP_EXCLUDE_END
/*#MIDP_INCLUDE_BEGIN
String url = "socket://"+ta.getHost()+":"+ta.getPort();
sc = (StreamConnection) Connector.open(url, Connector.READ_WRITE,
false);
#MIDP_INCLUDE_END*/
Pag 13
LEAP User Guide
The lines such as //#MIDP_EXCLUDE_BEGIN and /*MIDP_INCLUDE_BEGIN are
just comments for the Java compiler, but are well defined directives for the LEAP
preprocessor. Therefore, with reference to the example above, the same code after midp
preprocessing would look like
String url = "socket://"+ta.getHost()+":"+ta.getPort();
sc = (StreamConnection) Connector.open(url, Connector.READ_WRITE,
false);
Similar directives exist for pjava
3) Compilation. In this step the preprocessed files are compiled to produce class files.
When building JADE-LEAP for midp, compiled files are also pre-verified.
4) Jar. In this step all compiled/pre-verified files are packaged into a single jar file called
JadeLeap.jar and stored into the leap/<env>/lib directory.
3.4 The demo
The LEAP add-on also includes a simple demonstrative application that allows you to try
JADE-LEAP and that is located in the leap/demo directory. This demo is a simplified
chat application by means of which a group of participants exchange textual messages.
Each message sent by a member of the group is received by all participants.
3.4.1 Building the demo
In order to compile the demo go to the LEAP root directory and type
ant <env> demo
where <env>, as usual, indicates the environment you want to compile the demo for
(j2se, pjava, midp). Note that the only part of the demo that depends on the environment
is the GUI that is based on AWT for j2se and pjava and on the
javax.microedition.lcdui package for midp.
Typing
ant all demo
compiles the demo for all environments.
As a result of the compilation three files are created (one per environment) into the
leap/demo directory called
demoJ2se.jar
demoPjava.jar
demoMidp.jar
Note that, unlike demoJ2se.jar that only includes the demo classes, demoPjava.jar
and demoMidp.jar include both the demo classes and the JADE-LEAP classes so that
they are ready to be uploaded on a handheld device.
3.4.2 Running the demo
In order to run the demo the following utility files are provided.
startPlatform.bat - Batch file to execute the platform plus the
ChatManagerAgent, i.e. the agent that acts as a presence server informing each
participant when other participants join/leave the chat.
Pag 14
LEAP User Guide
startParticipant.bat - Batch file to start a ChatClientAgent (i.e. the agent that
allows a user to take part to the chat) on the PC. You can activate as many of these agents
as you like.
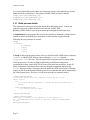
demo.jad - JAD descriptor file to execute the demo on a MIDP device (refer to your
MIDP device documentation to see how to upload this file plus the demoMidp.jar file to
your MIDP device). You must edit this file and set the correct size of the demoMidp.jar
file in the MIDlet-Jar-Size property. Assuming the Java Wireless Toolkit is correctly
installed on your PC, double-clicking on this file should activate the wireless device
emulator and load the demo MIDlet suite as shown in Figure 5.
Figure 5. Starting the demo on the wireless emulator
Selecting Start activates a ChatClientAgent on the wireless emulator.
Selecting Configure starts the Config MIDlet that allows you to set configuration
options as described in 2.2.3.2. As the wireless emulator should be running on the same
host as the main container you should not need to configure anything and keep default
options.
Selecting View-output allows you to review logs (see 2.2.3.3) in case of problems.
3.5 Minimization
JADE includes a lot of library classes that are useful only when the programmer actually
uses them. For this reason the JadeLeap jar file (and as a consequence a JadeLeap based
application jar file) is quite big. In MIDP it would be desirable to remove all unused
classes so that to reduce the size of the MIDlet suite jar file as much as possible. This can
be done by means of the minimize target. This target gets a MIDlet suite jar file and
produces a minimized jar file including only classes that are actually needed. The dlc
file specifies the dynamically loaded classes that are used as starting point to identify the
Pag 15
LEAP User Guide
classes to include in the minimized jar. The leap/demo/demo.dlc provides an
example in the case of the leap demo.
The syntax to minimize a jar file is as below.
ant minimize –DJAR=<jar file> -DMANIFEST=<manifest file>
-DDLC=<dlc file>
As an example the following command line minimizes the leap demo and produces the
demoMidp-min.jar file that is less than a half the size of the demoMidp.jar file.
ant minimize –DJAR=demo\demoMidp.jar -DDLC=demo\demo.dlc
When no manifest is specified the manifest already included in the jar to minimize is
used.
4 APPENDIX 1 - Summary of the differences between
JADE and JADE-LEAP for j2se
This appendix provides a summary of the differences between JADE and JADE-LEAP
for j2se from both the administrator and programmer point of view.
Jar files. The JadeLeap.jar jar file that is produced when building JADE-LEAP for j2se
includes also the classes related to the administration tools (that in JADE are included in
the jadeTools.jar file) and to the default IIOP MTP (that in JADE are included in the
iiop.jar file).
Command line. In JADE-LEAP agent specification (as already highlighted in 2.1) the
semicolon (‘;’) character is used as separator instead of a space (‘ ‘). Moreover, unlike in
JADE, there must be no spaces between agent arguments. As for command line options
the following differences should be taken into account.
• If only agents specification must be put in the command line (without any option),
the –agents option must be used instead since, when using JADE-LEAP, a
command line like
java jade.Boot xxxx
is interpreted as if xxxx represented the name of a configuration file. Therefore e.g.
java jade.Boot john:MyClass
will not work and
java jade.Boot –agents john:MyClass
•
must be typed instead.
The –nomobility and –dump options are not available in JADE-LEAP
5 APPENDIX 2 - Summary of the limitations in JADELEAP for pjava and midp
This appendix provides a summary of JADE-LEAP limitations that you have to take into
account when working in pjava and midp with respect to a j2se environment.
5.1 PJAVA
•
All JADE administration tools have GUIs based on Swing. As a consequence they
cannot be executed on a pjava container. The same applies for the jade.gui package.
Pag 16
LEAP User Guide
•
•
It is not possible to “sniff” (by means of the Sniffer agent) or “introspect” (by means
of the Introspector agent) an agent running on a pjava stand-alone container. Note
that, on the other hand, it is possible to sniff an agent running on a pjava split
container.
The MainReplication and PersistentDelivery services are not supported.
5.2 MIDP
•
•
•
•
The limitations described for pjava in the previous section also apply to midp.
Agent mobility and cloning is not supported.
The reflective introspectors (jade.content.onto.ReflectiveIntrospector
and jade.content.onto.BCReflectiveIntrospector) are not supported in
midp as they make use of Java reflection. The JADE support for content languages
and ontologies can still be used by either working with abstract descriptors or using
the jade.content.onto.MicroIntrospector.
The jade.wrapper package and the methods of the jade.core.Runtime class that refer
to classes in that package are not available in midp. A simplified in-process interface
is still available through the startUp() and shutDown() methods of the
jade.core.Runtime class (when executing a standalone container) and the
jade.core.MicroRuntime class (when executing a split container).
6 APPENDIX 3. Hints for programmers
As already mentioned in 1.4, JADE-LEAP provides the same APIs to applications
developers with respect to JADE (except for the differences described in 4 and 5). As a
consequence there is no need for a specific JADE-LEAP programmers guide or API
documentation since those provided with JADE are still valid. When working on MIDP
devices however there are issues that should be taken into account that are not covered in
JADE documentation. This appendix provides proper hints to address these issues
properly.
6.1 Ad-hoc startup
In some cases programmers might need to perform specific operations before starting up
the JADE-LEAP runtime or, more in general, they might need to start the JADE-LEAP
runtime from within another MIDlet. This can be done by means of the
jade.core.Runtime (standalone execution) and jade.core.MicroRuntime (split
execution) classes that provide a minimal “in-process interface”. In particular a useful
(but not mandatory) approach is to create an ad-hoc startup class by extending
jade.Boot (for standalone execution) or jade.MicroBoot (for split execution) and
redefining the startApp() method as needed. The MIDP part of the
chat.client.Start class included in the chat demo provided with the LEAP add-on
shows an example for this.
6.2 Agent GUI
Agents typically have GUIs to interact with a user. The base element for all MIDP GUIs
is the javax.microedition.lcdui.Displayable class. In order to show whatever Displayable
object it is necessary to have a reference to the current MIDlet.
Pag 17
LEAP User Guide
When starting JADE-LEAP for midp using the built-in startup classes jade.Boot
(standalone execution) and jade.MicroBoot (split execution) a pointer to the current
MIDlet is made available by means of the public static variable midlet of the
jade.core.Agent class.
A code similar to that below can therefore be used (e.g. within the setup() method of
an agent) to show a Form that acts as a GUI.
Form f = new Form(“My Gui”);
// Append proper items to the form
Display.getDisplay(Agent.midlet).setCurrent(f);
When starting JADE-LEAP by means of an ad-hoc startup class, as described in 6.1,
programmers should take care that the Agent.midlet variable is properly set or make
available to agents a pointer to the current MIDlet in a different way.
6.3 Printouts
In general a MIDP device does not show logging printouts produced by calls to
System.out.println(). Especially during the development phase this can be quite
unconvenient. To partially overcome this limitation the println() static method of the
jade.util.Logger class can be used. When running on a j2se or pjava environment
this method just calls System.out.println(). When running on a midp environment,
on the other hand, logging printouts written by means of this method are redirected so
that they can later be viewed by means of the jade.util.leap.OutputViewer
MIDlet.
Pag 18