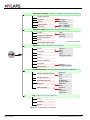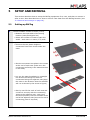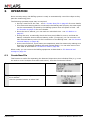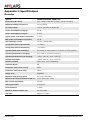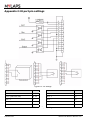
1
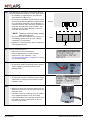
BibTag
User Manual
(REVISION 1.1)
18 May 2010
Published by:
MYLAPS B.V.
Havenweg 15
6541 AD Nijmegen
The Netherlands
© 2010 No part of this document may be reproduced by any means without
the written consent of the publisher.
Whilst every care has been taken to ensure that the information in this
document is correct, no liability can be accepted by MYLAPS for loss,
damage or injury caused by any errors or omissions in this document.
Manual rev.
Software rev.
Date (d/m/y)
Amendments
(Revision 1.0)
(Revision 1.0)
02/04/10
This is the first version of this manual.
(Revision 1.1)
(Revision 1.0)
18/05/10
CE Declaration added.
New cautions added about handling
modem/GPS cable.
Page 2 of 66
BibTag User Manual (Revision 1.1)
TABLE OF CONTENTS
1
2
3
4
5
6
7
INTRODUCTION . . . . . . . . . . . . . . . . . . . . . . . . . . . . . . . . . . . . . . . . . . . . . . . . . . . . . . 6
1.1 Scope of this manual. . . . . . . . . . . . . . . . . . . . . . . . . . . . . . . . . . . . . . . . . . . . . . . 6
1.2 How to use this manual. . . . . . . . . . . . . . . . . . . . . . . . . . . . . . . . . . . . . . . . . . . . . 6
SAFETY . . . . . . . . . . . . . . . . . . . . . . . . . . . . . . . . . . . . . . . . . . . . . . . . . . . . . . . . . . . . 7
2.1 General safety responsibilities . . . . . . . . . . . . . . . . . . . . . . . . . . . . . . . . . . . . . . . 7
2.2 Warnings and cautions . . . . . . . . . . . . . . . . . . . . . . . . . . . . . . . . . . . . . . . . . . . . . 8
PHYSICAL DESCRIPTION . . . . . . . . . . . . . . . . . . . . . . . . . . . . . . . . . . . . . . . . . . . . . . 9
3.1 Introduction . . . . . . . . . . . . . . . . . . . . . . . . . . . . . . . . . . . . . . . . . . . . . . . . . . . . . . 9
3.2 Decoder. . . . . . . . . . . . . . . . . . . . . . . . . . . . . . . . . . . . . . . . . . . . . . . . . . . . . . . . 10
3.2.1
Decoder panel. . . . . . . . . . . . . . . . . . . . . . . . . . . . . . . . . . . . . . . . . . . . 11
3.2.2
Modem/GPS unit. . . . . . . . . . . . . . . . . . . . . . . . . . . . . . . . . . . . . . . . . . 12
3.2.3
LED status panel. . . . . . . . . . . . . . . . . . . . . . . . . . . . . . . . . . . . . . . . . . 12
3.3 Antenna mats . . . . . . . . . . . . . . . . . . . . . . . . . . . . . . . . . . . . . . . . . . . . . . . . . . . 13
3.4 Antenna cable . . . . . . . . . . . . . . . . . . . . . . . . . . . . . . . . . . . . . . . . . . . . . . . . . . . 13
3.5 Bibtags . . . . . . . . . . . . . . . . . . . . . . . . . . . . . . . . . . . . . . . . . . . . . . . . . . . . . . . . 14
FUNCTIONAL DESCRIPTION . . . . . . . . . . . . . . . . . . . . . . . . . . . . . . . . . . . . . . . . . . 15
4.1 Basic principle . . . . . . . . . . . . . . . . . . . . . . . . . . . . . . . . . . . . . . . . . . . . . . . . . . . 15
4.2 Date and time . . . . . . . . . . . . . . . . . . . . . . . . . . . . . . . . . . . . . . . . . . . . . . . . . . . 17
4.3 System controls. . . . . . . . . . . . . . . . . . . . . . . . . . . . . . . . . . . . . . . . . . . . . . . . . . 17
4.3.1
Operator controls . . . . . . . . . . . . . . . . . . . . . . . . . . . . . . . . . . . . . . . . . 17
4.3.2
Main Screen . . . . . . . . . . . . . . . . . . . . . . . . . . . . . . . . . . . . . . . . . . . . . 18
4.4 Menus . . . . . . . . . . . . . . . . . . . . . . . . . . . . . . . . . . . . . . . . . . . . . . . . . . . . . . . . . 19
4.4.1
Markers and Files . . . . . . . . . . . . . . . . . . . . . . . . . . . . . . . . . . . . . . . . . 21
4.4.2
Timeline Setup . . . . . . . . . . . . . . . . . . . . . . . . . . . . . . . . . . . . . . . . . . . 22
4.4.3
General . . . . . . . . . . . . . . . . . . . . . . . . . . . . . . . . . . . . . . . . . . . . . . . . . 24
4.4.4
Communication . . . . . . . . . . . . . . . . . . . . . . . . . . . . . . . . . . . . . . . . . . . 27
4.4.5
Log . . . . . . . . . . . . . . . . . . . . . . . . . . . . . . . . . . . . . . . . . . . . . . . . . . . . 30
4.5 Info screens. . . . . . . . . . . . . . . . . . . . . . . . . . . . . . . . . . . . . . . . . . . . . . . . . . . . . 31
4.5.1
Network . . . . . . . . . . . . . . . . . . . . . . . . . . . . . . . . . . . . . . . . . . . . . . . . . 31
4.5.2
EA/SerialNr . . . . . . . . . . . . . . . . . . . . . . . . . . . . . . . . . . . . . . . . . . . . . . 32
4.5.3
Versions . . . . . . . . . . . . . . . . . . . . . . . . . . . . . . . . . . . . . . . . . . . . . . . . 32
4.5.4
Passings . . . . . . . . . . . . . . . . . . . . . . . . . . . . . . . . . . . . . . . . . . . . . . . . 32
4.5.5
Battery info . . . . . . . . . . . . . . . . . . . . . . . . . . . . . . . . . . . . . . . . . . . . . . 32
SETUP AND REMOVAL . . . . . . . . . . . . . . . . . . . . . . . . . . . . . . . . . . . . . . . . . . . . . . . 33
5.1 Setting up BibTag . . . . . . . . . . . . . . . . . . . . . . . . . . . . . . . . . . . . . . . . . . . . . . . . 33
5.2 Removal and storage . . . . . . . . . . . . . . . . . . . . . . . . . . . . . . . . . . . . . . . . . . . . . 39
OPERATION . . . . . . . . . . . . . . . . . . . . . . . . . . . . . . . . . . . . . . . . . . . . . . . . . . . . . . . . 42
6.1 Create New File . . . . . . . . . . . . . . . . . . . . . . . . . . . . . . . . . . . . . . . . . . . . . . . . . 42
6.2 Gunshot . . . . . . . . . . . . . . . . . . . . . . . . . . . . . . . . . . . . . . . . . . . . . . . . . . . . . . . 43
6.3 Marker . . . . . . . . . . . . . . . . . . . . . . . . . . . . . . . . . . . . . . . . . . . . . . . . . . . . . . . . . 43
6.4 Connect external battery . . . . . . . . . . . . . . . . . . . . . . . . . . . . . . . . . . . . . . . . . . . 44
6.5 Retrieve data. . . . . . . . . . . . . . . . . . . . . . . . . . . . . . . . . . . . . . . . . . . . . . . . . . . . 44
6.5.1
Retrieving data (local network via Ethernet cable) . . . . . . . . . . . . . . . . 45
6.5.2
Retrieving data (GSM) . . . . . . . . . . . . . . . . . . . . . . . . . . . . . . . . . . . . . 46
6.5.3
Retrieving data via internet (Ethernet) . . . . . . . . . . . . . . . . . . . . . . . . . 46
MAINTENANCE . . . . . . . . . . . . . . . . . . . . . . . . . . . . . . . . . . . . . . . . . . . . . . . . . . . . . 47
7.1 Periodic maintenance schedules . . . . . . . . . . . . . . . . . . . . . . . . . . . . . . . . . . . . 47
7.2 Clean. . . . . . . . . . . . . . . . . . . . . . . . . . . . . . . . . . . . . . . . . . . . . . . . . . . . . . . . . . 48
7.3 Charge battery . . . . . . . . . . . . . . . . . . . . . . . . . . . . . . . . . . . . . . . . . . . . . . . . . . 49
7.4 Check/Update software. . . . . . . . . . . . . . . . . . . . . . . . . . . . . . . . . . . . . . . . . . . . 50
7.5 Calibrate battery indicators . . . . . . . . . . . . . . . . . . . . . . . . . . . . . . . . . . . . . . . . . 51
7.6 Remove/replace SIM card. . . . . . . . . . . . . . . . . . . . . . . . . . . . . . . . . . . . . . . . . . 52
BibTag User Manual (Revision 1.1)
Page 3 of 66
8
Page 4 of 66
7.7 Replace battery . . . . . . . . . . . . . . . . . . . . . . . . . . . . . . . . . . . . . . . . . . . . . . . . . . 53
7.8 Replace cables and antennas . . . . . . . . . . . . . . . . . . . . . . . . . . . . . . . . . . . . . . . 53
TROUBLESHOOTING . . . . . . . . . . . . . . . . . . . . . . . . . . . . . . . . . . . . . . . . . . . . . . . . 54
8.1 Troubleshooting principles . . . . . . . . . . . . . . . . . . . . . . . . . . . . . . . . . . . . . . . . . 54
8.2 Start up problems . . . . . . . . . . . . . . . . . . . . . . . . . . . . . . . . . . . . . . . . . . . . . . . . 54
8.3 Errors during operation . . . . . . . . . . . . . . . . . . . . . . . . . . . . . . . . . . . . . . . . . . . . 54
8.4 Problems with updating software . . . . . . . . . . . . . . . . . . . . . . . . . . . . . . . . . . . . 59
8.5 Reset to factory defaults . . . . . . . . . . . . . . . . . . . . . . . . . . . . . . . . . . . . . . . . . . . 59
8.6 GPS reception is weak or lost . . . . . . . . . . . . . . . . . . . . . . . . . . . . . . . . . . . . . . . 60
BibTag User Manual (Revision 1.1)
LIST OF FIGURES
Figure 3.1
Figure 3.2
Figure 3.3
Figure 3.4
Figure 3.5
Figure 3.6
Figure 3.7
Figure 4.1
Figure 4.2
Figure 4.3
Figure 4.4
Figure 4.5
Figure 4.6
Figure 8.1
Figure 8.2
Figure 8.3
Decoder . . . . . . . . . . . . . . . . . . . . . . . . . . . . . . . . . . . . . . .
Decoder panel . . . . . . . . . . . . . . . . . . . . . . . . . . . . . . . . . .
Modem/GPS unit . . . . . . . . . . . . . . . . . . . . . . . . . . . . . . . .
LED status display . . . . . . . . . . . . . . . . . . . . . . . . . . . . . . .
Antenna mat . . . . . . . . . . . . . . . . . . . . . . . . . . . . . . . . . . . .
Antenna cable. . . . . . . . . . . . . . . . . . . . . . . . . . . . . . . . . . .
BibTag . . . . . . . . . . . . . . . . . . . . . . . . . . . . . . . . . . . . . . . .
Athlete passing antenna mat . . . . . . . . . . . . . . . . . . . . . . .
Example mat setups . . . . . . . . . . . . . . . . . . . . . . . . . . . . . .
Operator controls . . . . . . . . . . . . . . . . . . . . . . . . . . . . . . . .
Main screen . . . . . . . . . . . . . . . . . . . . . . . . . . . . . . . . . . . .
Operator menu structure . . . . . . . . . . . . . . . . . . . . . . . . . .
Info screens . . . . . . . . . . . . . . . . . . . . . . . . . . . . . . . . . . . .
Error message on control screen . . . . . . . . . . . . . . . . . . . .
Error lamp. . . . . . . . . . . . . . . . . . . . . . . . . . . . . . . . . . . . . .
Pin settings . . . . . . . . . . . . . . . . . . . . . . . . . . . . . . . . . . . . .
BibTag User Manual (Revision 1.1)
10
11
12
12
13
13
14
16
16
17
18
20
31
54
55
64
Page 5 of 66
1
INTRODUCTION
1.1
Scope of this manual
This manual is intended for operating, maintenance, and supervisory personnel and provides
information on installing, operating, and maintaining your unit.
The manual is divided into the following sections:
• Introduction - (this section)
• Safety (page 7): describes all safety aspects required when working with MYLAPS
equipment
• Physical description (page 9): physical descriptions of major components in the
unit
• Functional description (page 15): functional descriptions of the unit
• Setup and Removal (page 33): site preparation, installation, and connecting power
supply and data cables among the components (also how to remove and store the
unit if required)
• Operation (page 42): how to start up, run, and shut down the unit
• Maintenance (page 47): instructions on how to maintain and repair the equipment.
Contains sub-sections for periodic maintenance schedules and corrective
maintenance procedures
• Troubleshooting (page 54): tables with potential problems, causes and solutions
• Appendices (page 61): contain unit specifications and CE declaration form
NOTE: Setting up and operating the BibTag system may only be done by MYLAPS trained and
certified professionals. Contact MYLAPS for information over the training programs.
1.2
How to use this manual
This manual is designed to be used in electronic and printed form. Cross references in the
online version can be clicked to go directly to the referenced item. Navigation can be done
with the bookmarks and/or the table of contents, which contains live links. Page numbers are
also provided for ease of use with printed copy.
Before installing, operating or maintaining your BibTag for the first time, always read section
2 Safety on page 7 to familiarize yourself with the safety aspects of this manual and your
system.
To identify individual components, read 3 Physical description on page 9.
For an explanation of how the unit works, read 4 Functional description on page 15.
Read both 5 Setup and Removal on page 33 and 6 Operation on page 42 completely to
overview the steps required to setup and run BibTag. Refer to 8 Troubleshooting on page 54
to find solutions to setup/operating problems.
When performing scheduled maintenance on BibTag, use 7.1 Periodic maintenance
schedules on page 47 to view the schedules and find the required maintenance procedures.
Corrective maintenance is guided from the tables in section 8 Troubleshooting on page 54.
Refer to the Appendices on page 61 for an overview of the technical specifications.
Page 6 of 66
BibTag User Manual (Revision 1.1)
2
SAFETY
This section describes all safety aspects required when working with MYLAPS equipment. The
safety aspect can relate to potential equipment damage or to danger to personnel working
with this equipment or in the vicinity.
• When installing, operating or maintaining equipment, closely follow the prescribed
instructions in this manual, and use common sense at all times
• If ever in doubt about how to do a job or task safely, always ask for assistance
2.1
General safety responsibilities
High voltages, thermal and stored energy hazards are present in MYLAPS systems. Therefore,
pay special attention to safety when transporting, operating and maintaining each system,
including:
• Meet all applicable codes, laws and local regulations
• When transporting the MYLAPS BibTag decoders by air, use a transport agency that
is approved for the safe handling and transport of hazardous goods in accordance
with the global safety standards and the rules and regulations of IATA/ICAO. MYLAPS
can supply the MSDS and the Lithium Battery UN38.3 test report for the lithium
batteries in the decoders, but takes no further responsibility for incorrect transport
methods.
• Read and understand each item in this manual and follow the installation, operator
and maintenance procedures exactly
• Always use the correct tools for the job
• Take recommended precautions—never take short cuts
FCC Declaration
This equipment has been tested and found to comply with the limits for a Class A digital device, pursuant to
part 15 of the FCC Rules. These limits are designed to provide reasonable protection against harmful
interference when the equipment is operated in a commercial environment. This equipment generates, uses,
and can radiate radio frequency energy and, if not installed and used in accordance with the instruction
manual, may cause harmful interference to radio communications. Operation of this equipment in a residential
area is likely to cause harmful interference in which case the user will be required to correct the interference
at their own expense.
RoHS Compliant
This equipment has been tested and found to comply with the limits for RoHS compliant materials. These
limits require manufacturers to ensure that they do not use materials or components that contain restricted
substances that may be harmful to the environment.
BibTag User Manual (Revision 1.1)
Page 7 of 66
2.2
Warnings and cautions
The following alerts are used in this manual:
• WARNINGS alert users of potentially dangerous situations
• CAUTIONS alert users of potential equipment damage
Warnings and cautions in this manual, are indicated by:
• an icon
• the text WARNING or CAUTION
• a textual description, which states the hazard and how to avoid it
The following icons to highlight and warn of safety aspects are used in this manual, and are
attached to the BibTag equipment at appropriate locations:
General
Caution or
Warning
Page 8 of 66
Dangerous
voltage
Grounding
required
BibTag User Manual (Revision 1.1)
3
PHYSICAL DESCRIPTION
3.1
Introduction
BibTag is a timing concept for sports where simple setup, plus minimal race handling are
needed. The BibTag system is portable and is designed for battery operation during outdoor
sports events.
The standard BibTag system consists of the following components:
• Portable BibTag decoder (housed in a sturdy Pelican case)
• 8 x antenna cables - in varying lengths up to 9 m (30 ft)
• Power cable (100 to 240 VAC)
• 8 x antenna mats
• Modem/GPS unit
• This BibTag User Manual
NOTE: An alternative 4-mat BibTag system is also available with a set of 4 antenna cables and
a decoder with 4 antenna connectors.
The following components can be ordered from MyLaps as options for further expanding the
BibTag system:
• Extra antenna cables - varying lengths up to 9 m (30 ft)
• 12 VDC cable with battery terminals
• Ethernet cable - 10 m (33 ft)
• Extra Antenna mats
• BibTags
• USB cable
Additionally, you can purchase the following component from local suppliers:
• SIM card (this will depend on your country and GSM cellular provider)
• Power adaptors
See Appendix 1 Specifications on page 62 for complete specifications.
BibTag User Manual (Revision 1.1)
Page 9 of 66
3.2
Decoder
1
2
3
4
1
Upper cover
Hinged upper cover (must be closed during a race to protect
decoder from rain)
2
Modem/GPS unit
See 3.2.2 Modem/GPS unit on page 12
3
Decoder panel
For connecting external devices and operator control (see
3.2.1 Decoder panel on page 11)
4
LED status display
Shows battery, error and detect status (see 3.2.1 Decoder
panel on page 11)
Figure 3.1 Decoder
Page 10 of 66
BibTag User Manual (Revision 1.1)
3.2.1
Decoder panel
3
2
4
6
5
1
8
7
1
Modem/GPS cable
Cable from the Modem/GPS unit (normally stored in cover)
2
I/O port
For connecting external devices (Start gun, etc.) - see
6.2 Gunshot on page 43
3
Modem/GPS connector
Connect here the Modem/GPS unit (see 3.2.2 Modem/GPS unit on
page 12) or use this port as a USB connector
4
Detect and error LEDs
Detect LED flashes each time a BibTag passes over a connected
antenna mat.
Error LED flashes if an error is present (see 8 Troubleshooting on
page 54)
5
Operator controls
2 buttons and display for menu selections and status
6
Network connectors
To connect an ethernet cable for a wired connection to a laptop,
network or loop-through
7
Power connectors and
‘Power on’ button
Connect an external power source (100-240 VAC or 12 VDC) here
if required.
Press the Power button to start the unit (the LED lights when
power is on)
8
Antenna connectors
Connect here all the antenna cables (1 to 8) that are fed from the
detection mats.
A 4-antenna system is available with only 4 connectors
Figure 3.2 Decoder panel
BibTag User Manual (Revision 1.1)
Page 11 of 66
3.2.2
Modem/GPS unit
3
1
2
closed
opened
1
Case with attached cable
2
Print board with card holder
3
SIM card (in holder)
Figure 3.3 Modem/GPS unit
3.2.3
LED status panel
1
2
3
4
1
Battery level indicators
(E = empty; F = full)
The battery level indicator LEDs light up from left to right as the
Decoder is charging with the following color definitions:
- red = 0-20% full
- yellow = 20-40% full
- 1st green = 40-60% full
- 2nd green = 60-80% full
- 3rd green = 80-100% full
2
Power indicator
Lights if the system is powered up and there is sufficient battery/
source power
3
Bib detection indicator
Flashes each time a BibTag passes over a connected antenna mat
4
Error indicator
Flashes if an error is present (see 8 Troubleshooting on page 54)
Figure 3.4 LED status display
Page 12 of 66
BibTag User Manual (Revision 1.1)
3.3
Antenna mats
2
3
1
1
Dogbone connectors
To connect mats
2
Flap
To protect antenna cables
3
Groove for slotting cables
Antenna cables are connected to the antenna in the center of the
mat and fed along these grooves to the next mat or decoder
Figure 3.5 Antenna mat
CAUTION
EQUIPMENT DAMAGE
The antenna cable connections in the BibTag mats are not completely waterproof if the mats are completely
submerged in snow or water. Never place the mats in a low lying area where water and snow can enter
under the flap and possibly short circuit the antenna connectors
3.4
Antenna cable
1
2
3
1
Connector
Attach this connector to the antenna in the mat
2
Number tag
This number identifies the cable (from 1 to 8) to help when
connecting the correct mat to the correct decoder connector
3
Connector (decoder)
Attach this connector to the decoder antenna connector
Figure 3.6 Antenna cable
CAUTION
EQUIPMENT DAMAGE
Never use MYLAPS Portable Decoder antenna cables on a MYLAPS BibTag system, and never short
circuit the Portable BibTag decoder by attaching both ends of an antenna cable to the decoder.
BibTag User Manual (Revision 1.1)
Page 13 of 66
3.5
Bibtags
1
2
1
Race/runner identification
2
BibTag unique identification signals
Figure 3.7 BibTag
The all-weather BibTag is normally in “sleep” mode until activated by the antenna to send a
signal to the BibTag Decoder - see 4.1 Basic principle on page 15 for more on this.
When used in a race, the BibTag must be correctly worn for best reception. See Figure 3.7
and following recommendations for race participants:
• always keep the BibTag visible; do not remove or cover with a jacket
• do not excessively bend or twist the BibTag
• do not attach beside or under a zip: metal has a negative impact on the BibTag chip
• do not wear on your back or side, or around your arm or leg
• do not cover the BibTag with your hand or arm when crossing the finish line: runners
often do this when checking their watch when crossing the line
• always remember that the mat must ‘see’ the number when you cross the finish line
• do not separate the BibTag from the start number
NOTE: Race organizers can post clear instructions at the ‘Start’ location for correct BibTag use.
Before use, each BibTag can be checked by passing it over a connected antenna to see it is
detected and registered by the decoder (signalled by detection light and/or beep). Always
reject any defective chips.
Page 14 of 66
BibTag User Manual (Revision 1.1)
4
FUNCTIONAL DESCRIPTION
4.1
Basic principle
Every participant in a MYLAPS timed event wears a registered BibTag containing a chip. When
the BibTag comes in the vicinity of a detection mat, the BibTag continuously starts sending
out messages with its unique identification (ID). The antennas in the detection mat receive
these ID messages and transfer them to the Decoder. The Decoder determines the BibTag
time for each ID by calculating the received signal strength from that BibTag. This passing
time is calculated to an accuracy of at least 0.5 seconds.
The BibTag system can operate with one or more decoders and mats, and is responsible for:
• Controlling the antennas in the mats
• Keeping accurate time (via a GPS signal or via an internal clock)
• Data collection and storage (chip codes and times)
• Record a gunshot start so that the equipment can use this same start time as the
official time
• Passing data from the Decoders to a central results computer via internet (GSM) with
MYLAPS servers, or directly via an ethernet link
• Synchronizing multiple Decoder times via GPS
NOTE: The antenna field will stop detecting the BibTag after a period of seconds if the tag
remains within the antenna field (see 4.4.2.5 Time Between Same Chip on page 24).
This means that the BibTag may be assigned a false start time if it has already been
detected within the antenna field previous to the start time. To prevent this, the tags
detected within the antenna field at the official start time will all receive this official start
time.
Figure 4.1 shows an example setup with 4 antenna mats connected to a single Decoder (more
or less mats are possible). Other options can have a double sets of antenna mats in
combination with 2 Decoders (useful for a main and backup timing system). See Figure 4.2
for other example setups.
NOTE: Main and backup systems are described further in 4.4.2.1 Profile on page 22
NOTE: The 4-mat decoder system can only be used with a maximum of 4 mats.
BibTag User Manual (Revision 1.1)
Page 15 of 66
Figure 4.1 Athlete passing antenna mat
backup
main
recommended
3 m (10 ft)
main
backup
recommended
3 m (10 ft)
2 x 8 mat system with 2 decoders
(main and backup)
2 x 4 mat system with 1 decoder
(main and backup at split point)
6 mat system
with 1 decoder
at split point
Figure 4.2 Example mat setups
Page 16 of 66
BibTag User Manual (Revision 1.1)
4.2
Date and time
The BibTag internal clock is extremely accurate when recording timing data. It can be
synchronized using time signals from GPS satellites. This guarantees precise time
synchronization between multiple BibTag systems, and gives extreme accuracy over a long
period.
All date and time parameters are set via the menu selections on the control panel. See
4.3.1 Operator controls on page 17 for more information.
NOTE: Never change the time during a race. When the BibTag Decoder is powered down, the
clock will no longer be accurate.
4.3
System controls
4.3.1
Operator controls
1
2
3
1
Display (showing Main
screen)
See 4.3.2 Main Screen on page 18
2
Left button (
For accessing and navigating through the operating menu (see
4.4 Menus on page 19); also used to move between field
selections in a screen
3
Right button (
)
)
For accessing the Info screens (see 4.5 Info screens on page 31);
also used for confirming menu selections and field selections
Figure 4.3 Operator controls
NOTE: Additionally the POWER button is used to activate the Decoder (with LED to show on/off
status)
BibTag User Manual (Revision 1.1)
Page 17 of 66
4.3.2
Main Screen
2
1
3
4
5
7
6
8
9
1
Connection indication
Can be NET, GSM or nothing (see 4.4.4 Communication on
page 27)
2
Status of connection
Can be OK or ER (error)
3
Number of detected
satellites
The
symbol indicates if GPS satellites are detected and how
many. The symbol can change shape as follows:
- NC = not connected
- open symbol = satellite detected but no time available
- blinking symbol = waiting for a time to be assigned
- closed symbol = using GPS time
- a clock symbol means that you can assign a manual time
4
Current time
Can be the time applied manually or the time assigned by the
GPS connection
5
Message
A short message indicating the last BibTag that has been detected
or the current status (can be an error situation see 8.3 Errors
during operation on page 54)
6
Profile
Indicates the profile assigned to the decoder (Main, Backup or
Scanner)
7
Name of decoder
Identifies this decoder (see 4.4.3.3 Name on page 26)
8
File
Identifies the file number currently being used and the number of
bibtags in the file
9
Antennas
The array of antenna mats currently installed to the decoder:
- enabled and detected mats are shown as an open rectangle
- mats activated by a chip are shown as a filled rectangle
- enabled mats that are not detecting are shown as a blinking ‘X’
- antenna connectors with no mat connections are shown as
- antenna connectors shown as a dashed rectangle
cannot be
detected (this also signifies the decoder is in scanner mode)
Figure 4.4 Main screen
NOTE: The backlighting for the screen will flicker if there is an error present.
Page 18 of 66
BibTag User Manual (Revision 1.1)
From the Main screen, use the
INFO screens:
and right
buttons to navigate to the operator MENU and
• Press
to show the menu options (refer to 4.4 Menus on page 19 for a description
of all the menu functions)
• Press
to access the info screens (refer to 4.5 Info screens on page 31 for a
description of all the info screens)
NOTE: If the operator does not make a selection within a few seconds, the operator MENU and
INFO screens will automatically revert to the Main screen (exceptions are the Gun,
Marker and Clock menu selections).
4.4
Menus
Figure 4.5 shows the menu structure for the BibTag control system (navigate through the
selections with
and choose a selection with
).
BibTag User Manual (Revision 1.1)
Page 19 of 66
Markers and Files - see 4.4.1 Markers and Files on page 21
Create new File
Gunshot
New/Exit
Marker
New/Exit
Clear device
Gun holdoff
Ext. 1 holdoff
Ext. 2 holdoff
Auxiliary
Timeline setup - see 4.4.2 Timeline Setup on
Profile
Number of Antennas
Reader Channel *
Main
Backup
Scanner
Beep
* not for FCC/USA
Time betw. Same chip
General - see 4.4.3 General on page 24
Clock
Contrast
Name
Source
Date
Time
Zone
Daylight saving
Index
Factory defaults
Firmware
Maintenance
Decoder
Energy manager
Communication - see 4.4.4 Communication on page 27
Server Communication
Primary Server
Secondary Server
Network
GSM Settings
Ethernet
GSM
Off
Auto
IP address
Subnet mask
Gateway
DNS
Network
APN
Username
Password
Log - see 4.4.5 Log on page 30
Files
Markers
Errors
Figure 4.5 Operator menu structure
Page 20 of 66
BibTag User Manual (Revision 1.1)
4.4.1
Markers and Files
Choose here to:
• Create a new file
• Set a gunshot or a marker
• Clear the device memory
• Use an ‘Auxiliary’ menu to enter a delay time for
the gunshot or marker device
4.4.1.1 Create New File
Choose Markers and Files > Create New File
This function is useful for separating the detected chips
times into individual files (e.g. it can be used to record
multiple races after each other). A maximum 999 files can
be created.
4.4.1.2 Gunshot
Choose Markers and Files > Gunshot
This function is useful for manually registering a start gun
time at the beginning of a race.
Choose ‘New’ to register a gunshot (choose ‘Exit’ to leave
the screen without registering a gunshot).
See 4.4.1.5 Auxiliary on page 22 for information on how to set a delay for the gunshot.
4.4.1.3 Marker
Choose Markers and Files > Marker
Choose here to set a marker at a random point.
Choose ‘New’ to register a marker (choose ‘Exit’ to leave
the screen without registering a marker).
See 4.4.1.5 Auxiliary on page 22 for information on how to set a delay for the marker.
4.4.1.4 Clear device
Choose Markers and Files > Clear device
Important: Make sure all recorded BibTag passings
are copied to a PC or memory device before clearing.
Here you can delete all passings (BibTags that have been
detected), files and markers from the detector memory.
Confirm the delete action as follows:
1.
Press
to choose ‘Clear’ (choose ‘Cancel’ if you wish to cancel the selection).
2.
Press
to confirm the delete.
3.
Wait until the message ‘Clearing device...’ disappears and you return to the main screen.
BibTag User Manual (Revision 1.1)
Page 21 of 66
4.4.1.5 Auxiliary
Choose Create Marker and File > Auxiliary
Assign here the various delay times (in milliseconds) for a
start gun, or any other External device attached to the
decoder I/O port. Navigate through the menu selections
with
and choose a selection with
.
Once in the appropriate screen (see example of Gun holdoff below), change the assigned
delay time as follows:
4.4.2
1.
Use
and
to enter the required delay time and
move to ‘Accept’.
2.
Press
to accept and return to the main screen
(choose ‘Cancel’ if you wish to cancel the selection).
Timeline Setup
Choose here to assign:
• Profile
• Number of antennas
• Reader channel *
• Beep (on/off)
• Time between same chip
* Reader channel is not available for USA/FCC systems
4.4.2.1 Profile
Choose Timeline > Profile
Here you can assign whether your decoder is used as a
main or backup system, or as a scanner.
• Main and backup systems are set up in two rows at
a recommended distance of 3 m (10 ft) from each
other (see examples in Figure 4.2). Main and
backup decoders are mostly used at start/finish
lines to guarantee accuracy and ensure that all chip
times are registered.
• A scanner assigned decoder can be used to check
bibtags (never use this setting when the decoder is
used in a race)
The first array of mats that is passed is normally assigned as ‘main’ and the second array is
assigned as backup. The backup system has less precise timing but is more sensitive for weak
chip signals.
Change the selection as follows:
1.
Page 22 of 66
Press
to choose the required setting (Main, Backup or Scanner).
BibTag User Manual (Revision 1.1)
2.
Press
to confirm the setting and move to the next field ‘Accept’.
3.
Press
to confirm and return to the main screen (choose ‘Cancel’ if you wish to cancel
the selection).
4.4.2.2 Number of Antennas
Choose Timeline > Number of antennas
Assign here the number of antennas connected to your
decoder (1 to 8).
NOTE: A 4-meter system with a maximum 4 antennas is
also available
Change the Number of Antennas as follows:
1.
Press
shown.
repeatedly to increase the number of antennas until the correct number is
2.
Press
to confirm the number and move to ‘Accept’.
3.
Press
to accept and return to the main screen (choose ‘Cancel’ if you wish to cancel
the selection).
4.4.2.3 Reader Channel
Choose Timeline > Reader Channel
Assign here the channel used by the reader to gather data.
Always assign a different channel to a main and backup
system to eliminate interference between decoders in close
proximity. Also always assign a different channel to each of
the 2 readers installed in an 8 antenna system.
Change the Reader Channel as follows:
1.
Press
repeatedly to assign the required symbol to the blinking field.
2.
Press
to confirm the symbol and move to the next field.
3.
Press
repeatedly to assign the required symbol.
4.
Press
to confirm the symbol and move to the ‘Accept’ field.
5.
Press
to confirm and return to the main screen (choose ‘Cancel’ if you wish to cancel
the selection).
4.4.2.4 Beep
Choose General > Beep
Here you can set the decoder beeper on or off.
Do this as follows:
1.
Press
to select on or off.
2.
Press
to confirm the selection and move to ‘Accept’.
3.
Press
to accept and return to the main screen (choose ‘Cancel’ if you wish to cancel
the selection).
BibTag User Manual (Revision 1.1)
Page 23 of 66
4.4.2.5 Time Between Same Chip
Choose Timeline > Time Betw. Same Chip
This setting prevents a chip being accidentally and
repeatedly registered while still in the vicinity of the
antennas. If a chip is detected more then once within this
interval, each new registration will be neglected until the
interval is over.
Change the time between the same chip as follows:
4.4.3
1.
Press
to increase the number of seconds (default is 10; min is 3; max is 30).
2.
Press
to confirm the symbol and move to the next field ‘Accept’.
3.
Press
to confirm and return to the main screen (choose ‘Cancel’ if you wish to cancel
the selection).
General
Choose here to assign:
• Clock
• Contrast
• Name
• Index
• Factory defaults
• Firmware
• Main tenace
4.4.3.1 Clock
Choose General > Clock
Here you can set the source (GPS or manual), date, time
time zone, and daylight saving for the decoder.
IMPORTANT: Never change ‘Clock’ parameters
during a race
Source
1.
Press
to select ‘Manual’ or ‘GPS’ depending on how
you wish to assign your clock settings.
2.
Press
3.
Press
to accept and return to the main screen
(choose ‘Cancel’ if you wish to cancel the selection).
Page 24 of 66
to enter the setting and move to ‘Accept’.
BibTag User Manual (Revision 1.1)
Date
1.
Press
to select ‘Date’.
2.
Press
and
to ‘Accept’.
3.
Press
to accept and return to the main screen
(choose ‘Cancel’ if you wish to cancel the selection).
to enter the correct date and move
Time
1.
Press
and
to select ‘Time’.
2.
Press
and
to ‘Accept’.
3.
Press
to accept and return to the main screen
(choose ‘Cancel’ if you wish to cancel the selection).
to enter the correct time and move
.
Time zone
1.
Press
and
to select ‘Time Zone’.
2.
Press
and
to enter the correct time zone and
move to ‘Accept’.
3.
Press
to accept and return to the main screen
(choose ‘Cancel’ if you wish to cancel the selection).
Daylight saving
1.
Press
and
to select ‘Daylight Saving’.
2.
Press
and
to choose between ‘off’ and ‘on’, and
move to ‘Accept’.
3.
Press
to accept and return to the main screen
(choose ‘Cancel’ if you wish to cancel the selection).
4.4.3.2 Contrast
Choose General > Contrast
Here you can alter the brightness of the BibTag operator
screen.
Do this as follows:
1.
Select [-] and press
repeatedly to dim the screen.
2.
Select [+] and press
3.
Press
4.
Press
to accept and return to the main screen (choose ‘Cancel’ if you wish to cancel
the selection).
repeatedly to brighten the screen.
to confirm the contrast and move to the ‘Accept’ field.
BibTag User Manual (Revision 1.1)
Page 25 of 66
4.4.3.3 Name
Choose General > Name
Here you can assign a personalized name for easy
identification when the BibTag is connected to a network.
This name will be displayed on the main screen, and in the
MYLAPS software.
Change the name as follows:
1.
Press
field.
repeatedly to assign the required symbol (alphabetic or numeric) to the blinking
2.
Press
to confirm the symbol and move to the next field.
3.
Repeat steps 1 and 2 until the name is correct.
4.
Press
until ‘Reset’ is selected and press
to confirm and return to the main screen.
4.4.3.4 Index
Choose General > Index
Here you can assign an index (maximum 2 characters) for
the bibtag to identify the decoder in software.
Change the index as follows:
1.
Press
field.
repeatedly to assign the required symbol (alphabetic or numeric) to the blinking
2.
Press
to confirm the symbol and move to the next field.
3.
Press
repeatedly to assign the required symbol (alphabetic or numeric).
4.
Press
to confirm the symbol and move to the ‘Accept’ field.
5.
Press
to confirm and return to the main screen (choose ‘Cancel’ if you wish to cancel
the selection).
4.4.3.5 Factory defaults
Choose General > Factory defaults
Here you can reset all the software settings in the decoder
to their default factory settings.
Confirm the reset action as follows:
1.
Press
to choose ‘Default’ (choose ‘Cancel’ if you wish to cancel the selection).
2.
Press
to confirm the reset.
Page 26 of 66
BibTag User Manual (Revision 1.1)
4.4.3.6 Firmware
Choose General > Firmware
Here you can switch the current software version (to a
previous version) and view the current ‘Energy Manager’
software version.
View Energy manager by pressing
and then
.
Switch software version as follows:
1.
Press
to choose ‘Decoder’.
2.
Press
to choose ‘Switch’ (choose ‘Cancel’ if you
wish to cancel the selection).
3.
Press
to switch the software versions.
4.4.3.7 Maintenance
Choose General > Maintenance
This function is only to be used by a MYLAPS service
engineer, or after contact with MYLAPS.
Enter the maintenance code as follows:
4.4.4
1.
Press
repeatedly to assign the required character (alphabetic or numeric) to the
blinking field.
2.
Press
3.
Repeat steps 1 and 2 to enter all four characters for the required code.
4.
Press
to confirm the character and move to the next field.
to accept the address (choose ‘Cancel’ if you wish to cancel the selection).
Communication
Choose here to assign:
• Server communication
• Primary Server
• Secondary Server
• Network
• GSM Settings
When setting up BibTag for the first time, register your decoder at the CCNet server - refer
to http://partner.mylaps.com for more information (go to 'Download > Networking
Championchip equipment'.
BibTag User Manual (Revision 1.1)
Page 27 of 66
4.4.4.1 Server Communication
Choose Communication > Server Communication
Here you can assign the method (Ethernet, GSM or off) for
.
connecting to a server.
• Off means that communication to Toolkit is via LAN
• Ethernet or GSM means that communication to
Toolkit is via WAN (using the MYLAPS server as
intermediate)
Make a selection as follows:
1.
Press
to select ‘Ethernet’, ‘GSM’ or ‘off’.
2.
Press
to confirm the selection and move to ‘Accept’.
3.
Press
to accept and return to the main screen (choose ‘Cancel’ if you wish to cancel
the selection).
4.4.4.2 Primary Server
Choose Communication > Primary Server
Here you can enter a server address for the 'CCNetServer'
for your region - check with your MYLAPS account manager
for a list of local CCNetServer addresses.
.
NOTE: You can assign a second 'CCNetServer' address in
the Secondary Server menu selection (see section
4.4.4.3).
When communicating, the software will search for the
primary server; if not found, the software will search for
the ‘Secondary server’ address.
Change a server address as follows:
1.
Press
repeatedly to assign the required character (alphabetic or numeric) to the
blinking field.
2.
Press
3.
Repeat steps 1 and 2 to enter characters for the required address (maximum
20 characters)
4.
When the address is complete press
5.
Press
to accept the address and return to the main screen (choose ‘Cancel’ if you wish
to cancel the selection).
to confirm the character and move to the next field.
to move to the ‘Accept’ field.
4.4.4.3 Secondary Server
Choose Communication > Secondary Server
Here you can enter a second server address for the
'CCNetServer' for your region. See section 4.4.4.2.
Page 28 of 66
.
BibTag User Manual (Revision 1.1)
4.4.4.4 Network
Here you can assign all the specifications for the network
connection. Choose ‘Automatic’ to ask the software to
assign the address automatically; alternatively you can
manually set the IP address, Subnet mask and Gateway.
Automatic
Choose ‘on’ for an automatic search for the network; set to
‘off’ before manually assigning IP address, etc.
IP address
Always first set ‘Automatic’ to ‘off’ before you can assign
fixed IP settings.
NOTE: The decoder cannot register IP addresses in the
198.51.100.x series
Subnet mask
Always first set ‘Automatic’ to ‘off’ before you can assign
Subnet Mask settings.
Gateway
Always first set ‘Automatic’ to ‘off’ before you can assign
Gateway settings.
Primary DNS
Always first set ‘Automatic’ to ‘off’ before you can assign
DNS settings.
Secondary DNS
See ‘Primary DNS’.
BibTag User Manual (Revision 1.1)
Page 29 of 66
4.4.4.5 GSM Settings
Choose Communication > GSM Settings
Always first set ‘Server Communication’ to ‘GSM’ - see
4.4.4.1 Server Communication on page 28
Here you can configure the GSM (wireless modem) settings
of the Modem/GSM unit. Settings must be obtained from
your GSM provider and entered in the following screens:
• Network (Automatic or Manual)
• APN (Access Point Name)
• Username
• Password
Configure GSM as follows:
1.
First press
to select Network.
2.
Press
3.
Press
to accept (choose ‘Cancel’ if you wish to
cancel the selection).
to choose ‘Manual’.
Now select APN:
4.
Press
repeatedly to assign the required character
(alphabetic or numeric) to the blinking field.
5.
Press
to confirm the character and move to the
next field.
6.
Repeat these steps to enter characters for the
complete name (maximum 20 characters)
7.
When the address is complete press
‘Accept’ field.
8.
Press
to accept the address and return to the main
screen (choose ‘Cancel’ if you wish to cancel the
selection; choose ‘CL’ if you wish to clear the name).
9.
Repeat the same steps for ‘Username’ and ‘Password’.
to move to the
When setting up BibTag for the first time, register your decoder at the CCNet server - refer
to http://partner.mylaps.com for more information (go to 'Download > Networking
Championchip equipment'.
4.4.5
Log
Here you can view the archive of Files, markers and errors
4.4.5.1 Files
Choose Log > Files
Choose ‘Next’ to view the next file.
Page 30 of 66
BibTag User Manual (Revision 1.1)
4.4.5.2 Markers
Choose Log > Markers
Choose ‘Previous’ to view previous marker.
4.4.5.3 Errors
Choose Log > Errors
Choose ‘Previous’ to view previous error.
4.5
Info screens
From the Main screen, press the
button repeatedly to navigate through the various INFO
screens and eventually return to the main screen.
Info
Network
EA/SerialNr
Versions
Passings
Battery info
Figure 4.6 Info screens
4.5.1
Network
Choose
repeatedly until Network appears.
Here you can read off the IP address for the connection to
the decoder.
Press
repeatedly to return to the main screen.
BibTag User Manual (Revision 1.1)
Page 31 of 66
4.5.2
EA/SerialNr
Choose
repeatedly until EA/SerialNr appears.
Here you can read off the EA/Serial number (MAC address)
for the decoder.
Press
4.5.3
repeatedly to return to the main screen.
Versions
Choose
repeatedly until Versions appears.
Here you can read off the current BibTag software version
installed in the decoder (and the previously installed
‘passive’ version, if present).
Press
4.5.4
repeatedly to return to the main screen.
Passings
Choose
repeatedly until Passings appears.
Here you can read off the number of passings (Bibtag
detections) recorded by the decoder.
Press
4.5.5
repeatedly to return to the main screen.
Battery info
Choose
repeatedly until Battery info appears.
Here you can read off all the details about the internal
battery (or external battery if connected). This information
includes voltage, remaining charge and capacity.
Press
Page 32 of 66
to return to the main screen.
BibTag User Manual (Revision 1.1)
5
SETUP AND REMOVAL
This section describes how to setup the BibTag equipment for a race, and then to remove it
after a race. Also described here is how to retrieve race data from the BibTag Decoder (see
5.2 Removal and storage on page 39).
5.1
1
Setting up BibTag
Choose suitable number of mats (1 to 8)
• Measure the total width of the timing
location (start/finish/split line)
• Select the number of mats to span this
width - each mat is 1 meter (3 ft) wide
2
Lay out mats
• Remove the two plastic dogbone
connectors from their recess under the
mats
• Slot the connectors into place in the recess
at the end of each mat (make sure the
connectors are facing in the same direction
in the mats)
• Lay out the mats lengthwise in a straight
line across the timing line with the
connectors facing the adjacent mat (align
the mats in the direction that the athletes
will run as shown by the arrow in figure)
• One-by-one lift the ends of each mat and
connect it securely with the connecting
joints to the adjacent mat - each joint
should fit precisely into the recesses at the
end of the adjacent mat (remove the end 2
connecting joints if required)
BibTag User Manual (Revision 1.1)
Page 33 of 66
3
Position the BibTag decoder
• Place the decoder approximately 1 meter
(3 ft) from the end of the mats
• The decoder can be positioned at either end
of the mat array where it will not hinder
competing athletes
CAUTION
Damage:
Danger of damaging cables. Always take special care when handling the antenna cables as they are easily
damaged. Never excessively bend or twist them, and make sure the connectors are kept dry.
4
Prepare antenna cables
• Select the correct number of antenna
cables for the map setup; e.g. if you are
using 5 mats, select the 5 antenna cables
to correspond with the mat (cables
numbered 1 to 5)
5
4
mats
3
2
1
decoder
Page 34 of 66
1 2 3 4 5
antennas
BibTag User Manual (Revision 1.1)
5
Insert antenna cables in mats
• Lift all mat flaps
• Take the shortest antenna cable and lay it
from the decoder location to the middle of
the first mat of the mat array
• Connect the cable to the antenna in the
middle recess in the mat; align the cable in
the cable groove in the mat in the direction
of the decoder
• Take the next longest antenna cable
(no. 2) and lay it over the mats from the
decoder to the middle of the second mat of
the mat array
• Connect this cable into the antenna in the
middle recess in the second mat
• Align the antenna cable in the cable groove
in both mats in the direction of the decoder
• Repeat these steps for the remaining mats
until all mats have a cable installed, and all
cables are slotted correctly into the cable
grooves
• Close all flaps
• Ensure all mat flaps are correctly closed
with the magnetic strip and no flaps
protrude
BibTag User Manual (Revision 1.1)
Page 35 of 66
CAUTION
Damage:
Danger of short circuiting decoder electrics. Always take special care that no water enters an opened
decoder case as the connections are not completely waterproof and water may damage the internal
electric circuitry. Never open the decoder case in damp conditions.
6
Click open both front latches on the decoder
case and carefully open the lid
7
Connect antennas
• Plug the antenna cables into the coax
antenna connectors on the decoder (make
sure the antenna cables are connected in
their correct number sequence (i.e. cable 1
to antenna 1; cable 2 to antenna 2, and so
on)
8
Check external connections
• Check that the modem/GPS unit is
connected to the modem/usb connector on
the panel
• Connect any other required devices (e.g.
starting gun to I/O port, laptop to network
connector)
9
Switch on Power
• Press the Power button
• Wait until the Main screen appears on the
control panel (this screen is described in
4.3.2 Main Screen on page 18)
Page 36 of 66
BibTag User Manual (Revision 1.1)
10 Check Main screen
• Check that no errors are displayed on the
screen - if so, refer to 8 Troubleshooting on
page 54 for how to solve them
11 Check battery level
• Check the battery level (shown on the LED
panel on the front of the case)
• If battery level is low (‘E’ LED is lit), supply
external power by connecting a 12 VDC
supply to the connector on BibTag panel
(you can also connect a 100-240 VAC
supply if available)
12 Clear data in BibTag memory
• Make sure the previous race data has been
read and stored
• Access the ‘Files and Markers’ menu
• Choose 'Clear Device'
• Select 'Clear' and confirm
NOTE: Another possibility here is to clear
the memory using Toolkit - see the
Toolkit User Manual for more
information
13 Synchronize time with GPS
• Verify if GPS is available (may take several
minutes) - eventually the ‘satellite’ logo
and number of satellites is displayed on the
top line of the screen
9
• If no GPS signal is available, reposition the
BibTag Modem/GPS unit for better satellite
reception (remove it from its straps in the
decoder case)
• Wait until time is synchronized
• If no GPS signal is available, set the correct
time on the internal clock
(see 4.4.3.1 Clock on page 24)
14 Check time zone
• Ensure the correct time zone is used (and
daylight saving, if required)
15 Configure the 'Detection' parameters by using
the Timeline menu selections to configure:
• Time Betw. Same Chip
• Reader channel
• Number of antennas
• Profile - Main or Backup (see
4.4.2.1 Profile on page 22)
BibTag User Manual (Revision 1.1)
Page 37 of 66
16 Test BibTag by carrying a test BibTag across
each of the antenna mats, in turn, and check:
• The BibTag is registered by the decoder
(the detection LED is lit)
• The antenna symbols in the bottom of the
screen show that the BibTag is detected by
the individual antennas. As the BibTag is
carried across a mat, the block symbol for
that mat should show a full symbol. See
example figure where BibTag is carried
over the second mat.
screen
NOTE: The block signal will slowly ‘empty’
after a few seconds
• The time and date settings are correct on
the BibTag system and on your results
computer (if connected)
• Replace or reconnect any faulty antennas
and repeat the test
mats
chip
17 Set up communication
• Select menu 'Communication'
• Choose appropriate communication
method for your situation - see
4.4.4 Communication on page 27 for more
on communication
18 Attach starter pistol (optional)
• If required, attach a starting pistol (and/or
other triggers) to the I/O port on the
BibTag panel
19 Configure 'Beeper'
• If required, use the ‘Timeline setup’ menu
selections to configure the beeper to Off
(default is On)
20 Close case
• Make sure that the antenna cables are all
aligned in the cutout on the right side of the
decoder case
• Carefully close lid (making sure no cables
are trapped between cover and case)
• Click closed both front latches to make sure
the case is tightly closed and no dirt or
moisture can enter
Page 38 of 66
BibTag User Manual (Revision 1.1)
5.2
1
Removal and storage
Retrieve race data (if not already done):
• Refer to 6.5 Retrieve data on page 44 to
see how to retrieve data (race results) from
the decoder
• If no data connection to a Toolkit system is
immediately available, data can be
retrieved later (the decoder retains all data
in memory even when power is off).
2
Switch off power
• Press 'Power' button
• Choose "Confirm'' on menu
NOTE: Pressing the ‘Power’ button for
5 seconds will also power down the
system
3
Disconnect cables
• Remove antenna cables from their
connectors on case
• Remove power cable (if connected)
• Remove Ethernet cable (if connected)
• Remove starter pistol cable from I/O port
(if connected)
CAUTION
Damage:
Danger of damaging cables. Always take special care when handling the antenna cables as they are easily
damaged. Never excessively bend or twist them, and make sure the connectors are kept dry.
4
Disassemble antennas
• Carefully remove antennas from their slots
in the antenna mats
• Loop the cables and load them into their
carry bags
• Load all other cable accessories into their
carry bags
BibTag User Manual (Revision 1.1)
Page 39 of 66
5
Disassemble mats
• Carefully lift the mats one-by-one so that
they separate from the adjacent mat
• If required, remove the protruding
dogbone connectors from their slots; do
this by twisting the connectors in their
recess before lifting them clear
NOTE: Leaving the dogbone in its
protruding position is often useful
as a handle to easily carry the mats
• Insert the dogbones into their storage
recesses in the back of the mat
• Remove the mats
6
Close case and remove equipment
• Carefully close lid (making sure that
nothing is trapped between cover)
• Click closed both front latches
• Remove the BibTag equipment to a storage
area (see step 7) or to an area where race
data can be retrieved (see 6.5 Retrieve
data on page 44).
7
Store case in a dry area at storage temp of
0 °C to +40 °C (+32 °F to +104 °F), and
close to a mains power socket
CAUTION
HIGH VOLTAGE:
Danger of electrocution. Before connecting power to the BibTag, make sure that all electrical connections
are secure.
8
Charge BibTag
• Attach 100 - 240 VAC power cable into AC
connector on case
• Connect the power cable into the mains
power socket
• Leave power connected until BibTag is next
required (the battery will be automatically
charged so it stays fully charged)
Page 40 of 66
BibTag User Manual (Revision 1.1)
CAUTION
Damage:
Danger of damaging mats. Always store the mats according to the instructions given in the following step.
9
Store mats
• Make sure that the storage area used for
the mats is flat with no sharp or protruding
surfaces
• Never bend the mats and make sure the
corners are not twisted under the mat
• Never lean the mats against a wall so that
they are bent and deformed
• Always store the mats laid out flat with the
MYLAPS logo facing up
BibTag User Manual (Revision 1.1)
Page 41 of 66
6
OPERATION
Once correctly setup, the BibTag system is ready to automatically record the chips as they
pass the measuring point.
The following operation steps may be required:
• Set up a new file for the race - see 6.1 Create New File on page 42 for more details
• If an electronic starting pistol is connected to the BibTag case I/O port, the start signal
can be automatically recorded by the BibTag system when the pistol is fired - see
6.2 Gunshot on page 43 for more details.
• Once the race is started, you can mark an individual time - see 6.3 Marker on
page 43.
• During the race, occasionally check the front panel LEDs for errors, and that the
battery indicators show sufficient battery power (if required, you can connect a 12
VDC external battery to the 12 VDC connection on the BibTag case - see 6.4 Connect
external battery on page 44).
• At the race finish line, check status as competitors pass the antenna by making sure
that they are detected (flashing LED and optional beep). You can also retrieve the
race data as described in 6.5 Retrieve data on page 44.
When ready you can remove the BibTag equipment as described in 5.2 Removal and
storage on page 39.
6.1
Create New File
This function is useful for separating the detected chips times into individual files (e.g. it can
be used to record multiple races after each other). Use this function as follows:
1
Select Markers and Files > Create New File
2
A message appears showing the time the new
file is started.
Use the operator buttons to select ‘OK’
Page 42 of 66
BibTag User Manual (Revision 1.1)
6.2
Gunshot
This function is useful for manually registering a start gun time at the beginning of a race.
The BibTags detected within the antenna field at the gunshot time will all receive this official
start time.
Never use the gun after the race is started because all new BibTag passings will be adjusted
to the new gun times; always use the marker function during the race to mark a BibTag (see
6.3 Marker on page 43).
Use the gun function as follows:
1
Select Markers and Files > Gunshot
2
Use the operator buttons to select 'New'.
A message appears showing the number of
the gun marker and the time it was entered
6.3
Marker
This function is useful to manually register a time during a race (e.g. recording the time for
a competitor without a chip). Use this function as follows:
1
Select General > Marker
2
Use the operator buttons to select 'New'
A message appears showing the number of
the marker and the time it was entered
BibTag User Manual (Revision 1.1)
Page 43 of 66
6.4
Connect external battery
CAUTION
EQUIPMENT DAMAGE
The BibTag will be seriously damaged if connected to an incompatible power supply.
Only connect the BibTag to a 12 VDC external battery.
Normally the internal battery (when fully charged) is sufficient for a race duration (maximum
12 hour for 8 mat systems; maximum 20 hour for 4 mat systems), however for longer races
a 12 VDC external battery can be connected as follows:
1
Connect battery:
• Attach leads to battery terminals (red to +;
black to -)
• Insert the battery connector into the socket
on the BibTag panel and check the LED is lit
2
Check the connection
• Switch power on (if not already on)
• Press the
selections
button to access the ‘Info’
• Choose ‘Battery info’ for the battery
information screen
• Ensure that the external battery symbol is
showing, and the battery has sufficient
charge (more than 20%)
6.5
Retrieve data
Here you can choose from the following data retrieval methods:
• 6.5.1 Retrieving data (local network via Ethernet cable) on page 45
• 6.5.2 Retrieving data (GSM) on page 46
• 6.5.3 Retrieving data via internet (Ethernet) on page 46
Page 44 of 66
BibTag User Manual (Revision 1.1)
6.5.1
1
Retrieving data (local network via Ethernet cable)
Connect an Ethernet cable
• Firmly click the cable into one of the two
NETWORK connectors on the panel (always
use a MYLAPS supplied Ethernet cable, or
standard Ethernet UTP cable up to a max.
100 m (300 ft) long).
• Check the orange LED on the NETWORK
connection is on
2
Choose Communication > Network
From here you can select one of the following:
• If you wish to automatically assign the
network settings - go to step 3
• If you wish to manually assign the network
settings - go to step 4
3
Choose 'Automatic':
• Select ‘on’
• Select ‘Accept’
• Continue at step 5
4
Choose IP address:
• If ‘AUTO’ is on, a new screen will appear
asking you to ‘Disable AUTO first’ - do this
by selecting ‘OK’
• Once in the IP screen, use the operator
buttons to enter the IP address and choose
‘Accept’
• Do the same to manually assign the
‘Subnet mask', 'Gateway' and 'DNS'
(Gateway and DNS are optional if an
internet connection is not required or is not
available)
• Continue at step 5
5
When connected to the network, use MYLAPS
software (e.g. ‘Toolkit’) to retrieve data
BibTag User Manual (Revision 1.1)
Page 45 of 66
6.5.2
1
Retrieving data (GSM)
Select internet mode:
• Choose menu 'Communication', then
'Server Communication'
• Use the operator buttons to toggle from
‘Ethernet’ to 'GSM' and then select ‘Accept’
2
Check GSM connection
• Return to the Main screen
• Check the left of the top line is showing
'GSM OK'
• If this does not appear within a minute,
refer to 8 Troubleshooting on page 54
3
6.5.3
1
When connected, use the MYLAPS software
(e.g. ‘Toolkit’) to retrieve data
Retrieving data via internet (Ethernet)
Select internet mode:
• Choose menu 'Communication', then
'Server Communication'
• Choose 'Ethernet' to connect to the internet
via your local server
2
Check connection:
• Return to the Main screen
• Check that the top line is showing 'NET OK'
• If this does not appear within a minute,
refer to 8 Troubleshooting on page 54
3
When connected, use the MYLAPS software
(e.g. ‘Toolkit’) to retrieve data
Page 46 of 66
BibTag User Manual (Revision 1.1)
7
MAINTENANCE
Only qualified and trained personnel should perform maintenance on MYLAPS equipment.
Maintenance can be described as, but not limited to:
• Checking and testing components
• Cleaning the unit and individual components - accumulated dirt can hamper unit
operations
• Installing and removing parts from the unit
• Troubleshooting any malfunctions that may occur on the unit before, during and after
operations
• Calibrating and adjusting settings on the unit
7.1
Periodic maintenance schedules
Use the following table to plan routine maintenance for your unit. If you are using the
electronic version of this document, click the text or the page number to jump to the
procedure.
as required
6-monthly
monthly
daily
Maintenance activity
Page
Service interval
Clean
48
Charge battery
49
Check/Update software
50
Calibrate battery indicators
51
Remove/replace SIM card
52
z
Replace battery
53
z
Replace cables and antennas
53
z
BibTag User Manual (Revision 1.1)
z
z
z
z
Page 47 of 66
7.2
Clean
1
Take a clean soft cloth and moisten it with
clean water (do not use an abrasive cleaning
liquid).
2
Using gentle strokes, clean the inside of the
case, including the display screen and
antenna connectors.
Dry off any excess moisture.
Use a newly moistened cloth to clean the
outside of the case, including the front LED
display
3
Use a moist cloth to clean the antenna cables,
paying particular attention to remove any dirt
in the connectors.
CAUTION
ENVIRONMENTAL HAZARD
Plastic and other waste products are harmful to the environment. Dispose of waste items in a responsible,
environment-friendly manner. Separate recyclable products from other, non-recyclable waste. Heed site
regulations and obey local environmental by-laws
4
Dispose of the cleaning materials (check your
local environmental regulations).
Page 48 of 66
BibTag User Manual (Revision 1.1)
7.3
1
Charge battery
Check that temperature of the charging
location is within range 0 to +40 °C (+32 to
+104 °F)
CAUTION
HIGH VOLTAGE:
Before connecting power to the BibTag, make sure that all electrical connections are secure..
2
Connect cable:
• Switch off BibTag decoder at main switch
(you can leave the power on, but charging
will take longer)
• Attach 100 - 240 VAC cable into AC
connector on display panel
• Connect the power cable into the mains
power socket
3
Check the battery status at the front of the
case:
• The LEDs will gradually light from left to
right as charging is in progress (last LED
will blink)
• Wait until battery is fully charged and all 5
LEDs remain lit (takes 5 to 10 hours from
empty to full)
4
Remove power (optional):
• MYLAPS recommends leaving power
connected to retain battery life and ensure
the BibTag is fully charged and ready for its
next use
BibTag User Manual (Revision 1.1)
Page 49 of 66
7.4
Check/Update software
1
Connect to a local internet provider via a
cable connection or via GSM
2
Access the MYLAPS support website and check
if there is updated decoder firmware
3
Update version (if required):
• Follow the instructions on the support
website to download and install the
updated firmware
4
Check update:
• Confirm reboot to new version
• Verify that new version works correctly (if
problems occur, refer to section
Troubleshooting)
Page 50 of 66
BibTag User Manual (Revision 1.1)
7.5
1
Calibrate battery indicators
Check that temperature of the charging
location is within range 0 to +40 °C (+32 to
+104 °F)
CAUTION
HIGH VOLTAGE:
Before connecting power to the Decoder, make sure that all electrical connections are secure..
2
Fully charge the battery until the green 'F'
lamp stays constantly lit (takes 5 to 10 hours
from empty to fully charged)
3
Deplete battery:
• Disconnect power from the Decoder
• Switch on the Decoder
• Leave the Decoder running until the
internal battery is completely empty (can
take 24 hours from full to empty)
• The Decoder will switch off automatically to
prevent battery damage
4
Fully charge the battery until the green 'F'
lamp stays constantly lit (takes 5 to 10 hours
from empty to fully charged)
BibTag User Manual (Revision 1.1)
Page 51 of 66
7.6
Remove/replace SIM card
CAUTION
Equipment damage:
To prevent damage to the SIM card and possible data loss, always disconnect the Modem/GPS unit before
removing/replacing the card.
Always correctly connect and disconnect the modem/GPS cable. Only handle the cable connector by
holding it on the ribbed part of the connector; never pull on the cable.
Also always take special care to prevent moisture entering the opened Modem/GPS unit, and take
standard precautions to prevent ESD when handling electrical components.
1
Disconnect unit cable:
• Place your fingers around the ribbed part of
the connector (never disconnect it by
pulling on the cable)
• Press the connector with a vertical motion
downwards
• Remove the connector by pulling it with a
smooth vertical motion upwards
2
Remove unit:
• Remove the unit from its attachment straps
in the cover
3
Remove unit cover:
• Unscrew the 4 corner screws with a
screwdriver
• Remove the cover to expose the card
holder
4
Open card holder:
• Slide down the front of the card holder
slightly to release the holder
• Flip the holder open to access the card
Page 52 of 66
BibTag User Manual (Revision 1.1)
5
Remove card:
• Gently slide the old SIM card out of the
holder
• Leave the holder in its upright position
6
Replace card:
• Gently slide the new SIM card into the
holder, making sure the cut-out corner is
on the top left
• Press the new card completely into place in
the base of the holder
7
Close holder:
• Press the holder down into its closed
position, making sure that the card is not
bent or damaged
• Slide down the front of the card holder to
lock the holder
8
Replace unit cover:
• Place the unit cover back on the unit
• Firmly screw in the 4 corner screws
9
Replace unit:
• Replace the unit in its attachment straps in
the decoder cover, making sure that the
label on the base of the unit is visible
• Place your fingers around the ribbed part of
the connector and press the connector with
a vertical motion downwards into the
connector (making sure it locks in place)
7.7
Replace battery
Please contact MYLAPS for the procedure for replacing the battery.
7.8
Replace cables and antennas
Please contact MYLAPS for the part numbers and ordering instructions.
BibTag User Manual (Revision 1.1)
Page 53 of 66
8
TROUBLESHOOTING
8.1
Troubleshooting principles
Troubleshooting for the BibTag can be divided into 3 distinct categories:
• Start up problems - see 8.2 Start up problems on page 54
• Operating errors and warnings (signalled by screen messages) - see 8.3 Errors during
operation on page 54
• Problems with updating software - see 8.4 Problems with updating software on
page 59
If troubleshooting does not solve a problem, contact MYLAPS at
[email protected]. Alternatively, check the MYLAPS forum site for similar
problems and solutions - see http://partner.mylaps.com
8.2
Start up problems
Normally when starting up the BibTag, the main screen will appear after the power button is
pressed on the control panel. However, the following problems may be encountered during
startup.
No power is available (no LEDs lit)
Connect power to the BibTag and check if the 'E' battery indicator is lit:
• If lit, charge the BibTag (see 7.3 Charge battery on page 49) until the internal battery
is sufficiently full (the second charge LED starts to blink)
• If battery indicator is not lit, contact MYLAPS
Start screen freezes
Restart (startup can take longer after a restart).
8.3
Errors during operation
If errors or warnings occur during operation, a flashing error message is displayed in the
middle of the BibTag control screen. See location in following figure.
Figure 8.1 Error message on control screen
Page 54 of 66
BibTag User Manual (Revision 1.1)
The red 'error' LED on the panel on the front of the case (and beside the control screen) will
also glow continuously for an error - see location of red 'error' LED in following figure:
Figure 8.2 Error lamp
To acknowledge the error and clear the message, press the
or
buttons. In an extreme
emergency situation, hold in the main power switch for 7 seconds to completely shut down
the BibTag.
Errors can be caused by human, software, mechanical or electrical faults - read the message
carefully, and decide upon the best course of action. The following table alphabetically lists
the various operating errors as follows:
• Error text
• Possible Causes (in order of likelihood)
• Solutions to the listed causes (also in order of likelihood) with suggested procedure
number (as listed in the Maintenance section of this manual)
BibTag User Manual (Revision 1.1)
Page 55 of 66
Error
Problem(s)
Solution(s)
Ambient temperature too
high to charge
Surrounding temperature too
high to charge battery
Charge battery in correct temp.
range - (see 7.3)
Ambient temperature too
low to charge
Surrounding temperature too
low to charge battery
Charge battery in correct temp.
range - (see 7.3)
Antenna # lost
Antenna connection is faulty
Check the antenna connections
Battery error
Battery is not connected or
has been shut down by
temperature protection
Contact MYLAPS
Battery low
Warning that the battery
charge level is becoming low
Connect to an external battery, or
connect to AC power (if no other
option)
Battery status
Software error
Restart (see 7.8)
Battery fuse broken
Battery fuse is faulty
Replace fuse
Battery temperature too
high to charge
Battery temperature too high
Charge battery in correct temp.
range - (see 7.3)
Battery temperature too low
to charge
Battery temperature too low
Charge battery in correct temp.
range - (see 7.6)
CCNet error
Contact MYLAPS
Connection to the CCNet
server is lost
Wait for BibTag to reconnect. If
error occurs frequently, check
GSM status or network
connections
CCNet Unregistered
Device is unregistered
Register the BibTag at the CCNet
server - refer to http://
partner.mylaps.com for more
information
Internet unavailable
Check APN, User name and
password. Contact network
provider
Internet unavailable
Check APN, User name and
password. Contact network
provider
The measured charge current
is too high
Connect alternative (110 - 240
VAC) supply. Contact MYLAPS if
error repeats
low current)
The measured charge current
is too low
Connect alternative (110 - 240
VAC) supply. Contact MYLAPS if
error repeats
Chip queue at 75%
Memory is becoming full
Save the current passings to
Toolkit
Check antenna now
read failed
Register device
CCNet Auth failed
Login OK?
CCNet not found
Server settings OK?
Charge error
high current
Charge error
save passings
Page 56 of 66
BibTag User Manual (Revision 1.1)
Error
Problem(s)
Solution(s)
Chip queue at 90%
Memory is becoming full
Save the current passings to
Toolkit
Undefined
Contact MYLAPS
Internal communication failed
Contact MYLAPS
Internal communication failed
Contact MYLAPS
Internal communication failed
Contact MYLAPS
Internal communication failed
Contact MYLAPS
Decoder Re-read
Internal communication
resync was required
Contact MYLAPS
EM Com error FE
Undefined
Contact MYLAPS
EM Com error OE
Undefined
Contact MYLAPS
EM Com error BRK
Undefined
Contact MYLAPS
External battery low
Warning that external battery
charge level is low and BibTag
will switch to internal battery
supply
Connect to an extra external
battery, or connect to AC power (if
no other option)
Firmware will expire
Firmware must be updated
Install new firmware (see section
4.4.3.6)
Firmware must be updated
Install new firmware (see section
4.4.3.6)
GPS
No communication is possible
via GPS - no sync with GPS
time.
Restart (see 7.8)
Internal battery
Battery connection is disabled
Reconnect
Maintenance required
battery voltage high
Battery has been charged at
too high a current
Replace battery if message
repeats (see 7.7)
Maintenance required
battery delta T
Battery has been loaded for
too long
Replace battery if message
repeats (see 7.7)
Maintenance required
battery capacity
Battery has been loaded for
too long
Replace battery if message
repeats (see 7.7)
Old EM firmware
Started wrong software
version
Reload correct firmware (see
section 4.4.3.6)
Started wrong software
version
Reload correct firmware (see
section 4.4.3.6)
save passings
Communication error
Contact MYLAPS
Decoder error
Contact MYLAPS
Decoder time failed
Contact MYLAPS
Decoder not found
Contact MYLAPS
Decoder conn lost
Contact MYLAPS
in 1 month
Firmware expired
Update now
disconnected
Update firmware
Old reader firmware
Update firmware
BibTag User Manual (Revision 1.1)
Page 57 of 66
Error
Problem(s)
Solution(s)
Supply voltage
load high
The measured supply current
is too high
Connect alternative (110 - 240
VAC) supply. Contact MYLAPS if
error repeats
Timing error
Undefined
Contact MYLAPS
Internal communication failed
Contact MYLAPS
Software problem
Contact MYLAPS
Confirmation of a software
update
Press operator button to
acknowledge message
Contact MYLAPS
Unsupported decoder
Contact MYLAPS
Update error
Contact MYLAPS
Version changed to Version
x.x
Page 58 of 66
BibTag User Manual (Revision 1.1)
8.4
Problems with updating software
If a problem occurs with an updated software version, BibTag can revert to a working
software version as follows.
1
Check BibTag is started:
• If BibTag does not start correctly, restart to
force a reboot with a working software
version
2
Update software and make sure you select a
software version that previously ran correctly
on your BibTag.
3
Report software problem to MYLAPS.
8.5
Reset to factory defaults
If required, BibTag can be reset to the original factory settings.
1
Access General > Factory settings
2
Use the operator buttons to choose 'Default'
3
The controller will automatically reboot with
the factory defaults.
BibTag User Manual (Revision 1.1)
Page 59 of 66
8.6
GPS reception is weak or lost
Solve problems with a weak or lost GPS signal as follows.
1
Reposition the Modem/GPS unit so that it has
a clear view of any possible satellites (not
obstructed by buildings, trees, etc.)
2
Check signal strength
• Check the number of GPS satellites shown
on the top of the screen (should be showing
at least 3 satellites)
3
Reposition the Modem/GPS unit again if
necessary
Page 60 of 66
BibTag User Manual (Revision 1.1)
APPENDICES
This section contains the following appendices:
• Appendix 1: Specifications on page 62
• Appendix 2: IO port pin settings on page 64
• Appendix 3: CE Declaration on page 65
BibTag User Manual (Revision 1.1)
Page 61 of 66
Appendix 1: Specifications
Decoder
Material
Modified Pelican 1500 case
Dimensions (B x D x H)
371 x 258 x 152 mm (14.61 x 10.16 x 5.98 in)
Weight (including accessories)
10 kg (22 lb)
AC input voltage
100 to 240 VAC at 50/60 Hz
Power consumption (charging)
60 W
Power consumption (charged)
2.5 W
Typical power consumption (operation)
7.2 W
Max. power consumption (operation)
12 W
Internal battery current
14.8 V / 40 Ah LiPo
Charge time (device switched off)
<5 hours
Charge time (device switched on)
<10 hours
Operating time (with full battery)
20 hours (4 mat system); 12 hours (8 mat system)
Operating temperature (charging)
0 to +40 °C (+32 to +104 °F)
Operating temperature (not charging)
-20 to +50 °C (-4 to +122 °F)
Storage temperature
-20 to +40 °C (-4 to +104 °F)
Relative humidity
Max. 90%, non-condensing
Pollution degree
III
Protection class (cover closed)
IP54
Protection class (cover open)
IP33
Safety norm
EN60950
Maximum chip passing speed
40 km/h (25 mph)
Maximum laid antenna dimension (W x L)
0.6 x 24 m (2 x 72 ft)
Max. unique chip detects
50/sec
Timing Resolution
0.004 sec
Clock tolerance
1 ppm
Maximum detection buffer size
80,000 chips
Life span
approx. 5 years
Page 62 of 66
BibTag User Manual (Revision 1.1)
Modem/GPS unit
Dimensions (B x D x H)
100 mm x 70 mm x 40 mm (3.94 x 2.76 x 1.57 in)
Cable length
3 m (118 in)
Weight
350 g (0.77 lb)
Life span
approx. 5 years
Operating temperature
-20 to +50 °C (-4 to +122 °F)
Storage temperature
-20 to +40 °C (-4 to +104 °F)
GSM unit
Quadband (850/900/1800/1900 MHz), GPRS, EDGE
IP Protection Class
IP 65
Mat
Dimensions (Width x Length x Height)
1000 mm x 770 mm x 20 mm (39.3 x 30.3 x 0.79 in)
Weight
5 kg (11 lb)
Life span
approx. 3 years
Operating temperature
-20 to +50 °C (-4 to +122 °F)
Storage temperature
-20 to +40 °C (-4 to +104 °F)
IP Protection Class
IP 11
BibTag
Dimensions (Width x Height)
125 x 57 mm (4.92 x 2.24 in)
Weight
customer dependent
Life span
approx. 2.5 years (at room temperature)
Max. speed
40 km/h (25 mph)
Max. detection height
approx. 2 m (6.6 ft)
Operating temperature
-40 to +85 °C (-40 to +185 °F)
Storage temperature
-20 to +40 °C (-4 to +104 °F)
Protocol
EPCglobal Class 1, Gen 2 ISO 18000-6C
Power source
Integrated proprietary disposable battery
Operating frequency
860-960 MHz
IP Protection Class
IP 53
BibTag User Manual (Revision 1.1)
Page 63 of 66
Appendix 2: IO port pin settings
Figure 8.3 Pin settings
Function
Pin
Function
Pin
ground
1, 5, 9
Gun -
12
+5 V (max 300 mA)
8, 15
Ext 2 +
11
Ext 1 +
7
Ext 2 -
10
Ext 1 -
6
output +
14
Gun +
13
output -
4
Table 8.1 I/O port settings
Page 64 of 66
BibTag User Manual (Revision 1.1)
Appendix 3: CE Declaration
CE DECLARATION OF CONFORMITY
We,
MYLAPS
Zuiderhoutlaan 4
2012 PJ Haarlem, The Netherlands
Declare that the UHF system
BibTag Portable Decoder
in accordance with the following directives:
2006 / 95 / EC
The Low Voltage Directive
2004 / 108 / EC
The Electromagnetic Compatibility Directive
1999/5/EC
Radio & Telecommunications Terminal Equipment Directive
has been designed and manufactured to the following specifications:
EN 301-489-1 (2005-09)
EN 301-489-3 (2002-08)
EN 302-208-2 (2008-04)
EN 61000-3-2 (2006)
EN 61000-3-3 (2008)
I hereby declare that the product named above is designed to comply with the relevant
sections of the above referenced specifications, and all essential requirements of the
Directives.
Name of authorized person:
John Verwoerd
Function of authorized person:
R & D Director
Place and Date:
Haarlem, 20 April 2010
Signature of authorized person:
BibTag User Manual (Revision 1.1)
Page 65 of 66
MYLAPS contact information:
For general information:
MYLAPS EMEA Office Haarlem
Zuiderhoutlaan 4
2012 PJ Haarlem
The Netherlands
Phone: +31 (0)23 529 1893
Fax: +31 (0)23 529 0156
[email protected]
For information about BibTag:
MYLAPS Office Nijmegen
Havenweg 15
6541 AD Nijmegen
The Netherlands
Phone: +31 (0)24 379 1244
Fax: +31 (0)24 379 1245
[email protected]
Worldwide support team
[email protected]
Worldwide sales
[email protected]
Local enquiries
Please contact your local distributor
Page 66 of 66
BibTag User Manual (Revision 1.1)