1
SFACCESS
USER MANUAL
__________________________________________
DANIEL MEASUREMENT AND CONTROL
HOUSTON, TEXAS
Part Number: 3-9000-509
REVISION F
DECEMBER 1998
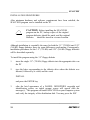
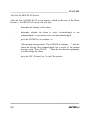
Year 2000 Warranty
The Company represents and warrants that computer programs in any medium, software,
firmware and combinations thereof (“Deliverables”) manufactured by the Company and
incorporated into or supplied by the Company for use with goods manufactured by the Company
will, under normal use and care:
i)
recognize and accept dates falling on or after 1 January 2000;
ii)
recognize and accept the year 2000 and every succeeding fourth year as leap
years;
iii)
recognize and accept 29 February in the year 2000 and every succeeding fourth
year;
iv)
record, store, process, sequence, present and output calendar dates and data related
to dates falling on or after 1 January 2000, in the same manner and with the same
functionality as they do on or before 31 December 1999 and without errors or
omissions; and
v)
lose no functionality with respect to the introduction into them of dates or data
related to dates falling on or after 1 January 2000;
provided that, in the case of any non-conforming Deliverables that are returned to the Company
promptly following discovery of the non-conformity, the Company will, at its option and cost,
repair or replace such Deliverable or refund to the Purchaser the purchase price therefor. This
shall be the Purchaser's sole and exclusive remedy for breach of the foregoing warranty.
Notwithstanding the foregoing, the Company shall not, under any circumstances whatsoever, be
liable for any defects or errors caused by: materials or workmanship made, furnished or specified
by the Purchaser; non-compliance with the Company's installation or operation requirements;
failure to install any revisions and/or upgrades to the Deliverables deemed mandatory by the
Company; any modifications to Deliverables not previously authorized by the Company in
writing; the use by the Purchaser of any non-authorized spare or replacement parts in connection
with the goods used in conjunction with the Deliverables; or the use of the Deliverables with any
hardware or software not supplied by the Company. The Purchaser shall at all times remain
solely responsible for the adequacy and accuracy of all information supplied by it. Any third
party content in Deliverables shall carry only the warranty extended by the original manufacturer.
THE FOREGOING CONSTITUTES THE COMPANY'S SOLE AND EXCLUSIVE
WARRANTY IN RELATION TO THE PERFORMANCE OF THE DELIVERABLES AS IT
RELATES TO THE CHANGE FROM YEAR 1999 TO YEAR 2000 OR THE OCCURRENCE
OF LEAP YEARS THEREAFTER, AND THE PURCHASER'S EXCLUSIVE REMEDY FOR
BREACH THEREOF. IN NO EVENT WILL THE COMPANY BE LIABLE FOR INDIRECT,
CONSEQUENTIAL, INCIDENTAL OR SPECIAL DAMAGES, INCLUDING LOSS OF USE,
BUSINESS INTERRUPTION OR LOSS OF PROFITS, IRRESPECTIVE OF WHETHER THE
COMPANY HAD NOTICE OF THE POSSIBILITY OF SUCH DAMAGES.
The foregoing warranty shall remain valid until the later of December 31, 2000 or one year after
the date that the Deliverable was shipped.
SFACCESS _________________________________________________________
DANIEL INDUSTRIES, INC.
SFACCESS USERS MANUAL
NOTICE
DANIEL INDUSTRIES, INC. AND DANIEL MEASUREMENT AND CONTROL ("DANIEL")
SHALL NOT BE LIABLE FOR TECHNICAL OR EDITORIAL ERRORS IN THIS MANUAL
OR OMISSIONS FROM THIS MANUAL. DANIEL MAKES NO WARRANTIES, EXPRESS
OR IMPLIED, INCLUDING THE IMPLIED WARRANTIES OF MERCHANTABILITY
AND FITNESS FOR A PARTICULAR PURPOSE WITH RESPECT TO THIS MANUAL
AND, IN NO EVENT, SHALL DANIEL BE LIABLE FOR ANY SPECIAL OR
CONSEQUENTIAL DAMAGES INCLUDING, BUT NOT LIMITED TO, LOSS OF
PRODUCTION, LOSS OF PROFITS, ETC.
PRODUCT NAMES USED HEREIN ARE FOR MANUFACTURER OR SUPPLIER
IDENTIFICATION ONLY AND MAY BE TRADEMARKS/REGISTERED TRADEMARKS OF
THESE COMPANIES.
COPYRIGHT © 1998
BY DANIEL MEASUREMENT AND CONTROL
HOUSTON, TEXAS, U.S.A.
All rights reserved. No part of this work may be reproduced or
copied in any form or by any means - graphic, electronic or
mechanical - without first receiving the written permission of
Daniel Measurement and Control, Houston, Texas, U.S.A.
_____________________________________________________________________
PREFACE
i
_________________________________________________________ SFACCESS
WARRANTY
Daniel Measurement and Control ("Daniel") warrants all equipment manufactured by it to be free
from defects in workmanship and material, provided that such equipment was properly selected
for the service intended, properly installed, and not misused. Equipment which is returned,
transportation prepaid to Daniel within twelve (12) months of the date of shipment (eighteen (18)
months from date of shipment for destinations outside of the United States), which is found after
inspection by Daniel to be defective in workmanship or material, will be repaired or replaced at
Daniel’s sole option, free of charge, and return-shipped at lowest cost transportation. All
transportation charges and export fees will be billed to the customer. Warranties on devices
purchased from third party manufacturers not bearing a Daniel label shall have the warranty
provided by the third party manufacturer.
Extended warranty - Models 2470, 2480 and 2500 are warranted for a maximum of twenty-four
(24) months. The Danalyzer valves are warranted for the life of the instrument and the columns
for five years.
The warranties specified herein are in lieu of any and all other warranties, express or implied,
including any warranty of merchantability or fitness for a particular purpose.
Daniel shall be liable only for loss or damage directly caused by its sole negligence. Daniel’s
liability for any loss or damage arising out of, connected with, or resulting from any breach
hereof shall in no case exceed the price allocable to the equipment or unit thereof which gives
rise to the claim. Daniel’s liability shall terminate one year after the delivery of the equipment
except for overseas deliveries and extended warranty products as noted above.
In no event, whether as a result of breach of warranty or alleged negligence, shall Daniel be
liable for special or consequential damages, including, but not limited to, loss of profits or
revenue; loss of equipment or any associated equipment; cost of capital; cost of substitute
equipment, facilities or services; downtime costs; or claims of customers of the purchaser for
such damages.
_____________________________________________________________________
ii
PREFACE
SFACCESS _________________________________________________________
SECTION 1
INTRODUCTION . . . . . . . . . . . . . . . . . . . . . . . . . . . . . . . . . . . . . . . .
1
PROGRAM FEATURES . . . . . . . . . . . . . . . . . . . . . . . . . . . . . . . . . . . .
3
DUAL PROGRAM ENVIRONMENT . . . . . . . . . . . . . . . . . . . . . . .
4
"OFF-LINE" MAIN MENU OVERVIEW . . . . . . . . . . . . . . . . . . . .
5
"ON-LINE" MAIN MENU OVERVIEW . . . . . . . . . . . . . . . . . . . .
11
KEY FUNCTIONS . . . . . . . . . . . . . . . . . . . . . . . . . . . . . . . . . . .
17
MANUAL DESIGN FEATURES . . . . . . . . . . . . . . . . . . . . . . . . . . . . .
20
SECTION 2
INSTALLATION AND INITIAL SETUP . . . . . . . . . . . . . . . . . . . . . .
21
INTRODUCTION . . . . . . . . . . . . . . . . . . . . . . . . . . . . . . . . . . . .
21
HARDWARE REQUIREMENTS . . . . . . . . . . . . . . . . . . . . . . . . .
22
SOFTWARE REQUIREMENTS . . . . . . . . . . . . . . . . . . . . . . . . . .
23
INSTALLATION PROCEDURES . . . . . . . . . . . . . . . . . . . . . . . .
24
SETUP PROCEDURES . . . . . . . . . . . . . . . . . . . . . . . . . . . . . . . .
31
PC SETUP PROCEDURES . . . . . . . . . . . . . . . . . . . . . . . . . . . . .
32
The "SFPlus Communications Setup" Option . . . . . . . . . . . . .
34
The "Printer Function Setup" Option . . . . . . . . . . . . . . . . . .
36
_____________________________________________________________________
TABLE OF CONTENTS
iii
_________________________________________________________ SFACCESS
The "Export Function Setup" Option . . . . . . . . . . . . . . . . . .
41
The "View Function Setup" Option . . . . . . . . . . . . . . . . . . .
45
The "Display Setup" Option . . . . . . . . . . . . . . . . . . . . . . . .
48
The "Database Setup" Option . . . . . . . . . . . . . . . . . . . . . . .
50
The "Password Setup" Option . . . . . . . . . . . . . . . . . . . . . . .
55
The "Save Configuration" Option
....................
60
EXITING THE PROGRAM . . . . . . . . . . . . . . . . . . . . . . . . . . . . .
61
SOLARFLOW PLUS SETUP PROCEDURES . . . . . . . . . . . . . . . .
63
The "General Information" Option . . . . . . . . . . . . . . . . . . . .
65
The "Security Code List" Option . . . . . . . . . . . . . . . . . . . . .
67
The "User Report Definition" Option . . . . . . . . . . . . . . . . . .
69
The "Communication Configuration" Option . . . . . . . . . . . . .
71
The "Data Log Definition" Option . . . . . . . . . . . . . . . . . . . .
73
The "Analog Inputs" Option . . . . . . . . . . . . . . . . . . . . . . . .
79
The "Control Outputs" Option . . . . . . . . . . . . . . . . . . . . . . .
82
The "Scale Values" Option . . . . . . . . . . . . . . . . . . . . . . . . .
85
The "Calculation Configuration" Option . . . . . . . . . . . . . . . .
88
The "Alarm Configuration" Option . . . . . . . . . . . . . . . . . . . .
91
_____________________________________________________________________
iv
TABLE OF CONTENTS
SFACCESS _________________________________________________________
The "Calculation Factors" Option . . . . . . . . . . . . . . . . . . . . .
94
SECTION 3
PC MAIN MENU CONTENTS . . . . . . . . . . . . . . . . . . . . . . . . . . . . . .
97
THE "LOGON" OPTION . . . . . . . . . . . . . . . . . . . . . . . . . . . . . .
98
The "Go On-line" Option . . . . . . . . . . . . . . . . . . . . . . . . . .
99
THE "PRINT" OPTION . . . . . . . . . . . . . . . . . . . . . . . . . . . . . . . 105
The "All Collected Data" Option . . . . . . . . . . . . . . . . . . . . . 106
The "Selected Location" Option . . . . . . . . . . . . . . . . . . . . . . 109
THE "VIEW" OPTION . . . . . . . . . . . . . . . . . . . . . . . . . . . . . . . . 113
The "Data Logs (Graph)" Option . . . . . . . . . . . . . . . . . . . . . 114
The "Data Logs (Text)" Option . . . . . . . . . . . . . . . . . . . . . . 120
The "Miscellaneous Logs" Option . . . . . . . . . . . . . . . . . . . . 126
The "Event Logs" Option . . . . . . . . . . . . . . . . . . . . . . . . . . 129
THE "EXPORT" OPTION . . . . . . . . . . . . . . . . . . . . . . . . . . . . . . 135
The "All Collected Data" Option . . . . . . . . . . . . . . . . . . . . . 137
The "Selected Location" Option . . . . . . . . . . . . . . . . . . . . . . 140
THE "ERASE" OPTION . . . . . . . . . . . . . . . . . . . . . . . . . . . . . . . 144
The "All Collected Data" Option . . . . . . . . . . . . . . . . . . . . . 145
_____________________________________________________________________
TABLE OF CONTENTS
v
_________________________________________________________ SFACCESS
THE "EXIT" OPTION . . . . . . . . . . . . . . . . . . . . . . . . . . . . . . . . 147
The "Go to DOS" Option . . . . . . . . . . . . . . . . . . . . . . . . . . 148
SECTION 4
SOLARFLOW PLUS MAIN MENU CONTENTS . . . . . . . . . . . . . . . . 151
THE "LOGOFF" OPTION . . . . . . . . . . . . . . . . . . . . . . . . . . . . . . 153
The "Go Off-line" Option . . . . . . . . . . . . . . . . . . . . . . . . . . 154
THE "COLLECT" OPTION . . . . . . . . . . . . . . . . . . . . . . . . . . . . . 155
The "Update Since Last Collection" Option . . . . . . . . . . . . . . 157
The "Specified Number of Days" Option . . . . . . . . . . . . . . . 161
The "Specified Date Range" Option . . . . . . . . . . . . . . . . . . . 167
The "All Stored Information" Option . . . . . . . . . . . . . . . . . . 173
THE "DISPLAY" OPTION . . . . . . . . . . . . . . . . . . . . . . . . . . . . . 177
The "General Information" Option . . . . . . . . . . . . . . . . . . . . 179
The "Security Code List" Option . . . . . . . . . . . . . . . . . . . . . 180
The "User Report Definition" Option . . . . . . . . . . . . . . . . . . 181
The "Communication Configuration" Option . . . . . . . . . . . . . 182
The "Data Log Definition" Option . . . . . . . . . . . . . . . . . . . . 183
The "Analog Inputs" Option . . . . . . . . . . . . . . . . . . . . . . . . 184
_____________________________________________________________________
vi
TABLE OF CONTENTS
SFACCESS _________________________________________________________
The "Status Inputs" Option . . . . . . . . . . . . . . . . . . . . . . . . . 185
The "Control Outputs" Option . . . . . . . . . . . . . . . . . . . . . . . 186
The "Scale Values" Option . . . . . . . . . . . . . . . . . . . . . . . . . 187
The "Rates and Volumes" Option . . . . . . . . . . . . . . . . . . . . . 188
The "Calculation Configuration" Option . . . . . . . . . . . . . . . . 189
The "Alarm Configuration" Option . . . . . . . . . . . . . . . . . . . . 190
The "Calculation Factors" Option . . . . . . . . . . . . . . . . . . . . . 191
THE "CALIBRATION" OPTION . . . . . . . . . . . . . . . . . . . . . . . . . 192
The "Pressures" Option . . . . . . . . . . . . . . . . . . . . . . . . . . . . 194
The "Others" Option . . . . . . . . . . . . . . . . . . . . . . . . . . . . . . 202
THE "ALARM" OPTION . . . . . . . . . . . . . . . . . . . . . . . . . . . . . . 210
The "Acknowledge" Option . . . . . . . . . . . . . . . . . . . . . . . . . 211
APPENDIX A
ASCII EXPORT FILE SPECIFICATIONS . . . . . . . . . . . . . . . . . . . . . 213
APPENDIX B
APPLICATION NOTES . . . . . . . . . . . . . . . . . . . . . . . . . . . . . . . . . . . 223
INTRODUCTION . . . . . . . . . . . . . . . . . . . . . . . . . . . . . . . . . . . . 223
dBASE IV . . . . . . . . . . . . . . . . . . . . . . . . . . . . . . . . . . . . . . . . . 224
_____________________________________________________________________
TABLE OF CONTENTS
vii
_________________________________________________________ SFACCESS
FOXPRO . . . . . . . . . . . . . . . . . . . . . . . . . . . . . . . . . . . . . . . . . . 237
LOTUS 1-2-3 . . . . . . . . . . . . . . . . . . . . . . . . . . . . . . . . . . . . . . . 252
PARADOX . . . . . . . . . . . . . . . . . . . . . . . . . . . . . . . . . . . . . . . . 259
QUATTRO . . . . . . . . . . . . . . . . . . . . . . . . . . . . . . . . . . . . . . . . 267
QUATTRO PRO . . . . . . . . . . . . . . . . . . . . . . . . . . . . . . . . . . . . 274
_____________________________________________________________________
viii
TABLE OF CONTENTS
SFACCESS _________________________________________________________
INTRODUCTION
This manual, the DANIEL INDUSTRIES SFACCESS USERS MANUAL, Daniel
Part No. 3-9000-509, describes the installation, features and operation of the
DANIEL INDUSTRIES SFACCESS (SOLARFLOW PLUS Access) SOFTWARE
PROGRAM, Daniel Part No. 3-2470-040.
_________________________________________________________
WARNING: Do NOT use the DANIEL
INDUSTRIES SFACCESS SOFTWARE PROGRAM,
or any other DANIEL INDUSTRIES software
programs, in a hazardous environment, which
contains potentially flammable or explosive
atmospheric conditions, unless the program is
housed and operated in a safe and appropriatelydesigned computer hardware system (or systems).
_________________________________________________________
The DANIEL INDUSTRIES SFACCESS (SOLARFLOW PLUS Access)
SOFTWARE PROGRAM (hereafter referred to as the SFACCESS program) is
designed to contact, configure and collect data from DANIEL INDUSTRIES
SOLARFLOW-PLUS computer hardware through the use of IBM or IBMcompatible personal computers (PC’s). Since DANIEL INDUSTRIES, INC. does
not recommend or supply IBM or IBM-compatible personal computers to be used
in hazardous operating environments, all indemnity pertaining to the use of such
a device is the sole responsibility of the user.
_____________________________________________________________________
SECTION 1
1
_________________________________________________________ SFACCESS
The SFACCESS program emulates the capabilities of the DANIEL INDUSTRIES
HAND HELD DATA TERMINAL (HHDT), but provides the user the
conveniences of a personal computer (PC) screen and keyboard. The SFACCESS
program enables the user to
-
set up a SOLARFLOW-PLUS computer in the field
-
customize, change application parameters in, and collect data from a
SOLARFLOW-PLUS computer
-
calibrate or monitor analog inputs
-
view and print SOLARFLOW-PLUS data and event logs
-
erase data and event logs
-
view graphs of data logs
-
create export files for use by other programs
_____________________________________________________________________
2
SECTION 1
SFACCESS _________________________________________________________
PROGRAM FEATURES
The DANIEL INDUSTRIES SFACCESS program is a menu-driven program with
menus, options and windows designed to allow the user efficient operation of the
system in both a
-
personal computer (PC) environment and
-
SOLARFLOW PLUS computer environment.
This section categorizes, lists and briefly explains
-
the basic operational features of the program, including all menus,
sub-menus, and windows, along with their various options and
selections
-
the designated key functions, which allow the user to successfully use
and navigate through the system.
_____________________________________________________________________
SECTION 1
3
_________________________________________________________ SFACCESS
DUAL PROGRAM ENVIRONMENT
The SFACCESS program has the unique distinction of containing two MAIN
MENU screens with each one containing distinct options, sub-menus, and windows.
The necessity for such a dual arrangement is because the SFACCESS program is
designed to link together, operate in and communicate between a personal computer
(PC) environment and a SOLARFOW PLUS computer environment.
The MAIN MENU screen for the personal computer (PC) environment is
designated as the "SOLARFLOW PLUS ACCESS (Off-line menu)", and the MAIN
MENU screen for the SOLARFLOW PLUS computer environment is designated
as the "SOLARFLOW PLUS ACCESS (On-line menu)".
Broad features of both environment "halves" will be briefly presented in following
sub-sections, which are entitled "OFF-LINE" MAIN MENU OVERVIEW, and
"ON-LINE" MAIN MENU OVERVIEW. For further information about where to
access complete program details, refer to the sub-section in this manual, which is
entitled MANUAL DESIGN FEATURES.
_____________________________________________________________________
4
SECTION 1
SFACCESS _________________________________________________________
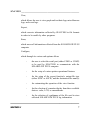
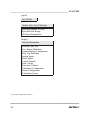
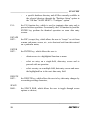
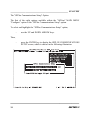
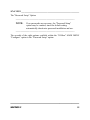
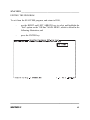
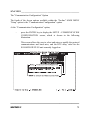
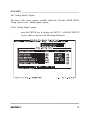
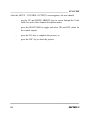
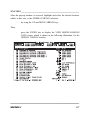
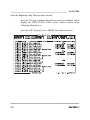
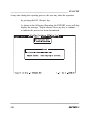
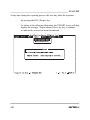
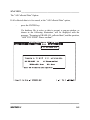
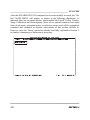
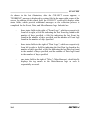
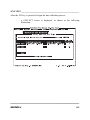
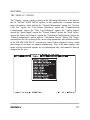
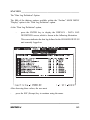
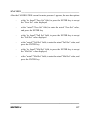
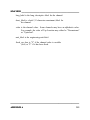
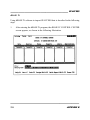
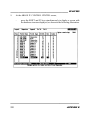
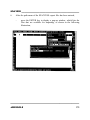
"OFF-LINE" MAIN MENU OVERVIEW
The "Off-line" MAIN MENU screen, which is shown in the following illustration,
is the first screen to appear after the SFACCESS program is activated. As shown,
the screen illustrates the "top title" line, the "MAIN MENU bar" line and the
"bottom title" line.
_____________________________________________________________________
SECTION 1
5
_________________________________________________________ SFACCESS
As previously indicated, the "Off-line" MAIN MENU screen features, which are
also reflected in most of the "Off-line" program’s other screens, include the
"TOP TITLE" LINE
The first or top line of the screen designates or identifies the program as the
"SOLARFLOW PLUS ACCESS (Off-line Menu)".
"MAIN MENU BAR" LINE
The second line, which appears immediately beneath the first or "top title"
line, is the "MAIN MENU BAR" line. This line, which is also referred to as
the "option" or "menu" line, displays the seven primary, "fixed" menu
options. Each of these primary options contains additional options or submenu selections.
From left to right, the seven MAIN MENU screen options are
Logon,
which allows the user to initiate communication (logon) with the
SOLARFLOW PLUS computer. However, before this function can be
performed, a security code is required.
When the "Off-line" MAIN MENU screen first appears, the "Logon"
option is automatically highlighted by default.
Print,
which allows the user to print collected data logs, event log, and
configuration information either from all locations or selected
locations. A beginning/ending date range and other options defining
the scope of the report may also be selected.
_____________________________________________________________________
6
SECTION 1
SFACCESS _________________________________________________________
View,
which allows the user to view graph and text data logs, miscellaneous
logs, and event logs.
Export,
which converts information collected by SFACCESS to file formats
in order to be usable by other programs.
Erase,
which erases all information collected from the SOLARFLOW PLUS
computer.
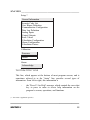
Configure,
which through its various sub-options allows
-
the user to select the serial port (either COM1 or COM2)
to be used by SFACCESS to communicate with the
SOLARFLOW PLUS computer
-
for the setup of various printer operational features
-
for the setup of the export function’s output-file type
(either SFDC or ASCII), and the destination file name(s)
-
for customizing the operation of the view function
-
for the selection of a monitor display from three available
choices: color, LCD, or monochrome
-
for the selection of a pathname of the file used to store
collected SOLARFLOW PLUS log information
_____________________________________________________________________
SECTION 1
7
_________________________________________________________ SFACCESS
-
for the setup of a password system to restrict access to
SFACCESS
-
the saving of configuration changes made through the
previous menu options
Exit,
which allows the user to exit the SFACCESS program and return to
DOS.
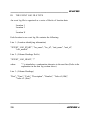
MAIN MENU OPTION MENUS
There are several "sub-menus" (or windows), which can be individually and
sequentially accessed from the seven primary MAIN MENU options
described above. Each of these menus contains various sub-menus,
selections, or options, which will be discussed and explained in detail in later
sections.
However, the MAIN MENU options, along with any associated menus, are
shown in the following illustrations. These menus, which are also accessed
and viewed from left to right on the MAIN MENU screen, are
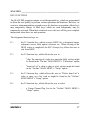
Logon
Go On-line
Print
All Collected Data
Selected Location
_____________________________________________________________________
8
SECTION 1
SFACCESS _________________________________________________________
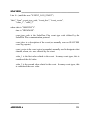
View
Data Logs (Graph)
Data Logs (Text)
Miscellaneous Logs
Event Logs
Export
All Collected Data
Selected Location
Erase
All Collected Data
Configure
SFPlus Communications Setup
Printer Function Setup
Export Function Setup
View Function Setup
Display Function Setup
Database Setup
Password Setup
Save Configuration
Exit
Go to DOS
_____________________________________________________________________
SECTION 1
9
_________________________________________________________ SFACCESS
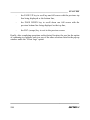
"BOTTOM TITLE" LINE
This line, which appears at the bottom of most program screens, and is
sometimes referred to as the "status" line, provides several types of
information. From left to right, this information is
-
the "Press F1 for Help" message, which reminds the user what
key to press in order to access help information on the
program’s screens, operations, and functions.
-
the path and file name of the currently active data base
-
the current amount of disk space being used, which is expressed
as a percentage
-
the current time
_____________________________________________________________________
10
SECTION 1
SFACCESS _________________________________________________________
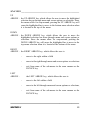
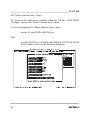
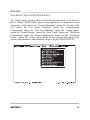
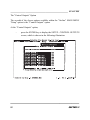
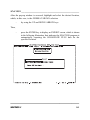
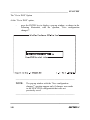
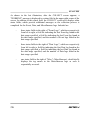
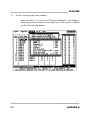
"ON-LINE" MAIN MENU OVERVIEW
The "On-line" MAIN MENU screen, which is shown in the following illustration,
is the first screen to appear after the user logs on to the SOLARFLOW PLUS
computer side of the SFACCESS program. As shown, the screen illustrates the "top
title" line, the "MAIN MENU bar" line and the "bottom title" line.
_____________________________________________________________________
SECTION 1
11
_________________________________________________________ SFACCESS
As previously indicated, the "On-line" MAIN MENU screen features, which are
also reflected in most of the "On-line" program’s other screens, include the
"TOP TITLE" LINE
The first or top line of the screen designates or identifies the program as the
"SOLARFLOW PLUS ACCESS (On-line Menu)".
"MAIN MENU BAR" LINE
The second line, which appears immediately beneath the first or "top title"
line, is the "MAIN MENU BAR" line. This line, which is also referred to as
the "option" or "menu" line, displays the six primary, "fixed" menu options.
Each of these primary options contains additional options or sub-menu
selections.
From left to right, the six MAIN MENU screen options are
Logoff,
which allows the user to terminate communication (logoff) with the
SOLARFLOW PLUS computer, and return to the "Off-line" MAIN
MENU of the SFACCESS program.
When the "On-line" MAIN MENU screen first appears, the "Logoff"
option is automatically highlighted by default.
Collect,
which allows the user to collect Event, Data, and Miscellaneous logs,
as well as various configuration and channel information over selected
periods of time, and send this data to a specific database file
_____________________________________________________________________
12
SECTION 1
SFACCESS _________________________________________________________
Display,
which allows the user to view the various setup parameters and
calculated values in the SOLARFLOW PLUS.
Setup,
which allows the user to select and set the various setup parameters
and calculated values in the SOLARFLOW PLUS.
Calibration,
which allows the user to match the SOLARFLOW PLUS analog input
circuitry/software with the outputs from the analog transmitters that
drive the SOLARFLOW PLUS device, and to monitor the various
input values.
Alarm,
which allows the user to scan and acknowledge (or not acknowledge)
enabled alarms in the SOLARFLOW PLUS unit currently logged on.
MAIN MENU OPTION MENUS
There are several "sub-menus" (or windows), which can be individually and
sequentially accessed from the six primary MAIN MENU options described
above. Each of these menus contains various sub-menus, selections, or
options, which will be discussed and explained in detail in later sections.
However, the MAIN MENU options, along with any associated menus, are
shown in the following illustrations. These menus, which are also accessed
and viewed from left to right on the MAIN MENU screen, are
_____________________________________________________________________
SECTION 1
13
_________________________________________________________ SFACCESS
Logoff
Go Off-line
Collect
Update Since Last Collection
Specified Number of Days
Specified Date Range
All Stored Information
Display *
General Information
Security Code List
User Report Definition
Communication Configuration
Data Log Definition
Analog Inputs
Status Inputs
Control Outputs
Scale Values
Rates and Volumes
Calculation Configuration
Alarm Configuration
Calculation Factors
(* this menu is application specific)
_____________________________________________________________________
14
SECTION 1
SFACCESS _________________________________________________________
Setup *
General Information
Security Code List
User Report Definition
Communication Configuration
Data Log Definition
Analog Inputs
Control Outputs
Scale Values
Calculation Configuration
Alarm Configuration
Calculation Factors
Calibration
Pressures
Others
Alarm
Acknowledge
"BOTTOM TITLE" LINE
This line, which appears at the bottom of most program screens, and is
sometimes referred to as the "status" line, provides several types of
information. From left to right, this information is
-
the "Press F1 for Help" message, which reminds the user what
key to press in order to access help information on the
program’s screens, operations, and functions.
(* - this menu is application specific)
_____________________________________________________________________
SECTION 1
15
_________________________________________________________ SFACCESS
-
the path and file name of the currently active data base
-
the current amount of disk space being used, which is expressed
as a percentage
-
the current time
_____________________________________________________________________
16
SECTION 1
SFACCESS _________________________________________________________
KEY FUNCTIONS
The SFACCESS program contains several designated keys, which are programmed
to allow the user quickly to perform various operations and functions. However, on
occasion, when manipulating a graph screen, the function or operation of these keys
may temporarily change, or other keys, which are used infrequently, may be
temporarily activated. When these situations occur, the user will be given complete
instructions about their use and operation.
The designated function keys are
F1 -
the F1 function key, which accesses HELP for a designated menu,
sub-menu, screen, field, option, selection, etc.. When viewing of the
HELP screen is completed, the ESC (Escape) key allows the user to
exit from HELP.
F2 -
the F2 function key, which allows the user to
-
"skip" the entering of a value in a particular field, such as might
be found in the "On-line" MAIN MENU’s "Calibration" option
-
"Insert to List" a value or entry to a list, such as might be found
in the "On-line" MAIN MENU’s "Setup" option.
F3 -
the F3 function key, which allows the user to "Delete from List" a
value or entry on a list, such as might be found in the "On-line"
MAIN MENU’s "Setup" option.
F9 -
the F9 function key, which allows the user to select
-
a Popup Channel/Tag List in the "On-line" MAIN MENU’s
"Setup" option
_____________________________________________________________________
SECTION 1
17
_________________________________________________________ SFACCESS
-
F10 -
ESCAPE
KEY -
ENTER
KEY -
DELETE
KEY -
SPACE
BAR -
a specific database directory and all files currently available in
the selected directory through the "Database Setup" option in
the "Off-line" MAIN MENU’s "Configure" option.
the F10 function key, which is used to terminate data entry and to
proceed with an operation. Occasionally, the F10 function key and the
ENTER key perform the identical operation on some data entry
screens.
the ESC (escape) key, which allows the user to "escape" or exit from
a menu, sub-menu, screen, etc., or to abort and exit from data entered
on a particular menu,
the ENTER key, which allows the user to
-
obtain access to a highlighted function or menu
-
select an entry on a single-field, data-entry screen and to
proceed with an operation
-
select an entry on a multiple-field, data-entry screen and move
the highlighted bar to the next data-entry field
the DELETE key, which allows the user to key data entry changes by
overwriting existing characters,
the SPACE BAR, which allows the user to toggle through screen
options or choices,
_____________________________________________________________________
18
SECTION 1
SFACCESS _________________________________________________________
UP
ARROW - the UP ARROW key, which allows the user to move the highlighted
selection bar up through menu and screen options or selections. Since
the menus allow for wrap-around, pressing the UP ARROW key will
cause the highlighted bar to move to the bottom menu selection when
it is located at the top of the menu.
DOWN
ARROW - the DOWN ARROW key, which allows the user to move the
highlighted selection bar down through menu and screen options or
selections. Since the menus allow for wrap-around, pressing the
DOWN ARROW key will cause the highlighted bar to move to the
top menu selection when it is located at the bottom of the menu.
RIGHT
ARROW - the RIGHT ARROW key, which allows the user to
-
move to the right within a field
-
move to the right through menu and screen options or selections
-
exit from some of the sub-menus in the same manner as the
ESCAPE key
LEFT
ARROW -
the LEFT ARROW key, which allows the user to
-
move to the left within a field
-
move to the left through menu and screen options or selections,
-
exit from some of the sub-menus in the same manner as the
ESCAPE key
_____________________________________________________________________
SECTION 1
19
_________________________________________________________ SFACCESS
MANUAL DESIGN FEATURES
Attempting to identify and describe the combined features and operation of both
"halves" of the SFACCESS program, which contain the "Off-line" (PC) and
"On-line" (SOLARFLOW PLUS computer) MAIN MENU’s, would be confusing.
Consequently, this manual is designed to allow the user to navigate through and
locate
-
specific information about the features of the "Off-line" MAIN MENU
(for the PC) in Section 3, which is entitled, PC MAIN MENU
CONTENTS, and
-
specific information about the features of the "On-line" MAIN MENU
(for the SOLARFLOW PLUS computer) in Section 4, which is
entitled, SOLARFLOW PLUS MAIN MENU CONTENTS.
Both sections (3 and 4) will attempt to explore all aspects of the program’s content
"halves", including all the sub-menus and sub-menu options and selections, without
needlessly duplicating information that may be discussed in other portions of this
manual.
_____________________________________________________________________
20
SECTION 1
SFACCESS _________________________________________________________
INSTALLATION AND INITIAL SETUP
INTRODUCTION
This section addresses the installation and initial setup of the DANIEL
INDUSTRIES SFACCESS PROGRAM, including its hardware requirements, and
installation and configuration procedures. Because the SFACCESS program
operates in a dual environment, which is composed of both the personal computer
(PC) environment and the SOLARFLOW PLUS computer environment, the
configuration procedure involves
-
the "Off-line" MAIN MENU’s "Configure" option menu (for the PC),
which controls the selection of communications port, printer, export,
view, display, database, password and save options, and
-
the "On-line" MAIN MENU’s "Setup" option menu (for the
SOLARFLOW PLUS computer), which controls the selection of
general information, transmitter inputs, control outputs, scale values,
calculation configuration, alarm configuration, and calculation factors
options.
The "Setup" menu performs the functions of setup location and setup
unit as found in the DANIEL INDUSTRIES HAND HELD DATA
TERMINAL (HHDT).
_____________________________________________________________________
SECTION 2
21
_________________________________________________________ SFACCESS
HARDWARE REQUIREMENTS
Minimum hardware required for using the SFACCESS program includes:
-
a 12 Megahertz (MHz), 80286-based IBM or IBM-compatible
computer with no less than 640 kilobytes (Kb) of RAM memory
-
two 720 kilobyte (Kb) floppy drives, or one 720 Kb floppy disk drive
and a hard disk drive
-
a CGA, EGA, OR VGA compatible graphics board and monitor
-
a parallel or serial printer.
In addition, the DANIEL INDUSTRIES SOLARFLOW PLUS is connected to the
PC by using the standard interconnect cable, Daniel Part No. 3-2460-165, which
is supplied with the DANIEL INDUSTRIES HAND HELD DATA TERMINAL.
This cable is fitted with a customized connector for the SOLARFLOW PLUS, and
a DB25 connector for the PC. However, if the PC being connected to the
SOLARFLOW PLUS utilizes a 9-pin serial port instead of a 25-pin serial port, the
user will need to obtain a DB25-to-DB9 adaptor from a PC supply vendor in order
to complete the SOLARFLOW PLUS to PC connection.
For more detailed information about the DANIEL INDUSTRIES SOLARFLOW
PLUS, refer to the latest revision of the DANIEL INDUSTRIES SOLARFLOW
PLUS SYSTEM REFERENCE MANUAL, Daniel Part No. 3-9000-497
_____________________________________________________________________
22
SECTION 2
SFACCESS _________________________________________________________
SOFTWARE REQUIREMENTS
Minimum software required for using the SFACCESS program includes:
-
a 3.0 or later version of either MS-DOS or PC-DOS for the PC
operating environment
-
either the one 3.5" (720 Kb) or the two 5.25" (360 Kb) floppy
diskettes, which come furnished with the DANIEL INDUSTRIES
SFACCESS SOFTWARE PROGRAM, Daniel Part No. 3-2470-040.
_____________________________________________________________________
SECTION 2
23
_________________________________________________________ SFACCESS
INSTALLATION PROCEDURES
After minimum hardware and software requirements have been satisfied, the
SFACCESS program can be installed on the PC.
_________________________________________________________
CAUTION: Before installing the SFACCESS
program on the PC, backup copies of the original
program diskettes should be made, and the original
diskettes
should be stored in a secure location.
_________________________________________________________
Although installation is essentially the same for both the 3.5" (720 Kb) and 5.25"
(360 Kb) floppy diskettes, there are some differences worth noting. Consequently,
installation procedures for the 3.5" (720 Kb) and 5.25" (360 Kb) floppy diskettes
will be described separately.
To install the program using the 3.5" floppy diskette
1.
insert the single 3.5" (720 Kb) floppy diskette into the appropriate drive on
the PC
2.
type the letter corresponding to the diskette drive where the diskette was
inserted, followed by a colon, and the word
INSTALL
and press the ENTER key
3.
after the brief appearance of a DANIEL INDUSTRIES copyright and
identification screen, an initial prompt screen will appear with the
message(s), "This program will install SFACCESS on your computer system
and verify the integrity of the distribution disk. You may press the ESC
_____________________________________________________________________
24
SECTION 2
SFACCESS _________________________________________________________
(Escape) key at any time to abort the installation. INSTALL will ask you
several questions about your computer hardware."
The user must then "Press ESC to quit, any other key to continue. . ."
4.
a screen will appear and the program will request that a drive be selected
where the SFACCESS program can be installed. The user should use the UP
and DOWN, or PAGE UP and PAGE DOWN keys to move to and select the
appropriate disk drive, and press the ENTER key
5.
a screen will appear with the message(s), "The subdirectory is
on your disk where SFACCESS (3.5") will be installed. If you
to change the displayed default, simply press ENTER. To
subdirectory, use the BACKSPACE to remove the default and
subdirectory name."
the location
do not wish
change the
enter a new
In addition, the screen will also display the "Destination subdirectory?"
pop-up window with "\SFACCESS" shown as the default subdirectory. After
accepting the default or replacing it with another entry, the user must press
the ENTER key.
6.
a screen will appear with the message(s), "SFACCESS (3.5") will now be
copied onto the destination drive you selected." In addition, the program will
inform the user that the "CONFIG.SYS" file must contain "a minimum of
FILES=20 and BUFFERS=20".
Since SFACCESS’s installation program can safely modify the user’s
existing CONFIG.SYS file, the user is informed that "after all of the
SFACCESS (3.5") files have been copied onto your computer, you will be
asked if it is OK for the install program to modify your CONFIG.SYS file.
If you select YES, the install program will check to determine if your
CONFIG.SYS actually needs to be modified, and if so, (will) modify the
file."
The user must then "Press ESC to quit, any other key to continue. . ."
_____________________________________________________________________
SECTION 2
25
_________________________________________________________ SFACCESS
7.
a screen will display the "VERIFY" pop-up window with the message, "May
I create/modify your CONFIG.SYS file if needed (Y/N)?". At this point, the
entry of a "Y" (YES) or "N" (NO) response will determine the next series
of screens that appears. In turn, the series of screens that appear will indicate
if
-
no changes need to be made to the CONFIG.SYS file,
-
the system has automatically created or modified the existing
CONFIG.SYS file, or
-
the user must incorporate certain changes into the file.
8.
after the CONFIG.SYS has been created or modified, a final installation
screen will appear indicating "Installation complete.", and requesting that the
user "Press any key to continue. . ." the program.
9.
the user is returned to the DOS prompt, which indicates the directory where
the SFACCESS program has just been installed. For example, if the program
were installed onto the C drive, the user would read,
C:\SFACCESS>
At this prompt, the user may now activate the program by typing
SFACCESS
and pressing the ENTER key.
10.
To activate the program after a shutdown, the user must type
CD\SFACCESS
and press the ENTER key,
_____________________________________________________________________
26
SECTION 2
SFACCESS _________________________________________________________
and then type
SFACCESS
and press the ENTER key.
To install the program using the 5.25" floppy diskette
1.
insert Disk # 1 of the 5.25" (360 Kb) floppy diskettes into the appropriate
drive on the PC
2.
type the letter corresponding to the diskette drive where the diskette was
inserted, followed by a colon, and the word
INSTALL
and press the ENTER key
3.
after the brief appearance of a DANIEL INDUSTRIES copyright and
identification screen, an initial prompt screen will appear with the
message(s), "This program will install SFACCESS on your computer system
and verify the integrity of the distribution disk. You may press the ESC
(Escape) key at any time to abort the installation. INSTALL will ask you
several questions about your computer hardware."
The user must then "Press ESC to quit, any other key to continue. . ."
4.
a screen will appear and the program will request that a drive be selected
where the SFACCESS program can be installed. The user should use the UP
and DOWN, or PAGE UP and PAGE DOWN keys to move to and select the
appropriate disk drive, and press the ENTER key
5.
a screen will appear with the message(s), "The subdirectory is the location
on your disk where SFACCESS (5.25") will be installed. If you do not wish
to change the displayed default, simply press ENTER. To change the
_____________________________________________________________________
SECTION 2
27
_________________________________________________________ SFACCESS
subdirectory, use the BACKSPACE to remove the default and enter a new
subdirectory name."
In addition, the screen will also display the "Destination subdirectory?"
pop-up window with "\SFACCESS" shown as the default subdirectory. After
accepting the default or replacing it with another entry, the user must press
the ENTER key.
6.
a screen will appear with the message(s), "SFACCESS (5.25") will now be
copied onto the destination drive you selected." In addition, the program will
inform the user that the "CONFIG.SYS" file must contain "a minimum of
FILES=20 and BUFFERS=20".
Since SFACCESS’s installation program can safely modify the user’s
existing CONFIG.SYS file, the user is informed that "after all of the
SFACCESS (5.25") files have been copied onto your computer, you will be
asked if it is OK for the install program to modify your CONFIG.SYS file.
If you select YES, the install program will check to determine if your
CONFIG.SYS actually needs to be modified, and if so, (will) modify the
file."
The user must then "Press ESC to quit, any other key to continue. . ."
7.
after the first of the two 5.25" program diskettes has been installed, a screen
will display a "PRESS ANY KEY" pop-up window with the message,
"Please place the Master Distribution Disk labeled "SFACCESS (5.25")/Disk
2 of 2 (version #) in drive A:". After doing this, the user must "Press the
ESC key to abort, any other key to continue. . ." the installation process.
8.
a screen will display the "VERIFY" pop-up window with the message, "May
I create/modify your CONFIG.SYS file if needed (Y/N)?". At this point, the
entry of a "Y" (YES) or "N" (NO) response will determine the next series
of screens that appears. In turn, the series of screens that appear will indicate
if
_____________________________________________________________________
28
SECTION 2
SFACCESS _________________________________________________________
-
no changes need to be made to the CONFIG.SYS file,
-
the system has automatically created or modified the existing
CONFIG.SYS file, or
-
the user must incorporate certain changes into the file.
9.
after the CONFIG.SYS has been created or modified, a "PRESS ANY KEY"
pop-up window with the message, "Please remove the disk in drive A: and
replace it with the disk labeled: "SFACCESS (5.25")/Disk 1 of 2". After
doing this, the user must "Press the ESC key to abort, any other key to
continue. . .".
10.
a final installation screen will appear indicating "Installation complete.", and
requesting that the user "Press any key to continue. . ." the program.
11.
the user is returned to the DOS prompt, which indicates the directory where
the SFACCESS program has just been installed. For example, if the program
were installed onto the C drive, the user would read,
C:\SFACCESS>
At this prompt, the user may now activate the program by typing
SFACCESS
and pressing the ENTER key.
12.
To activate the program after a shutdown, the user must type
CD\SFACCESS
and press the ENTER key,
and then type
_____________________________________________________________________
SECTION 2
29
_________________________________________________________ SFACCESS
SFACCESS
and press the ENTER key.
_____________________________________________________________________
30
SECTION 2
SFACCESS _________________________________________________________
SETUP PROCEDURES
Since the SFACCESS program operates in a dual computer environment, which is
composed of both the personal computer (PC) and the SOLARFLOW PLUS
computer, the configuration or setup procedures for both of these will be addressed
separately.
The configuration or setup procedures for the PC will be presented first, and then
the configuration or setup procedures for the SOLARFLOW PLUS computer will
be presented.
_____________________________________________________________________
SECTION 2
31
_________________________________________________________ SFACCESS
PC SETUP PROCEDURES
_________________________________________________________
CAUTION: While making choices for the various
options in the CONFIGURE menu (for the PC),
pressing the ESC (Escape) key will ABORT the
process and eliminate all previously selected entries.
_________________________________________________________
The "Configure" option is the sixth of the seven "Off-line" MAIN MENU options.
It contains eight main sub-options, which are the "SFPlus Communications Setup",
"Printer Function Setup", "Export Function Setup", "View Function Setup",
"Display Setup", "Database Setup", "Password Setup", and "Save Configuration"
options. The "Configure" option allows the user to
-
to specify the communications port of the PC to be used to
communicate with the SOLARFLOW PLUS computer
-
setup various operational features of the printer function
-
select the export type, which is either SFDC or ASCII
-
customize operation of the View function related to the graphing of
collected data
-
specify the type of screen display
-
select the drive path, and name of the database file used to store
collected data
-
establish passwords to limit access to the SFACCESS program
-
save any configuration changes made under the "Configure" option.
_____________________________________________________________________
32
SECTION 2
SFACCESS _________________________________________________________
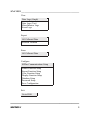
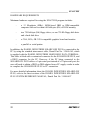
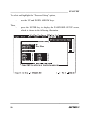
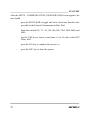
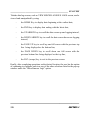
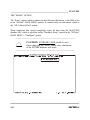
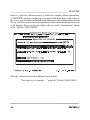
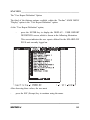
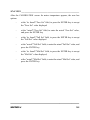
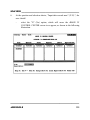
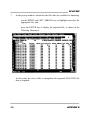
To select and highlight the "Configure" option, which is shown in the following
illustration,
-
use the LEFT or RIGHT ARROW keys.
_____________________________________________________________________
SECTION 2
33
_________________________________________________________ SFACCESS
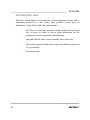
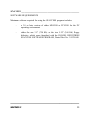
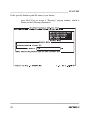
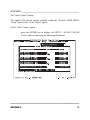
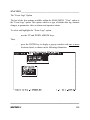
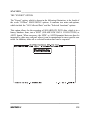
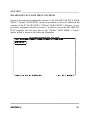
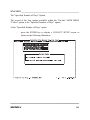
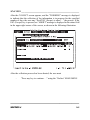
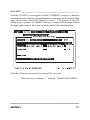
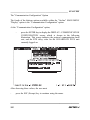
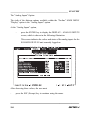
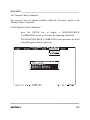
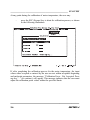
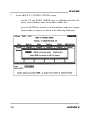
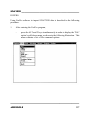
The "SFPlus Communications Setup" Option
The first of the eight options available within the "Off-line" MAIN MENU
"Configure" option is the "SFPlus Communications Setup" option.
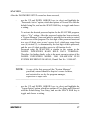
To select and highlight the "SFPlus Communications Setup" option,
-
use the UP and DOWN ARROW keys.
-
press the ENTER key to display the SFPLUS COMMUNICATIONS
SETUP screen, which is shown in the following illustration.
Then,
_____________________________________________________________________
34
SECTION 2
SFACCESS _________________________________________________________
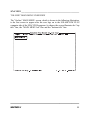
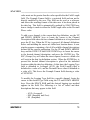
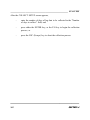
After the "SFPlus Communications Setup" screen has been accessed,
-
either accept the "Comm Port Connected To SolarFlow Plus" default
setting of COM1, or
-
use the SPACE BAR key to toggle and choose a setting of COM2.
After the setting for the option has been selected,
-
press either the ENTER or F10 key to indicate that the selection
process is "Done" or finished, and to exit from the menu, or
-
press the ESC (Escape) key to ABORT the selection process.
_____________________________________________________________________
SECTION 2
35
_________________________________________________________ SFACCESS
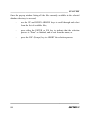
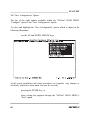
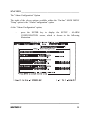
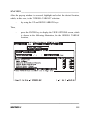
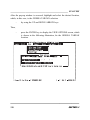
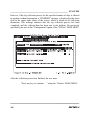
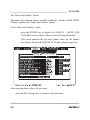
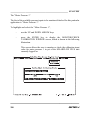
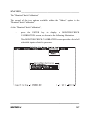
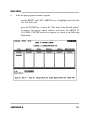
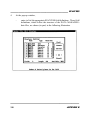
The "Printer Function Setup" Option
The second of the eight options available within the "Off-line" MAIN MENU
"Configure" option is the "Printer Function Setup" option.
To select and highlight the "Printer Function Setup" option,
-
use the UP and DOWN ARROW keys.
-
press the ENTER key to display the PRINTER FUNCTION SETUP
screen, which is shown in the following illustration.
Then,
_____________________________________________________________________
36
SECTION 2
SFACCESS _________________________________________________________
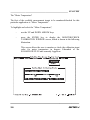
After the PRINTER FUNCTION SETUP screen has been accessed,
-
use the UP and DOWN ARROW keys to select and highlight the
"Printer Type" option, which has options of IBM, EPSON, and ASCII
with the default being ASCII, and use the SPACE BAR key to toggle
and choose a setting,
With an IBM/Epson or IBM/Epson-compatible printer, special codes
may be sent to put the device into a compressed print mode for output
of reports. Many printer manufacturers supply an operation mode to
emulate either an IBM/Epson or IBM/Epson-compatible printer.
However, if the printer in use cannot emulate either of these, then the
"ASCII" setting should be selected.
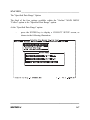
-
use the UP and DOWN ARROW keys to select and highlight the
"Character Size" option, which has options of Normal and Compressed
with the default being Normal, and use the SPACE BAR key to toggle
and choose a setting,
With an IBM/Epson or IBM/Epson-compatible printer, the
"Compressed" setting may be selected to obtain compressed charactersize print reports from the SFACCESS program. If the printer cannot
be configured for compressed character-size print, or if normal
character-size characters are preferred, the "Normal" setting should be
selected.
-
use the UP and DOWN ARROW keys to select and highlight the
"Paper Width" option, which has options of 8 Inch and 14 Inch with
the default being 8 inch, and use the SPACE BAR key to toggle and
choose a setting,
The "Paper Width" option permits the use of wide carriage printers,
which use 14 inch (or greater) paper. If the "14 Inch" setting is
selected, then more columns of data may be printed per line of paper
_____________________________________________________________________
SECTION 2
37
_________________________________________________________ SFACCESS
to allow the printing of some data logs without wrapping the data to
the next printable line.
-
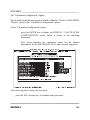
use the UP and DOWN ARROW keys to select and highlight the
"Print To" option, which has options of LPT1, LPT2, LPT3, COM1,
COM2 and File with the default being COM1, and use the SPACE
BAR key to toggle and choose a setting,
Settings of LPT1, LPT2, and LPT3, refer respectively to Parallel
Printer (output) Ports One, Two, or Three. Settings of COM1 and
COM2, refer respectively to Serial (output) Ports One and Two. The
"File" setting causes all reports to be written in an ASCII format to a
disk file, which is specified in the "Output File Name".
_________________________________________________________
NOTE:
Printer options (Serial Baud Rate, Serial Word Size,
Serial Parity and Serial Stop Bits) determine the
operation of Serial Communications Port One (COM1)
or Serial Communications Port Two (COM2) only
when the "Print to" setting is defined as "COM1" or
"COM2". Since these options are set to match the
parameters of a specific serial printer, reference should
be made to the factory printer manual for more
complete details.
_________________________________________________________
-
use the UP and DOWN ARROW keys to select and highlight the
"Serial Baud Rate" option, which has options of 9600, 110, 150, 300,
600, 1200, 2400, and 4800 with the default being 9600, and use the
SPACE BAR key to toggle and choose a setting,
_____________________________________________________________________
38
SECTION 2
SFACCESS _________________________________________________________
-
use the UP and DOWN ARROW keys to select and highlight the
"Serial Word Size" option, which has options of Seven and Eight with
the default being Eight, and use the SPACE BAR key to toggle and
choose a setting,
The "Serial Word Size" option determines the number of data bits that
will be used to make one data word. The choices are for either seven
data bits or eight data bits per word.
-
use the UP and DOWN ARROW keys to select and highlight the
"Serial Parity" option, which has options of None, Even and Odd with
the default being None, and use the SPACE BAR key to toggle and
choose a setting,
The "Serial Parity" option determines whether and how data parity is
used in the serial communications.
-
use the UP and DOWN ARROW keys to select and highlight the
"Serial Stop Bits" option, which has options of One and Two with the
default being One, and use the SPACE BAR key to toggle and choose
a setting,
The "Serial Stop Bits" option determines the number of data stop bits
used at the end of a serial word.
-
use the UP and DOWN ARROW keys to select and highlight the
"Output File Name" option with the default being DANREPT.PRN,
and either use the default setting or enter a new output file name.
The Output File Name, which must contain a file name, and may
contain a drive and/or path name to acknowledge different drives and
sub-directories, determines where data will be stored on disk. To
change the default file name, enter a new report output file name.
_____________________________________________________________________
SECTION 2
39
_________________________________________________________ SFACCESS
After the settings for each option have been selected,
-
press either the ENTER or F10 key to indicate that the selection
process is "Done" or finished, and to exit from the menu, or
-
press the ESC (Escape) key to ABORT the selection process.
_____________________________________________________________________
40
SECTION 2
SFACCESS _________________________________________________________
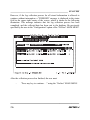
The "Export Function Setup" Option
The third of the eight options available within the "Off-line" MAIN MENU
"Configure" option is the "Export Function Setup" option.
To select and highlight the "Export Function Setup" option,
-
use the UP and DOWN ARROW keys.
-
press the ENTER key to display the EXPORT FUNCTION SETUP
screen, which is shown in the following illustration.
Then,
_____________________________________________________________________
SECTION 2
41
_________________________________________________________ SFACCESS
After the EXPORT FUNCTION SETUP screen has been accessed, at the Export
Type option,
-
either accept the "Export Type" default setting of SFDC, or
-
use the SPACE BAR key to toggle and choose a setting of ASCII.
_________________________________________________________
NOTE:
If the export function is performed for use with the
DANIEL INDUSTRIES SFDC program, the user
should select SFDC as the export type. Otherwise,
the ASCII export type allows separation of the
various files associated with the export.
_________________________________________________________
Under the SFDC File Options section,
-
use the UP and DOWN ARROW keys to select and highlight the
"SFDC Output File Name" option, which has a default setting of
DANDATA$.SFP, and either use the default setting, or enter a new
SFDC Output File Name,
The "SFDC Output File Name" option determines the
drive/path/filename of SFDC output data. To change the default, enter
a new drive/path/filename.
Under the ASCII File Options section,
-
use the UP and DOWN ARROW keys to select and highlight the
"Data Log File Name" option, which has a default setting of
DANDATA.OUT, and either use the default setting or enter a new
Data Log File Name,
_____________________________________________________________________
42
SECTION 2
SFACCESS _________________________________________________________
The "Data Log File Name" option, which determines the name of the
file that will hold ASCII data logs exported from the SFACCESS
database, must have a file name. To change the default, enter a new
file name.
-
use the UP and DOWN ARROW keys to select and highlight the
"Misc.(Miscellaneous) Channels File Name" option, which has a
default of DANMISC.OUT, and either use the default setting or enter
a new Misc. Channels File Name,
The "Misc. Channels File Name" option, which determines the name
of the file that will hold ASCII miscellaneous logs exported from the
SFACCESS database, must have a file name. To change the default,
enter a new file name.
-
use the UP and DOWN ARROW keys to select and highlight the
"Event Log File Name", which has a default setting of
DANEVENT.OUT, and either use the default setting or enter a new
Event Log File Name,
The "Event Log File Name" option, which determines the name of the
file that will hold ASCII event logs exported from the SFACCESS
database, must have a file name. To change the default, enter a new
file name.
Finally,
-
use the UP and DOWN ARROW keys to select and highlight the
"Previous File Option" option, which has options of Append and
Overwrite with the default being Append, and use the SPACE BAR
key to toggle and select the treatment of previous fields under the
"Previous File Option" option,
The "Previous File Option" allows the user to append or overwrite
previous data.
_____________________________________________________________________
SECTION 2
43
_________________________________________________________ SFACCESS
Once the option settings have been selected,
-
press the F10 key to indicate both that the selection process is "Done"
or finished, and to exit from the menu, or
-
press the ESC (Escape) key to ABORT the selection process.
_____________________________________________________________________
44
SECTION 2
SFACCESS _________________________________________________________
The "View Function Setup" Option
The fourth of the eight options available within the "Off-line" MAIN MENU
"Configure" option is the "View Function Setup" option.
To select and highlight the "View Function Setup" option,
-
use the UP and DOWN ARROW keys.
-
press the ENTER key to display the VIEW FUNCTION SETUP
screen, which is shown in the following illustration.
Then,
_____________________________________________________________________
SECTION 2
45
_________________________________________________________ SFACCESS
After the VIEW FUNCTION SETUP screen has been accessed,
-
use the UP and DOWN ARROW keys to select and highlight the
"Graphics Mode" option, which has options of Auto, CGA, EGA, and
VGA with the default being Auto, and use the SPACE BAR key to
toggle and choose a setting,
_________________________________________________________
NOTE:
Some "non-standard" graphic-display adapter boards
cannot automatically be recognized by the
SFACCESS program. However, the video mode options
can be used to "force" the video display adapter into
the proper mode.
_________________________________________________________
The SFACCESS program has the capability of graphically displaying
data on either a CGA, EGA, or VGA display monitor. "AUTO" mode
allows the program to automatically determine what graphics modes
are supported by the hardware.
_________________________________________________________
NOTE:
The CGA video display mode shows white data against
a dark background.
_________________________________________________________
-
use the UP and DOWN ARROW keys to select and highlight the
"Mark Data Point" option, which has options of Yes and No with the
default being Yes, and use the SPACE BAR key to toggle and choose
a setting,
_____________________________________________________________________
46
SECTION 2
SFACCESS _________________________________________________________
The "Mark Data Points" option allows for three distinctive marks,
which are an asterisk, circle and a square, to be placed on a graph to
differentiate one line from another. This allows monitors that cannot
display color graphs to differentiate one line from another.
-
use the UP and DOWN ARROW keys to select and highlight the
"Default Zoom Level" option, which has options of 96, 192, 288, 576,
24, and 48 with the default being 96, and use the SPACE BAR key to
toggle and choose a setting,
The "Default Zoom Level" option, which is numbers indicating data
points, allows the user to set the number of logs to be displayed when
graphs are first shown.
Once the option settings have been selected,
-
press the F10 key to indicate both that the selection process is "Done"
or finished, and to exit from the menu, or
-
press the ESC (Escape) key to ABORT the selection process.
_____________________________________________________________________
SECTION 2
47
_________________________________________________________ SFACCESS
The "Display Setup" Option
The fifth of the eight options available within the "Off-line" MAIN MENU
"Configure" option is the "Display Setup" option.
To select and highlight the "Display Setup" option,
-
use the UP and DOWN ARROW keys.
-
press the ENTER key to display the DISPLAY SETUP screen, which
is shown in the following illustration.
Then,
_____________________________________________________________________
48
SECTION 2
SFACCESS _________________________________________________________
After the DISPLAY SETUP screen has been accessed,
-
use the UP and DOWN ARROW keys to select and highlight the
"Display type" option, which has options of LCD, Color, Monochrome
with the default being LCD, and use the SPACE BAR key to toggle
and choose a setting,
The "LCD" setting is for LCD (liquid crystal display) monitors (or
other monitors) that display gray scales, the "Color" setting is for color
display monitors and the "Monochrome" setting is for monochrome
monitors, which display neither colors or gray scales.
After the setting for the option has been selected,
-
press either the ENTER or F10 key to indicate that the selection
process is "Done" or finished, and to exit from the menu, or
-
press the ESC (Escape) key to ABORT the selection process.
_____________________________________________________________________
SECTION 2
49
_________________________________________________________ SFACCESS
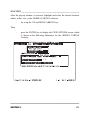
The "Database Setup" Option
The sixth of the eight options available within the "Off-line" MAIN MENU
"Configure" option is the "Database Setup" option.
To select and highlight the "Database Setup" option,
-
use the UP and DOWN ARROW keys.
-
press the ENTER key to display the DATABASE SETUP screen,
which is shown in the following illustration.
Then,
_____________________________________________________________________
50
SECTION 2
SFACCESS _________________________________________________________
After the DATABASE SETUP screen has been accessed,
-
either use the existing database path/file name, which has a default
setting of "SFACCESS.DAT", or enter a new destination drive
path/file name for storing collected data.
Once the database path/file name has been entered or selected from the pop-up
window,
-
press either the ENTER or F10 key to indicate that the selection
process is "Done" or finished, and to exit from the menu, or
-
press the ESC (Escape) key to ABORT the selection process.
_____________________________________________________________________
SECTION 2
51
_________________________________________________________ SFACCESS
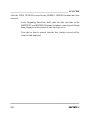
If the specific database path/file name is not known,
-
press the F9 key to access a "Directory" pop-up window, which is
shown in the following illustration.
_____________________________________________________________________
52
SECTION 2
SFACCESS _________________________________________________________
After the "Directory" pop-up window appears,
-
enter the name of the database directory, which in this example, is
*.dat, and
-
press the ENTER key to access another pop-up window, as shown in
the following illustration, that lists all the files currently available in
the selected database directory.
_____________________________________________________________________
SECTION 2
53
_________________________________________________________ SFACCESS
Once the pop-up window listing all the files currently available in the selected
database directory is accessed,
-
use the UP and DOWN ARROW keys to scroll through and select
from the list of available files,
-
press either the ENTER or F10 key to indicate that the selection
process is "Done" or finished, and to exit from the menu, or
-
press the ESC (Escape) key to ABORT the selection process.
_____________________________________________________________________
54
SECTION 2
SFACCESS _________________________________________________________
The "Password Setup" Option
_________________________________________________________
NOTE:
If no passwords are necessary, the "Password Setup"
option may be omitted, since the default setting
automatically deactivates password installation and use.
_________________________________________________________
The seventh of the eight options available within the "Off-line" MAIN MENU
"Configure" option is the "Password Setup" option.
_____________________________________________________________________
SECTION 2
55
_________________________________________________________ SFACCESS
To select and highlight the "Password Setup" option,
-
use the UP and DOWN ARROW keys.
-
press the ENTER key to display the PASSWORD SETUP screen,
which is shown in the following illustration.
Then,
_____________________________________________________________________
56
SECTION 2
SFACCESS _________________________________________________________
After the PASSWORD SETUP screen has been accessed,
-
use the UP and DOWN ARROW keys to select and highlight the
"Passwords Active" option, which has options of No and Yes with the
default being No, and use the SPACE BAR key to toggle and choose
a setting,
To activate the desired password option for the SFACCESS program,
select a "Yes" setting. After the password option has been activated,
a "System Manager" password must be entered first in order to control
overall access to the program. The last digit of this password must end
in a zero (0) digit, since a user’s access level, which may range from
zero (0) to nine (9), is determined by the last digit of their password,
and the zero (0) digit provides access to all function levels.
Password setup for SFACCESS is similar to the system in the
DANIEL INDUSTRIES HAND HELD DATA TERMINAL.
Therefore, for further details, refer to the most current revision of the
DANIEL INDUSTRIES MODEL 2480 SOLARFLOW PLUS
SYSTEM REFERENCE MANUAL, Daniel Part No. 3-9000-497.
_________________________________________________________
NOTE:
A copy of the first password (the "System Manager"
password) entered should be kept in a secure location,
and restricted to use by the program manager,
supervisor or super user.
_________________________________________________________
-
use the UP and DOWN ARROW keys to select and highlight the
"Logon Option" option, which has options of User Entry and Password
with the default being User Entry, and use the SPACE BAR key to
toggle and choose a setting,
_____________________________________________________________________
SECTION 2
57
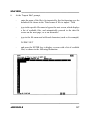
_________________________________________________________ SFACCESS
If this option is set to Password, a user’s password will be used as a
default value when entering the security code for the Logon function.
This option allows use of SFACCESS passwords as SOLARFLOW
PLUS security codes.
_________________________________________________________
NOTE:
The last digit of a password is forced to zero (0) to
ensure compatibility with the SOLARFLOW PLUS
system.
_________________________________________________________
-
use the UP and DOWN ARROW keys to select and highlight the
"Password List" option, which is blank and contains no default, and
enter the desired password, or passwords,
Up to twenty passwords may be entered in the "Password List" option,
and each of the passwords, which are separated by commas, may
contain up to ten alphanumerical characters. Each password must end
in a digit ranging from zero (0) to nine (9).
-
use the UP and DOWN ARROW keys to select and highlight the list
of function levels and their digital settings located under "Function
Levels" option,
_________________________________________________________
NOTE:
To use a particular function, the user’s access level
must be less than, or equal to the function’s access
level.
_________________________________________________________
_____________________________________________________________________
58
SECTION 2
SFACCESS _________________________________________________________
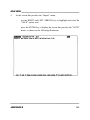
After the options settings have been selected,
-
press the F10 key to indicate both that the selection process is "Done"
or finished, and to exit from the menu, or
-
press the ESC (Escape) key to ABORT the selection process.
_____________________________________________________________________
SECTION 2
59
_________________________________________________________ SFACCESS
The "Save Configuration" Option
The last of the eight options available within the "Off-line" MAIN MENU
"Configure" option is the "Save Configuration" option.
To select and highlight the "Save Configuration" option, which is shown in the
following illustration,
-
use the UP and DOWN ARROW keys.
At this point, installation and setup procedures are complete. Any changes or
selections, which have been made, can now be saved by
-
pressing the ENTER key, or
-
when exiting the program through the "Off-line" MAIN MENU’s
"Exit" option.
_____________________________________________________________________
60
SECTION 2
SFACCESS _________________________________________________________
EXITING THE PROGRAM
To exit from the SFACCESS program, and return to DOS,
-
use the RIGHT and LEFT ARROW keys to select and highlight the
"Exit" option on the "Off-line" MAIN MENU, which is shown in the
following illustration, and
-
press the ENTER key.
_____________________________________________________________________
SECTION 2
61
_________________________________________________________ SFACCESS
If changes and selections have been made in the setup procedures, but not saved,
a pop-up window, which is shown in the following illustration, will appear.
After the pop-up window appears,
-
use the SPACE BAR key to toggle and choose a "Yes" or "No"
setting for the "Save Configuration Changes?" window option. The
default is "Yes".
Once the parameter option has been selected,
-
press the ENTER key to save, or not to save the setup procedure
changes and selections, and to exit from the program to DOS.
_____________________________________________________________________
62
SECTION 2
SFACCESS _________________________________________________________
SOLARFLOW PLUS SETUP PROCEDURES
The "Setup" option, which is shown in the following illustration, is the fourth of
the six "On-line" MAIN MENU options. In this application, it contains eleven main
sub-options, which include the "General Information" option, the "Security Code
List" option, the "User Report Definition" option, the "Communication
Configuration" option, the "Data Log Definition" option, the "Analog Inputs"
option, the "Control Outputs" option, the "Scale Values" option, the "Calculation
Configuration" option, the "Alarm Configuration" option, and the "Calculation
Factors" option. The "Setup" option allows for the selection and setting of the
various setup parameters and calculated values in the SOLARFLOW PLUS.
_____________________________________________________________________
SECTION 2
63
_________________________________________________________ SFACCESS
_________________________________________________________
NOTE:
The "Setup" option menu shown in the last illustration
is for a specific application. This menu list, along with its
associated sub-menus, will vary depending on the application
installed in the SOLARFLOW PLUS.
_________________________________________________________
_____________________________________________________________________
64
SECTION 2
SFACCESS _________________________________________________________
The "General Information" Option
The first of the eleven options available within the "On-line" MAIN MENU
"Setup" option is the "General Information" option.
At the "General Information" option,
-
press the ENTER key to display the SETUP - GENERAL
INFORMATION screen, which is shown in the following illustration.
This screen allows the user to enter the enter the values for the
location and unit names, the location and unit ID numbers, the current
date and time, and the calculation module for the SOLARFLOW
PLUS currently logged on.
_____________________________________________________________________
SECTION 2
65
_________________________________________________________ SFACCESS
After the SETUP - GENERAL INFORMATION screen appears, the user should
-
enter the value for the location name in the Location name field
-
use the TAB key to cursor to, and enter the new unit name in the Unit
name field
-
use the TAB key to cursor to, and enter the new location ID number
in the Location ID Number field
-
use the TAB key to cursor to, and enter the new unit ID number in the
Unit ID Number field
-
use the TAB key to cursor to, the Date field and enter the current date
in the MM/DD/YY format
-
use the TAB key to cursor to the Time field, and enter the current
time in the HH:MM:SS format
-
use the TAB key to cursor to the Calculation Module field, and press
the SPACE BAR to toggle and select the calculation module, which
in the case, is the AGA3 DUAL STD (Standard)
After the values have been entered, the user should
-
press either the ENTER or F10 key to complete the process, or
-
press the ESC (Escape) key to abort the process.
_____________________________________________________________________
66
SECTION 2
SFACCESS _________________________________________________________
The "Security Code List" Option
The second of the eleven options available within the "On-line" MAIN MENU
"Setup" option is the "Security Code List" option.
At the "Security Code List" option,
-
press the ENTER key to display the SETUP - SECURITY CODE
LIST screen, which is shown in the following illustration.
This screen allows the user to modify the necessary security code or
codes for the SOLARFLOW PLUS unit currently logged on.
_____________________________________________________________________
SECTION 2
67
_________________________________________________________ SFACCESS
After the SETUP - SECURITY CODE LIST screen appears, the user should
-
use the UP and DOWN ARROW keys to cursor through the list of
twenty entry fields, and enter new security codes
-
press the F2 key to insert a new code to the list, or
-
press the F3 key to delete an existing code from the list
-
press the F10 key to complete the process, or
-
press the ESC key to abort the process.
_____________________________________________________________________
68
SECTION 2
SFACCESS _________________________________________________________
The "User Report Definition" Option
The third of the eleven options available within the "On-line" MAIN MENU
"Setup" option is the "User Report Definition" option.
At the "User Report Definition" option,
-
press the ENTER key to display the SETUP - USER REPORT
DEFINITION screen, which is shown in the following illustration.
This screen allows the user to define the user reports for the
SOLARFLOW PLUS unit currently logged on.
_____________________________________________________________________
SECTION 2
69
_________________________________________________________ SFACCESS
After the SETUP - USER REPORT DEFINITION screen appears, the user should
-
use the UP and DOWN ARROW keys to cursor through the list of
fifteen entry fields, and enter new channel descriptions
-
press the F2 key to insert a new channel description to the list
When the F2 key is pressed, all channel descriptions below and
including including the cursor are moved to the next position. If the
list is full, the last item in the list is lost. A channel description
selection list will appear. Use the UP and DOWN ARROW keys, or
the PAGE UP and PAGE DOWN keys to the new, desired channel
description. When the new description is located, press the ENTER
key. To abort the process, press the ESC (Escape) key. However, if
the ESC (Escape) key is pressed at this time, a blank item exists in the
channel description list of the SETUP screen. When the ENTER key
is pressed, the channel description is place in the desired item location
within the channel description list of the SETUP screen.
-
press the F3 key to delete an existing channel description from the list
When the F3 key is pressed, the desired channel description is
removed from the list and all items below the cursor are moved up an
item row in order to fill the gap caused by the delete request.
-
press the F10 key to complete the process, or
-
press the ESC key to abort the process.
_____________________________________________________________________
70
SECTION 2
SFACCESS _________________________________________________________
The "Communication Configuration" Option
The fourth of the eleven options available within the "On-line" MAIN MENU
"Setup" option is the "Communication Configuration" option.
At the "Communication Configuration" option,
-
press the ENTER key to display the SETUP - COMMUNICATION
CONFIGURATION screen, which is shown in the following
illustration.
This screen allows the user to select and enter or modify the protocol
communications and baud rates, and the RTS delay value for the
SOLARFLOW PLUS unit currently logged on.
_____________________________________________________________________
SECTION 2
71
_________________________________________________________ SFACCESS
After the SETUP - COMMUNICATION CONFIGURATION screen appears, the
user should
-
press the SPACE BAR to toggle and select a baud rate from the rates
provided in the Protocol Communication Rate field
Baud rates include 50, 75, 110, 150, 300, 600, 1200, 2400, 4800, and
9600.
-
use the TAB key to cursor to and enter a 0 to 99 value in the RTS
Delay field
-
press the F10 key to complete the process, or
-
press the ESC key to abort the process.
_____________________________________________________________________
72
SECTION 2
SFACCESS _________________________________________________________
The "Data Log Definition" Option
The fifth of the eleven options available within the "On-line" MAIN MENU
"Setup" option is the "Data Log Definition" option.
At the "Data Log Definition" option,
-
press the ENTER key to display the SETUP - DATA LOG
DEFINITION screen, which is shown in the following illustration.
_____________________________________________________________________
SECTION 2
73
_________________________________________________________ SFACCESS
This screen allows the user to define the contract hour, the data
logging interval, and the channels that belong in the data log for the
SOLARFLOW PLUS unit currently logged on.
This screen is divided into three sections, which include
- the Contract Hour
- the Data Logging Interval
- the Data Log Definition
The Contract Hour section consists of a single numeric entry. This
field may contain any value within the range of 0 to 23, where a value
of 0 indicates midnight and a value of 23 indicates 11:00 p.m.. To
change the current Contract Hour value, locate the cursor to the
Contract Hour field using any of the arrow keys, and enter the new
value.
The Data Logging Interval section consists of a single selection entry.
This field may be set to None, 5 Minute, 15 Minute, 30 Minute, 1
Hour, 4 Hour, and 24 Hour. To change the current Data Logging
Interval setting, locate the cursor to the Data Logging Interval field
using any of the arrow keys, and press the SPACE BAR until the
desired setting appears in the field.
The Data Log Definition section consists the Channel Description, the
Logging Type (Type), the Field Length (Len), the Decimal Places
(Dec), and the Example Format (Ex. Format) fields. The Channel
Description field contains the descriptive name for the channel being
logged. The Logging Type field contains the logging method used
when the data is logged. This field may be set to Averaged (AVG),
Snapshot (SS), or Snapshot and Zero (SSZ). The Field Length field
contains the number of significant digits of the data to place in the
log. This field may be set to 2, 4, 6, or 8. The Decimal Places field
contains the number of the significant digits that must appear to the
right of the decimal place of the data to be placed in the log. This
_____________________________________________________________________
74
SECTION 2
SFACCESS _________________________________________________________
value must not be greater than the value specified in the Field Length
field. The Example Format field is a protected field and can not be
directly modified by the user. This field can be used as a reference
and shows the resulting format of the data once it has been placed in
the data log. This field is automatically updated by SFACCESS any
time a change is made to either the Field Length value or the Decimal
Places value.
To add a new channel to the current data log definition, use the UP
and DOWN ARROW keys to locate the cursor to the Channel
Description field where the new channel definition is to be placed and
press the F2 key. When the F2 key is pressed, all channel definitions
below and including the cursor are shifted one location down. A new
window appears containing a list of all available channel descriptions
defined for the specific application. Use the UP and DOWN ARROW
kesy and the PAGE UP and PAGE DOWN keys to locate the cursor
to the desired channel description, and press the ENTER key. The
ESC (Escape) key will abort the insert request, however a blank slot
will exist in the data log definition section. When the ENTER key is
pressed the desired channel description is placed in the indicated
location within the data log definition. At this time, the Logging Type
field is defaulted to Averaged (AVG), the Field Length value is
defaulted to a value of 6, and the Decimal Places value is defaulted to
a value of 0. This leaves the Example Format field showing a value
of XXXXXX.
To modify the Logging Type field for a specific channel, locate the
cursor to the desired Type field using the UP and DOWN ARROW
keys. Press the SPACE BAR until the desired logging type method
appears in the field. The following is a list of values and their
descriptions that may appear in this field
- AVG (Averaged)
- SSZ (Snapshot and Zero)
- SS (Snapshot)
_____________________________________________________________________
SECTION 2
75
_________________________________________________________ SFACCESS
To modify the Field Length field for a specific channel, locate the
cursor to the desired Len field using the UP and DOWN ARROW
keys. Press the SPACE BAR until the desired field length appears in
the field. This field may be set to 2, 4, 6, or 8.
To modify the Decimal Places field for a specific channel, locate the
cursor to the desired Dec field using the UP and DOWN ARROW
keys, and enter the desired value. Note that this value may not be
greater than the value specified in the Field Length field for this
specific channel.
To completely remove a channel from the data log definition, locate
the cursor to the desired Channel Description field using the UP and
DOWN ARROW keys and press the F3 key. The data log
information for that channel is removed and all subsequent channels
are moved up to fill in the empty slot.
__________________________________________________________________
WARNING: Use extreme caution when performing this
function. The user is not prompted to confirm the delete request;
the request is immediately performed.
__________________________________________________________________
The user may abort any changes made to the DATA LOG
DEFINITION screen at any time by pressing the ESC (Escape) key.
When the ESC (Escape) key is pressed, all changes are discarded and
the is removed from the display.
To save any changes made on the Data Log Definition screen to the
SOLARFLOW PLUS press the F10 key. Only those changes that were
made are sent to the unit. When the F10 key is pressed, the DATA
LOG DEFINITION screen is removed from the display, and a
"Working ..." window appears while the changes are being sent. When
the process is completed, the "Working ..." window is removed from
the display, and control is passed back to the MAIN MENU.
_____________________________________________________________________
76
SECTION 2
SFACCESS _________________________________________________________
After the SETUP - DATA LOG DEFINITION screen appears, the user should
-
enter a value for the contract hour in the Contract Hour field
Valid values are from 0 (Midnight) to 23 (11:00 pm).
-
use the RIGHT and LEFT ARROW keys to cursor to the Data
Logging Interval field, and the SPACE BAR to toggle and select a
data logging interval
Supported data logging intervals include None, 5 minutes, 15 minutes,
30 minutes, 1 hour, 4 hours, and 24 hours.
-
use the UP and DOWN ARROW keys to cursor through the list of ten
entry fields, and enter new channel descriptions
-
press the F2 key to insert a new channel description to the list, or
-
press the F3 key to delete an existing channel description from the list
-
use the RIGHT and LEFT ARROW and/or UP and DOWN ARROW
keys to cursor to the Type field for each Channel Description field and
use the SPACE BAR to toggle and select either an AVG (averaged),
SS (snapshot) or SSZ (snapshot and zero) value
-
use the RIGHT and LEFT ARROW and/or UP and DOWN ARROW
keys to cursor to the Len (Length) field for each Channel Description
field and use the SPACE BAR to toggle and select a field length value
-
use the RIGHT and LEFT ARROW and/or UP and DOWN ARROW
keys to cursor to the Dec (Decimal) field for each Channel Description
field and enter a decimal place value
_____________________________________________________________________
SECTION 2
77
_________________________________________________________ SFACCESS
-
press the F10 key to complete the process, or
-
press the ESC key to abort the process.
_____________________________________________________________________
78
SECTION 2
SFACCESS _________________________________________________________
The "Analog Inputs" Option
The sixth of the eleven options available within the "On-line" MAIN MENU
"Setup" option is the "Analog Inputs" option.
At the "Analog Inputs" option,
-
press the ENTER key to display the SETUP - ANALOG INPUTS
screen, which is shown in the following illustration.
_____________________________________________________________________
SECTION 2
79
_________________________________________________________ SFACCESS
The SETUP - ANALOG INPUTS screen provides the user the ability
to modify the input status of the analog inputs for the SOLARFLOW
PLUS unit currently logged on. The input status of analog inputs may
either be Fixed or Live. If the input status of an analog input is set to
Live, then the live value will be used in the calculations. If the input
status of an analog input is set to Fixed, then the user may supply a
desired value to be used in the calculations, which overrides the live
input value.
To change the input status of an analog input, locate the cursor at the
Status field of the desired analog input using the ARROW keys. Press
the SPACE BAR until the desired status appears in the field. This
field may be set to either ’Fixed’ or ’Live’.
To modify the value of a Fixed analog input, locate the cursor to the
Value field of the desired analog input and enter the new value.
The user may abort or cancel any changes made by pressing the ESC
(Escape) key. When this key is pressed, the SETUP - ANALOG
INPUTS screen is removed from the display and control is passed
back to the MAIN MENU.
To save any changes made on this screen to the SOLARFLOW PLUS,
press the F10 key. Note that only those changes that were made are
sent to the unit. When the F10 key is pressed, the SETUP -ANALOG
INPUTS screen is removed from the display and a "Working ..."
window appears while the changes are being sent. When the process
is completed, the "Working ..." window is removed from the display,
and control is passed back to the MAIN MENU.
_____________________________________________________________________
80
SECTION 2
SFACCESS _________________________________________________________
After the SETUP - ANALOG INPUTS screen appears, the user should
-
use the UP and DOWN ARROW keys to cursor through and enter
values for the channel description entries
-
press the F10 key to complete the process, or
-
press the ESC key to abort the process.
_____________________________________________________________________
SECTION 2
81
_________________________________________________________ SFACCESS
The "Control Outputs" Option
The seventh of the eleven options available within the "On-line" MAIN MENU
"Setup" option is the "Control Outputs" option.
At the "Control Outputs" option,
-
press the ENTER key to display the SETUP - CONTROL OUTPUTS
screen, which is shown in the following illustration.
_____________________________________________________________________
82
SECTION 2
SFACCESS _________________________________________________________
This screen provides the ability to change the value of a control output
for the SOLARFLOW PLUS unit currently logged on. Output values
may be either ’On’ or ’Off’.
To change the value of a control output, locate the cursor to the Value
field of the desired channel using the arrow keys. Press the SPACE
BAR until the desired output value state appears in the field.
The user may abort or cancel any changes made by pressing the ESC
(Escape) key. When this key is pressed, the SETUP - CONTROL
OUTPUTS screen is removed from the display and control is passed
back to the MAIN MENU.
To save any changes made on this screen to the SOLARFLOW PLUS,
press the F10 key. Note that only those changes that were made are
sent to the unit. When the F10 key is pressed, the SETUP -CONTROL
OUTPUTS screen is removed from the display and a "Working ..."
window appears while the changes are being sent. When the process
is completed, the "Working .." window is removed from the display,
and control is passed back to the MAIN MENU.
_____________________________________________________________________
SECTION 2
83
_________________________________________________________ SFACCESS
After the SETUP - CONTROL OUTPUTS screen appears, the user should
-
use the UP and DOWN ARROW keys to cursor through the Value
fields for each of the channel description entries
-
press the SPACE BAR to toggle and select ON and OFF values for
the control outputs
-
press the F10 key to complete the process, or
-
press the ESC key to abort the process.
_____________________________________________________________________
84
SECTION 2
SFACCESS _________________________________________________________
The "Scale Values" Option
The eighth of the eleven options available within the "On-line" MAIN MENU
"Setup" option is the "Scale Values" option.
At the "Scale Values" option,
-
press the ENTER key to display the SETUP - SCALE VALUES
screen, which is shown in the following illustration.
_____________________________________________________________________
SECTION 2
85
_________________________________________________________ SFACCESS
This screen provides the ability to change the scale value of an analog
channel for the SOLARFLOW PLUS unit currently logged on.
To change the scale value of an analog channel, locate the cursor to
the Value field of the desired channel using the arrow keys, and enter
the new value.
The user may abort or cancel any changes made by pressing the
Escape (ESC) key. When this key is pressed, the SETUP - SCALE
VALUES screen is removed from the display and control is passed
back to the MAIN MENU.
To save any changes made on this screen to the SOLARFLOW PLUS,
press the F10 key. Note that only those changes that were made are
sent to the unit. When the F10 key is pressed, the SETUP -SCALE
VALUES screen is removed from the display and a "Working ..."
window appears while the changes are being sent. When the process
is completed, the "Working .." window is removed from the display,
and control is passed back to the MAIN MENU.
_____________________________________________________________________
86
SECTION 2
SFACCESS _________________________________________________________
After the SETUP - SCALE VALUES screen appears, the user should
-
use the UP and DOWN ARROW keys to cursor through and enter
values for each of the channel description entries
-
press the F10 key to complete the process, or
-
press the ESC key to abort the process.
_____________________________________________________________________
SECTION 2
87
_________________________________________________________ SFACCESS
The "Calculation Configuration" Option
The ninth of the eleven options available within the "On-line" MAIN MENU
"Setup" option is the "Calculation Configuration" option.
At the "Calculation Configuration" option,
-
press the ENTER key to display the SETUP - CALCULATION
CONFIGURATION screen, which is shown in the following
illustration.
_____________________________________________________________________
88
SECTION 2
SFACCESS _________________________________________________________
This screen provides the ability to modify a calculation value for the
SOLARFLOW PLUS unit currently logged on.
To modify a calculation value, locate the cursor to the Value field of
the desired channel using the arrow keys. The Value field has one of
two data entry formats, which are numeric or selection. To modify a
numeric field simply, enter the desired value. To modify a selection
field, press the SPACE BAR until the desired value appears in the
field.
The user may abort or cancel any changes made by pressing the
Escape (ESC) key. When this key is pressed, the SETUP CALCULATION CONFIGURATION screen is removed from the
display and control is passed back to the MAIN MENU.
To save any changes made on this screen to the SOLARFLOW PLUS,
press the F10 key. Note that only those changes that were made are
sent to the unit. When the F10 key is pressed, the SETUP CALCULATION CONFIGURATION screen is removed from the
display and a "Working ..." window appears while the changes are
being sent. When the process is completed, the "Working ..." window
is removed from the display, and control is passed back to the MAIN
MENU.
_____________________________________________________________________
SECTION 2
89
_________________________________________________________ SFACCESS
After the SETUP - CALCULATION CONFIGURATION screen appears, the user
should
-
use the UP and DOWN ARROW keys to cursor through and enter
values for each of the channel description entries
-
press the F10 key to complete the process, or
-
press the ESC key to abort the process.
_____________________________________________________________________
90
SECTION 2
SFACCESS _________________________________________________________
The "Alarm Configuration" Option
The tenth of the eleven options available within the "On-line" MAIN MENU
"Setup" option is the "Alarm Configuration" option.
At the "Alarm Configuration" option,
-
press the ENTER key to display the SETUP - ALARM
CONFIGURATION screen, which is shown in the following
illustration.
_____________________________________________________________________
SECTION 2
91
_________________________________________________________ SFACCESS
This screen provides the ability to configure and enter setpoint values
for alarms defined on the SOLARFLOW PLUS unit currently logged
on. Alarms may be enabled or disabled. Optional setpoint values may
be divided into low and high values when necessary.
To change the current state of an alarm, locate the cursor to the
desired alarm ’- Enable’ record using the arrow keys, and press the
SPACE BAR until the desired state appears in the field. This field
may be set to ’Enable’ or ’Disable’. An enabled alarm is available to
the alarm monitoring system on the SOLARFLOW PLUS unit and
will generate appropriate alarm events when the alarm conditions exist.
A disabled alarm is not available to the alarm monitoring system. In
this case, no alarm events are generated when alarm conditions exist.
To change a setpoint value for a specific alarm, locate the cursor to
the desired alarm ’- Setpoint’, ’- Low Setpoint’, or ’- High Setpoint’
record (as appropriate) using the ARROW keys, and enter the desired
value.
The user may abort or cancel any changes made by pressing the
Escape (ESC) key. When this key is pressed, the SETUP - ALARM
CONFIGURATION screen is removed from the display and control
is passed back to the MAIN MENU.
To save any changes made on this screen to the SOLARFLOW PLUS,
press the F10 key. Note that only those changes that were made are
sent to the unit. When the F10 key is pressed, the SETUP -ALARM
CONFIGURATION screen is removed from the display and a
"Working ..." window appears while the changes are being sent. When
the process is completed, the "Working ..." window is removed from
the display, and control is passed back to the MAIN MENU.
_____________________________________________________________________
92
SECTION 2
SFACCESS _________________________________________________________
After the SETUP - ALARM CONFIGURATION screen appears, the user should
-
use the UP and DOWN ARROW keys to cursor through the Value
fields for each of the alarm description entries
-
press the SPACE BAR to toggle and enable or disable the alarm for
each alarm descriptions
-
enter setpoint values as indicated for each of the alarm descriptions
-
press the F10 key to complete the process, or
-
press the ESC key to abort the process.
_____________________________________________________________________
SECTION 2
93
_________________________________________________________ SFACCESS
The "Calculation Factors" Option
The last of the eleven options available within the "On-line" MAIN MENU "Setup"
option is the "Calculation Factors" option.
At the "Calculation Factors" option,
-
press the ENTER key to display the SETUP - CALCULATION
FACTORS screen, which is shown in the following illustration.
_____________________________________________________________________
94
SECTION 2
SFACCESS _________________________________________________________
This screen provides the user the ability to modify the input status of
the calculation factors for the SOLARFLOW PLUS unit currently
logged on. The input status of the calculation factors may either be
Fixed or Live. If the input status of a calculation factor is set to Live,
then the calculated value will be used in the calculations. If the input
status of a calculation factor is set to Fixed, then the user may supply
a desired value to be used in the calculations, thus over-riding the true
calculated value.
To change the input status of a calculation factor, locate the cursor to
the Status field of the desired factor using the ARROW keys. Press the
SPACE BAR until the desired status appears in the field. This field
may be set to either ’Fixed’ or ’Live’.
To modify the value of a Fixed calculation factor, locate the cursor to
the Value field of the desired factor and enter the new value.
The user may abort or cancel any changes made by pressing the
Escape (ESC) key. When this key is pressed, the SETUP CALCULATION FACTORS screen is removed from the display and
control is passed back to the MAIN MENU.
To save any changes made on this screen to the SOLARFLOW PLUS,
press the F10 key. Note that only those changes that were made are
sent to the unit. When the F10 key is pressed, the SETUP CALCULATION FACTORS screen is removed from the display and
a "Working ..." window appears while the changes are being sent.
When the process is completed, the "Working ..." window is removed
from the display, and control is passed back to the MAIN MENU.
_____________________________________________________________________
SECTION 2
95
_________________________________________________________ SFACCESS
After the SETUP - CALCULATION FACTORS screen appears, the user should
-
use the UP and DOWN ARROW keys to cursor through and enter
values for each of the channel description entries
-
press the F10 key to complete the process, or
-
press the ESC key to abort the process.
_____________________________________________________________________
96
SECTION 2
SFACCESS _________________________________________________________
PC MAIN MENU CONTENTS
As indicated in the following illustration, there are seven menu options in the "Offline" MAIN MENU (for the PC), which include the Logon, Print, View, Export,
Erase, Configure and Exit options. Since all seven options contain at least some
form of sub-menu, sub-menu option, or selection screen, most will be segregated,
examined and explained in separate sub-sections of this section (Section 3).
However, since the "Configure" option has already been fully explained in Section
2, no further examination or discussion is necessary.
_____________________________________________________________________
SECTION 3
97
_________________________________________________________ SFACCESS
THE "LOGON" OPTION
The "Logon" option, which is shown in the following illustration, is the first of the
seven "Off-line" MAIN MENU options. It contains one main sub-option, which
is the "Go On-line" option, that allows the user to logon to the SOLARFLOW
PLUS computer.
_____________________________________________________________________
98
SECTION 3
SFACCESS _________________________________________________________
The "Go On-line" Option
At the "Go On-line" option,
-
press the ENTER key to display the LOGON screen, which is shown
in the following illustration.
_____________________________________________________________________
SECTION 3
99
_________________________________________________________ SFACCESS
After the "Logon" screen has been accessed,
-
enter an appropriate SOLARFLOW PLUS security code and
-
press the ENTER key.
If an inappropriate security code is entered, access to the SOLARFLOW PLUS will
be denied, and an error message will appear, as shown in the following illustration.
_____________________________________________________________________
100
SECTION 3
SFACCESS _________________________________________________________
After an appropriate SOLARFLOW PLUS security code is entered and accepted,
a pop-up window, which is shown in the following illustration, will be diplayed.
This window lists the various applications available for use in the SOLARFLOW
PLUS.
_________________________________________________________
NOTE:
In a newly installed SOLARFLOW PLUS computer,
the "calculation module" or application name will be
asked for. However, in a working application, the
"calculation module" or application name will not be
asked for, because the SOLARFLOW PLUS furnishes
the correct parameters.
_________________________________________________________
_____________________________________________________________________
SECTION 3
101
_________________________________________________________ SFACCESS
After the pop-up window appears,
-
use the UP and DOWN ARROW keys to select the appropriate
application from the application list, and
-
press the ENTER key.
Each application is listed and defined in more detail in the
"Application File Designator" table, which is shown in the following
illustration(s).
_________________________________________________________
NOTE:
Each of the File Name Descriptors has two files on
the SFACCESS distribution diskette designated as:
NAME.CFG - The configuration file for the application
NAME.MNU - The menu option list for the application
In the event that disk storage space is at a premium,
the user may delete the application files, which are not
applicable to the system.
_________________________________________________________
_____________________________________________________________________
102
SECTION 3
SFACCESS _________________________________________________________
The standard application selections for the SOLARFLOW PLUS, which the
SFACCESS program supports are
APPLICATION FILE
DESIGNATOR
DESCRIPTION
AGA3 SNGL STD
70_3S
Model 2460 and 2470 single meter
run application.
AGA3 DUAL-SEP T
70_3D_ST
Model 2460 and 2470 AGA3 dual
meter run application with separate
temperature inputs for each run.
AGA3 IDUAL STD
70_3D_IR
Model 2460 and 2470 AGA3 dual
meter run application with
independent calculation modules for
each run.
AGA3 SDUAL TS
70_3DS
Model 2460 and 2470 AGA3 dual
meter run application with stacked
DP’s on run two, plus tube switching
capability.
AGA3 DUAL STD
70_3D
Model 2460 and 2470 dual meter run
application.
AGA7 2480 SNGL
80_7S
Model 2480 single meter run AGA7
application.
AGA3 2480 SSNGL
80_3SS
Model 2480 single meter run AGA7
application with stacked DP inputs.
AGA3 2480 SNGL
80_3S
Model 2480 single meter run AGA3
application.
AGA7 SNGL STD
70_7S
Model 2460 and 2470 single meter
run AGA7 application.
_____________________________________________________________________
SECTION 3
103
_________________________________________________________ SFACCESS
APPLICATIONS TABLE (continued)
APPLICATION FILE
DESIGNATOR
DESCRIPTION
AGA7 DUAL STD
70_7D
Model 2460 and 2470 dual meter run
AGA7 application.
AGA3 TRIPLE TS
70_3T
Model 2460 and 2470 triple meter
run AGA3 application with tube
switching capability.
AGA3 SSNGL STD
70_3SS
Model 2460 and 2470 single meter
run AGA3 application with stacked
DP inputs.
After the necessary security code and the appropriate application file name have
been entered, the "On-line" MAIN MENU will appear, and the user may begin
operation in the SOLARFLOW PLUS computer environment. The "On-line" MAIN
MENU and its operation will be addressed in Section 4, entitled SOLARFLOW
PLUS MAIN MENU CONTENTS.
_____________________________________________________________________
104
SECTION 3
SFACCESS _________________________________________________________
THE "PRINT" OPTION
The "Print" option, which is shown in the following illustration, is the second of
the seven "Off-line" MAIN MENU options. It contains two main sub-options,
which include "All Collected Data" and "Selected Locations", and allows for the
printing of all or selected data collected from the SOLARFLOW PLUS computer.
_________________________________________________________
NOTE:
Before using the "Print" option, the user must configure
the SFACCESS program to print the collected data to a
specific printer or file within the program by using the
print options under the "Off-line" MAIN MENU’s
"Configure" option. (Refer to Section 2 of this manual.)
_________________________________________________________
_____________________________________________________________________
SECTION 3
105
_________________________________________________________ SFACCESS
The "All Collected Data" Option
The first of the two options available within the "Off-line" MAIN MENU "Print"
option is the "All Collected Data" option.
At the "All Collected Data" option,
-
press the ENTER key to display a PRINT OPTIONS screen, as shown
in the following illustration.
_____________________________________________________________________
106
SECTION 3
SFACCESS _________________________________________________________
After the PRINT OPTIONS screen for "All" locations has been accessed,
-
use the UP and DOWN ARROW keys to highlight, and the SPACE
BAR to select one or more of the Report Types to be printed,
The Report Types include
-
-
Data Log Reports
-
Miscellaneous Data Reports
-
Event Log Reports
-
Calibration Reports
-
Alarm Event Log Reports
-
Parameter Change Event Log Reports
use the UP and DOWN ARROW keys to highlight, and the SPACE
BAR to select one or more of the Data Log Options, which apply to
the printing of data log records only,
These options include
-
Details, which is a detailed report that is printed with no
totals
-
Hourly Totals, which is a detail report that is printed with
hourly totals
-
Daily Totals, which is a detail report that is printed with
daily totals
_____________________________________________________________________
SECTION 3
107
_________________________________________________________ SFACCESS
-
-
Range Totals, which is a detail report that is printed with
range totals
use the UP and DOWN ARROW keys to move to the Beginning
Date/Time field, and enter the date and time in the MM/DD/YY and
HH:MM:SS formats to indicate when to begin printing in the period
of time covered by the collected data,
If no beginning date or time is entered, then printing will begin at the
first (or oldest) record in the database.
-
use the UP and DOWN ARROW keys to move to the Ending
Date/Time field, and enter the date and time in the MM/DD/YY and
HH:MM:SS formats to indicate when to end printing in the period of
time covered by the collected data,
If no ending date or time is entered, then reports will print up through
the last (or newest) records in the database.
_________________________________________________________
NOTE:
If no beginning or ending date or time is entered for the
collected data, then all the collected data for that
location will be printed.
_________________________________________________________
After the PRINT OPTION settings have been selected,
-
press the ENTER key to proceed with the printing process, or
-
press the ESC (Escape) key to ABORT the process.
_____________________________________________________________________
108
SECTION 3
SFACCESS _________________________________________________________
The "Selected Location" Option
The second of the two options available within the "Off-line" MAIN MENU "Print"
option is the "Selected Location" option.
At the "Selected Location" option,
-
press the ENTER key to display a pop-up window, as shown in the
following illustration, which lists the locations available for selection
_____________________________________________________________________
SECTION 3
109
_________________________________________________________ SFACCESS
After the pop-up window, which lists the locations available for selection, has been
accessed,
-
use the UP and DOWN ARROW keys to highlight and the SPACE
BAR key to select specific locations, and
-
press the ENTER key to display a PRINT OPTIONS screen for the
selected location, as shown in the following illustration
_____________________________________________________________________
110
SECTION 3
SFACCESS _________________________________________________________
After the PRINT OPTIONS screen for a specific location has been accessed,
-
use the UP and DOWN ARROW keys to highlight, and the SPACE
BAR to select one or more of the Report Types to be printed,
The Report Types include
-
-
Data Log Reports
-
Miscellaneous Data Reports
-
Event Log Reports
-
Calibration Reports
-
Alarm Event Log Reports
-
Parameter Change Event Log Reports
use the UP and DOWN ARROW keys to highlight, and the SPACE
BAR to select one or more of the Data Log Options, which apply to
the printing of data log records only,
These options include
-
Details, which is a detailed report that is printed with no
totals
-
Hourly Totals, which is a detail report that is printed with
hourly totals
-
Daily Totals, which is a detail report that is printed with
daily totals
_____________________________________________________________________
SECTION 3
111
_________________________________________________________ SFACCESS
-
-
Range Totals, which is a detail report that is printed with
range totals
use the UP and DOWN ARROW keys to move to the Beginning
Date/Time field, and enter the date and time in the MM/DD/YY and
HH:MM:SS formats to indicate when to begin printing in the period
of time covered by the collected data,
If no beginning date or time is entered, then printing will begin at the
first (or oldest) record in the database.
-
use the UP and DOWN ARROW keys to move to the Ending
Date/Time field, and enter the date and time in the MM/DD/YY and
HH:MM:SS formats to indicate when to end printing in the period of
time covered by the collected data,
If no ending date or time is entered, then reports will print up through
the last (or newest) records in the database.
_________________________________________________________
NOTE:
If no beginning or ending date or time is entered for the
collected data, then all the collected data for that
location will be printed.
_________________________________________________________
After the PRINT OPTION settings have been selected,
-
press the ENTER key to proceed with the printing process, or
-
press the ESC (Escape) key to ABORT the process.
_____________________________________________________________________
112
SECTION 3
SFACCESS _________________________________________________________
THE "VIEW" OPTION
The "View" option, which is shown in the following illustration, is the third of the
seven "Off-line" MAIN MENU options. It contains four main sub-options, which
include the "Data Logs (Graph)", "Data Logs (Text)", "Miscellaneous Logs", and
the "Event Logs" options. These various sub-options allow data to be viewed either
in a graph mode, which is not possible in the DANIEL INDUSTRIES HAND
HELD DATA TERMINAL, or a text mode.
The graph mode permits up to three items to be graphed simultaneously with the
capability to manipulate the data by panning forward, panning backwards, and
zooming in and out. The text mode allows viewing of data, events, and
miscellaneous logs in column or tabular form.
_____________________________________________________________________
SECTION 3
113
_________________________________________________________ SFACCESS
The "Data Logs (Graph)" Option
The first of the four options available within the "Off-line" MAIN MENU "View"
option is the "Data Logs (Graph)" option.
At the "Data Logs (Graph)" option,
-
press the ENTER key to display a pop-up window, as shown in the
following illustration,
Only when a database file is active and data is present, will a pop-up
window with one or more locations be displayed.
_____________________________________________________________________
114
SECTION 3
SFACCESS _________________________________________________________
After the pop-up window is accessed, highlight and select the desired location,
which, in this case, is the "ODESSA TARZAN" selection
-
by using the UP and DOWN ARROW keys.
-
press the ENTER key to display the VIEW OPTIONS screen, which
is shown in the following illustration, for the ODESSA TARZAN
location,
Then,
_____________________________________________________________________
SECTION 3
115
_________________________________________________________ SFACCESS
After the VIEW OPTIONS screen for the desired location has been accessed,
-
at the Beginning Date/Time field, enter the date and time in the
MM/DD/YY and HH:MM:SS formats to indicate when to begin
viewing in the period of time the collected data covers,
If no date or time is entered, then the first (oldest) record in the
database will be graphed.
-
use the TAB key, or RIGHT ARROW key to move to the Data
Interval field, and use the SPACE BAR to select a data time interval
(5, 15, or 30 minutes, or 1, 4, or 24 hours) with the default being 1
hour,
-
use the TAB key and/or UP and DOWN ARROW keys to move to the
items listed under the Channel column,
-
use the SPACE BAR to select (with a check mark) or de-select one
or more channel items to be graphed with up to three items being
charted at one time,
If more than three channels items are selected, the first three items
selected will be graphed. If no channels items are selected, then none
will be graphed.
-
use the TAB key and/or UP and DOWN ARROW keys to move to
and enter the number values listed under the Zero (low) and Full
(high) Scale columns with the default being 0.0 for the Zero Scale
values and 100.0 to 1000.0 being the values for the Full Scale values.
_____________________________________________________________________
116
SECTION 3
SFACCESS _________________________________________________________
Once the option settings have been selected,
-
press the F10 key to indicate the selection process is finished, and the
"View" process can begin, or
-
press the ESC (Escape) key to ABORT the selection process.
_____________________________________________________________________
SECTION 3
117
_________________________________________________________ SFACCESS
Graphic screen plots can be displayed with a minimum of 24 data points (level
one) at the closest, "zoomed in" screen view, to a maximum of 576 data points
(level six) at the farthest, "zoomed out" screen view. Level two shows 49 data
points, level three shows 97, level four shows 193, and level five shows 289. Each
data point represents a set of data identified by location, date and time. Symbols,
such as asterisks, circles and rectangles help to represent and track these data
points.
Although there may be many data points, the program will only show the first 97
(or 96 intervals) beginning with the "Beginning Date/Time". The remaining data
points, as well as the entire graph, can be viewed by using the following features.
The graph can be manipulated by using
-
the LEFT ARROW key to pan to the left 1/24 the width of the screen,
-
the RIGHT ARROW key to pan to the right 1/24 the width of the
screen,
-
the UP ARROW key to pan to the left 1/2 the width of the screen,
-
the DOWN ARROW key to pan to the right 1/2 the width of the
screen,
-
The PLUS (+) key to zoom into a smaller scale to indicate greater
detail,
-
The MINUS (-) key to zoom out to a larger scale to indicate less
detail,
-
the HOME key to move to the earliest record, or the first log time in
the database for a location,
_____________________________________________________________________
118
SECTION 3
SFACCESS _________________________________________________________
-
the END key to move the most recent record, or the last log time in
the database for a location.
-
the SPACE BAR key to toggle between units and scales of variables,
-
the ESC (escape) key to exit from the display.
Finally, after completing operations on the ODESSA TARZAN location, the user
has the option of continuing to configure and view any of the other specific
locations listed in the pop-up window under the "Data Logs (Graph)" option.
However, since the configuration and view process is the same for these two
locations as for the ODESSA TARZAN location, no further illustration of this
operation is necessary.
_____________________________________________________________________
SECTION 3
119
_________________________________________________________ SFACCESS
The "Data Logs (Text)" Option
The second of the four options available within the MAIN MENU "View" option
is the "Data Logs (Text)" option. This option, which is a type of tabular data log,
allows for the viewing of data collected in a text form. The data is presented in
specific columns that can be scrolled and viewed in four directions on the screen.
To select and highlight the "Data Logs (Text)" option,
-
use the UP and DOWN ARROW keys.
-
press the ENTER key to display a pop-up window with one or more
locations listed, as shown in the following illustration.
Then,
_____________________________________________________________________
120
SECTION 3
SFACCESS _________________________________________________________
After the pop-up window is accessed, highlight and select the desired location,
which, in this case, is the ODESSA TARZAN selection
-
by using the UP and DOWN ARROW keys.
-
press the ENTER key to display the VIEW OPTIONS screen, which
is shown in the following illustration, for the ODESSA TARZAN
location,
Then,
_____________________________________________________________________
SECTION 3
121
_________________________________________________________ SFACCESS
After the VIEW OPTIONS screen for the ODESSA TARZAN location has been
accessed,
-
at the Beginning Date/Time field, enter the date and time in the
MM/DD/YY and HH:MM:SS formats to indicate when logs will begin
being displayed in the period of time the logs cover,
If no date or time is entered, then the first (earliest) record will be
retrieved and displayed.
_____________________________________________________________________
122
SECTION 3
SFACCESS _________________________________________________________
After the Beginning Date/Time has been selected,
-
press the F10 key to indicate the selection process is finished, and to
display the VIEW DATA LOGS screen, which is shown in the
following illustration, or
-
press the ESC (Escape) key to ABORT the selection process.
_____________________________________________________________________
SECTION 3
123
_________________________________________________________ SFACCESS
Tabular data log screens, such as the VIEW DATA LOGS screen, can be viewed
and manipulated by using
-
the HOME Key to display data beginning at the earliest date,
-
the END key to display data ending with the latest date,
-
the LEFT ARROW key to scroll the data screen to the left,
-
the RIGHT ARROW key to scroll the data screen to the right,
-
the UP ARROW key to scroll the data screen up one logging interval,
-
the DOWN ARROW key to scroll the data screen down one logging
interval,
-
the TAB key to scroll the data screen to the right,
-
the SHIFT and TAB keys scroll the data screen to the left,
This is done by holding the SHIFT key, and pressing the TAB key.
-
The CONTROL and LEFT ARROW key to scroll the data screen to
the far left,
This is done by holding the CONTROL key and pressing the LEFT
ARROW key.
-
The CONTROL and RIGHT ARROW key to scroll the data screen to
the far right,
This is done by holding the CONTROL key and pressing the RIGHT
ARROW key.
_____________________________________________________________________
124
SECTION 3
SFACCESS _________________________________________________________
-
the PAGE UP key to scroll up one full screen with the previous top
line being displayed as the bottom line,
-
the PAGE DOWN key to scroll down one full screen with the
previous bottom line being displayed as the top line,
-
the ESC (escape) key to exit to the previous screen.
Finally, after completing operations on the desired location, the user has the option
of continuing to configure and view any of the other selections listed in the pop-up
window under the "Data Logs (Text)" option.
_____________________________________________________________________
SECTION 3
125
_________________________________________________________ SFACCESS
The "Miscellaneous Logs" Option
The third of the four options available within the MAIN MENU "View" option is
the "Miscellaneous Logs" option. This option, which is a type of tabular data log,
contains data on parameters such as temperature, pressure, specific gravity, and
meter and flow factors.
To select and highlight the "Miscellaneous Logs" option,
-
use the UP and DOWN ARROW keys.
-
press the ENTER key to display a pop-up window with one or more
locations listed, as shown in the following illustration.
Then,
_____________________________________________________________________
126
SECTION 3
SFACCESS _________________________________________________________
After the pop-up window is accessed, highlight and select the desired location,
which, in this case, is the ODESSA TARZAN selection
-
by using the UP and DOWN ARROW keys.
-
press the ENTER key to display the VIEW MISCELLANEOUS
LOGS screen, which is shown in the following illustration, for the
ODESSA TARZAN location
Then,
_____________________________________________________________________
SECTION 3
127
_________________________________________________________ SFACCESS
Tabular data log screens, such as VIEW MISCELLANEOUS LOGS screen, can be
viewed and manipulated by using
-
the HOME Key to display data beginning at the earliest date,
-
the END key to display data ending with the latest date,
-
the UP ARROW key to scroll the data screen up one logging interval,
-
the DOWN ARROW key to scroll the data screen down one logging
interval,
-
the PAGE UP key to scroll up one full screen with the previous top
line being displayed as the bottom line,
-
the PAGE DOWN key to scroll down one full screen with the
previous bottom line being displayed as the top line,
-
the ESC (escape) key to exit to the previous screen.
Finally, after completing operations on the desired location, the user has the option
of continuing to configure and view any of the other selections listed in the pop-up
window under the "Miscellaneous Logs" option.
_____________________________________________________________________
128
SECTION 3
SFACCESS _________________________________________________________
The "Event Logs" Option
The last of the four options available within the MAIN MENU "View" option is
the "Event Logs" option. This option, which is a type of tabular data log, contains
changes in parameters, data on alarms and operator entries.
To select and highlight the "Event Logs" option,
-
use the UP and DOWN ARROW keys.
-
press the ENTER key to display a pop-up window with one or more
locations listed, as shown in the following illustration.
Then,
_____________________________________________________________________
SECTION 3
129
_________________________________________________________ SFACCESS
After the pop-up window is accessed, highlight and select the desired location,
which, in this case, is the ODESSA TARZAN selection
-
by using the UP and DOWN ARROW keys.
-
press the ENTER key to display the VIEW OPTIONS screen, which
is shown in the following illustration, for the ODESSA TARZAN
location.
Then,
_____________________________________________________________________
130
SECTION 3
SFACCESS _________________________________________________________
After the VIEW OPTIONS screen for the desired location has been accessed,
-
at the Beginning Date/Time field, enter the date and time in the
MM/DD/YY and HH:MM:SS formats to indicate when logs will begin
being displayed in the period of time the logs cover.
If no date or time is entered, then the earliest log will be retrieved and
displayed.
_____________________________________________________________________
SECTION 3
131
_________________________________________________________ SFACCESS
After the Beginning Date/Time has been selected,
-
press the F10 key to indicate the selection process is finished, and to
display the VIEW EVENT LOGS screen, which is shown in the
following illustration, or
-
press the ESC (Escape) key to ABORT the selection process.
_____________________________________________________________________
132
SECTION 3
SFACCESS _________________________________________________________
Tabular data log screens, such as VIEW EVENT LOGS screen, can be viewed and
manipulated by using
-
the HOME Key to display data beginning at the earliest date,
-
the END key to display data ending with the latest date,
-
the LEFT ARROW key to scroll the data screen to the left,
-
the RIGHT ARROW key to scroll the data screen to the right,
-
the UP ARROW key to scroll the data screen up one logging interval,
-
the DOWN ARROW key to scroll the data screen down one logging
interval,
-
the TAB key to scroll the data screen to the right,
-
the SHIFT and TAB keys scroll the data screen to the left,
This is done by holding the SHIFT key, and pressing the TAB key.
-
The CONTROL and LEFT ARROW key to scroll the data screen to
the far left,
This is done by holding the CONTROL key and pressing the LEFT
ARROW key.
-
The CONTROL and RIGHT ARROW key to scroll the data screen to
the far right,
This is done by holding the CONTROL key and pressing the RIGHT
ARROW key.
_____________________________________________________________________
SECTION 3
133
_________________________________________________________ SFACCESS
-
the PAGE UP key to scroll up one full screen with the previous top
line being displayed as the bottom line,
-
the PAGE DOWN key to scroll down one full screen with the
previous bottom line being displayed as the top line,
-
the ESC (escape) key to exit to the previous screen.
Finally, after completing operations on the desired location, the user has the option
of continuing to configure and view any of the other selections listed in the pop-up
window under the "Event Logs" option.
_____________________________________________________________________
134
SECTION 3
SFACCESS _________________________________________________________
THE "EXPORT" OPTION
The "Export" option, which is shown in the following illustration, is the fourth of
the seven "Off-line" MAIN MENU options. It contains two main sub-options,
which include the "All Collected Data" and the "Selected Locations" options.
This option allows for the exporting of SOLARFLOW PLUS data, which is in a
binary database form, into a SFDC (SOLARFLOW DATA COLLECTION) or
ASCII format. When necessary, the SFDC or ASCII-formatted data can then be
imported by other user software where it can be manipulated to meet specific user
needs. In addition, either all or selected location data can be exported.
_____________________________________________________________________
SECTION 3
135
_________________________________________________________ SFACCESS
In order to export SOLARFLOW PLUS data, the user must first configure the
"Export Function Setup" located in the "Off-line" MAIN MENU’s "Configure"
option. For detailed information about the "Configure" option, refer to Section 2
of this manual.
_________________________________________________________
NOTE:
For information about importing SOLARFLOW
PLUS data into other software programs, refer to the
APPLICATION NOTES located in this manual’s
appendix.
_________________________________________________________
_____________________________________________________________________
136
SECTION 3
SFACCESS _________________________________________________________
The "All Collected Data" Option
The first of the two options available within the "Off-line" MAIN MENU "Export"
option is the "All Collected Data" option.
At the "All Collected Data" option,
-
press the ENTER key to display an EXPORT screen, which is shown
in the following illustration, that indicates the SFACCESS program is
automatically exporting all collected SOLARFLOW PLUS data.
All collected data will be exported first-to-last in the order of the
locations listed in the SFACCESS program. In addition, as the
operation continues, the EXPORT screen displays a message indicating
what location is currently being exported.
_____________________________________________________________________
SECTION 3
137
_________________________________________________________ SFACCESS
At any time during the exporting process, the user may abort the operation
-
by pressing the ESC (Escape) key.
As shown in the following illustration, the EXPORT screen will then
display the message, "Export aborted. Press any key to continue. . .",
to indicate the process has been discontinued.
_____________________________________________________________________
138
SECTION 3
SFACCESS _________________________________________________________
If the exporting process is not aborted, all collected data locations listed in the
SFACCESS program will be exported until the operation is completed. Upon
completion, the EXPORT screen, which is shown in the following illustration, will
appear with the message, "Finished. Press any key to continue. . .".
_____________________________________________________________________
SECTION 3
139
_________________________________________________________ SFACCESS
The "Selected Location" Option
The last of the two options available within the MAIN MENU "Export" option is
the "Selected Location" option.
To select and highlight the "Selected Location" option,
-
use the UP and DOWN ARROW keys.
-
press the ENTER key to display a pop-up window with one or more
locations listed, as shown in the following illustration.
Then,
_____________________________________________________________________
140
SECTION 3
SFACCESS _________________________________________________________
After the pop-up window is accessed, highlight and select the desired location,
which, in this case, is the ODESSA TARZAN selection
-
by using the UP and DOWN ARROW keys.
-
press the ENTER key to display an EXPORT screen, which is shown
in the following illustration, that indicates the SFACCESS program is
automatically exporting the SOLARFLOW PLUS data for the
specified location.
Then,
_____________________________________________________________________
SECTION 3
141
_________________________________________________________ SFACCESS
At any time during the exporting process, the user may abort the operation
-
by pressing the ESC (Escape) key.
As shown in the following illustration, the EXPORT screen will then
display the message, "Export aborted. Press any key to continue. . .",
to indicate the process has been discontinued.
_____________________________________________________________________
142
SECTION 3
SFACCESS _________________________________________________________
If the exporting process is not aborted, the collected data for the specified location
will be exported until the operation is completed. Upon completion, the EXPORT
screen, which is shown in the following illustration, will appear with the message,
"Finished. Press any key to continue. . .".
_____________________________________________________________________
SECTION 3
143
_________________________________________________________ SFACCESS
THE "ERASE" OPTION
The "Erase" option, which is shown in the following illustration, is the fifth of the
seven "Off-line" MAIN MENU options. It contains only one sub-option, which is
the "All Collected Data" option.
When employed, this option completely erases all data from the SFACCESS
database file, which is specified in the "Database Setup" located in the "Off-line"
MAIN MENU’s "Configure" option.
_________________________________________________________
CAUTION: EXTREME CARE should be used
when employing the "Erase" option since elimination
of the ENTIRE database will result.
_________________________________________________________
_____________________________________________________________________
144
SECTION 3
SFACCESS _________________________________________________________
The "All Collected Data" Option
If all collected data is to be erased, at the "All Collected Data" option,
-
press the ENTER key.
If a database file is active or data is present, a pop-up window, as
shown in the following illustration, will be displayed with the
message, "Preparing to ERASE ALL collected data", and the question,
"ARE YOU SURE? Please confirm!".
_____________________________________________________________________
SECTION 3
145
_________________________________________________________ SFACCESS
There is also the request, along with the "ARE YOU SURE? Please confirm!"
message, which directs the user to "enter YES to confirm erase operation". At this
point, the user has the option to either enter the word, YES, and
-
press the ENTER key, or
-
press the ESC (Escape) key to Abort.
_____________________________________________________________________
146
SECTION 3
SFACCESS _________________________________________________________
THE "EXIT" OPTION
The "Exit" option, which is shown in the following illustration, is the last of the
seven "Off-line" MAIN MENU options. It contains only one sub-option, which is
the "Go to DOS" option that allows the user to exit from the SFACCESS program
and to return to the DOS prompt.
_____________________________________________________________________
SECTION 3
147
_________________________________________________________ SFACCESS
The "Go to DOS" Option
At the "Go to DOS" option,
-
press the ENTER key to display a pop-up window, as shown in the
following illustration, with the question, "Save configuration
changes?".
_________________________________________________________
NOTE:
The pop-up window with the "Save configuration
changes?" question appears only if changes were made
to the SFACCESS configuration that were not
previously saved.
_________________________________________________________
_____________________________________________________________________
148
SECTION 3
SFACCESS _________________________________________________________
After the pop-up window appears,
-
use the SPACE BAR to toggle and select YES or NO to indicate
whether the configuration changes made to the SFACCESS program
should be saved or not.
-
press the ENTER key to from the SFACCESS program, and return to
the DOS prompt.
Then,
_____________________________________________________________________
SECTION 3
149
_________________________________________________________ SFACCESS
BLANK PAGE
_____________________________________________________________________
150
SECTION 3
SFACCESS _________________________________________________________
SOLARFLOW PLUS MAIN MENU CONTENTS
Section 4 describes and explains the contents of the SOLARFLOW PLUS MAIN
MENU ("On-line" MAIN MENU) in the same manner as Section 3 addressed the
contents of the PC MAIN MENU ("Off-line" MAIN MENU). However, as was
previously explained in detail in Section 3, in order to access the SOLARFLOW
PLUS computer, the user must first use the "Off-line" MAIN MENU’s "Logon"
option, which is shown in the following illustration.
_____________________________________________________________________
SECTION 4
151
_________________________________________________________ SFACCESS
After the SOLARFLOW PLUS computer has been successfully accessed, the "Online" MAIN MENU will appear, as shown in the following illustration. As
indicated, there are six menu options, which include the Logoff, Collect, Display,
Setup, Calibration and Alarm options. Since all six options contain at least some
form of sub-menu, sub-menu option, or selection screen, most will be segregated,
examined and explained in separate sub-sections of this section (Section 4).
However, since the "Setup" option has already been fully explained in Section 2,
no further examination or discussion is necessary.
_____________________________________________________________________
152
SECTION 4
SFACCESS _________________________________________________________
THE "LOGOFF" OPTION
The "Logoff" option, which is shown in the following illustration, is the first of the
six "On-line" MAIN MENU options. It contains one main sub-option, which is the
"Go Off-line" option, that allows the user to logoff from the SOLARFLOW PLUS
computer, and return to the PC MAIN MENU ("Off-line" MAIN MENU).
_____________________________________________________________________
SECTION 4
153
_________________________________________________________ SFACCESS
The "Go Off-line" Option
At the "Go Off-line" option,
-
press the ENTER key to return to the PC MAIN MENU ("Off-line"
MAIN MENU), which is shown in the following illustration.
_____________________________________________________________________
154
SECTION 4
SFACCESS _________________________________________________________
THE "COLLECT" OPTION
The "Collect" option, which is shown in the following illustration, is the second of
the six "On-line" MAIN MENU options. It contains four main sub-options, which
include the "Update Since Last Collection" option, "the Specified Number of Days"
option, the "Specified Date Range"option, and the "All Stored Information" option.
These options allow for the collection of Event, Data, and Miscellaneous logs, and
various configuration and channel information over selected periods of time. This
data is then sent to the database file previously specified by the user in the
"Configuration" option of the "Off-line" MAIN MENU.
_____________________________________________________________________
SECTION 4
155
_________________________________________________________ SFACCESS
_________________________________________________________
NOTE:
SFACCESS allows more options than the HAND
HELD DATA TERMINAL when collecting and
manipulating SOLARFLOW PLUS data. For example,
the "Specified Date Range" option, which is available
on SFACCESS, is not available on the HAND HELD
DATA TERMINAL.
_________________________________________________________
_____________________________________________________________________
156
SECTION 4
SFACCESS _________________________________________________________
The "Update Since Last Collection" Option
The first of the four options available within the "On-line" MAIN MENU "Collect"
option is the "Update Since Last Collection" option.
At the "Update Since Last Collection" option,
-
press the ENTER key to display a COLLECT screen, as shown in the
following illustration.
_____________________________________________________________________
SECTION 4
157
_________________________________________________________ SFACCESS
As shown in the last illustration, after the COLLECT screen appears, a
"WORKING" message is displayed in a status field in the upper right corner of the
screen. In addition to this status field, the COLLECT screen also displays other
status fields, which provide additional messages as the collection process is
completed for the Event, Data, and Miscellaneous logs. Included are
-
three status fields to the right of "Event Logs:", which are respectively
from left to right, a field for indicating the first Event log found, since
the last log collection, a field for indicating the last Event log found,
since the last log collection, and the number of Event logs found,
since the last log collection
-
three status fields to the right of "Data Logs:", which are respectively
from left to right, a field for indicating the first Data log found, since
the last log collection, a field for indicating the last Data log found,
since the last log collection, and the number of Data logs found, since
the last log collection
-
one status field to the right of "Misc:" (Miscellaneous), which briefly
displays the tag names in the Miscellaneous logs as each is
sequentially accessed.
_____________________________________________________________________
158
SECTION 4
SFACCESS _________________________________________________________
After the COLLECT screen appears, and the "WORKING" message is displayed
to indicate that the collection of log information is in progress since the last log
collection, the user may "Press ESC (Escape) to abort. . ." the process. If the ESC
(Escape) key is pressed, an "ABORT" message is displayed in the status field in
the upper right corner of the screen, as shown in the following illustration.
After the collection process has been aborted, the user must
-
"Press any key to continue. . ." using the "On-line" MAIN MENU.
_____________________________________________________________________
SECTION 4
159
_________________________________________________________ SFACCESS
However, if the log collection process is allowed to continue without interruption,
a "FINISHED" message is displayed in the status field in the upper right corner of
the screen, which is shown in the following illustration. This message indicates that
the log collection process has been completed, and the collected data has been sent
to the database file previously specified by the user in the "Configuration" option
of the "Off-line" MAIN MENU.
After the collection process has finished, the user must
-
"Press any key to continue. . ." using the "On-line" MAIN MENU.
_____________________________________________________________________
160
SECTION 4
SFACCESS _________________________________________________________
The "Specified Number of Days" Option
The second of the four options available within the "On-line" MAIN MENU
"Collect" option is the "Specified Number of Days" option.
At the "Specified Number of Days" option
-
press the ENTER key to display a COLLECT SETUP screen, as
shown in the following illustration.
_____________________________________________________________________
SECTION 4
161
_________________________________________________________ SFACCESS
After the COLLECT SETUP screen appears,
-
enter the number of days of log data to be collected in the "Number
of days to collect:" field, and
-
press either the ENTER key, or the F10 key to begin the collection
process, or
-
press the ESC (Escape) key to abort the collection process.
_____________________________________________________________________
162
SECTION 4
SFACCESS _________________________________________________________
After the ENTER key, or the F10 key is pressed to begin the data collection
process,
-
a COLLECT screen is displayed, as shown in the following
illustration.
_____________________________________________________________________
SECTION 4
163
_________________________________________________________ SFACCESS
As shown in the last illustration, after the COLLECT screen appears, a
"WORKING" message is displayed in a status field in the upper right corner of the
screen. In addition to this status field, the COLLECT screen also displays other
status fields, which provide additional messages as the collection process is
completed for the Event, Data, and Miscellaneous logs. Included are
-
three status fields to the right of "Event Logs:", which are respectively
from left to right, a field for indicating the first Event log found in the
number of days specified, a field for indicating the last Event log
found in the number of days specified, and the number of Event logs
found in the number of days specified
-
three status fields to the right of "Data Logs:", which are respectively
from left to right, a field for indicating the first Data log found in the
number of days specified, a field for indicating the last Data log found
in the number of days specified, and the number of Data logs found
in the number of days specified
-
one status field to the right of "Misc:" (Miscellaneous), which briefly
displays the tag names in the Miscellaneous logs as each is
sequentially accessed.
_____________________________________________________________________
164
SECTION 4
SFACCESS _________________________________________________________
After the COLLECT screen appears, and the "WORKING" message is displayed
to indicate that the collection of log information is in progress for the specified
number of days, the user may "Press ESC (Escape) to abort. . ." the process. If the
ESC (Escape) key is pressed, an "ABORT" message is displayed in the status field
in the upper right corner of the screen, as shown in the following illustration.
After the collection process has been aborted, the user must
-
"Press any key to continue. . ." using the "On-line" MAIN MENU.
_____________________________________________________________________
SECTION 4
165
_________________________________________________________ SFACCESS
However, if the log collection process for the specified number of days is allowed
to continue without interruption, a "FINISHED" message is displayed in the status
field in the upper right corner of the screen, which is shown in the following
illustration. This message indicates that the log collection process has been
completed, and the collected data has been sent to the database file previously
specified by the user in the "Configuration" option of the "Off-line" MAIN MENU.
After the collection process has finished, the user must
-
"Press any key to continue. . ." using the "On-line" MAIN MENU.
_____________________________________________________________________
166
SECTION 4
SFACCESS _________________________________________________________
The "Specified Date Range" Option
The third of the four options available within the "On-line" MAIN MENU
"Collect" option is the "Specified Date Range" option.
At the "Specified Date Range" option
-
press the ENTER key to display a COLLECT SETUP screen, as
shown in the following illustration.
_____________________________________________________________________
SECTION 4
167
_________________________________________________________ SFACCESS
After the COLLECT SETUP screen appears,
-
enter the beginning date for the log data that is to be collected in the
highlighted field in the "Beginning date/time" line,
-
use the ENTER key to move to, highlight and select the second field
in the "Beginning date/time" line, and enter the beginning time for the
log data that is to be collected
-
use the ENTER key to move to, highlight and select the first field in
the "Ending date/time" line, and enter the ending date for the log data
that is to be collected
-
use the ENTER key to move to, highlight and select the second field
in the "Ending date/time" line, and enter the ending time for the log
data that is to be collected, and
-
press the F10 key to begin the collection process, or
-
press the ESC (Escape) key to abort the collection process.
_____________________________________________________________________
168
SECTION 4
SFACCESS _________________________________________________________
After the F10 key is pressed to begin the data collection process,
-
a COLLECT screen is displayed, as shown in the following
illustration.
_____________________________________________________________________
SECTION 4
169
_________________________________________________________ SFACCESS
As shown in the last illustration, after the COLLECT screen appears, a
"WORKING" message is displayed in a status field in the upper right corner of the
screen. In addition to this status field, the COLLECT screen also displays other
status fields, which provide additional messages as the collection process is
completed for the Event, Data, and Miscellaneous logs. Included are
-
three status fields to the right of "Event Logs:", which are respectively
from left to right, a field for indicating the first Event log found in the
date range specified, a field for indicating the last Event log found in
the date range specified, and the number of Event logs found in the
date range specified
-
three status fields to the right of "Data Logs:", which are respectively
from left to right, a field for indicating the first Data log found in the
date range specified, a field for indicating the last Data log found in
the date range specified, and the number of Data logs found in the
date range specified
-
one status field to the right of "Misc:" (Miscellaneous), which briefly
displays the tag names in the Miscellaneous logs as each is
sequentially accessed.
_____________________________________________________________________
170
SECTION 4
SFACCESS _________________________________________________________
After the COLLECT screen appears, and the "WORKING" message is displayed
to indicate that the collection of log information is in progress for the specified date
range, the user may "Press ESC (Escape) to abort. . ." the process. If the ESC
(Escape) key is pressed, an "ABORT" message is displayed in the status field in
the upper right corner of the screen, as shown in the following illustration.
After the collection process has been aborted, the user must
-
"Press any key to continue. . ." using the "On-line" MAIN MENU.
_____________________________________________________________________
SECTION 4
171
_________________________________________________________ SFACCESS
However, if the log collection process for the specified date range is allowed to
continue without interruption, a "FINISHED" message is displayed in the status
field in the upper right corner of the screen, which is shown in the following
illustration. This message indicates that the log collection process has been
completed, and the collected data has been sent to the database file previously
specified by the user in the "Configuration" option of the "Off-line" MAIN MENU.
After the collection process has finished, the user must
-
"Press any key to continue. . ." using the "On-line" MAIN MENU.
_____________________________________________________________________
172
SECTION 4
SFACCESS _________________________________________________________
The "All Stored Information" Option
The last of the four options available within the "On-line" MAIN MENU "Collect"
option is the "All Stored Information" option.
At the "All Stored Information" option
-
press the ENTER key to display a COLLECT screen, which is shown
in the following illustration. This screen indicates the data collection
process of all stored information has begun.
_____________________________________________________________________
SECTION 4
173
_________________________________________________________ SFACCESS
As shown in the last illustration, after the COLLECT screen appears, a
"WORKING" message is displayed in a status field in the upper right corner of the
screen. In addition to this status field, the COLLECT screen also displays other
status fields, which provide additional messages as the collection process is
completed for the Event, Data, and Miscellaneous logs. Included are
-
three status fields to the right of "Event Logs:", which are respectively
from left to right, a field for indicating the first Event log found in the
collection of all stored information, a field for indicating the last Event
log found in the collection of all stored information, and the number
of Event logs found in the collection of all stored information
-
three status fields to the right of "Data Logs:", which are respectively
from left to right, a field for indicating the first Data log found in the
collection of all stored information, a field for indicating the last Data
log found in the collection of all stored information, and the number
of Data logs found in the collection of all stored information
-
one status field to the right of "Misc:" (Miscellaneous), which briefly
displays the tag names in the Miscellaneous logs as each is
sequentially accessed.
_____________________________________________________________________
174
SECTION 4
SFACCESS _________________________________________________________
After the COLLECT screen appears, and the "WORKING" message is displayed
to indicate that the collection of all stored information is in progress, the user may
"Press ESC (Escape) to abort. . ." the process. If the ESC (Escape) key is pressed,
an "ABORT" message is displayed in the status field in the upper right corner of
the screen, as shown in the following illustration.
After the collection process has been aborted, the user must
-
"Press any key to continue. . ." using the "On-line" MAIN MENU.
_____________________________________________________________________
SECTION 4
175
_________________________________________________________ SFACCESS
However, if the log collection process for all stored information is allowed to
continue without interruption, a "FINISHED" message is displayed in the status
field in the upper right corner of the screen, which is shown in the following
illustration. This message indicates that the log collection process has been
completed, and the collected data has been sent to the database file previously
specified by the user in the "Configuration" option of the "Off-line" MAIN MENU.
After the collection process has finished, the user must
-
"Press any key to continue. . ." using the "On-line" MAIN MENU.
_____________________________________________________________________
176
SECTION 4
SFACCESS _________________________________________________________
THE "DISPLAY" OPTION
The "Display" option, which is shown in the following illustration, is the third of
the six "On-line" MAIN MENU options. In this application, it contains thirteen
main sub-options, which include the "General Information" option, the "Security
Code List" option, the "User Report Definition" option, the "Communication
Configuration" option, the "Data Log Definition" option, the "Analog Inputs"
option, the "Status Inputs" option, the "Control Outputs" option, the "Scale Values"
option, the "Rates and Volumes" option, the "Calculation Configuration" option, the
"Alarm Configuration" option, and the "Calculation Factors" option. The "Setup"
option allows for the viewing of the various setup parameters and calculated values
in the SOLARFLOW PLUS. As necessary, some of these displayed values, which
may change in real-time, are updated continuously. Also, as the name implies, this
menu, and its associated options, are for information only, and cannot be directly
changed by the user.
_____________________________________________________________________
SECTION 4
177
_________________________________________________________ SFACCESS
_________________________________________________________
NOTE:
The "Display" option menu shown in the last illustration
is for a specific application. This menu list, along with its
associated options, may vary depending on the application
installed in the SOLARFLOW PLUS.
_________________________________________________________
_____________________________________________________________________
178
SECTION 4
SFACCESS _________________________________________________________
The "General Information" Option
The first of the thirteen options available within the "On-line" MAIN MENU
"Display" option is the "General Information" option.
At the "General Information" option,
-
press the ENTER key to display the DISPLAY - GENERAL
INFORMATION screen, which is shown in the following illustration.
This screen indicates the values for the location and unit names, the
location and unit ID numbers, the current date and time, and the
calculation module for the SOLARFLOW PLUS currently logged on.
After observing these values, the user must
-
press the ESC (Escape) key to continue using the menu.
_____________________________________________________________________
SECTION 4
179
_________________________________________________________ SFACCESS
The "Security Code List" Option
The second of the thirteen options available within the "On-line" MAIN MENU
"Display" option is the "Security Code List" option.
At the "Security Code List" option,
-
press the ENTER key to display the DISPLAY - SECURITY CODE
LIST screen, which is shown in the following illustration.
This screen indicates the security code or codes for the SOLARFLOW
PLUS unit currently logged on.
After observing these values, the user must
-
press the ESC (Escape) key to continue using the menu.
_____________________________________________________________________
180
SECTION 4
SFACCESS _________________________________________________________
The "User Report Definition" Option
The third of the thirteen options available within the "On-line" MAIN MENU
"Display" option is the "User Report Definition" option.
At the "User Report Definition" option,
-
press the ENTER key to display the DISPLAY - USER REPORT
DEFINITION screen, which is shown in the following illustration.
This screen indicates the user reports defined for the SOLARFLOW
PLUS unit currently logged on.
After observing these values, the user must
-
press the ESC (Escape) key to continue using the menu.
_____________________________________________________________________
SECTION 4
181
_________________________________________________________ SFACCESS
The "Communication Configuration" Option
The fourth of the thirteen options available within the "On-line" MAIN MENU
"Display" option is the "Communication Configuration" option.
At the "Communication Configuration" option,
-
press the ENTER key to display the DISPLAY - COMMUNICATION
CONFIGURATION screen, which is shown in the following
illustration. This screen indicates the protocol communication baud
rate, and the RTS delay value for the SOLARFLOW PLUS unit
currently logged on.
After observing these values, the user must
-
press the ESC (Escape) key to continue using the menu.
_____________________________________________________________________
182
SECTION 4
SFACCESS _________________________________________________________
The "Data Log Definition" Option
The fifth of the thirteen options available within the "On-line" MAIN MENU
"Display" option is the "Data Log Definition" option.
At the "Data Log Definition" option,
-
press the ENTER key to display the DISPLAY - DATA LOG
DEFINITION screen, which is shown in the following illustration.
This screen indicates the data log defines for the SOLARFLOW PLUS
unit currently logged on.
After observing these values, the user must
-
press the ESC (Escape) key to continue using the menu.
_____________________________________________________________________
SECTION 4
183
_________________________________________________________ SFACCESS
The "Analog Inputs" Option
The sixth of the thirteen options available within the "On-line" MAIN MENU
"Display" option is the "Analog Inputs" option.
At the "Analog Inputs" option,
-
press the ENTER key to display the DISPLAY - ANALOG INPUTS
screen, which is shown in the following illustration.
This screen indicates the values and status of the analog inputs for the
SOLARFLOW PLUS unit currently logged on.
After observing these values, the user must
-
press the ESC (Escape) key to continue using the menu.
_____________________________________________________________________
184
SECTION 4
SFACCESS _________________________________________________________
The "Status Inputs" Option
The seventh of the thirteen options available within the "On-line" MAIN MENU
"Display" option is the "Status Inputs" option.
At the "Status Inputs" option,
-
press the ENTER key to display the DISPLAY - STATUS INPUTS
screen, which is shown in the following illustration.
This screen indicates the values and status of the inputs for the
SOLARFLOW PLUS unit currently logged on.
After observing these values, the user must
-
press the ESC (Escape) key to continue using the menu.
_____________________________________________________________________
SECTION 4
185
_________________________________________________________ SFACCESS
The "Control Outputs" Option
The eighth of the thirteen options available within the "On-line" MAIN MENU
"Display" option is the "Control Outputs" option.
At the "Control Outputs" option,
-
press the ENTER key to display the DISPLAY - CONTROL
OUTPUTS screen, which is shown in the following illustration.
This screen indicates the ON or OFF values for the control outputs for
the SOLARFLOW PLUS unit currently logged on.
After observing these values, the user must
-
press the ESC (Escape) key to continue using the menu.
_____________________________________________________________________
186
SECTION 4
SFACCESS _________________________________________________________
The "Scale Values" Option
The ninth of the thirteen options available within the "On-line" MAIN MENU
"Display" option is the "Scale Values" option.
At the "Scale Values" option,
-
press the ENTER key to display the DISPLAY - SCALE VALUES
screen, which is shown in the following illustration.
This screen indicates the scale values for the channel descriptions for
the SOLARFLOW PLUS unit currently logged on.
After observing these values, the user must
-
press the ESC (Escape) key to continue using the menu.
_____________________________________________________________________
SECTION 4
187
_________________________________________________________ SFACCESS
The "Rates and Volumes" Option
The tenth of the thirteen options available within the "On-line" MAIN MENU
"Display" option is the "Rates and Volumes" option.
At the "Rates and Volumes" option,
-
press the ENTER key to display the DISPLAY - RATES AND
VOLUMES screen, which is shown in the following illustration.
This screen indicates the rate and volume values for the channel
descriptions for the SOLARFLOW PLUS unit currently logged on.
After observing these values, the user must
-
press the ESC (Escape) key to continue using the menu.
_____________________________________________________________________
188
SECTION 4
SFACCESS _________________________________________________________
The "Calculation Configuration" Option
The eleventh of the thirteen options available within the "On-line" MAIN MENU
"Display" option is the "Calculation Configuration" option.
At the "Calculation Configuration" option,
-
press the ENTER key to display the DISPLAY - CALCULATION
CONFIGURATION screen, which is shown in the following
illustration.
This screen indicates the calculation values for the channel
descriptions for the SOLARFLOW PLUS unit currently logged on.
After observing these values, the user must
-
press the ESC (Escape) key to continue using the menu.
_____________________________________________________________________
SECTION 4
189
_________________________________________________________ SFACCESS
The "Alarm Configuration" Option
The twelveth of the thirteen options available within the "On-line" MAIN MENU
"Display" option is the "Alarm Configuration" option.
At the "Alarm Configuration" option,
-
press the ENTER key to display the DISPLAY - ALARM
CONFIGURATION screen, which is shown in the following
illustration. This screen indicates the alarm configurations and setpoint
values for the alarm descriptions for the SOLARFLOW PLUS unit
currently logged on.
After observing these values, the user must
-
press the ESC (Escape) key to continue using the menu.
_____________________________________________________________________
190
SECTION 4
SFACCESS _________________________________________________________
The "Calculation Factors" Option
The last of the thirteen options available within the "On-line" MAIN MENU
"Display" option is the "Calculation Factors" option.
At the "Calculation Factors" option,
-
press the ENTER key to display the DISPLAY - CALCULATION
FACTORS screen, which is shown in the following illustration.
This screen allows indicates the calculation factor values and status of
the channel descriptions for the SOLARFLOW PLUS unit currently
logged on.
After observing these values, the user must
-
press the ESC (Escape) key to continue using the menu.
_____________________________________________________________________
SECTION 4
191
_________________________________________________________ SFACCESS
THE "CALIBRATION" OPTION
The "Calibration" option, which is shown in the following illustration, is the fifth
of the six "On-line" MAIN MENU options. It allows the user to monitor and/or
calibrate the transmitters in the SOLARFLOW PLUS. In addition, the "Calibration"
option contains two main options, which are the "Pressures" and "Others" options.
The "Pressures" sub-option contains all inputs, which are related to pressure, such
as differential or static, and the "Others" sub-option contains all inputs, which are
not related to pressure.
_____________________________________________________________________
192
SECTION 4
SFACCESS _________________________________________________________
_________________________________________________________
IMPORTANT: For more complete details about
calibration, calibration procedures for specific models
and modules, calibration reference devices, etc., refer
to the DANIEL INDUSTRIES MODEL 2470
SOLARFLOW PLUS SYSTEM REFERENCE
MANUAL, Daniel Part No. 3-9000-451.
_________________________________________________________
_____________________________________________________________________
SECTION 4
193
_________________________________________________________ SFACCESS
The "Pressures" Option
The first of the two options available within the "On-line" MAIN MENU
"Calibration" option is the "Pressures" option.
At the "Pressures" option,
-
press the ENTER key to display a CALIBRATION OPTIONS pop-up
window, which is shown in the following illustration. This pop-up
window lists two further sub-options, which are "Calibrate Transducer"
and "Monitor/Check Calibration".
The "Calibrate Transducer" sub-option provides the calibration
capabilities, and the "Monitor/Check Calibration" sub-option provides
the monitor and calibration check capabilities.
_____________________________________________________________________
194
SECTION 4
SFACCESS _________________________________________________________
The "Calibrate Transducer"
The first of the two options available within the "Pressures" option is the "Calibrate
Transducer".
At the "Calibrate Transducer",
-
press the ENTER key to display a CALIBRATE TRANSDUCER
screen, as shown in the following illustration.
This CALIBRATE TRANSDUCER screen provides a list of all
selectable inputs related to pressures.
_____________________________________________________________________
SECTION 4
195
_________________________________________________________ SFACCESS
The "Meter Pressure 1"
The first of the available pressure inputs for this particular application is "Meter
Pressure 1".
To highlight and select the "Meter Pressure 1",
-
use the UP and DOWN ARROW keys
-
press the ENTER key to display the CALIBRATION screen, which is
shown in the following illustration.
This screen allows the user to modify the calibration input values for
the "As found" and "Actual" "Zero Set", "Full Set", and "Mid Set"
points for the meter pressure in psi of the SOLARFLOW PLUS unit
currently logged on.
_____________________________________________________________________
196
SECTION 4
SFACCESS _________________________________________________________
After the CALIBRATION screen for meter pressure 1 appears, the user has options
-
at the "as found"/"Zero Set" field, to press the ENTER key to accept
the "Zero Set" value displayed
-
at the "actual"/"Zero Set" field, to enter the actual "Zero Set" value,
and press the ENTER key
-
at the "as found"/"Full Set" field, to press the ENTER key to accept
the "Full Set" value displayed
-
at the "actual"/"Full Set" field, to enter the actual "Full Set" value, and
press the ENTER key
-
at the "as found"/"Mid Set" field, to press the ENTER key to accept
the "Mid Set" value displayed,
-
at the "actual"/"Mid Set" field, to enter the actual "Mid Set" value, and
press the ENTER key.
_____________________________________________________________________
SECTION 4
197
_________________________________________________________ SFACCESS
At any point during the calibration of meter pressure 1, the user may
-
press the ESC (Escape) key to abort the calibration process, as shown
in the following illustration.
If, after completing the calibration process for the meter pressure, the input values
either accepted or entered by the user are not within acceptable beginning and endpoint parameters, the message, "Calibration Error - Not Accepted. Press any key.
. ." (to continue), will appear. This message indicates that the user must adjust the
calibration point values within the specified limits.
_____________________________________________________________________
198
SECTION 4
SFACCESS _________________________________________________________
The "Monitor/Check Calibration"
The second of the two options available within the "Pressures" option is the
"Monitor/Check Calibration".
At the "Monitor/Check Calibration",
-
press the ENTER key to display a MONITOR/CHECK
CALIBRATION screen, as shown in the following illustration.
This MONITOR/CHECK CALIBRATION screen provides a list of all
selectable inputs related to pressures.
_____________________________________________________________________
SECTION 4
199
_________________________________________________________ SFACCESS
The "Meter Pressure 1"
The first of the available pressure inputs to be monitored/checked for this particular
application is "Meter Pressure 1".
To highlight and select the "Meter Pressure 1",
-
use the UP and DOWN ARROW keys
-
press the ENTER key to display the MONITOR/CHECK
CALIBRATION WINDOW screen, which is shown in the following
illustration.
This screen allows the user to monitor or check the calibration input
value for meter pressure 1 in psi of the SOLARFLOW PLUS unit
currently logged on.
_____________________________________________________________________
200
SECTION 4
SFACCESS _________________________________________________________
After the MONITOR/CHECK CALIBRATION WINDOW screen for meter
pressure 1 appears, the user has options
-
at the "as found" field, to observe the meter pressure 1 value, and if
the value is acceptable, to press the F10 key and exit from the screen,
or
-
at the "as found" field, to press the F2 key to cursor to the "expected"
field in order to enter an expected value
-
at the "expected" field, to enter an expected value and press the
ENTER key to proceed to the "confirm" field
-
at the "confirm" field, to press the SPACE BAR and toggle a YES or
NO confirmation, or
-
at any time, to press the ESC (Escape) key to abort the process.
_____________________________________________________________________
SECTION 4
201
_________________________________________________________ SFACCESS
The "Others" Option
The second of the two options available within the "On-line" MAIN MENU
"Calibration" option is the "Others" option.
At the "Others" option,
-
press the ENTER key to display a CALIBRATION OPTIONS pop-up
window, which is shown in the following illustration. This pop-up
window lists two further sub-options, which are "Calibrate Transducer"
and "Monitor/Check Calibration".
The "Calibrate Transducer" sub-option provides the calibration
capabilities, and the "Monitor/Check Calibration" sub-option provides
the monitor and calibration check capabilities.
_____________________________________________________________________
202
SECTION 4
SFACCESS _________________________________________________________
The "Calibrate Transducer"
The first of the two options available within the "Pressures" option is the "Calibrate
Transducer".
At the "Calibrate Transducer",
-
press the ENTER key to display a CALIBRATE TRANSDUCER
screen, as shown in the following illustration.
This CALIBRATE TRANSDUCER screen provides a list of all
selectable inputs related to measurements other than pressure.
_____________________________________________________________________
SECTION 4
203
_________________________________________________________ SFACCESS
The "Meter Temperature"
The first of the available measurement inputs for this particular application is
"Meter Temperature".
To highlight and select the "Meter Temperature",
-
use the UP and DOWN ARROW keys
-
press the ENTER key to display the CALIBRATION screen, which is
shown in the following illustration.
This screen allows the user to modify the calibration input values for
the "As found" and "Actual" "Zero Set", "Full Set", and "Mid Set"
points for the meter temperature in degrees Fahrenheit of the
SOLARFLOW PLUS unit currently logged on.
_____________________________________________________________________
204
SECTION 4
SFACCESS _________________________________________________________
After the CALIBRATION screen for meter temperature appears, the user has
options
-
at the "as found"/"Zero Set" field, to press the ENTER key to accept
the "Zero Set" value displayed
-
at the "actual"/"Zero Set" field, to enter the actual "Zero Set" value,
and press the ENTER key
-
at the "as found"/"Full Set" field, to press the ENTER key to accept
the "Full Set" value displayed
-
at the "actual"/"Full Set" field, to enter the actual "Full Set" value, and
press the ENTER key
-
at the "as found"/"Mid Set" field, to press the ENTER key to accept
the "Mid Set" value displayed,
-
at the "actual"/"Mid Set" field, to enter the actual "Mid Set" value, and
press the ENTER key.
_____________________________________________________________________
SECTION 4
205
_________________________________________________________ SFACCESS
At any point during the calibration of meter temperature, the user may
-
press the ESC (Escape) key to abort the calibration process, as shown
in the following illustration.
If, after completing the calibration process for the meter temperature, the input
values either accepted or entered by the user are not within acceptable beginning
and end-point parameters, the message, "Calibration Error - Not Accepted. Press
any key. . ." (to continue), will appear. This message indicates that the user must
adjust the calibration point values within the specified limits.
_____________________________________________________________________
206
SECTION 4
SFACCESS _________________________________________________________
The "Monitor/Check Calibration"
The second of the two options available within the "Others" option is the
"Monitor/Check Calibration".
At the "Monitor/Check Calibration",
-
press the ENTER key to display a MONITOR/CHECK
CALIBRATION screen, as shown in the following illustration.
This MONITOR/CHECK CALIBRATION screen provides a list of all
selectable inputs related to pressures.
_____________________________________________________________________
SECTION 4
207
_________________________________________________________ SFACCESS
The "Meter Temperature"
The first of the available measurement inputs to be monitored/checked for this
particular application is "Meter Temperature".
To highlight and select the "Meter Temperature",
-
use the UP and DOWN ARROW keys
-
press the ENTER key to display the MONITOR/CHECK
CALIBRATION WINDOW screen, which is shown in the following
illustration.
This screen allows the user to monitor or check the calibration input
value for meter temperature in degrees Fahrenheit of the
SOLARFLOW PLUS unit currently logged on.
_____________________________________________________________________
208
SECTION 4
SFACCESS _________________________________________________________
After the MONITOR/CHECK CALIBRATION WINDOW screen for meter
temperature appears, the user has options
-
at the "as found" field, to observe the meter temperature value, and if
the value is acceptable, to press the F10 key and exit from the screen,
or
-
at the "as found" field, to press the F2 key to cursor to the "expected"
field in order to enter an expected value
-
at the "expected" field, to enter an expected value and press the
ENTER key to proceed to the "confirm" field
-
at the "confirm" field, to press the SPACE BAR and toggle a YES or
NO confirmation, or
-
at any time, to press the ESC (Escape) key to abort the process.
_____________________________________________________________________
SECTION 4
209
_________________________________________________________ SFACCESS
THE "ALARM" OPTION
The "ALARM" option, which is shown in the following illustration, is the last of
the six "On-line" MAIN MENU options. It contains one main sub-option, which
is the "Acknowledge" option. This option allows the user to scan and acknowledge
(or not acknowledge) enabled alarms in the SOLARFLOW PLUS unit currently
logged on. The alarm setup, including enabling, disabling, and setpoint adjustment,
is performed in the "On-line" MAIN MENU "Setup" option.
_____________________________________________________________________
210
SECTION 4
SFACCESS _________________________________________________________
The "Acknowledge" Option
The one option available within the "On-line" MAIN MENU "Alarm" option is the
"Acknowledge" option.
At the "Acknowledge" option
-
press the ENTER key to display an ALARM SCAN screen, as shown
in the following illustration. In this application under the
"Acknowledge" option, there is only one ALARM SCAN screen that
is accessed sequentially by pressing the ENTER key. The one
ALARM SCAN screen is for the "Meter Pressure # 1". However, the
number and identity of the ALARM SCAN screens accessed is
determined by how the alarm setup has been configured for the
SOLARFLOW PLUS unit.
_____________________________________________________________________
SECTION 4
211
_________________________________________________________ SFACCESS
The First ALARM SCAN Screen
After the first ALARM SCAN screen appears, which in this case is the Meter
Pressure 1 ALARM SCAN screen, the user may
-
determine the identity of the alarm
-
determine whether the alarm is active (acknowledged or not
acknowledged), or previously active and not acknowledged
-
press the ENTER key to continue, or
If the prompt message reads, "Press ENTER to continue. . .", then the
alarm has already been acknowledged, but is active. If the prompt
message reads, "Press SPACE. . .", then the user has the opportunity
to acknowledge the alarm.
-
press the ESC (Escape) key "to quit" the process.
_____________________________________________________________________
212
SECTION 4
SFACCESS _________________________________________________________
ASCII EXPORT FILE SPECIFICATIONS
The ASCII export function of the SFACCESS program generates three different
types of data files, which are
-
data log,
-
miscellaneous channel/tags,
-
event log.
Each of these files may contain information about one or more locations. The
beginning of each location in a file is marked with special blocks containing
information about the location and the following data.
The data files are in a "standard" ASCII format, which means
-
each line of text is terminated with a carriage return, line feed combination,
-
fields on a line are separated by commas,
-
and non-numeric fields are quoted.
_____________________________________________________________________
APPENDIX A
213
_________________________________________________________ SFACCESS
The three data file types with their individual specifications are
I.
THE DATA LOG FILE
A data log file is organized as a series of blocks of location data:
Location I
Location 2
...
Location N
Each location in a data log file contains:
Line 1: (Location identifying information)
"\DATA_LOG_START", "loc_name", "loc_id", "unit_name", "unit_id",
"calc_module"
Line 2: (Data log definition, etc)
"\DATA_LOG_DEFINE", "contract_hour", log_interval, chan_count,
"def1", "def2", ..., "defN"
where contract_hour is in the format HH:MM (ex. 07:00),
log_interval is in minutes (0 to 1440),
chan_count is the number of channels logged,
_____________________________________________________________________
214
APPENDIX A
SFACCESS _________________________________________________________
def1..n is in the format ":ChnTD"
where Chn is the three digit channel number,
T is the type,
A - Average,
S - Snapshot,
Z - Snapshot and Zero,
D is the number of decimal places to print,
________________________________________________________
NOTE:
Future revisions of the SFACCESS program will have
the tag name, "TagName:ChnTD", inserted in this
field. Programs parsing this field must account for this
to avoid incompatibility problems later.
________________________________________________________
Line 3: (Column Headings Prefix)
"\DATA_LOG_HEAD", "\"
where
"\" is intended as a continuation character to the next line. Custom
programs actually parsing the data file use this to continue reading to
the next physical text line in order to read the labels. The purpose for
this continuation is for programs such as Lotus 1-2-3 that put the
"Date", "Time", etc. in the same column as the following data.
Line 4: (Column Headings)
"Date", "Time", "Faults", "label_l", "label_2", ..., "label_N"
where
label_1, label_2, ... are the column heading labels for the logged
channels.
_____________________________________________________________________
APPENDIX A
215
_________________________________________________________ SFACCESS
Line 5+: (until the next "\DATA_LOG_START")
"date", "time", "fault_list", value_1, value_2, ...., value_N
where date is "MM/DD/YY".
time is "HH:MM".
fault_list is a 24 character field corresponding, in order, to the three 8
character "Under Range", "Over Range", and "Misc." fault fields normally
appearing on a data log report. Refer to the Model 2480 System Reference
Manual (P/N 3-9000-497) paragraph 5.12.3.3 for a detailed explanation of
the fault fields.
value_1, value_2, ..., value_N are logged channel values.
_____________________________________________________________________
216
APPENDIX A
SFACCESS _________________________________________________________
II.
THE MISCELLANEOUS CHANNEL/TAGS FILE TYPE
A miscellaneous channel/tags file is organized as a series of blocks of location
data:
Location 1
Location 2
...
Location N
Each location in a miscellaneous channel/tags file contains the following:
Line 1: (Location identifying information)
"\MISC_TAG_START", "loc_name", "loc_id", "unit_name", "unit_id",
"calc module"
Line 2: (Column Headings Prefix)
"\MISC_TAG_HEAD", "\"
where
"\" is intended as a continuation character to the next line. (Refer the
explanation in the data log section above).
Line 3: (Column Headings)
"Tag", "Type", "Channel", "Label", "Label", "Value", "Units",
"Fix/Var"
_____________________________________________________________________
APPENDIX A
217
_________________________________________________________ SFACCESS
Line 4+: (until the next "\MISC_TAG_START")
"tag_name", "tag_type", "channel", "long_label", "short_label",
"value", "unit_label", "fixed_var_char"
where "tag_name" is the channel tag such as "DIFF_PRES1",
"LIVE_SPEC_GRAV", etc. up to 15 characters in length.
tag_type is
DIN (digital input),
DOUT (digital output),
AIN (analog input),
AOUT (analog output),
ASCALE (analog input/output low or high scale),
CALC (calculated channel 29+),
ALARM (alarm enable/disable status or setpoint),
SPEC (special: items found on general menu in
SFAccess SETUP and DISPLAY function).
channel is the SolarFlow Plus channel number for tag types DIN, DOUT,
AIN, and AOUT; channel number decimal 1 or 2 for analog
low and high scale, respectively (ex. 20.1 low scale, 20.2 high
scale); 2001 to 2020 for ALARM; and 1000 to 1015 for SPEC.
Channel numbers for SPEC type channels are not guaranteed to
remain the same over different revisions of the SFAccess
program. It is recommended that the tag name be used to
identify these channels.
________________________________________________________
NOTE:
In the SFACCESS program, application files are NOT
configured to collect ALARM or SPEC types.
________________________________________________________
_____________________________________________________________________
218
APPENDIX A
SFACCESS _________________________________________________________
long_label is the long, descriptive label for the channel.
short_label is a brief (12 characters maximum) label for
the channel.
value is the channel value. Some channels may have an alphabetic value.
For example, the value of Tap Location may either be "Downstream"
or "Upstream".
unit_label is the engineering unit label.
fixed_var_char is "V" if the channel value is variable
(live) or "F" if it has been fixed.
_____________________________________________________________________
APPENDIX A
219
_________________________________________________________ SFACCESS
III.
THE EVENT LOG FILE TYPE
An event log file is organized as a series of blocks of location data:
Location I
Location 2
...
Location N
Each location in an event log file contains the following:
Line 1: (Location identifying information)
"\EVENT_LOG_START", "loc_name", "loc_id", "unit_name", "unit_id",
"calc_module"
Line 2: (Column Headings Prefix)
"\EVENT_LOG_HEAD", "\"
where
"\" is intended as a continuation character to the next line (Refer to the
explanation in the data log section above).
Line 3: (Column Headings)
"Date", "Time", "Code", "Description", "Number", "Value #1(Old)",
"Value #2 (New)"
_____________________________________________________________________
220
APPENDIX A
SFACCESS _________________________________________________________
Line 4+: (until the next "\EVENT_LOG_START")
"date", "time", event_type_code, "event_desc", "event_vector",
"value_1", "value_2"
where date is "MM/DD/YY".
time is "HH:MM:SS".
event_type_code is the SolarFlow Plus event type code defined by the
SolarFlow Plus communication protocol.
event_desc is a description of the event (as normally seen on SFACCESS
event log reports).
event_vector is the event vector (or number) normally used to designate what
channel, alarm, etc. was affected by the event.
value_1 is the first value related to the event. In many event types, this is
considered the old value.
value_2 is the second value related to the event. In many event types, this
is considered the new value.
_____________________________________________________________________
APPENDIX A
221
_________________________________________________________ SFACCESS
SPECIAL CASES
If the user of SFACCESS program specifies the same name for one or more of the
output files when exporting, the data will be appended into the file specified.
Custom programs written to interpret these data files must account for this.
If the user intends to import SFACCESS data into spreadsheet or database
programs, separate files for data log, miscellaneous channel/tags, and event logs
should be used.
_____________________________________________________________________
222
APPENDIX A
SFACCESS _________________________________________________________
APPLICATION NOTES
INTRODUCTION
After the DANIEL INDUSTRIES, INC. SFACCESS PROGRAM has acquired
data, it must be exported through the program’s ASCII export function and into the
user’s software. After being imported, the data can then be manipulated to meet
specific user needs.
In order to assist the user with this SFACCESS to database/spreadsheet interface,
DANIEL INDUSTRIES provides the following information, which by necessity,
assumes that the user is utilizing one (or more) of the more common, or widelyused
database or spreadsheet software programs.
DANIEL INDUSTRIES has selected six of these "industry-standard" database or
spreadsheet programs. These programs, which include the Paradox, Quattro,
Quattro Pro software products by Borland International, Inc., FoxPro software by
Fox Software, Inc., Lotus 1-2-3 (release 3.X) by the Lotus Development
Corporation, and dBASE IV software by the Ashton-Tate Corporation, are
addressed in the following sections, and include screens and instructions appropriate
to each.
________________________________________________________
NOTE:
Although this DANIEL INDUSTRIES manual names and
briefly discusses six commercially available database and
spreadsheet programs, DANIEL INDUSTRIES, INC. is
not endorsing these products as being preferable or
superior to any other commercially available database or
spreadsheet programs.
________________________________________________________
_____________________________________________________________________
APPENDIX B
223
_________________________________________________________ SFACCESS
dBASE IV
Using dBASE IV software to import SFACCESS data is described in the following
steps.
1.
After entering the dBASE IV program, the dBASE IV CONTROL CENTER
screen appears, as shown in the following illustration.
_____________________________________________________________________
224
APPENDIX B
SFACCESS _________________________________________________________
2.
At the dBASE IV CONTROL CENTER screen,
-
use the UP and DOWN ARROW keys to highlight and select the
Create field in the Data column, and
-
press the ENTER key to display a screen used for entering the
components of the database structure, as shown in the following
illustration.
_____________________________________________________________________
APPENDIX B
225
_________________________________________________________ SFACCESS
3.
At the screen used for entering the components of the database structure,
-
enter the database structure as shown in the following illustration, and
when finished
-
press the ENTER key on a blank line in order to save the newly
entered data.
_____________________________________________________________________
226
APPENDIX B
SFACCESS _________________________________________________________
4.
When the ENTER key is pressed to save the new database structure, a popup
window will appear, as shown in the following illustration. At this point,
-
enter the database name, and again
-
press the ENTER key.
_____________________________________________________________________
APPENDIX B
227
_________________________________________________________ SFACCESS
5.
After the ENTER key has been pressed and the database name has been
saved, a question and selection choice, "Input data records now? (Y/N)", will
appear at the bottom of the screen, as shown in the following illustration.
_____________________________________________________________________
228
APPENDIX B
SFACCESS _________________________________________________________
6.
At the question and selection choice, "Input data records now? (Y/N) ", the
user should
-
select the "N" (No) option, which will cause the dBASE IV
CONTROL CENTER screen to re-appear, as shown in the following
illustration.
_____________________________________________________________________
APPENDIX B
229
_________________________________________________________ SFACCESS
7.
At the dBASE IV CONTROL CENTER screen,
-
use the UP and DOWN ARROW keys to highlight and select the
newly created database name in the Data column, and
-
press the ENTER key in order to use that database, and cause a popup
option window to appear, as shown in the following illustration.
_____________________________________________________________________
230
APPENDIX B
SFACCESS _________________________________________________________
8.
After the pop-up option window appears,
-
use the RIGHT and LEFT ARROW keys to highlight and select the
Use File field, and
-
press the ENTER key, or press the "first letter of the desired option",
to remove the pop-up option window, and cause the dBASE IV
CONTROL CENTER screen to re-appear, as shown in the following
illustration.
_____________________________________________________________________
APPENDIX B
231
_________________________________________________________ SFACCESS
9.
At the dBASE IV CONTROL CENTER screen,
-
press the SHIFT and F2 keys simultaneously to display a screen with
the database structure displayed, as shown in the following illustration.
_____________________________________________________________________
232
APPENDIX B
SFACCESS _________________________________________________________
10.
At the screen displaying the database structure,
-
use the RIGHT and LEFT ARROW keys to highlight and select the
"Append" option, and display a pop-up menu window used for
entering, appending, and copying records, as shown in the following
illustration, and
-
press the letter C key to "copy records from (a) non-dBASE file", and
display an additional pop-up menu window, which is also shown in
the following illustration.
_____________________________________________________________________
APPENDIX B
233
_________________________________________________________ SFACCESS
11.
At the second pop-up menu window,
-
press the letter C key to select "Character delimited", and display a
third pop-up menu window on the right side of the screen, as shown
in the following illustration.
_____________________________________________________________________
234
APPENDIX B
SFACCESS _________________________________________________________
12.
At the third pop-up menu window, which appears at the right side of the
screen,
-
press the ENTER key to accept the default delimiter, and display
another (and fourth) pop-up window (the "picklist") at the top, right
portion of the screen, as shown in the following illustration, and
-
use the UP and DOWN ARROW keys and the ENTER key as many
times as necessary in order to locate and select the directory
containing the desired export file(s).
_____________________________________________________________________
APPENDIX B
235
_________________________________________________________ SFACCESS
13.
After the desired directory and export file(s) have been located and selected,
-
press the ENTER key to append the chosen records to the database,
and display them in the "picklist" pop-up window, as shown in the
following illustration.
__________________________________________________________
NOTE:
The "picklist" pop-up window displays only files with
a ".TXT" extension. Therefore, the ASCII SFACCESS
export files will need to be renamed accordingly.
__________________________________________________________
_____________________________________________________________________
236
APPENDIX B
SFACCESS _________________________________________________________
FOXPRO
Using FoxPro software to import SFACCESS data is described in the following
procedure.
1.
After entering the FoxPro program,
-
press the ALT and F keys simultaneously in order to display the "File"
option’s pull-down menu, as shown in the following illustration. This
menu contains a list of file command options.
_____________________________________________________________________
APPENDIX B
237
_________________________________________________________ SFACCESS
2.
At the "File" option’s pull-down menu, the cursor position will be defaulted
to the "New. . . " option. At this option,
-
press the ENTER key to display a pop-up window to provide a list of
new option possibilities available to the FoxPro program, as shown in
the following illustration.
_____________________________________________________________________
238
APPENDIX B
SFACCESS _________________________________________________________
3.
After the list of new option possibilities appears, the cursor position is
defaulted to the "Database" option. At this option,
-
press the ENTER key to display a pop-up window that allows the user
to enter field definitions for the SFACCESS program, as shown in the
following illustration.
_____________________________________________________________________
APPENDIX B
239
_________________________________________________________ SFACCESS
4.
At the pop-up window,
-
enter (or list) the appropriate SFACCESS field definitions. These field
definitions, which reflect the structure of the DATA MANAGER’s
data files, are shown (in part) in the following illustration.
_____________________________________________________________________
240
APPENDIX B
SFACCESS _________________________________________________________
A complete list of the SFACCESS program’s field definitions is presented
in the following table.
_____________________________________________________________________
APPENDIX B
241
_________________________________________________________ SFACCESS
5.
After the field definitions have been entered,
-
use the TAB key to move to the "OK" option on the screen, and
-
press the ENTER key to display a pop-up window used for entering
a database name, as shown in the following illustration.
_____________________________________________________________________
242
APPENDIX B
SFACCESS _________________________________________________________
6.
At the pop-up window,
-
enter the database name
-
press the ENTER key
-
use the TAB key to move to the "Save" option on the screen, and
-
press the ENTER key, to display a pop-up window, which asks the
user to respond to the question, "Input data records now?"
The user selects and enters a "no" response, which creates the database
structure, and returns the FoxPro program to the initial program screen.
_____________________________________________________________________
APPENDIX B
243
_________________________________________________________ SFACCESS
7.
At the initial FoxPro screen,
-
press the ALT and D keys simultaneously in order to display the
"Database" option’s pull-down menu, which contains a list of database
command options, and
-
press the letter A key, or use the UP and DOWN ARROW keys to
highlight and select "Append From..." option, as shown in the
following illustration.
_____________________________________________________________________
244
APPENDIX B
SFACCESS _________________________________________________________
8.
At the "Append From . . . " option,
-
press the ENTER key to display an "Append From:" pop-up window,
as shown in the following illustration.
_____________________________________________________________________
APPENDIX B
245
_________________________________________________________ SFACCESS
9.
At the "Append From:" POP-UP window,
-
press the TAB key to move to the blank file name field,
-
enter the file name of the SFACCESS ASCII export file, which in this
example is
\dm\dandata.out
-
press the ENTER key to highlight the "TYPE: Database" field, and
-
press the SPACE BAR to display a pop-up window, as shown in the
following illustration. In this example, this new pop-up window will
provide a list of available program options and will temporarily
overlay the "Append From:" pop-up window.
_____________________________________________________________________
246
APPENDIX B
SFACCESS _________________________________________________________
10.
At the pop-up window with the list of program options,
-
use the UP and DOWN ARROW keys to highlight and select the
"Delimited with Commas" option
-
press the ENTER key, which will remove the pop-up window with its
list of program options, and cause the "Append From: " pop-up
window to be displayed again, as shown in the following illustration.
_____________________________________________________________________
APPENDIX B
247
_________________________________________________________ SFACCESS
11.
At the "Append From:" pop-up window,
-
press the letter F key, or use the TAB key to highlight and select the
" [ ] For. . . " field,
-
press the ENTER key to display a pop-up window,
-
type
__
LOG.DATE < > {b}
in the blank "FOR Clause: <expl.>" field, as shown in the following
illustration, and
-
press the ENTER key.
_____________________________________________________________________
248
APPENDIX B
SFACCESS _________________________________________________________
12.
After filling in the "FOR Clause: <expl.>" field, and pressing the ENTER
key,
-
press the TAB key to move to the "<OK>" field, and
-
press the ENTER key to again display the "Append From:" pop-up
window, as shown in the following illustration.
_____________________________________________________________________
APPENDIX B
249
_________________________________________________________ SFACCESS
13.
At the "Append From:" pop-up window,
-
press the TAB key to move to the "<OK>" field
-
press the ENTER key to append, or bring SFACCESS data into the
FoxPro program
-
press the ALT and D keys simultaneously in order to display the
"Database" option’s pull-down menu, which contains a list of database
command options, and
-
use the UP and DOWN ARROW keys to highlight and select the
"Browse. . ." option, as shown in the following illustration.
_____________________________________________________________________
250
APPENDIX B
SFACCESS _________________________________________________________
14.
Finally, after the "Browse" option has been selected
-
press the ENTER key to display the imported SFACCESS data, as
shown in the following illustration.
At this point, the user is able to manipulate the imported SFACCESS data
as required.
_____________________________________________________________________
APPENDIX B
251
_________________________________________________________ SFACCESS
LOTUS 1-2-3
Using Lotus 1-2-3 software to import SFACCESS data is described in the
following procedure.
1.
After entering the Lotus program, a "blank" screen is displayed, as shown in
the following illustration.
_____________________________________________________________________
252
APPENDIX B
SFACCESS _________________________________________________________
2.
At the "blank" screen,
-
press the FORWARD SLASH (/) key to display the MAIN MENU
screen, as shown in the following illustration.
_____________________________________________________________________
APPENDIX B
253
_________________________________________________________ SFACCESS
3.
At the MAIN MENU screen,
-
press the letter F key, or
-
use the LEFT and RIGHT ARROW keys to highlight and select the
"File" option, and then
-
press the ENTER key to display the File Menu, as shown in the
following illustration.
_____________________________________________________________________
254
APPENDIX B
SFACCESS _________________________________________________________
4.
At the File Menu,
-
press the letter I key, or
-
use the LEFT and RIGHT ARROW keys to highlight and select the
"Import" option, and then
-
press the ENTER key to display the Import Menu, as shown in the
following illustration.
_____________________________________________________________________
APPENDIX B
255
_________________________________________________________ SFACCESS
5.
At the Import Menu,
-
press the letter N key, or
-
use the LEFT and RIGHT ARROW keys to highlight and select the
"Numbers" option, and then
-
press the ENTER key to display an "Import Edit" prompt, as shown
in the following illustration.
_____________________________________________________________________
256
APPENDIX B
SFACCESS _________________________________________________________
6.
At the "Import Edit" prompt,
-
enter the name of the file to be imported by first backspacing over the
defaulted file shown in the "Enter name of file to import:" field
-
type in the specific file name to bypass the next screen, which displays
a list of available files, and automatically proceed to the data file
screen on the next page, or as an alternative
-
type in the file name and wild card characters (such as for example)
D:\DM\*.OUT
-
and press the ENTER key to display a screen with a list of available
files, as shown in the following illustration.
_____________________________________________________________________
APPENDIX B
257
_________________________________________________________ SFACCESS
7.
At the previous screen displaying the list of available files,
-
use the LEFT and RIGHT ARROW keys to highlight and select the
desired data file,
-
press the ENTER key to initiate the import process, which displays a
"WAIT" message in the upper right corner of the screen. After
completion of the import process, a data file screen is displayed, as
shown in the following illustration.
At this point, the user is able to manipulate the imported SFACCESS data
as required.
_____________________________________________________________________
258
APPENDIX B
SFACCESS _________________________________________________________
PARADOX
Using PARADOX software to import SFACCESS data is described in the
following steps.
1.
After entering the PARADOX program, the MAIN MENU screen is
displayed, as shown in the following illustration.
_____________________________________________________________________
APPENDIX B
259
_________________________________________________________ SFACCESS
2.
At the MAIN MENU screen,
-
use the RIGHT and LEFT ARROW keys to highlight and select the
"Tools" option, and
-
press the ENTER key to display the screen that provides the "Tools"
menu, as shown in the following illustration,
_____________________________________________________________________
260
APPENDIX B
SFACCESS _________________________________________________________
3.
At the screen that provides the "Tools" menu,
-
use the RIGHT and LEFT ARROW keys to highlight and select the
"Exportlmport" option, and
-
press the ENTER key to display the screen that provides the
"ExportImport" menu, as shown in the following illustration.
_____________________________________________________________________
APPENDIX B
261
_________________________________________________________ SFACCESS
4.
At the screen that provides the "ExportImport" menu,
-
use the RIGHT and LEFT ARROW keys to highlight and select the
"Import" option, and
-
press the ENTER key to display the screen that provides the "Import"
menu, as shown in the following illustration.
_____________________________________________________________________
262
APPENDIX B
SFACCESS _________________________________________________________
5.
At the screen that provides the "Import" menu,
-
use the RIGHT and LEFT ARROW keys to highlight and select the
"ASCII" option, and
-
press the ENTER key to display the screen that provides the "ASCII"
menu, as shown in the following illustration.
_____________________________________________________________________
APPENDIX B
263
_________________________________________________________ SFACCESS
6.
At the screen that provides the "ASCII" menu,
-
make certain that the "ASCII" option is highlighted, and
-
press the ENTER key to display the screen where the name of the file
to be imported is entered in the File Name field, as shown in the
following illustration.
_____________________________________________________________________
264
APPENDIX B
SFACCESS _________________________________________________________
7.
After the name of the file to be imported is entered in the File Name field,
-
press the ENTER key to display the screen where the name of the new
Paradox table is entered in the Table field, as shown in the following
illustration.
_____________________________________________________________________
APPENDIX B
265
_________________________________________________________ SFACCESS
8.
After the name of the new Paradox table is entered in the Table field,
-
press the ENTER key to display the screen where the newly named
table is viewed, as shown in the following illustration.
At this point, the user is able to manipulate the imported SFACCESS data
as required.
_____________________________________________________________________
266
APPENDIX B
SFACCESS _________________________________________________________
QUATTRO
Using Quattro Software to import SFACCESS data is described in the following
procedure.
1.
After entering the Quattro program,
-
press the FORWARD SLASH (/) key in order to access the
QUATTRO pop-up window, which contains a list of MAIN MENU
commands.
_____________________________________________________________________
APPENDIX B
267
_________________________________________________________ SFACCESS
2.
At the QUATTRO pop-up window, either
-
press the letter F key, or
-
use the UP and DOWN ARROW keys to highlight and select the
"File" option, as shown in the following illustration, and then
-
press the ENTER key to access the FILE pop-up window.
_____________________________________________________________________
268
APPENDIX B
SFACCESS _________________________________________________________
3.
At the FILE pop-up window, either
-
type the letter I key, or
-
use the UP and DOWN ARROW keys to highlight and select the
"Import" option, as shown in the following illustration, and then
-
press the ENTER key to access the IMPORT pop-up window.
_____________________________________________________________________
APPENDIX B
269
_________________________________________________________ SFACCESS
4.
At the IMPORT pop-up window,
-
use the UP and DOWN ARROW keys to highlight and select the
"Comma & Delimited File" option, as shown in the following
illustration, and
-
press the ENTER key to access the "edit" line at the top of screen.
_____________________________________________________________________
270
APPENDIX B
SFACCESS _________________________________________________________
5.
After accessing the "edit" line, enter the path name of the SFACCESS export
file to be imported, as shown in the following illustration.
In this example, the screen indicates the use of a wildcard character to access
the available files.
_____________________________________________________________________
APPENDIX B
271
_________________________________________________________ SFACCESS
6.
After the path name of the SFACCESS export file has been entered,
-
press the ENTER key to display a pop-up window that lists the files
available for importation, as shown in the following illustration.
_____________________________________________________________________
272
APPENDIX B
SFACCESS _________________________________________________________
7.
At the pop-up window,
-
use the UP and DOWN ARROW keys to highlight and select the
appropriate file, and
-
press the ENTER key to display the imported file, as shown in the
following illustration.
At this point, the user is able to manipulate the imported SFACCESS file
data as required.
_____________________________________________________________________
APPENDIX B
273
_________________________________________________________ SFACCESS
QUATTRO PRO
Using Quattro Pro software to import SFACCESS data is described in the
following steps.
1.
After entering the Quattro Pro program,
-
press the FORWARD SLASH (/) key in order to access the MAIN
MENU screen, which is shown in the following illustration.
_____________________________________________________________________
274
APPENDIX B
SFACCESS _________________________________________________________
2.
At the MAIN MENU screen, either
-
press the letter T key, or
-
use the RIGHT and LEFT ARROW keys to highlight and select the
"Tools" option, as shown in the following illustration, and then
-
press the ENTER key to display the "Tools" pull-down menu.
_____________________________________________________________________
APPENDIX B
275
_________________________________________________________ SFACCESS
3.
At the "Tools" pull-down menu,
-
press the letter I key, or
-
use the UP and DOWN ARROW keys to highlight and select the
"Import" option, and then
-
press the ENTER key to display the "Import" pop-up window, as
shown in the following illustration.
_____________________________________________________________________
276
APPENDIX B
SFACCESS _________________________________________________________
4.
At the "Import" pop-up window,
-
press the letter C key, or
-
use the UP and DOWN ARROW keys to highlight and select the
"Comma & " " Delimited File" option, and then
-
press the ENTER key to display a pop-up window, which is used for
entering the name of the file to be imported, as shown in the following
illustration.
_____________________________________________________________________
APPENDIX B
277
_________________________________________________________ SFACCESS
5.
At the pop-up window used for entering the name of the file to be imported,
-
press the ESC (Escape) key to display the same pop-up window used
for entering the name of the file to be imported, but reconfigured with
"Enter" and "Esc" options, as shown in the following illustration
-
backspace over the defaulted file name,
-
enter the path name of the SFACCESS export files.
In this example, the screen indicates the use of a wildcard character to access
the available files.
_____________________________________________________________________
278
APPENDIX B
SFACCESS _________________________________________________________
6.
After the path name of the SFACCESS export files has been entered,
-
press the ENTER key to display a pop-up window, which lists the
files that are available for importing, as shown in the following
illustration,
_____________________________________________________________________
APPENDIX B
279
_________________________________________________________ SFACCESS
7.
At the pop-up window, which lists the files that are available for importing,
-
use the RIGHT and LEFT ARROW keys to highlight and select the
appropriate file, and
-
press the ENTER key to display the imported file, as shown in the
following illustration.
At this point, the user is able to manipulate the imported SFACCESS file
data as required.
_____________________________________________________________________
280
APPENDIX B
WARRANTY CLAIM REQUIREMENTS
To make a warranty claim, you, the Purchaser, must:
1.
Provide Daniel with proof of the Date of Purchase and proof of the Date of Shipment of
the product in question.
2.
Return the product to Daniel within twelve (12) months of the date of original shipment
of the product, or within eighteen (18) months of the date of original shipment of the
product to destinations outside of the United States. The Purchaser must prepay any
shipping charges. In addition, the Purchaser is responsible for insuring any product
shipped for return, and assumes the risk of loss of the product during shipment.
3.
To obtain Warranty service or to locate the nearest Daniel office, sales, or service center
call (713) 467-6000, Fax (281) 897-2901, or contact:
Daniel Measurement and Control
P. O. Box 55435
Houston, Texas 77255
When contacting Daniel for product service, the purchaser is asked to provide
information as indicated on the following "Customer Problem Report".
Daniel Measurement and Control offers both on call and contract maintenance service
designed to afford single source responsibility for all its products.
Daniel Industries, Inc. reserves the right to make changes at any time to any product to
improve its design and to insure the best available product.
DANIEL INDUSTRIES, INC.
CUSTOMER PROBLEM REPORT
FOR FASTEST SERVICE, COMPLETE THIS FORM, AND RETURN IT ALONG WITH THE AFFECTED
EQUIPMENT TO CUSTOMER SERVICE AT THE ADDRESS INDICATED BELOW.
COMPANY NAME:____________________________________________________________________________
TECHNICAL CONTACT:_________________________________ PHONE:______________________________
REPAIR P. O. #:_____________________________ IF WARRANTY, UNIT S/N:_________________________
INVOICE ADDRESS:____________________________________________________________________
_________________________________________________________________
_________________________________________________________________
SHIPPING ADDRESS:___________________________________________________________________
_________________________________________________________________
_________________________________________________________________
RETURN SHIPPING METHOD:__________________________________________________________________
EQUIPMENT MODEL #:____________________ S/N:__________________FAILURE DATE:_____________
DESCRIPTION OF PROBLEM:__________________________________________________________________
______________________________________________________________________________________________
______________________________________________________________________________________________
WHAT WAS HAPPENING AT TIME OF FAILURE?________________________________________________
______________________________________________________________________________________________
ADDITIONAL COMMENTS:____________________________________________________________________
______________________________________________________________________________________________
______________________________________________________________________________________________
REPORT PREPARED BY:________________________________ TITLE:________________________________
IF YOU REQUIRE TECHNICAL ASSISTANCE, PLEASE FAX OR WRITE THE MAIN CUSTOMER SERVICE
DEPARTMENT AT:
DANIEL MEASUREMENT AND CONTROL
ATTN: CUSTOMER SERVICE
19203 HEMPSTEAD HIGHWAY
HOUSTON, TEXAS 77065
PHONE: (281) 897-2900
FAX: (281) 897-2901
The sales and service offices of Daniel Industries, Inc. are located
throughout the United States and in major countries overseas.
Please contact Daniel Measurement and Control at
P. O. Box 55435, Houston, Texas 77255, or phone (713) 467-6000
for the location of the sales or service office nearest you.
Daniel Measurement and Control offers both on-call and contract
maintenance service designed to provide single-source
responsibility for all Daniel Measurement and Control products.
Daniel Measurement and Control reserves the right to make changes to any of its products or services
at any time without prior notification in order to improve that product or service and to supply
the best product or service possible.