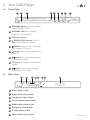
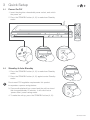
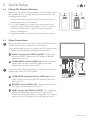
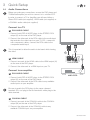
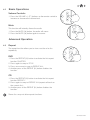
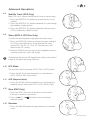
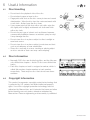
1
DVD PLAYER
OPEN/CLOSE
STANDBY
MODEL: GDVD3607HDMI
USER MANUAL
1
Welcome
2
Your DVD Player
2.1 In The Box
2.4 Remote Control
2.2 Front View
2.3 Rear View
3
Quick Setup
3.1 Power On/Off
3.2 Standby & Auto Standby
3.3 Fitting The Remote Batteries
4
Operation
Getting Started
4.1 Power On and Play a DVD
Basic Operation
4.2 Basic Operation
Advanced Operation
4.3Repeat
4.4 Repeat A-B
4.5 Numeric Buttons
4.6 Multi-Angle (DVD Only)
4.7 Audio Track (DVD Only)
4.8 Subtitle Track (DVD Only)
5
4.9 Zoom (DVD & JPG Disc Only)
4.10 N/P Mode
4.11 A/R (Aspect ratio)
4.12 Step (DVD Only)
4.13Random
4.14 Go To
4.15Reset
4.16Resume
4.17Return
4.18 JPG Disc
4.19 Program Playback
4.20Clear
Setup Menu
5.1 System Setup
5.2 General Setup
5.3 Audio Setup
6
3.4 Video Connections
3.5 Audio Connections
5.4 Video Setup
5.5 Preferences Setup
Useful Information
6.1 Disc Handling
6.2 Disc Information
6.3 Copyright Information
7
Troubleshooting
8
Technical Specifications
9
Customer Support
6.4 Disc Types
6.5 Region Management Information
1 Welcome
Thank you for choosing this Goodmans product. We’ve been
making electronics for the British people for 70 years. Each of
our projects has been carefully designed to be great at what it
does and this one is no exception. We hope you enjoy your
new DVD player.
2 Your DVD Player
2.1
In The Box
Carefully remove your DVD Player from the packaging.
Inside the box you will find:
• DVD player
• Remote Control
• Quick Start Guide
• Guarantee Booklet
If any of these items are missing, contact customer support.
Visit: www.goodmans.co.uk/support
Mains Power
Your DVD player requires a mains supply of 230-240V AC ~ 50Hz.
Please ensure that your mains supply is compatible before use.
Disconnect the Power Cord from the mains when not in use.
Position of DVD Player
Place on a flat, stable surface that is not subject to vibrations. Avoid
the following locations:
• Where it is exposed to direct sunlight
• Where it is close to heat radiating sources
• Where the humidity is high and ventilation is poor
• Where it is dusty
GDVD3607HDMI
2 Your DVD Player
2.2
Front View
A
B
C
D
E
F
E
F
G
H
I
G
H
I
OPEN/CLOSE
STANDBY
A STANDBY button. Press to wake or
enter STANDBY mode.
B STANDBY LED. Red -Standby,
Green-Unit is powered on.
C DVD disc drawer.
OPEN/CLOSE button. Press to
open or close the disc drawer.
J
K
L M N
O P
A BPress C
button.
to skip to previous
E
DVD chapters /CD tracks.
D
F
button. Press to stop playback of a
DVD/ CD.
Y
Pb/Cb
L-AUDIO-R
Pr/Cr
COAXIAL
D
Q
VIDEO
HDMI
OPEN/CLOSE
S-VIDEO
SCART OUT
STANDBY
G
button. Press to begin playback.
Press again to pause.
H IR sensor. IR receiver for the remote
control.
I
2.3
button. Press to skip through
DVD chapters /CD tracks.
Rear View
J
K
L
Y
M N
Pb/Cb
L-AUDIO-R
Pr/Cr
COAXIAL
O P
Q
VIDEO
HDMI
S-VIDEO
SCART OUT
J Mains power cable.
K Stereo RCA audio output.
L Component video output.
M Coaxial digital audio output.
N HDMI audio/ video output.
O Composite video output.
P S-Video video output
Q Scart audio/ video output
GDVD3607HDMI
2 Your DVD Player
2.4
Remote Control
01
STANDBY button.
02
Numeric buttons.
01
SETUP button. Press to enter the
system setup options.
02
03
04
05
07
PLAY button. Press to begin
playback.
10
19
20
21
GO TO
ENTER button. Press to select an
option.
TITLE button. Title menu button.
09
18
DISPLAY
Navigation buttons.
06
08
OPEN/CLOSE
STOP button. Press to stop
playback.
button. Press to skip to previous
DVD chapters /CD tracks.
N/P (NTSC/PAL) button. Press the
cycle between NTSC, PAL & AUTO
modes.
11
button. Press to fast rewind.
12
SLOW button. Press to initiate slow
motion playback.
13
STEP button. Press to advance one
frame at a time.
14
RESET button. Press to reset all
settings.
15
A-B repeat button. A to B repeat
mode.
16
MUTE button. Press to silence
audio output.
17
RESUME button. Resume from the
last point.
18
OPEN/CLOSE button. Press to
eject/ close the disc drawer.
19
DISPLAY button. Displays
information about the current disc.
20
AUDIO track select button. Press
to select alternate audio tracks.
22
23
03
24
04
05
06
25
26
07
08
27
09
28
10
29
11
13
15
12
32
14
RESUME
16
17
30
31
33
A/R
34
35
GDVD3607HDMI
2 Your DVD Player
2.4
Remote Control
21
SUBTITLE select button. Press to
select alternate subtitle tracks.
22
ANGLE select button. Press to
select alternate angles (if available).
23
GO TO button. Press to jump to a
specific point on a disc.
OPEN/CLOSE
01
18
DISPLAY
19
02
20
21
GO TO
24
25
26
27
28
22
ZOOM button. Press to initiate the
zoom function.
MENU button. Press to enter the
main disc menu.
04
PAUSE button. Press to pause
playback.
06
VOLUME +/- buttons. Press to
increase or decrease the volume
output.
button. Press to skip through
DVD chapters /CD tracks.
23
03
24
05
25
26
07
08
27
09
28
10
29
11
13
29
button. Press to fast forward.
15
30
RETURN button. Press to return to
the previous operation.
17
31
REPEAT button. Press to initiate the
repeat functions.
32
PROG button. Press to initiate the
program function.
33
CLEAR button. Press to clear
program digits.
34
A/R (Aspect ratio) button. Press to
change the aspect ratio.
35
RAN (random) button. Press to
initiate the random playback function.
30
12
32
14
RESUME
16
31
33
A/R
34
35
GDVD3607HDMI
3 Quick Setup
3.1
Power On/Off
1.Insert the plug into a household power socket, and switch
the power on.
2.Press the STANDBY button (A, 01) to wake from Standby
mode.
OPEN/CLOSE
DISPLAY
GO TO
OPEN/CLOSE
STANDBY
RESUME
A/R
OPEN/CLOSE
DISPLAY
STANDBY
3.2
Standby & Auto Standby
1.Press the STANDBY button (A, 01) to wake from Standby
mode.
2.Press the STANDBY button (A, 01) again to enter Standby
mode.
STANDBY
Due to new ECO regulation requirements this product
incorporates a power saving feature.
3.Once audio playback has ceased and the unit has stood
idle for approximately 20 minutes, it will switch into a
‘power-down’ power saving mode.
4.To wake the unit up, press the STANDBY button (A, 01).
GDVD3607HDMI
3 Quick Setup
3.3
Fitting The Remote Batteries
Before use, the remote control batteries will need fitting. These
are supplied with the package and need removing from their
packaging before fitting.
1.Remove the battery compartment lid by pressing the tab
inwards and lifting the lid upwards.
2.Fit 2 x AAA batteries as shown. Take care to match the
polarities of the remote to the batteries. EG: the + sign on
the battery matches the + sign on the remote control
battery compartment.
3.Replace the battery compartment lid and proceed to use.
3.4
Video Connections
Before you make any connections, ensure the DVD player and
TV/Monitor you wish to connect to is switched off.
There are a number of ways to connect the DVD player to your
TV. Please see the diagram showing the connections.
A SCART: Carries both VIDEO & AUDIO. Connect one
end of the SCART cable to the DVD player (Q) and the
other end to your TV.
B COMPONENT: Carries VIDEO only. Connect all three
cables from one end to the DVD player (L) the three
cables from the other end to your TV.
Ensure the Green, Blue & Red plugs are matched to the same
colour plugs on the TV & DVD player.
Y
C COMPOSITE: (supplied) Carries VIDEO only. Yellow
cable. Connect one end to the DVD player (O) the other
end to your TV.
Pb/Cr
L-AUDIO-R
Pr/Cr
COAXIAL
VIDEO
HDMI
S-VIDEO
SCART OUT
DVD PLAYER
D S-VIDEO: Carries VIDEO only. Connect one end to the
DVD player (P) the other end to your TV.
E HDMI: Carries both VIDEO & AUDIO. This connection
method will allow the image to be ‘up scaled’ to HD
resolutions (when connected to a supported TV). Connect
one end to the DVD player (N) the other end to your TV.
GDVD3607HDMI
3 Quick Setup
3.5
Audio Connections
Before you make any connections, ensure the DVD player and
TV/Monitor/Amplifier you wish to connect to is switched OFF.
In order to connect a TV or Amplifier you will need either a
Stereo RCA cable (not supplied), HDMI cable (not supplied) or
a COAXIAL audio cable (not supplied).
Connect to a TV
A RCA AUDIO CABLE
1.Connect both RED & WHITE plugs to the STEREO RCA
output (K) on the rear of the DVD player.
2.Connect the other end of the RCA cable to the audio input
that matches the video input on your TV. EG:- connected
with component cables, connect the RCA cable to the
component audio input.
This is important to allow the audio to be heard while viewing
the video.
B HDMI CABLE
1.Connect one end of the HDMI cable to the HDMI output (N)
on the rear of the DVD player.
2.Connect the other end to a HDMI input on your TV.
Y
Pb/Cr
L-AUDIO-R
Pr/Cr
COAXIAL
VIDEO
HDMI
S-VIDEO
DVD PLAYER
Connect to an amplifier
A RCA AUDIO CABLE
1.Connect both RED & WHITE plugs to the STEREO RCA
output (K) on the rear of the DVD player.
2.Connect the other end of the RCA cable to any available
audio inputs on your amplifier.
AMPLIFIER
Be sure to match the RCA plugs to the same coloured
terminals EG:- red plug to the red terminal & white plug to the
white terminal.
C COAXIAL CABLE
1.Connect one end of the COAXIAL cable to the COAXIAL
output (M) on the rear of the DVD player.
2.Connect the other end of the COAXIAL cable to any
available COAXIAL input on your amplifier.
GDVD3607HDMI
4 Operation
Getting Started
4.1
Power On and Play a DVD
1.Ensure you have correctly connected all the cables.
2.Turn on your TV/Monitor and set it to the correct input. This
will depend on which cable(s) you connected the DVD
player with.
3.Press the STANDBY button (A, 01).
4.Press the OPEN/CLOSE button (D, 18). Insert a disc (label
side up), press the OPEN/CLOSE button once again to
shut the drawer and wait for the DVD player to read the
disc.
5.Use the navigation buttons (04) to navigate to the play
option on the DVD menu. When an audio CD is inserted the
first track will begin playback automatically. A picture CD will
load and display the contents of the disc in a file browser.
6.Press the ENTER (05) or
(G) button to begin playback.
4.2
OPEN/CLOSE
Basic Operation
Stop
1.Pressing the button (F, 08) once during playback will stop
play at the current position.
2.Pressing the (07) or
(G) button at this point will
resume playback from the position you stopped playback
from.
3.If you press the button twice, playback will cease and the
resume option will not be available.
Pause
1.If you need to pause the playback at any time, press the
(G) button or PAUSE (26).
2.To resume playback press the (07) or
(G) button once
more.
/
Skip
1: Press either
(E, 09) or
(I, 28) buttons during playback
to skip a chapter (DVD) or a track (CD) ahead or backwards.
This function may not work during the “Warning” section of a
DVD.
GDVD3607HDMI
4.2
Basic Operations
/
Fast Search
1.During playback, press either
(11) or
(29) buttons to
fast search forwards or backwards.
2.Each press increases the search speed from 2X, 4X, 8X
16X & 32X the next press of the button will resume normal
playback.
This function may not work during the “Warning” section of a
DVD.
Slow Motion (DVD Only)
3.During playback, it is possible to slow the speed down.
Press the SLOW (12) button to activate the mode.
4.Each press of the SLOW (12) button cycles through the
following options: 1/2, 1/4, 1/8 or 1/16 and OFF.
5.You can resume normal playback at any time by pressing
the (07) or
(G) button.
Display
1.When playing a disc, pressing the DISPLAY (19) button will
display various information about the playing disc. You will
need to press the DISPLAY (19) button a few times to view
all the info another press will hide the display info.
DVD
TITLE
ELAPSED
TITLE
REMAINING
CHAPTER
ELAPSED
CHAPTER
REMAINING
TOTAL
ELAPSED
TOTAL
REMAIN
SINGLE
ELAPSED
OFF
CD
SINGLE
REMAIN
Different types of disc will show different options.
Menu (DVD Only)
Pressing the MENU (25) button during playback activates the
disc main menu.
Title (DVD Only)
1.Pressing the TITLE (06) button during playback activates the
discs title menu (if available).
The TITLE menu is the beginning track of a disc. (not all discs
contain these and as such the TITLE button may not respond).
GDVD3607HDMI
4.2
Basic Operations
Volume Controls
1.Press the VOLUME +/- (27) buttons on the remote control to
increase or decrease the volume level.
Mute
This function will instantly silence the audio.
RESUME
1.Press the MUTE (16) button, the audio will cease.
2.Press the MUTE (16) button again to resume.
Advanced Operation
4.3
Repeat
The repeat function allows you to view a section of a disc
repeatedly.
DVD
1.Press the REPEAT (31) button to activate the first repeat
function CHAPTER.
2.Press again to swap to TITLE.
3.Press once more to swap to REPEAT ALL.
4.Another press of the REPEAT (31) button disables the
function.
RESUME
A/R
CD
1.Press the REPEAT (31) button to activate the first repeat
function REPEAT 1.
2.Press again to swap to REPEAT ALL (repeats all track on
the current disc).
3.Another press of the REPEAT (31) button disables the
function.
Some discs may not allow repeat functions.
GDVD3607HDMI
Advanced Operations
4.4
Repeat A-B
This function allows you to set a start & end time to be
repeated.
1.Press the A-B (15) button to set the start frame “A”.
2.Press the A-B (15) button once more to set the end frame
“B”. The player will now repeat the section from A to B.
3.To cancel the REPEAT A-B function press the A-B (15)
button again.
RESUME
Some discs may not allow repeat functions. The period
between A & B should be at least 3 seconds long.
4.5
Numeric Buttons
DISPLAY
It is possible to use the numeric keys to control various
functions on the player, for example.
TRACK: when playing a CD disc
CHAPTER/TITLE: When playing a DVD disc.
GO TO
1.Input the required chapter or track number using the
numeric keypad (02).
2.To select chapter or track 10, press the 10+ button then the
0 button. To select chapter or track 22 press the 10+ button
twice and then the 2 button. If the second digit is ‘0’ press
the 0 button.
4.6
Multi-Angle (DVD Only)
Some discs contain scenes which have been shot
simultaneously from a number of different angles. For these
discs, the same scene can be viewed from each of these
angles by using the ANGLE button.
GO TO
1.During playback, pressing the ANGLE (22) button will cycle
through the available angles (if any exist).
A single DVD disc can contain up to 9 different viewing angles.
4.7
Audio Track (DVD Only)
It is common for a DVD disc to contains more than one audio
track for example 5.1 audio, stereo audio and other languages.
1.Press the AUDIO (20) button to cycle through the tracks.
This DVD player does NOT support DTS audio. If you select a
DTS audio track or one is selected automatically no sound will
be output. Should this occur select a compatible audio track.
GO TO
GDVD3607HDMI
Advanced Operations
4.8
Subtitle Track (DVD Only)
Many DVD discs contain subtitle tracks to aid in various ways.
1.Press the SUBTITLE (21) button to activate the first set of
subtitles.
2.Press the SUBTITLE (21) button repeatedly to cycle through
the available subtitle options.
3.Press the SUBTITLE (21) button repeatedly until you reach
OFF to disable the subtitle function.
4.9
GO TO
Zoom (DVD & JPG Disc Only)
To zoom into the displayed image follow the below steps.
1.Press the ZOOM (24) button to activate the zoom setting of
2X. Every subsequent press cycles through the zoom
options EG:- 3X, 4X, 1/2, 1/3 & 1/4. The next press will
return to the OFF setting.
2.When in ZOOM mode you can use the navigation button to
scroll the picture up, down, left & right.
Zooming into the picture will degrade the quality of the viewed
image as the pixels are being stretched.
4.10
N/P Mode
This function switches between NTSC, PAL & AUTO modes.
1.Press the N/P (10) button repeatedly to cycle between
AUTO, NTSC & PAL video modes.
4.11
A/R
A/R (Aspect ratio)
1.Press the A/R (34) button repeatedly to cycle through the
available Aspect ratio modes EG:- 4:3 PS, 4:3LB & 16:9
4.12
Step (DVD Only)
1.Press the STEP (13) button to advance in slow motion.
Each press advances one frame.
2.Press the (07) or
(G) button to resume normal
playback speed.
4.13
Random
RESUME
RESUME
A/R
1.Press the RAN (35) button to begin playback in a random
order.
GDVD3607HDMI
Advanced Operations
4.14
Go To
To jump to a specific chapter or title on a disc use the GO TO
function.
GO TO
1.Press the GO TO (23) button during playback to activate the
GO TO options.
2.Use the navigation arrow buttons to select either TITLE or
CHAPTER options.
3.Use the numeric buttons (02) to enter the Title or Chapter
digits.
4.Press the ENTER (05) button to jump to the set position.
4.15
RESUME
Reset
1.Press the RESET (14) button on the remote to restore all
settings back to the factory default.
RESUME
4.16
Resume
1.Press the RESUME (17) button to resume playback from the
last played position.
4.17
Return
1.Press the RETURN (30) button to return to the previous
screen.
4.18
JPG Disc
JPEG picture discs can be obtained from any good photo
developing lab when your photos are developed. Or can be
created manually on a computer.
1.Insert a DVD disc containing JPG images into the DVD
player. A file browser menu will be displayed.
2.You can use the navigation buttons (4) to scroll through the
(G) or ENTER (05)
list of images. Press the (07),
button to begin a slide show of the entire contents of the
disc from the selected image.
A/R
00:00
002/011
00:00
DSC00283
DSC00283
DSC00283
DSC00283
DSC00283
DSC00283
Resolution 3072 x 2048
Use the navigation buttons to scroll up and down, left to right
and press the ENTER button to select.
3.Press the (F, 08) button to return to the file browser
screen.
4.To display an image indefinitely press the (26) or
(G)
button. To resume the slide show press the (07) or
(G)
button.
GDVD3607HDMI
Advanced Operations
4.18
JPG Disc
During the slide show the navigation buttons (04) will rotate the
displayed image.
(E, 09) or
The
next image.
00:00
002/011
DSC00283
DSC00283
(I, 28) buttons will skip to the previous or
Press the ZOOM (24) button to activate the default zoom
setting of 100%. Every subsequent press cycles through the
zoom options eg: 100%, 125%, 150%, 200%, 75% & 50%.
00:00
DSC00283
DSC00283
DSC00283
DSC00283
Resolution 3072 x 2048
Repeat can be set to SINGLE, REP ONE, REP FOLDER or
FOLDER by repeatedly pressing the REPEAT (31) button.
The REPEAT function can only be set from the file browser
screen.
4.19
Program Playback
1.Press the PROG (32) button to begin the program function.
2.Use the navigation buttons (04) to highlight ‘Track 01’.
3.Enter the CHAPTER /TRACK number EG:- Chapter/Track
22 would mean pressing the ‘10+’ button twice and then
the ‘2’ button.
4.Repeat steps 2-3 until you have programmed all the
chapters/tracks required. Should you require more
chapters/tracks than 10, navigate to the NEXT icon and
press the ENTER (05) button. Tracks 11-20 will now be
programmable.
5.Once the programming is complete navigate to the START
icon and press the ENTER (05) button to begin playback of
your programmed sequence.
4.20
01
10
06
02
12
07
03
08
04
09
05
10
Exit
Start
Next
Clear
1.When programming should you enter an incorrect chapter/
track number press the CLEAR (33) button to clear the
digits and re-enter the number.
GDVD3607HDMI
5 Setup Menu
5.1
System Setup
The setup menu contains various preferences for functions
found on the unit. To enter the Setup menu press the SETUP
(03) button on the remote control.
Use the navigation buttons (04) to scroll up and down, left to
right and press the ENTER (05) button to select. To access the
‘preferences’ panel, press the STOP button twice during
playback or press SETUP without a disc loaded.
5.2
General Setup
TV Display
Choose a setting between 4:3/PS (pan and scan), Normal/LB
(letter box) or 16:9 (widescreen).
Angle mark
Enabling this function displays an icon for a compatible disc
when multiple angles are available for selection.
General
Audio
Video
Preference
Video
Preference
- - General setup page - TV Display
Angle Mark
OSD Lang
Captions
Screen Saver
HDCD
Last Memory
16:9
On
ENG
Off
On
Off
On
Go To General Setup Page
OSD Lang
This sets the On Screen Display language. Choose between:
English, Spanish, German & French.
Captions
Enabling closed captions displays recorded explanatory
captions for hearing impaired people.
Screen Saver
When the unit is not in use, the DVD logo will appear as a
screen saver to prevent screen burn in. Choose on or off.
HDCD
When playing CD’s or HDCD’s you can apply filters to the
sound output. Select from 1X, 2X and OFF.
Last Memory
When set to ON the unit will remember the last position on a
disc before the unit was shut down (STANDBY).
5.3
Audio Setup
Downmix
This option allows you to change the way the audio is
assigned to each speaker. Choose from:
LT/RT: Left / Right mixed mode
STEREO: Stereo audio output
General
Audio
- - General setup page - TV Display
Angle Mark
OSD Lang
Captions
Screen Saver
HDCD
Last Memory
16:9
On
ENG
Off
On
Off
On
Go To General Setup Page
GDVD3607HDMI
5 Setup Menu
5.3
Audio Setup
SPDIF Output
Select one of the options below for digital audio output when
connecting an external amplifier.
SPDIF OFF: Outputs an analogue signal.
SPDIF/RAW: Outputs a Dolby digital signal
General
Audio
Video
Preference
Video
Preference
- - General setup page - TV Display
Angle Mark
OSD Lang
Captions
Screen Saver
HDCD
Last Memory
16:9
On
ENG
Off
On
Off
On
Go To General Setup Page
SPDIF/PCM: Outputs a LPCM digital format in either 48K or
96K audio formats.
5.4
Video Setup
Output Mode
Set the video output mode. Select from:S-VIDEO: (s-video TV connection)
General
Audio
Video Quality Setup
Output Mode
Resolution
Quality
HDMI Setup
S-Video
Component
Scart RGB
COMPONENT: (Component TV connection)
SCART-RGB: (Scart & Composite TV connection)
Sharpness
Do not connect multiple cables at the same time as this will
cause picture quality loss.
Resolution
When using a HDMI cable to connect to a TV or monitor you
can select the resolution displayed (providing the connected
TV/Monitor supports them).
Select from the below options:480(i/p)/576(i/p) . . . . . (standard progressive DVD resolution)
720p (50/60Hz). . . . . . . (1280x720 progressive HD resolution)
1080i (50/60Hz) . . . . . . (1920x1080 interlaced HD resolution)
1080p (50/60Hz). . . . . (1920x1080 progressive HD resolution)
Quality
Sharpness
Set the video sharpness level. Select from LOW, MEDIUM or
HIGH.
Brightness
Set the video brightness level. Use the / (04) navigation
buttons to increase or decrease from -20 to +20. Press the
ENTER (05) button to complete the setting.
GDVD3607HDMI
5 Setup Menu
5.4
Video Setup
Contrast
Set the video contrast level. Use the / (04) navigation
buttons to increase or decrease from -16 to +16. Press the
ENTER (05) button to complete the setting.
Gamma
Set the video gamma level. Select from NONE, LOW, MEDIUM
or HIGH.
General
Audio
Video
Preference
Video
Preference
Video Quality Setup
Output Mode
Resolution
Quality
HDMI Setup
S-Video
Component
Scart RGB
Sharpness
Hue
Set the video hue level. Use the / (04) navigation buttons
to increase or decrease from -9 to +9. Press the ENTER (05)
button to complete the setting.
Saturation
Set the video saturation level. Use the / (04) navigation
buttons to increase or decrease from -9 to +9. Press the
ENTER (05) button to complete the setting.
5.5
Preferences Setup
TV Type
Set this option to whatever type of disc you are watching.
NTSC, PAL or AUTO (to set automatically).
Audio
General
Audio
- - Preference Page - TV Type
Audio
Subtitle
Disc Menu
Parental
Password
Default
PAL
ENG
Off
ENG
PAL
AUTO
NTSC
Set TV Standard
Choose the default audio setting. This means the DVD player
will automatically select this language as the audio track (if
available).
Select from:- English, Spanish, German & French.
Subtitle
Select the default subtitle language.
Select from:- English, Spanish, German, French & Off.
Disc Menu
This option sets the default DVD menu language, once set if
the DVD you are watching contains a menu with your specified
language that is used by default.
Select from:- English, Spanish, German & French.
GDVD3607HDMI
5 Setup Menu
5.5
Preferences Setup
Parental
Choose between: Kid Safe, G, PG, PG13, PG-R, R, NC-17 and
Adult. When changing the parental level you will be asked to
enter the password. The default password is ‘1234’.
Password
General
Audio
Video
Preference
- - Preference Page - TV Type
Audio
Subtitle
Disc Menu
Parental
Password
Default
PAL
ENG
Off
ENG
PAL
AUTO
NTSC
Set TV Standard
Enter a new password. First you will be required to enter the
current password. This will be ‘1234’ if changing for the first
time.
Once you have entered a correct existing password you can
then enter your new password and confirm. Press the ENTER
button to save the new password.
The master override password can be used if you change the
default but forget the new password. The master password is
‘1234’.
Default
Activating this option resets every setting to the factory default.
GDVD3607HDMI
6 Useful Information
6.1
Disc Handling
• Do not touch the playback side of the disc.
• Do not attach paper or tape to disc.
• Fingerprints and dust on the disc cause picture and sound
deterioration. Wipe the disc from the centre outwards with
a soft cloth. Always keep the disc clean.
• If you cannot wipe off the dust with a soft cloth, wipe the
disc lightly with a slightly moistened soft cloth and finish
with a dry cloth.
• Do not use any type of solvent such as thinner, benzene,
commercially available cleaners or antistatic spray for vinyl.
It may damage the disc.
• Do not store discs in a place subject to direct sunlight or
near heat source.
• Do not store discs in a place subject to moisture and dust
such as a bathroom or near a humidifier.
• Store discs vertically in a case, stacking or placing object
on discs outside or their case may cause warping.
6.2
Disc Information
• Normally, DVD discs are divided into titles, and the titles are
sub-divided into chapters. Audio CD discs are divided into
tracks.
• Each title, chapter, or track is assigned a number, which is
called title number, chapter number or track number
respectively. There may be discs that do not have these
numbers.
6.3
Copyright Information
This product incorporates copyright protection technology that
is protected by U.S. patents and other intellectual property
rights. Use of this copyright protection technology must be
authorized by Macrovision, and is intended for home and other
limited viewing uses only unless otherwise authorized by
Macrovision. Reverse engineering or disassembly is prohibited.
GDVD3607HDMI
6.4
Disc types
Audio and Video
Disc size 12cm
Single side, single layer / single side, double layer
PAL and NTSC DVD disc
Playback time 135min / 240min max
Audio
Disc size 12cm / 8cm CD disc Playback time 74min/20min
max
Picture
JPG format disc
* Player is DVD-Video, DVD+/-R, DVD+/-RW, CD-DA, CD-R,
CD-RW compatible.
6.5
Region Management Information
This DVD Player is designed and manufactured to
respond to the Region Management Information that is
recorded on a DVD disc. If the Region number described on
the DVD disc does not correspond to the Region number of
this DVD Player, this DVD player can¬not play that disc.
The Region number of this DVD player is ‘REGION 2’
GDVD3607HDMI
7 Troubleshooting
Problem
What to do
No Power
Check the mains plug is connected to the wall socket.
Switch the wall socket ON.
Press the Standby (A, 01) button to wake from Standby
mode.
No Picture
Set to the correct input channel on your TV.
Re-connect the connection cable if incorrectly fitted.
Incompatible TV resolution selected. Press the
RESET button to return to the default resolution
No Sound
Re-connect the cable(s) if in-correctly fitted.
Audio output settings incorrect. Set to the correct
mode.
Non compatible DTS audio track selected. Press the
AUDIO button repeatedly to cycle through the
available audio tracks.
Distorted Picture
Disc is dirty. Clean the disc or try another disc
In fast forward or rewind mode. Picture distortion
can occur during this function. This is normal.
Unable to Play
Load a compatible disc.
Check the disc is loaded correctly.
Clean the disc if it is dirty or try a clean disc.
The setup menu obscures the picture. Press the
SETUP (03) button to close the menu.
Remote not working
Replace the batteries.
Move any objects obstructing the sensor path to the
DVD player.
Move closer to the DVD player.
GDVD3607HDMI
8 Technical Specifications
Model Number
GDVD3607HDMI
Power
100-240V ~ 50/60Hz
Power Consumption
12W (maximum)
CD: 20Hz-20KHz(EIAJ)
Frequency Response
DVD: 20Hz-44KHz(96KHz)(Sample result)
20Hz-22KHz(48KHz)(Sample result)
Audio S/N ratio
>90dB
Video/Picture
MPEG1 V2.0; MPEG2
Audio
MPEG LAYER2 standard
Audio output (analog audio)
Electric level output: 1.8 ± 0.2V Resistance: 10KS
Audio output (digital audio)
Electric level output: 0.5Vp--p Resistance: 75S
Video output
Electric level output: (1.0 ± 0.2)Vp--p Resistance: 75S
Unbalanced negative
S-Video output
Electric level output: Brightness(Y)1.0Vp--p,
Chrominance (C): 0.286Vp--p,
Resistance: 75S
Component video (Y, CB,CR)
Electric level output: 0.7Vp--p,
Output
Audio: 2.0 Channel output, Coaxial output
Video: AV output, S-Video output, Y,Cb,Cr output & HDMI output
Dimensions
360 x 239 x 44mm
Resistance: 75S
Resistance: 75S
9 Customer Support
Our customer service team is available for technical or
guarantee support. Visit www.goodmans.co.uk/support
www.goodmans.co.uk
QSG-AUGUST14-GDVD3607HDMI
GDVD3607HDMI