1
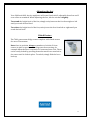
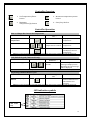
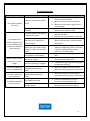
USER MANUAL Arctica Refrigerator Range Applicable Models: HEA700 HEA701 HEA704 HEA705 HEA708 1 – Important Information Contents 1. Important Information Useful Information Unpacking Warranty Positioning Removing the Compressor Safety Band Electrical Connection Safety Information Transporting and Moving the Appliance Before plugging in Using Appliance for First Time Important Refrigerant Information page 3 page 4 page 4 page 5 page 5 page 6 page 7 page 8 page 8 page 8 page 8 2. Using Your Appliance Product Information Product Details Doors Internal Light Shelves Adjusting the Feet Fitted Castors Controller Overview and Operation Energy Saving Tips Storage Disposal page 9 page 9 page 10 page 10 page 10 page 11 page 11 page 12 page 13 page 13 page 13 3. Care & Maintenance of Your Appliance Defrosting Cleaning Instructions page 14 page 15 4. Troubleshooting, Service & Repairs Troubleshooting, Service & Repairs After Sales Support What Spares do we offer? Replacing the Door Gasket Replacing the LED Light Bulb Changing the Door Hinge Troubleshooting FAQ’s Contact Information page 16 page 16 page 16 page 17 page 17 page 17 page 18 page 19 page 20 2 Useful Information We strongly recommend that you spend some time to fill in the information below and keep it in a safe place. This will save you time if you need to contact our After Sales team. Model Number: (e.g. HEA700) Serial Number: (found on the data plate of the appliance) Date of Purchase: / / Purchased from: ............................................................................................................................................... Please take some time to fill in the information above and keep it in a safe place. This will save you time if you need to contact our After Sales team. 3 Thank you for purchasing this Arctica refrigerator. Whilst unpacking, please carry out the following actions Check the refrigerator has not been damaged in any way during transportation. If any damage is found, it MUST be reported to our After Sales department immediately by calling 0844 815 0641. When unpacking the appliance, ensure that all packaging has been removed, including cardboard, polystyrene and any tape used to hold the shelves in place during transportation. The refrigerator has been cleaned prior to dispatch; however, we advise that it should also be cleaned before use. We recommend that the interior should be wiped with a soft cloth dampened with lukewarm water containing a mild detergent. Rinse with clean lukewarm water, and dry thoroughly. When unpacking is complete, we recommend that the appliance should stand for 24 hours prior to switching on. Warranty How to activate your Warranty Your Arctica fridge comes with a 2 years Parts and Labour warranty from the date of purchase. Registering your product and activating your Arctica warranty couldn’t be easier. Do not hesitate to call 0844 815 0641 and one of our advisors will be happy to assist you with this. In the unlikely event of breakdown, please contact us on 0844 815 0641. Remember: You will need to quote the model number and the serial number of this unit. The serial number can be found on the data plate of the appliance. 4 Positioning your Arctica Fridge When positioning your Arctica fridge, please ensure you have taken into account the following factors: In order to conserve electricity, do not place your appliance near a source of heat, such as a radiator. Try to avoid locations where the appliance could be exposed to direct sunlight. If the product is to be placed next to another unit or a wall, there should be at least a 20cm gap. Increase this distance if the obstacle is a heat source. This refrigerator must be placed on a hard flat surface. It is important that the 2 front feet are adjusted so that the unit stands firm and level. The internal temperature of this appliance is affected by location, room temperature, and frequency of opening the door. The factory settings of the electronic control (thermostat) are set to allow for these conditions. This appliance is designed to operate in ambient temperatures between +16°C and +36°C for the 200L and 400L models and +16°C and +40°C for the 700L gastronorm fridge. Operating outside of these temperature parameters may cause the appliance to perform out of specification. Once in position, ensure that you lock the 2 front castors by pushing the lever attached to the castors down so that they reach a horizontal position and click into place. This applies to the 700L model only. Removing the Compressor Safety Band (on 700L model) The compressor is located on the top of the appliance and sits on the rubber washers. Under normal operating conditions the compressor is allowed to vibrate. To avoid damage through excessive motion during transit, a stainless steel safety band is placed over the compressor and screwed into the top of the appliance. The safety band and the two screws fixing it to the appliance must be removed before the appliance is switched on. 5 Electrical Connection This appliance is intended for connection with alternating current. The connection values for voltage (V) and frequency (Hz) are declared on the name plate in the product. Power must be connected via a wall socket with a switch. It is strongly recommended that the wall socket is accessible. The product plug and wall socket should give correct earthing. If in doubt, please contact your local supplier or an authorised electrician. If the supply cord is damaged, it must be replaced by the manufacturer, its service agent or similarly qualified persons in order to avoid a hazard. WARNING: THIS APPLIANCE MUST BE EARTHED The flexible cord (mains lead) fitted to this product has three cores for use with a 3-pin 13 amp plug. If a BS 1363 (13-amp) fused plug is used it should be fitted with a 13-amp fuse. The cores in the mains lead are coloured in accordance with the following code: GREEN AND YELLOW - EARTH BLUE - NEUTRAL BROWN - LIVE Note: These colours may not correspond with the coloured markings identifying the terminals in your plug. Do not push excess mains lead into the compressor compartment. If it is necessary to change the fuse in a moulded plug and the fuse cover is detachable, it must be refitted after the fuse has been changed. If the fuse cover is lost or damaged the plug must not be used until a replacement is obtained. It is important that the colour of the replacement fuse cover corresponds with the coloured insert or as indicated in embossed words on the base of the plug. Replacement fuse covers are available from our Spares department. For contact details, see page 20. 6 Safety Information WARNING: Keep ventilation openings, in the appliance enclosure or in the built-in structure, clear of obstruction. WARNING: Do not use electrical appliances inside the storage compartment of the appliance, unless they are of the type recommended by the manufacturer. Before ANY maintenance activity, carefully take the plug out of the socket by gripping the plug, DO NOT pull on the plug cord. DO NOT use double-wire extension cords. If an extension cord is necessary make sure it is a cord, which possesses a protection safety certificate. If the main power supply cord is damaged, it should be replaced by a qualified service engineer. DO NOT attempt to make any repairs to the appliance yourself. Repairs carried out by someone without the relevant training are putting their personal safety at risk and will invalidate your warranty. DO NOT store explosive substances such as aerosol cans with a flammable propellant in this appliance. This appliance is not intended for use by persons (including children) with reduced physical, sensory or mental capabilities, or lack of experience and knowledge, unless they have been given supervision or instruction concerning use of the appliance by a person responsible for their safety. Children should be supervised to ensure that they do not play with the appliance. Remember: This Arctica unit is intended to be used in commercial premises and similar applications such as: Staff kitchen areas in shops, offices and other working environments. Hotels, bars, pubs and cafes. Fast food providers. Restaurants and similar. Retail premises. Local authorities (e.g. Schools, nursing homes, hospital kitchens). 7 Transporting and moving your Arctica fridge The product must be unplugged before moving and should always be moved in the vertical position. Leave the product to stand for at least 24 hours before reconnecting. Before you plug your appliance in IMPORTANT: Ensure that your Arctica unit is left to stand for 24 hours after transportation prior to switching on, as this will allow the refrigerant to settle. Ensure that you have cleaned the interior with a soft cloth dampened with lukewarm water containing a mild detergent. Rinse with clean lukewarm water, and dry thoroughly. DO NOT use soaps, wire wool, scouring powder disinfectants of any kind or detergents containing acids or abrasives to clean the interior. Using Appliance for First Time When unpacking and cleaning are complete, plug your 200L or 400L fridge into a suitable earthed socket and the appliance will switch on. For the 700L Gastronorm fridge, before plugging in, close the door of the appliance and ensure that the power switch is set to [O]. Plug the mains lead of your appliance into a suitable earthed socket. Switch the green power button next to the controller from [O] to [1]. Once switched on, the current internal temperature will be displayed. IMPORTANT: We also recommend that you leave your Arctica refrigerator running for 24 hours before filling to ensure it is working properly. Note: This appliance has been supplied with a factory pre-set temperature of +3°C. Important Refrigerant Information All 200L & 400L Arctica refrigerators contain environmentally-friendly, non ozone depleting R600a refrigerant. Our 700L Arctica gastronorm fridge uses R134a. WARNING: Do not damage the refrigerant circuit As R600a and R134a are both flammable gases, it is essential to avoid damage to the refrigeration circuit during transportation and installation. If the refrigeration circuit is damaged, avoid using a naked flame in the vicinity of the refrigerator and connecting power to the refrigerator. Also make sure there is good ventilation within the room. 8 2 - Using Your Appliance Product Information Model Number HEA700 HEA701 HEA704 HEA705 HEA708 Dimensions WxDxH (mm) 595 x 667 x 838 595 x 667 x 838 603 x 653 x 1960 603 x 653 x 1960 740 x 830 x 2010 Refrigerant Type Temperature Range Colour Handle Type Door Type R600a +0°C to +10°C White Easy Grab Solid R600a +0°C to +10°C Stainless Steel Easy Grab Solid R600a +0°C to +10°C White Integrated Solid R600a +0°C to +10°C Integrated Solid R134a -2°C to +8°C Integrated Solid Stainless Steel Stainless Steel Product Features Unless otherwise stated, all Arctica fridges feature: 1. 2. 3. 4. 5. 6. 7. 8. Fitted Lock Adjustable Wire Shelves 2 Adjustable front feet/2 rear rollers (200L & 400L models) Fitted Castors (700L model) Electronic Controller Easy Grab Handle (200L models) Integrated Handle (400L and 700L models) Interior Light Note: Additional or replacement parts are also available from our Spares department by calling 03701 678678. 9 Doors Self closing Door The 700L refrigerator model features a self closing door. If the self closing mechanism fails, apply gentle pressure until the magnetic door gasket seals against the unit. Do not "slam close". Check periodically that there are no gaps between the gasket and the unit face as this will cause the refrigerator to operate less efficiently. Handle Styles The 200L Arctica units feature an easy grab handle for ease of opening. The 400L & 700L models come with an integrated handle. Reversible Doors This refrigerator is fitted with a reversible door, which allows the user to change from right hand-hinged to left hand-hinged, or vice versa. See page 17 for details. Internal Light The 200L & 400L Arctica refrigerators feature an internal LED light that switches on automatically when the door is opened, whilst the 700L unit features a standard light tube that switches on automatically too. Shelves For 200L & 400L models, to adjust shelf height, simply align the shelf onto the moulded holder whilst making sure that the shelf is securely in place before stocking. On the 700L gastronorm unit, fit one set of shelf guides on either side of the cabinet, before sliding the shelf into place. Model 200L 400L 700L Number of shelves 2 (adjustable) 5 (adjustable) 3 (adjustable) Shelf positions 7 16 22 200L & 400L integrated moulded shelf holder 700L shelf guides WARNING: Maximum loading capacity per shelf is 20kg for 200L & 400L models and 30kg for the 700L Gastronorm unit. Note: The 700L Arctica refrigerator is 2/1 gastronorm compatible. 10 Adjusting the feet Your 200L and 400L Arctica appliance will come fitted with 2 adjustable front feet and 2 rear rollers as standard. When adjusting the feet, tilt the unit back slightly. To extend the height level of the feet, simply twist/unscrew the feet from right-to-left until you reach desired level. To reduce the height level of the feet, twist/screw the feet from left-to-right until you reach desired level. Fitted Castors The 700L gastronorm fridge comes complete with fitted castors for ease of movement. Note: Once in position, always remember to lock the 2 front castors in place to prevent the refrigerator from moving, for example when the door is opened or if someone leans on it. These can be easily locked by pressing down the metal lever attached to the castor until it clicks in place. To unlock, simply flick the lever back up. 11 Controller Overview 1. Set Temperature/Enter button 2. 3. Minimum Temperature/Down button Maximum Temperature/Up button 4. Start/Stop Defrost Controller Operation View or Change the Current Set Temperature Function Press To view/set temperature Followed by Hold button(s) down for 1 second Until desired temperature is reached Result Displays current set temperature Modifies and saves set temperature or Followed by 1 second Exits the adjustment and displays internal temperature Note: If no more buttons are pressed within 6 seconds, the interior temperature will be displayed. Lock/Unlock Keypad (700L model only) Function Press Lock/Unlock Keypad Hold button(s) down for Simultaneously for 4 seconds Result When locking the ‘OF’ message is displayed or if Unlocking the ‘ON’ message + will be displayed Note: If no more buttons are pressed within 3 seconds, the interior temperature will be displayed. Performing a Manual Defrost cycle Function Manual start / stop Defrost Press Hold button(s) down for 6 seconds Result Starts or stops defrost. Defrost LED illuminates when defrost is in progress. Note: If no more buttons are pressed within 6 seconds, the interior temperature will be displayed. LED indication symbols 700L model only 12 Energy Saving Tips The Arctica 200L & 400L refrigerators are cooled by energy-efficient R600a and the 700L model is cooled by R134a refrigerant. In order to keep running costs as low as possible, always: Position the appliance away from heat sources. Make sure the air can circulate freely around the appliance. Ensure that products being stored in the appliance are below room temperature upon entry. Make sure the door is opened a little as possible whilst in use and closed as quickly as possible to prevent unnecessary temperature fluctuations. Energy Consumption Models HEA700 & HEA701 HEA704 & HEA705 HEA708 Energy Consumption (kWh per 24 hours) 1.4 1.5 3.2 Storage If your appliance is to remain unused for a period of time (e.g. during refurbishment work), it is advised that the appliance is unplugged from the power supply. Ensure that the interior is thoroughly cleaned and dried. We recommend that you leave the door slightly ajar to prevent any bad odours from forming within the refrigerator. Disposal of your product When disposing of your refrigerator or freezer do not take it to regular municipal waste containers. Instead, take it to an electrical/electronic waste recycling and re-use centre. A relevant label has been placed on the refrigerators packaging (see right). The product has been manufactured using recyclable materials. Ask your local environmental care authority for information concerning location of such facilities. 13 3 - Care & Ongoing Maintenance of your Appliance Service Information It is important to maintain your fridge regularly. We recommend that the condenser, drain and gasket are serviced every 6 months by a qualified service engineer. Defrosting Automatic defrost function All Arctica refrigerators feature automatic defrosting and, in normal conditions, means that no manual defrosting is required. However, in certain conditions (e.g. when the refrigerator is very full or when any new items of stock are stored in the refrigerator) frost may form on the rear wall of the product as the compressor must run for long periods of time. As automatic defrosting takes place while the compressor is not running, the refrigerator may not defrost completely before the compressor restarts. In these instances some manual defrosting may be required. Manual defrost Instructions on how to manually defrost your appliance can be found within the table on page 12 under the title, ‘performing a manual defrost cycle.’ IMPORTANT: Do not use any knives or sharp metallic objects to remove frost. WARNING: Do not use mechanical devices or other means to accelerate the defrosting process, other than those recommended by the manufacturer. 14 Keeping your Arctica fridge clean Interior This Arctica fridge should be cleaned regularly. Before cleaning you MUST switch off and disconnect the appliance from the power supply. The interior, except for the door gasket, can be cleaned using a mild detergent and lukewarm water, before rinsing with clean lukewarm water and drying thoroughly. Regularly clean the gasket with water only and wipe dry. This helps prevent the build up of food and liquid residues. Remove the shelves and wipe with a soft cloth using a mild detergent and lukewarm water. Ensure that you rinse them totally with clean lukewarm water and make sure that they are completely dry before replacing. Do not put them in a dishwasher. Detergents containing abrasives or acids are not suitable for cleaning and must NOT be used. When all cleaning has been completed, reconnect the plug with dry hands. DO NOT use soaps, wire wool, scouring powder or disinfectants of any kind. Exterior We recommend that you use a good wax polish that will clean and polish the exterior of your Arctica fridge in one easy application. DO NOT use an aerosol polish as the spray may damage plastic parts IMPORTANT: Damage to the unit as a result of not cleaning regularly, or not using the correct cleaning materials may invalidate your warranty. 15 4 - Troubleshooting, Service & Repairs If something appears to be wrong, before calling our sales department, please check the following: 1. Make sure the plug is connected properly into the mains socket. 2. Check that the fuse hasn’t blown. (Details of changing a fuse can be found on page 6) 3. Check that the mains switch is ‘ON’. 4. Ensure that the door closes firmly and check the gasket sealing as this may require cleaning. After Sales Support Should you require any after sales support, we recommend that you contact the retailer who supplied the appliance, or alternatively, contact our After Sales support team on 0844 815 0641. Note: You will need to have the date of purchase, the model and serial number (found on the Data Plate label of the appliance) to hand and state the nature of the fault. What Spares do we offer? A few examples include: LED light Additional shelves Compressor Adjustable feet Lock and key Replacement door gasket Digital controller Door handles Door hinges Mains cable with plug For further information or to purchase any spare parts, please do not hesitate to contact our Spares department on 03701 678678. Please ensure that you have your model number (e.g. HEA700) and serial number (located on data plate) to hand. Replacing the Door Gasket Pull the gasket out from the door and replace it with a new one. Make sure the new gasket seals against the unit and there are no air gaps. You may use a hot air gun (hair drier) to mould the new gasket on to the door if required. We advise that you clean the door gasket frequently 16 Replacing the LED Light The Arctica 200L & 400L refrigerators are fitted with energy efficient, LED lighting. In the unlikely event that you need to replace the light, please follow the instructions below: Switch the refrigerator off at mains and remove plug from mains socket. Remove the screws holding the LED cover in place using a screw driver and then remove screws holding LED strip by same method. Disconnect the LED strip at the connector block and replace with a new LED strip. Re-fix the LED strip and the LED cover to the product using the screws that were previously removed ensuring that all screws are secure. Re-connect the plug to mains socket and switch on. Changing the Door Hinge IMPORTANT: Changing the door hinge requires at least 2 people and should not be attempted on your own. To change the door hinge on the 200L & 400L Arctica refrigerators, proceed as follows: 1. Switch off power at the mains socket and remove the plug from the mains socket. 2. Remove the top panel and disconnect the multi plug inside. 3. Remove the hinge pin, and lift off the door. 4. Move hinge from one side to the other. 5. Move the handle from one side to the other. 6. Place the door in the hinge on the desired side. Insert hinge pin in the hinge and in the door hinge bush. Fasten the hinge. 7. Re-connect the multi plug to the panel, and secure the panel. Re-connect to the mains. Note: A series of pictorial instructions are available on request from our After Sales department. Simply call 0844 815 0641 and one of our advisors will be able to send these to you. To change the door hinge on the 700L Arctica refrigerator, proceed as follows: 1. Remove the top hinge pin, lift off the door, and remove the bottom hinge pin. 2. Fit the bottom hinge pin on the desired side. 3. Place the door on the bottom hinge pin, fit the top hinge pin. 17 Troubleshooting PROBLEM The appliance does not work REASON A gap in the electrical system circuit The compressor hardly ever activates The door doesn’t shut tight or is opened too often The temperature inside the appliance is not low enough (the compressor operates continuously) Water collects at the bottom part of the fridge Excess frost build up and slow defrosting Excess condensation on outer surface of your appliance The appliance makes too much noise Appliance is positioned near a heat source or exposed to direct sunlight The ambient temperature is above +36°C for 200L & 400L models or +40°C for the 700L model Air circulation at the back of the appliance is hampered The contents touch the back wall of the interior The drain opening is clogged Operating the appliance in an unheated location (e.g. a cellar) Operating the appliance in an unheated location (e.g. a cellar) The fridge is not level The appliance is touching another object SOLUTION 1. Make sure the plug is properly inserted into the socket. 2. Make sure the socket is not faulty 3. Make sure the power supply cord is not damaged 1. Check to see if the ambient temperature is below +16°C 1. Rearrange the products so they don’t hamper the door. 2. Shorten the time the door is open for 1. Move appliance away from any area’s where heat sources or direct sunlight are present 1. Check the appliance is operating at an ambient temperature that is less than +36°C for 200L & 400L models or +40°C for the 700L model 1. Move product further away from the wall 1. Move the products so they aren’t in contact with the back wall 1. Take the cleaning plug and unclog the condensate opening 1. Move to a warmer location where temperature fluctuations are minimal 1. Move to a warmer location where temperature fluctuations are minimal 1. Place the appliance on an even surface or use adjustable feet 1. Reposition the appliance so it is detached from any other objects 18 Frequently Asked Questions 1. Are there any restrictions as to where I can locate my Arctica fridge? Yes, for optimum performance, it’s important that you position your Arctica fridge on a hard flat surface in an area where the ambient temperature will not drop below +16°C or exceed +36°C for the 200L & 400L models, or exceed +40°C or the 700L. Ensure the appliance has sufficient clearance around it to provide adequate ventilation. We do not recommend positioning your refrigerator close to a heat source. Avoid an unheated location such as a cellar as it may cause frost build up and slow defrosting. 2. Can I plug my Arctica fridge in straight away after unpacking? No, we recommend that you leave the fridge to stand for 24 hours before plugging in to allow the refrigerant to settle after transportation and delivery. You should then run the fridge whilst it’s empty for 24 hours before filling. Also, it is essential that you have followed the cleaning recommendations on page 4 of this manual prior to filling. 3. What should I do if my floor is uneven? If the floor is uneven, adjust the front feet on your refrigerator by twisting the feet on the 200L & 400L models. 4. Can I change the temperature inside the unit? Yes. Arctica refrigerators have a temperature range of 0°C to +10°C for 200L & 400L units and -2°C to +8°C for the 700L gastronorm model. You can easily change the temperature by following the instructions on page 12. 5. How do I operate the light inside the unit? The 200L & 400L Arctica fridges feature an internal LED light that switches on automatically when the door is opened, whereas the 700L features a standard light tube that also switches on automatically when the door is opened. 6. How often should I clean my Arctica fridge and how? It’s advised that you clean your fridge at least once a month. We recommend that the appliance should be wiped with a soft cloth dampened with lukewarm water containing a mild detergent. Rinse with clean lukewarm water, and dry thoroughly. 7. How often should I defrost my fridge? It is recommended to defrost your fridge 2-3 times per year or whenever appropriate. 8. What Warranty does my Arctica refrigerator have? Your fridge comes with a 2 year parts and labour warranty. See Warranty page 4. 9. What should I do if the lock or key is damaged? Simply call our Spares department on 03701 678678 and we will send arrange for a replacement lock to be fitted if the appliance is still within warranty. Additional keys can also be purchased from our Spares department. 10. Can I purchase replacement parts? Yes, we have a number of replacement parts. To order, please call our Spares department on 03701 678678. 19 Sales Orders: tel: fax: 03701 678 678 03701 678 679 After Sales: tel: 0844 815 0641 Spare Parts: tel: fax: 03701 678 678 03701 678 679 For all International (Non-UK) Enquiries: tel: fax: +44 3701 678 678 +44 3701 678 679 20