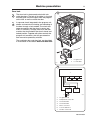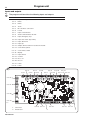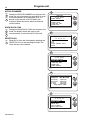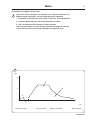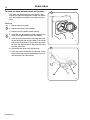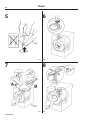
1
Service Manual
W455 H, Quick Wash
Compass Control
438 9226-51
06.18
Contents
Safety regulations......................................................................................... 5
Techical data ................................................................................................ 7
Machine presentation ................................................................................... 9
Description............................................................................................... 9
Function ................................................................................................. 10
Periodic maintenance ................................................................................. 17
Daily....................................................................................................... 17
Every three month ................................................................................. 17
Troubleshooting .......................................................................................... 19
General information on troubleshooting................................................. 19
Description of fault and causes ............................................................. 23
Program unit ............................................................................................... 41
Description............................................................................................. 41
Menu tree .............................................................................................. 43
Engaging service mode ......................................................................... 44
Service programme ............................................................................... 45
Config 1 ................................................................................................. 52
Aktivate washing programme ................................................................ 64
Unbalance detecting .............................................................................. 65
Door and doorlock ...................................................................................... 67
Door ....................................................................................................... 67
Doorlock ................................................................................................ 67
Motor .......................................................................................................... 69
Description............................................................................................. 69
Troubleshooting ..................................................................................... 74
Drain valve ................................................................................................. 79
Description............................................................................................. 79
Troubleshooting ..................................................................................... 79
Drain pump ................................................................................................. 87
Description............................................................................................. 87
Troubleshooting ..................................................................................... 87
Detergent dispenser ................................................................................... 89
Heating ....................................................................................................... 91
Description............................................................................................. 91
Troubleshooting ..................................................................................... 91
Drum .......................................................................................................... 93
Changing lifters ...................................................................................... 93
Frame ......................................................................................................... 97
Tightening torques ..................................................................................... 99
The manufacturer reserves the right to make changes to design and
material specifications.
Safety regulations
5
Safety regulations
• The machine is intended for washing with water only.
• Do not allow children to use the machine.
• Installation and service must be carried out by authorised personnel.
• The machine’s door lock must under no circumstances be bypassed.
• Leaks in the system, e.g. worn door seal, must be repaired immediately.
• The personnel concerned shall study the relevant user instructions and
service manuals before commencing repairs or maintenance.
• Do not hose down the machine with water.
Warnings
The service manual contains the following warnings concerning serious
personal injury. Next to each warning is a reference to the page and
section where the warning text is located in the manual.
DANGER
Take care when measuring the motor control system since all
components have a potential difference of approximately 300V in
relation to protective earth and neutral.
The components will contain dangerous voltages when the green
LED on the motor control board is on.
The motor control system will remain live for 10-30 seconds after
cutting the power to the machine and the motor has stopped
running.
438 9047-01/01
Technical data
7
Technical data
Physical properties
Drum
volume
diameter
depth
Capacity dry weight
fill factor 1:10
fill factor 1:13
Drum rpm
washing
washing, mild and
wool programmes
extraction
l
mm
mm
53
520
365
kg
kg
5.3
4.0
rpm
54
rpm
rpm
35
1300
G-factor
washing
extraction
0.7
425
Dimensions
width
depth
height
mm
mm
mm
595
680
850/875
Free service space,
recommended
side
rear
mm
mm
50
500
kg
99
Weight
net
438 9047-21/01
Technical data
8
Connections
Max floor load when
spin drying
kN
1.2±0.3
Frequency (dynamic load)
kN
1.2±0.3
kPa
kPa
DN20 BSP3/4
200-500
40-1000
mm
l/min
50
160
Water valves
connection
rec. water pressure
pressure limits
Drain valve
outer connection diameter
capacity
438 9047-21/01
Machine presentation
Description
9
1
General Information
Fig.
1
The machine has an electronic program unit with
fixed wash programs that can be changed with
options. The program unit also has an integrated
troubleshooting program for extended possibility
of rational service.
The motor is frequency controlled through an
advanced motor control unit. This offers a very
precise and flexible control of the motor rpm in
each step.
The machine is delivered complete with customer
options for heating with electricity or unheated.
6212
438 9047-41/02
Machine presentation
10
Function
General Information
The machine is freely suspended, which means the outer drum and motor
are mounted on a supporting ”cradle” that rests on four shock absorbers for
dampening the imbalance in the machine.
Fig.
2
The washer drum (inner drum) is belt driven by a motor. This motor is
located at the bottom of the machine and is mounted on the cradle with
a belt tensioner. The inner drum is mounted to the outer drum at the rear
plate with two bearings sealed against leakage with sealing rings.
The drain valve is a water-controlled diaphragm valve alternatively, an
electrical drain valve or drain pump.
The door is of sturdy type that is interlocked with a lock module when in
operation.
The control panel contains a program knob for selecting the fixed wash
programs and a display.
The program unit is mounted inside the control panel. Contactor, water
valves, etc., are located at the back of the machine.
2
1
2
3
4
5
17
CON6
1
1
16
6
1
15
14
7
13
12
8
11
10
1.
Detergent drawer
2.
Water inlet valves
3.
Power supply
4.
I/O-board
5.
Rear electrical module
6.
Motor control
7.
Outer drum
8.
Shock absorber
9.
Motor
10.
Drain valve
11.
Bottom plate
12.
Door
13.
Door lock
14.
Program knob
15.
Display
16.
Control panel
17.
Program unit
9
6211
438 9047-41/02
Machine presentation
Program unit
Fig.
3
11
3
The control panel contains a program knob and a
display. The panel can also be equipped with two
preset buttons.
Program unit
The control panel and display are used by:
• the user to select the machine’s fixed wash
programs, to select up to two options for each
wash program and for information on the wash
process and any fault indicators.
CON6
1
1
• service personnel for navigation and control of
the program unit’s service program.
Fig.
4
1
• programming personnel for setting and
program adjustment in the program unit’s
software.
If present, the preset buttons are used for direct
start of two preset wash programs.
Using information on torque values from the
motor, the weight of each wash is measured
before each wash program in order to adapt the
amount of water used for washing.
The program unit controls the water valves, drain
valve and heating via an I/O board in the rear
electrical module. Control signals to external
units, such as detergent pumps or external water
valves can also be engaged here.
6211
4
1
2
3
4
5
K21
5190
6
1.
Program unit A1
2.
I/O-board A11,
Outputs for water, detergent and drain.
3.
Heater element
4
Water valves
5.
Drain valve
6.
Power supply
438 9047-41/02
Machine presentation
12
Motor and motor control
Fig.
5
Fig.
6
5
1
The washer drum (inner drum) is belt driven by a
frequency controlled motor. The motor is located
on a motor shelf under the outer drum and has
been arranged with a belt tensioner.
Motor control is microprocessor controlled and
can control the acceleration of the drum, its rpm
and its retardation very precisely.
CON6
1
Motor control communicates with the program
unit through a serial interface.
1
1
The machine’s motor and motor control are
described in more detail in the section Motor.
2
1.
Motor control
2.
Motor
6211
6
1
3
2
M1
5189
438 9047-41/02
1.
Program unit A1
2.
Power supply
3.
Motor control U1
Machine presentation
Door lock
Fig.
7
Fig.
8
13
7
The door lock is electromechanical with twin
safety breakers. The lock is bi-stable, i.e. the lock
must be given an active signal from the program
unit to lock as well as unlock the door.
1
A separate circuit integrated in the program unit
checks and controls the locking and unlocking of
the door through a lock module. The circuit has
separate controls that the drum is empty and
that it is stationary. Through sensors in the lock
module, the circuit checks the door’s closed and
locked position. Together with other controls the
program unit conducts, this will guarantee the
door cannot be opened by mistake.
CON6
1
1
1
The machine’s door and door lock are described
in more detail in the section Door and door lock.
2
1.
Program unit
2.
Lock module
6305
8
1
2
5
7
M1
1.
Program unit A1
2.
Temperature sensor B1
3.
Level switch B2
4.
Level switch B4
5.
Motor control U1
6.
Lock module A111
7.
Rotation sensor B3
4
3
6
6303
438 9047-41/02
Machine presentation
14
Heating
Fig.
9
9
Electric heating heats the washing water with two
elements accessible from the rear of the machine.
1
The machine’s heating system is described more
thoroughly in the section Heating.
Water connections
Fig.
9
CON6
1
1
The machine can have one, two, three or four
water inlet valves depending on the machine size
and customer requirements.
1
2
In this unit there are also eight connections for an
external detergent feeder.
Rear electric module
Fig.
10
Contains the main switch or terminal block for
incoming power, heating contactor, I/O board with
outputs for controlling the machine’s water and
drain valves and heating. There are also terminal
blocks for connecting e.g. external detergent
feeder.
6211
1.
Water connections
2.
Heating element
10
1
2
4
3
CON6
1
1
1
6256
438 9047-41/02
1.
Rear electric module
2.
Power supply connection
3.
Distribution board
4.
Contactor K21 (Heat)
Machine presentation
Detergent Drawer
Fig.
11
15
11
The drawer has four compartments for prewash,
main wash, rinse and bleaching agent/liquid
detergent.
1
The machine’s detergent drawer is described
more thoroughly in the section Detergent
drawer.
CON6
1
1
Drain valve
Fig.
11
1
The valve is a diaphragm valve that is opened
and closed through water pressure. The control
valve is mounted by the water valves.
The machine’s drain valve is described more
thoroughly in the section Drain valve.
Frame and suspension
Fig.
11
6211
The machines are freely suspended, i.e. the
drum package can move and is suspended in
relation to the frame. In this way, a minimum
of vibration passes to the bottom plate, which
in turn simplifies installation as a concrete
foundation is not required.
2
3
4
The machine has four shock absorbers between
the bottom plate and the drum package.
The machine’s frame is described more
thoroughly in the section Frame.
5
1.
Detergent drawer
2.
Bottom plate
3.
Drain valve
4.
Shock absorbers
5.
Drum package
438 9047-41/02
Periodic maintenance
17
The following maintenance procedures should be followed to ensure good
and safe operation and to prevent functional disturbances.
The time for maintenance should be adapted to the degree of usage of the
machine.
Daily
• Check door and door lock:
- Leave the door open and try to start the machine. The machine
should not start.
- Close the door, start the machine and try to open the door again. It
should not be possible to open the door until the drum has come to
rest.
- Make sure the door is not leaking.
- Clean the door seal from detergent residue and lint.
• Clean the detergent drawer from residue by rapidly advancing through a
programme and allowing the water to flush it clean.
Every three months
Carried out by authorised personnel only!
• Make sure the drain valve does not leak during the wash.
• Make sure there have not been any leaks from the door.
• Inspect the machine’s drain and remove any lint.
• Inspect inside the machine (in direct connection in a way so that any
leaks are visible) in the following manner:
- Turn off the machine’s main switch.
- Remove the top cover and the protective plates front and rear.
438 9047-61/01
Periodic maintenance
18
- Check that none of the inner hose connections are leaking.
- Check the drive belt and tighten or replace as appropriate (see
section on Motor).
- Make sure water has not leaked onto the floor.
- If the warm-up time has been abnormally long, check the heater
element (see section of Heating). In very hard water, check that there
are no lime deposits on the heater element. If necessary, decalcify the
element. Follow the manufacturer’s recommendations regarding
amount of decalcifying agent to use.
- Never turn on the heater element without water in the machine. This
will trigger the fusible cut-out.
- Check the shock absorbers.
438 9047-61/01
Troubleshooting
19
General information on troubleshooting
The troubleshooting section is used to trace faults in the machine to a
defective component or unit.
There is a memory in the program unit that will save the selected program
for approx. 3-5 minutes in the case of power cuts.
The machine will restart automatically if the power is turned on again within
this time.
Safety regulations
Troubleshooting may only be carried out by authorised personnel.
Observe the safety regulations in chapter 1 before commencing
troubleshooting.
Take care during all work on the machine while the power is on.
DANGER
Take care when measuring the motor control system since all components have a potential difference of approximately 300V in relation
to protective earth and neutral.
The components will contain dangerous voltages when the green
LED on the motor control board is on.
The motor control system will remain live for 30-60 seconds after
cutting the power to the machine and the motor has stopped running.
Measurements
For information on measuring points, components and voltages, please
refer to the relevant wiring diagram for the machine in question.
438 9047-81/02
Troubleshooting
20
Faults with fault code
Illustration
1
A fault in the program or in the machine is indicated on the display
by an error message comprising an error code and a descriptive text.
1
Fault code
FAULT
001
NO WATER
6204
Fault code
The following is a brief description of all fault codes. The following pages
describe fault codes, possible causes and corrective measures for each
code.
Fault code
Text message
001
No water
002
Door open
003
Door lock fault
004
NTC low temp
005
NTC high temp.
006
Water in drum
007
Drum overflow
008
No heat
009
Klixon
010
Drum not empty
011
Imbal. to prog. start
438 9047-81/02
Troubleshooting
21
Fault code Text message
012
Program fault
013
No motor comm.
014
Level adjust.
015
Emergency stop
017
Door lock
018
MIS/CMIS approval
019
Master comm.
020
I/O Interlock
021
I/O Communication
022
Oil
023
No I/O address.
024
Checksum from DLCU
027
Level offset
028
CPU/DLCU low level
031
Cool flange high temp
032
Motor too hot
033
No interlock
035
Short in motor
036
Interlock hardware
037
Low DC voltage
038
High DC voltage
043
Imbal. switch RDC/MCU on
044
RPM too high
045
Motor not following
051
Checksum from CPU
052
Arming circuit
053
CPU/DLCU high level
054
Tacho, no should rotate
056
Should rotate lock open
058
Should rotate no tacho
060
Actuator circuit
062
Water, door unlocked
438 9047-81/02
Troubleshooting
22
General
2
This programming manual is intended for personnel with the authority to adjust parameters in
the machine’s existing wash programs,
programming slot meters, reading statistics and
configuring certain machine interfaces with the
user. Programming is achieved using menus in
the display while the machine is in service mode.
Engaging servicemode
Service mode is engaged by using one of the
following alternative:
Fig.
2
Alt. 1 Service switch on the CPU board under
the top cover on the front of the machine.
CON6
1
1
1
6242
Alt. 2 Service switch on the I/O board at the rear
of the machine to the right of the electrical
connection.
Press the service button about 2 sec.
Fig.
3
The machine software will now switch to its
service mode. The display lists the submenus
available in this mode.
This programming manual describes the
functions and programming instructions for
the following submenus:
•
•
•
•
•
Service button
PARAMETER PROGR.
STATISTICS
ADJUST DISPLAY
RESET TO FACTORY
QUICK START BUTTONS
CON6
1
1
1
6256
For other submenus, please refer to the service
manual.
Fig.
4
3
To save changes to the machine’s flash memory,
they must be confirmed in a menu that is displayed automatically whenever a change has
been made and you are exiting the menu.
MAIN MENU
01.00.00.00
SERVICE
PARAMETER PROG
STATISTICS
CONFIG 1
CONFIG 2
6204
4
SAVE TO MEMORY
YES
6204
438 9047-81/02
Troubleshooting
23
Description of fault codes and causes
Fault code 01, NO WATER
This fault code is generated by the programming CPU card.
When filling with water, the level specified by the wash program must be
attained within a certain time. This time is normally set to 10 minutes but
can vary depending on the type of machine and the software. If the filling
time eceeds the maximum allowed filling time, fault code 01 will be
displayed.
Long filling times can be caused by a blocked filler valve, defective filler
valve, a break in the cable between the filler valve control board, defective
valve control board, leaking level system, etc.
Fault code 02, DOOR OPEN
This fault code is generated by the programming CPU card. The fault code
can only arise during an on-going wash program.
This fault code will be displayed if the input for closed door signals that the
door has been opened during an on-going wash program.
This can be caused by a bad or defective door lock, loose cable to door
lock, problem with door lock edge connection.
Fault code 03, DOOR LOCK ERROR
This fault code is generated by the programming CPU card. The fault code
can arise at program start. If the door lock doesn't lock within a certain time
after program start, this fault code will be shown.
This fault code will be displayed if the door lock for closed door signals that
the door has been unlocked during an on-going wash program.
This can be caused by a bad or defective door lock, loose cable to door
lock, problem with door lock edge connection.
438 9047-81/02
Troubleshooting
24
Fault code 04, NTC LOW TEMP
This fault code is generated by the programming CPU card. This fault code
is displayed if the temperature around the NTC sensor is below approx. -9
degrees C.
A low temperature means the resistance in the sensor is too high, above
approx. 23.7 kohm. This can be because the machine has been standing
outdoors, an open circuit in the sensor, a break in the cable to the sensor,
etc.
The resistance should be as shown in the table below:
Approximate values of a fault free temperature sensor
T (°C)
R (ohm)
19
6100
20
5850
21
5600
22
5350
23
5100
Fault code 05, NTC HIGH TEMP
This fault code is generated by the programming CPU card. This fault code
is displayed if the temperature around the NTC sensor exceeds +98
degrees C.
A high temperature means the resistance in the sensor is too low, lower
than approx. 350 ohm. This can be caused by a short circuit in the sensor,
break in the cable to the sensor, etc.
Fault code 06, WATER IN DRUM
This fault code is generated by the programming CPU card. The fault code
arises when rapid advancing to program end.
438 9047-81/02
Troubleshooting
25
Action:
• Check drain for dirt.
• Blow through the level hose and check that it is not blocked and does not
contain any water.
• Check in the service program that the level control is working correctly.
Fault code 07, DRUM OVERFULL
This fault code is generated by the programming CPU board. The fault code
arises if the drum has been filled with water above a predetermined level
during an on-going wash program. It can be caused by a blocked level
hose, drops of water in the level tube, defective filler valve, defective filler
control, etc.
Action:
• Blow through the level hose and check that it is not blocked and does not
contain any water.
• Check in the service program that the level control is working correctly.
• Check using the service program that all the water valves are working
correctly.
Fault code 08, NO HEAT
This fault code is generated by the programming CPU board. The fault code
means that the temperature is rising too slowly when heating is active. The
limit for this fault code is normally set to a water temperature increase of
approx. 3°C per 10 minutes but can vary depending on the type of machine
and the software.
The fault code can be caused by a defective heater element, a break in the
power supply to the heater element, defective heater contactor, etc.
438 9047-81/02
Troubleshooting
26
Fault code 09, KLIXON
This fault code is generated by the programming CPU board. The fault code
means that the temperature in the motor has been so high that the klixon
breaker in the motor has been triggered. It can be caused by overloading
the motor due to an overloaded drum, low rpm for long periods, defective
klixon breaker in motor, short in cable between motor and CPU board, etc.
Fault code 10, DRUM NOT EMPTY
This fault code is generated by the programming CPU card. The fault code
arises if the water in the drum is not below a predetermined level when a
drain period has been completed in the wash program. It can be caused by
a blocked drain, blocked level hose, a water drop in the level hose, defective
level control, restricted drain lines to the machine, too many machines
emptying simultaneously into drain pipes that are too narrow, etc.
Action:
• First check the drain installation and that the waste water can flow freely
out from the machine without any restrictions.
• Check the drain valve in the machine with regard to dirt.
• Blow through the level hose and check that it is not blocked and does not
contain any water.
• Check in the service program that the level control is working correctly.
Fault code 11, IMBAL. TO PROG. START
This fault code is generated by the programming CPU board. The fault code
means that the mechanical imbalance breaker is already active when the
wash program starts. It can be caused by a defective imbalance breaker,
mechanical problem making the imbalance breaker always active, short in
the edge connection or cables, etc.
438 9047-81/02
Troubleshooting
27
Fault code 12, PROGRAMME ERROR
This fault code is generated by the programming CPU board. This fault code
means that one of the CPU board memories can be defective.
Action:
• Try reloading the software into the machine memory. If this does not
help, the CPU board will have to be replaced.
Fault code 13, NO MOTOR COMM.
This fault code is generated by the programming CPU board. The fault code
arises if the CPU board cannot communicate with motor control via the
communication cable.
Actions:
• Check that there is power reaching the motor control.
• Then check that the indicator LED on the motor control is on. The LED
can be seen by looking down by the motor control edge connections.
• Check also that the communication cable between the CPU board and
the motor control is intact and not damaged. Measure also with a
reference instrument to see whether there is contact between all the
leads in the communication cable.
Fault code 14, LEVEL ADJUST
This fault code is generated by the programming CPU board. The fault code
arises if the circuit board’s internal level system has not been calibrated by
the manufacturer.
438 9047-81/02
Troubleshooting
28
Fault code 15, EMERGENCY STOP
This fault code is generated by the programming CPU board. The fault code
arises if the emergency stop switch has been activated on the machine.
The cause can be inadvertent activation of the emergency stop, defective
emergency stop switch, incorrect or shorted cable, etc.
Fault code 17, DOOR LOCK
This fault code is generated by the programming CPU card. The fault code
arises if the door lock is locked at the start of the wash program, i.e. that the
door is locked although the CPU board has not requested locking. This fault
code will be shown if one try to start a program when the DLCU has given a
fault code.
Fault code 18, MIS/CMIS APPROVAL
The machine’s program unit has been disabled by a superior monitoring
system.
Actions
• Get in touch with the supplier of the monitoring system for possible
causes of the monitoring system disabling operation of the wash
machine.
Fault code 19, MASTER COMM.
Communication with superior system has been broken. The cause can be a
fault in the network connections, damaged cable, defective monitoring
system, etc.
Action:
• Firstly, contact the supplier of the monitoring system for possible causes
of the monitoring system not communicating.
438 9047-81/02
Troubleshooting
29
Fault code 20, I/O INTERLOCK
This fault code is generated by the programming CPU board. The program
controller has read from the motor control or I/O board that the interlock is
not active. The reason for interlock failure can be a problem with the hatch
lock, damaged motor supply cables or the I/O board with interlock voltage
etc. The most probable fault source is the I/O board.
Fault code 21, I/O COMMUNICATION
This fault code is generated by the programming CPU board. The program
unit cannot communicate any longer with one or more I/O boards in the
machine that it has communicated with before. The cause can be a problem
with the machine’s internal communication cables or that one or more I/O
boards have lost their address.
Action:
• (Requires password) Check the machine’s internal communication
cables. Readdress all the I/O boards in the system using the service
program if the cables are not at fault.
Note.
If only one I/O-card in mascine, press the service button about 10 seconds
or untill the LED goes out. Now I/O.card 1 will be addressed as No. 1.
Fault code 22, OIL
This fault code is generated by the programming CPU board. The fault code
indicates low oil level in the oil reservoir for the oil lubrication. It can be
caused by a lack of oil, defective sensor, shorted cable, etc.
Action:
• Fill with oil first. If this does not help, check sensor and cables.
438 9047-81/02
Troubleshooting
30
Fault code 23, NO I/O ADDRESS.
The fault code means that there is no I/O board addressed in the system at
all.
Action:
• (Requires password) Readdress the existing I/O board from the service
menu.
Fault code 24, CHECKSUM FROM DLCU
This fault code is generated by the programming CPU board. The program
unit has detected a fault in the internal communication on the CPU board.
Action:
• Replace the CPU board.
Fault code 27, LEVEL OFFSET
This fault code is generated by the programming CPU board. The fault code
arises if the level system indicates a level at the start of the wash program
(when the drum should be empty) that exceeds what the program unit can
compensate for automatically. This can be caused by blocked drain, blocked
level hose, a drop of water in the level hose, leaking level system, defective
level control, etc.
Action:
• Check drain for dirt.
• Blow through the level hose and check that it is not blocked and does not
contain any water.
• Check in the service program that the level control is working correctly.
438 9047-81/02
Troubleshooting
31
Fault code 28, CPU/DLCU LOW LEVEL
The DLCU contains a mechanical level monitor which ensures that there is
no water in the machine when the lock opens. To ensure that the level
monitor functions correctly, the mechanical level monitor is compared with a
nominal value generated by the CPU, which is compared with the electronic
level check.
When the water level exceeds the nominal value, a check is made to ensure
that the mechanical level monitor is switched on, and if so, a fault code is
generated.
Reason:
• The level controller can be damaged:
• Cross talk in the level controller electrical system.
• Leakage in the level controller’s air hoses.
• Incorrect nominal value, possibly caused by a fault in the electronic level
controller.
Action:
• Check the level controller function. (Switch-on level = 40 mm, switch-off
level = 15 mm Wg)
• Check the cables and their connections. The voltage across the level
controller should be 0 V when the water level is < 15 mm Wg and 5 V
when water level is > 40 mm Wg.
• Check that the level hoses are not blocked. Blow clean all the hoses in
the level system.
Fault code 31, COOL FLANGE HIGH TEMP.
This fault code is generated by the motor control. There is a temperature
sensor (NTC) mounted on the motor control cooling flange next to the
power transistors in the output stage. If the temperature of the cooling
flange gets too high (> 90°C) the fault code will be set to protect the
transistors.
438 9047-81/02
Troubleshooting
32
The cause of high cooling flange temperature can be e.g. a stiff drum in
combination with intensive use and high ambient temperature. There may
also be a fault in the motor (sticking bearings or short circuit in windings,
which impairs the efficiency of the motor). There may also be a fault in the
motor control temperature measuring circuits.
Actions:
• Make sure the drum turns easily.
• Check the value on the fault code counter for fault code 31.
• Check the last 8 motor control fault codes. Start a 90 •C normal program
with load on continuous operation and measure the temperature of the
motor and motor control.
• Replace the defective part.
Fault code 32, MOTOR TOO HOT
This fault code is generated by the motor control. Each time the motor is
started from stationary, the motor control will first measure the resistance
between two phases in the motor. The motor control processor governs the
output transistors so that a determined DC current flows between two
phases in the motor winding. The actuation of the transistors is a measure
of the voltage applied to the winding and the resistance can be calculated
using the current and voltage values. The resistance can then be converted
to a temperature since the winding resistance at 20°C and the temperature
coefficient are known. If the average value of the four latest temperature
readings is higher than the maximum motor temperature (e.g. 130°C), the
”Motor too hot” fault code will be activated.
The cause of high motor temperature can be a stiff drum, possibly in
combination with intensive use and high ambient temperature. There may
also be a fault in the motor (sticking bearings or short circuit in windings,
which impairs the efficiency of the motor). There could also be a contact
fault in the connectors between the motor control and the motor or a fault in
the motor cable. A fault in motor control temperature measurement circuits
can also occur.
438 9047-81/02
Troubleshooting
33
Actions:
• Make sure the drum turns easily.
• Check the value on the fault code counter for fault code 32.
• Check the last 8 motor control fault codes.
• Measure the three phases to the phase resistors on the motor control
motor connector (disconnect motor control and take the reading in the
cable connector) to make sure they are the same.
• Start a 90°C normal program with load on continuous operation and
measure the temperature of the motor and motor control.
• Replace the defective part.
Fault code 33, NO INTERLOCK
This fault code is generated by the motor control. The motor control must be
powered with 230V/50 Hz on the interlock input in order to drive the motor.
This signal is confirmation that the door is closed and locked. Motor control
receives its commands to rotate the drum from the timer via a serial
communication link between the motor control and timer. Since the timer
also has access to the interlock signal, the timer must never send a run
command to the motor control if the interlock signal is missing. If this does
happen, the ”No interlock” fault code will be activated.
The cause of this fault code being activated can be e.g. a break in the cable
leading the interlock signal to the motor control. There may also be a fault in
the connector in the door lock, which connects 230V/50Hz to the interlock
signal. A fault in the interlock circuits of the motor control can also set this
fault code.
Actions:
• Use a measuring instrument to check that the interlock signal comes on
X302:1-2 when the door lock is activated. Read also bit 1 in the second
bye under ”Motor Status” in the service program (the bits are numbered
from 0 to 7 where bit 0 is on the far right). If bit 1 in the second byte is 1
then the lock is open, while a 0 indicates that the lock is closed.
• Replace the defective part when it has been located.
438 9047-81/02
Troubleshooting
34
Fault code 35, SHORT CIRCUIT MOTOR
This fault code is generated by the motor control. The motor control reads
the power consumption of the motor continuously. If the current for some
reason gets too high (= exceeds a certain limit), the motor control will cut
the current to the motor. After the motor has stopped (= tachometer
indicates stationary motor), the motor control will attempt to restart it. If the
motor control then detects high motor current again, the ”Short circuit
motor” fault code will be activated. If on restarting after a first short circuit,
the motor control rotates normally, a fault code will not be activated.
This fault code can be activated for a number of reasons:
• Short circuit in motor
• Short circuit internally in motor winding (impaired efficiency, higher
current consumption)
• Short circuit in motor cables
• Short circuit in connectors
• Drops of water causing short circuits in the motor connector
• Short circuit in the motor control output transistors
• Bad contact in tacho signal
• Bad contact in interlock signal
Actions:
If the fault is a stable one, it is generally not difficult to locate the defective
unit through resistance measurement and testing with the service program.
Further information can be obtained by studying the contents of ”MCU
FAULT LOGGER”. Study the following:
• SHORT CIRCUIT 2 (specifies how many times fault code 35 has been
active)
• SHORT CIRCUIT 1 (specifies how many times the current limit has been
exceeded. The difference between short circuit 1 and short circuit 2
indicates how many times there has been a short circuit 1 that has not
been confirmed when restarting the motor).
• LAST FAULT CODE N/8 (shows the 8 latest fault codes)
• TACHO CUT-OUT LOW RPM (can give a clue in case of intermittent
faults)
• TACHO CUT-OUT HIGH RPM (can give a clue in case of intermittent
faults)
438 9047-81/02
Troubleshooting
35
Fault code 36, INTERLOCK HARDWARE
This fault code is generated by the motor control. The motor control must be
powered with 230V/50 Hz on the interlock input in order to drive the motor.
The interlock circuits in the motor control have been split into two channels
so that a component fault in motor control cannot give a false confirmation
that the door is locked. These two channels are checked against each other.
If this check gives an incorrect result, the ”INTERLOCK HARDWARE” fault
code will be activated.
The reason for this fault code being activated can be attributed to a fault in
the interlock circuits in motor control.
Action:
• Replace motor control.
Fault code 37, LOW DC VOLTAGE
This fault code is generated by the motor control. Motor control reads the
voltage across the bulk capacitors (DCBUS voltage) continuously. If the
voltage becomes too low (= below a certain limit), the motor control will cut
the current to the motor. Once the motor has stopped (= tacho sensor
indicates stationary motor), the motor control will check to see whether the
low DCBUS voltage remains. If this is the case, the ”LOW DC VOLTAGE”
fault code will be activated.
The reason for this fault code being activated can be low mains voltage or
that the machine’s on/off switch has been operated in an unsuitable
manner. Further information can be obtained by studying the contents of
”MCU FAULT LOGGER”:
• UNDERVOLTAGE 2 (specifies how many times fault code 37 has been
active)
• UNDERVOLTAGE 1 (specifies how many times the voltage has dropped
below the limit. The difference between undervoltage 1 and undervoltage
2 indicates how many times there has been an undervoltage 1 without it
being confirmed when the motor has stopped).
• LAST FAULT CODE N/8 (shows the 8 latest fault codes)
438 9047-81/02
Troubleshooting
36
Undervoltages can be registered even during normal operation.
Consequently, a small number of registrations need not mean that there is
a fault in the motor control.
Measure:
• Check that the supply voltage is stable and never drops below nominal
voltage - 10%.
• Check that the fuses and cables are not faulty.
• Check the supply voltage in the network cabling and at the motor control
system in the machine.
Fault code 38, HIGH DC VOLTAGE
This fault code is generated by the motor control. The motor control reads
the voltage across the bulk capacitors (DCBUS voltage) continuously. If the
voltage becomes too high (= exceeds a certain limit), the motor control will
cut the current to the motor. Once the motor has stopped (= tacho sensor
indicates stationary motor), the motor control will check to see whether the
high DCBUS voltage remains. If this is the case, the ”HIGH DC VOLTAGE”
fault code will be activated.
The reason for this fault code being activated can be high mains voltage
(e.g. power surge). Further information can be obtained by studying the
contents of ”FC FAULT LOGGER”:
• OVERVOLTAGE 2 (specifies how many times fault code 38 has been
active)
• OVERVOLTAGE 1 (specifies how many times the voltage limit has been
exceeded. The difference between overvoltage 1 and overvoltage 2 gives
the number of times overvoltage 1 has occurred without it being
confirmed when the motor has stopped).
• LAST FAULT CODE N/8 (shows the 8 latest fault codes)
Overvoltage registrations can also occur if there is a bad contact in the
tacho signal. Check also the following registers:
• TACHO CUT-OUT LOW RPM (number of short tacho interruptions
during wash rpm)
• TACHO CUT-OUT HIGH RPM (number of short tacho interruptions
during extraction rpm)
Action:
• Check the tacho cables if there are many registrations in the TACHO
CUT-OUT registers.
438 9047-81/02
Troubleshooting
37
Fault code 45, MOTOR NOT FOLLOWING
This fault code is generated by the motor control. The motor control must
always receive information on the rotation of the motor from the tacho
sensor in order to rotate. If the tacho sensor is not working, the motor can
rotate for max. 10 seconds during the starting process. After this period, the
”MOTOR NOT FOLLOWING” fault code will be activated.
Reasons for this code being activated can be:
• Break in the cables between the tacho sensor and the motor control
• Break in connectors in tacho cables
• Break in one of the phases to the motor (cables or connectors). This fault
can be suspected if the motor does not rotate for 10 seconds (the motor
will not start with only two phases).
• Fault in tacho generator
• Fault in tacho circuits in the motor control
Further information can be obtained by studying the contents of ”FC FAULT
LOGGER”. Study the following:
• MOTOR NOT FOLLOWING (specifies how many times fault code 45 has
occurred)
• LAST FAULT CODE N/8 (shows the 8 latest fault codes)
• TACHO CUT-OUT LOW RPM (can give a clue in case of intermittent
faults)
• TACHO CUT-OUT HIGH RPM (can give a clue in case of intermittent
faults)
Action:
• Replace the defective part when troubleshooting is complete.
Fault code 51, CHECKSUM FROM CPU
DLCU has detected a fault in the internal communication between DLCU
and CPU. The DLCU processor will reset itself when the fault has
disappeared.
CPU reads the fault message when the program starts and finishes and
generates a fault code, the fault message is ignored between these two
occasions.
438 9047-81/02
Troubleshooting
38
Reason:
Strong interference from surrounding equipment etc. can cause fault codes.
Action:
Re-set the fault codes. If the fault codes can not be re-generated or if they
return, rectify the adjacent equipment that causes the interference. If this
does not help, try changing the CPU board, since the interference
sensitivity of different CPU boards can vary to some extent.
Fault code 52, ARMING CIRCUIT
DLCU contains an arming circuit that is charged when the door lock coil is
to be activated. For safety reasons, this arming circuit must be discharged
when the door lock coil is not to be activated.
If the arming circuit for operating the door lock is charged when it is not
supposed to be, a fault message will be sent to the CPU processor. If the
fault ceases, the message will not be sent to the CPU.
CPU reads the fault message when the program starts and finishes and
generates a fault code, the fault message is ignored between these two
occasions.
Cause:
• The error can have been caused by overloads and/or defective
components in the DLCU, or caused by defective components in the
CPU.
Measure:
• If the error cannot be corrected, replace the CPU unit.
Fault code 53, CPU/DLCU HIGHLEVEL
The DLCU contains a mechanical level monitor which ensures that there is
no water in the machine when the lock opens. To ensure that the level
monitor functions correctly, the mechanical level monitor is compared with a
nominal value generated by the CPU, which is compared with the electronic
level check.
When a program starts or terminates, a check is made to ensure that the
mechanical level monitor is switched off, and if this is not the case, a fault
code is generated.
438 9047-81/02
Troubleshooting
39
Reason:
• The level controller can be damaged:
• Open circuit in the cables for the level controller.
• Blocked air hoses in the level controller system.
Action:
• Check the level controller function. (Switch-on level = 40 mm, switch-off
level = 15 mm Wg)
• Check the cables and their connections. The voltage across the level
controller should be 0 V when the water level is < 15 mm Wg and 5 V
when water level is > 40 mm Wg.
• Check that the level hoses are not blocked. Blow clean all the hoses in
the level system.
Fault code 54, TACHO, NOT SHOULD ROTATE
DLCU counts the tacho pulses from the motor in order to guarantee that the
drum is stationary when the door is opened. To ensure that the signal from
the tacho generator is working correctly, DLCU compares the tacho signal
to a default value from the CPU processor, which is due to the CPU having
activated the motor. The tacho signal should always correspond to the
default value and if the tacho signal is present without the default value, a
fault message will be generated to CPU.
The fault message is filtered in such a way that the drum must rotate and
stop twice without the ”should rotate” signal being present before a fault
message is sent to CPU.
The DLCU processor will reset itself when the fault has disappeared.
CPU reads the fault message when the program finishes and generates a
fault code, the fault message is ignored between these two occasions.
Reason:
The fault can be caused by cross talk in circuits in the CPU, or caused by
damaged components in the CPU.
Action:
If the fault returns after a reset, change the CPU.
438 9047-81/02
Troubleshooting
40
Fault code 56, SHOULD ROTATE LOCK OPEN
DLCU counts the tacho pulses from the motor in order to guarantee that the
drum is stationary when the door is opened. To ensure that the signal from
the tacho generator is working correctly, DLCU compares the tacho signal
to a default value from the CPU processor, which is due to the CPU having
activated the motor.
If the default value is on when the door lock is unlocked, a fault message
will be sent to CPU.
The DLCU processor will reset itself when the fault has disappeared.
CPU reads the fault message when the program finishes and generates a
fault code, the fault message is ignored between these two occasions.
Reason:
The fault can be caused by cross talk in circuits in the CPU, or caused by
damaged components in the CPU.
Action:
If the fault returns after a reset, change the CPU.
Fault code 58, SHOULD ROTATE NO TACHO
DLCU counts the tacho pulses from the motor in order to guarantee that the
drum is stationary when the door is opened. To ensure that the signal from
the tacho generator is working correctly, DLCU compares the tacho signal
to a default value from the CPU processor, which is due to the CPU having
activated the motor. The tacho signal should always correspond to the
default value and if the tacho signal is not present when the default value is
present, a fault message will be generated to CPU.
The fault message is filtered in such a way that the default value should
438 9047-81/02
Troubleshooting
41
have been on for 2 seconds; if this is the case, a check is made that the
pulses from the tacho sensor are present when the default value ceases.
The DLCU processor will reset itself when the fault has disappeared.
CPU reads the fault message when the program finishes and generates a
fault code, the fault message is ignored between these two occasions.
Reason:
• The fault can be caused by breaks in the circuits for the tacho sensor, or
caused by a fault in the magnet in the tacho sensor.
• Collateral damage due to a fault in the motor system.
Action:
• If there is no fault in the tacho sensor or the motor system, and the fault
returns after a reset, change the CPU.
Fault code 60, ACTUATOR CIRCUIT
The DLCU processor controls the door lock actuator coil. The DLCU
processor checks continuously that the coil is engaged. DLCU can detect a
break in the circuit (>100kohm) (DLCU cannot detect a short in the circuit).
If there is a break in the actuator circuit, CPU will be notified; the fault
message will disappear if the fault ceases.
CPU reads the fault message when the program starts and finishes and
generates a fault code, the fault message is ignored between these two
occasions.
Reason:
• The fault can be caused by a break in the cables between the hatch lock
and the CPU, or caused by a fault in the hatch lock solenoid.
• Fault or break in the CPU circuits.
Action:
• If the fault returns after a reset, and is not caused by a fault in the hatch
lock or the cables for the hatch lock, change the CPU.
438 9047-81/02
42
438 9047-81/02
Troubleshooting
Program unit
Description
43
1
General Information
Fig.
The program unit is electronic and comprises a
circuit board containing microprocessor, program
memory, current regulating circuits, temperature
and level control, etc.
1
Fig.
The program unit receives its power from a
separate voltage unit.
2
The program unit receives information from the
temperature sensor, door lock and level switches.
There is also a serial interface to the motor
control.
The program unit controls the water and drain
valves and the heating via the I/O board, door
closing/opening via a drum module and the motor
via the motor control.
CON6
1
1
1
6211 6207
2
1
2
5
9
7
E1, E2
3
4
11
10
6301
6
8
M1
12
13
K21
14
1.
Program unit A1
8.
Rotation sensor B3
2.
Temperature sensor B1
9.
Door lock module
3,
Level switch B2
10.
Voltage unit A105
4,
Level switch B4
11.
I/O board A11
5.
Display
12.
Watervalves
6.
Heater element
13.
Drain valve
7.
Motor control U1
14.
Power supply
438 9048-01/02
Program unit
44
Inputs and outputs
Fig.
The program unit board has the following inputs and outputs:
3
Board connector
Function
Con 1
Input from temperature sensor
Con 2
D-bus
Con 3
D-bus
Con 4
Tacho
Con 5
M-com, Motor control unit
Con 6
P-load
Con 7
Input, Level switches
Con 8
Serial communication, RS 232
Con 9
Input, Emergency stop
Con 10
Input, Free wash (key switch)
Con 11
Input, Slot meter
Con 12
Input, Inp
Con 13
Output, Service button in rear electric module
Con 14
Control knob, pulses
Con 15
Control knob, switch
Con 16
Display
Con 17
Input, Buzzer
Con 18
Counter
Con 19
Door, out
Con 20
Door, in
Con 21
P-bus
Con 22
P-bus
3
Con 2
Con 1
Con 4
Con 3
Con 5
Con 6
Con 8
Con 7
Con 10
Con 9
Con 12
Con 11
Con 13
Con 22
Con 21
Con 20
Con 19
6207
Con 18 Con 17
1.
CPU reset
2.
DLCU reset
438 9048-01/02
Con 16
2
Con 15
Con 14
1
Program unit
45
Menu tree
The machine software is constructed with menus that are structured
according to the menu tree below. The menus become available when the
machine is in service mode, see under the heading ”Engaging service
mode”.
SERVICE
ACTIVATE OUTPUTS
SHOW INPUTS
ARTICLE NUMBER
SHOW DLCU COM.
RESET DLCU
SHOW MCU COM.
RESET MCU
SHOW SINGLE
SHOW COM.PORTS
WEIGHT CALIBRATION
MEASURE WEIGHT
MEASURE UNBALANCE
DISPLAY TEST
See programming manual
MAIN MENU
SERVICE
PARAMETER PROG.
STATISTICS
CONFIG 1
CONFIG 2
ADJUST DISPLAY
RESET TO FACTORY
ACTIVATE WASH PROGR.
QUICK START BUTTONS
I/O ADDRESS
See programming manual
Not used
See programming manual
See programming manual
ACTIVATE WASH PROGR.
G01
G01
G01
G01
G01
G01
NORMAL 40
NORMAL 60
NORMAL 95
SYNTHETIC 40
DELICATE 30
HANDWASH
See programming manual
I/O ADDRESS
I/O BOARD 1
I/O BOARD 2
I/O BOARD 3
I/O BOARD 4
I/O BOARD 5
I/O BOARD 6
I/O BOARD 7
I/O BOARD 8
I/O BOARD 9
I/O BOARD 10
REMOVE I/O BOARD
CONFIG 1
PAUSE PERMITTED
RAPID ADVANCE
NEW PROG. SELECT
SHOW TIME
SHOW TEMP
SHOW IS LEVEL
MACHINE HEATED
HEATING RELAY ON
TEMP CONTROL WATER
SHOW °C
DELAYED START
AUTO RESTARTS
AUTO START PAID
AUTO PROG. PAID
SHOW COIN COUNTER
SHOW HOUR COUNTER
SHOW PROG. COUNTER
BUTTON CLICK
FLASH LIGHT ON
HEAT ERROR ON
SHOW MODULE NUMBER
AUTO PROG SELECT
MEASURE WEIGHT
POWER CTRL HEAT
POWER CTRL EXTRACT
BLOCK START ACTIVE
DEFAULT LANGUAGE
LANGUAGE TIMEOUT SEC.
COIN VALUE 1
COIN VALUE 2
TIMEOUT, DISPLAY, SEC
TIMEOUT,END BUZZ. SEC
TIMEOUT,PAUS BUZZ. SEC
MAX FILL TIME, SEC
6. WATER IN DRUM
7. DRUM OVERFILLED
10. DRUM NOT DRAINED
MACHINE ADDRESS
PASSWORD
SHOW WEIGHT TIME, SEC
MAXDIFF.WASH TIME MIN
DEFAULT HEAT
BACK LIGHT TIME SEC.
OFFS.LEVEL READING MM
DISPLAY WARNING, SEC
COLON WHEN PRICE
FLUSH DELAY, LIQ. SEC
FLUSH ON, LIQ. SEC
FLUSH DELAY, POWD.SEC
FLUSH ON, POWD.SEC
LEVEL COOL DOWN, SCU
COOL STEP TEMP
COOL MIDDLE TEMP
438 9048-01/02
Program unit
46
Engaging servicemode
4
Service mode is engaged by using one of the
following alternative:
Alt. 1 Service switch on the CPU board under
the top cover on the front of the machine.
Fig.
4
Fig.
5
Alt. 2 Service switch on the I/O board at the rear
of the machine to the right of the electrical
connection.
Press the service switch for about 2 seconds.
The machine software will now switch to its
service mode. The display lists the submenus
available in this mode.
CON6
1
1
1
This service manual describes the functions and
programming instructions for the following
submenus:
•
•
•
•
6242
SERVICE
CONFIG 1
ACTIVATE WASH PROGR.
I/O ADDRESS
For other submenus, please refer to the
programming manual.
Fig.
6
To save changes to the machine’s flash memory,
they must be confirmed in a menu that is
displayed automatically whenever a change has
been made and you are exiting the menu.
Service button
CON6
1
1
1
6256
5
MAIN MENU
01.00.00.00
SERVICE
PARAMETER PROG
STATISTICS
CONFIG 1
CONFIG 2
6204
6
SAVE TO MEMORY
YES
6204
438 9048-01/02
Program unit
Service program
47
7
The service program is used to facilitate
troubleshooting the machine. Using this program
you can:
MAIN MENU
01.00.00.00
SERVICE
PARAMETER PROGR.
STATISTICS
CONFIG 1
CONFIG 2
ADJUST DISPLAY
• control the machine functions individually
• check the sensor signals to the CPU
• check the communication in the machine
control system
6204
• calibrate the weighing function
• weigh and measure unbalance
8
• check the display
Fig.
7
*SERVICE*
01.01.00.00
ACTIVATE OUTPUTS
SHOW INPUTS
ARTICLE NUMBER
SHOW DLCU COM.
RESET DLCU
Engage service mode, mark the SERVICE row in
the main menu and press the knob.
The display will now show the different submenus
in the service program.
Fig.
8
•
•
•
•
•
•
•
•
•
•
•
•
•
ACTIVATE OUTPUTS
SHOW INPUTS
ARTICLE NUMBER
SHOW DLCU COM.
RESET DLCU
SHOW MCU COM.
RESET MCU
SHOW SINGLE
SHOW COM.PORTS
WEIGHT CALIBRATION
MEASURE WEIGHT
MEASURE UNBALANCE
DISPLAY TEST
6204
Select the desired menu and press the knob.
438 9048-01/02
Program unit
48
ACTIVATE OUTPUTS
Fig.
9
9
Select the ACTIVATE OUTPUTS row and press
the knob.
*SERVICE*
01.01.00.00
ACTIVATE OUTPUTS
SHOW INPUTS
ARTICLE NUMBER
SHOW DLCU COM.
RESET DLCU
The display now shows the functions (outputs)
that can be activated.
Fig.
10
•
•
•
•
•
•
•
•
•
•
•
•
•
•
•
•
•
•
•
•
•
•
•
•
•
•
•
•
•
DOOR
NORMAL DRAIN
DRAIN A-D
COLD WATER
HOT WATER
HARD WATER
TANK 1-4 WATER
HEAT 1
HEAT 2
HEAT 3
POWDER DETERGENT
LIQUID DETERGENT
INTERLOCK MOTOR
PROGRAM RUN
MACHINE FREE
DRUM CW
DRUM CCW
DISTRIBUTION
LOW EXTRACT
MEDIUM EXTRACT
HIGH EXTRACT
TURBO EXTRACT
CLUTCH
START CAP. RELAY
BUZZER
FLASH LIGHT
OIL PULSE
SLOT BLOCKING
LCD BACK LIGHT ON
Select the desired function and press the knob.
Several outputs can be activated simultaneously.
An activated output is indicated by a filled box to
the right.
438 9048-01/02
6204
10
ACTIVATE OUTPUTS
01.01.01.00
DOOR
NORMAL DRAIN
DRAIN A-D
COLD WATER
HOT WATER
6204
Program unit
SHOW INPUTS
Fig.
11
Fig.
12
49
11
Select the SHOW INPUTS row and press the
knob. The display now shows the sensor signals
(inputs) that can be activated.
•
•
•
•
•
•
•
•
•
•
•
•
•
•
•
•
•
•
•
•
•
•
•
•
•
•
•
•
•
•
•
•
•
•
•
•
•
•
•
•
•
•
•
•
•
•
•
•
•
•
•
•
•
COUNT 1
DOOR LOCK
DOOR CLOSED
START BUTTON CPU
SERVICE BUTTON
PRICE PROGRAMMING
PRICE REDUCTION
FREE WASH
COIN 1
COIN 2
EMERGENCY STOP
ALTER. HEAT RELAY
START/STOP
TEMPORARILY PAUSE
BLOCK START BUTTON
MOTOR KLIXON
PC5
TEMPERATURE PAUSE
TANK 1 EMPTY
TANK 2 EMPTY
TANK 3 EMPTY
TANK 4 EMPTY
OIL EMPTY
TEMPERATURE
LEVEL A/D SCU
LEVEL SCU
LEVEL MM
SHOW TEMP
DRUM SPEED RPM
TACHO SIGNAL
LIQUID TANK EMPTY
QUICK START 1
QUICK START 2
BUTTON I/O 1
INTERLOCK I/O 1
BUTTON I/O 2
INTERLOCK I/O 2
BUTTON I/O 3
INTERLOCK I/O 3
BUTTON I/O 4
INTERLOCK I/O 4
BUTTON I/O 5
INTERLOCK I/O 5
BUTTON I/O 6
INTERLOCK I/O 6
BUTTON I/O 7
INTERLOCK I/O 7
BUTTON I/O 8
INTERLOCK I/O 8
BUTTON I/O 9
INTERLOCK I/O 9
BUTTON I/O 10
INTERLOCK I/O 10
*SERVICE*
01.02.00.00
ACTIVATE OUTPUTS
SHOW INPUTS
ARTICLE NUMBER
SHOW DLCU COM.
RESET DLCU
6204
12
SHOW INPUTS
01.02.01.00
COUNT 1
DOOR LOCK
DOOR CLOSED
START BUTTON CPU
SERVICE BUTTON
6204
Several inputs can be activated simultaneously.
An activated input is indicated by a filled box to
the right.
438 9048-01/02
Program unit
50
ARTICLE NUMBER
Fig.
13
Fig.
14
SHOW DLCU COM.
Fig.
15
Fig.
13
Select the ARTICLE NUMBER row and press the
knob. You can now choose on the display to show
the article numbers for the program units, I/O
boards, motor control or DLCU fitted in the
machine. Select the unit for which to show the
article number.
Select the SHOW DLCU COM. row and press the
knob. The display shows the status of the
communication to and from the DLCU board.
*SERVICE*
01.03.00.00
SHOW INPUTS
ARTICLE NUMBER
SHOW DLCU COM.
RESET DLCU
SHOW MCU COM.
RESET MCU
6204
14
16
SHOW PART NUMBER
01.03.01.00
PROGRAM UNIT
I/O
MCU
DOOR CONTROL UNIT
EXIT
RESET DLCU
Fig.
17
Reset DLCU from the fault code by selecting the
RESET DLCU row and pressing the knob. The
reset will take a few seconds.
6204
15
*SERVICE*
01.04.00.00
ARTICLE NUMBER
SHOW DLCU COM.
RESET DLCU
SHOW MCU KOM.
RESET MCU
SHOW SINGLE
6204
16
DLCU STATUS
FROM DLCU
10000100
FROM DLCU
000000CD
TO DLCU
10110000
TO DLCU
00000000
BACK=PRESS KNOB
6204
17
*SERVICE*
01.05.00.00
SHOW DLCU COM.
RESET DLCU
SHOW MCU COM.
RESET MCU
SHOW SINGLE
SHOW COM.PORTS
6204
438 9048-01/02
Program unit
SHOW MCU COM.
Fig.
18
Fig.
19
51
18
Select the SHOW MCU COM. row and press the
knob.
*SERVICE*
01.06.00.00
RESET DLCU
SHOW MCU COM.
RESET MCU
SHOW SINGLE
SHOW COM.PORTS
CALIBRATION PESAGE
The display shows the status of the
communication to and from the frequency control.
RESET MCU
Fig.
20
Reset frequency control from the fault code by
selecting the RESET MCU row and pressing the
knob. The reset will take a few seconds.
SHOW SINGLE
Select the SHOW SINGLE row and press the
knob. The display shows the status of the
communication to and from the slot meter.
SHOW COM. PORTS
Select the SHOW COM. PORTS row and press
the knob. The display shows the status of the
communication to and from the communication
ports.
6204
19
MOTOR STATUS
FROM MOTOR 10000100
FROM MOTOR 000000CD
ACTUAL SPEED RPM
0
SET SPEED RPM
0
BACK=PRESS KNOB
6204
20
*SERVICE*
01.07.00.00
SHOW MCU COM.
RESET MCU
SHOW SINGLE
SHOW COM.PORTS
CALIBRATION PESAGE
MEASURE WEIGHT
6204
438 9048-01/02
Program unit
52
WEIGHT CALIBRATION
Fig.
21
21
Select the WEIGHT CALIBRATION row and
press the knob.
*SERVICE*
01.10.00.00
SHOW COM.PORTAR
WEIGHT CALIBRATION
MEASURE WEIGHT
MEASURE UNBALANCE
DISPLAY TEST
EXIT
• Operate the machine with an empty drum.
• After weight calibration, the weight deviation
will be shown in a hexadecimal format on the
bottom line of the display.
• The drum will go faster and slower a number
of times during weight calibration. This is
normal. Weight calibration will take a few
minutes.
6204
22
*WEIGHT CALIBRATION*
• When exiting weight calibration after it is
complete, you will have the option of saving
the calibration value.
• The value for 0 calibration is taken on each
washing occasion and the weight value is
adjusted automatically for any deviations.
NB!
The drum must be empty during calibration.
Fig.
22
YES
6204
23
*SERVICE*
01.11.00.00
WEIGHT CALIBRATION
MEASURE WEIGHT
MEASURE UNBALANCE
DISPLAY TEST
EXIT
Confirm that calibration is to be performed with
YES or return to the previous menu with NO.
MEASURE WEIGHT
Fig.
23
Fig.
24
Select the MEASURE WEIGHT row and press
the knob.
Confirm that measurement is to be performed
with YES or return to the previous menu with NO.
6204
24
*START WEIGHING*
Put in a known weight. The same weight should
be shown on the display. This function is used to
check that the machine is weighing correctly.
YES
6204
438 9048-01/02
Program unit
MEASURE UNBALANCE
Fig.
25
Fig.
26
*SERVICE*
01.12.00.00
MEASURE WEIGHT
MEASURE UNBALANCE
DISPLAY TEST
EXIT
Confirm that measurement is to be performed
with YES or return to the previous menu with NO.
DISPLAY TEST
27
25
Select the MEASURE UNBALANCE row and
press the knob.
Put in a known unbalance weight. The
corresponding weight should be shown on the
display. This function is used to check that the
machine is measuring unbalance correctly.
Fig.
53
6204
26
Select the DISPLAY TEST row and press the
knob.
*START UNBALANCE*
Fig.
28
The display shows a grid for checking that all the
segments in the display are intact. By turning the
control knob, two different grids and a completely
black and a completely blank page are shown.
Press the knob to return to the previous menu.
YES
6204
27
*SERVICE*
01.13.00.00
MEASURE UNBALANCE
DISPLAY TEST
EXIT
6204
28
6204
438 9048-01/02
Program unit
54
CONFIG 1
29
The configuration 1 menu contains all the
functions and parameters that service personnel
can change without a password.
Fig.
29
MAIN MENU
01.04.00.00
STATISTICS
CONFIG 1
CONFIG 2
ADJUST DISPLAY
RESET TO FACTORY
ACTIVATE WASH PROGR.
Engage the machine’s service mode.
Select the CONFIG 1 row in the main menu and
press the knob.
All the available parameters will now be
displayed. The table below gives the default value
on the right.
•
•
•
•
•
•
•
•
•
•
•
•
•
•
•
•
•
•
•
•
•
•
•
•
•
•
•
•
•
•
•
•
PAUSE PERMITTED
RAPID ADVANCE
NEW PROG. SELECT
SHOW TIME
SHOW TEMP
SHOW IS LEVEL
MACHINE HEATED
HEATING RELAY ON
TEMP CONTROL WATER
SHOW °C
DELAYED START
AUTO RESTART
AUTO START PAID
AUTO PROG. PAID
SHOW COIN COUNTER
SHOW HOUR COUNTER
SHOW PROG. COUNTER
BUTTON CLICK
FLASH LIGHT ON
HEAT ERROR ON
SHOW MODULE NUMBER
AUTO PROG SELECT
COUNT WEIGHT
POWER CTRL HEAT
POWER CTRL EXTRACT
BLOCK START ACTIVE
DEFAULT LANGUAGE
LANGUAGE TIMEOUT SEC.
COIN VALUE 1
COIN VALUE 2
TIMEOUT, DISPLAY, SEC
TIMEOUT,END BUZZ. SEC
438 9048-01/02
YES
YES
YES
YES
YES
NO
YES
YES
YES
YES
YES
YES
NO
NO
NO
NO
NO
YES
NO
YES
NO
NO
YES
NO
NO
NO
ENGLISH
120
0000
0000
600
30
6204
Program unit
•
•
•
•
•
•
•
•
•
•
•
•
•
•
•
•
•
•
•
•
•
Fig.
30
Fig.
31
Fig.
32
TIMEOUT,PAUSE BUZZ. SEC
MAX FILL TIME, SEC
6. WATER IN DRUM
7. DRUM OVERFILLED
10. DRUM NOT DRAINED
MACHINE ADDRESS
PASSWORD
SHOW WEIGHT TIME, SEC
MAXDIFF.WASH TIME MIN
DEFAULT HEAT
BACK LIGHT TIME SEC.
OFFS.LEVEL READING MM
DISPLAY WARNING, SEC
COLON WHEN PRICE
FLUSH DELAY, LIQ. SEC
FLUSH ON, LIQ. SEC
FLUSH DELAY, POWD.SEC
FLUSH ON, POWD.SEC
LEVEL COOL DOWN, SCU
COOL STEP TEMP
COOL MIDDLE TEMP
10
600
YES
YES
YES
0000
0000
30
10
YES
0000
0000
0000
NO
0000
0000
0000
0000
55
30
CONFIG 1
04.01.00.00
PAUSE PERMITTED
RAPID ADVANCE
NEW PROG. SELECT
SHOW TIME
SHOW TEMP
6204
31
CONFIG 1
04.01.00.00
PAUSE PERMITTED
YES
Select the desired function/parameter and press
the knob.
To engage and disengage functions, select YES
or NO and press the knob.
To adjust the value, set the value and press the
knob. The arrow in each menu shows the column
to be adjusted.
6204
32
CONFIG 1
04.34.00.00
• Turn the knob clockwise to set the desired
number between 0 and 9.
• Turn the knob anticlockwise to move to the
next column. Turn the knob clockwise and set
the value, etc.
• Once all the columns have been set, press the
knob to confirm and go back to the config
menu 1.
MAX FILLTIME, SEC
0600
6204
33
When all the relevant values have been adjusted,
select EXIT and press the knob.
Fig.
33
SAVE TO MEMORY
Confirm the changes (write to memory YES/NO)
and return to the main menu.
Note!
All changes will be executed only after exiting
the CONFIG 1 menu.
YES
6204
438 9048-01/02
Program unit
56
PAUSE PERMITTED
Select whether it should be possible to pause during an on-going wash
program.
Yes = A pause is allowed during a wash program.
No = A pause is not allowed during a wash program.
RAPID ADVANCE
Select whether is should be possible to step rapidly forward or backward
through the wash program while it is in progress.
Yes = It is allowed to step rapidly through a wash program.
No =It is not allowed to step rapidly through a wash program. Rapid
advance can be used on all machines during the first five minutes after a
program has been started, even if you have answered NO.
NEW PROG. SELECT
Select whether to allow switching to another wash program while one is in
progress without first stepping rapidly through to the end of the current
program before switching. Will only work if PAUS is allowed.
Yes = Switching to a new wash program is allowed.
No = Switching to a new wash program is not allowed.
SHOW TIME
Select whether the calculated remaining program time is to be shown on the
display window while the program is in progress. This will require the
program having been used at least once or the row will be blank even if you
respond with Yes.
The time shown is based on a calculation model using an input value from
the previous wash program.
Yes = The calculated time remaining of the program is shown on the display
window while a wash program is in progress.
No =No time is displayed in the display window.
438 9048-01/02
Program unit
57
SHOW TEMP
Select whether the current water temperature is to be shown on the display
window while a wash program is in progress. This function cannot be shown
on the display at the same time as the SHOW IS LEVEL function, only one
of the functions can be shown at one time.
Yes = The water temperature is shown.
No = No temperature is displayed in the display window.
SHOW IS LEVEL
Select whether the current water level is to be shown on the display window
while a wash program is in progress. The level is shown in divisions. This
function cannot be shown on the display at the same time as the SHOW
TEMP function, only one of the functions can be shown at one time.
Yes = The water level is shown. (replaces temperature display in display
window)
No = No level is displayed in the display window.
MACHINE HEATED
Select whether the machine is to wait until a programmed temperature has
been attained before the wash time starts being counted.
Yes = The programmed temperature must be attained
No = The washing time is counted down as soon as the washing module
has been started.
HEATING RELAY ON
Select whether the heating contactor should activate or not when the
heating starts.
Yes =The heating contactor will cut in when the heating starts. This is the
normal process for heated machines.
Note!
The heating contactor will also cut in on machines that are
configured as unheated.
No = The heating contactor will not cut in. Used on unheated machines that
are fitted with heating contactors (machine changed from heated to
unheated.
438 9048-01/02
Program unit
58
TEMP CONTROL WATER
Select whether the machine is to control and adjust the water temperature
by opening and closing the main valves for hot and cold water during filling.
Yes =Control of main valves during filling.
- Alt.1: Hot and cold water valves both open. If the set water
temperature is exceeded, the hot water valve will be shut
automatically.
- Alt. 2: Only hot water valve open. If the set water temperature is
exceeded, the cold water valve will be opened automatically.
No = No temperature control. The hot and cold water valves are both open
until the correct level has been attained.
SHOW °C
Select whether all the temperature values are to be displayed in °C or °F
Yes = All temperature values displayed in °C.
No =
All temperature values displayed in °F.
DELAYED START
Select whether there should be the possibility of setting a delay from when
the start button is pressed until the machine is to start.
Yes = Time for delayed start can be set. The time is set when choosing the
wash program.
No = The delayed start function is disengaged.
AUTO RESTART
Select whether there should be the possibility of setting the machine for
automatic restart. The number of restarts the machine is to perform is
chosen by the user.
Yes = Number of automatic restarts can be set.
No = The delayed start function is disengaged.
438 9048-01/02
Program unit
59
AUTO START PAID
Select whether the machine is to be able to start automatically, when full
price has been paid, for the chosen wash program.
Yes =Automatic start engaged.
Note!
If the signal for blocking the start button is engaged, it also applies to
the blocking signal for the automatic starting function.
No = The automatic start function is disengaged.
AUTO PROG. PAID
Select whether the machine should automatically select wash program 1 for
full payment of this program, unless another wash program has been
chosen previously.
This function assumes AUTO START PAID is active.
Yes =Wash program 1 is chosen automatically.
No = Wash program chosen manually.
SHOW COIN COUNTER
Select whether the contents of the machine’s coin counter should be shown
in the display window while a wash program is in progress or outside the
wash program without going into service mode. The counter is shown on
the display after pressing the control knob twice in quick succession.
Yes = The contents of the coin counter can be shown. Displayed after
pressing the control knob twice in succession when washing or before the
wash program starts.
No = No display of the contents in the coin counter.
SHOW HOUR COUNTER
Select whether the contents of the machine’s hour counter should be shown
in the display window while a wash program is in progress or outside the
wash program without going into service mode. The counter is shown on
the display after pressing the control knob twice in quick succession.
Yes = The contents of the hour counter can be shown. Displayed after
pressing the control knob twice in succession when washing or before the
wash program starts.
No = No display of the contents in the hour counter.
438 9048-01/02
Program unit
60
SHOW PROG. COUNTER
Select whether the contents of the machine’s counter of completed wash
programs should be shown in the display window while a wash program is
in progress or outside the wash program without going into service mode.
The counter is shown on the display after pressing the control knob twice in
quick succession.
Yes = The contents of the counter can be shown. Displayed after pressing
the control knob twice in succession when washing or before the wash
program starts.
No = No display of the contents in the counter.
BUTTON CLICK
Select whether the machine should give a sound for each new position
when the knob is turned and pressed in.
Yes = Sound.
No = No sound.
FLASH LIGHT ON
Select whether the output for the flash light is to be activated while the
buzzer is activated during a wash program. The output is on all the time and
becomes inactive when the buzzer is turned off.
Yes = Flash function on.
No = Flash function off.
HEAT ERROR ON
Select whether the HEAT ON fault code should be displayed when the
machine is heating up too slowly.
Yes = The fault code is displayed.
No = The fault code is not shown.
SHOW MODULE NUMBER
Select whether the washing module number should be shown while a wash
program is being used.
The washing module number will always be shown during rapid advance,
however.
Yes = The module number is displayed.
No = The module number is not shown.
438 9048-01/02
Program unit
61
COUNT WEIGHT
Select whether the count weight function should be activated. Note that the
function cannot be activated for wash programs that are programmed for no
weight count.
Yes = Count weight activated.
No = Count weight not activated.
POWER CTRL HEAT
Select whether the power priority function (PC5) for heating should be
engaged. For connecting and setting PC5, please refer to separate
instructions.
Yes = Power priority (PC5) engaged.
No = Power priority (PC5) not engaged.
POWER CTRL EXTRACT
Select whether the power priority function (PC5) for extraction should be
engaged. For connecting and setting PC5, please refer to separate
instructions.
Yes = Power priority (PC5) engaged.
No = Power priority (PC5) not engaged.
BLOCK START ACTIVE
Select whether it should be possible to block the start of the wash program
with the control knob.
Yes = Wash program start can be blocked.
No = The wash program start cannot be blocked.
DEFAULT LANGUAGE
Select the language to be shown when the machine is started. The program
unit will return to the language set here if the machine is not used during
the period specified in the LANGUAGE TIMEOUT menu.
438 9048-01/02
Program unit
62
LANGUAGE TIMEOUT SEC.
Specify with the knob the time after which an unused machine
should return to the set default language. The time is given in
steps of 1 second; 0 - 2550 seconds.
COIN VALUE 1 and 2
Specify with the knob the value (0 999) for the respective coin slot.
For example: Coin 1, 1 = 1 EURO
Coin 2, 5 = 5 EURO
Coin 1, 50 = 50 Cent
Coin 2, 100 = 1 EURO
Setting the price to 300 and selecting COLON
WHEN PRICE will display the price as 3:00.
TIMEOUT, DISPLAY, SEC
Specify with the knob the time after which the machine should
reset a program selection that has not started. The time is given in
steps of 10 seconds; 0 - 2550 seconds.
TIMEOUT,END BUZZ. SEC
Specify with the knob the time during which the buzzer should
sound at the end of the program unless the machine is turned off
manually. The time is given in seconds; 0 - 255.
TIMEOUT,PAUS BUZZ. SEC
Specify with the knob the time during which the buzzer should
sound for a pause unless the pause is interrupted manually. The
time is given in seconds; 0 - 255.
MAX FILL TIME, SEC
Specify with the knob the maximum time (in seconds, 0 - 2550) it
should take to fill the machine with water to the programmed level.
If the water has not reached the correct level within the set time,
the ”NO WATER” fault message will appear on the display.
438 9048-01/02
Program unit
63
MACHINE ADDRESS
Specify with the knob the machine’s address (0 - 127) that is used when the
machine is connected to the CMIS system.
PASSWORD
Select whether the functions under CONFIG 1 should be password
protected or not.
The password comprises four numerals. The code 0000 means no
password is required for the CONFIG 1 menu.
The password code can be changed or removed at any time.
SHOW WEIGHT TIME, SEC
Used for machines with weight count.
MAXDIFF.WASH TIME MIN
Specify with the knob the maximum time deviation for the total time of the
wash program. If this is exceeded in comparison with the total time when
the same wash program was last used, the stored total time shall only be
adjusted with the limit time. Note that this applies to both positive and
negative time.
The time is given in minutes; 0 - 20
DEFAULT HEAT
Select whether the machine should be heated with steam (heating
contactors 1/2) or electricity (heating contactor 3) as the default heating
system.
Yes = Steam.
No = Electricity.
BACK LIGHT TIME SEC.
Specify how long in seconds that the display lighting should be on without
the control knob being activated. The value 0000 means that the lighting is
on all the time.
438 9048-01/02
Program unit
64
OFFS.LEVEL READING MM
Specify how large a deviation in level control from zero is to be allowed
before the fault code for empty drum is displayed
DISPLAY WARNING, SEC
Specify with the knob the number of seconds the warnings are to be
displayed. Warnings are e.g. empty tank alarm from detergent that is shown
each time a wash program is displayed.
The time is given in steps of 1 second in the range 0 -255 seconds.
COLON WHEN PRICE
On machines with coin counter, the price can be displayed with or without
colon (0:00 or 000).
Yes = The colon is displayed.
No = The colon is not displayed.
FLUSH DELAY, LIQ. SEC
Delay for rinsing detergent after the drum has been filled with water.
The time is given in steps of 1 second in the range 0 -255 seconds.
FLUSH ON, LIQ. SEC
Rinse times for rinsing detergent after the drum has been filled with water.
The time is given in steps of 1 second in the range 0 -255 seconds.
FLUSH DELAY, POWD.SEC
Delay for rinsing detergent after the drum has been filled with water.
The time is given in steps of 1 second in the range 0 -255 seconds.
438 9048-01/02
Program unit
65
FLUSH ON, POWD.SEC
Rinse times for rinsing detergent after the drum has been filled with water.
The time is given in steps of 1 second in the range 0 -255 seconds.
LEVEL COOL DOWN, SCU
Select the level to which the machine should be filled with the cold water
valve if the wash program includes the rapid cooling function.
The level is given in divisions (DIV) in the range 0 - 850.
COOL STEP TEMP
Specify the maximum drop in temperature allowed per minute during
cooling. During cooling, the temperature will be monitored so that the
average drop in temperature from the starting temperature down to the
specified intermediate temperature does not exceed the given value.
The temperature is given in steps of one degree in the range 0 - 100 °C.
COOL MIDDLE TEMP
Specify the temperature at which the cooling function should stop
monitoring that the drop in temperature during cooling is not going too fast.
The temperature is given in steps of one degree in the range 0 -100 °C.
438 9048-01/02
Program unit
66
ACTIVATE WASH PROGR.
34
The ACTIVATE WASH PROGR. menu is used to
specify the wash programs in the program library
that are to be made available to the user and in
which order the wash programs are to be
presented in the display.
Fig.
34
Fig.
35
Engage service mode and select the
ACTIVATE WASH PROGR. row in the main
menu. Press in the knob.
All the wash programs contained in the installed
program library are now shown.
MAIN MENU
08.00.00.00
RESET TO FACTORY
ACTIVATE WASH PROGR.
QUICK START BUTTONS
I/O ADDRESS
GO BACK
6204
35
NORMAL
ACTIVATE WASH.PROG.
08.01.00.00
G01 NORMAL 40
01
G01 NORMAL 60
02
G01 NORMAL 95
03
G01 SYNTHETIC 60
04
G01 SYNTHETIC 40
05
SYNTHETIC
DELICATE
HANDWASH
WOOL
EXTRACTION
The activated wash program is presented in the
program selection menu. At the end of each row
these wash programs are numbered in the order
they are presented in the program selection
menu.
6204
36
ACTIVATE WASH.PROG.
08.06.00.00
G01 SYNTHETIC 60
05
G01 DELICATE 30
06
G01 HAND WASH
G01 NORMAL 40
G01 NORMAL 60
G01 NORMAL 95
Add (activate) a wash program
Fig.
36
Select the wash program to be activated and
press the knob. The selected wash program is
assigned the number after the last activated
program, i.e. the selected program will be
presented last in the program selection menu.
Remove (deactivate) a wash program
Fig.
37
6204
37
Select the wash program to be removed and
press the knob. The selected wash program is
deactivated and renumbering will take place
automatically for the remaining programs in the
list.
ACTIVATE WASH.PROG.
08.03.00.00
G01 NORMAL 40
01
G01 NORMAL 60
02
G01 NORMAL 95
G01 SYNTHETIC 40
03
A01 SYNTHETIC 60
04
6204
438 9048-01/02
Door and door lock
Door
67
1
Description
Fig
1
The door is mounted on the balance weight
attached to the machine outer drum. The door
glass is held in the door by the door gasket,
which also forms a seal directly against the outer
drum when the door is shut.
6112
Leaking door seal
If the seal shows no signs of scratches or other
damage, a loss of elasticity in the seal may be
the cause of a leak. Replace the seal.
Leaks from the door seal can also be caused by
dirt and build-up of lint. Clean the seal.
5
Door lock
Description
The machine door lock is a safety system which
prevents injury because:
• The machine cannot be started until the door
is closed.
• The door cannot be opened until the wash
program is ended and the drum is at a
standstill.
The lock is built on a lock housing and its
electrical components are connected using quick
connectors.
102235
3
2
1
4
1. Door gasket
2. Door glass
3. Door
4. Cover plate
5. Lock unit
438 9047-71/01
Door and door lock
68
Function
When the door is closed, the lock’s safety switch closes, which indicates to
the timer that the door is locked and the machine is ready to start.
A safety switch sends a go-ahead signal to the motor control.
When the start button is activated the machine starts the program selected.
438 9047-71/01
Motor
69
Description
General
The motor is mounted on a shaft under the outer drum and drives the inner
drum by means of a drive belt. To reduce motor noise and vibrations the
motor mountings have rubber mountings. Between the motor and the outer
drum is a belt tensioner which also has a rubber damper.
Fig
1
For its electrical connections the motor has a quick connector.
On the motor shaft there is a tachogenerator used for three functions:
• Act as a rotation guard for checking that the drum is completely at a
standstill before the door is opened.
• Act as a sensor for imbalance detection - checking that the load is
properly distributed before extraction.
• Act as a sensor for weight measurement.
The motor is a 3-phase asynchronous motor. The various motor speeds for
normal action, distribution speed and extraction are regulated by a
microprocessor based motor control. The motor windings are protected
against overheating. The PCB is monitoring the temperature in the windings
(it is checking the resistance in the windings).
1
5884
438 9047-51/01
Motor
70
Program start
The following conditions must be fulfilled before the motor can start:
• Motor not overloaded.
• Door shut.
• Go-ahead signal from timer.
Once the door is closed, a program is selected and the start button is
activated, the machine carries out a short extraction which does not form
part of the program selected. During this extraction the electronics perform
a weight measurement so that the optimum quantity of water can be used
for the current wash load. After that the sequences of the program selected
start up, the machine starts to fill and the motor to operate.
When the door is shut an electrical contact in the relay is closed and sends
a signal to the electronics that the door is closed. If for some reason the
relay contact does not close within 30 seconds, the motor will stop and
error code 03 will appear on the display.
438 9047-51/01
Motor
71
Calculation of weight of wash load
At the start of every program, the machine runs a special sequence. Four
different torque parameters are calculated during this sequence.
Fig
2
1. Distribution to distribute the load evenly in the drum. Then deceleration.
2. Constant speed, 900 rpm, the torque parameter is stored.
3. Roll out sequence. Measurement of time parameter.
These two parameters are then used to calculate the weight of the wash
load so that the water level can be adjusted to the optimum level.
2
rpm
����
2
3
���
1
�
�
�
��
��
��
��
��
���
���
sec
Imbalance check
Dry extraction
Weight calculation
Wash program
6443
438 9047-51/01
Motor
72
Extraction
For extraction the motor operates in an extraction pattern which is always
the same. The pattern is as follows:
• A distribution period, with unbalance sensing – 20 seconds
• Extraction at 550 rpm - 30 seconds
• Extraction at 850 rpm - 30 seconds
• Extraction at 1100 rpm - 30 seconds
• Extraction at 1300 rpm - remaining time out of the program’s total
extraction time.
The different extraction cycles in the different programs are achieved by
varying the time that the motor will follow this extraction pattern.
During the distribution period the imbalance of the wash load is checked
with the aid of a tachogenerator which signals the motor control whether
extraction can take place or not. This is repeated a maximum of three times.
After the third time the electronics unit decides whether the imbalance is
”great” or ”small”.
• If the unbalance is ”great” the wash program is ended without extraction.
• If the unbalance is ”small”, extraction will be performed, but at a reduced
speed.
438 9047-51/01
Motor
73
Motor control unit
The motor control unit communicates with the program control unit board
via a serial (input/output) interface. With the aid of the motor control unit the
program control unit can control not only the speed of the motor at any
given point, but also the acceleration or deceleration rate at which the motor
is to achieve the speed required. The motor control unit constantly feeds
information on current status (both normal status and on any abnormalities
arising) back to the program control unit board.
The motor control unit can also supply data on the different torque and
effect of the motor at constant speed when accelerating and decelaration.
These data are used both for calculating the weight of the load and for
detecting any unbalance.
WARNING
The voltage on the motor control circuit has a potential difference of
approx. 300 V in relation to incoming neutral and earth. Because of
this, be careful when measuring. Use unearthed oscilloscopes. If the
motor control unit has a green LED, this will remain lit for as long as
there are hazardous voltages present in components.
438 9047-51/01
Motor
74
Troubleshooting
Fig
3
• Check the motor windings with an ohmmeter
to detect any possible short-circuit or fault.
• The motor winding shall have the resistance of
2,6 ohm, measured between two phases.
• Check that the motor shaft can be turned. If it
can’t, the problem is probably bearing failure.
Replace the motor (see under ”To replace the
motor”).
• If the motor feels abnormally hot (Error code
32E) directly after it has stopped functioning,
its thermal protector has probably been
activated. Investigate the cause of the
overload. Check that the motor and drum can
revolve freely.
The thermal protector will reset automatically
when the motor has cooled. Start the machine
again and listen carefully for any abnormal
noise.
If the thermal protector is triggered repeatedly
the cause may be:
- short-circuit
- bearing failure in drum
- bearing failure in motor.
• If the motor appears to be sound, the site of
the fault will probably be the motor control.
Replace the circuit board.
438 9047-51/01
3
Black
Blue
Red
3 2 1
6 5 4
G
M
Tacho
generator
Motor
5908
Motor
75
Fault/error indication
If a fault or error occurs in the motor or motor control unit, the latter will indicate this to the
program control unit board. Information on these errors, besides appearing as an error
code on the display, is also provided by a yellow LED on the motor control unit board. To
understand this additional inform-ation, the pattern of flashes from the LED has to be
observed and compared with this chart:
LED pattern of flashes
1 sec.
Error code Cause
1
31E
Heat sink temperature too high.
2
32E
The motor is too hot.
3
33E
The motor control gets start signal but lacks lock acknowledgement.
No communication between motor control and program control unit.
4
5
35E
Short-circuit in motor windings, wire harness or internely in
motor control.
6
36E
Fault in receiving circuitry for lock acknowledgement signal.
7
37E
Too low DC level in the motor control.
8
38E
Too high DC level in the motor control.
9
45E
Motor not following.
F
6444
Motor control unit current-limiting function activated.
Does not give an error code..
438 9047-51/01
Motor
76
The motor is very noisy or seizing
The cause will be bearing failure. Replace the motor (see below under ”To
replace the motor”).
To replace the motor
Fig
4
1. Release the belt tensioner and lift off the drive belt.
2. Undo and remove the holder securing the wiring harness to the motor’s
quick connector.
3. Disconnect the motor’s quick connector.
4. Undo the motor’s two remaining mounting points and lift the motor out.
4
1
4
3
2
5884
438 9047-51/01
Motor
Belt tension
Fig
5
77
5
The tensioning of the drive belt is preset at the
factory.
When checking belt tension, or after replacing
components which affect belt tension, follow
Fig. 5 here.
Belt tension is an important aspect of
the machine’s operation and should
always be checked as part of service and
maintenance.
Motor speed for ”gentle action”
Max 12 mm
Min 10 mm
F = 30 N
2311
The motor normally works at 35 rpm during
gentle action.
438 9047-51/01
Drain valve
Description
Fig
1
The water pressure in the cold water intake is
used for closing the drain valve. There is a hose
(1) connected between the water intake and
the control valve (2). When the control valve is
activated it opens and lets water into the supply
line (3) which is connected to the drain valve. The
water presses up a rubber membrane (4) and a
plunger (5) with a pressure plate (6) which closes
the valve’s rubber membrane (7).
When the control valve shuts off water pressure
to the drain valve the springs (8) pull back the
plunger. The return water passes the control
valve and runs out into the drain via the return
hose (9).
Fault location
79
1
1
9
2
3
7
6
8
5
4
To be carried out by authorised personnel
only.
Drain valve will not close
Check that:
• Control valve (2) is energised.
• Hoses and control valve are not blocked, by
disconnecting the supply line (3) at the drain
valve and then activating the control valve.
6442
• The rubber membrane (4) is intact.
• The plunger (5) is not binding.
Drain valve will not open
Check that:
• The return hose (9) is not blocked.
• The plunger (5) is not binding.
438 9047-91/01
Drain valve
80
To replace entire valve or valve components
2
This work can be carried out more easily if the
machine is inclined backwards. Check first which
way the individual machine is mounted on/in the
floor.
Removal
Fig
2
1. Remove the front panel.
2. Remove the door and its hinges.
3. Remove the trim panel (three screws).
Fig
3
4. Remove the hose from the valve’s nipple for
water supply.
5. Undo the nut (leave bolt in place) securing the
valve to the right-hand side of the saddle.
6. Undo and remove the bolts securing the valve
on the left-hand side of the saddle. Pull the left
side of the valve down a little and lift the valve
off from the right-hand bolt. Separate the valve
from the hose (6a).
1
3
2
6441
3
7. Remove the valve from the machine.
8. Replace the faulty valve with a new one or
replace defective parts. For article numbers,
see the spare parts list.
6
5
6a
4
6b
2407
438 9047-91/01
Drain valve
81
Installation
1. First fit the valve onto the right-hand bolt in the saddle.
2. Fit and then tighten the two bolts on the left-hand side. Tighten the bolt
on the right.
3. Connect the hose for water supply.
4. Fit the hose from the drum on the valve. Use the rubber edge on the
hose and pull down the hose over the valve cover. Check that the hose
edge snaps into place over the lower edge of the cover.
5. Test the machine by running a program and check valve functioning and
that the machine is not leaking.
6. Fit the trim panel, door and front panel. Lock the screws for the door and
trim panel with locking fluid (Loctite no. 243).
438 9047-91/01
Drain valve
82
To replace a component between the drum and
the valve
4
This work can be carried out more easily if the
machine is inclined backwards. Check first which
way the individual machine is mounted on/in the
floor.
Removal
Fig
4
1. Remove the front panel.
2. Remove the door and its hinges.
3. Remove the trim panel (three screws).
Fig
5
4. Undo the nut (leave bolt in place) securing the
valve to the right-hand side of the saddle.
1
3
2
6441
5. Undo and remove the bolts securing the valve
on the left-hand side of the saddle. Pull the left
side of the valve down a little and lift the valve
off from the right-hand bolt. Separate the valve
from the hose (6a).
5
6. Disconnect the hose from the drum (6a).
7. Disconnect the hose from the junction
(6b).
8. Replace the faulty components.
6
Installation
Fig
6
1. Place the hose clip (A) on the hose connector
(B).
2. Fit the hose on the sleeve and check that it
moves right up onto the groove on the sleeve,
and that it is correctly aligned in relation to the
junction.
6a
2407
5
4
6b
6
A
3. Place the hose clip (A) in position and tighten
it.
4. Place the other hose clip on the other hose
connector (B). Fit the hose on the junction and
tighten the hose clip. Check that the hose is
pushed far enough into the junction.
B
2410
438 9047-91/01
Drain valve
83
5. First fit the valve onto the right-hand bolt in the saddle.
6. Fit and then tighten the two bolts on the left-hand side. Tighten the bolt
on the right.
7. Fit the hose from the drum on the valve. Use the rubber edge on the
hose and pull down the hose over the valve cover. Check that the hose
edge snaps into place over the lower edge of the cover.
8. Test the machine by running a program and check valve functioning and
that the machine is not leaking.
9. Fit the trim panel, door and front panel. Lock the screws for the door and
trim panel with locking fluid (Loctite no. 243).
438 9047-91/01
Drain valve
84
To clean the hose between drum and junction
7
This work can be carried out more easily if the
machine is inclined backwards. Check first which
way the individual machine is mounted on/in the
floor.
Removal
Fig
7
1. Remove the front panel.
2. Remove the door and its hinges.
3. Remove the trim panel (three screws).
Fig
8
4. Undo the nut (leave bolt in place) securing the
valve to the right-hand side of the saddle.
5. Undo and remove the bolts securing the valve
on the left-hand side of the saddle. Pull the left
side of the valve down a little and lift the valve
off from the right-hand bolt. Separate the valve
from the hose (6a).
6. Disconnect the hose from the junction.
1
3
2
6441
8
7. Push the hose’s connection to one side. Clean
the hose by pressing on the bellows around it
and removing any solid matter.
6
5
6a
4
6b
2407
438 9047-91/01
Drain valve
85
Installation
1. Fit the hose to the junction.
2. First fit the valve onto the right-hand bolt in the saddle.
3. Fit and then tighten the two bolts on the lefthand side. Tighten the bolt on
the right.
4. Fit the hose from the drum on the valve. Use the rubber edge on the
hose and pull down the hose over the valve cover. Check that the hose
edge snaps into place over the lower edge of the cover.
5. Test the machine by running a program and check valve functioning and
that the machine is not leaking.
6. Fit the trim panel, door and front panel. Lock the screws for the door and
trim panel with locking fluid (Loctite no. 243).
438 9047-91/01
Drain pump
87
Description
Fig
1
The pump is located under the drum inside the front of the machine. Access
for cleaning foreign matter (out of the discharge water) from the pump is
through a cover on the machine front. The motor which drives the pump is
activated from the timer.
Fault location
Machine not emptying
• Clean any foreign matter out of the pump.
• Check pump functioning:
- Is the motor energised?
- Has the impeller come loose from the motor shaft?
Machine cannot extract
This fault can arise if the drain pump is blocked.
• Clean any foreign matter out of the pump.
1
2257
438 9048-11/01
Detergent dispenser
89
Detergent dispenser
Fig
The detergent dispenser is divided into four compartments:
1
One compartment for prewash detergent, powder or liquid
detergent
Two compartments for main wash detergent, one for powder
detergent (1) and one for liquid detergent (2).
One compartment for fabric conditioner.
Water connections into the dispenser are fitted with dispersers which mix
the detergent thoroughly with water and flush the compartments clean.
From the bottom of the dispenser the water is flushed down into the drum.
1
2
1
102248
438 9048-21/01
Heating
Description
Fig
1
Fig
2
91
1
The two heating elements are in the lower part
of the outer drum, accessible from the machine
rear. They are switched by a heating relay (K21),
which is controlled by the timer, level control and
thermostat.
The elements must never be activated without
water in the drum. If they are, their fuses will blow.
Fault location
K21
To be carried out by authorised personnel
only.
E1
If heating time is abnormally long
E1
• Check with a multimeter to see if one of the
elements is burnt out. For access to the
elements, remove the machine rear.
• Build-up of limescale can reduce the efficiency
of the elements. If necessary descale them
with a suitable descaling product. Follow the
manufacturer’s instructions concerning
quantity of descaler.
To replace an element
2260
2
• Switch off the power supply to the machine at
the main switch/wall switch and check that the
power supply to the machine is off.
• Note how the elements are connected and
then disconnect them.
• Undo the nut between the element
connections and pull the element out.
• Guide the new element into its element holder
in the bottom of the drum.
• Fit the new element and tighten the nut.
Connect the element’s electrical connections.
• Fill the machine and check that there are no
leaks from the element.
Sensor,
thermostat
Element
2212
438 9048-31/01
Drum
93
Changing lifters
2
1
�
�
2595
6440
4
3
2597
2598
438 9048-41/01
94
Drum
6
5
2599
8
7
2601
438 9048-41/01
2600
2660
Drum
95
10
9
2602
2603
12
11
2604
2605
438 9048-41/01
Drum
96
14
13
2606
2622
16
15
�
�
6439
438 9048-41/01
2624
Frame
97
Description
The frame consists of a ”saddle” with straps which is attached to a base
plate by four strut dampers. The drum unit is mounted on the cradle and
secured by the strap which is held together at the top of the outer drum.
Fig
1
The base plate stands on four adjustable feet on the floor.
The motor unit and drain valve are mounted on the underside of the cradle.
In machines equipped with a drain pump, this is mounted on the base plate.
1
9
1
8
2
7
3
4
6
1.
2.
3.
4.
5.
6.
7.
8.
9.
Cradle
Drain valve
Transformer
Drain pump
Adjustable foot
Shock absorbers
Tachometer
Motor
Strap
5
2265
438 9048-51/01
Tightening torques
99
Tightening torques for especially important bolted unions
The following unions must be tightened to the torques specified here:
Fig
1
A.
Between bearing strut and outer drum.
38 ±5.7 Nm
B.
Between pulley and shaft.
38 ±5.7 Nm
C.
Between shaft strut and inner drum.
24 ±1.2 Nm
D.
For strap between front gable and outer drum.
24 ±1.2 Nm
E.
For strap between cradle and outer drum.
24 ±1.2 Nm
1
C
E
A
D
B
2405
438 9048-61/01
www.electrolux.com/professional
Share more of our thinking at www.electrolux.com
about | case studies | contact
0845 077 65 65
Home
Laundry Equipment
Ozone Laundry Systems
Chemicals
Services
Special Offers
Ex Rental
Testimonials
Contact Us