1
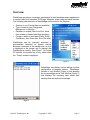
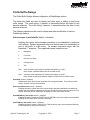
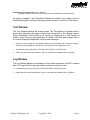
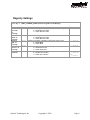
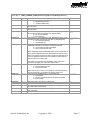
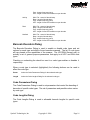
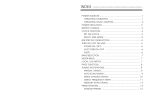
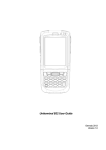
DataWedge User Guide
For DataWedge v2.01.02
Table of Contents
Overview............................................................................................................................... 2
Menu Functions .................................................................................................................... 3
Prefix/Suffix Dialogs ............................................................................................................ 5
Test Window......................................................................................................................... 6
Log Window ......................................................................................................................... 6
AutoPIE Mode ...................................................................................................................... 7
Registry Settings ................................................................................................................... 8
Barcode Feedback Dialog ................................................................................................... 15
Barcode Decoders Dialog ................................................................................................... 16
Installation........................................................................................................................... 18
Overview
DataWedge provides a convenient mechanism for non-hardware-aware applications
to receive data from barcodes, RFID tags, Magnetic stripe cards and serial devices.
The following characteristics of DataWedge can be setup in the Registry:
•
•
•
•
Scanner to use (if more than one available)
Type of reads to use (Foreground,
Background, or Monitor)
Decoders to enable (Start from All or None
then enable or disable individual decoders)
Format in which to send data (Prefix, Suffix,
Text/Binary, Auto Enter after, Auto Tab after).
DataWedge can be manually launched or
automatically launched on system startup.
Because it executes in the background, an icon
is displayed in the system tray to indicate that
DataWedge is running. See Figure 1. On Pocket
PC devices, the system tray is only visible when
the “Today” screen is displayed.
Figure 1
DataWedge can display various dialogs to allow
configuration of program options. DataWedge
includes a Log Window (Figure 2) that displays
the log messages and a Test Window (Figure 3)
that displays the incoming data rather than
sending them as keyboard messages.
Figure 2
Symbol Technologies, Inc
Copyright © 2006
Page 2
DataWedge can be pre-configured via the
registry to adjust its options or the manner in
which the data is transmitted. In particular, the
types of data that will be captured can be
adjusted. Additionally, the prefix (the data sent
before the data) and the suffix (the data sent
after the data) can be adjusted.
Figure 3
Note: The User Interface of this application may look different when run on different
terminals with different screen sizes.
Menu Functions
NOTE: Even if a particular Scanner is enabled in DataWedge, Scanning is prevented on entry to any
configuration sub-dialog of that Scanner (Dialogs invoked through Sub Menu options under that
Scanner) and allowed again on return back to the Test Window or back to the hidden state (no UI).
Barcode
RFID
Presents a secondary menu to allow selection of a configuration type to view or modify.
Enable
Allow scanning to occur due to the trigger. Scanning is allowed by
default when the application starts.
Disable
Prevent scanning from occurring due to the trigger.
Prefix/Suffix
Displays the Prefix/Suffix Dialog to allow Barcode prefix/suffix
options to be viewed or modified.
Feedback
Displays the Feedback Dialog to change Barcode feedback options.
Decoders
Displays the Decoders Dialog to enable or disable code types and
set options for each type.
Presents a secondary menu to allow selection of a configuration type to view or modify.
Enable
Symbol Technologies, Inc
Allow tag reading to occur due to the trigger. If supported tag reading
is allowed by default when the application starts.
Copyright © 2006
Page 3
MSR
Serial
Disable
Prevent tag reading from occurring due to the trigger.
Prefix/Suffix
Displays the Prefix/Suffix Dialog to allow RFID prefix/suffix options to
be viewed or modified.
Feedback
Displays the Feedback Dialog to change RFID feedback options.
Options
Displays the Options Dialog to allow setting of RFID options.
Presents a secondary menu to allow selection of a configuration type to view or modify.
Enable
Allow reading of data from a Mag Stripe Reader if connected.
Reading is disabled by default when the application starts.
Disable
Prevent reading of data from a Mag Stripe Reader.
Prefix/Suffix
Displays the Prefix/Suffix Dialog to allow MSR prefix/suffix options to
be viewed or modified.
Feedback
Displays the Feedback Dialog to change MSR feedback options.
Options
Displays the Options Dialog to display the MSR dll being used.
Presents a secondary menu to allow selection of a configuration type to view or modify.
Enable
Allow data input from a serial connection. This is disabled by default
when the application starts.
Disable
Prevent data input from a serial connection.
Prefix/Suffix
Displays the Prefix/Suffix Dialog to allow Serial prefix/suffix options
to be viewed or modified.
Feedback
Displays the Feedback Dialog to change Serial feedback options.
Options
Displays the Options Dialog to set Serial input options.
Serial Setup
Displays the Serial Setup Dialog to set the Serial interface
parameters.
Test
Brings up the Test Window to allow scanning operation to be tested locally.
Log
Brings up the Log Window which displays the logs of DataWedge.
About
Displays the About Box, showing application name, version, etc.
Exit
Exits the application.
Symbol Technologies, Inc
Copyright © 2006
Page 4
Prefix/Suffix Dialogs
The Prefix/Suffix Dialogs allows configuration of DataWedge options.
Two data entry fields are used to display and allow entry or editing of prefix and
suffix strings. The prefix string, if present, is transmitted before the data for any
barcode scanned. The suffix string, if present, is transmitted after the data for any
barcode scanned.
The following checkboxes are used to display and allow modification of various
DataWedge options:
Allow escapes in prefix/suffix (default = disabled)
Enabling this option allows escape sequences to be embedded in prefix and
suffix strings. Escape sequences allow non-textual data to be transmitted as
part of the prefix or suffix string. All escape sequences begin with the
backslash “\” character. The supported escape sequences are:
\b
Backspace
\f
Form feed
\n
New line (line feed)
\r
Carriage return
\t
Tab
\xHH
ASCII character represented in Hexadecimal notation (e.g \x3F)
Note: consult a standard ASCII chart for suitable values.
\vHH
Virtual key code represented in Hexadecimal notation (e.g \x3F)
Note: consult the Microsoft Windows header file WinUser.h for suitable values.
Send data (default = enabled)
Disabling this option prevents the actual data from being transmitted. The prefix and suffix
strings, if present, will still be transmitted.
Don't treat data as text (default = disabled)
Enabling this option causes data to be read as binary data and transmitted in hexadecimal
notation with 2 hexadecimal digits per binary byte of data.This option does not affect the Test
Display, which has its own mechanism to display Hex and Text formats of data.
Send ENTER key after suffix (default = disabled)
Enabling this option causes an ENTER key (VK_RETURN virtual key code) to be transmitted
following all other data (prefix, barcode, and suffix).
Send TAB key after suffix (default = disabled)
Enabling this option causes a TAB key (VK_TAB virtual key code) to be transmitted following
all other data (prefix, barcode, and suffix).
Symbol Technologies, Inc
Copyright © 2006
Page 5
Send keys only to Pocket IE (default = disabled)
Enabling this option turns on AutoPIE mode which is discussed later in this document.
All options changed in the Prefix/Suffix Dialogs are saved in the registry and in a
DataWedge.reg file and hence will persist across a warm or cold boot of the device.
Test Window
The Test Window displays the scanned data. The Test Window is typically used to
ensure that barcodes are being scanned and transmitted in the desired manner.
When DataWedge Test Window is not running on foreground (i.e. Test Window is
hidden, closed or some other application is invoked over that), data is again sent to
the current foreground application via keyboard messages.
•
There is a button to toggle the Test Display mode, which should state “Hex” on startup. Pressing
this button, would change text data to hex, second press would change back to text.
•
Test Window can be closed via the Title Bar Close (WCE) or OK (PPC) button.
•
A Menu bar with all the functionalities of the Tray Icon Menu is available with Test Window.
Log Window
The Log Window displays a scrolling list of the actions performed, but NOT scanned
data. The Log Window is typically used to confirm the actions of user.
•
Log Window can be closed via the Title Bar Close (WCE) or OK (PPC) button.
•
A Menu bar with all the functionalities of the Tray Icon Menu is available with Log Window.
Symbol Technologies, Inc
Copyright © 2006
Page 6
AutoPIE Mode
DataWedge supports an AutoPIE mode that is designed to integrate with Microsoft
Pocket Internet Explorer (PIE) on Pocket PC 2002, Pocket PC 2003 and Windows
Mobile 5.0 devices ONLY.
When AutoPIE mode is enabled, DataWedge looks to see if Pocket Internet Explorer
is running and if there is an empty data entry field on the currently displayed web
page. If PIE is not running or there is no empty data entry field on the currently
displayed web page, then scanning is NOT enabled. This can result in improved
battery life as well as less user confusion, since the scanner will not come on, even if
the trigger is pressed, when there is nowhere for the data to go. While scanning is
not enabled, DataWedge periodically re-checks to see if the conditions necessary to
enable scanning have changed.
If DataWedge finds that PIE is running and that there is at least one empty data
entry field on the currently displayed web page then DataWedge makes PIE the
foreground window, sets the input the focus to the first empty data entry field, and
then enables scanning. While scanning is enabled, DataWedge periodically rechecks to make sure that the conditions necessary to enable scanning remain
present. If the condition cease to be met, then scanned is disabled. When a
barcode is scanned, DataWedge re-checks to make sure that PIE is running and
that there is at least one empty data entry field on the currently displayed web page.
If so, then DataWedge makes PIE the foreground window, sets the input the focus to
the first empty data entry field, and then sends the data (prefix, barcode, and suffix)
as keyboard messages. DataWedge then repeats the check to determine if
scanning should be enabled again.
The net effect of enabling AutoPIE mode is that scanning is only enabled when PIE
is running and there is an empty data entry field on the currently displayed web
page. Further, when data is transmitted, steps are taken to ensure that it arrives at
an appropriate destination. AutoPIE mode therefore increases the effectiveness of
scanning into web-based applications.
To select AutoPIE mode, either select the "Send Keys only to Pocket IE" check box
in the Setup Dialog or by add an appropriate Registry setting as defined in the next
section.
Registry Settings
Root Key = [HKEY_CURRENT_USER\Software\Symbol\DataWedge]
Name
Enable
Barcode
on
startup
Enable
RFID on
startup
Enable
MSR on
startup
Enable
Serial on
startup
UI
Enabled
Type
Description
Default
dword
Permits the enabling or disabling of Barcode reader on startup
0 = disable Barcode reader
1 = enable Barcode reader
1 = enable
dword
Permits the enabling or disabling of RFID reader on startup
0 = disable Barcode reader
1 = enable Barcode reader
1 = enable
dword
Permits the enabling or disabling of all barcode types at once.
0 = disable MSR
1 = enable MSR
Permits the enabling or disabling of Serial input on startup
0 = disable Serial input
1 = enable Serial input
0 = disable
Permits the enabling or disabling of User Interface on startup
0 = disable User Interface
1 = enable User Interface
If MC1000
0 = disable
else
1 = enable
dword
dword
Symbol Technologies, Inc
Copyright © 2006
0 = disable
Page 8
Root Key = [HKEY_CURRENT_USER\Software\Symbol\DataWedge\Barcode]
Name
AutoPIE
Type
Description
Default
dword
0 = disable
Scanner
dword
All
dword
code
string
Prefix
string
Suffix
string
AutoTab
dword
AutoEnter
dword
Binary
dword
Permits the enabling or disabling of AutoPIE mode
0 = disable AutoPIE mode
1 = enable AutoPIE mode
This string entry sets the scanner to use, if multiple scanners are
available. Where the x in “SCNx:” is the scanner number
Permits the enabling or disabling of all barcode types at once.
0 = disable All types
1 = enable All types
In addition to using the defaults or the “All” entry, individual
barcode types can also be enabled or disabled. This is done using
the same format, but with the barcode type name instead of the “All”
keyword. For example, PDF417=1, enables the scanner for
PDF417 decoding, while PDF417=0 disables it. The possible
barcode types are: UPCE0, UPCE1, UPCA, MSI, EAN8, EAN13,
CODABAR, CODE39, D2OF5, I2OF5, CODE11, CODE93,
CODE128, PDF417, TRIOPTIC39, RSS14, RSSLIM, RSSEXP,
WEBCODE
Allows the adjustment of the prefix string (the data sent before the
barcode data).
Allows the adjustment of the suffix string (the data sent after the
barcode data).
Sets whether or not a TAB key (VK_TAB virtual key code) should
be sent after the barcode (and after any selected suffix).
0 = do not send TAB key
1 = send TAB key
Sets whether or not an ENTER key (VK_RETURN virtual key code)
should be sent after the barcode (and after any selected suffix)
0 = do not send ENTER key
1 = send ENTER key
Sets whether or not a conversion of barcode data from ASCII to
UNICODE should take place before sending barcode data.
0 = convert barcode data to UNICODE
1 = don’t convert barcode data.
SCN1
default for
selected
scanner
default set
for selected
scanner
none
none
0 = do not
send
0 = do not
send
0 = convert
Note: DataWedge requires UNICODE data to produce keystrokes. If
binary mode is selected, the binary data will be formatted as a HEX
string (2 characters per byte) and then converted to UNICODE to be
sent. The application will thus receive keystrokes representing the
HEX encoding of the binary data.
Data
Scan Type
Code ID
dword
dword
dword
This option does not affect the Test Display, which has its own
mechanism to display Hex and Text formats of data.
Sets whether or not barcode data should be sent.
0 = don't send barcode data
1 = send barcode data
Note: If this is entry is set to 0, only the prefix and suffix (if present),
and any terminator (e.g. AutoTab or AutoEnter) will be sent.
Sets the type of scan used to obtain barcodes.
0 = use foreground reads
1 = use background reads
2 = use monitor reads
See the description of the ScanSamp2 application for details about
how the various scan types operate.
Sets the Code ID used to prefix barcodes.
Symbol Technologies, Inc
Copyright © 2006
1 = send
data
1 =
background
0 = None
Page 9
0 = None
1 = Symbol
2 = AIM
Feedback
Decode
Feedback
Start
Feedback
Intermedi
ate
Feedback
Fatal
Feedback
NonFatal
Feedback
Activity
code_MINL
EN
binary
code_MAXL
EN
dword
code_PARA
MS
binary
binary
binary
binary
binary
binary
dword
See the description of the ScanSamp2 application for details about
how the various Code IDs operate.
Binary structure defining the Decode feedback parameters.
Refer to the SMDK help file for further information.
Binary structure defining the Start feedback parameters.
Refer to the SMDK help file for further information.
Binary structure defining the Intermediate feedback parameters.
Refer to the SMDK help file for further information.
Binary structure defining the Fatal feedback parameters.
Refer to the SMDK help file for further information.
Binary structure defining the Non-Fatal feedback parameters.
Refer to the SMDK help file for further information.
Binary structure defining the Activity feedback parameters.
Refer to the SMDK help file for further information.
The minimum length for a barcode symbology can be set. This is
done using the format code_MINLEN. For example,
CODE39_MINLEN=10, sets the minimum length for Code39
barcodes to 10. The possible barcode types are: UPCE0, UPCE1,
UPCA, MSI, EAN8, EAN13, CODABAR, CODE39, D2OF5, I2OF5,
CODE11, CODE93, CODE128, PDF417, TRIOPTIC39, RSS14,
RSSLIM, RSSEXP, WEBCODE
The maximum length for a barcode symbology can be set. This is
done using the format code_MAXLEN. For example,
CODE39_MAXLEN=20, sets the maximum length for Code39
barcodes to 20. The possible barcode types are: UPCE0, UPCE1,
UPCA, MSI, EAN8, EAN13, CODABAR, CODE39, D2OF5, I2OF5,
CODE11, CODE93, CODE128, PDF417, TRIOPTIC39, RSS14,
RSSLIM, RSSEXP, WEBCODE
Individual barcode parameters can be set using this setting. This is
done using the format code_PARAMS. For example,
CODE39_PARAMS would specify parameters for Code39
barcodes. Please refer to the SMDK help file for further details on
binary structures for the various barcode types. The possible
barcode types are: UPCE0, UPCE1, UPCA, MSI, EAN8, EAN13,
CODABAR, CODE39, D2OF5, I2OF5, CODE11, CODE93,
CODE128, PDF417, TRIOPTIC39, RSS14, RSSLIM, RSSEXP,
WEBCODE
Symbol Technologies, Inc
Copyright © 2006
Page 10
Root Key = [HKEY_CURRENT_USER\Software\Symbol\DataWedge\RFID]
Name
AutoPIE
Type
Description
Default
dword
0 = disable
Prefix
string
Suffix
string
AutoTab
dword
AutoEnter
dword
Binary
dword
Permits the enabling or disabling of AutoPIE mode
0 = disable AutoPIE mode
1 = enable AutoPIE mode
Allows the adjustment of the prefix string (the data sent before the
barcode data).
Allows the adjustment of the suffix string (the data sent after the
barcode data).
Sets whether or not a TAB key (VK_TAB virtual key code) should
be sent after the Data (and after any selected suffix).
0 = do not send TAB key
1 = send TAB key
Sets whether or not an ENTER key (VK_RETURN virtual key code)
should be sent after the Data (and after any selected suffix)
0 = do not send ENTER key
1 = send ENTER key
Sets whether or not a conversion of Tag data from ASCII to
UNICODE should take place before sending Tag data.
0 = convert Tag data to UNICODE
1 = don’t convert Tag data.
none
none
0 = do not
send
0 = do not
send
0 = convert
Note: DataWedge requires UNICODE data to produce keystrokes. If
binary mode is selected, the binary data will be formatted as a HEX
string (2 characters per byte) and then converted to UNICODE to be
sent. The application will thus receive keystrokes representing the
HEX encoding of the binary data.
Data
dword
Feedback
dword
BeepTime
BeepFreq
LEDTime
dword
dword
dword
WaveFile
string
This option does not affect the Test Display, which has its own
mechanism to display Hex and Text formats of data.
Sets whether or not Tag data should be sent.
0 = don't send Tag data
1 = send Tag data
Note: If this is entry is set to 0, only the prefix and suffix (if present),
and any terminator (e.g. AutoTab or AutoEnter) will be sent.
Sets the type of feedback given on a successful read.
1 = no feedback
2 = play the wav file specified by the WaveFile setting
4 = sound a beep
Sets the duration of the beep in milliseconds
Sets the frequency of the beep in Hertz
Sets the length of time the green LED is on for following a
successful read in miliseconds
Specifies the wav file to play. This string should not contain any
path information.
Symbol Technologies, Inc
Copyright © 2006
1 = send
data
4 = beep
500
3000
3000
Page 11
Root Key = [HKEY_CURRENT_USER\Software\Symbol\DataWedge\MSR]
Name
AutoPIE
Type
Description
Default
dword
0 = disable
Prefix
string
Suffix
string
AutoTab
dword
AutoEnter
dword
Binary
dword
Permits the enabling or disabling of AutoPIE mode
0 = disable AutoPIE mode
1 = enable AutoPIE mode
Allows the adjustment of the prefix string (the data sent before the
MSR data).
Allows the adjustment of the suffix string (the data sent after the
MSR data).
Sets whether or not a TAB key (VK_TAB virtual key code) should
be sent after the MSR data (and after any selected suffix).
0 = do not send TAB key
1 = send TAB key
Sets whether or not an ENTER key (VK_RETURN virtual key code)
should be sent after the MSR data (and after any selected suffix)
0 = do not send ENTER key
1 = send ENTER key
Sets whether or not a conversion of MSR data from ASCII to
UNICODE should take place before sending MSR data.
0 = convert MSR data to UNICODE
1 = don’t convert MSR data.
none
none
0 = do not
send
0 = do not
send
0 = convert
Note: DataWedge requires UNICODE data to produce keystrokes. If
binary mode is selected, the binary data will be formatted as a HEX
string (2 characters per byte) and then converted to UNICODE to be
sent. The application will thus receive keystrokes representing the
HEX encoding of the binary data.
Data
dword
Feedback
dword
BeepTime
BeepFreq
LEDTime
dword
dword
dword
WaveFile
string
This option does not affect the Test Display, which has its own
mechanism to display Hex and Text formats of data.
Sets whether or not MSR data should be sent.
0 = don't send MSR data
1 = send MSR data
Note: If this is entry is set to 0, only the prefix and suffix (if present),
and any terminator (e.g. AutoTab or AutoEnter) will be sent.
Sets the type of feedback given on a successful read.
1 = no feedback
2 = play the wav file specified by the WaveFile setting
4 = sound a beep
Sets the duration of the beep in milliseconds
Sets the frequency of the beep in Hertz
Sets the length of time the green LED is on for following a
successful read in miliseconds
Specifies the wav file to play. This string should not contain any
path information.
Symbol Technologies, Inc
Copyright © 2006
1 = send
data
4 = beep
500
3000
3000
Page 12
Root Key = [HKEY_CURRENT_USER\Software\Symbol\DataWedge\Serial]
Name
AutoPIE
Type
Description
Default
dword
0 = disable
Prefix
string
Suffix
string
AutoTab
dword
AutoEnter
dword
Binary
dword
Permits the enabling or disabling of AutoPIE mode
0 = disable AutoPIE mode
1 = enable AutoPIE mode
Allows the adjustment of the prefix string (the data sent before the
barcode data).
Allows the adjustment of the suffix string (the data sent after the
barcode data).
Sets whether or not a TAB key (VK_TAB virtual key code) should
be sent after the barcode (and after any selected suffix).
0 = do not send TAB key
1 = send TAB key
Sets whether or not an ENTER key (VK_RETURN virtual key code)
should be sent after the barcode (and after any selected suffix)
0 = do not send ENTER key
1 = send ENTER key
Sets whether or not a conversion of barcode data from ASCII to
UNICODE should take place before sending barcode data.
0 = convert barcode data to UNICODE
1 = don’t convert barcode data.
none
none
0 = do not
send
0 = do not
send
0 = convert
Note: DataWedge requires UNICODE data to produce keystrokes. If
binary mode is selected, the binary data will be formatted as a HEX
string (2 characters per byte) and then converted to UNICODE to be
sent. The application will thus receive keystrokes representing the
HEX encoding of the binary data.
Data
dword
Feedback
dword
BeepTime
BeepFreq
LEDTime
dword
dword
dword
WaveFile
string
This option does not affect the Test Display, which has its own
mechanism to display Hex and Text formats of data.
Sets whether or not barcode data should be sent.
0 = don't send barcode data
1 = send barcode data
Note: If this is entry is set to 0, only the prefix and suffix (if present),
and any terminator (e.g. AutoTab or AutoEnter) will be sent.
Sets the type of feedback given on a successful read.
1 = no feedback
2 = play the wav file specified by the WaveFile setting
4 = sound a beep
Sets the duration of the beep in milliseconds
Sets the frequency of the beep in Hertz
Sets the length of time the green LED is on for following a
successful read in miliseconds
Specifies the wav file to play. This string should not contain any
path information.
Symbol Technologies, Inc
Copyright © 2006
1 = send
data
4 = beep
500
3000
3000
Page 13
Root Key = [HKEY_CURRENT_USER\Software\Symbol\DataWedge\Serial]
Name
AutoPIE
Type
Description
Default
dword
0 = disable
Prefix
string
Suffix
string
AutoTab
dword
AutoEnter
dword
Binary
dword
Permits the enabling or disabling of AutoPIE mode
0 = disable AutoPIE mode
1 = enable AutoPIE mode
Allows the adjustment of the prefix string (the data sent before the
barcode data).
Allows the adjustment of the suffix string (the data sent after the
barcode data).
Sets whether or not a TAB key (VK_TAB virtual key code) should
be sent after the barcode (and after any selected suffix).
0 = do not send TAB key
1 = send TAB key
Sets whether or not an ENTER key (VK_RETURN virtual key code)
should be sent after the barcode (and after any selected suffix)
0 = do not send ENTER key
1 = send ENTER key
Sets whether or not a conversion of barcode data from ASCII to
UNICODE should take place before sending barcode data.
0 = convert barcode data to UNICODE
1 = don’t convert barcode data.
none
none
0 = do not
send
0 = do not
send
0 = convert
Note: DataWedge requires UNICODE data to produce keystrokes. If
binary mode is selected, the binary data will be formatted as a HEX
string (2 characters per byte) and then converted to UNICODE to be
sent. The application will thus receive keystrokes representing the
HEX encoding of the binary data.
Data
dword
Feedback
dword
BeepTime
BeepFreq
LEDTime
dword
dword
dword
WaveFile
string
This option does not affect the Test Display, which has its own
mechanism to display Hex and Text formats of data.
Sets whether or not barcode data should be sent.
0 = don't send barcode data
1 = send barcode data
Note: If this is entry is set to 0, only the prefix and suffix (if present),
and any terminator (e.g. AutoTab or AutoEnter) will be sent.
Sets the type of feedback given on a successful read.
1 = no feedback
2 = play the wav file specified by the WaveFile setting
4 = sound a beep
Sets the duration of the beep in milliseconds
Sets the frequency of the beep in Hertz
Sets the length of time the green LED is on for following a
successful read in miliseconds
Specifies the wav file to play. This string should not contain any
path information.
Symbol Technologies, Inc
Copyright © 2006
1 = send
data
4 = beep
500
3000
3000
Page 14
The following default values are used if no registry settings are present.
•
•
•
•
•
•
•
•
•
Scanner=SCN1:
scanner default decoders
Prefix=""
Suffix=""
AutoTab=false
AutoEnter=false
Binary=false
Data=true
Type=Background
Barcode Feedback Dialog
The Barcode Feedback Dialog is used to change scanning feedback options and
affects future barcodes scanned. The following parameters can be altered:
Code ID - Selects the code type reporting prefix to be added to the data to indicate the type of
barcode scanned. The possible values are:
Symbol
AIM
None
A Symbol-defined single-character prefix.
A standards-based three-character prefix.
No prefix. This is the default.
Scan Type - Selects the type of scan to be performed. The possible values are:
Foreground
The scan will take place in the foreground, as the primary
user activity. Foreground reads combine only with other
foreground reads and preempt background reads.
Background
The scan will take place in the background, but only if no
foreground reads are pending.
Monitor
No scanning will be requested, but if scanning is initiated by
another application, a monitor read will receive a copy if the
code type is appropriate.
Feedback parameters - These buttons invoke sub-dialogs to control various types of feedback. The
same settings can be controlled for each type.
Good Decode
WAV File - sound of decode beep
Beep - length of decode beep
Freq - beeper frequency (tone)
LED - length of time LED remains on upon decode
Start
WAV File - sound of decode beep
Beep - length of decode beep
Freq - beeper frequency (tone)
LED - length of time LED remains on upon decode
Intermediate
WAV File - sound of decode beep
Beep - length of decode beep
Symbol Technologies, Inc
Copyright © 2006
Page 15
Freq - beeper frequency (tone)
LED - length of time LED remains on upon decode
Activity
WAV File - sound of decode beep
Beep - length of decode beep
Freq - beeper frequency (tone)
LED - length of time LED remains on upon decode
Fatal
WAV File - sound of decode beep
Beep - length of decode beep
Freq - beeper frequency (tone)
LED - length of time LED remains on upon decode
Nonfatal
WAV File - sound of decode beep
Beep - length of decode beep
Freq - beeper frequency (tone)
LED - length of time LED remains on upon decode
Barcode Decoders Dialog
The Barcode Decoders Dialog is used to enable or disable code types and set
options for each type and affects future barcodes scanned. The list of code types
will vary based on the capabilities of the scanner. The UPC/EAN General entry is
actually a set of general purpose parameters that apply to all UPC and EAN code
types.
Checking or unchecking the check box next to a code type enables or disables it,
respectively.
When a code type is selected (highlighted) the following buttons can be used to
affect the code type.
Param
Invoke the Code Parameters Dialog for the selected code type.
Length
Invoke the Code Lengths Dialog for the selected code type.
Code Parameters Dialog
The Code Parameters Dialog is used to set parameters that control the decoding of
barcodes of specific code types. The set of parameters and possible values varies
by code type.
Code Lengths Dialog
The Code Lengths Dialog is used to allowable barcode lengths for specific code
types.
Symbol Technologies, Inc
Copyright © 2006
Page 16
Lengths are specified as a Minimum Length and a Maximum Length. If both length
values are set to zero, then any (variable) length is selected. If both length values
are non-zero, then three possible results can occur. If the Minimum Length is less
than the Maximum Length, then a range is selected which includes are values
between the two lengths, inclusive. If the Minimum Length is greater than the
Maximum Length, then the two length values indicated by Minimum Length and
Maximum Length are selected. If the Minimum Length is equal to the Maximum
Length, then only that single length is selected.
Not all code types support all combinations. Some code types (e.g. UPC, EAN)
always have fixed lengths and hence ignore the length settings specific. Other code
types may impose limits on the possible lengths. The Code Lengths Dialog does not
attempt to enforce these code type-specific restrictions.
Symbol Technologies, Inc
Copyright © 2006
Page 17
Installation
Download Package
The download package for DataWedge contains the following components:
Component
DataWedge User Guide.PDF
readme.html
DataWedge.exe
DataWedge.exe
DataWedge.cpy
Folder
\
\
\Bin\PPC
\Bin\WCE
\Application
DataWedge.run
\Application\Startup
Description
User Guide
README file
Executable for Pocket PC devices
Executable for Windows CE devices
CPY file used to copy the executable into the
Windows folder
RUN file use to automatically launch the
application at startup
Install Procedure
To install DataWedge so that it is launched automatically after a Cold boot\Clean
boot (WM50), do the following:
1. Unzip the DataWedge download package into a temporary folder on your PC.
2. If installing on a Pocket PC/WM50s device, copy “\Bin\PPC\DataWedge.exe”
from your PC to the \Application folder on the device
If installing on a Windows CE device, copy “\Bin\WCE\DataWedge.exe” from
your PC to the “\Application” folder on the device.
3. Copy “\Application\DataWedge.cpy” from your PC to the \Application on the
device.
4. Copy “\Application\Startup\DataWedge.run” from your PC to the
“\Application\Startup” folder on the device.
5. Cold boot the device.
Symbol Technologies, Inc
Copyright © 2006
Page 18