1
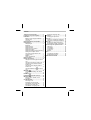
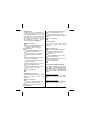
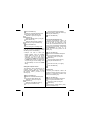
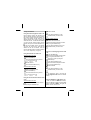
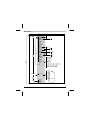
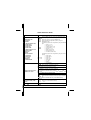
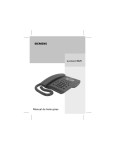
s
euroset 3020
User Manual
Instrucciones de Manejo
Contents
Telephone characteristics....................... 3
Learning to use your telephone ............. 3
Installation ................................................ 3
Battery / Power supply installation....... 3
Handset cord........................................ 4
Line cord .............................................. 4
Recommendation for Installation........... 4
Configuration............................................ 5
Display bright ....................................... 5
Backlight............................................... 5
Setting the time.................................... 5
Setting the date.................................... 6
Setting the ringer volume..................... 6
Setting the melody ............................... 6
Setting the dialing mode (tone/pulse) .. 6
Setting the reception volume ............... 7
Area code for long distance call .......... 7
Operator code ...................................... 7
Mailbox................................................. 8
Other configurations ............................ 8
Receiving calls ......................................... 8
Dialing call numbers ................................ 9
Using the numeric keypad to make a
call........................................................ 9
Using the memories to make a call ..... 9
Using the List of Received Calls to
make a call........................................... 9
Using the List of Outgoing Calls to
make a call........................................... 9
Using the REDIAL key
to make a
call........................................................ 9
MUTE key
........................................... 10
Activating/deactivating the MUTE
music.................................................. 10
PAUSE key
......................................... 10
FLASH Key
(special services).......... 10
Memories................................................. 10
Storing phone number in the
memories ........................................... 10
Call Identification ................................... 11
Receiving a call.................................. 11
Indication of received calls................. 11
Consultation of received calls............ 11
Erasing the received calls.................. 12
Consultation of outgoing calls............ 12
Erasing the outgoing calls ................. 12
Password ................................................ 12
Changing the password..................... 13
Key Lock ................................................. 13
Locking or unlocking the telephone... 13
Temporary unlocking the telephone .. 14
Baby Call................................................. 14
Activating the Baby Call function....... 14
Deactivating the Baby Call function... 14
Function keys for special services ...... 14
Follow-me .......................................... 15
Call Waiting........................................ 15
Consultation....................................... 15
Conference ........................................ 15
Mailbox............................................... 15
Alarm ....................................................... 15
Programming the alarm..................... 16
Deactivating the alarm....................... 16
Quick Reference Guide.…….………….. 17
1
Telephone characteristics
This
telephone
characteristics:
has
the
15)
16)
17)
18)
following
• Telephone with FSK caller identification
• Telephone with intelligent keys (activates
special services in digital central offices)
• Ring with 3 volumes and 3 melodies
• List of received calls for 99 numbers
• List of originated calls for 99 numbers
• Telephone with 12 memories
• Display illumination (backlight)
19
( )
*
Call Waiting key
( )
*
Release Call key
Numeric keypad
Input for the external power supply
20
21
22
23
29
Learning to use your telephone
10
4
11
5
12
6
13
7
14
8
15
9
16
26
27
28
Repeated calls indicator
Indicator symbol of MUTE activated
Received calls counter
Time
AM and PM indicator
Date
Connection time in minutes
Indicator
symbol
of
Mailbox
( )
messages *
27) Low battery indicator symbol
28) Field for numeric digits
29) Field for alpha-numeric characters
1
3
25
19)
20)
21)
22)
23)
24)
25)
26)
18
2
24
( )
*
depends on the availability of the service by
your local operator
17
1)
2)
3)
4)
5)
6)
7)
8)
9)
10)
11)
12)
13)
14)
Installation
Display
ARROW key above
ARROW key below
MEM key
REDIAL / PAUSE key
FLASH key
( )
Follow-me key
*
( )
Conference key
*
Operator key
DIAL / SELECT key
DEL / EXIT key
MUTE key
MENU key
( )
Mailbox key
*
Battery / Power supply installation
This telephone requires 4 AA type batteries
- small size (not included) or a power
supply of 9 Vdc - 200 mA with positive in
the central pin of the connector (not
included).
Do not use the two possibilities at the same
time, because there is risk of damage for
the batteries. Only use the batteries or the
power supply to supply the telephone. If
you are using the power supply and a
3
Handset cord
Connect the long end of the handset cord in
the socket marked with the symbol
(position 31). Insert the cord in the cable
line (position 32) and attach the short end
to the handset.
power fault occurs, the telephone will not
be supplied by the power supply.
To install or replace the batteries, follow the
steps below:
• disconnect the equipment from the
telephone line.
• open the battery compartment (position
30).
• install four new batteries, taking care to
observe the correct position (polarity
indicated by the drawing inside the
compartment).
Line cord
Connect the line cord in the socket marked
with the symbol
(position 33). Insert the
cord in the cable line (position 34). Attach
the other end to the telephone line (RJ11
modular Jack connector).
When the batteries are low, needing to be
changed, the display will show the low
battery indicator symbol (position 27 on
page 3).
To install the power supply, just connect it
to the telephone (position 18 on page 3)
and to the electric energy network plug.
Recommendation for Installation
Please, observe the following guidelines:
• For your own safety and protection, do
not uses the telephone in places with
overheat or extreme humidity. The
telephone operates at temperatures
between +5ºC and +55ºC and it is not
water-proof.
• Varnished or lacquered furniture may be
marked by some parts of the telephone
such as the rubber feet.
• Place the telephone at least one meter
away from devices such as cordless
telephones or TV sets. These devices
may cause interference in the telephone.
• To clean the telephone, just use a damp
or antistatic cloth. Never use a dry cloth
(danger of electrostatic discharge) or any
abrasive cleaning products.
• When the telephone reaches its end of
service life, dispose of it in a way that
does not cause any harm to the
environment, in accordance with the local
legal requirements.
• Please, dispose of used batteries in
accordance
with
requirements
of
environment protection.
34
31
32
30
33
Note:
• The telephone operates without batteries
or without a power supply to carry out
calls, but the call identification will not
work and the display can switch off.
• When a power supply is used with the
telephone, it is recommended to use the
C39280-Z4-C508 Siemens power supply.
4
Configuration
Press the MENU key
Select the CONFIGURATION option
by using the DIAL/SELECT key
Once connected to the line, the telephone
will be ready to make and receive calls. In
this initial situation, the display will show
information shown in the figure below,
where NEW 00 is the number of non
answered calls:
Select the Y option by using the
ARROW key
Select the BACKLIGHT option by
using the DIAL/SELECT key
Select the desired option (Y or N) by
using the ARROW key, to activate or
deactivate the backlight
Press the MENU key
Setting the time
To adjust the time of the telephone it is
necessary to access two options of the
CONFIGURATION menu: time adjustment
and visualization format (24h or AM/PM). If
any of these items are already correct, you
can go to the next step by pressing the
DIAL/SELECT key
. See the following
adjustment procedure:
In the next items, it will be shown the
description of the possible configurations
made by the telephone menu. To make the
adjustments, the handset must be on hook.
Display bright
To adjust the display bright, proceed in the
following way:
Press the MENU key
Press the MENU key
Select the CONFIGURATION option
by using the DIAL/SELECT key
Select the CONFIGURATION option
by using the DIAL/SELECT key
Select the Y option by using the
ARROW key
Select the Y option by using the
ARROW key
Select the ENTER TIME option by
using the DIAL/SELECT key
Select the BRIGHT option by using
the DIAL/SELECT key
:
Select the desired option (1, 2 or 3) by
using the ARROW key
Enter the time with four digits in the
24h format (example: 13:57h - enter
1357 digits)
Press the DIAL/SELECT key, until
appears the FORMAT option
Press the MENU key
Select the desired option (24 HS or
AM PM) by using the ARROW key
Backlight
To activate or deactivate the backlight of
the display, proceed in the following way:
Press the MENU key
5
Setting the date
To adjust the date of the telephone it is
necessary to access more than one option
of the CONFIGURATION menu, to enter
day, month and year. If any of these items
are already correct, you can go to the next
step, without enter anything, by pressing
the DIAL/SELECT key
.
See the
following date adjustment procedure:
Select the RINGER VOLUME option
by using the DIAL/SELECT key
Select the desired option (1-low, 2medium, 3-high) by using the ARROW
key
Press the MENU key
Setting the melody
This telephone offers three different
melodies. To adjust, proceed in the
following way:
Press the MENU key
Select the CONFIGURATION option
by using the DIAL/SELECT key
Select the Y option by using the
ARROW key
Press the MENU key
Select the CONFIGURATION option
by using the DIAL/SELECT key
Select the ENTER MONTH option by
using the DIAL/SELECT key
:
Select the Y option by using the
ARROW key
Enter the number of the month with
two digits (example: 06 for June)
Select the MELODY option by using
the DIAL/SELECT key
Press the DIAL/SELECT key, passing
to the option ENTER DAY
:
Select the desired option (1, 2 or 3) by
using the ARROW key
Enter the number of the day with two
digits (example: 08)
Press the MENU key
Press the DIAL/SELECT key, passing
to the option ENTER YEAR
:
Setting the dialing mode (tone/pulse)
Your telephone must be programmed for
TONE dialing or PULSE dialing, according
to the telephone line it is connected to. The
default factory setting is the TONE dialing
mode with the flash time of 250 ms
(DTMF).
Enter the number of the year with two
digits (example: 03 for 2003)
Press the MENU key
Setting the ringer volume
This telephone offers three different ringer
volumes. To adjust, proceed in the
following way:
Checking the dialing mode:
Press any numeric key. If you can still hear
a dialing tone, change to the other dialing
mode.
Press the MENU key
Changing the dialing mode:
To adjust the dialing mode to PULSE or
TONE, proceed in the following way:
Select the CONFIGURATION option
by using the DIAL/SELECT key
Select the Y option by using the
ARROW key
6
Press the MENU key
Select the desired option (NORMnormal volume, HIGH-high volume) by
using the ARROW key
Select the CONFIGURATION option
by using the DIAL/SELECT key
Press the MENU key
Select the Y option by using the
ARROW key
Select the MODE option by using the
DIAL/SELECT key
Area code for long distance call
If necessary, this telephone is able to be
programmed with the area code of your
city. It will allow your telephone to dial
correctly the stored RECEIVED CALLS (in
case of having contracted the Identification
Call Service of your operator - see the item
Call Identification on page 11). To
program the area code, proceed in the
following way:
Select the desired option (TONE or
PULSE) by using the ARROW key
Press the MENU key
Temporary changeover of dialing mode:
While the telephone is set to PULSE dialing
it may be necessary to temporarily change
the dialing mode to TONE dialing.
Press the MENU key
• Example: You wish to check your
banking balance using the telebank
service. Make the call as you usually
would and, as soon as the call is
completed, press
; at this moment
your telephone dialing mode will change
to TONE dialing. When you finished the
call, just hang up and the dialing mode
will automatically turn back to PULSE
dialing.
Select the CONFIGURATION option
by using the DIAL/SELECT key
Select the Y option by using the
ARROW key
Select the AREA CODE option by
using the DIAL/SELECT key
:
Enter the area code (1 to 4 digits)
Press the MENU key
Setting the reception volume
This telephone allows adjustment of the
reception volume, which its default is
programmed at normal volume. To select
the desired volume, proceed in the
following way:
Operator code
If necessary, this telephone is able to be
programmed with the operator code of your
preference. To program the operator code,
proceed in the following way:
Press the MENU key
Select the CONFIGURATION option
by using the DIAL/SELECT key
Press the MENU key
Select the CONFIGURATION option
by using the DIAL/SELECT key
Select the Y option by using the
ARROW key
Select the Y option by using the
ARROW key
Select the VOLUME RX option by
using the DIAL/SELECT key
Select the OP_CODE option by using
the DIAL/SELECT key
7
:
Enter one of the codes below, in
according with the desired option:
Enter the operator code (1 to 6 digits)
Press the MENU key
Note:
The operator code is valid just for the
countries where this service is available.
Mailbox
To program the number of your mailbox by
( )
using the MAILBOX * key (position 14 on
page 3), proceed in the following way:
:
•
•
•
•
•
•
•
•
•
•
Press the MENU key
•
•
•
Select the CONFIGURATION option
by using the DIAL/SELECT key
Select the Y option by using the
ARROW key
Press the MENU key
Select the MAILBOX option by using
the DIAL/SELECT key
:
( )
*
11 flash time 250 ms
12 flash time 375 ms
13 flash time 600 ms
14 flash time 100 ms
21 pause time 2 s
22 pause time 3 s
23 pause time 3,6 s
24 pause time 1 s
31 enables checking repeated
calls
32 disables checking repeated
calls
51 erase the list of outgoing calls
52 erase the list of received calls
99 returns to default
configuration
Enter access number of your mailbox
(max of 16 digits)
Receiving calls
Press the MENU key
When receiving a call, the telephone will
give a resonant warning in accordance with
the melody and the volume selected. To
answer the call, lift the handset. In case of
having contracted the Service of Call
Identification of your local operator, the
display will show information about the
number that originated the call (see the
item about Call Identification on page 11).
in case of having contracted the Mailbox service
of your local operator
Other configurations
There are other configurations that can be
accessed by using the PREFERENCES
option, as is shown by the following:
Note:
To receive call identification information, do
not answer the telephone before the
second ring.
Press the MENU key
Select the CONFIGURATION option
by using the DIAL/SELECT key
Select the Y option by using the
ARROW key
Select the PREFERENCES option by
using the DIAL/SELECT key
8
Dialing call numbers
Lift the handset
Using the numeric keypad to make a call
Lift the handset, wait for the dial tone and
dial the desired telephone number through
the numeric keypad. During the dialing, the
digits of the number will be shown on the
display (position 28 on page 3) and the call
will be carried out. To dial with the handset
on hook, dial the desired number, lift the
handset and press the DIAL/SELECT key
.
As well as the dialed number, the display
will show the current time, date and the
duration of the call in minutes, from the
moment that the handset is lifted (positions
22, 24 e 25, respectively, on page 3).
or
Press the DIAL/SELECT or the
OPERATOR key to make a call
With the handset off hook:
With the handset off hook
Select the desired telephone number
by using the ARROW keys
or
Press the DIAL/SELECT key or the
OPERATOR key to make a call
Using the List of Outgoing Calls to make
a call
Using the memories to make a call
Press the MENU key
With the handset on hook:
Select the OUTGOING CALLS option
by using the DIAL/SELECT key
Press the MEM key
:
Select the Y option by using the
ARROW keys
Press the desired memory number
(
to
,
and
)
Press the DIAL/SELECT key
Lift the handset
Select the desired telephone number
by using the ARROW keys
Press the DIAL/SELECT key
Lift the handset
With the handset off hook:
or
With the handset off hook
Press the DIAL/SELECT or the
OPERATOR key to make a call
Press the MEM key
:
Note:
It is not possible to make a call from the
List of Originated Calls with the handset
off hook.
Press the desired memory number
(
to
,
and
)
Using the List of Received Calls to make
a call
to make a call
Using the REDIAL key
In order to redial the last dialed number,
press the REDIAL key . If the last dialed
number contained more than 32 digits, the
REDIAL function will not work.
With the handset on hook:
Select the desired telephone number
by using the ARROW keys
9
shows the character P on the dialed
number to indicate the pause
MUTE key
During a call, when you press the MUTE
key , the microphone is switched off and
the other party cannot listen to you. The
icon
will appear on the display while
MUTE is activated. To reactivate the
conversation, press the MUTE key
again. While the MUTE is activated, the
person you are speaking to will hear music
on hold.
Music generation can be
deactivated through programming. If the
music is deactivated, you will be able hear
the person you are speaking to, although
he will not be able to hear you.
Activating/deactivating the MUTE music
FLASH Key
(special services)
allows you to access
The FLASH key
specific special services (follow-me, call
waiting, conference, etc.), as long as your
telephone is connected on a digital central
office or on a PBX system.
The default flash is 250 ms. It may be
necessary to program a different flash time
(see the item Other configurations on
page 8). If you are not sure about the
correct
flash
time,
refer
to
the
documentation of your PBX to check what
the recommended time is.
Press the MENU key
Select the CONFIGURATION option
by using the DIAL/SELECT key
Memories
Select the Y option by using the
ARROW keys
The telephone has 12 memories. Numbers
can be stored on the following keys:
to
,
and
. All the memories can
contain a maximum of 16 digits each.
With the handset on hook, the stored
numbers can be visualized by pressing the
MEM key , followed by the memory key.
The display will show the number of the
respective register, in accordance with the
figure below:
Select the MUSIC ON MUTE option
by using the DIAL/SELECT key
Select the desired option (Y-activated
music, N-deactivated music) by using
the ARROW keys
Press the MENU key
PAUSE key
This key may be used when the telephone
is connected on a PBX system, to insert a
pause between the digits (the default pause
is 2 s – to program another pause time see
the item Other configurations on page 8).
It works after pressing or entering the first
digit, when pressing the PAUSE key
.
These pauses, that are essential for some
systems with extension lines, can be stored
in the memories, in the Originated Calls
and in the REDIAL key
. The display
Storing phone number in the memories
10
:
Enter the phone number to be stored
Press the MEM key
:
Press the desired memory number
to
,
and
)
(
The message "STORED” will appear
on the display
Note:
• The number must be stored with the
handset on hook.
• A phone number won’t be stored in the
memories if it is longer than 16 digits.
• You can erase a stored phone number in
a specific memory by restoring another
phone number in it.
and
are stored in the
• The keys
memories (
to
,
and
),
independently of the used dialing mode,
but they only have effect on the TONE
mode.
• It is possible to store an external
telephone number in one of the
memories, when the telephone is
connected on a PBX system. Just insert,
before the number that will be stored, the
access code for external line followed by
a pause (press the PAUSE key ).
Call Identification
If the call identification service has been
contracted together with your local
operator, the telephone number and the
name of the call originator can be seen on
the display, before taking the handset off
hook. The information will be shown on the
display after the second telephone ring. If
the telephone is answered before this,
the identification information will not be
shown on the display.
area code. Now for calls with the same
area code that are programmed in the
telephone, the caller's number will be
shown on the display without the area
code.
If the caller number is not sent, it will not be
shown on the display and will not be stored
in the list of received calls.
On answering the call, the number, the
name and current time/date will be shown.
The time and the date will be stored for
future consultation.
The information received will be shown
during the conversation, disappearing when
the handset is replaced on hook.
Indication of received calls
With the handset on hook, the display will
show the following information: number of
received calls, number of new calls, current
time and date.
Consultation of received calls
To consult the received calls, press one of
the ARROW keys
or , with the handset
on or off hook. During the consultation, the
display will show the information described
below, in accordance with the figure of the
display:
1
2
3
6
Receiving a call
On receiving a call, the display will show
the number and the name of the caller. In
the case of Long Distance Calls the
received number will be showed with the
4
5
1) Order number of call on the list, where 1
is the most recent call
2) Time of the call beginning
3) Date of the call beginning
11
4) Duration of call in minutes (00' if it was
not answered and 99' if it exceeds the
two digit counter)
5) Caller number
6) Caller name
If the list of received calls is empty, on
making the consultation the display will
show the message "NO CALL”.
In the list of new calls (unanswered calls
still not reviewed), you can enable or
disable the telephone to check repeated
calls (see the item Other configurations
on page 8). When the repeated call
indicator REP is enabled and there are
repeated calls without verification (they are
listed as NEW), the telephone will store
only the last call of each repeated number.
When the check of repeated calls is
disabled, all the calls will be stored in the
list of received calls, even if it is repeated.
Select the Y option by using the
ARROW key
Press the DIAL/SELECT key
Scroll the list by using the ARROW
key
Erasing the outgoing calls
To erase a call from the list of outgoing
calls, proceed in the following way:
Press the MENU key
Select the OUTGOING CALLS option
by using the DIAL/SELECT key
Select the Y option by using the
ARROW key
Press the DIAL/SELECT key
Select the register that will be erased
by using the ARROW key
Press the DEL/EXIT key
Erasing the received calls
To erase a call from the list of received
calls, proceed in the following way:
to confirm
To erase all the list of outgoing calls,
proceed in accordance with the item Other
configurations on page 8, code number
51 in the PREFERENCE option.
Select the register that will be erased
by using the ARROW key
Press the DEL/EXIT key
Press the key
Press the key
to confirm
Password
To erase all the list of received calls,
proceed in accordance with the item Other
configurations on page 8, code number
52 in the PREFERENCE option.
Consultation of outgoing calls
To consult the list of outgoing calls,
proceed in the following way:
The key lock function is protected by a 4
digit password. The default password is
1234, and it can be modified. When the
password is entered, the characters " - "
(hyphens) replace the password digits as
they are keyed in. The ARROW
or
erases the last digit.
Press the MENU key
Select the OUTGOING CALLS option
by using the DIAL/SELECT key
12
Changing the password
lock international calls, it is not possible to
make calls for numbers beginning with 00.
When it is programmed for locking mobile
phone numbers, it is not possible to make
calls for numbers beginning with 8 or 9.
Press the MENU key
Select the LOCK OPTIONS option by
using the DIAL/SELECT key
Select the Y option by using the
ARROW key
Note:
The lock option for mobile phones may not
work properly in some countries due to the
numbering plan of mobile phones.
Press the DIAL/SELECT key
:
Enter the password (4 digits)
Locking or unlocking the telephone
Select the CHANGE PASSWORD
option by using the DIAL/SELECT key
:
Press the MENU key
Select the Y option by using the
ARROW key
Select the LOCK OPTIONS option by
using the DIAL/SELECT key
Press the DIAL/SELECT key
Select the Y option by using the
ARROW key
Press the DIAL/SELECT key
Enter the new password (4 digits)
:
Press the DIAL/SELECT key
:
Enter the password (4 digits)
Select the desired option by using the
DIAL/SELECT key
Repeat the new password (4 digits)
•
•
•
•
Press the DIAL/SELECT key
If the entered password does not match
with the programmed password in the
equipment, the telephone will show a
message "PASSWORD ERROR". If there
is an error in the repetition of the password,
the telephone will ask the new password
again.
Key Lock
This telephone allows the lock of calls for
mobile phones (LOCK CELL), long distance
calls (LOCK LD) and international calls
(LOCK INTER). When the telephone is
programmed to lock long distance calls, it is
not possible to make calls for numbers
beginning with 0. When it is programmed to
TOTAL LOCK
LOCK LD
LOCK INTER
LOCK CELL
Select the Y or N option by using the
ARROW key for the desired lock
options
Press the MENU key to exit or the
or DIAL/SELECT key to select another
lock option
Note:
If the TOTAL LOCK is enabled, the other
locking levels will not appear in the Menu. If
the Long Distance Call Lock (LOCK LD) is
enabled, the telephone will also be locked
for international calls (LOCK INTER).
13
Temporary unlocking the telephone
With knowledge of the password, it is
possible to unblock the telephone in order
to make a call. After the call, the equipment
will return to the previous state of
programmed lock. For temporary unlocking,
proceed in the following way:
Press the MENU key
:
:
Select the Y option by using the
ARROW key
:
Dial the emergency telephone number
that you wish to program
Press the DIAL/SELECT key
Deactivating the Baby Call function
Enter the password (4 digits)
Press the MENU key
Press the MENU key
Select the LOCK OPTIONS option by
using the DIAL/SELECT key
Select the Y option by using the
ARROW key
Dial the desired telephone number
normally
Press the DIAL/SELECT key
:
Baby Call
This telephone allows the programming of a
number to be called automatically on
pressing any numeric key (
to
,
and
). This function is useful, for
example, to program an emergency
number for children in case the parents are
absent. This function requires the password
for activation and deactivation.
Activating the Baby Call function
Enter the password (4 digits)
Select the BABY CALL option by
using the DIAL/SELECT key
Select the N option by using the
ARROW key
Press the MENU key
Note:
The Baby Call function will not work when
the telephone was programmed with the
TOTAL LOCK option.
Press the MENU key
Select the LOCK OPTIONS option by
using the DIAL/SELECT key
Select the Y option by using the
ARROW key
Press the DIAL/SELECT key
:
Function keys for special services
This telephone incorporates facilities to
access some special services on your
telephone line.
The dedicated keys to the special services
allow the direct operation of:
Enter the password (4 digits)
•
•
•
•
Select the BABY CALL option by
using the DIAL/SELECT key
14
Follow-me
Call Waiting
Conference
Mailbox
Once the consultation is made, press the
Call Waiting key
to change between the
calls or the Release Call key
to finish
the communication in progress and
continue with the other one.
Note:
These services must be contracted
together with your local operator.
Follow-me
The Follow-me service allows automatic
transference of received calls to another
telephone number. To activate follow-me,
proceed in the following way:
Lift the handset
Press the FOLLOW-ME key (position
7 on page 3)
:
Dial the telephone number to where
you want to make the call transference
Press the FOLLOW-ME key (position
7 on page 3)
To deactivate the follow-me service, press
twice.
the Follow me key
Call Waiting
If during a conversation you hear the
warning tone of a waiting call, you can
answer it by pressing the Call Waiting key.
. The first call will be retained.
When you wish to pass from one call to
another, press the Call Waiting key
again. The procedure can be repeated as
many times as you wish. To finish the
communication in progress and continue
with the other, press the Release Call key
. To finish the last communication, just
hung up.
Consultation
When, during a conversation, you wish to
make a consultation, press the FLASH key
to get the dial tone again. Dial the
desired number to set up the consultation
communication.
Conference
The conference service allows the setting
up of communication among three people.
Firstly set up two communications by using
the procedures of Call Waiting or
Consultation described earlier. Then press
the Conference key
to establish
simultaneous communication among the
three people.
Mailbox
The Mailbox service allows messages to be
stored so that the user can hear them later.
This service has an access code that can
be programmed in the Mailbox key (see
the item Mailbox on page 8).
Alarm
The alarm sounds daily at the programmed
time and shows on the display, when
alarming, the message "ALARM", the time
and the date. The alarm stops ringing after
40 seconds or after lifting the handset.
If the telephone is off hook at the
programmed time, there will be no audio
signaling, only the message on the display.
The alarm rings at a single volume,
independent
of
the
ring
volume
programming.
The melody of the ring is the same
programmed for the call signaling and the
ring rhythm of the alarm (1 second followed
by a 3 second pause) is distinct from the
normal rhythm generated by central office
exchange.
15
In case of collision between the entering
call and the alarm, the entering call has
priority, it means:
• The ring will be in the rhythm of the call;
• If there is call identification, the alarm
clock message on the display will not be
shown.
Programming the alarm
Press the MENU key
Select the ALARM option by using the
DIAL/SELECT key
Select the Y option by using the
ARROW key
Press the DIAL/SELECT key
Select the ENABLED option by using
the ARROW key
Press the DIAL/SELECT key
:
Enter the desired time for the alarm
with four digits in 24h format
(example: 13:57h - enter 1357)
Press the MENU key
Deactivating the alarm
Press the MENU key
Select the ALARM option by using the
DIAL/SELECT key
Select the Y option by using the
ARROW key
Press the DIAL/SELECT key
Select the DISABLED option by using
the ARROW key
Press the MENU key
16
Menu Scheme
Level 1
Level 2
Level 3
BRIGHT
1
2
3
OUTGOING CALLS
CONFIGURATION
BACKLIGHT
Y
N
ENTER HOUR
ENTER MONTH
ENTER DAY
ENTER YEAR
FORMAT
24 HS
AM PM
RING VOLUME
1
2
3
MELODY
MODE
MUTE ON MUSIC
1
2
3
TONE
PULSE
Y
N
VOLUME RX
NORM
HIGH
AREA CÓDE
11
12
13
14
21
22
23
24
31
32
51
52
99
OP_CÓDE
MAILBOX
PREFERENCES
Flash 250 ms
Flash 375 ms
Flash 600 ms
Flash 100 ms
Pause 2 s
Pause 3 s
Pause 3,6 s
Pause 1 s
Enables the checking of repeated calls
Disables the checking of repeated calls
Erase the list of outgoing calls
Erase the list of received calls
Returns to default configuration
TOTAL LOCK
LOCK LD
LOCK OPTIONS
PASSWORD
LOCK INTER
LOCK CEL
BABY CALL
CHANGE PASSWORD
ENABLED
ALARM
DISABLED
17
Quick Reference Guide
FUNCTION
PROCEDURE
+
Select the Y option by using the ARROW key
Select the desired configuration option by using the
DIAL/SELECT key
The following options are configurable by using the ARROW
keys:
CONFIGURING THE
TELEPHONE:
•
•
•
•
•
•
•
•
•
•
•
•
•
•
•
•
BRIGHT
LIGHTING (BACKLIGHT)
ENTER HOUR
ENTER MONTH
ENTER DAY
ENTER YEAR
FORMAT AM PM / 24 HS
RING VOLUME
MELODY
MODE
MUTE ON MUSIC
VOLUME RX
AREA CODE
OP_CODE
MAILBOX
PREFERENCES
Press the MENU key and e select the CONFIGURATION
option by using the DIAL/SELECT key
•
•
•
•
•
•
•
BRIGHT (1, 2 or 3)
BACKLIGHT (Y / N)
FORMAT (AM PM / 24 HS)
RING VOLUME (1, 2 or 3)
MELODY (1, 2 or 3)
MODE (TONE / PULSE)
MUTE ON MUSIC (Y / N)
• VOLUME RX (NORM / HIGH)
The following options are configurable by using the numeric
keypad:
...
•
•
•
•
•
•
•
•
ENTER HOUR
ENTER MONTH
ENTER DAY
ENTER YEAR
AREA CODE
OP_CODE
MAILBOX
PREFERENCES
Using the numeric keypad
...
Lift the handset and wait for the dial tone
Dial the desired telephone number
Using the memories
DIALING CALLS WITH THE
HANDSET OFF HOOK
+
...
,
Lift the handset and press the MEM key
Press the desired memory number (
to
,
and
Using the list of received calls
Lift the handset
Select the desired telephone number by using the ARROW
key
or
Press the DIAL/SELECT key or the OPERATOR key
TEMPORARY CHANGEOVER
OF DIALING MODE (TONE /
PULSE)
After establishing a call, change to TONE by pressing the
key
(i.e. to use telebank services)
REDIAL
To redial the last dialed number, press the REDIAL key
18
)
Quick Reference Guide
FUNCTION
PROCEDURE
Using the numeric keypad
Dial the desired telephone number
...
Lift the handset and wait for the dial tone
or
Press the DIAL/SELECT key or the OPERATOR key
Using the memories
Press the MEM key
...
,
Press the desired memory number (
+
Lift the handset and press the DIAL/SELECT key
to
,
and
)
Using the list of received calls
DIALING CALLS WITH THE
HANDSET ON HOOK
Select the desired telephone number by using the ARROW
key
+
or
Lift the handset and press the DIAL/SELECT key or the
OPERATOR key
Using the list of outgoing calls
Press the MENU key and e select the OUTGOING CALLS
option by using the DIAL/SELECT key
+
Select the Y option by using the ARROW key
+
Press the DIAL/SELECT key and select the desired
telephone number by using the ARROW key
+
Lift the handset and press the DIAL/SELECT key or the
OPERATOR key
or
By pressing the MUTE key during a call, the handset will
deactivate the voice transmission. To go back to
conversation, press the MUTE key again.
MUTE
...
STORING PHONE NUMBER IN
THE MEMORIES
+
...
,
CONSULTATION OF
RECEIVED CALLS
Press the desired memory number (
to
,
and
)
To consult the received calls, press one of the ARROW
keys, with the handset on or off hook
+
CONSULTATION OF
OUTGOING CALLS
Enter the phone number to be stored and press the MEM
key
+
Press the MENU key and e select the OUTGOING CALLS
option by using the DIAL/SELECT key
Select the Y option by using the ARROW key and press the
DIAL/SELECT key
Press one of the ARROW keys
19
www.my-siemens.com
A30054-X5793-A800-1-6019 (11/03)