1
Digital Surveillance Recorder
Intelligent Remote Player
User Manual
Table of Contents
INTRODUCTION ........................................................................................................................................ 4
OVERVIEW .................................................................................................................................................. 4
STANDARD FEATURES ................................................................................................................................. 4
OPTIONAL FEATURES................................................................................................................................... 4
GLOSSARIES OF TERMS ............................................................................................................................... 4
DSR REMOTE PLAYER SETUP .............................................................................................................. 5
INSTALLATION ............................................................................................................................................ 5
INSTALL MODEM ......................................................................................................................................... 5
INSTALL ETHERNET CARD ........................................................................................................................... 5
MAKE A NEW DIAL-UP CONNECTION ........................................................................................................... 5
START THE DSR REMOTE PLAYER .................................................................................................... 6
THROUGH TELEPHONE LINE ......................................................................................................................... 6
SELECT DSR STATION ............................................................................................................................ 6
SELECT DSR SERVER STATION .................................................................................................................... 6
ON-LINE VIEWING ................................................................................................................................... 7
START THE DSR ON-LINE VIEWING ............................................................................................................. 7
SELECT DSR SERVER STATION .................................................................................................................... 7
(VIA DIAL-UP)............................................................................................................................................. 7
SELECT VIEWING CAMERA(S) ...................................................................................................................... 8
SELECT VIEWING SERVER STATION .............................................................................................................. 8
VIEWING MORE THAN ONE DSR STATION AT THE SAME TIME ..................................................................... 9
RESIZE OF THE VIEWING WINDOW ............................................................................................................... 9
CONFIGURE THE VIDEO COMPRESSOR......................................................................................................... 9
SELECT THE RESOLUTION OF TRANSMITTED IMAGE ...................................................................................10
RECORDING THE VIEWING VIDEO ..............................................................................................................10
CLOSE THE VIEWING WINDOW ....................................................................................................................11
PLAYBACK THE RECORDED VIDEO .................................................................................................12
SHOW THE RECORDED VIDEO FILES ............................................................................................................12
FILENAME FORMAT ....................................................................................................................................12
SORT, SELECT AND PLAY THE VIDEO FILE ...................................................................................................12
THE DSR VIDEO PLAYER ............................................................................................................................13
VIDEO PLAYBACK CONTROLS .....................................................................................................................14
ABSOLUTE DATE/TIME AND VIDEO LENGTH DISPLAY..................................................................................14
PLAYBACK SPEED CONTROL .......................................................................................................................14
FRAME MODE .............................................................................................................................................14
ZOOM .........................................................................................................................................................14
PRINT HARD COPY ......................................................................................................................................14
SAVE A FRAME TO FLOPPY DISK .................................................................................................................14
RETURN TO VIDEO MODE ...........................................................................................................................14
OPEN A DOWNLOADED VIDEO FILE .............................................................................................................15
OPEN A LOCALLY (CLIENT STATION) RECORDED VIDEO FILE .....................................................................16
APPENDIX I................................................................................................................................................17
DSR REMOTE PLAYER CONFIGURATION .......................................................................................17
DATABASE .................................................................................................................................................17
TEC00-034-G
DSR Intelligent Remote Player User Manual (Rev. 3.0)
Page 2 of 18
VIDEO FILES ...............................................................................................................................................17
HOUSEKEEPING OF THE VIDEO FILES ..........................................................................................................17
APPENDIX II ..............................................................................................................................................18
DSR RECORDER CONFIGURATION FOR REMOTE PLAYBACK AND ONLINE VIEWING...18
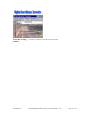
This software is intended to use in the Local Area Networking system. Any machine
in the same LAN with the DSR can be used to playback the recorded video or doing
online viewing remotely by using this software.
Remote client also can be connected to the LAN through DSR telephone dial-up
service.
TEC00-034-G
DSR Intelligent Remote Player User Manual (Rev. 3.0)
Page 3 of 18
Introduction
Overview
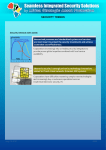
The DSR Intelligent Remote Player Application software plays an integral part
with the DSR-series of Digital Surveillance Recorder to form a total Digital
Surveillance Network system.
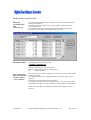
Standard Features
Optional features
Glossaries of Terms
TEC00-034-G
Playback of Pre-recorded video files on a DSR Digital Recorder Station
View listing of available video files prior download and playback
Support PAL and NTSC standard
Online Remote viewing of live video connected to the DSR Server Station
Instant recording of on-line view (instantly received)
Integrated video Player with comprehensive playback control (Stop,
Pause, Play forward, Speed control, Video search)
Video frame capture and print out
Video Storage to floppy Disk for transport
Support multiple mode of connectivity, LAN, PTSN and ISDN
Video Recording at Remote Client
Compression control on video receiving for optimization of refresh rate
and delay
Internet connection for remote viewing, recording and playback
Video Server – This refers to the DSR station which transmits the digital
video data using the camera as direct input source or retrieve from the
recorded video files.
Video Client – Normally refer to the Remotely connected PC workstation
with the DSR Intelligent Remote Player application installed. The System
unit for DSR station can be used as a video client of another DSR station,
however, please note that the DSR Main Screen is not designed to work
with both application simultaneously. The user is responsible for working
around for such operational setting.
On-line View – Unlike the playback of recorded video, this refer to the
instant view of the “live” video despite of some possible delay or lower
refresh rate due to limited bandwidth of network and transmission process.
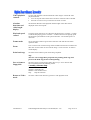
Station ID -- The identification of a server or station in a network.
Depending on the type of network media and protocol, the Station
(Computer) name or the IP address will be applicable. The IP address is
used in the TCP/IP type of transport protocol environment. It usually takes
the from as xxx.xxx.xxx.xxx. When a station have more than one
networking interface connectors, you have to put the one that is associated
with the connection you are using. For example, for telephone dial up,
please use the one associated with the Windows Dial-up Adapter (Driver).
DSR Network Administrator -- As the networking system included the
DSR server and client expands, it is the emerging role of Network system
Administrator who will be responsible for the various designs on
configuration of the network to avoid and resolve conflicting setup
condition. (Such as for the assignment of IP address for internal or
external accesses, the Name and Workgroup of the involved workstations
and the use of Name Resolution Services).
DSR Intelligent Remote Player User Manual (Rev. 3.0)
Page 4 of 18
DSR Remote Player Setup
Installation
Install the DSR remote player by run the setup program in the provided
installation disk.
The remote (PC) station should work either in Windows 95 or Windows 98
with Microsoft IE5.0 and Microsoft Access installed.
After installation complete, a DSR remote player icon will be appeared on the
desktop window.
Install Modem
Make sure to have a modem properly installed if you want to use the dial-up
connection
Install Ethernet
card
Make sure to have a PCI Ethernet card properly installed if you want to access
the DSR system (server) via LAN
Make a new dial-up If you want to use telephone Dial-up for remote access, you have to setup a
dial-up connection using the Windows95 or Windows 98’s Dial-Up
connection
Networking function.
Go to My Computer, Dial-Up Networking, Connections, Make New
Connection
- Input name for the computer you are dialing to connect : e.g. DSR,
Consult your DSR networking Administrator for the assigned Name if
necessary
- Select a modem; enter the following data:
- Area code:
- Telephone number:
- Country code:
Go to My Computer, Dial-Up Networking, Right click the DSR icon, select
Properties, select Server Types
- Type of Dial-Up Servers : PPP: Internet, Windows NT Server, Windows 98
- Check the Log on to network check box , if necessary.
- Check the Enable software compression check box
- Check the NetBEUI check box, if necessary
Note also:
Please refer to Section 3 of the DSR Installation Guide on basic setup for
Remote Intelligent Playback and Section 4, Dial-Up Server/Client TCP/IP
Setting for Windows98. The IP address assigned during the setup will be used
as the Station ID here after.
TEC00-034-G
DSR Intelligent Remote Player User Manual (Rev. 3.0)
Page 5 of 18
Start the DSR remote player
DSR Remote
Player Icon
Double click this icon to invoke a new start of the DSR Remote Player
Through LAN
If the LAN is up and running, Double click the DSR remote player icon on the
desktop window to invoke the DSR remote player.
Through
telephone line
Go to My Computer, Dial-Up Networking and then double click the desired
connection icon (e.g. DSR). A “Connect to” dialog box for the desired
connection will pop-up, click the connect button to start the telephone dialing and
connection. Once the dial-up networking is connected, Double click the DSR
remote player icon on the desktop window to invoke the DSR remote player.
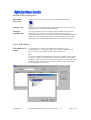
Select DSR Station
Select DSR server
station
It is possible to have more than one DSR digital recorders in a LAN.
Click the “Browse…” button and a “Browse for Computer” dialog box will
appear for you to select the desired DSR station from the LAN.
Tips
If you do not find the desired DSR station in the pop up window at the first place,
Click the”+” sign next to the Entire Network Icon to expand the tree, locate the
Workgroup where the DSR is assigned and expand it, then Select the DSR station
and then click OK. You may need to consult your DSR Network Administrator
for the assigned name if necessary.
TEC00-034-G
DSR Intelligent Remote Player User Manual (Rev. 3.0)
Page 6 of 18
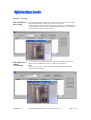
On-line Viewing
Start the DSR online viewing
Once the desired DSR station is selected, you can activate the on-line viewing
function of the DSR by clicking the “OnLine View” button.
A new window for on-line viewing will pop up accordingly. The DSR Station
name and the default camera name (initially assigned Camera 1) of viewing will
be displayed as the caption of the window.
Select DSR server
station
(Via Dial-up)
In case of access via Dial-up connection, you have to manually enter the IP
address into the DSR Station entry box. (such as 192.168.42.34)
Tips
Again, you may need to consult your DSR Network Administrator for the
assigned name if necessary.
TEC00-034-G
DSR Intelligent Remote Player User Manual (Rev. 3.0)
Page 7 of 18
Select viewing
camera(s)
Click “Camera” button inside the viewing window to select or change camera.
If you want to more than one camera in the Desktop Window, Open another
viewing window for a new camera by clicking the “OnLine View” button again,
and select another camera for viewing.
Select viewing
server station
Click “Server” button inside the viewing window to select another server.
The Input Server Name or IP address Dialog Box appears, enter the IP address
as required or select a Server Name by clicking the Browse button. Open the
viewing window for a new server by clicking the “OK” button. If the server is
not accessible, it will take several seconds before the message “Connection to
server…..-failed” comes out. You may try with a different Station ID or consult
your DSR network Administer to provide the other IP address
TEC00-034-G
DSR Intelligent Remote Player User Manual (Rev. 3.0)
Page 8 of 18
Viewing more
than one DSR
station at the
same time
While the camera(s) of a DSR station is viewing, user can “Browse” another
DSR station and start online viewing of the newly selected DSR station
simultaneously. Or you may enter the IP address to the DSR station ID and click
the OnLine View button to invoke the next window of camera view, as shown in
the example below.
Resize of the
viewing window
You can change the size of the viewing window by dragging the window at the
edge or corner of the window or to click the “minimize” and “maximize” buttons
to change the window size.
Click the “Resume” button to resume to the default (previous) size of the
window.
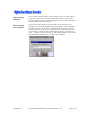
Configure the
Video
Compressor
You can change the Compressor setting to optimize the OnLine Viewing
performance to meet with your specific requirement. Activate the Compression
Control dialog by clicking the” Compression” button; use the slide bar to adjust
the index as follows:
Quality: from 0 to 100 (Highest)
Data Rate: Up to 60.oo kb/s can be set, consider matching it with the data transfer
rate of the current networking performance.
Frame Rate: A max of 30 fps for NTSC or 25 fps for PAL system
Key frame rate: Enter 1 to 99 seconds
Click OK to confirm your selection, Cancel to return to the previous setting
After the selection complete, Click the Camera or Server button and select the
existing or a new camera to see the effect of the new setting
TEC00-034-G
DSR Intelligent Remote Player User Manual (Rev. 3.0)
Page 9 of 18
Select the
Resolution of
transmitted
image
You can change the Resolution (the captured active pixels) setting to optimize
the OnLine Viewing performance and duration of the video storage to meet with
your specific requirement. Activate the Resolution Control dialog by clicking the
”Resolution” button; and select one of the following options
384x288 (PAL)
320x240 (NTSC)
192x144 (PAL)
160x120 NTSC
After the selection complete, Click the Camera or Server button and select the
existing or a new camera to see the effect of the new setting
Recording the
Viewing Video
You can Record the video under OnLine View by clicking the Record -> Start
button. To stop the video recording,, click Record -> Stop . All the other control
function on the menu of the Receiver will be suspended during the video
recording period.
The recorded video is stored in a folder, bearing the camera name and created
under the c:\DSR\image\{DSR station ID}\{camera title} folder. Please refer to
the Open a locally (Client Station) recorded video file, in the following section.
TEC00-034-G
DSR Intelligent Remote Player User Manual (Rev. 3.0)
Page 10 of 18
Close the viewing
window
Click the “X” button to close the viewing window.
TEC00-034-G
DSR Intelligent Remote Player User Manual (Rev. 3.0)
Page 11 of 18
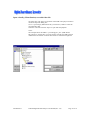
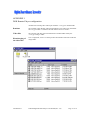
Playback the recorded video
Show the
recorded video
files
(From Server)
Filename format
Upon the selection of DSR station complete (by browse for the station name or
entering the IP address)
Click the “Show Files” button to retrieve the available video files from the
selected DSR station.
The available video files of that DSR station will be displayed inside a list
control box with scroll bars to scroll around for file access.
The filename has the following format:
x-mmddyy-hhmmss.avi
x:
camera number
mmddyy: month/day/year (record start date)
hhmmss: hour:minute:second (record start time)
avi:
filename extension
Sort, select and
play the video file
(Video stored in
Server Station)
User can click on the column’s top button to sort the list by using of that column
as sorting key field.
Click the desired filename for high light and then click “Play Back” to start
playback.
Or double click the desired file to start playback.
The selected video file will be down loaded into the “c:\net_pico\image” folder
of the DSR remote player’s client workstation, and then play back automatically.
Please refer to the Open a downloaded video file, in the following section, if
required..
TEC00-034-G
DSR Intelligent Remote Player User Manual (Rev. 3.0)
Page 12 of 18
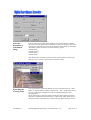
The DSR video player
Selected video will be playback by the DSR video player automatically.
Also, the DSR video player can be used to open and playback the downloaded
video files.
Select video files locally recorded by client Station
Back to
video mode
Frame
operation
Speed control
for playback
Camera
Number
Absolute
Date/Time
and length
of the video
Play
Stop
Begin/end marker
Scroll bar for manual search
Steps advance and go to begin/end
TEC00-034-G
DSR Intelligent Remote Player User Manual (Rev. 3.0)
Page 13 of 18
Video playback
controls
Use the video playback controls beneath the video image to control the video
playback function.
• User can stop the video and use the scroll bar to search the video if needed.
• Press the “two-arrow” keys to advance one frame at a time.
Absolute
date/time and
video length
display
The absolute date/time of the playback and the length of the video will be
displayed on the control panel.
Playback speed
control
Using the speed control box can control the playback speed. Click the “+” button
to increase the playing speed. Click the “–“ button to decrease the playing speed.
The playback speed indicates in the speed control box. The normal speed is at
value 100.
Frame mode
Click “Snap shot” button to grab a frame from the video and enter the frame
operation mode.
Zoom
User can select area of interest using mouse left button and mouse movement and
then click “Zoom” button to zoom into the image. Click “Unzoom” to return to
normal display.
Print hard copy
Click the “Print” button to print out the image captured.
Tip:
The user can set up printer properties for printing hard copy and
preview the hard copy before actual printing.
Save a frame to
floppy disk
The frame can be saved to floppy disk in drive A by a “Save” button click.
The saved filename has the following format:
x-mmddyy-hhmmss.bmp
x:
camera number
mmddyy: month/day/year
hhmmss: hour:minute:second
bmp:
bmp file extension
Return to Video
mode
Click the “Video mode” button to go back to video playback mode.
TEC00-034-G
DSR Intelligent Remote Player User Manual (Rev. 3.0)
Page 14 of 18
Open a downloaded video file
Click the “file” and “Open” in menu bar of the DSR video player window to
invoke the Open file dialog box.
Go to “c:\net_pico\image” to select the downloaded video files.
Select the video file and click “Open” to open and start playback.
TEC00-034-G
DSR Intelligent Remote Player User Manual (Rev. 3.0)
Page 15 of 18
Open a locally (Client Station) recorded video file
Click the “file” and “Open” in menu bar of the DSR video player window to
invoke the Open file dialog box.
Go to “c:\pico\image\{DSR station ID}\{camera title}” folder to select the
recorded video files.
Select the video file and click “Open” to open and start playback.
Notes:
The example shows the folder C: \pico\image\pico_ntsc {DSR Station
ID}\Camera 6{ camera title}. You may need to consult your DSR Network
Administrator for details of camera title and Server station ID assignment.
TEC00-034-G
DSR Intelligent Remote Player User Manual (Rev. 3.0)
Page 16 of 18
APPENDIX I
DSR Remote Player configuration
All data base and image files will be put inside the “c:\net_pico” default folder.
Database
The available video database will be downloaded to a file called “net_DSR.mdb”.
The “net_pico.mdb” is a database file with Microsoft Access format.
Video files
The selected video files will be downloaded to a default folder namely the
“c:\net_pico\image” folder.
Housekeeping of
the video files
User can playback, remove or backup of these downloaded video files inside the
image folder.
TEC00-034-G
DSR Intelligent Remote Player User Manual (Rev. 3.0)
Page 17 of 18
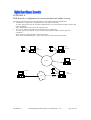
APPENDIX II
DSR Recorder configuration for remote playback and online viewing
The DSR recorder should be accessible through the LAN with the following configuration:
1. It should have assigned with a computer name for the DSR recorder unit.
To check, right mouse click the “Network Neighborhood” icon on the Windows Explorer window and
select “Properties”.
Select “Identification” tab to show the computer name.
2. The “c:\pico” folder of the DSR recorder should be set to “Shared As”.
To check, right mouse click the “c:\pico” folder on the Windows Explorer window and select
“Properties”.
Select “Sharing” tab and check the “Shared As” button.
There will be a hand holding the “c:\pixo” folder icon to indicate sharing of the folder.
DSR
Station #2
DSR
Station #1
Client #1
LAN
Client #2
DSR
Station #3
PSTN
Modem
TEC00-034-G
Modem
DSR Intelligent Remote Player User Manual (Rev. 3.0)
Page 18 of 18