1
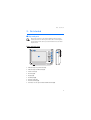
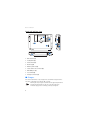
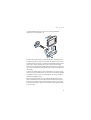
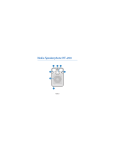
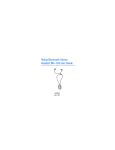
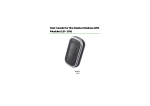
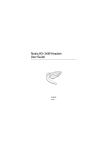
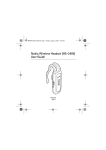
Nokia 330 Auto Navigation
User Guide
9253745
Issue 1
DECLARATION OF CONFORMITY
Hereby, NOKIA CORPORATION declares that this PD-12 product is in compliance
with the essential requirements and other relevant provisions of Directive 1999/
5/EC. A copy of the Declaration of Conformity can be found at http://
www.nokia.com/phones/declaration_of_conformity/.
The crossed-out wheeled bin means that within the European Union the product
must be taken to separate collection at the product end-of-life. Do not dispose of
these products as unsorted municipal waste. For more information, see product
Eco-Declaration or country specific information at www.nokia.com.
© 2006 Nokia. All rights reserved.
Nokia and Nokia Connecting People are registered trademarks of Nokia Corporation. Other
product and company names mentioned herein may be trademarks or tradenames of their
respective owners.
Reproduction, transfer, distribution, or storage of part or all of the contents in this document
in any form without the prior written permission of Nokia is prohibited.
This product is licensed under the MPEG-4 Visual Patent Portfolio License (i) for personal and
noncommercial use in connection with information which has been encoded in compliance
with the MPEG-4 Visual Standard by a consumer engaged in a personal and noncommercial
activity and (ii) for use in connection with MPEG-4 video provided by a licensed video
provider. No license is granted or shall be implied for any other use. Additional information,
including that related to promotional, internal, and commercial uses, may be obtained from
MPEG LA, LLC. See <http://www.mpegla.com>.
Nokia operates a policy of ongoing development. Nokia reserves the right to make changes
and improvements to any of the products described in this document without prior notice.
TO THE MAXIMUM EXTENT PERMITTED BY APPLICABLE LAW, UNDER NO CIRCUMSTANCES
SHALL NOKIA OR ANY OF ITS LICENSORS BE RESPONSIBLE FOR ANY LOSS OF DATA OR
INCOME OR ANY SPECIAL, INCIDENTAL, CONSEQUENTIAL OR INDIRECT DAMAGES
HOWSOEVER CAUSED.
THE CONTENTS OF THIS DOCUMENT ARE PROVIDED "AS IS". EXCEPT AS REQUIRED BY
APPLICABLE LAW, NO WARRANTIES OF ANY KIND, EITHER EXPRESS OR IMPLIED, INCLUDING,
BUT NOT LIMITED TO, THE IMPLIED WARRANTIES OF MERCHANTABILITY AND FITNESS FOR A
PARTICULAR PURPOSE, ARE MADE IN RELATION TO THE ACCURACY, RELIABILITY OR
CONTENTS OF THIS DOCUMENT. NOKIA RESERVES THE RIGHT TO REVISE THIS DOCUMENT OR
WITHDRAW IT AT ANY TIME WITHOUT PRIOR NOTICE.
The availability of particular products and applications for these products may vary by region.
Please check with your Nokia dealer for details, and availability of language options.
This device complies with Directive 2002/95/EC on the restriction of the use of certain
hazardous substances in electrical and electronic equipment.
Unauthorized changes or modifications to this device may void the user's authority to
operate the equipment.
Export Controls
This device may contain commodities, technology or software subject to export laws and
regulations from the US and other countries. Diversion contrary to law is prohibited.
9253745 / Issue 1 EN
Contents
1. Introduction .......................... 5
3. Operation............................ 14
About the GPS ........................................ 5
Third-party applications....................... 6
Touch screen ........................................
Adjust the volume...............................
Adjust the screen backlight .............
Lock the screen and keys ..................
Standby mode ......................................
Access and start applications..........
GPS navigation ....................................
Copy files to the memory card........
Listen to music ....................................
View photos..........................................
Watch video clips................................
Adjust settings.....................................
Reset the device ..................................
2. Get started ............................ 7
Keys and parts......................................... 7
Front and right view .......................... 7
Back, left, and base view.................. 8
Chargers.................................................... 8
Charge the battery................................. 9
Install the device in a car ................. 10
General safety instructions........... 10
Mount the device ............................ 10
Connect to cigarette lighter
socket.................................................. 12
Switch on or off .................................. 12
Switch on........................................... 12
Switch off .......................................... 12
Insert the memory card..................... 12
4
14
14
14
14
14
15
15
15
15
17
17
18
19
4. Battery information ........... 20
Care and maintenance ........... 21
Introduction
1. Introduction
The Nokia 330 Auto Navigation device allows you to use GPS navigation
in a car and in outdoor activities. You can also view photos, watch
videos, and listen to music.
Read this user’s guide carefully before using the device. Also read the
user guide for the GPS navigation application available in the device.
Check www.nokia.com/support or your local Nokia website for the latest
version of the user guide, additional information, downloads, and
services related to your Nokia product.
■ About the GPS
The GPS (global positioning system) is a worldwide satellite-based radio
navigation system.The GPS receiver, built into the navigation device, can
calculate its location to an accuracy of 10 meters. The accuracy
depends, for example, on the number of satellites, the signals of which
the GPS module receives. In optimal conditions, the accuracy may be
within a few meters.
The GPS antenna is located at the top of the navigation device. Some car
windshields and windows may contain metal, that may block or weaken
the satellite signals.
If you stand still, GPS cannot detect which way you are facing, because
it determines your direction on the basis of your movement.
The Global Positioning System (GPS) is operated by the government of the United
States, which is solely responsible for its accuracy and maintenance. The
accuracy of location data can be affected by adjustments to GPS satellites made
by the United States government and is subject to change with the United States
Department of Defense civil GPS policy and the Federal Radionavigation Plan.
Accuracy can also be affected by poor satellite geometry. Availability and quality
of GPS signals may be affected by your location, buildings, natural obstacles, and
weather conditions. The GPS receiver should only be used outdoors to allow
reception of GPS signals.
5
Introduction
GPS should only be used as a navigation aid. It should not be used for precise
location measurement and you should never rely solely on location data from the
GPS receiver for positioning or navigation.
■ Third-party applications
The third-party applications provided with your device may have been created
and may be owned by persons or entities not affiliated with or related to Nokia.
Nokia does not own the copyrights or intellectual property rights to the thirdparty applications. As such, Nokia does not take any responsibility for end-user
support, functionality of the applications, or the information in the applications
or these materials. Nokia does not provide any warranty for the third-party
applications.
BY USING THE APPLICATIONS YOU ACKNOWLEDGE THAT THE APPLICATIONS ARE
PROVIDED AS IS WITHOUT WARRANTY OF ANY KIND, EXPRESS OR IMPLIED, TO
THE MAXIMUM EXTENT PERMITTED BY APPLICABLE LAW. YOU FURTHER
ACKNOWLEDGE THAT NEITHER NOKIA NOR ITS AFFILIATES MAKE ANY
REPRESENTATIONS OR WARRANTIES, EXPRESS OR IMPLIED, INCLUDING BUT NOT
LIMITED TO WARRANTIES OF TITLE, MERCHANTABILITY OR FITNESS FOR A
PARTICULAR PURPOSE, OR THAT THE APPLICATIONS WILL NOT INFRINGE ANY
THIRD-PARTY PATENTS, COPYRIGHTS, TRADEMARKS, OR OTHER RIGHTS.
6
Get started
2. Get started
■ Keys and parts
Note: Parts of the device are magnetic. Metallic materials may be
attracted to the device. Do not place credit cards or other magnetic
storage media near the device, because information stored on them
may be erased.
Front and right view
1
2
4
3
9
5
6
7
8
• Indicator light for power status (1)
• Indicator light for GPS status (2)
• Touch screen (3)
• Home key (4)
• Flag key (5)
• Standby key (6)
• Volume up key (7)
• Volume down key (8)
• Connector for an optional external GPS antenna (9)
7
Get started
Back, left, and base view
1
2
4
6
3
8
5
7
9
• GPS antenna (1)
• Loudspeaker (2)
• Power switch (3)
• Reset key (4)
• Memory card slot (5)
• Stereo audio-out connector (6)
• Mini USB port (7)
• Lock switch (8)
• Charger connector (9)
■ Chargers
Check the model number of any charger before use with this navigation device.
This device is intended for use with the DC-3 charger.
Warning: Use only chargers and enhancements approved by Nokia for
use with this particular device. The use of any other types may
invalidate any approval or warranty, and may be dangerous.
8
Get started
For availability of approved enhancements, please check with your dealer. When
you disconnect the power cord of any enhancement, grasp and pull the plug, not
the cord.
■ Charge the battery
This navigation device has an internal, nonremovable, rechargeable
battery. Do not attempt to remove the battery from the device, as you
may damage the device.
Connect the DC-3 charger to the charger
connector on the navigation device, and
insert the charger plug into the cigarette
lighter socket of your car. Power must be
supplied by the 9- to 18-volt car battery.
Ensure that the charger is properly inserted
in the cigarette lighter socket and does not
interfere with the normal operation of the
car.
In some car models, the cigarette lighter
socket is powered by the car battery even
when you remove the ignition key. In those
cases, the car battery might be discharged if the navigation device is left
on, or if the device is turned off but connected to the cigarette lighter
socket for a long time. Contact the vehicle manufacturer for more
information.
When you charge the battery, the yellow indicator light flashes. If
charging does not start, disconnect the charger, plug it in again, and
retry. When the battery is fully charged, the indicator light turns off.
Once the battery is fully charged, disconnect the charger from the
navigation device and the cigarette lighter socket.
When battery power is low, the red indicator light flashes and the
battery icon at the top of the application menu screen shows no green
bars.
You can use the navigation device while it is connected to the cigarette
lighter socket.
9
Get started
■ Install the device in a car
To use the navigation device in a car, attach the mounting device
HH-14 to the windshield, attach the mobile holder CR-79 to the
mounting device, attach the navigation device into the mobile holder,
and connect the navigation device into the cigarette lighter socket of
your car.
General safety instructions
Obey all local laws. Always keep your hands free to operate the vehicle
while driving. Your first consideration while driving should be road
safety. Only operate the mounting device, mobile holder, or navigation
device if it is safe to do so under all driving conditions.
When you install the mounting device or mobile holder, ensure that they
do not interfere with or hinder the steering or braking systems or other
systems used in the operation of the vehicle (for example, airbags) or
disturb your field of vision while driving.
Check that the deployment of the airbag is not blocked or impaired in
any way.
Ensure that the mounting device or mobile holder is not installed where
you might come in contact with it in the event of an accident or
collision.
Periodically check that the suction cup at the bottom of the mounting
device is firmly attached to the windshield, especially if the ambient
temperature changes a lot.
Do not leave the product parts inside the vehicle in direct sunlight or in
excessive heat. The parts may be damaged if the inside temperature falls
below -0°C (32°F) or exceeds +40°C (104°F).
Mount the device
Locate a safe mounting surface on the windshield, and clean the surface
thoroughly with a glass cleaner and a clean towel. If the ambient
temperature is below +15°C (60°F), carefully warm the surface and the
suction cup at the bottom of the mounting device to ensure a firm grip
10
Get started
on the windshield. Ensure that you do not heat the windshield
excessively to avoid damage to it.
5
1
4
2
3
Press the suction cup firmly on the windshield, and carefully push the
locking lever above the suction cup towards the suction cup to create a
vacuum between the suction cup and the windshield (1). Check that the
suction cup is firmly attached. If you want to detach the mounting
device from the windshield, carefully push the locking lever toward the
top of the mounting device, and pull the strap located on the edge of the
suction cup.
To attach the mobile holder to the mounting device, insert the catches
at the top of the mounting device into the slots on the mobile holder (2),
and slide the holder to lock it into place (3). For your safety, install the
holder in the upright position.
Place the navigation device into the mobile holder (4), and press the
device toward the back of the holder until the device clicks into place.
Ensure that the device screen is clearly visible for the user. If you want
to release the navigation device from the mobile holder, pull the device
from the holder.
11
Get started
To use the device for GPS navigation, lift the GPS antenna up to
approximately 90 degrees (5). Do not try to force the antenna open
more.
Connect to cigarette lighter socket
You can have the navigation device connected to the cigarette lighter
socket while using the device. See Charge the battery, page 9.
■ Switch on or off
Switch on
To switch on, slide the power switch toward the top of the device, and
press the standby key.
When you switch on the device for the first time, a series of setting
screens are displayed and the GPS navigation application starts. Follow
the displayed instructions to define the settings, and refer to the user
guide of the navigation application to use it. To exit to the application
menu, press the home key.
Switch off
To switch off, slide the power switch toward the base of the device.
■ Insert the memory card
An SD (secure digital) memory card is supplied with the navigation
device. You can only use memory cards formatted with the FAT file
system with this device.
Use only compatible SD cards approved by Nokia for use with this device. Nokia
uses approved industry standards for memory cards, but some brands may not be
fully compatible with this device. Incompatible cards may damage the card and
the device and corrupt data stored on the card.
12
Get started
If the SD card is not already inserted in the
memory card slot, with the screen facing
up, insert the card so that the label faces up
and the bevelled corner faces toward the
base of the device. Carefully slide the
memory card into the slot until it locks into
place.
To remove the memory card, push the card
until it pops out from the slot.
Important: Do not remove the memory card in the middle of an
operation when the card is being accessed. Removing the card in the
middle of an operation may damage the memory card as well as the
device, and data stored on the card may be corrupted.
13
Operation
3. Operation
■ Touch screen
To use the device, tap the screen with your finger.
Important: Avoid scratching the touch screen. Never use a pen
or pencil or other sharp objects to write on the touch screen.
■ Adjust the volume
To adjust the volume, press the volume up or down key to display the
volume bar, and use either key to set the volume.
■ Adjust the screen backlight
To adjust the backlight, press the volume up or down key, and quickly
tap the sun icon (shown in the top right corner) to activate the night
mode or the moon icon to activate the day mode. The sun icon shows
that the day mode is active and the moon icon shows that the night
mode is active.
To change the backlight settings, in the application menu screen, tap
Setup > Backlight.
■ Lock the screen and keys
To prevent accidental operation of the screen and keys, slide the lock
switch at the base of the device toward the padlock icon. A padlock icon
is displayed on the screen. To activate the screen and keys, slide the
switch to the opposite direction.
■ Standby mode
To save battery power, you can set the device to the standby mode by
pressing the standby key. The screen turns off. To use the device, press
the standby key.
14
Operation
■ Access and start applications
The applications in the device can be started from the application menu
screen that is shown when you switch on the device.
To exit to the application menu screen, press the home key.
To start an application, tap its icon in the application menu screen.
■ GPS navigation
To use the device for GPS navigation, lift the GPS antenna up to
approximately 90 degrees. Do not try to force the antenna open more.
To start the GPS navigation application, tap Navigation in the
application menu screen, or press the flag key. For using the application,
refer to its user guide.
When you start the application, it takes some time for the device to
position itself, depending on how long the device has been switched off
and how well it can receive the satellite signals. In optimal conditions,
the start-up takes about one minute
Almost all digital cartography is inaccurate and incomplete to some
extent. Never rely solely on the cartography provided for use with the
GPS navigation application.
■ Copy files to the memory card
You can use the MP3, Photo, and Video application to open media files
saved on the memory card. To copy files to the SD memory card, use a
compatible memory card writer and an operating system that supports
the FAT file system. For more information, refer to the documentation of
the memory card writer and the operating system.
■ Listen to music
To play audio files saved on the memory card, tap MP3 in the application
menu screen.
The application supports the mp3 and wma file formats. However, the
application does not necessarily support all the variations of these
formats.
15
Operation
The navigation device has a stereo audio-out connector (6) for
compatible headphones with a 3.5-mm plug. The connector is
compatible with 32-ohm or higher impedance headphones.
To listen to music, you must first add music tracks from the memory
card to the track playlist.
Warning: Do not hold the device near your ear when the loudspeaker is
in use, because the volume may be extremely loud.
To add tracks to the playlist, tap
in the player screen. A list of
sorting categories (for example, Artists) is displayed. In the playlist
screen, you can do the following:
• To update the playlist with new tracks on the memory card, tap
.
• To add a track to a folder of favorite tracks, tap a category and the
track, and tap
and the desired folder; to select several tracks,
tap the first track, and move your finger over the other tracks.
• To scroll through the track or category list, tap the up or down arrow.
• To return to the previous screen, tap
.
In the music player screen, you can do the following:
• To open a track, tap
tap the track and
. Tap a category, and tap the track twice, or
.
• To play the displayed track or pause or resume playing, tap
stop playing, tap .
. To
Warning: Listen to music at a moderate level. Continuous
exposure to high volume may damage your hearing.
• To play the next or previous track within the same sorting group (for
example, album or music genre) as the displayed track, tap or .
• To scroll through the track, drag the slider at the top of the screen.
• To adjust the volume, tap either speaker icon, or use the volume keys.
• To play the current track continuously, tap
play the tracks of the sorting group, tap 1
the sorting group once, tap
.
• To play the tracks in a random order, tap
the normal order, tap
.
16
. To continuously
. To play the tracks of
. To play the tracks in
Operation
• To set the timer to show the playing time or the remaining playing
time of the current track, tap the time.
• To close the player, tap
.
■ View photos
To view images saved on the memory card, tap Photo in the application
menu screen.
The application supports the bmp and jpeg file formats. However, the
application does not necessarily support all the variations of these
formats.
To view an image, tap the folder where the image is saved, and tap the
desired image file twice, or tap the image and
.
In the image folder screen, you can do the following:
• To scroll through the displayed files or folders, tap the up or down
arrow.
• To return to the previous folder, tap
• To return to the main folder, tap
.
.
In the image viewer screen, you can do the following:
• To view the next or previous image, tap the right or left arrow.
• To zoom in the image, tap
• To rotate the image, tap
. To zoom out, tap
.
.
• To return to the folder screen, tap
.
To view all the images in the selected folder one by one, tap
return to normal playing, tap the screen.
To close the viewer, tap
. To
.
■ Watch video clips
To watch video clips saved on the memory card, tap Video in the
application menu screen.
17
Operation
The application supports the mpeg-4, wmv, asf, mpg, and avi file
formats. However, the application does not necessarily support all the
variations of these formats.
To watch videos, you must first transfer the video files from the memory
card to the video playlist.
To manage the videos on the playlist, tap
in the video player screen.
The video playlist is displayed. In the video playlist screen, you can do
the following:
• To open a video, tap the up or down arrow to scroll through the
videos, tap the video that you want to watch, and tap
.
• To add a video, tap
, tap the folder where the video is saved
twice, and tap the video.
• To remove a video, tap the video and
.
• To return to the previous screen, tap
.
In the video player screen, you can do the following:
• To play the video or resume playing, tap
. To stop playing, tap .
. To pause playing, tap
• To play the next or previous video, tap
or
.
• To view the video in full screen, tap
mode during playback, tap the screen.
. To return to the normal
• To adjust the volume, tap either speaker icon, or use the volume keys.
• To play all the videos on the playlist one by one, tap
to normal playing, tap
.
To close the player, tap
. To return
.
■ Adjust settings
To adjust the general device settings, tap Setup in the application menu
screen. In setting screens, to save the settings and close the current
screen, tap OK; to close the screen without saving the settings, tap
Cancel.
To change the device language, tap Language and the desired language.
To scroll through the languages, tap the up or down arrow.
18
Operation
To define the time settings, tap Time. To select the time zone, tap the
left or right arrow in the Time zone field. Cities located in the time zone
are shown below the daylight saving setting. To turn daylight saving on
or off, tap the left or right arrow in the Daylight saving field. To set the
date and time, tap NEXT, tap the desired option, and repeatedly tap the
up or down arrow until the desired value is shown.
To adjust the screen backlight, tap Backlight. You can set the backlight
level separately for the day and night mode. To set the backlight level,
tap the left or right arrow. To set the time after which the night mode
turns on, tap the left or right arrow in the Backlight timer field. If you
select Never, the night mode is not automatically activated when the
day mode is active. When the device automatically activates the night
mode, to switch to the day mode, tap the screen.
To calibrate the screen if it responds inaccurately, tap Calibration and
YES. Follow the displayed instructions.
To view information about the device software, tap About. To reset the
device to the factory settings, tap Factory reset and OK.
■ Reset the device
If the device stops functioning, although it has been charged, you need
to reset it. When the device is switched on, press and hold the reset key
until the device automatically restarts. The reset does not reset the
device settings.
19
Battery information
4. Battery information
Your device is powered by a rechargeable battery. The battery can be charged and
discharged hundreds of times, but it will eventually wear out. Recharge your
battery only with Nokia approved chargers designated for this device.
Unplug the charger from the electrical plug and the device when not in use. Do
not leave a fully charged battery connected to a charger, since overcharging may
shorten its lifetime. If left unused, a fully charged battery will lose its charge over
time.
If the battery is completely discharged, it may take several minutes before the
charging indicator appears on the screen.
Never use any charger that is damaged.
Leaving the device in hot or cold places, such as in a closed car in summer or
winter conditions, will reduce the capacity and lifetime of the battery. Always try
to keep the battery between 15°C and 25°C (59°F and 77°F). A device with a hot
or cold battery may not work temporarily, even when the battery is fully charged.
Battery performance is particularly limited in temperatures well below freezing.
Do not dispose of batteries in a fire as they may explode. Batteries may also
explode if damaged. Dispose of batteries according to local regulations. Please
recycle when possible. Do not dispose as household waste.
20
Care and maintenance
Care and maintenance
Your device is a product of superior design and craftsmanship and should be
treated with care. The suggestions below will help you protect your warranty
coverage.
• Keep all accessories and enhancements out of the reach of small children.
• Keep the device dry. Precipitation, humidity, and all types of liquids or
moisture can contain minerals that will corrode electronic circuits. If your
device does get wet, allow it to dry completely.
• Do not attempt to remove the battery from the device.
• Do not use or store the device in dusty, dirty areas. Its moving parts and
electronic components can be damaged.
• Do not store the device in hot areas. High temperatures can shorten the life of
electronic devices, damage batteries, and warp or melt certain plastics.
• Do not store the device in cold areas. When the device returns to its normal
temperature, moisture can form inside the device and damage electronic
circuit boards.
• Do not attempt to open the device.
• Do not drop, knock, or shake the device. Rough handling can break internal
circuit boards and fine mechanics.
• Do not use harsh chemicals, cleaning solvents, or strong detergents to clean
the device.
• Do not paint the device. Paint can clog the moving parts and prevent proper
operation.
• Use only the supplied or an approved replacement antenna. Unauthorized
antennas, modifications, or attachments could damage the device and may
violate regulations governing radio devices.
These suggestions apply equally to your device, battery, charger, or any
enhancement. If any device is not working properly, take it to the nearest
authorized service facility for service.
21