1
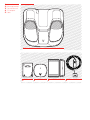
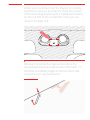
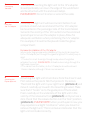
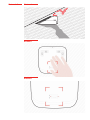
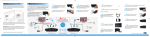
Installation Manual
To use if the space is smaller than 30mm in width
Important!
Please read the entire installation manual carefully
before attempting to install your Rayzer light.
Manufacturer’s liability
The manufacturer’s liability does not extend to:
a) Faults caused by the customer’s use of the products with
other equipment or accessories in a manner that affects their operation.
b) Faults caused by changes to or interference with the products carried out by the
customer that are not performed in accordance with the manufacturer’s instructions.
c) Faults caused by the customer’s use of the products in a manner other than that laid
down in the user documentation or by the negligence of the customer, his staff or a
third party or by other circumstances outside the manufacturer’s control.
d) Poor/impaired operation resulting from incorrect fitting/installation.
Introduction
Thank you for choosing Rayzer. We hope that you
will find your unique auxiliary light extremely useful
and that it will serve you well for a long time. If you
have any questions or concerns about your Rayzer,
contact your retailer.
Rayzer is comprised of five separate components:
the actual light unit, the mounting bracket, the
transmitter unit, a 12V adapter and a cable.
In addition to the five Rayzer components, the
package also contains a wiper cloth and special clamps
for use during assembly.
The Rayzer was designed to be easily installed by
any driver. However, we do encourage professional
installation through a dealership or professional
mechanic — especially if you have Xenon high and low
beams — to ensure the best performance from your
Rayzer. If a professional installation is not available
or not an option for you, then carefully follow these
instructions, and you’ll find that you can manage
just fine on your own – and even better if there are
two of you!
1 Light unit
2 Mounting bracket
3 Transmitter unit
4 12V adapter
5 Cable
1
2
3
4
5
1
Mounting the
Rayzer transmitter
unit in the engine
compartment
The transmitter unit automatically synchronizes
the car’s headlights with Rayzer. This way, Rayzer
automatically switches on and off as you turn your
high beams on and off.
In cars with conventional high (halogen) beams,
connect the transmitter’s red cable to the positive
terminal of the high-beam light. Attach the
transmitter unit’s black cable to a grounding point.
In cars with that use Xenon bulbs for both high and
low beams, you must first localize the control signal
for the high beams. A professional mechanic at a
dealership or garage should be able to help you.
Attach the red cable of the transmitter unit to the
control-signal connection point and attach the
black cable to a grounding point.
Place the transmitter as close to the car’s cabin as
possible for best results.
2
Install the Rayzer
mounting bracket
on the inside of
the windshield
The mounting bracket was designed to allow
the Rayzer to be attached and removed easily,
maximizing its portability. When disconnecting
Rayzer, first carefully remove the cable without
letting it be pulled out along with the unit. It is
important that the mounting bracket is positioned
properly and firmly adhered to the windshield.
PLEASE NOTE: Do not, under any circumstances,
replace the special adhesive tape that is on the
mounting bracket with any other type of tape.
Likewise, do not reuse the tape if you replace the
windshield.
2
Before mounting the attachment, you must
thoroughly clean the windshield with the enclosed
wiper cloth. We also recommend that you ask
someone to help you during assembly—it will
make the job much simpler.
a
Adjust the rear-view mirror for the shortest person
who normally drives the car. This ensures a proper
fit and unobstructed view for everyone who will be
driving the car.
b
Position the Rayzer light unit against the windshield
and move it as far up as possible without the unit
coming up against the mirror.
c
Ask your assistant to stand right in front of the car
and check that the Rayzer is straight and correctly
positioned.
2
d
When you’re satisfied that the Rayzer is correctly
positioned, ask your assistant to mark the corners
of the mounting bracket with a whiteboard marker
on the outside of the windshield. Then you can
remove the light unit.
e
Remove the protective tape and position the
mounting bracket exactly between the marks. To
minimize air bubbles, begin at the top short side
and work your way downward.
3
Connecting
the cable
The cable connecting the light unit to the 12V adapter
should preferably run down the edge of the windshield
and be attached with the enclosed clamps.
PLEASE NOTE: Do not shorten or extend the cable.
4
Mounting
the 12V adapter
Naturally, the light unit will need current before it can
produce a beam. We recommend that the 12V adapter
be mounted on the passenger side of the transmission
tunnel in the vicinity of the 12V outlet. Use the enclosed
special tape to secure the adapter in place. Allow for
adequate ventilation when positioning the 12V adapter.
For example, it should not be placed inside the glove
compartment.
Permanent installation of the 12V adapter
When conducting a permanent installation of the electrical connection
to the 12V adapter (not through the cigarette lighter/12V outlet), keep in
mind:
1. The electric circuit should go through a relay where the ignition
activates the circuit. PLEASE NOTE: Activation does not go through the
high beam connection.
2. The cables from the battery to the 12V adapter should be at least
1.5mm in diameter, although 2.5mm is recommended.
5
Attaching the
Rayzer light unit
Attaching the light unit is best done from the driver’s seat.
First remove the plastic film that protects the lenses.
Then hold the light unit in your right hand (picture 4) and
move it carefully up towards the mounting bracket. Make
sure that it “hooks” on to the guide pins of the bracket.
Press carefully on the underside of the light unit in the
vicinity of the release button (picture 5) until you hear a
click. Check that the release button is in the “lock” position
(picture 6). PLEASE NOTE: When your Rayzer is new, you
may experience a slight “resistance” when you mount or
remove the light unit. This is normal and indicates that the
light unit is installed correctly.
Picture 4–6
Picture 4
Picture 5
Picture 6
Getting started
with Rayzer
Once the Rayzer has been properly
assembled and mounted in your car, there
are one or two points you should bear in
mind before taking your car on the road. By
following these simple instructions, you’ll
get the most out of your Rayzer.
The car must be started before you switch
to high beams and activate Rayzer.
Synchronization
Rayzer is synchronized with the
vehicle’s high beams by a sophisticated
wireless control system. The radio signal
is encrypted to prevent the transmitter
from interfering with other vehicles using
Rayzer. The sender unit and Rayzer are
automatically integrated the first time you
switch to high beams and activate Rayzer.
PLEASE NOTE: The high beams must be
turned on within 10 seconds.
However, you can still use your Rayzer
in other cars*. When moving the Rayzer
to another car, simply mount the unit and
switch on the high beams during the first
ten seconds after you turn on the ignition.
Rayzer will automatically recalibrate to
this car’s wireless system.
* Additional mounting brackets are
available for purchase
Avoid extreme temperatures
The Rayzer works best at “normal”
temperatures. In a worst-case scenario,
extreme temperatures may affect its
function. We therefore recommend
that you do not leave your Rayzer in
your parked car either on freezing
winter days or in the heat of summer.
Using your Rayzer
Rayzer can become hot after prolonged
driving. Avoid removing the unit
immediately after driving.
• Reflector adjustment: The thumb-wheel
on the underside of the Rayzer enables
each reflector to be individually adjusted
for height and breadth, ensuring that
you can achieve optimum lighting
conditions at all times. PLEASE NOTE: When you feel resistance, do not try to
force the thumb-wheel further. For safety reasons, adjustments should
be made only while the vehicle is at a
standstill. If necessary, minor
adjustments can be made while driving if traffic conditions allow.
• Indicator lamps: The 12V adapter
(which is connected to the vehicle’s 12V
system) has three indicator lamps as well
as an indicator light on the transmitter
(see pictures):
– Green lamp: Indicates that the
12V adapter is connected and ready
to be taken into operation. If this
light is not showing, then check the
vehicle’s 12V (cigarette lighter)
outlet and fuses.
– Orange lamp: Indicates when
the Rayzer is on (high beams) and
indicates contact between the
transmitter unit and the light unit.
If the lamp does not show on full
beam, then the cable between the
light unit and the 12V adapter might
not be properly connected. If it is
connected properly, then the fault
may lie with the transmitter unit,
which is also provided with an
indicator lamp.
If this lamp does not illuminate
when you switch to high beams, then
check to make sure that the trans mitter unit cables have been properly
connected. Otherwise, contact
your retailer.
– Red lamp: Indicates the 12V adapter
has become overheated. To protect
the electronic equipment, Rayzer temporarily shuts down. Generally, this does not happen until Rayzer has
been in uninterrupted use for 40 minutes. Allow about five minutes for the adapter to cool sufficiently. The red light will switch off and Rayzer automatically turns back on.
We hope you enjoy your new
Rayzer and find it very useful!
High beams only
High beams and Rayzer
www.visualeyes.se
To use if the space is smaller than 30mm in width
Patent No: SE529793, Design Protected, Reg No: 814512, Visualeyes™, rayzer™
Second edition