1
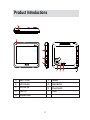
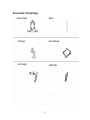
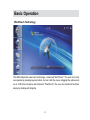
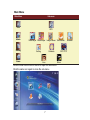
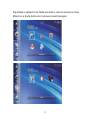
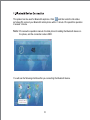
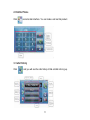
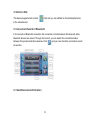
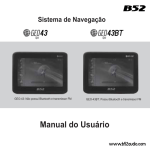
GEO-43: without Bluetooth & FM Transmitter
GEO-43BT with Bluetooth & FM transmitter
User's Manual
Table of Contents
Product Introductions ....................................................................................................... 2
Precautions ...................................................................................................................... 4
Guides of Using GPS Navigator....................................................................................... 5
Basic Operation .............................................................................................................. 6
Bluetooth and FM ............................................................................................................ 9
Change Wallpaper...........................................................................................................14
Media Playback..............................................................................................................16
Games ........................................................................................................................... 22
System Setting ............................................................................................................... 23
Specifications ................................................................................................................. 26
In order to enable you to use this product correctly and quickly, we design and provide this
manual to introduce the product and the operation instructions. Please read it carefully
before using the navigator.
1
Product Introductions
A
Menu / Power
F
B
LED Indicator
G
Reset Button
C
SD Card Slot
H
Power Switch
D
E
USB Port
Earphone Jack
I
Stylus
2
Speaker
Accessories in the package
Device Holder
Stylus
Car Mount
User’s Manual
Car Charger
USB Cable
3
Precautions
Always operate the vehicle in a safe manner. Do not become distracted by the navigation
while driving, and always be fully aware of all driving condition. Minimize the amount of
time spent viewing the screen of the navigation while driving and use voice prompts when
possible. Do not enter destinations, change settings, or access any functions requiring
prolonged use of the unit’ controls while driving. Pull over in a safe and legal manner
before attempting such operations.
Use the specified power adaptor. Using a different type of adaptor may damage the
product.
Never attempt to repair the product by yourself.
Do not use the product near water. Do not touch this product with wet hands.
Do not use for many hours at extremely low or high temperature.
Avoid leaving the product in hot or humid place.
Do not drop it and avoid heavy impact at anytime.
Always use soft and dry cotton cloth when cleaning the product. Use of water/
detergent/benzene/surfactants as cleaning agents is strictly prohibited.
When attaching a navigation car mount, remove impurities on the surface before
attaching, and press suction cup lever to avoid falling.
Do not pull out SD Memory Card during the operation of navigation program. It may
cause a mechanical trouble.
Please obey the practical traffic regulations. Voice guidance and map route may
differ from the actual traffic condition.
When moving the product, separate the power from cigarette jack and separate the
main body from holder or separate the holder from window before moving.
4
Guides of Using GPS Navigator
This device is supplied with built-in Lithium battery which could be recharged. In
order to prolong battery's service life, please charge it at least 8 hours before the first
times use.
When using the device for the first time, it is necessary to calibrate the screen strictly
to avoid poor touch effect result from inaccurate calibration.
Re-calibrate if the touch screen couldn't run properly after it is used for a long time.
After connect to PC with USB cable, the system would close all the application
programs in progress to guarantee that the system can run stably.
Charge the device when following conditions occur:
1. The power icon shows that the power is low;
2. The system turns off immediately when you turn it on.
3. There isn't any response when pressing any key.
Two methods of charging are available:
1. Connect the device to the computer to charge, no matter it is power on or off. As
long as the device is connected to the computer, the battery will be recharged.
2. Charge with attached car charger. Connect the car charger to the cigarette jack;
insert another end (USB) to the GPS supply port. When the LED indicator is on,
charging is in process.
5
Basic Operation
WindTouch Technology
This GPS adopts the new touch technology - advanced “WindTouch”. The user is not only
can operate by pressing keys as before, but can click the menu, dragging the options and
so on. With this innovative and functional “WindTouch”, the user can handle all functions
simply by clicking with fingertip.
6
Main Menu
Main Menu
Sub-menu
GPS
Media
Setting
Game
GPS
VideoPlayer
MusicPlayer
Setting
Image Viewer Text Reader
Calibrate
Line
Click the main menu icon on the left to open the sub-menu.
Click the same icon again to close the sub-menu.
7
GPS TTFF
Miner
Browser
Drag leftward or rightward on the Taskbar area which is under the sub-menu to choose
different icon or directly click the icon of sub-menu to launch the program.
8
Bluetooth
Click the setting,double click
and then enter bluetooth. Pls see thefollowing:
You will find the following interface:
9
This product can be used for Bluetooth earphone. Click
and then enter the link status
as follows.Pls connect your Bluetooth mobile phone with in 1 minute. Pls repeat this operation
if exceed 1 minute.
Note: Pls review the operation manual of mobile phone for adding the Bluetooth device on
the phone, and the connection code is 0000.
You will see the following interface after you connecting the Bluetooth device.
10
2. Dialthe Phone
Click
and enter dial interface. You can make a call via this product.
3. Calls History
Click
and you will see the calls history of dial out/dial in & hng up.
11
4. Shortcut Dial
This device support short cut dial,
click and you can callfast on the last telephone No.
in the calloutrecord
5. Connection Record of Bluetooth
In the records of Bluetooth connection the connection records between this device & other
Bluetooth devices are saved. Through this record, you can switch the connection status
between this product and these devices. Click
pls see the.
6. Checktheversioninformation
12
,and you can check the connection record,
Click
, and you can check the version information. Pls see the following:
Click the FM transmitter menu and enter the operation interface of
FM transmitter.
1. Move the frequency adjustment button left & right with your finger or click+-to select
afixed frequency.
2. Open the car radio and adjust it to match the fixed frequency on the GPS.
3. Try to choose the frequency that is unoccupied by the local broadcasting station.
4. If it is with big noise, you can change some different frequencies to test till you find the best one.
5. The speaker of the GPS keep no sound when using the FM trans mitter function.
13
Change Wallpaper
The replacement of wallpaper
Touch on the top edge of desktop to change the wallpaper.
Audio Control
Click the music symbol on the top right of desktop to turn on or off the audio.
Audio on
Audio off
14
Reset the Device
If the system halts when the GPS is running, restart the device by pressing the reset
button on the back side of device.
Connect to Computer & Transfer Data Files
1. Connect GPS device with USB Cable to computer.
2. Turn on the GPS device.
3. The folders of device will pop out; one for local memory and the other for user card if
it’s inserted.
4. Drag files into the folders to download or delete.
Battery
This device has built-in a high-capacity Lithium battery. The battery can be fully recharged
within 3-4 hours. Please charge the device at least 8 hours for the first time use.
GPS Navigating
Click GPS icon to enter GPS interface. Please see the attached Map Instruction for
details.
15
Media Playback
Media Center
On the main menu, click and select Media => Browser to enter My Media Center.
On the top right corner of My Media Center interface and other main interface, there is a
power icon of battery. When the device is connected to the computer or charger, the
power pulse in power icon is scrolling, and the icon is in static state while the battery is
fully charged.
16
File Classification Management
Button Icon
File Type
Audio ( MP3, WMA, OGG, ACC)
Video ( AVI, WAV, 3GP, ASF, MPG)
Image (JPEG, BMP, GIF)
e-Book (TXT)
My Media Center
Play List
Click different icons on the bottom of browser to display related files.
17
Click the upper right icon of the browser to add or delete the files.
Select and click a media file in any category, the player or browser will be started
automatically to play the designated file.
User can browse all the files in My Media Center to play, edit or delete files.
Music Player
Music player supports the audio files of following formats: MP3, WMA, OGG, and ACC.
On the main menu, press Media => Music player to browse audio files and start to play.
LRC Function
The Media player supports lyrics display function. If there is LRC file available with the
same file name as music file and stored in the same location, the player will enter lyrics
show interface automatically.
Media Player Interface
18
Play List in Media Player
File options
Add file (to open file-selection dialog box)
Move file upward
Move file downward
Delete file
OK and back
Cancel and close
File-selection dialog box
Selecting : When this botton is hold, user can select multiple files to add into playlist.
All : Press this button to select all files in the current directory.
Dir : When this botton is hold, user can select folders (includs sub-directory) and files at
one time.
OK : Complete selection and go back to Media player.
: Exit dialog box.
19
Video Player
Video Player supports video files in format of AVI, WAV, 3GP, ASF, and MPG.
On the main menu, press Media => Video Player to brows video files and start to play.
Customized Icon of Video File
In the Media Center, user can select a frame from the video file to be its icon so the user
can recognize the file easily by previewing the icon.
Two ways to create customized icon for video files:
1. When the video files downloaded to GPS device from PC, the Media Center will take
the first frame from the video file as the default icon.
2. The user can select any frame from the video file and save it in BMP format. Rename
it as same as original video file and store them in the same directory. The Media
Center will recognize it automatically and set it as the icon for the video file.
Image Viewer
On the main menu, click and select Image Viewer in Media.
Click any image file to view the image.
20
Image Viewer Interface
Toolbar Icons
Descriptions
Open files
To open image files in specific direction.
Previous
Display the previous image.
Next
Display the next image.
Zoom in
Zoom in the image.
Zoom out
Zoom out the image.
Hand tool
Drag and move to view the image if image size is larger
than the screen.
Viewing mode
Upward = Zoom in
Leftward = Previous
Full screen
Display the image in full screen. Hidden toolbar will
appear again by clicking on the bottom area.
Adaptable size
Display the image in adaptable size.
Downward = Zoom out
Rightward = Next
Delete current image / Set the image as desktop
While browsing, the icon of sandglass may appear on the upper left corner which
means the system is loading the file.
If the system can't read the file, a red symbol “X” will appear on the upper right
corner.
21
Save bookmark
Save a bookmark (take row as a unit)
Font Size
Select font size (Small / Middle / Big)
Page selection
Move to specific page
Encoding
Select character encoding
In reading mode, click “Current/total Pages” on the upper right corner can switch to
“Current/total Rows”.
User can drag on screen to operate the Text Reader:
Drag upward to scroll rows up.
Drag downward to scroll rows down.
Drag leftward to turn one page up.
Drag rightward to turn one page down.
NOTE: The bookmark is only valid in current file. Reset bookmarks to read another file.
Games
22
Miner
Line
System Setting
On the main menu, there are several setting options are available.
User can click and select these options to adjust the system properly according to
individual requirements.
23
System Information:
It describes the software version, remained and total memory capacity details.
Sound Setting: Adjust audio volume of system.
Backlight Setting: Adjust the backlight.
Background Selection:
User can select a picture in BMP format from folder and set it as desktop background.
24
Language Selection: Selection would be effected only after the device is restarted.
Calibrate the Touch Screen
For the first time use of the GPS device or after it’s used for a long time, the user can enter
the screen calibration to reset it. In order to keep high accuracy, please use stylus to
calibrate and follow the instructions. Touch any place on screen to exit when finished.
25
Specifications
Basic Specifications
Model
Navigationssystem GEO-43
Operating System
Windows® CE 6.0 core
Built-in Memory
2GB NAND Flash Memory
Power Source
Built-in Li-ion Battery (3.7V/1100mAh)
Memory Expansion
Support SD / MMC Card
Interface
USB 2.0 (High-Speed)
Display System
Screen Size
4.3" Touch Screen (16:9)
Screen Features
260K Color TFT LCD, 480x272 Resolution
Languages
Support 14 Languages
Pictures
Support pictures of JPEG, GIF and BMP
Read Text
Support TXT
Video Features
Video Format
Support AVI, WMV, ASF, MPG, MJPEG and 3GP
Performance
480x272 @ 25fps
26
Audio Features
Audio Format
Support MP3, WMA, OGG, ACC, AC3
Loudspeaker
Built-in Loudspeaker, 1W
Lyrics
Support LRC lyrics function
Additional function
Games
Built-in
Others
Accessories
Car Charger, USB Cable, Stylus, Car Mount
User’s Manual
26