1
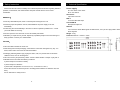
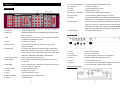
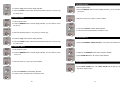
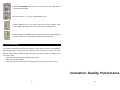
Editor II
CA-32D
TABLE OF CONTENTS
Professional Lighting Controller
1.Safety Instruction
2.Technical Specification
3. Overview
3.1 Front View
3.2 Rear View
4. Operation Guide
4.1 Program mode
4.2 Stand by mode
4.3 Stand Alone Mode
4.4 Setting Strobe
4.5 Setting COLOR
4.6 Setting DIMMER
4.7 Create a Scene
4.8 Create a Chase
4.9 Running Scenes
4.10 Insert a Scene
4.11 Overwrite a Scene
4.12 Copy a Scene
4.13 Copy a Chase
4.14 Delete a Scene
4.15 Delete a Chase
4.16 Clear Memory
4.17 Light Show
User Guide
5. Fixture Cleaning
Please read these instructions carefully before use
1-
1. Safety Instruction
2. Technical Specification
Please read the user manual carefully as it includes important information regarding details of
Power supply
operation, maintenance, and technical data. Keep this manual with the unit for future
AC 120v~60Hz / 230v~50Hz
consultation.
DC 9~12V 300mA
Stand Alone
5 pin male connector
WARNING!
Midi in
♦ Avoid any flammable liquids, water or metal objects entering into the unit.
♦ Should any liquid be spilled on the unit, DISCONNECT the power supply to the unit
immediately.
To receive MIDI data input.
Sound DMX IN
Microphone/ Earphone
DMX out
♦ STOP using the unit immediately In the event of serious operation problems and contact
your local dealer for servicing.
Two connectors sends DMX signals to DMX fixtures, use 3 pin XLR plug cable to link the
fixture together
♦ DO NOT open the unit--there are no user serviceable parts inside.
Weight: 2.4 kg
♦ NEVER try to repair the unit yourself. Repairs by unqualified people could cause damage or
Dimension:483mm×134mm×73mm
faulty operation. Contact your nearest dealer.
CAUTION!
♦ This unit is NOT intended for home use.
♦ After having removed the packaging, check that the unit is NOT damaged in any way. If in
doubt, DON'T use it and contact an authorized dealer.
♦ Packaging material (plastic bags, polystyrene foam, nails, etc.) MUST NOT be left within
children's reach, as it can be dangerous.
♦ This unit must only be operated by adults . DO NOT allow children to tamper or play with it.
♦ NEVER use the unit under the following conditions:
In places subject to excessive humidity.
In places subject to vibrations.
In places with a temperature of over 45℃/113℉ or less than 2℃/35.6℉.
Protect the unit from excessive dryness or humidity (ideal conditions are between 35% and
80%).
Do not dismantle or modify the unit.
2-
3-
3. Overview
3.1 Front View:
15. Save/ Insert/ Overwrite
To set Save/Insert/Overwrite three modes.
16. Light show
To run the Light Show.
17. Mode
To set Auto/Sound two modes.
18. Full on
All lighting effect at once.
19. Stand by / Stand alone
To set Stand by / Stand alone two modes.
20. Fog machine
To set activate Fog Machine/Ready two modes.
21. Strobe
To activate Non-DMX Strobe. Hold on the Strobe button and
press button 1 ~ 12 separately to change the strobe speed.
22. Speed Slider
To set chase speed ( wait time between scenes ) within the
range of 0.1 second to 5 minutes when running light shows.
The fade time of scenes will be always completed, Speed
slider decides the wait time ( interval time ) between scenes.
1. Fixture 1~8
To select (1~8) fixtures.
2. Hold color
Red/Orange/Yellow/Green/Cyan/Blue/Purple/magenta/ White
Nine colors button.
3. Hold
23. Master Slider
To set the dimmer intensity.
3.2 Rear View:
Press the button for select color on Red /Orange/Yellow/Green
/Cyan/Blue/ Purple/Magenta/ White
4. Chase
5. Spectrum mix
To select (0~12) chase.
Press the button for select 32 spectrum mix colors form
Spectrum Mix slider
6. Chase Slider
To choose chase patterns on Standard chase / Bright chase /
Mood chase / spectrum random chase / spectrum sequence
1. Power
Turns On/Off the power.
chase / Dynamic chase / Red-Green+ Blue / Green-Red+ Blue
2. DC Input
DC 9~12V,300mA min
/ Blue-Red / Yellow-Blue / Red-Green / Yellow-Green
3. FOG machine
5 pin din socket for connecting DC Fog Machine.
7. Spectrum mix Slider
Use to control 32 spectrum mix color
4. Strobe
Trigger non-DMX strobe. Signal +12V DC.
8. Speed Slider
Use to adjust chase speed within the range of 0.1 second to
5. Midi in
To receive MIDI data input.
2.5 seconds.
6. DMX out
Two connectors sends DMX signals to DMX fixtures, use 3
9. Fade Slider
Use to adjust fade time. Fade time is amount of time it take for
one color to fade in or fade out.
10. Dimmer Slider
To set the dimmer intensity.
11. Chase
To select (1~12) chase.
12. Copy
Copy a Scene/Copy a chase.
13. Memory / Delete
To edit exist scenes or delete a chase.
14. Cancel
To delete a scene.
4-
pin XLR plug cable to link the fixture together
Fog machine diagram
5-
4. Operation Guide
4. Press the SPECTRUM MIX button.
4.1 Program mode
When power is turned on, the controller enters Programming mode
automatically. The LED above this button lights off indicating Program mode in
active.
5. To set SPECTRUM MIX, you can view the 32 different mix colors.
4.2 Stand by mode
Press the STAND BY button, the LED above this button lights up indicating
STAND BY in active.
4.3 Stand Alone Mode
6. To set DIMMER and hold color or spectrum mix intensity.
Hold on the STAND BY/ STAND ALONE for 3 seconds, the LED above this
button will blink indicating Stand-Alone mode in active.
4.6 Setting DIMMER
4.4 Setting Strobe
1. Select the fixtures you want to control.
1. Select the fixtures you want to control
2. Press the Chase button.
2. Press STROBE button and the display will blink.
4.5 Setting COLOR
1. Select the fixtures you want to control.
3. Select a dimmer value with 1~12 buttons.
2. Press HOLD button and the display will blink.
3. To set HOLD COLOR button, you can view the Red /Orange /Yellow /Green
/Cyan Blue /Purple/ Magenta/ White nine colors.
6-
4. You can set the fade and chase speed by using the sliders.
7-
4.10 Insert a Scene
1.Enter Program mode.
5. You can set the Dimmer and chase intensity by using the sliders.
2.Press MEMORY button and the display will blink, you can view the scene one
by one.
3. Create a new scene.
4.7 Create a Scene
4. Press INSERT button and the display will blink, you can view the scene one by
1. Enter Program mode.
2. Select the fixtures (1~8) you want to control.
one.
3. To select hold color or chase or spectrum.
4. Press SAVE button and the display will blink.
5. Press the CHASE (1~12) to store your desired scene.
5. Press the desired position (1~12) you selected again to insert the new scene.
4.11 Overwrite a Scene
1. Enter Program mode.
4.8 Create a Chase
2. Press the MEMORY button and the display will blink, you can view the scene
one by one.
1. Enter Program mode.
2. Select the fixtures (0~8) you want to control.
3. Press SAVE button and the display will blink.
4. Press the CHASE (1~12) to store your desired scene. The scene is saved into
the selected button.
3. Create a desired scene.
4. Press the OVERWRITE button and the display will blink.
5. Hold down the SAVE button and then press former selected button (1 ~ 12) to
5. Repeat steps 2 & 3 as many times as you want until the controller’s memory is
overwrite a scene.
full. The SAVE LED will blink when the memory is full.
6. A chase (The controller) can store up to 500 scenes.
4.9 Running Scenes
4.12 Copy a Scene
1. Enter Program mode.
2. Press the MEMORY button and the display will blink, you can view the scene
1.Enter Program mode.
2.Press MEMORY button and the display will blink.
3.Press the CHASE (1~12) button and the display will blink, you can view the
one by one.
3. Select the desired position (1~12) which you want to copy.
scene one by one.
8-
9-
4.15 Delete a Chase
1. Enter Program mode.
4. Press the Copy button and the display will blink.
5. Hold down SAVE and then select the desired position which you want to copy
2. Press the MEMORY button and the display will blink, you can view the scene
one by one.
the chase into it.
4.13 Copy a Chase
3. Select the scene (0~12) that you want to delete.
1. Enter Program mode.
2. Press the MEMORY button and the display will blink, you can view the scene
one by one.
4. Hold down CANCEL and the display will blink.
5. Press the former selected button to delete a scene.
3. Select the desired position (1~12) which you want to copy.
4.16 Clear Memory
4. Press the Copy button and the display will blink.
5. Hold down SAVE and then select the desired position where you want to copy
1. Press the STAND BY /STAND ALONE for 3 seconds, into Stand-Alone mode.
the chase into it.
4.14 Delete a Scene
1. Enter Program mode.
2. Press the MEMORY button and the display will blink, you can view the scene
one by one.
2. Hold down the MEMORY button and the display will blink.
3. Press STAND BY button, all memory will be deleted.
3. Select the scene (1~12) that you want to delete.
4.17 Light Show
1. Press LIGHT SHOW button. The LIGHT SHOW LED will light up, indicating
light show mode is active.
4. Hold down CANCEL and the display will blink.
5. Press the former selected button to delete a scene.
10-
11-
2. Press AUTO/SOUND to activate Auto or Sound mode. The LEDs indicate
which mode is activated.
3. Press the button (1 ~ 12) to run a desired lighting show.
4. When in Auto mode, you can set the wait time by using the sliders. When
these settings will be kept when next time you run the same light show.
5. When in Auto mode / Sound mode activation, the Light show will be triggered
by music, however, you can still set the fade time of the light show.
5. Fixture Cleaning
The cleaning of internal and external optical lenses or mirror must be carried out periodically to
optimize light output. Cleaning frequency depends on the environment in which the fixture
operates: damp, smoky or particularly dirty surrounding can cause greater accumulation of dirt
on the unit’s optics.
y
Clean with soft cloth using normal glass cleaning fluid.
y
Always dry the parts carefully.
y
Clean external optics at least every 20 days and internal optics at least every 30 days.
Innovation, Quality, Performance
12-
13-