1
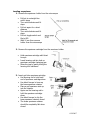
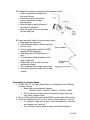
JEOL 1400 TEM
User Guide
Prior to getting started
1. Turn on Monitors 1 and 2
2. Login to EMU server at Monitor 2
3. At Monitor 1, open the “TEM Centre” software
4. Make sure that “HT On” & “Beam Ready” are displayed in the HT/Beam
condition window
5. Open Beam Controller window from Control menu
• Beam (dark) current should indicate:
• ~44uA for 80kV
• ~55uA for 100kV
• ~65uA for 120kV
6. If HT is off, no beam current is displayed or you want to work at a higher
or lower kV than that indicated, please seek help from Jenny, Sigrid or
Katie
6/28/2007
Loading a specimen
1. Remove the specimen holder from the microscope:
•
•
•
•
•
•
Pull out in a straight line
until it stops
Turn anti-clockwise until it
stops
Pull out again for a short
distance
Turn anti-clockwise until it
stops
Pull out toggle switch and
flip to AIR
Wait 10 sec then remove
holder from the microscope
2. Remove the specimen cartridge from the specimen holder
•
•
•
Hold specimen cartridge with blunt
forceps
Insert levering rod into hole on
specimen cartridge fastening jaw
Raise the jaw by gently tilting the
levering tool backward
3. Insert grid into specimen cartridge
• Use levering rod to hold back
end of specimen cartridge down
• Use blunt forceps to lever up
the brass specimen retainer
• Place a grid specimen side up
into the retainer
• Again use the levering rod to
hold the specimen cartridge
down
• Use blunt forceps to clip the
brass specimen retainer closed
• The brass specimen retainer
should lie completely flat when
closed
6/28/2007
4. Reattach the specimen cartridge to the specimen holder
• Hold the specimen cartridge with
the blunt forceps
• Insert the levering rod into the
hole on specimen cartridge
fastening jaw
• Raise the jaw by gently tilting the
levering tool backward
• Align the guide hole over the guide
pin and close jaw
5. Insert specimen holder into microscope column
• Align guide pin with grove
• Push specimen holder in until it stops (do
not turn yet)
• Pull out toggle switch and flip to PUMP,
orange LED will illuminate
• Wait until green LED illuminates (~ 1
min)
• Turn specimen holder clockwise until it
stops (small turn)
• Guide holder as it is drawn into the
microscope column
• Turn clockwise until it stops (larger turn)
• Very gently guide the holder into its final
position
Generating an electron beam
1. Confirm that “HT On” and “Beam Ready” are displayed in the HT/Beam
condition window
• Beam (dark) current should indicate:
~44uA for 80kV, ~55uA for 100kV or ~65uA for 120kV
• If HT is off and no beam current is displayed, please seek help
from Jenny, Sigrid or Katie
2. At top of left hand control panel press BEAM and wait until blinking stops
3. Turn the brightness knob to see if an electron image appears on screen
• If no electron image can be seen, move the specimen in case you
are situated over a grid bar
• If you still can’t see an electron image, seek staff assistance
6/28/2007
4. A good starting point for getting underway is:
• Condenser aperture 2 (second largest dot)
• Press LOW MAG
• Remove objective aperture by turning anti-clockwise to the red dot
• Locate region of interest on grid and centre to screen
• Introduce objective aperture 2 (second largest dot)
• Press MAG 1
• Spot size set to 2
5. Centre the beam using the gun shift X and gun shift Y knobs
6. Begin imaging
Focusing using the wobbler
1. Roughly focus the image through the binocular head
2. Press IMAGE WOBB X or Y
3. Adjust the OBJ FOCUS knob so that the image stops oscillating and the
double image is unified
4. Press IMAGE WOBB X or Y again to deactivate
Taking digital images using “DIGITAL MICROGRAPH” software
The digital camera can be damaged by the bright flash that occurs during
changes to magnification. Please only insert the camera to take an image then
remove again to move around the specimen or adjust image magnification.
1. Set the desired image magnification, focus
the image and spread the beam to achieve
a uniformly bright image
2. Insert the digital camera
3. In the Camera View box, check that the
Camera Inserted box is ticked and that the
Auto Exposure box is ticked
4. Click on Start View
• If you need to change image magnification
click on Stop View and remove the digital
camera from the microscope column
• Reintroduce digital camera and click on
Start View again
5. In the Camera Acquire box, check that the
Auto Exposure box is ticked
6. Click on the Tools icon in the bottom right
corner
6/28/2007
7. Check that Full CCD is selected
8. Check that Auto Exposure is
selected and that Connections
is set to Gain Normalised
9. Usually Binning 1 is ok
10. Good resolution can be obtained
by setting Frame Sum to 4
• The specimen must not be
drifting otherwise the 4 frame
averaged image will be out of
focus
• If specimen drift is an issue
reduce the number of frames to
be averaged
11. The Gatan image file format is dm3. To save images as tif or jpg go to
File, Save display as, and name the file. When prompted, choose: actual
resolution, include annotations (to save scale bar) and save as grey scale.
Specimen exchange
1. If specimen has been tilted during imaging, open STAGE CONTROL
window from CONTROL menu and click STAGE NEUTRAL
2. At top of left hand control panel press BEAM and wait until blinking stops
3. Remove specimen holder from microscope column as described previously
4. Load new grid into specimen cartridge
5. Reload specimen holder into microscope as described previously
6. Press BEAM and wait until blinking stops
7. Begin imaging
At end of session
1. Minimise microscope magnification
2. If specimen has been tilted during imaging, open STAGE CONTROL
window from CONTROL menu and click STAGE NEUTRAL
3. Ensure digital camera is retracted and Stop View has been selected
4. At top of left hand control panel press BEAM and wait until blinking stops
5. Remove specimen holder from microscope column as described previously
6. Remove grid from specimen cartridge
7. Reload specimen holder into microscope as described previously
8. To ensure your images are archived, copy them to a folder under
Jeol1400 in the Images folder of the EMU samba server (M drive)
9. It may be worthwhile to also save a copy to your User folder on the M
drive
10. Logoff the EMU Server
11. Turn both monitors off
6/28/2007
Advanced Users Notes
Optimising the electron image
Changing the objective aperture
The objective aperture has a significant effect on image contrast and
resolution. The smaller the aperture, the higher the image contrast but the
darker the image. We have 20um, 40um, 60um and 120um apertures
selectable.
• Insert a specimen into the beam path
• Ensure an objective aperture is inserted
• Press DIFF on the right hand control panel
• Using DIFF FOCUS knob, focus to create bright spot on screen
• Centre bright spot using DEF/STIG X and Y knobs
• Press PLA and focus for smallest spot using BRIGHTNESS knob
• Centre the spot using SHIFT X and Y
• Select desired objective aperture
• Focus the aperture image using
the DIFF FOCUS knob
• Adjust aperture knobs A and B so
bright spot is in the centre of the
aperture
• When done, press DIFF and PLA
to deactivate and return to normal
imaging
Changing the condenser aperture
The condenser aperture controls the illumination area, angle and brightness.
The smaller the aperture, the higher the image quality but the darker the
image. We have 100um, 200um and 300um apertures selectable.
• Adjust the brightness knob for the smallest beam spot
• Centre the beam spot to the screen using SHIFT X and Y
• Insert the desired condenser
aperture
• Slowly turn the brightness knob
clockwise
• If the beam moves off centre,
re-centre it using the condenser
aperture knobs A and B
• Ensure electron beam converges
and diverges centrally through
BRIGHTNESS focus
6/28/2007
Correcting condenser lens astigmatism
• Adjust the BRIGHTNESS knob for the smallest electron beam
• Press COND STIG
• Slowly turn BRIGHTNESS knob back and forth through focus
• Use DEF/STIG X and Y knobs to make electron beam round rather
than elliptical at either side of focus
• Press COND STIG again to deactivate
Diffraction Mode
• Turn the BRIGHTNESS knob to darken the image sufficiently
• Press the DIFF switch
• Adjust the MAG/CAML knob to choose the desired camera length
• Adjust the DIFF FOCUS knob to obtain the sharpest diffraction
pattern
• Press MAG 1 to return to normal imaging
Imaging difficulties
• If the microscope imaging system is misaligned
• Press IMAGE SHIFT, then NTRL
• Press PLA, then NTRL
• Press COND STIG, then NTRL
• Press OBJ STIG, then NTRL
• Press DARK TILT, then NTRL
• Press BRIGHT TILT, then NTRL
• This reloads the default settings optimised during installation
Emergency Shutdown
• In an emergency, open the narrow panel on the right side under
the desktop console
• Press the EM-STOP switch
• Notify a staff member immediately
6/28/2007