1
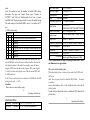
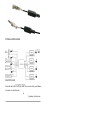
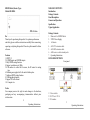
HDMI Matrix (Router Type)
Model:LM-MX04
Dear customer:
Thank you for purchasing this product. For optimum performance
and safety, please read these instructions carefully before connecting,
operating or adjusting this product. Please keep this manual for future
reference.
Features
1. HDCP 1.2
2. 4 HDMI inputs and 4 HDMI outputs.
3. Fully HDMI routing function.
4. Support resolution up to 1080p.
5. 4 IR emitters to control the 4 sources, the IR control is routing
type.
6. Mounting ears supplied to fix the unit to hidden place.
7. Intelligent EDID setting function.
8. USB upgrading function.
9. Support 3D video format
10. Compact size
Notice
Our company reserves the right to make changes in the hardware,
packaging and any accompanying documentation without prior
written notice.
1
Operating Instructions
TABLE OF CONTENTS
Introduction
Package Contents
Panel Descriptions
Connect and Operation
Specification
Typical Application
Package Contents
1. Main unit. 4x4 HDMI Matrix
2. 5VDC Power Supply.
3. 1x Remote.
4. 4x IR-TX extension cable.
5. 4x IR-RX extension cable.
6. 4xIR receiver cable extender jacks
7. Operating Instructions.
PANEL DESCRIPTIONS
Front panel
1)Power switch.
2)IR TX out 1 TO 4.
3)IR window.
2
Operating Instructions
4)Output selection and indicator of input for output port 1 to 4.
5)Indicator of locking status, when the output selection buttons are
locked, LED inside lit.
6)Key lock button.
7)USB port for ISP.
8)DIP switch.
Rear panel
1)Output 1 and 2 with HDMI.
2)Input ports 1 to 4 with HDMI.
3)Output 3 and 4 with HDMI.
4)Power input.
5)IR extension 1to 4.
CONNECT AND OPERATION
1) Connect the HDMI input sources (such as HD-DVD, PS3, STB
etc) into 4x4 HDMI Matrix.
2) Connect the HDMI outputs (such as HD-LCD, HD-DLP) into
4x4 HDMI Matrix.
3) Connect the IR RX receiving cable into 4x4 HDMI Matrix
extension and connect The IR TX cable into 4x4 HDMI Matrix
emitter
4) Power on the input source you want to show. (Keep the unused
input power off, otherwise it may interfere the normal display.)
5) Connect the power supply into 4x4 HDMI Matrix and turn on the
display you want to watch
3
Operating Instructions
6) Use remote or push the button to choose input source. Extra
infrared receiver extensions, IR emitter, are supplied for remote
control.
7) The IR signal of any IR extension will through "TX IR" port to
send the signal out.
8) SOURCE-SINK AUTO FIT Function
This function applies to the situation when the source's HDMI
version exceeds the sink's HDMI version. (This function can be used
to fix the deep color, 1080P, 1080i, 2ch audio, multi channel audio
issue.)
For example: When the TV is HDMI 1.2 version and PS3 source is
HDMI 1.3 version, it will output HDMI 1.2 version.
(1)Under default mode, this machine will output 1.2 version HDMI
signal (1080P and stereo audio).
(2) Under button mode.
There are two modes to update the EDID data according to the DIP
setting. When the DIP is in default mode ( 0,0,0 ), the matrix will be
in mix mode.
A、When the source is HDMI1.3, (e.g., HDMI output from PS3),
OUTPUT1 to 4 both support HDMI1.3 displays, press "selection of
OUTPUT1” and “lock key" simultaneously, the machine will output
HDMI1.3 signals.
B、When the source is HDMI1.3, (e.g., the HDMI output from PS3),
OUTPUT 1 to 4 are connected to the displays that can only support
HDMI 1.2 MAX, press "selection of OUTPUT1” and "lock key"
simultaneously (no matter whether HDMI OUTPUT port is
connected to the display that supports HDMI 1.3 or not), it will
output HDMI 1.2 signals.
When the DIP is in default mode ( 1,0,0), the matrix will be in copy
mode .
Note: The method to reset the machine to default EDID setting:
Disconnect the input and output. Please press "selection of
OUTPUT1” and “lock key" Simultaneously for at least 3 seconds,
and EDID of all the four input ports will be reset to the default setting.
The audio setting of the default EDID is stereo. It is suitable for TV
sets.
9)DIP switch setting
Position ID
1 2 3
0 0 0 Mix the low version EDID.(default) (note 1)
0 0 1 reserved
0 1 0 reserved
0 1 1 reserved
1 0 0 Copy the EDID of the display which connected the
1 0 1 reserved
OUTPUT1.(note 2)
1 1 0 reserved
1 1 1 reserved
Note1: The matrix will mix the EDID data of the sink devices. The
mixed EDID data will use the lowest resolution of the video and the
least channel number of the audio. For example, some sink device
support 1080P, some sink device only support 1080i, some support
5.1 audio, but some only support stereo. Then the mixed EDID will
be 1080i and stereo.
Note2: If user wants to just use one sink device’s EDID data, this DIP
setting can be used. (1.0,0)
Attention:
Please insert or extract cables gently.
4
Operating Instructions
SPECIFICATIONS
Operating Temperature -5 to +35°C (+23 to +95 °F)
Range
Operating
Humidity 5 to 90 % RH (no condensation)
Range
Input Video Signal
Input DDC Signal
Signaling Rate
Video
Amplifier
Bandwidth
Data
transfer speed rate
0.5-1.0 volts p-p
5 volts p-p (TTL)
2.25Gbit/s
140MHz
6.75Gbps(Maximum)
DTV/HDTV:
Video Format
1080P/1080i/720P/576P/480P/576i/480i
Video Color Format
xv-YCC/deep
color 36bit
/3D video
DTS-HD Master Audio、Dolby true-HD
Audio Format
etc.
Output Video
HDMI 1.3+HDCP1.2
Maximum Transmission <15m (If needed, HDMI extender is
Distance
optional)
Power Consumption
12wtts (Max)
290mmL×100mmW×26mmH/17.3''L×7
Dimensions
.9''W×1.7''H
Mass (Main Unit)
0.7kg/4.4lb
IR
wavelength Wavelength:940nm,frequency 38kHz
&frequency
*Note:
Specifications are subject to change without notice. Mass
and dimensions are approximate.
IR receiver cable extender jacks.
When the display device is not near to the matrix, the IR_RX cable
will be too
short. There is a pair of jacks to extend the IR_RX cable. Customer
or installer
can use the headphone cable or 4-line telephone cable to form the IR
cable extender.
Use the male jack and female jack to extend the IR_RX cable like the
picture below.
5
Operating Instructions
TYPICAL APPLICATION
MAINTENANCE
Clean this unit with a soft, dry cloth. Never use alcohol, paint thinner
or benzine to clean this unit.
6
Operating Instructions