1
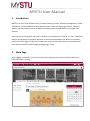
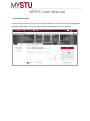
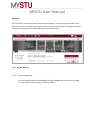
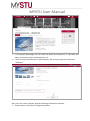
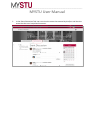
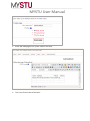
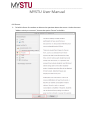
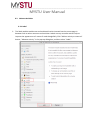
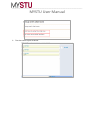
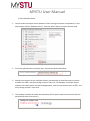
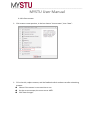
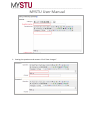
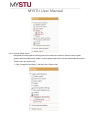
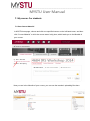
____________________________________________________________________________________ MYSTU User Manual Table of Contents 1. Introduction 3 2 Main Page 3 2.1 Course Discussion ...........................................................................................4 2.2 Event Discussion...........................................................................................5 2.3 Sharing .........................................................................................................5 2.4 Following .........................................................................................................6 2.5 Course Feed ....................................................................................................7 2.6 Calendar table .................................................................................................7 2.7 Reminder .........................................................................................................8 2.8 Search .............................................................................................................9 2.9 Project & Event ................................................................................................9 2.9.1 What’s happening? ..............................................................9 2.9.2 Project ...............................................................................10 2.9.3 Event .................................................................................14 3. Notification 19 4. Calendar 20 5. My Profile 21 5.1 Profile ............................................................................................................21 5.2 Transcript.......................................................................................................23 5.3 Traity .............................................................................................................25 6. My courses- For Teachers ...........................................................................................27 6.1 Enter Course Material 6.2 Add Basic Activity ..........................................................................................30 6.2.1 Add file..............................................................................................29 6.2.2 URL.................................................................................................. 32 6.2.3 Wiki....................................................................................................34 6.2.4 Quiz...................................................................................................39 6.2.5 Forum................................................................................................44 6.2.6 Assignments .................................................................................... .....................47 27 ____________________________________________________________________________________ MYSTU User Manual 6.2.6.a Set up assignments .................................................47 6.2.6.b Feedback ....................................................................49 6.3 Advance Activities .......................................................................................51 …………………………………………………………………...51 6.3.1 Label 6.3.2 Page..................................................................................................53 6.3.3 Folder................................................................................................55 6.3.4 Chat Room ......................................................................................57 6.3.5 Choice...............................................................................................61 6.3.6 Survey..............................................................................................63 6.4 Other features ...........................................................................................66 6.4.1 Week of adjustment ...............................................................66 6.4.2 Moving or hiding files .............................................................66 6.4.3 Announcement ................................................................................67 6.4.4 Arrange teaching progress ..............................................................69 6.4.5 Add assistants .................................................................................71 6.4.6 Question bank .................................................................................73 6.4.6.a Multiple choice .........................................................75 6.4.6.b Short answer ............................................................76 6.4.6.c True/False ................................................................78 6.4.6.d Matching ..................................................................80 6.4.7 Grades 6.4.7a Grades page..............................................................82 6.4.7b Export & Import..........................................................83 6.4.7c Custom Grade report..................................................84 7. My course- - For students ...........................................................................................87 7.1 Enter Course Material 7.2 Download files ...............................................................................................88 7.3 Doing assignments ........................................................................................89 7.4 Online test .....................................................................................................91 7.5 Read announcements....................................................................................93 87 ____________________________________________________________________________________ MYSTU User Manual 1. Introduction MYSTU is an all-in-one platform which includes elearning system, schedule management, school notification, school mailbox and other faculty system. With the single login feature, teacher / student / faculty staff can access to different school system through MYSTU to manage their account. User can also create project and event in MYSTU to invite others to “Follow” or “Join”. Moreover, teacher and student can also post question in the discussion platform for others to comment. Under the Profile page, student can review their course result, export their cv and understand more about himself/herself through participating in Traity. 2. Main Page After logging in to MYSTU, it shows the Discussion page, which consists of Course discussion, Event discussion, Sharing. ____________________________________________________________________________________ MYSTU User Manual 2.1 Course Discussion In the Course discussion forum, user can view all discussion of the courses that is being taken. And teacher & student are free to post questions and comments in their courses. ____________________________________________________________________________________ MYSTU User Manual 2.2 Event Discussion In the Event Discussion forum, users are free to post and comments in the event that they have joined. Click the event’s name, you can go to the event detail page. 2.3 Sharing In the Sharing forum, user can share feeling, comment, photo, interesting topics etc.. and even can create a vote for everyone to interact. Comments posted in this session can be viewed by everyone ____________________________________________________________________________________ MYSTU User Manual 2.4 Following All discussion that the user clicked “show the red eye icon” will be available in this Following section. If the user no longer interested in a specific discussion, simply click the “show red eye icon” again and it will turn grey and that discussion will be deleted from the Following section. ____________________________________________________________________________________ MYSTU User Manual 2.5 Course Feed All course related news is displayed in the Course Feed session which locates in the lower right on the main page. 2.6 Calendar table All scheduled appointment will be marked in this calendar table with a red dot, clicking the red dot will display the details of the appointment. If user needs to edit the appointment details, please go to calendar page (session 4) ____________________________________________________________________________________ MYSTU User Manual 2.7 Reminder Task for today and next day will be displayed in this Reminder session and this session locates at the lower right on the main page. ____________________________________________________________________________________ MYSTU User Manual 2.8 Search The search bar can be found at the top of the main page. It is for searching the profile of the user that you are interested, simply type in the user name (either Chinese or English and press the search button, then the system will search all related user(s) 2.9 Project & Event 2.9.1 What’s happening? All new projects & events are displayed in What’s Happening session on main page. User can click into each project / event for details ____________________________________________________________________________________ MYSTU User Manual 2.9.2 Project All upcoming projects will be displayed by clicking the “All Project” tab . User can click into each project for details User can click “Follow” if he/she is interested to know the progress of that project. Whenever the user is no longer interested in that project, simply click “Unfollow” ____________________________________________________________________________________ MYSTU User Manual In the project detail page, user can check the details of that project, i.e. start date, end date, contributor, project related photos, etc… User can also post comment or upload photo / file for that project that they have “followed” : Every user can create a project with the following information required: Project name: minimum of 6 English characters ____________________________________________________________________________________ MYSTU User Manual Project code: automatically assigned by the system Privacy settings: the project can be set for private (only assigned followers can view) , MYSTU users (user with MYSTU login can view) or public (for public view even without MYSTU login) Followers: Project owner can assign follower(s) to the project Administrators: Adminstrator can edit the project details Project image: Project owner can upload a photo or choose a default photo in the system About the project: description of the project Project Start & Project End: Please enter start date and time & end date and time Contribution: describe the contribution of this project Organizer: State the name of the organizer, can be a department, an organization or a person Tags: Project owner can assign tag(s) to the project for categorization ____________________________________________________________________________________ MYSTU User Manual All projects are grouped under the following categories: My Projects: This is the project created by and followed by me Projects created by me: This is the project created by me latest projects: This is the project uploaded recently Trending: This is the trending and popular project ____________________________________________________________________________________ MYSTU User Manual 2.9.3 Event All upcoming events will be displayed by clicking “All Event” tab. User event for details. User can click “Going” if he/she is interested to join the event. Whenever the user is no longer interested in that event, simply click “Not going ”to exit from the event. can click into each ____________________________________________________________________________________ MYSTU User Manual In the event detail page, user can check the details of that event, i.e. event duration, venue, organizer, event photos, etc… User can also post comment or upload photo / file for that event that they have joined ____________________________________________________________________________________ MYSTU User Manual In the Event Discussion Tab, user can view the event that created by him/her and also the event that the user has posted comment . ____________________________________________________________________________________ MYSTU User Manual Every user can create an event with the following information required : Event name: minimum of 6 English characters Event code: automatically assigned by the system Privacy settings: the event can be set for private (only assigned followers can view) , MYSTU users (user with MYSTU login can view) or public (for public view even without MYSTU login) Event Members: can input the event member name Administrators: Adminstrator can edit the event details Event image: event creator can upload event image (pdf format) Description: description of the event Event Duration: start date and time & end date and time Link: can insert website link for more information Venue: details of the venue Organizer: State the name of the organizer, can be a department, an organization or a person Tags: Project owner can assign tag(s) to the project for categorization ____________________________________________________________________________________ MYSTU User Manual All events are grouped under the following categories: My Events: This is the event created by and followed by me Events created by me: This is the event created by me latest events: This is the event uploaded recently Trending: This is the trending and popular event ____________________________________________________________________________________ MYSTU User Manual 3. Notification After logging in to MYSTU, click the 2nd left icon to enter the notification page The notification are displayed in ascending order ____________________________________________________________________________________ MYSTU User Manual User can sort the notification category that they are interested in, i.e. Discussion notification, course notification, system notification, etc… 4. Calendar After logging in to MYSTU, click the 3rd left icon to enter the calendar page, and it will display all schedules of the user ____________________________________________________________________________________ MYSTU User Manual The schedule can be edited or deleted by the user if that schedule is created by himself/herself Course exam and assignment due date will also display in the calendar page Event and projects that the user joined or followed will also display in the calendar page 5. My Profile 5.1 Profile The following information will be collected from Admission Department and display in the profile page - name, profile image, faculty, major & minor. ____________________________________________________________________________________ MYSTU User Manual User can edit the following information: profile image, qualification, address, email, phone, etc…. User is allowed to set privacy (public or private) for their information, if it is set as private, others cannot search your profile Student can export their cv for job search or interview. ____________________________________________________________________________________ MYSTU User Manual 5.2 Transcript Student can review their score for each course taken; or student can choose a period of time and the result, i.e. GPA, overall GPA, no. of credit obtained, score of the courses taken within that period of time will be available for viewing. ____________________________________________________________________________________ MYSTU User Manual Student’s capability will be displayed in the degree progress bar. ____________________________________________________________________________________ MYSTU User Manual 5.3 Traity Traity is in the 3rd tab in My Profile page, You and your friends is able to comment on each other’s characteristics through answering the system preset question. And the system will base on the statistics and generate a traity report of the user and let the user understand more about him/herself Invite friends to answering questions。 Raters can answer question to comment on others The system will generate questions and the rater has to choose one of his/her friend (out of 5) who best suits the question. If none of you friend or more than 1 of you friends who suit the question, please skip that question. Or if you are not familiar with those 1 or more people to be chosen for the question, please delete that people from the question and the system will generate another friend for you. ____________________________________________________________________________________ MYSTU User Manual Whenever a user is rated by at least 4 friends, the system will generate a traity spider Traity is also available in the main page of MYSTU. ____________________________________________________________________________________ MYSTU User Manual 6. My courses- For Teachers “My courses”is the online teaching platform, development is based on Moodle. Teachers can update teaching activities here, i.e. upload coursewares, set up assignments, set up test. The students can download files & assignments, work on online test, and online interact with the teacher. This serves as a communication platform for teacher and student 6.1 Enter Course Material In MYSTU homepage, choose and click one specified course on the left-hand menu, and then click “Course Material” or click the course name in big size, which leads you to the Moodle of your course. ____________________________________________________________________________________ MYSTU User Manual Now you are in the Moodle of your course, click “Add an activity or resource” button to upload teaching material. ____________________________________________________________________________________ MYSTU User Manual 6.2 Add Basic Activity 6.2.1 Add file After clicking “Add an activity or resource” button, select "File" in the pop-up dialog box: ____________________________________________________________________________________ MYSTU User Manual Enter the edit page, fill in the "file name" and "description", click "add" button to choose files, click “Save and display”. Now the files have been uploaded. ____________________________________________________________________________________ MYSTU User Manual Feel that the method is too complicated? In fact, the Moodle system comes with a drag and drop function. Simply open a local folder, mouse over to the file that you want to upload and directly drag and drop onto the course, now the files have been uploaded. It's very convenient. ____________________________________________________________________________________ MYSTU User Manual 6.2.2 URL Click "Add an activity or resource" button, select "URL "in the pop-up dialog box: ____________________________________________________________________________________ MYSTU User Manual In the edit page, fill in the "Name", "Description" and "URL", click“ Save and display". ____________________________________________________________________________________ MYSTU User Manual 6.2.3 Wiki The main function of Wiki is: Many people modify a text at the same time, everyone can express their idea, and to extend or comment the themes, always leave a history of the modified version, available for inspection. Click "Add an activity or resource" button, select "Wiki" to create a new wiki: ____________________________________________________________________________________ MYSTU User Manual In the edit page, fill in the "Wiki name", "Description" and "First page name". Click the "save and display" button. Choose HTML format, click “Create page” button: ____________________________________________________________________________________ MYSTU User Manual Enter wiki edit page to fill up the content and save. This is the first version of this wiki. ____________________________________________________________________________________ MYSTU User Manual The wiki is open to the class, everyone can modify and edit After editing the wiki, click “save” to update a new version. ____________________________________________________________________________________ MYSTU User Manual Click the "History" tab to see the previous versions: ____________________________________________________________________________________ MYSTU User Manual 6.2.4 Quiz The quiz activity enables a teacher to create quizzes comprising questions. Quizzes may be used as course exams. Click "Add an activity or resource" button, select “Quiz” in the pop-up dialog : ____________________________________________________________________________________ MYSTU User Manual In the edit page, fill in the name and introduction of the quiz, set up the timing. ____________________________________________________________________________________ MYSTU User Manual Set up the overall feedback: Fill in other options according with the requirements, click the "Save and display" button. Now edit the quiz: ____________________________________________________________________________________ MYSTU User Manual Add a new question: you can either add from the Question bank or create a new quiz. After add the questions for the quiz, return to the quiz page and click “Attempt quiz now”. ____________________________________________________________________________________ MYSTU User Manual Now you can begin to answer the quiz. ____________________________________________________________________________________ MYSTU User Manual 6.2.5Forum To build a forum for students to discuss the questions about the course. Under the menu “Add an activity or resource”, choose the option “forum” to build it. ____________________________________________________________________________________ MYSTU User Manual Fill in the forum name and introduction, and choose the forum type. Save and display. Now you can add a new question. ____________________________________________________________________________________ MYSTU User Manual Fill in the new topic of "Subject" and "Message", set up the other options if needed, and then click on "Post to Forum". ____________________________________________________________________________________ MYSTU User Manual 6.2.6 Assignments 6.2.6.a Set up assignments Click the button “Add an activity or resource”, choose the option “Assignments \ Advanced uploading of files”. ____________________________________________________________________________________ MYSTU User Manual Fill in the assignment name and description, then click “Save and display”. ____________________________________________________________________________________ MYSTU User Manual 6.2.6.b Feedback Teachers click to enter the assignment page and view the submissions from students. In the below page, click “Grade” to give feedback to the student: ____________________________________________________________________________________ MYSTU User Manual In the Feedback page, download the submission, give a grade and a comment to the student, then save changes. ____________________________________________________________________________________ MYSTU User Manual 6.3 Advance Activities 6.3.1 Label The label module enables text and multimedia to be inserted into the course page in between links to other resources and activities. Labels are very versatile and can help to improve the appearance of a course if used thoughtfully. Click "Add an activity or resource" button, "Advance activity" in the pop-up dialog box, and then select "Label": ____________________________________________________________________________________ MYSTU User Manual In the label edit box, you can insert images, tables or direct the preparation of Webpage, click save and return to the course. ____________________________________________________________________________________ MYSTU User Manual 6.3.2 Page We can add a page in the course. Click "Add an activity or resource" button, "Advance activity" in the pop-up dialog box, and then select "Page": ____________________________________________________________________________________ MYSTU User Manual And then fill in the name and description of the page, in the page content frame, insert text, pictures or using the HTML code to edit the Webpage. Click “Save and display”. ____________________________________________________________________________________ MYSTU User Manual 6.3.3 Folder Choose to add a folder, and then add the files in it. Click "Add an activity or resource" button, "Advance activity" in the pop-up dialog box, and then select "Folder": ____________________________________________________________________________________ MYSTU User Manual Fill in the name and description of the folder, and then add files in it, Click “Save and display”. ____________________________________________________________________________________ MYSTU User Manual If you want to amend the content of the folder, click “Edit”. 6.3.4 Chat Room Click "Add an activity or resource" button, "Advance activity" in the pop-up dialog box, and then select "Chat": ____________________________________________________________________________________ MYSTU User Manual Fill in the "Chat room name" and "Introduction", to set the various options, click “Save and display”. ____________________________________________________________________________________ MYSTU User Manual Now we can see the following page, click "enter the chat room" or "use more accessible interface" button can enter the chat. ____________________________________________________________________________________ MYSTU User Manual The chat room layout as below: ____________________________________________________________________________________ MYSTU User Manual 6.3.5 Choice The choice activity module enables a teacher to ask a single question and offer a selection of possible responses. Click "Add an activity or resource" button, "Advance activity" in the pop-up dialog box, and then select the "Choice" option: Fill in the choice name, introduction text and options. ____________________________________________________________________________________ MYSTU User Manual You can entry any number of options, the blank options will be ignored. If you need more than 8 options, click "Add 3 fields to form". Set up the other options, click “Save and display”. Below is the preview screen: ____________________________________________________________________________________ MYSTU User Manual 6.3.6 Survey The survey activity module provides a number of verified survey instruments that have been found useful in assessing and stimulating learning in online environments. A teacher can use these to gather data from their students that will help them learn about their class and reflect on their own teaching. Simply click “Add an activity or resource ” button, "Advance activity" in the pop-up dialog box, and then select the "Survey" option: ____________________________________________________________________________________ MYSTU User Manual Fill in the name and choose the “Survey type”, click Save and display: ____________________________________________________________________________________ MYSTU User Manual ____________________________________________________________________________________ MYSTU User Manual 6.4 Other features 6.4.1 There is a "mobile" button in the module of every week, click the button and drag the mouse can freely adjust the module orders. 6.4.2 Week of adjustment Moving or hiding files Move your mouse to the course materials, a list of icon will be appeared , click click click button and allow moving the material up or down by dragging the mouse; button to move right or left; button o hide or display the information, etc. ____________________________________________________________________________________ MYSTU User Manual 6.4.3 Announcement In the top of the course, there’s a module of Announcement, teachers can release news and notifications. Now enter the announcement discussion, click “add a new topic”, fill in the subject and message, and then “Post to forum”. ____________________________________________________________________________________ MYSTU User Manual The number of notice displays on the part can be changed in the setting.. Turn to menu Setting ->Course administration ->Edit settings: Choose the number of “News items to show” & click Save changes. ____________________________________________________________________________________ MYSTU User Manual 6.4.4 Arrange teaching progress The default display for the course is by week, teacher can add description for each week, and can click the edit icon to modify the course: In the edit summary page, input section name (need to disable "use the default section name" box), summary information (input teaching plan, teaching arrangement and other information), click "Save Changes”. ____________________________________________________________________________________ MYSTU User Manual Modified the descriptions of several weeks, the display effect is as follows, now we can see the teaching plan and the schedule of this semester as a panoramic view. ____________________________________________________________________________________ MYSTU User Manual 6.4.5 Add assistants With the concept of roles control the power of Moodle, the default roles in course are "teachers" and "students". If need to add "Assistant", please follow the steps as below: First enter the course, go to menu Setting ->Course administration ->Users->Enrolled users: In the page, if you want to enroll 吴波光 to be your assistant, click the “+”button which under the “Group”, and then click “assistant” to assign the role for him. ____________________________________________________________________________________ MYSTU User Manual If your assistant is not in the list, please click “Enroll users”: (1) In the search box, enter the account that you want to add (2) choose the role that you want to assign (3) Click “Enrol” and “Finish enrolling users” to complete the process ____________________________________________________________________________________ MYSTU User Manual 6.4.6 Question bank Enter the course, find the menu Settings->Course administration ->Question bank ____________________________________________________________________________________ MYSTU User Manual In question bank, click to create a new question. Now we show how to establish several types of questions: ____________________________________________________________________________________ MYSTU User Manual 6.4.6.a Multiple choice How to create a multiple choice question. After clicking to create a new question, in the pop-up box, choose "Multiple choice", click the "Next" button to enter the next step. Fill in the question name, question text, choose the option like follow: Setting each answer for the multiple choices, pay attention to that the scores of correct answers are 100%, and each wrong answer's score is 0. For example, a multiple-choice question has two answers and two wrong answers, each correct answer score of 50%, and every wrong answer’s score of 0. The student are allow to retake the question and this option controls how much they are penalized for each incorrect try. ____________________________________________________________________________________ MYSTU User Manual 6.4.6.b Short answer Click creates a new question, in the box choose “short answer”, then “Next”: Fill in the title, subject content, and the feedback which students see after submitting answers. Choose if the answer is case sensitive or not. Set the correct answer, the score sets to 100%. Click”Save changes”. ____________________________________________________________________________________ MYSTU User Manual ____________________________________________________________________________________ MYSTU User Manual 6.4.6.c True/False After clicking to create a new question, in the box, choose “True/False”, and then click “Next”. ____________________________________________________________________________________ MYSTU User Manual Fill in the question name and text, set the correct answer and feedback. Click “Save changes”. ____________________________________________________________________________________ MYSTU User Manual 6.4.6.d Matching After clicking to create a new question, in the box, choose “Matching”, and then click “Next”. Fill in the question name, text and default mark. ____________________________________________________________________________________ MYSTU User Manual Setting the questions and answers. Click “Save changes”. ____________________________________________________________________________________ MYSTU User Manual 6.4.7 Grades Enter the course, find the menu Settings->Course administration->Grades 6.4.7a Grades page Enter the Grades page, teacher can see the grade report including all the courseware which need to be graded, such as homework, test and so on. Student's name, ID number, Email address, and the courseware score can be shown in the page. ____________________________________________________________________________________ MYSTU User Manual Sort function & Check test paper 1.To get all the students sequenced according to their grades (ascending /descending order), teacher can click . . 2.To check one student's test paper, teacher can click behind his/her grade. 6.4.7b Export & Import Grade report can be exported, and the export format commonly used Excel spreadsheets or XML file. Take the exported grade report (XML file) as a template, and entry the local grade report to it. So that the teacher can import his/her local grade report to Moodle by using the Import function. ____________________________________________________________________________________ MYSTU User Manual 6.4.7c Custom Grade report Add grade item and make a custom grade report: add some common items such as regular grades and final examination, make a custom grade report which can be downloaded by teacher. Teacher can do it by this way: 1.Click “Categories and items”, and then click “Simple view” ____________________________________________________________________________________ MYSTU User Manual 2.Click "Add grade item": 3.Enter the item name, and then click "Save changes". ____________________________________________________________________________________ MYSTU User Manual So that a new item named "Regular grades" can be shown in the grade report. Teacher can download this template and edit it in local PC. Also, teacher can click “Turn editing on” at top right, and then manual input the grade. ____________________________________________________________________________________ MYSTU User Manual 7. My course -For students 7.1 Enter Course Material In MYSTU homepage, choose and click one specified course on the left-hand menu, and then click “Course Material” or click the course name in big size, which leads you to the Moodle of your course. Now you are in the Moodle of your course, you can see the teacher's uploading files here. ____________________________________________________________________________________ MYSTU User Manual 7.2 Download files In Moodle, click the files which the teacher uploaded, or click it and choose "save as" , then the files can be download to local. ____________________________________________________________________________________ MYSTU User Manual 7.3 Doing assignments Enter the course click the assignments. Click “Upload files” button to upload your homework: ____________________________________________________________________________________ MYSTU User Manual Click “Add” button to upload your files, and then click “Save” ,“Send for marking”, and “Continue”: ____________________________________________________________________________________ MYSTU User Manual Wait for teacher’s marking. 7.4 Online test Enter the course, click to join the test. Attempt the quiz and fill in the answers, and then click "next": ____________________________________________________________________________________ MYSTU User Manual Submit answers and the system will automatically give you scoring. ____________________________________________________________________________________ MYSTU User Manual 7.5 Read announcements Enter the course, in the "News and announcement forum" of the above , can see the latest notification from your teacher.