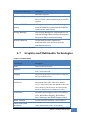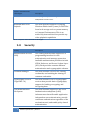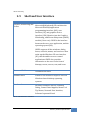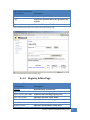
1
JetBox 8210 User Manual WinCE 5.0 www.korenix.com Copyright Notice Copyright© 2007 Korenix Technology Co., Ltd. All rights reserved. Reproduction without permission is prohibited. Information provided in this manual is intended to be accurate and reliable. However, the original manufacturer assumes no responsibility for its use, or for any infringements upon the rights of third parties that may result from its use. The material in this document is for product information only and is subject to change without notice. While reasonable efforts have been made in the preparation of this document to assure its accuracy, Korenix assumes no liabilities resulting from errors or omissions in this document, or from the use of the information contained herein. Korenix reserves the right to make changes in the product design without notice to its users. Acknowledgments Korenix is a registered trademark of Korenix Technology Co., Ltd. All other trademarks or registered marks in the manual belong to their respective manufacturers. 2 Overview | Korenix Table of Content Copyright Notice ............................................................................................ 2 Acknowledgments .......................................................................................... 2 Table of Content ............................................................................................................. 3 Chapter 1 Overview .................................................................................................... 6 Chapter 2 Software Specification ............................................................................... 6 2‐1 Applications—End User ............................................................................. 6 2‐2 Applications and Services Development .................................................... 7 2‐3 Communication Services and Networking ................................................. 9 2‐4 Core OS Services ...................................................................................... 13 2‐5 Device Management ................................................................................ 14 2‐6 File System and Data Store ...................................................................... 14 2‐7 Graphics and Multimedia Technologies ................................................... 15 2‐8 Security .................................................................................................... 16 2‐9 Shell and User Interface ........................................................................... 17 2‐10 Platform Manager .................................................................................... 18 Chapter 3 Software Feature ...................................................................................... 18 3‐1 Customized Device’s Application Programming Interfaces ...................... 18 3‐1‐1 Overview ...................................................................................... 18 3‐1‐2 Digital Input and Digital Output ................................................... 19 3‐1‐3 RS485 Direction Control ............................................................... 19 3‐1‐4 Battery Backup SRAM (Optional) ................................................. 20 3‐1‐5 I2C EEPROM ................................................................................. 20 3‐1‐6 Security Device ............................................................................. 21 3‐1‐7 DIP Switches ................................................................................. 22 3‐1‐8 Serial Port Configuration .............................................................. 22 3‐2 Customized Control Applets ..................................................................... 23 3‐2‐1 Overview ...................................................................................... 23 3‐2‐2 Digital Input and Digital Output ................................................... 23 3‐2‐3 Serial Port Throughput ................................................................. 25 3‐2‐4 Battery Backup SRAM (NVRAM)—Optional ................................. 26 3‐2‐5 I2C EEPROM ................................................................................. 26 3‐2‐6 Security Device ............................................................................. 27 3‐2‐7 DIP Switches ................................................................................. 27 Korenix | Overview 3 3‐2‐8 Serial Port Configuration .............................................................. 28 3‐3 Customized System Utilities ..................................................................... 28 3‐3‐1 Overview ...................................................................................... 28 3‐3‐2 User Management Utility ............................................................. 29 3‐3‐3 Registry Flush Utility .................................................................... 30 3‐3‐4 Auto Run Utility ............................................................................ 31 3‐4 Telnet Server ............................................................................................ 32 3‐4‐1 Overview ...................................................................................... 32 3‐4‐2 Default Registry Settings .............................................................. 33 3‐4‐3 Security Notes .............................................................................. 33 3‐4‐4 Recommendations ....................................................................... 34 3‐5 FTP Server ................................................................................................ 34 3‐5‐1 Overview ...................................................................................... 34 3‐5‐2 Default Registry Settings .............................................................. 35 3‐5‐3 Security Notes .............................................................................. 36 3‐5‐4 Recommendations ....................................................................... 37 3‐6 Web Server ............................................................................................... 37 3‐6‐1 Overview ...................................................................................... 37 3‐6‐2 Default Registry Settings .............................................................. 38 3‐6‐3 Security Notes .............................................................................. 41 3‐6‐4 Recommendations ....................................................................... 42 3‐7 File Server ................................................................................................. 42 3‐7‐1 Overview ...................................................................................... 42 3‐7‐2 Default Registry Settings .............................................................. 43 3‐7‐3 Security Notes .............................................................................. 44 3‐7‐4 Recommendations ....................................................................... 44 Chapter 4 Web‐based Network Configuration ......................................................... 45 4‐1 Overview .................................................................................................. 45 4‐2 Remote Administration Page ................................................................... 45 4‐2‐1 Introduction ................................................................................. 45 4‐2‐2 First Use SetUp Wizard ................................................................. 46 4‐2‐3 RemoteAdmin Home Page ........................................................... 48 4‐2‐4 Device Management Pages .......................................................... 50 4‐2‐5 Local Area Network Page ............................................................. 58 4‐2‐6 Wide Area Network Page ............................................................. 59 4‐2‐7 Security Pages .............................................................................. 60 4‐2‐8 Add/Del Users Page...................................................................... 63 4‐2‐9 Add/Del Share Page ..................................................................... 64 4 Overview | Korenix 4‐2‐10 Printer Pages ................................................................................ 66 4‐2‐11 EventLog Pages ............................................................................. 68 4‐3 Web Administration Page ........................................................................ 69 4‐3‐1 Introduction ................................................................................. 69 4‐3‐2 WebAdmin Home Page ................................................................ 69 4‐3‐3 Instructions Page .......................................................................... 71 4‐3‐4 Logging Page ................................................................................ 72 4‐3‐5 SSL Configuration Page................................................................. 74 4‐3‐6 Restart Web Server Page .............................................................. 75 4‐4 System Administration Page .................................................................... 75 4‐4‐1 Introduction ................................................................................. 75 4‐4‐2 SysAdmin Home Page .................................................................. 76 4‐4‐3 System Tools Page ........................................................................ 76 4‐4‐4 File Browser Page ......................................................................... 78 4‐4‐5 Registry Editor Page ..................................................................... 79 Chapter 5 Connectivity Features .............................................................................. 80 5‐1 Overview .................................................................................................. 80 5‐2 ActiveSync Connection ............................................................................. 81 5‐2‐1 Introduction ................................................................................. 81 5‐2‐2 Connection via COM port ............................................................ 81 5‐2‐3 Explore JetBox 8210 ..................................................................... 89 5‐3 Manual Server Connection via Ethernet .................................................. 90 5‐3‐1 Overview ...................................................................................... 90 5‐3‐2 Configure Platform Manager ....................................................... 91 5‐3‐3 Telnet with JetBox 8210 ............................................................... 93 5‐3‐4 Remote Tools via Manual Server Connection .............................. 95 Chapter 6 Application Development ........................................................................ 97 6‐1 Overview .................................................................................................. 97 6‐2 Install JetBox SDK ..................................................................................... 98 6‐3 Hello World Application with eVC++4.0 ................................................. 102 6‐4 Hello World Application with VS2005 .................................................... 108 6‐5 eVC++4.0 Sample Codes for Hardware Accessing ................................. 114 Chapter 7 Appendix ................................................................................................ 115 7‐1 Chart Index ............................................................................................. 115 7‐2 Customer Service ................................................................................... 120 Korenix | Overview 5 Chapter 1 Overview The advantage of adopting Korenix JetBox series is ready‐to‐use. Korenix is devoted to improve the usability of embedded computer in industrial domain. Besides operating system (Linux/WinCE), Korenix provides device drivers, protocol stacks, system utilities, supporting services and daemons in one Compact Flash card to make system integration simple. Further, Korenix provides application development toolkits for users to build up their own applications easily. JetBox 8210 is a high performance, compact and rugged embedded computer. All‐in‐one device with small volume, fanless design and a capability to withstand a wide range of temperatures is suitable for industrial severe environment. It is equipped with Intel Xscale PXA270 RISC processor and 128MB SDRAM (256MB optional) and supports Linux and WinCE5.0 to meet requirements of industrial PC applications. For better expansibility, it carries 4 USB ports, 2 RS‐232 ports and 2 RS‐232/422/485 ports for versatile peripheral and interfaces and one Compact Flash slot for system integration. It also supports VGA (640*480) and audio to give users much flexibility in industrial applications. In addition, it is equipped with 2 RJ‐45 ports and supports daemons and web server to accommodate to the network communication environment today. With complete software solution and excellent hardware design, JetBox series is the best choice of embedded computer. Chapter 2 Software Specification 21 Applications—End User Applications – End User Description ActiveSync This item provides support for synchronizing data between a Windows‐based desktop computer and 6 Overview | Korenix Microsoft® Windows® CE‐based devices. CAB File Installer/Uninstaller This item includes an application that enables installing and uninstalling CAB files. This application is for use with devices that include a display. Chart 1 Application—end user 22 Applications and Services Development Applications and Services Description Development .NET Compact Framework 1.0 The Microsoft® .NET Compact Framework 1.0 is a hardware‐independent program execution environment for applications that target resource‐constrained computing devices. This environment offers a choice of languages, Microsoft Visual Basic® and Microsoft Visual C#®, and lessens problems with language interoperability. .NET Compact Framework 2.0 SP2 The Microsoft® .NET Compact Framework 2.0 is a hardware‐independent program execution environment for applications that target resource‐constrained computing devices. This environment offers a choice of languages, Microsoft Visual Basic® and Microsoft Visual C#®, and lessens problems with language interoperability. Active Template Library (ATL) Includes support for Active Template Library for Windows CE. Microsoft Foundation Classes (MFC) MFC for Windows CE is a comprehensive class library and complete object‐oriented application framework designed to help build applications, COM components, and controls. You can create anything from a simple dialog box–based application to a Korenix | Software Specification 7 Applications and Services Description Development sophisticated application that uses the full MFC document or view architecture. C libraries and Runtimes Supports full ANSI C run time, compiler C++ exception handling equivalent to the desktop C++ compilers, compiler Run‐Time Type Information (RTTI) equivalent to the desktop C++ compilers, the standard input/output library, the standard input/output ASCII library and the standard ASCII string functions. Component Object Model The Component Object Model (COM) is a (COM & DCOM) platform‐independent, object‐oriented system for creating binary software components that can interact with other COM‐based components in the same process space, in other processes, or on remote devices. Message Queuing (MSMQ) The Message Queuing implementation in Microsoft® Windows® CE makes it possible for applications to communicate with other applications across networks and systems that might be temporarily offline. Object Exchange Protocol The Object Exchange Protocol (OBEX) (OBEX) technology for Microsoft® Windows® CE provides an efficient, compact binary protocol that enables a wide range of devices to exchange data spontaneously in a simple, efficient manner. SOAP Toolkit The client‐side SOAP Toolkit functionality in Microsoft® Windows® CE allows an application to invoke Web service operations, while the server‐side functionality maps invoked Web service operations to Component Object Model 8 Software Specification | Korenix Applications and Services Description Development (COM) object method calls. SQL Server CE2.0 SQL Server CE extends Microsoft SQL Server to Microsoft Windows CE‐based mobile devices. SQL Server CE delivers relational database functionality, including a data store, a query processor, and scalable connectivity capabilities, all in a small footprint. XML Extensible Markup Language (XML) is the universal format for data on the Web. XML allows developers to describe and deliver rich, structured data from any application in a standard, consistent way. XML does not replace HTML; rather, it is a complementary format. Chart 2 Applications and services development 23 Communication Services and Networking Communication Services and Networking Description Wired Local Area Network (802.3, 802.5) This item provides support for wired local area networks that use 802.3 and 802.5. Wireless LAN (802.11) STA ‐ Automatic Configuration and 802.1x This item includes support for 802.11 wireless LAN automatic configuration and 802.1x. Dial Up Networking (RAS/PPP) This item provides support for accessing network resources on a remote computer. Point‐to‐Point Protocol over Ethernet (PPPoE) This item includes the ability to connect hosts to a Remote Access Concentrator. Telephony API (TAPI 2.0) This item includes an API that simplifies and abstracts the details of making telephony connections between two or more devices. Virtual Private This Item includes a Layer Two Tunneling Korenix | Software Specification 9 Communication Services and Networking Networking (VPN) Description Domain Discovery Domain Discovery for Microsoft® Windows® CE 5.0 enables a Windows CE device to discover an Active Directory server to query. Protocol (L2TP)/IP Security Protocol (IPSec) implementation that enable a more secure virtual private network (VPN) connection to a server computer. This item includes a Point‐to‐Point Tunneling Protocol (PPTP) implementation that enables a virtual private network connection a server computer. Extensible Authentication The Extensible Authentication Protocol Protocol implementation in Microsoft® Windows® CE allows third‐party authentication code to interact with the implementation of the Point‐to‐Point Protocol (PPP) included in the Windows CE–based Remote Access Service (RAS). The Extensible Authentication Protocol (EAP) is also used with 802.1x and EAP over LAN (EAPOL) authentication. Firewall The IP firewall is typically used on an Internet gateway device. It can also be used as a host firewall. The firewall protects the device on which it runs and protects devices on the private side of the gateway. The firewall blocks IP traffic at the IP and transport layers. Internet Connection Sharing (ICS) Internet Connection Sharing (ICS) for Microsoft® Windows® CE consists of a collection of technologies and services that make it possible to connect multiple computing and information devices on a network located in a home, a small 10 Software Specification | Korenix Communication Services and Networking Description business, or a corporate branch office to the Internet through a single Internet connection. IPSec v4 IPSec v4 enables two client devices on a network to establish peer‐to‐peer communication using the IP Security (IPSec) protocol. This technology enables Windows CE‐based devices to participate in networks that are secured by IPSec. NDIS Packet Capturing NDIS Packet Capturing captures network traffic so that it can be read by the Microsoft Windows Network Monitor (NetMon). Network Utilities The Network Utilities includes IPConfig, IPv6tun, NetStat, Ping, Route and Tracert that you can use to troubleshoot network connections in your Windows CE‐based device. TCP/IP TCP/IP for Microsoft® Windows® CE allows devices to participate as peers and servers on local area networks (LANs) and remote networks. Windows Networking API/Redirector The Windows Networking API/Redirector (SMB/CIFS) implementation in Microsoft® Windows® CE provides functions to establish and terminate network connections and to access files on servers supporting the Common Internet File System (CIFS). Access to this data is made possible by way of the networking API (WNet). Winsock Windows Sockets (Winsock) for Microsoft® Windows® CE specifies a programming interface based on the familiar socket interface from the Korenix | Software Specification 11 Communication Services and Networking Description University of California at Berkeley. It includes a set of extensions designed to take advantage of the message‐driven nature of Windows CE. Windows CE .NET 4.1 and later supports Winsock 2.2, which provides easier access to multiple transport protocols. File Server The File Server functionality in Microsoft® Windows® CE enables clients to access files and other resources over the network. Ftp Server The FTP Server implementation in Microsoft® Windows® CE can copy files to and from remote computer systems over a network using TCP/IP. The source code is provided to you as is, so that you can customize the implementation for your specific requirements. SNTP Client and Server Windows CE supports the Simple Network Time Protocol (SNTP) technology. Telnet Server The Telnet Server functionality in Microsoft® Windows® CE provides a sample Telnet server can be installed on a device to allow remote administration through a standard Telnet client. Using the Telnet sample, the current device can be manipulated as if it is running the command prompt on the device itself. Web Server The Web Server (HTTPD) implementation in Microsoft® Windows® CE enables you to monitor, configure, and remotely control a device or computer through the use of a Hypertext Transfer Protocol (HTTP) server. The Web server provides this service for network printers, scanners, and other shared equipment. Chart 3 Communication services and networking 12 Software Specification | Korenix 24 Core OS Services Core OS Services Description Kernel Features This item includes Fiber API, FormatMessage API, Memory Mapped Files, and Message Queue Point‐to‐Point. Device Drivers This item includes display, serial port, USB host, etc… drivers Device Manager Tracks all loaded device drivers and their interfaces, and issues notifications when device interfaces are added or removed. The Device Manager registers special file names with the kernel that do the following tasks: • Map the stream interface functions • Load and track drivers by reading and writing registry values • Unload drivers when their devices are no longer needed PNP Notifications Power Management A functionality of the “AdvertiseInterface” system. This functionality is automatically included if either Storage Manager or Device Manager is selected. A fully implemented Power Manager framework, including all APIs and features. Power Manager applications and drivers can do the following tasks: • Suspend the system • Control device power levels • Register for notifications of power‐related activities such as Korenix | Software Specification 13 Core OS Services Description suspend, absence of user/system activity, and change in battery level. Drivers can intelligently self‐manage power. USB Human Input Device (HID) Class Driver A sample USB class driver that supports HID‐compatible USB devices on a run‐time image. USB Printer Class Driver A sample USB class driver that supports USB printer‐class‐compatible devices on a run‐time image. USB Remote NDIS Class Driver A sample USB class driver that supports Remote NDIS‐compatible Ethernet adapters. USB Storage Class Driver A sample USB class driver that supports USB Storage‐class compatible devices. Chart 4 Core OS Service 25 Device Management Device Management Description Device Management Client Provides support for the Device Management Client in the run‐time image. Simple Network Management Protocol Provides support for the Simple Network Management Protocol (SNMP) in the run‐time image. Chart 5 Device management 26 File System and Data Store File System and Data Store Description Bit‐based Provides support for the Device Management Client in the run‐time image. Compression Provides support for the Simple Network Management Protocol (SNMP) in the run‐time image. Database support An API that provides built‐in CEDB 14 Software Specification | Korenix File System and Data Store Description database support. Hive‐based Registry A registry system that stores data inside files, or hives, which can be kept on any file system RAM and ROM File System A file system driver capable of reading data from the ROM file system and the RAM file system in the object store. Storage Manager The Storage Manager is responsible for all external storage items, such as file systems, file system filters, and partitioning System Password An API that provides support for authentication on a device to prevent unauthorized access. Chart 6 File system and data store 27 Graphics and Multimedia Technologies Graphics and Multimedia Graphics and Multimedia Technologies Description Audio Supports Waveform audio. Graphics Supports Alphablend API, Direct3D Mobile, Direct Draw, and Gradient Fill. Imaging Support image decoders and encoders for BMP, GIF, ICO, JPG and PNG formats. Audio Codecs and Renderers Includes G.711 Audio Codec, GSM 6.10 Audio Codec, IMA ADPCM Audio Codec, MP3 Codec, MPEG‐1 Layer 1 and 2 Audio Codec, MS ADPCM Audio Codec, Wave/AIFF/au/snd File Parser, Waveform Audio Renderer, WMA Codec and WMA Voice Codec. DirectShow Includes ACM Wrapper Filter, DirectShow Core, DirectShow Display, DirectShow Error Messages and DMO Wrapper Filter. Media Formats Includes AVI Filter and MPEG‐1 Parser/Splitter. Video Codecs and Renderers Includes DirectShow Video Renderer, MPEG‐1 Video Codes, MS RLE Video Codec, Overlay Mixer, Korenix | Software Specification 15 Graphics and Multimedia Technologies Description Video/Image Compression Manager and WMV/MPEG‐4 Video Codec. WMA and MP3 Local Playback This item provides support for playing Windows Media Audio (.wma) or MP3 files from local storage such as system memory or Compact Flash memory. This is an audio‐only item and does not provide any video playback capabilities Chart 7 Graphics and multimedia technologies 28 Security Security Description Authentication Services (SSPI) This catalog item includes support for a programming interface for user authentication, and message protection. Available authentication providers include NTLM, Kerberos, and Secure Sockets Layer (SSL). Each provider contains different authentication and cryptographic schemes. Credential Manager This item includes a service for caching credentials, and enabling the sharing of common credentials. Cryptography Services (CryptoAPI 1.0) This item includes a set of cryptographic services that provide basic cryptography support for hashing, encrypting, and decrypting data. Local Authentication Sub‐System This item includes support for the Local Authentication subsystem (LASS) infrastructure that will enable application independent user authentication, provide consistent authentication regardless of the mechanism used, and enable policy‐based authentication. 16 Software Specification | Korenix Chart 8 Security 29 Shell and User Interface Shell and User Interface Description Graphics, Windowing and Microsoft® Windows® CE combines the Events Microsoft Win32® application programming interface (API), user interface (UI), and graphics device interface (GDI) libraries into the Graphics, Windowing, and Events Subsystem (GWES) module (Gwes.exe). GWES is the interface between the user, your application, and the operating system (OS). GWES supports all the windows, dialog boxes, controls, menus, and resources that make up the Windows CE user interface (UI), which enables users to control applications. GWES also provides information to the user in the form of bitmaps, carets, cursors, text, and icons. Command Shell Command‐line shell Standard Shell Similar to the Windows Explorer shell on Windows‐based desktop operating systems. User Interface Includes Common Controls, Common Dialog, Control Panel Applets, Menu Tool Tip, Mouse, Network User Interface, Software Input and Panel. Chart 9 Shell and user interface Korenix | Software Specification 17 210 Platform Manager Platform Manager Description Platform Manager This item is a communications technology that manages the communications between a development workstation and a Microsoft® Windows® CE–based device. It allows development tools to download and connect to a target device in a media‐independent manner. Remote tools, Microsoft eMbedded Visual C++® 4.0 and later, and the Microsoft .NET Compact Framework use Platform Manager to download files such as applications, Microsoft ActiveX® controls, run times, and remote‐tool clients to a target device. Chart 10 Platform manager Chapter 3 Software Feature 31 Customized Device’s Application Programming Interfaces 311 Overview Most of the customized device’s APIs are implemented as the standard stream interface drivers. The standard Win32 CreateFile, CloseHandle, ReadFile, WriteFile, SetFilePointer, and DeviceIoControl functions are used to operate the customized devices of JetBox 8210. Refer the application notes of JetBox 8210 SDK for details. 18 Software Feature | Korenix 312 Digital Input and Digital Output JetBox 8210 names the DIO device as “DIO1:”. The change of state event of the DI channels is supported for advanced programming. Device Name: _T(“DIO1:”) Win32 Functions Description CreateFile Opens DIO1 device. CloseHandle Closes DIO1 device. CreateThread (optional) Creates an event thread. TerminateThread (optional) Terminates an event thread. OpenEvent (optional) Opens a named event. WaitForSingleObject (optional) Waits an event. DeviceIoControl Calls a customized IOCTL function. Chart 11 Related Win32 APIs to operate DIO1 Io Control Codes Description DIO_IOCTL_READ_DI This IOCTL is used to get the DI states of all the 16 DI channels. DIO_IOCTL_READ_DO This IOCTL is used to get the last write DO states of all the 16 DO channels. DIO_IOCTL_WRITE_DO This IOCTL is used to set the DO states of all the 16 channels. DIO_IOCTL_WRITE_CHANNEL This IOCTL is used to set the DO state of one channel. DIO_IOCTL_SET_DI_INTERRUP This IOCTL is used to set the DI T interrupt condition of one channel. Chart 12 Control codes for DIO1 313 RS485 Direction Control The “COM1:” and “COM2:” of JetBox 8210 are RS232/RS422/RS485 configurable. After configuring the serial port as RS485 mode, it’s important to control the direction of the transmitting data to make the application work around. RTS line is used to control the direction of the transmitting data. Configure the flag Korenix | Software Feature 19 fRtsControl of DCB as RTS_CONTROL_TOGGLE to enable the serial driver of JetBox 8210 to switch the direction of transmit data automatically. The steps to configure the serial port driver switching the direction of transmitting data is listed as below, Step Description 1 Initialize the DCBlength member of the DCB structure to the size of the structure. This is required before passing the member as a variable to a function. 2 Call the GetCommState function to retrieve the default settings for the port opened with the CreateFile function. To identify the port, specify in the hPort parameter the handle that CreateFile returns. 3 Configure the flag fRtsControl of DCB as RTS_CONTROL_TOGGLE. 4 Call the SetCommState function to set the port settings. Chart 13 Steps to configure a RS485 port 314 Battery Backup SRAM (Optional) JetBox 8210 names the NVRAM device as “NVR1:”. The NVRAM device is operated as a file, and only the standard Win32 File APIs are necessary. Device Name: _T(“NVR1:”) Win32 Functions Description CreateFile Opens NVR1 device. CloseHandle Closes NVR1 device. ReadFile Reads data from NVR1. WriteFile Writes data from NVR1. SetFilePointer Sets file pointer position Chart 14 Related Win32 APIs to operate NVR1 315 I2C EEPROM JetBox 8210 names the I2C EEPROM device as “EPR1:”. The I2C EEPROM device is operated as a file, and only the standard Win32 File APIs are necessary. 20 Software Feature | Korenix Device Name: _T(“EPR1:”) Win32 Functions Description CreateFile Opens EPR1 device. CloseHandle Closes EPR1 device. ReadFile Reads data from EPR1. WriteFile Writes data from EPR1. SetFilePointer Sets file pointer position Chart 15 Related Win32 APIs to operate EPR1 316 Security Device JetBox 8210 names the security device as “SEC1:”. The security device contains a hardware unique serial number and an EEPROM storage space. The EEPROM is operated as a file, and only the standard Win32 File APIs are necessary. Note the security EEPROM can only be accessed in block of 8 bytes with 8 bytes alignment. Device Name: _T(“SEC1:”) Win32 Functions Description CreateFile Opens SEC1 device. CloseHandle Closes SEC1 device. ReadFile Reads data from SEC1. WriteFile Writes data from SEC1. SetFilePointer Sets file pointer position DeviceIoControl Calls a customized IOCTL function. Chart 16 Related Win32 APIs to operate SEC1 Io Control Codes Description SEC_IOCTL_GET_FAMILY_CODE This IOCTL is used to get the unique 8 bits family code of the security device. SEC_IOCTL_GET_SERIAL_CODE This IOCTL is used to get the unique 48 bits serial number of the security device. Chart 17 Io Control codes for SEC1 Korenix | Software Feature 21 317 DIP Switches The state of the DIP switches is stored into the registry during the system boot up phase. Note the state of the DIP switches will not be updated dynamically after system boot up. HKEY_LOCAL_MACHINE\IDENT\JetBox Value Description DIPSwitch : DWORD The bit mask 1 means the switch is ON, and 0 means the switch is OFF. Chart 18 DIP switches registry key and named value Win32 Functions Description RegOpenKeyEx Opens the specified key RegQueryValueEx Retrieves the type and data for a specified value name associated with an open registry key. RegCloseKey Releases the handle of the specified key. Chart 19 Related Win32 APIs to get the state of DIP switches 318 Serial Port Configuration JetBox 8210 names the serial ports as “COMx:” Note the COM_IOCTL_SET_OPERATION_MODE call will be returned with error if trying to configure a nonconfigurable port. Device Name: _T(“COMx:”) Win32 Functions Description CreateFile Opens COMx device. CloseHandle Closes COMx device. DeviceIoControl Calls a customized IOCTL function. Chart 20 Related Win32 APIs to configure COMx Io Control Codes Description COM_IOCTL_GET_OPERATION_MODE This IOCTL is used to get the operation mode. 22 Software Feature | Korenix Io Control Codes Description COM_IOCTL_SET_OPERATION_MODE This IOCTL is used to set the operation mode. Chart 21 Io Control codes for COMx 32 Customized Control Applets 321 Overview Most of the customized device’s control utilities are implemented as the applets of the control panel. These utilities could help user to diagnostic the hardware functionalities. Chart 22 Snapshot of the control panel of JetBox 8210 322 Digital Input and Digital Output The control applet named “DIO Tester” provides a simple user interface to diagnostic the functionality of the digital input and digital output channels. Korenix | Software Feature 23 Chart 23 Snapshot of “DIO Tester” control applet Applet Name: DIO Tester User Interface Description DO0 The check box is used to control the state digital output channel. Check the box means setting the specified DO channel to high state. Uncheck the box means setting the specified DO channel to low state. The check boxes represent the DO7, DO6, DO5, DO4, DO3, DO2, DO1 and DO0 from left to right. DO8 The check box is used to control the state digital output channel. Check the box means setting the specified DO channel to high state. Uncheck the box means setting the specified DO channel to low state. The check boxes represent the DO15, DO14, DO13, DO12, DO11, DO10, DO9 and DO8 from left to right. DI0 The check box is used to represent the digital output channel state. The checked box means setting the specified DI channel is in the high state. Unchecked box means the specified DI channel is in the low state. The check boxes represent the DI7, DI6, DI5, DI4, DI3, DI2, DI1 and DI0 from left to right. DI8 The check box is used to represent the digital output channel state. The checked box means setting the specified DI channel is in the high state. 24 Software Feature | Korenix Applet Name: DIO Tester User Interface Description Unchecked box means the specified DI channel is in the low state. The check boxes represent the DI15, DI14, DI13, DI12, DI11, DI10, DI9 and DI8 from left to right. Event Indicates the event status of the DI channels. X Exits. Chart 24 Description of the user interface of “DIO Tester” 323 Serial Port Throughput The control applet named “SerPerf” provides a simple user interface to test throughput of the serial ports. Loopback adapters or cables are necessary to perform this test. Note the layout of the serial ports is platform dependent. Your system may be different with the following snapshot. In addition, COM9 is a virtual COM port for USB ActiveSync connection, so it can’t be tested. Chart 25 Configuration snapshot of “SerPerf” control applet Korenix | Software Feature 25 Chart 26 Run time snapshot of “SerPerf” control applet 324 Battery Backup SRAM (NVRAM)—Optional JetBox 8210 names the NVRAM device as “NVR1:”. The NVRAM device is operated as a file, and only the standard Win32 File APIs are necessary. Device Name: _T(“NVR1:”) Win32 Functions Description CreateFile Opens NVR1 device. CloseHandle Closes NVR1 device. ReadFile Reads data from NVR1. WriteFile Writes data from NVR1. SetFilePointer Sets file pointer position Chart 27 Related Win32 APIs to operate NVR1 325 I2C EEPROM JetBox 8210 names the I2C EEPROM device as “EPR1:”. The I2C EEPROM device is operated as a file, and only the standard Win32 File APIs are necessary. Device Name: _T(“EPR1:”) Win32 Functions Description CreateFile Opens EPR1 device. CloseHandle Closes EPR1 device. ReadFile Reads data from EPR1. WriteFile Writes data from EPR1. 26 Software Feature | Korenix Device Name: _T(“EPR1:”) Win32 Functions Description SetFilePointer Sets file pointer position Chart 28 Related Win32 APIs to operate EPR1 326 Security Device JetBox 8210 names the security device as “SEC1:”. The security device contains a hardware unique serial number and an EEPROM storage space. The EEPROM is operated as a file, and only the standard Win32 File APIs are necessary. Note the security EEPROM can only be accessed in block of 8 bytes with 8 bytes alignment. Device Name: _T(“SEC1:”) Win32 Functions Description CreateFile Opens SEC1 device. CloseHandle Closes SEC1 device. ReadFile Reads data from SEC1. WriteFile Writes data from SEC1. SetFilePointer Sets file pointer position DeviceIoControl Calls a customized IOCTL function. Chart 29 Related Win32 APIs to operate SEC1 Io Control Codes Description SEC_IOCTL_GET_FAMILY_CODE This IOCTL is used to get the unique 8 bits family code of the security device. SEC_IOCTL_GET_SERIAL_CODE This IOCTL is used to get the unique 48 bits serial number of the security device. Chart 30 Io control codes for SEC1 327 DIP Switches The state of the DIP switches is stored into the registry during the system boot up phase. Korenix | Software Feature 27 HKEY_LOCAL_MACHINE\IDENT\JetBox Value Description DIPSwitch : DWORD The bit mask 1 means the switch is ON, and 0 means the switch is OFF. Chart 31 DIP switches registry key and named value 328 Serial Port Configuration JetBox 8210 names the serial ports as “COMx:”. Note the COM_IOCTL_SET_OPERATION_MODE call will be returned with error if trying to configure a nonconfigurable port. Device Name: _T(“COMx:”) Win32 Functions Description CreateFile Opens COMx device. CloseHandle Closes COMx device. DeviceIoControl Calls a customized IOCTL function. Chart 32 Related Win32 APIs to Configure COMx Io Control Codes Description COM_IOCTL_GET_OPERATION_MODE This IOCTL is used to get the operation mode. COM_IOCTL_SET_OPERATION_MODE This IOCTL is used to set the operation mode. Chart 33 Io control codes for COMx 33 Customized System Utilities 331 Overview Lots of system utilities are provides to make using JetBox 8210 more convenient. 28 Software Feature | Korenix 332 User Management Utility 3‐3‐2‐1 Introduction Microsoft® Windows® CE 5.0 provides authentication services that can be used by application developers to authenticate clients. Services supported by Windows CE include security services for user authentication, credential management, and message protection through a programming interface called the Security Support Provider Interface (SSPI). Within SSPI, different security providers are available, such as the NTLM security support provider (SSP) and Kerberos SSP; each one contains different authentication and cryptographic schemes. Windows CE uses the Windows NT® LAN Manager protocol (RPC_C_AUTHN_WINNT), which is also known as NTLM, to authenticate callers. This is the default authentication service for communications on Windows NT. You can set the domain variable in the DefaultDomain registry value, which is located under the HKEY_LOCAL_MACHINE\Comm\Redir registry key. If the DefaultDomain registry value is not set, Windows CE uses the local user database to set the domain variable. 3‐3‐2‐2 “UsrMgr.exe” Utility By Default, JetBox 8210 doesn’t set the DefaultDomain registry value under the HKEY_LOCAL_MACHINE\Comm\Redir registry key. Therefore, one command line utility named “UsrMgr.exe” is provides for the user to add, delete and list users and groups that are local to JetBox 8210. Korenix | Software Feature 29 Chart 34 Snapshot of “UsrMgr.exe” Utility Name: UsrMgr Arguments Description ‐a <user name> <password> Adds or updates a user. ‐d <user name> Removes a user. ‐l Lists all users. ‐gn <group name> Creates a new group. ‐gd <group name> Deletes a group. ‐gl Lists all groups. ‐gm <group name> Lists members in a group. ‐gat <user name> <group name> Adds a user to a group. ‐grf <user name> <group name> Removes a user from a group. Chart 35 Arguments description of “UsrMgr.exe” 333 Registry Flush Utility 3‐3‐3‐1 Introduction The hive‐based registry stores registry data inside files, or hives, which can be kept on any file system. This removes the need to perform backup and restore on power off. Removing this work during boot and power off makes the cold boot process faster. Outstanding registry data will be flushed on a suspend/resume cycle and any time the system goes through a software shutdown. However, data may be lost if power is suddenly removed. Because a software shutdown is not an UI option of JetBox 8210, so to ensure that data is not lost, call RegFlushKey API in your 30 Software Feature | Korenix application. It will flush any unsaved changes in the hive to the persistent file. 3‐3‐3‐2 “rFlush.exe” Utility To save the system resource, JetBox 8210 doesn’t implement a daemon to flush registry data periodically. A utility named “rFlush.exe” is provided to flush the changed registry data. Chart 36 Snapshot of “rFlush.exe” 334 Auto Run Utility 3‐3‐4‐1 Introduction When Windows CE begins loading, the kernel starts the file system and examines the HKEY_LOCAL_MACHINE\Init registry key to identify what applications to run. To control which applications run at system startup, create launch registry values. Launch registry values do not need to be sorted in the registry, although you can specify dependencies. You can specify up to 32 applications. HKEY_LOCAL_MACHINE\Init Value Description Launchnn : String Specifies the application to launch in order “nn”. Depnednn : Binary Launchnn registry values have optional dependencies as denoted by the Dependnn registry value. Chart 37 Named values of HKEY_LOCAL_MACHINE\Init key Dependnn registry values specify applications that Windows CE must be running before the Launchnn applications run. Korenix | Software Feature 31 Dependnn registry values begin with the keyword Depend, followed by the same decimal number as the Launchnn registry value. The Dependnn registry values define an order in which Windows CE launches applications. One or more dependent applications can be specified per Dependnn value. Dependent applications are specified as a series of Words in hexadecimal notation. HKEY_LOCAL_MACHINE\Init Value Name Value Launch10 shell.exe Launch20 device.exe Launch30 gwes.exe Depend30 hex:14,00 Launch50 taskman.exe Depend50 hex:14,00, 1e,00 Chart 38 a Typical Init Registry Entry Using Dependencies 3‐3‐4‐2 “AutoRun.exe” Utility If your applications have dependencies with other applications, use the Remote Registry Editor to setup your applications manually. After finishing the registry setup, run “rFlush.exe” utility to flush the changed registry data to hive. Otherwise, JetBox 8210 comes with an application launcher utility named “AutoRun.exe” to complete the setup. 34 Telnet Server 341 Overview JetBox 8210 provides a Telnet server to allow remote administration through a standard Telnet client. Using the Telnet server, the JetBox 8210 can be manipulated as if it is running the command prompt on the device itself. The Telnet server is also useful for device bring‐up and debugging. NOTE JetBox 8210 enables Telnet server without user authentication by default. 32 Software Feature | Korenix 342 Default Registry Settings It’s necessary to be aware of the registry settings that impact security. The Telnet server settings are located under the HKEY_LOCAL_MACHINE\Comm\TELNETD registry key. The Telnet server reads the values in the registry before servicing each request. Therefore, changes made to the registry take affect immediately and do not require the Telnet server to be restarted. HKEY_LOCAL_MACHINE\Comm\TELNETD Value Description IsEnabled : DWORD To disable the Telnet server, set this value to 0; otherwise, set it to nonzero. If the Telnet server is started and this value is not present, this value defaults to accepting connections. UseAuthentication To require a password check on the user, set : DWORD this value to 1; otherwise, set it to 0. By default, the value 0 is set to disable the authentication. UserList : String Provides a comma‐separated list of allowed users. Requires UseAuthentication to be enabled. By default, the “asterisk” or the “at sign” and the asterisk (* or @*) is set to allow all users. Chart 39 Telnet Server Registry Key and Named Values 343 Security Notes The security on the Telnet server is very light and vulnerable to security attacks. Even if the Telnet server is configured to require password authentication, the password is sent in plain text across the network and is therefore vulnerable to packet sniffing. A malicious user could obtain the password to JetBox 8210 by watching packets sent back and forth between the Telnet server and the client Korenix | Software Feature 33 during the authentication stage. If a malicious user could log on to JetBox 8210, they would have complete control over it. This could involve deleting or modifying key system files and the registry. Because of these serious security risks, it is strongly recommended you only run the Telnet server for development and debugging purposes, on a controlled, private network where you trust the users. It is strongly recommended that you do not deploy this Telnet server on a public network such as the Internet. 344 Recommendations NOTE: Set the User List and Domain variables to prevent hacker attacks on your device If Telnet server is used without appropriate values set for the User List and Domain variables, your Telnet server will be vulnerable to hacker attacks. These variables are not set by default. A hacker must only guess the device's password, the way it is set in Control Panel, to obtain access to the server. To prevent such an attack, the user name in the UserList registry value must be set for each of the servers that are currently running. The user will then need to log in with the specified user name and appropriate password to use the server. You can also set the domain variable in the DefaultDomain registry value, which is located under the HKEY_LOCAL_MACHINE\Comm\Redir registry key. Refer with Section 332 User Management Utility to learn how to add user information to the local database if no domain controller is available in the network. 35 FTP Server 351 Overview JetBox 8210 implementation of FTP server enables you to transfer files from a desktop computer using a TCP/IP connection. The implementation of FTP server in JetBox 8210 is based on RFC 959. The included FTP server supports the minimum implementation of the FTP protocol defined in RFC 959. This minimum implementation includes configuration values, transfer parameters, and ASCII and Image data types, and allows FTP to operate with a minimum of error messages. 34 Software Feature | Korenix NOTE JetBox 8210 disables FTP server by default. 352 Default Registry Settings It’s necessary to be aware of the registry settings that impact security. The FTP server settings are located under the HKEY_LOCAL_MACHINE\Comm\FTPD registry key. HKEY_LOCAL_MACHINE\Comm\FTPD Value Description AllowAnonymous : Default set to 1. Possible values are 0 (false) or 1 (true). Determines whether the server will allow anonymous access. DWORD AllowAnonymousUpload : Default set to zero (0). Possible values are DWORD 0 (false) or 1 (true). Determines whether authorization is required to upload files to the server, delete files from the server, and rename files. AllowAnonymousVroots : Default set to zero (0). Possible values are DWORD 0 (false) or 1 (true). Specifies whether access to virtual roots is granted or denied to anonymous users. AllowLowPortValues : DWORD Default set to false (0). Possible values are 0 (false) or 1 (true). If this value is set to false, all PORT commands requesting a port equal to or lesser than 1023 will be rejected. If this key is set to true, low ports will be allowed. DefaultDir : String Default root directory. Directory and subdirectories of this key are accessible remotely. If this value is not set in the registry, the default is \Temp. IsEnabled : DWORD To disable the FTP server, set this value to 0; otherwise, set it to nonzero. If the FTP server is started and this value is not present, This value is typically used to Korenix | Software Feature 35 HKEY_LOCAL_MACHINE\Comm\FTPD Value Description keep the server disabled at boot time. UseAuthentication : To require a password check on the user, DWORD set this value to 1; otherwise, set it to 0. By default, the value 0 is set to disable the authentication. UserList : String Provides a comma‐separated list of allowed users. Requires UseAuthentication to be enabled. By default, the “asterisk” or the “at sign” and the asterisk (* or @*) is set to allow all users. Chart 40 FTP Server Registry Key and Named Values 353 Security Notes If AllowAnonymous is set to true, it will allow users to connect to the server without providing verifiable credentials. Anyone can log in using the username "anonymous" and any password to gain access. It is recommended that you set this value to false and use the UserList registry setting to specify all allowed users. If AllowAnonymousUpload is set to true, unauthenticated users will be able to copy files to, and delete files from, your server. This can be very dangerous because attackers might upload dangerous applications and documents, or they might delete important system files. It is not recommended to allow upload permission for anonymous users. If AllowAnonymousVroots is set to false, anonymous users will only be able to access the main FTP share. If this value is set to true, unauthenticated users will also be able to access VROOTs as well as the main share. Therefore you should use this setting with caution. Setting UseAuthentication to false enables clients to connect to the server without providing credentials. It is therefore strongly recommended that you do not set this value to false. Change this setting only if you have anonymous clients that must access the server but cannot or will not send USER and PASS credentials. 36 Software Feature | Korenix It is recommended that you set this value to a list of all users who should have access to the server and its member VROOTs. Specifying the allowed users in UserList and setting AllowAnonymous to false will help protect the device from most attackers and keep your files available only to those users who need to see them. 354 Recommendations NOTE: Set the User List and Domain variables to prevent hacker attacks on your device If the FTP Server functionality is used without appropriate values set for the User List and Domain variables, the FTP server will be vulnerable to hacker attacks. These variables are not set by default. A hacker must only guess the device's password, the way it is set in Control Panel, to obtain access to the server. To prevent such an attack, the user name in the UserList registry value must be set for each of the servers that are currently running. The user will then need to log in with the specified user name and appropriate password to use the server. You can set the domain variable in the DefaultDomain registry value, which is located under the HKEY_LOCAL_MACHINE\Comm\Redir registry key. Setting the DefaultDomain registry value will require FTP clients to have valid domain credentials to log in. Refer with Section 332 User Management Utility to learn how to add user information to the local database if no domain controller is available in the network. 36 Web Server 361 Overview Web server facilitates the use of the Internet for communication between JetBox 8210 and network printers, scanners, and other shared equipment. The Web server applications send Hypertext Markup Language (HTML) pages to a requesting browser. Users only need to have an Internet connection and a Korenix | Software Feature 37 browser to be able to make use of the Web server functionality. The Web server supports IPv6 and also supports the use of Active Server Pages (ASP). 362 Default Registry Settings It’s necessary to be aware of the registry settings that impact security. The Web server settings are located under the HKEY_LOCAL_MACHINE\Comm\HTTPD registry key. If you make changes to the Web server registry settings, it is necessary to stop the Web server and restart it to make the changes take effect. The IsEnabled registry value is checked only when the Web server is initially loaded. If the registry value is set to zero (0), the Web server does not start. Changing this value to zero (0) while the Web server is running has no effect. You also must stop the Web server to make it stop accepting connections. HKEY_LOCAL_MACHINE\Comm\HTTPD Value Description BasicRealm : Specifies the string that the Web server will send STRING to clients as its Basic realm when performing basic authentication. If this registry value is not set, the Web server will default to using the string "Microsoft‐WinCE". IsEnabled : If the value is not set in the registry, the Web server is enabled. If the value is set to zero (0), the Web server does not accept connections from the network, even from the local host. DWORD Port : DWORD Default setting is 80. This port receives HTTP connections. Do not set the port to zero (0). Basic : DWORD Default setting is zero (0). If this value is nonzero, the Web server uses Basic authentication for client connections. NTLM : DWORD Default setting is 1. If this value is set to nonzero, the Web server uses NTLM authentication for client browser connections. Also, if this value is 38 Software Feature | Korenix HKEY_LOCAL_MACHINE\Comm\HTTPD Value Description nonzero, the failure of Basic authentication forces NTLM authentication. If the value is not set in the registry, NTLM is not used. DirBrowse : DWORD Default setting is zero (0). If this value is set to nonzero, directory browsing is allowed. If this value is not set in the registry, directory browsing is turned off. Filter DLLs : Default not set in the registry. List of DLL names, separated by commas that specifies the filters to use. String DefaultPage : Default not set in the registry. If the value is not String present in the registry, the Web server will use "default.htm;index.htm". List of page names, separated by semicolons that specifies file names interpreted by the Web server to be default pages. When browsing a directory, the Web server traverses this list searching for a file of the same name in the directory. If the file exists, it is sent to the client. If no matching file exists, the Web server sends a directory listing or returns an error, depending on whether directory browsing is enabled. If more than one DefaultPage file name is matched, the Web server uses the first matching file name. AdminUsers : Default not set in the registry. List of user names, String separated by semicolons. A user who has gained user access must be listed in this key to gain Administrator access. LogFileDirect ory : String Default setting is "\windows\www" directory. If the name is not set or if the specified directory is inaccessible, no logging is performed. Name of the Korenix | Software Feature 39 HKEY_LOCAL_MACHINE\Comm\HTTPD Value Description directory where the logging files are created. PostReadSize : DWORD If the value is not set in the registry, PostReadSize will default to 48 KB. The Web server uses a minimum value of 8192 bytes (8 KB). If the value in the registry is less than 8 KB, the value is ignored and the Web server will use 8 KB. Specifies the maximum number of bytes that the Web server reads when receiving POST data. To read more data, you must use a raw data filter or call ReadClient in an ISAPI extension. MaxLogSize : Default setting is 32 KB. If this value is not set in DWORD the registry, or if it is set to zero (0), no logging is performed. Maximum size, in bytes, that a log file can become before it is rolled over. MaxHeaderSi ze : DWORD Default setting is 48 KB in the registry. Maximum number of bytes that the Web server will read of HTTP headers. If the header size exceeds this value, the Web server will terminate the session and return a message to the client: 400 Bad Request. MaxConnecti Default is not set in the registry. If the value is not ons : DWORD set in the registry, MaxConnections will default to 10. Specifies the maximum number of simultaneous connections to the Web site. After the maximum number of connections is established, additional client requests will be sent a message: 503 – Server Too Busy. ServerID : String Default is not set in the registry. If the value is not set in the registry, ServerID will default to "MicrosoftWinCE/X.Y", where X is the major version and Y is the minor version of Windows CEbased device. If ServerID is set, the Web server 40 Software Feature | Korenix HKEY_LOCAL_MACHINE\Comm\HTTPD Value Description returns the specified server name in the response header. Identifies the server name that is included when the Web server generates HTTP response headers. The response header includes a field name "Server: ". Optionally, you can include the software version number or any similar information in the string. Chart 41 Web server registry key and named values 363 Security Notes When using Basic authentication, the client browser sends the user identifier and password to the server in clear text. In addition, all data sent between the client and the browser is in clear text and therefore vulnerable to packet sniffing. You should consider using SSL to help protect sensitive information. Although the client browser sends the password to the server in encrypted format, all data sent between the client and the browser is in clear text and therefore vulnerable to packet sniffing. You should consider using SSL to help protect sensitive information. DirBrowse turns on the Web server's ability to provide local directory browsing. This exposes the local file system to a remote browser through HTTP. Users can view file lists and download files depending on virtual root and authentication registry settings. Enabling directory browsing increases the potential attack surfaces, therefore you should enable directory browsing only when necessary. User names in this list identify the administrators of the site who have access to all virtual roots hosted on this Web site, including the restricted sites. Choose these users carefully and ensure that they set proper password, otherwise their accounts could be used to gain access to restricted sites. Setting the value too small can block user access to the site. However, if the value is too large the Web server will consume more system resources. Based on your deployment model, choose this number appropriately. To avoid revealing the server software information to malicious users, you may want to create a custom server name that obfuscates the Web server and operating system versions. Korenix | Software Feature 41 364 Recommendations A typical deployment uses a Web server in a private network to provide a remote user interface to configure a headless device. The registry defines the number of connections and when the MaxConnections registry value is not set, the registry limits the number to 10. A typical deployment uses the Web server to display status information or to host a family or community Web site. You should not use the Web Server to perform critical operations, such as machine control or financial processing. Use NTLM and/or Basic authentication mechanism to limit access to known users only. You can set the option in the HKEY_LOCAL_MACHINE\COMM\HTTPD registry key. SSL protocol helps to protect data from packet sniffing by anyone with physical access to the network. Carefully choose your virtual roots and limit access to the appropriate files by providing appropriate user access lists. Anonymous users with access to the virtual root may be able to access files and directories within that virtual root. You can set the options in HKEY_LOCAL_MACHINE\Comm\HTTPD\VROOTS registry key. 37 File Server 371 Overview The File Server technology enables clients to access files and other resources, such as printer, from a server over a network using TCP/IP. File Server uses the Common Internet File System (CIFS). This is an extension of the Server Message Block (SMB) file sharing protocol. CIFS enables a network‐enabled application to access and manipulate files and directories on a remote server in the same way that it the application accesses and manipulates files and directories on the local system. 42 Software Feature | Korenix 372 Default Registry Settings The registry stores information necessary to configure the system for applications and hardware devices. The registry also contains information that the operating system continually references during operation. JetBox 8210 enables you to create virtual file server directories. To users who access your file server share, virtual directories appear as subdirectories of the file server share, although these directories may be located in a different folder. You can create a virtual root directory called "myCF" by specifying the following registry key: HKEY_LOCAL_MACHINE\Services\SMBServer\Shares\myCF. Note the maximum length of the virtual root directory is 12 characters. HKEY_LOCAL_MACHINE\Services\SMBserver\Shares Value Description UseAuthentication : No default set. Setting this value to 0 will DWORD disable the authentication on the file server. The file server will be accessible to all users on the network. Chart 42 Named values of HKEY_LOCAL_MACHINE\Services\SMBServer\Shares Key HKEY_LOCAL_MACHINE\Services\SMBserver\Shares\myCF Value Description Path : String Specifies the path to be shared. Type : Setting this value to 1 designates this as a print DWORD server share, setting this value to 0 (zero) designates this as a file server share. UserList : Specifies a commaseparated list of allowed users. String Chart 43 Named values of HKEY_LOCAL_MACHINE\Services\SMBServer\Shares\myCF Key Korenix | Software Feature 43 373 Security Notes It is not recommended that you disable authentication on the file server and you share the \Windows or root directory. You can specify a list of folders that cannot be shared. You can use any name for each folder you specify in the exclusion list. Setting the HKEY_LOCAL_MACHINE\Services\Smbserver\Shares\ExcludePaths registry key prevents the configuration functions from creating the specified shares, so that they cannot be accessed by an un‐trusted application. HKEY_LOCAL_MACHINE\Services\Smbserver\Shares\ExcludePaths Value Name Value “Windows” “\\Windows” “My Documents” “\\Documents and Settings” Chart 44 An example to exclude the folders to be shared 374 Recommendations After you have configured your share folders by editing the registry manually or using the remote configuration tool, you can access and browse the folders you created in the following steps. 1. On the development workstation, from the Start menu, chooses Run. 2. In the Open box, type \\JetBox8210, and then choose OK. The Connect to JetBox8210 dialog box appears. 3. In the Connect to JetBox8210 dialog box, type the user name you created and the corresponding password, and then choose OK. A window appears that shows the two root directories you created. You can now browse the folders you created and access specific files in these folders. The net use command can also to be used in the DOS command prompt tool. 44 Software Feature | Korenix Chart 45 Snapshot of share a folder via “net use” command Chapter 4 Webbased Network Configuration 41 Overview JetBox8210 can also run without displays (think an industrial controller or a protocol gateway). In this case, a web server running on JetBox8210 itself can dynamically generate HTML and send it back to a remote web browser, which in turn can configure the device remotely. 42 Remote Administration Page 421 Introduction The Remote Configuration (RemoteAdmin) page for the Web Server enables you to remotely administer JetBox 8210 using your Web browser. The functionality of the RemoteAdmin includes a wizard that assists users with the initial Korenix | Web‐based Network Configuration 45 JetBox8210 setup and other common tasks. Use your Internet browser and go to http://<JetBox8210 IP Address> to launch RemoteAdmin. Note the RemoteAdmin page is set as the default home page of JetBox 8210. 422 First Use SetUp Wizard On first use, the application requires a password. In addition, the application requires authentication—you must use the default username ADMIN and the same password that you typed on first use. Chart 46 First use setup wizard 46 Web‐based Network Configuration | Korenix Chart 47 Input password and re‐type to confirm Chart 48 Choose “I do not want to setup an Internet connection now” Korenix | Web‐based Network Configuration 47 Chart 49 JetBox 8210 is resetting Chart 50 Authentication for remote configuration 423 RemoteAdmin Home Page JetBox8210 remote administration page also provides support for user tasks such as configuring user and share and security settings. Additionally, the UI provides advanced gateway features, such as port forwarding. Page Name: Home User Interface Description Wide Area Network (WAN) settings Displays a summary of the WAN network settings. Release Releases the dynamically assigned IP address on the WAN network. 48 Web‐based Network Configuration | Korenix Page Name: Home User Interface Description Renew Obtains a new IP address on the WAN network. Local Area Network (LAN) settings Displays a summary of the LAN network settings. DHCP client List Displays the clients on the LAN network. Chart 51 Description of the user interface of the reset base Chart 52 Snapshot of the RemoteAdmin Home Page Korenix | Web‐based Network Configuration 49 424 Device Management Pages 4‐2‐4‐1 Reset Base Station Page Page Name: Reset Base Station User Interface Description Reset Reset the JetBox8210 (Gateway). Chart 53 Description of the user interface of the reset base Chart 54 Click the reset button Chart 55 Click “OK” to confirm 50 Web‐based Network Configuration | Korenix Chart 56 JetBox 8210 is resetting 4‐2‐4‐2 Set Time Page Page Name: Set Time User Interface Description Time synchronization Options for time synchronization: method Synchronize to Internet time server or Set time manually. Internet time server Specifies the time server name. Set time manually Specifies the time settings. Base station time zone Sets time zone. Apply Applies the settings. Cancel Cancels the settings. Chart 57 Description of the user interface of the set time page Korenix | Web‐based Network Configuration 51 Chart 58 Snapshot of the set time page for synchronize to Internet time server Chart 59 Snapshot of the set time page for set time manually 52 Web‐based Network Configuration | Korenix 4‐2‐4‐3 Application Port Forwarding Page Note Add, Enable, Edit, Delete will cause the related services been reset. Page Name: Application Port Forwarding User Interface Description Description Description of the port forwarding settings. Outbound port Specifies outbound port number. Trigger protocol Specifies the trigger protocol. Inbound TCP ports Specifies inbound TCP port numbers. Inbound UDP ports .Specifies outbound UDP port numbers. Add Adds the current settings. Clear Clears the current settings Enable Enables the specified settings. Edit Edits the specified settings. Delete Deletes the specified settings. Chart 60 Description of the user interface of the application port forwarding page Chart 61 Snapshot of the application port forwarding page Korenix | Web‐based Network Configuration 53 4‐2‐4‐4 Backup/ Restore Setting Page Page Name: Back Up/Restoring Settings User Interface Description Back Up Settings Back ups the current settings to a file. Browse… Browses and selects a back up settings file. Restore Settings Restores the settings from a file. Chart 62 Description of the user interface of the back up/restoring settings page Chart 63 Snapshot of the back up/restoring settings page 54 Web‐based Network Configuration | Korenix Chart 64 Snapshot of download the back up settings file 4‐2‐4‐5 Port Forwarding Page Note Add, Enable, Edit, Delete will cause the related services been reset. Page Name: Port Forwarding User Interface Description Description Description of the port forwarding settings. Inbound port Specifies Inbound port number. Type Specifies the protocol type. Private IP address Specifies the private mapped IP address. Private port Specifies the private mapped port number. Add Adds the current settings. Clear Clears the current settings Enable Enables the specified settings. Edit Edits the specified settings. Delete Deletes the specified settings. Chart 65 Description of the user interface of the port forwarding page Korenix | Web‐based Network Configuration 55 Chart 66 Snapshot of the port forwarding page 4‐2‐4‐6 Virtual DMZ Page Page Name: Virtual DMZ User Interface Description Enable: Enables virtual DMZ functionality. Virtual DMZ at IP address: Specifies the virtual DMZ host IP address. Apply Applies the current settings. Cancel Cancels the current settings. Chart 67 Description of the user interface of the virtual DMZ page 56 Web‐based Network Configuration | Korenix Chart 68 Snapshot of the virtual DMZ page 4‐2‐4‐7 Add/Del Network Adapter Page Page Name: Add/Del Network Adapter User Interface Description □ Enables/Disables the specified network adapter for file server. Submit Query Applies the current settings. Chart 69 Description of the user interface of the Add/Del network adapter page Chart 70 Snapshot of the Add/Del network adapter page Korenix | Web‐based Network Configuration 57 4‐2‐4‐8 SMB Server Statistics Page Page Name: SMB Server Statistics User Interface Description Active Users Indicates the active users for file server. Total Bytes Read Indicates the total bytes read from file server. Total Bytes Writes Indicates the total bytes written to file server. Chart 71 Description of the user interface of the SMB server statistics page Chart 72 Snapshot of the SMB server statistics page 425 Local Area Network Page Note the IP address can’t be modified if the adapter was configured as “Obtain an IP address via DHCP”. Page Name: Local Area Network User Interface Description Gateway name: Specifies the name. IP address: Specifies the IP address. Subnet mask: Specifies the subnet mask. 58 Web‐based Network Configuration | Korenix Page Name: Local Area Network User Interface Description DHCP Server: Enables/Disables the DHCP server functionality. DHCP starting address: Specifies the starting IP address the DHCP server assigns to DHCP client. DHCP ending address: Specifies the ending IP address the DHCP server assigns to DHCP client. Lease time for assigned IP address: Specifies the lease time for assigned IP address. Local domain name: Specifies the local domain name. Chart 73 Description of the user interface of the local area network page Chart 74 Snapshot of the local area network page 426 Wide Area Network Page Page Name: Wide Area Network User Interface Description Internet Connection Type Options for Internet connection type: Dynamic or Static or PPPoE or Disabled. Korenix | Web‐based Network Configuration 59 Page Name: Wide Area Network User Interface Description Apply Applies the current settings. Cancel Cancels the current settings. Chart 75 Description of the user interface of the wide area network page Chart 76 Snapshot of the wide area network page 427 Security Pages 4‐2‐7‐1 Change Password Page Note the password is applied for the user: ADMIN. Page Name: Change Password User Interface Description Current password: Specifies the current password. New Password (3‐16 characters): Specifies the new password. Confirm new password: Specifies the new password again. 60 Web‐based Network Configuration | Korenix Chart 77 Description of the user interface of the change password page Chart 78 Snapshot of the change password page 4‐2‐7‐2 Firewall Page Note the firewall is disabled by default. Page Name: Firewall User Interface Description Block ping and other ICMP commands Blocks ping and other ICMP commands. Apply Applies the current settings. Cancel Cancels the current settings. Chart 79 Description of the user interface of the firewall page Korenix | Web‐based Network Configuration 61 Chart 80 Snapshot of the firewall page 4‐2‐7‐3 Client Filtering Page Note the firewall is disabled by default. Page Name: Firewall User Interface Description IP Address/host name Specifies the IP address. Outbound ports Specifies the outbound ports. Protocol Specifies the protocol. Duration Options for duration: Always or Customized duration. Add Adds a specified filter. Clear Clear the current filter settings. Block Enables/Disables the filter. Edit Edits the filter settings. Delete Deletes the filter. Chart 81 Description of the user interface of the client filtering page 62 Web‐based Network Configuration | Korenix Chart 82 Snapshot of the client filtering page 428 Add/Del Users Page Page Name: Add/Del Users User Interface Description User Specifies the user. Password Specifies the password. Password verify Specifies the password to verify. Add New Adds a new user. Delete Deletes the specified user. Chart 83 Description of the user interface of the add/del users page Korenix | Web‐based Network Configuration 63 Chart 84 Snapshot of the add/del users page 429 Add/Del Share Page Page Name: Add/Del Share User Interface Description Available Shares Indicates the available shares (i.e. \Storage Card). Share name Specifies share name. Add Adds the specified share. Remove Removes the specified share. Permissions Specifies the permissions for the specified share. Chart 85 Description of the user interface of the add/del share page 64 Web‐based Network Configuration | Korenix Chart 86 Snapshot of the add/del share page Page Name: Share Permissions User Interface Description Share name Indicates the share name (i.e. myCF). User Specifies user. Allow Allows the specified user to access. Deny Denies the specified user to access. Update Updates the current settings. Done Finishes the share permissions settings. Chart 87 Description of the user interface of the share permissions page Korenix | Web‐based Network Configuration 65 Chart 88 Snapshot of the share permissions page 4210 Printer Pages 4‐2‐10‐1 Add/Del Printer Page Page Name: Add/Del Printer User Interface Description Available Printers Indicates the available Printers (i.e. Kyocera Mita FS-1020D(LPT1:)). Printer name Specifies printer name. Add Adds the specified printer. Remove Removes the specified printer. Permissions Specifies the permissions for the specified printer. Chart 89 Description of the user interface of the add/del printer page 66 Web‐based Network Configuration | Korenix Chart 90 Snapshot of the add/del printer page Page Name: Printer Permissions User Interface Description Printer name Indicates the share name (i.e. myPrinter). User Specifies user. Allow Allows the specified user to access. Deny Denies the specified user to access. Update Updates the current settings. Done Finishes the printer permissions settings. Chart 91 Description of the user interface of the printer permissions page Chart 92 Snapshot of the printer permissions page Korenix | Web‐based Network Configuration 67 4211 EventLog Pages 4‐2‐11‐1 System Page These events include the following: 1. Potential attacks by client computers over the Internet 2. The initiation and status of Point‐to‐Point Protocol over Ethernet (PPPoE) connections 3. The public Gateway interface requesting, receiving, and releasing its Dynamic Host Configuration Protocol (DHCP) address 4. The Simple Network Time Protocol (SNTP) service retrieving the current time from a time server Page Name: System User Interface Description Select to clear this event log Clears the event log. Type Indicates the event type. Date Indicates the event date. Time Indicates the event time. Source Indicates the event source. EventID Indicates the event ID. Chart 93 Description of the user interface of the system page 68 Web‐based Network Configuration | Korenix Chart 94 Snapshot of the system page 43 Web Administration Page 431 Introduction The Web Server Administration (WebAdmin) page for the Web server enables you to remotely administer your Web server using your Web browser. Use WebAdmin to manage the accessibility, security, and file sharing features of your Web server. Include configure which files are shared and how they are accessed and which users have access to which files, and the authentication protocols the Web server will use and configure the Web server log. Use your Internet browser and go to http://<JetBox8210 IP Address>/WebAdmin to launch WebAdmin. Refer with 4‐3‐3 Instructions Page Instructions Page for details before starting configuring the Web server. 432 WebAdmin Home Page Page Name: Home User Interface Description Help topics For more information about WebAdmin. Configuring Web Sites For more information about configuring Web sites. Korenix | Web‐based Network Configuration 69 Page Name: Home User Interface Description Default Web Site: Modify Modifies the default Web site. Public Web Site: Modify Modifies the public Web site. Public Web Site: Delete Deletes the public Web site. CreateNew Creates a new Web site. Chart 95 Description of the user interface of the WebAdmin home page Chart 96 Snapshot of the WebAdmin home page 70 Web‐based Network Configuration | Korenix Chart 97 Snapshot of the WebAdmin home page 433 Instructions Page The Help topics provide information about configuring, securing, and managing the Web server on your JetBox 8210 device. Korenix | Web‐based Network Configuration 71 Chart 98 Snapshot of the instructions page 434 Logging Page Page Name: Logging User Interface Description Here For more information about Logging. View the Current Web server log file Views the current Web server log file.. Log File Location: Specifies the log file location. Maximum Log File Size: Specifies the maximum log file size in bytes. Update Settings Updates the settings. Chart 99 Description of the user interface of the logging page 72 Web‐based Network Configuration | Korenix Chart 100 Snapshot of the current logging page Chart 101 Snapshot of the log file Korenix | Web‐based Network Configuration 73 435 SSL Configuration Page Page Name: SSL Configuration User Interface Description Here For more information about SSL Configuration. Enable SSL: Enables SSL on initialization of Web server. Server Certificate Subject Specifies the server certificate subject Line: line. Update Updates the settings. Chart 102 Description of the user interface of the SSL configuration page Chart 103 Snapshot of the SSL configuration page 74 Web‐based Network Configuration | Korenix 436 Restart Web Server Page Chart 104 Snapshot of the restart web server page 44 System Administration Page 441 Introduction The System Administration (SysAdmin) page for the JetBox8210 Web Server enables you to remotely administer JetBox 8210 using your Web browser. Use SysAdmin to manage the processes, files and registry of JetBox 8210. Include launch/kill a process, upload/download a file, create/remove a directory and edit the registry. Use your Internet browser and go to http://<JetBox8210 IP Address>/SysAdmin to launch SysAdmin. Note the SysAdmin is discontinued in Windows CE 6.0. Korenix | Web‐based Network Configuration 75 442 SysAdmin Home Page Chart 105 Snapshot of the SysAdmin Home Page Chart 106 Snapshot of the SysAdmin Home Page 443 System Tools Page It shows the system information, includes version, number of processors, the CPU architecture, the memory and data store size, the network adapters and the system time. Page Name: System Info 76 Web‐based Network Configuration | Korenix User Interface Description Refresh Refreshes the current page Chart 107 Description of the user interface of the system info page Chart 108 Snapshot of the system info page Page Name: Processes User Interface Description Refresh Refreshes the current page. Launch processes: Specifies the executable file path. Execute Launches the specified executable file. PID Specifies the process ID. Process Name Specifies the process name. Kill Kills the process. Chart 109 Description of the user interface of the processes page Korenix | Web‐based Network Configuration 77 Chart 110 Snapshot of the processes page 444 File Browser Page Note you may consider looking at the SMB server to do upload and download as it will be way faster and probably a better user experience since it'll look like a remote file share. Page Name: File Browser User Interface Description Refresh Refreshes the working directory. Directory Tree View Selects the working directory. JetBox8210 Indicates the working directory. Upload File: Specifies the upload file path. Browse… Browses and selects the upload file. Upload Uploads the specified file. Copy to: Specifies the copy to file path. New Directory Name: Specifies the new directory name. Create Directory Creates a new directory under working directory. Remove Directory Removes the working directory. 78 Web‐based Network Configuration | Korenix Page Name: File Browser User Interface Description Delete Deletes the specified file. Copy Copies the specified file to the specified copy to path. File Name Downloads the specified file. Chart 111 Description of the user interface of the file browser page Chart 112 Snapshot of the file browser page 445 Registry Editor Page Page Name: File Browser User Interface Description Refresh Refreshes the current key. Registry Key Tree View Selects the working registry key. HKEY_LOCAL_MACHINE Indicates the working registry key. New Value Name: Specifies the new value name. New value Type: Specifies the new value type. New Value Creates a new value. Modified Value: Specifies the modified value data. Korenix | Web‐based Network Configuration 79 Page Name: File Browser User Interface Description New Subkey Name: Specified the new registry key. Create Key Create a new registry key. Delete Key Deletes the working registry key. Delete Deletes the specified value. Modify Modifies the value with specified modified value. Chart 113 Description of the user interface of the registry editor page Chart 114 Snapshot of the registry editor page Chapter 5 Connectivity Features 51 Overview Microsoft® Windows® CE provides tools for testing and debugging a Windows CE–based device. Most tools for debugging and testing reside on the development 80 Connectivity Features | Korenix workstation, and thus rely on a connectivity infrastructure that facilitates communication between the development workstation and a target device. Platform Manager supports application connectivity. Application connectivity is a communications framework that allows you to establish a connection between an application running on a development workstation and a target device. Remote Tools and eMbedded Visual C++ use the application connectivity support in Platform Manager to connect to a target device. 52 ActiveSync Connection 521 Introduction ActiveSync allows you to create a synchronization relationship between your mobile device and PC using a cable, cradle, Bluetooth, or infrared connection. ActiveSync can also make it possible for your device to connect to other resources through your PC. It’s recommended to setup an ActiveSync connection during developing your application with Microsoft eVC++4.0 or Visual Studio 2005. You can use a serial cable to connect JetBox 8210 to your PC. Note: Setup up Microsoft ActiveSync 4.5 or above before connecting the JetBox 8210 with your PC. Microsoft ActiveSync 4.5 can be downloaded from the following link: http://www.microsoft.com/windowsmobile/activesync/activesync45.mspx 522 Connection via COM port The way to setup an ActiveSync connection with JetBox 8210 is using the RS232 port. Note: JetBox 8210 configure the default PC connection as USB, so it’s necessary to change the PC connection before establish ActiveSync connection via RS232. Korenix | Connectivity Features 81 Chart 115 Launch “Network and Dial‐up Connections” control applet Chart 116 Make a new connection 82 Connectivity Features | Korenix Chart 117 Choose “Direct Connection” option Chart 118 Choose a RS232 COM port Korenix | Connectivity Features 83 Chart 119 Configure the selected COM port Chart 120 Flow control as none 84 Connectivity Features | Korenix Chart 121 Make “My Connection” is completed Chart 122 Launch “PC connection” control applet Korenix | Connectivity Features 85 Chart 123 Select “Change…” to change PC connection Chart 124 Change PC connection to “My Connection” 86 Connectivity Features | Korenix Chart 125 Change PC connection is completed Chart 126 Configure ActiveSync Connection settings Korenix | Connectivity Features 87 Chart 127 Allow connections to COM1 Chart 128 ActiveSync is not connected Chart 129 Connect JetBox 8210 with PC via RS232 Null Modem Cable 88 Connectivity Features | Korenix Chart 130 Choose “No” to skip setup a partnership Chart 131 ActiveSync is connected Chart 132 ActiveSync is connected 523 Explore JetBox 8210 After ActiveSync connection has been established, click the Explore button to Korenix | Connectivity Features 89 explore JetBox 8210. It’s recommended to exchange the application data with JetBox 8210 via ActiveSync connection during developing your applications. Chart 133 Microsoft ActiveSync Chart 134 Explore the JetBox 8210 via ActiveSync 53 Manual Server Connection via Ethernet 531 Overview If ActiveSync connectivity is not available, a Manual Server connection should be possible. Manual Server uses TCP/IP communications between host PC and device and supports most of the functions of ActiveSync. It does not support file or outlook synchronization and takes more steps to initiate. 90 Connectivity Features | Korenix Both ActiveSync and Manual Server are used by the Platform Manager component of eVC++. Platform Manager provides communication support for application debugging and add‐on tools. You may need to install Microsoft eVC++ 4.0 before establishing a manual server connection with JetBox 8210. 532 Configure Platform Manager Chart 135 Configure platform manager Korenix | Connectivity Features 91 Chart 136 Setup the properties of the default device Chart 137 Select “TCP/IP Transport for Windows CE” for transport 92 Connectivity Features | Korenix Chart 138 Select “Manual Server” for startup server, then click test Chart 139 Manual server—Action 533 Telnet with JetBox 8210 It’s recommended to Telnet with JetBox 8210 and launch CEMGRC.EXE remotely. Chart 140 Double click the network icon Korenix | Connectivity Features 93 Chart 141 IP address of the DM9CE1 network adapter Chart 142 Start a Telnet Session of JetBox 8210 Chart 143 Success to telnet JetBox 8210 Chart 144 Launch “Manual Server—Action” command 94 Connectivity Features | Korenix Chart 145 Success to establish the manual server connection 534 Remote Tools via Manual Server Connection Chart 146 Launch remote zoom in tool Korenix | Connectivity Features 95 Chart 147 Select “default device” Chart 148 Manual server—action 96 Connectivity Features | Korenix Chart 149 Launch “Manual Server—Action” command Chart 150 Success to launch remote zoomin Chapter 6 Application Development 61 Overview You can import JetBox 8210 SDK eMbedded Visual C++ 4.0 or Visual Studio .NET 2003. An application developer can then use the SDK to create applications that run on JetBox 8210 run‐time image. Korenix | Application Development 97 62 Install JetBox SDK Chart 151 Launch JetBox SDK setup file to start installing SDK Chart 152 JetBox 8210 SDK setup wizard 98 Application Development | Korenix Chart 153 Accept end‐user license agreement Chart 154 Enter customer information Korenix | Application Development 99 Chart 155 Choose “Complete” setup type Chart 156 Choose the destination folder 100 Application Development | Korenix Chart 157 Ready to install Chart 158 Install JetBox 8210 SDK Korenix | Application Development 101 Chart 159 Completing JetBox 8210 SDK setup wizard 63 Hello World Application with eVC++4.0 Note it’s necessary to establish a connection between JetBox 8210 with your PC before downloading and executing the application from eVC++4.0. 102 Application Development | Korenix Chart 160 New a project with eVC++4.0 Chart 161 Hello world application with Win32 (WCE ARMV4I) Korenix | Application Development 103 Chart 162 A typical “Hello World” application Chart 163 Complete to create the “Hello World” Project 104 Application Development | Korenix Chart 164 Select the active configuration for customized WCE OS devices Chart 165 Rebuild active project and all project dependencies Korenix | Application Development 105 Chart 166 Connecting to the JetBox 8210 Chart 167 Downloading hello world application to JetBox 8210 Chart 168 Finish downloading hello world application to JetBox 8210 106 Application Development | Korenix Chart 169 Execute hello world application Chart 170 Snapshot of the hello world application Korenix | Application Development 107 64 Hello World Application with VS2005 Chart 171 New an application project with VS2005 108 Application Development | Korenix Chart 172 Create a hello world application for windows CE 5.0 smart device using visual C# Chart 173 Edit the appearance text to hello world Korenix | Application Development 109 Chart 174 Configure the target device as windows CE5.0 device Chart 175 connect to device 110 Application Development | Korenix Chart 176 Connect to windows CE5.0 device succeeded Chart 177 Rebuild solution Korenix | Application Development 111 Chart 178 Start debugging Chart 179 Deploy hello world application to Windows CE5.0 Device 112 Application Development | Korenix Chart 180 Hello world (running) Chart 181 Snapshot of the hello world application on JetBox 8210 Korenix | Application Development 113 65 eVC++4.0 Sample Codes for Hardware Accessing A rich set of sample codes are provided for demo how to access the hardware peripherals. After installing SDK, the eVC++ 4.0 sample codes are located under C:\Program Files\Windows CE Tools\wce500\JetBox8210Core\Sdk folder. eVC++ 4.0 Sample Codes Folder Description Battery Demo how to query the voltage of the battery. DI_Event Demo how to query DI status by waiting events. DI_Poll Demo how to query DI status by polling. DIPSwitch Demo how to query DIP switches status. DO Demo how to operate DO channels. EEPROM Demo how to read/write data from/to EEPROM. NVRAM Demo how to read/write data from/to NVRAM. Security Demo how to query security serial code and read/write data from/to security ROM. Serial_ OperationMode Demo how to get/set the operation mode of the serial ports. WatchDogTimer Demo how to operate the watch dog timer normally. WatchDogTimer_ CrashSystem Demo how the hardware watch dog timer works by halting the OS. WatchDogTimer_ KillProcess Demo how the watch dog timer works in a timeout situation. Chart 182 Description of the eVC++4.0 Sample Codes 114 Appendix | Korenix Chapter 7 Appendix 71 Chart Index Chart 1 Application—end user .................................................................... 7 Chart 2 Applications and services development ....................................... 9 Chart 3 Communication services and networking .................................. 12 Chart 4 Core OS Service ............................................................................. 14 Chart 5 Device management ...................................................................... 14 Chart 6 File system and data store ............................................................ 15 Chart 7 Graphics and multimedia technologies ....................................... 16 Chart 8 Security .......................................................................................... 17 Chart 9 Shell and user interface ................................................................ 17 Chart 10 Platform manager ....................................................................... 18 Chart 11 Related Win32 APIs to operate DIO1 ........................................ 19 Chart 12 Control codes for DIO1 ............................................................... 19 Chart 13 Steps to configure a RS485 port ................................................ 20 Chart 14 Related Win32 APIs to operate NVR1 ....................................... 20 Chart 15 Related Win32 APIs to operate EPR1 ........................................ 21 Chart 16 Related Win32 APIs to operate SEC1 ........................................ 21 Chart 17 Io Control codes for SEC1 ........................................................... 21 Chart 18 DIP switches registry key and named value ............................. 22 Chart 19 Related Win32 APIs to get the state of DIP switches ............... 22 Chart 20 Related Win32 APIs to configure COMx .................................... 22 Chart 21 Io Control codes for COMx ......................................................... 23 Chart 22 Snapshot of the control panel of JetBox 8210 .......................... 23 Chart 23 Snapshot of “DIO Tester” control applet ................................... 24 Chart 24 Description of the user interface of “DIO Tester” ..................... 25 Chart 25 Configuration snapshot of “SerPerf” control applet ................ 25 Chart 26 Run time snapshot of “SerPerf” control applet ........................ 26 Chart 27 Related Win32 APIs to operate NVR1 ....................................... 26 Chart 28 Related Win32 APIs to operate EPR1 ........................................ 27 Chart 29 Related Win32 APIs to operate SEC1 ........................................ 27 Chart 30 Io control codes for SEC1 ........................................................... 27 Chart 31 DIP switches registry key and named value ............................. 28 Korenix | Appendix 115 Chart 32 Related Win32 APIs to Configure COMx ................................... 28 Chart 33 Io control codes for COMx .......................................................... 28 Chart 34 Snapshot of “UsrMgr.exe” ........................................................... 30 Chart 35 Arguments description of “UsrMgr.exe” .................................... 30 Chart 36 Snapshot of “rFlush.exe” ............................................................ 31 Chart 37 Named values of HKEY_LOCAL_MACHINE\Init key ................. 31 Chart 38 a Typical Init Registry Entry Using Dependencies ................... 32 Chart 39 Telnet Server Registry Key and Named Values ......................... 33 Chart 40 FTP Server Registry Key and Named Values ............................ 36 Chart 41 Web server registry key and named values .............................. 41 Chart 42 Named values of HKEY_LOCAL_MACHINE\Services\SMBServer\Shares Key .................. 43 Chart 43 Named values of HKEY_LOCAL_MACHINE\Services\SMBServer\Shares\myCF Key ...... 43 Chart 44 An example to exclude the folders to be shared ....................... 44 Chart 45 Snapshot of share a folder via “net use” command .................. 45 Chart 46 First use setup wizard ................................................................ 46 Chart 47 Input password and re‐type to confirm .................................... 47 Chart 48 Choose “I do not want to setup an Internet connection now” 47 Chart 49 JetBox 8210 is resetting ............................................................. 48 Chart 50 Authentication for remote configuration .................................. 48 Chart 51 Description of the user interface of the reset base .................. 49 Chart 52 Snapshot of the RemoteAdmin Home Page .............................. 49 Chart 53 Description of the user interface of the reset base .................. 50 Chart 54 Click the reset button ................................................................. 50 Chart 55 Click “OK” to confirm .................................................................. 50 Chart 56 JetBox 8210 is resetting ............................................................. 51 Chart 57 Description of the user interface of the set time page ............. 51 Chart 58 Snapshot of the set time page for synchronize to Internet time server .......................................................................................................... 52 Chart 59 Snapshot of the set time page for set time manually ............... 52 Chart 60 Description of the user interface of the application port forwarding page ......................................................................................... 53 Chart 61 Snapshot of the application port forwarding page .................. 53 Chart 62 Description of the user interface of the back up/restoring settings page .............................................................................................. 54 Chart 63 Snapshot of the back up/restoring settings page .................... 54 Chart 64 Snapshot of download the back up settings file ....................... 55 116 Appendix | Korenix Chart 65 Description of the user interface of the port forwarding page ..... 55 Chart 66 Snapshot of the port forwarding page .......................................... 56 Chart 67 Description of the user interface of the virtual DMZ page ........... 56 Chart 68 Snapshot of the virtual DMZ page ................................................ 57 Chart 69 Description of the user interface of the Add/Del network adapter page ............................................................................................................. 57 Chart 70 Snapshot of the Add/Del network adapter page .......................... 57 Chart 71 Description of the user interface of the SMB server statistics page ..................................................................................................................... 58 Chart 72 Snapshot of the SMB server statistics page .................................. 58 Chart 73 Description of the user interface of the local area network page 59 Chart 74 Snapshot of the local area network page ..................................... 59 Chart 75 Description of the user interface of the wide area network page 60 Chart 76 Snapshot of the wide area network page ..................................... 60 Chart 77 Description of the user interface of the change password page .. 61 Chart 78 Snapshot of the change password page ....................................... 61 Chart 79 Description of the user interface of the firewall page .................. 61 Chart 80 Snapshot of the firewall page ....................................................... 62 Chart 81 Description of the user interface of the client filtering page ........ 62 Chart 82 Snapshot of the client filtering page ............................................. 63 Chart 83 Description of the user interface of the add/del users page ........ 63 Chart 84 Snapshot of the add/del users page ............................................. 64 Chart 85 Description of the user interface of the add/del share page ........ 64 Chart 86 Snapshot of the add/del share page ............................................. 65 Chart 87 Description of the user interface of the share permissions page . 65 Chart 88 Snapshot of the share permissions page ...................................... 66 Chart 89 Description of the user interface of the add/del printer page ..... 66 Chart 90 Snapshot of the add/del printer page ........................................... 67 Chart 91 Description of the user interface of the printer permissions page ..................................................................................................................... 67 Chart 92 Snapshot of the printer permissions page .................................... 67 Chart 93 Description of the user interface of the system page ................... 68 Chart 94 Snapshot of the system page ........................................................ 69 Chart 95 Description of the user interface of the WebAdmin home page .. 70 Chart 96 Snapshot of the WebAdmin home page ....................................... 70 Chart 97 Snapshot of the WebAdmin home page ....................................... 71 Chart 98 Snapshot of the instructions page ................................................ 72 Chart 99 Description of the user interface of the logging page .................. 72 Korenix | Appendix 117 Chart 100 Snapshot of the current logging page ......................................... 73 Chart 101 Snapshot of the log file ............................................................... 73 Chart 102 Description of the user interface of the SSL configuration page 74 Chart 103 Snapshot of the SSL configuration page ...................................... 74 Chart 104 Snapshot of the restart web server page .................................... 75 Chart 105 Snapshot of the SysAdmin Home Page ....................................... 76 Chart 106 Snapshot of the SysAdmin Home Page ....................................... 76 Chart 107 Description of the user interface of the system info page .......... 77 Chart 108 Snapshot of the system info page ............................................... 77 Chart 109 Description of the user interface of the processes page ............ 77 Chart 110 Snapshot of the processes page .................................................. 78 Chart 111 Description of the user interface of the file browser page ......... 79 Chart 112 Snapshot of the file browser page .............................................. 79 Chart 113 Description of the user interface of the registry editor page ..... 80 Chart 114 Snapshot of the registry editor page........................................... 80 Chart 115 Launch “Network and Dial‐up Connections” control applet ....... 82 Chart 116 Make a new connection .............................................................. 82 Chart 117 Choose “Direct Connection” option ............................................ 83 Chart 118 Choose a RS232 COM port .......................................................... 83 Chart 119 Configure the selected COM port ............................................... 84 Chart 120 Flow control as none ................................................................... 84 Chart 121 Make “My Connection” is completed ......................................... 85 Chart 122 Launch “PC connection” control applet ...................................... 85 Chart 123 Select “Change…” to change PC connection ............................... 86 Chart 124 Change PC connection to “My Connection” ............................... 86 Chart 125 Change PC connection is completed ........................................... 87 Chart 126 Configure ActiveSync Connection settings .................................. 87 Chart 127 Allow connections to COM1 ........................................................ 88 Chart 128 ActiveSync is not connected ........................................................ 88 Chart 129 Connect JetBox 8210 with PC via RS232 Null Modem Cable ...... 88 Chart 130 Choose “No” to skip setup a partnership .................................... 89 Chart 131 ActiveSync is connected .............................................................. 89 Chart 132 ActiveSync is connected .............................................................. 89 Chart 133 Microsoft ActiveSync ................................................................... 90 Chart 134 Explore the JetBox 8210 via ActiveSync ...................................... 90 Chart 135 Configure platform manager ....................................................... 91 Chart 136 Setup the properties of the default device ................................. 92 Chart 137 Select “TCP/IP Transport for Windows CE” for transport ........... 92 118 Appendix | Korenix Chart 138 Select “Manual Server” for startup server, then click test .......... 93 Chart 139 Manual server—Action ............................................................... 93 Chart 140 Double click the network icon ..................................................... 93 Chart 141 IP address of the DM9CE1 network adapter ............................... 94 Chart 142 Start a Telnet Session of JetBox 8210 .......................................... 94 Chart 143 Success to telnet JetBox 8210 ..................................................... 94 Chart 144 Launch “Manual Server—Action” command .............................. 94 Chart 145 Success to establish the manual server connection ................... 95 Chart 146 Launch remote zoom in tool ....................................................... 95 Chart 147 Select “default device” ................................................................ 96 Chart 148 Manual server—action ................................................................ 96 Chart 149 Launch “Manual Server—Action” command .............................. 97 Chart 150 Success to launch remote zoomin ............................................... 97 Chart 151 Launch JetBox SDK setup file to start installing SDK ................... 98 Chart 152 JetBox 8210 SDK setup wizard .................................................... 98 Chart 153 Accept end‐user license agreement ............................................ 99 Chart 154 Enter customer information ........................................................ 99 Chart 155 Choose “Complete” setup type ................................................. 100 Chart 156 Choose the destination folder ................................................... 100 Chart 157 Ready to install .......................................................................... 101 Chart 158 Install JetBox 8210 SDK ............................................................. 101 Chart 159 Completing JetBox 8210 SDK setup wizard ............................... 102 Chart 160 New a project with eVC++4.0 .................................................... 103 Chart 161 Hello world application with Win32 (WCE ARMV4I)................. 103 Chart 162 A typical “Hello World” application .......................................... 104 Chart 163 Complete to create the “Hello World” Project ......................... 104 Chart 164 Select the active configuration for customized WCE OS devices ................................................................................................................... 105 Chart 165 Rebuild active project and all project dependencies ................ 105 Chart 166 Connecting to the JetBox 8210 ................................................. 106 Chart 167 Downloading hello world application to JetBox 8210 .............. 106 Chart 168 Finish downloading hello world application to JetBox 8210 .... 106 Chart 169 Execute hello world application ................................................ 107 Chart 170 Snapshot of the hello world application ................................... 107 Chart 171 New an application project with VS2005 .................................. 108 Chart 172 Create a hello world application for windows CE 5.0 smart device using visual C# ........................................................................................... 109 Chart 173 Edit the appearance text to hello world.................................... 109 Korenix | Appendix 119 Chart 174 Configure the target device as windows CE5.0 device ............. 110 Chart 175 connect to device ...................................................................... 110 Chart 176 Connect to windows CE5.0 device succeeded .......................... 111 Chart 177 Rebuild solution ........................................................................ 111 Chart 178 Start debugging ......................................................................... 112 Chart 179 Deploy hello world application to Windows CE5.0 Device ....... 112 Chart 180 Hello world (running) ................................................................ 113 Chart 181 Snapshot of the hello world application on JetBox 8210.......... 113 Chart 182 Description of the eVC++4.0 Sample Codes .............................. 114 72 Customer Service Korenix Technologies Co., Ltd. 9F, No. 100‐1, Ming‐Chuan Rd., Shing Tien City, Taipei, Taiwan Tel:+886‐2‐82193000 Fax:+886‐2‐82193300 Business service: [email protected] Customer service: [email protected] 00.101.04 120 Appendix | Korenix