1
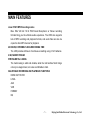
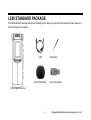
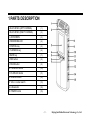
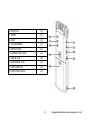
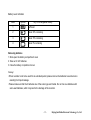
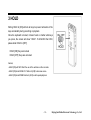
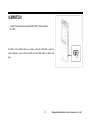
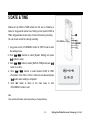
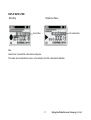
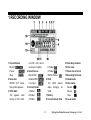
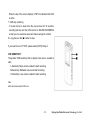
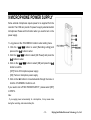
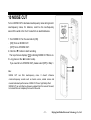
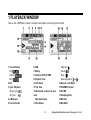
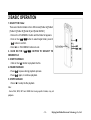
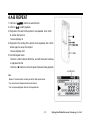
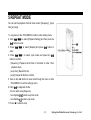
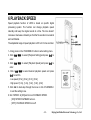
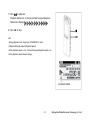
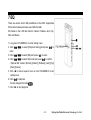
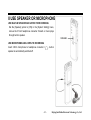
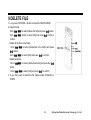
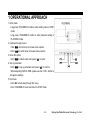
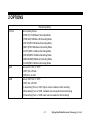
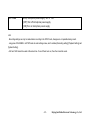
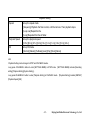
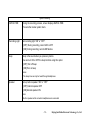
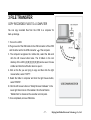
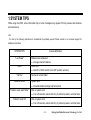
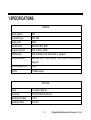
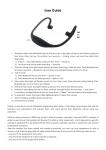
USER MANUAL LOTOO LS50
CONTENT
MAIN FEATURES .................................................................................................................................... - 5 LS50 STANDARD PACKAGE.................................................................................................................. - 6 IMPORTANT ............................................................................................................................................ - 7 -
1 SET UP
1 PARTS DESCRIPTION ........................................................................................................................ - 9 2 BATTERIES ........................................................................................................................................ - 12 3 HOLD .................................................................................................................................................. - 14 4 SWITCH .............................................................................................................................................. - 15 5 DATE & TIME ...................................................................................................................................... - 16 -
2 RECORD
1 RECORDING WINDOW ..................................................................................................................... - 19 2 BASIC OPERATION ........................................................................................................................... - 20 3 ADDING BOOKMARKS DURING RECORDING ............................................................................... - 22 4 LEVELS .............................................................................................................................................. - 23 5 AUTOMATIC GAIN CONTROL (AGC) ............................................................................................... - 24 6 CHANGE RECORDING FORMAT ..................................................................................................... - 25 7 STEREO OR MONO RECORDING ................................................................................................... - 27 -
-2-
Beijing InfoMedia Electronic Technology Co., Ltd
8 VOLUME OPERATED RECORDING (VOR) ..................................................................................... - 28 9 MICROPHONE POWER SUPPLY ..................................................................................................... - 30 10 NOISE CUT ...................................................................................................................................... - 31 -
3 PLAYBACK
1 PLAYBACK WINDOW ........................................................................................................................ - 33 2 BASIC OPERATION ........................................................................................................................... - 34 3 ADD BOOKMARKS DURING PLAYBACK ......................................................................................... - 36 4 A-B REPEAT ....................................................................................................................................... - 38 5 REPEAT MODE .................................................................................................................................. - 39 6 PLAYBACK SPEED ............................................................................................................................ - 40 7 EQ ....................................................................................................................................................... - 42 8 USE SPEAKER OR MICROPHONE .................................................................................................. - 43 9 DELETE FILE ..................................................................................................................................... - 44 -
4 MENUS
1 OPERATIONAL APPROACH ............................................................................................................. - 46 2 OPTIONS ............................................................................................................................................ - 47 -
5 TRANSMIT DATA
1 SYSTEM AND HARDWARE REQUIREMENT ................................................................................... - 55 2 FOLDER STRUCTURE ...................................................................................................................... - 56 -
-3-
Beijing InfoMedia Electronic Technology Co., Ltd
3 FILE TRANSFER ................................................................................................................................ - 57 -
6 TROUBLE SHOOTING
1 SYSTEM TIPS .................................................................................................................................... - 61 2 FAQ ..................................................................................................................................................... - 64 -
7 ADDITIONAL INFO
1 SPECIFICATIONS .............................................................................................................................. - 67 2 SAFETY STATEMENT........................................................................................................................ - 69 -
-4-
Beijing InfoMedia Electronic Technology Co., Ltd
MAIN FEATURES
Linear PCM / MP3 Recording modes
Max. WAV 48 kHz 16 bit PCM linear Monophonic or Stereo recording
formats bring you the ultimate audio experience. The LS50 also supports
lots of MP3 recording and playback formats, and audio files can also be
copied to other MP3 devices for playback.
40 HOURS, EXTREMELY LONG RECORDING TIME
The LS50 provides 40 hours of continuous recording using 2 “AA” batteries.
4 GB, MASS STORAGE
STRONG METAL CASING
The metal casing is solid and durable, while the matt surface finish brings
not only an elegant look, but is also comfortable to hold.
ADJUSTABLE RECORDING AND PLAYBACK FUNCTIONS
NOISE CUT FILTER
LEVEL
AGC
VOR
FORMAT
EQ
-5-
Beijing InfoMedia Electronic Technology Co., Ltd
LS50 STANDARD PACKAGE
The LS50 standard package includes the following items. When you purchase the recorder, please make sure
that the package is complete.
USB
Wrist strap
Foam Windshield
User manual disk
LS50 Digital Recorder
-6-
Beijing InfoMedia Electronic Technology Co., Ltd
IMPORTANT
Disclaimer
All rights reserved. Without the written approval in advance, this manual and machine software whether in
whole, or in part, cannot be copied, translated, nor compressed into computer-readable data.
InfoMedia Electronic Technology Co., Ltd is not responsible for incidents, consequences or losses due to the
violation of the IP rights.
InfoMedia Electronic Technology Co., Ltd reserves the right to modify this manual and all the included
information at any time without prior notification.
Trademarks Notices
Lotoo is the registered trademark of InfoMedia.
IBM and PC/AT are registered trademarks of the international business recorder company.
Microsoft and Windows are Microsoft Corporation’s registered trademarks in America and other countries.
Apple and Macintosh are Apple Computer Inc.’s registered trademarks in America and other countries.
Pentium is Intel Corporation’s registered trademark.
Other trademarks and registered trademarks are owned by their respective companies.
-7-
Beijing InfoMedia Electronic Technology Co., Ltd
This chapter introduces each part of LS50 and some
useful tips, along with several preparatory operations
such as installing batteries, power-on / off and time-date
setting, etc.
-8-
Beijing InfoMedia Electronic Technology Co., Ltd
1 PARTS DESCRIPTION
1. BUILT-IN MIC (LEFT CHANNEL)
(1)
2. BUILT-IN MIC (RIGHT CHANNEL)
(2)
3. LCD SCREEN
(3)
4. RECORDING LED
(4)
5. DISP/DEL key
(5)
6. FILE/MENU key
(6)
7. MARK key
(7)
8. REC button
(8)
9. PAUSE button
(9)
10. FORWARD button
( 10 )
11. PLAYBACK button
( 11 )
12. REWIND button
( 12 )
13. VOL +/- rocker switch
( 13 )
14. A-B selector
( 14 )
15. POWER button
( 15 )
-9-
Beijing InfoMedia Electronic Technology Co., Ltd
16. NOISE CUT
( 16 )
17. SPEED
( 17 )
18. HOLD
( 18 )
19. LOUDSPEAKER
( 19 )
20. BATTERY BOX
( 20 )
21. EXTERNAL MIC JACK
( 21 )
22. LINE IN JACK
( 22 )
23. HEADPHONE JACK
( 23 )
24. USB INTERFACE
( 24 )
25. HAND STRAP HOLE
( 25 )
- 10 -
Beijing InfoMedia Electronic Technology Co., Ltd
Notes:
1/2: The LS50 uses high sensitivity differential microphones which ensure excellent recording.
3:
128 x 64 resolution LCD display.
4:
Click the <DISP/DEL> button to show more file information during playback. A long press of the <DISP/DEL> button,
enters the delete menu enabling files and bookmarks to be deleted.
5:
Click the <FILE/MENU> button to enter the folder list in STOP mode. A long press of the <FILE/MENU> button enters
the settings menu. When in PLAY mode, pressing the <FILE/MENU> button for a few seconds will enter the playback
settings menu.
6:
Click the <MARK> button to add bookmarks during recording or playback.
7:
Click the<■> button to return to the previous menu.
8:
Click the <
> button to scroll DOWN through the menus during browsing.
9:
Click the <
> button to confirm the option or enter the highlighted submenu.
10:
Click the <
> button to scroll UP during browsing.
11:
Click the <VOL> button to adjust the values in the DATE & TIME setting menu.
12:
The LS50 recorder uses 2 “AA” dry or rechargeable batteries.
13:
Line-in recording uses a special audio cable, which is not delivered as a standard accessory in the package but can be
ordered through the local supplier.
14:
The LS50 recorder uses headphones equipped with a 3.5mm miniature jack connector.
- 11 -
Beijing InfoMedia Electronic Technology Co., Ltd
2 BATTERIES
The LS50 uses 2 “AA” dry or rechargeable batteries.
The battery type can be chosen through “BATTERY TYPE” in the
“SYSTEM” menu. Please choose the correct battery type according
to battery so that LS50 can display the correct remaining power
level.
Installing batteries
1. According to the figure, slide and open the battery compartment
cover
2. Insert 2 “AA” batteries taking care of the correct polarity
3. Replace the cover
Caution:
Up to 40 hours of continuous recording time is available using 2 high-quality
batteries. Recording time will vary with different recording formats and
differences in the battery capacities.
It may be necessary to set DATE & TIME before the first use, reboot or after
long periods without use.
Recording will stop and automatically save the audio file if the battery voltage
gets too low during recording.
- 12 -
Beijing InfoMedia Electronic Technology Co., Ltd
Battery Level Indication
Level
Symbol
Dry or rechargeable battery
1
Sufficient
2
About 30% remaining
3
About 15% remaining
4
About 5% remaining
Removing batteries
1. Slide open the battery compartment cover
2. Take out 2 “AA” batteries
3. Close the battery compartment cover
Warning!
• When recorder is not to be used for an extended period, please remove the batteries to avoid erosion
resulting from liquid leakage.
• Please make sure that the 2 batteries are of the same type and model. Do not mix new batteries with
semi-used batteries, which may lead to the damage of the recorder.
- 13 -
Beijing InfoMedia Electronic Technology Co., Ltd
3 HOLD
Sliding HOLD to [ON] will lock all keys to prevent activation of the
keys accidentally during recording or playback.
Once the keyboard is locked, it doesn’t work no matter what keys
you press, the screen will show “HOLD”. To UNLOCK the LS50,
please slide HOLD to [OFF].
HOLD [ON]: Keys are locked
HOLD [OFF]: Keys are unlocked.
Caution;
• HOLD [ON] will NOT affect the use of the switches on the rear side.
• HOLD [ON] slide NOISE CUT button to [ON] to decrease noise.
• HOLD [ON] slide SPEED button to [ON] to start speed playback.
- 14 -
Beijing InfoMedia Electronic Technology Co., Ltd
4 SWITCH
Long press to turn the recorder OFF and a short press to
turn ON.
If HOLD is in the [ON] position you cannot switch the LS50 ON or perform
other operations, screen shows “HOLD”. Please slide HOLD to [OFF] and
retry.
- 15 -
Beijing InfoMedia Electronic Technology Co., Ltd
5 DATE & TIME
Please set up DATE & TIME before the first use or following a
reboot or long periods without use. Setting correct system DATE &
TIME, will guarantee the accuracy of record time during recording.
You can check current time during recording.
1. Long press on the <FILE/MENU> button in STOP mode to enter
the settings menu.
2. Click < >< > buttons to select [System Setting] and press
< > button to enter.
3. Click < >< > button to select [DATE & TIME] and press < >
button to confirm.
4. Click <
><
> buttons to select desired DATE & TIME
information, click <VOL+><VOL-> buttons to set value and press
< > button when setting is completed.
5. Click <■> button to return to the main menu or click
<FILE/MENU> button to exit.
Note:
Time and date information will be kept while you change batteries.
- 16 -
Beijing InfoMedia Electronic Technology Co., Ltd
DISPLAY DATE & TIME
Recording
Playback or Pause
File creation time
Current time
Note:
Creation time of recorded file is the initial recording time.
The creation time of external files or music, not recorded by the LS50, is stored as file attributes.
- 17 -
Beijing InfoMedia Electronic Technology Co., Ltd
The LS50 has many recording functions including various
PCM, MP3 recording formats, manual & automated gain
control, VOR, NOISE CUT and so on. The LS50 can be
adapted to any recording situation. This chapter explains in
detail how to record.
- 18 -
Beijing InfoMedia Electronic Technology Co., Ltd
1 RECORDING WINDOW
1 Current Status
Record:
Pause:
Stop:
2 Noise Cut
but VOR / AGC cannot
be turned on together.
4 Input Devices
Built-in MIC:
External MIC:
D Folder:
E Folder:
MUSIC Folder:
6 USB
9 Recording duration
10 File name
11 Pause time of record
12 Recording file format
13 Bookmarks
NOISE CUT active,
this symbol appears.
3 VOR / AGC
This appears when
turning on VOR / AGC,
Line Input:
5 Current Folder
A Folder:
B Folder:
C Folder:
The LS50 doesn’t
allow charging via
USB
7 Battery
8 Current Date & Time
14 Run status
Record:
Pause:
Stop:
15 Level meter
- 19 -
Beijing InfoMedia Electronic Technology Co., Ltd
2 BASIC OPERATION
1. CHOOSE RECORDING FILE FORMAT
·Click <FILE/MENU> button, a list of folders will pop-up.
·Click < >< > buttons to choose the target folder and click
< > to confirm.
·Click <■> or <FILE/MENU> button to exit.
2. START recording
·Point the microphone towards the sound source.
·Click <●> button to start recording.
●
·If screen status icon display
and the recording LED is on, this
indicates recording is under way.
3. PAUSE
·Click < > button to pause.
·Click < > button again to continue to record
4. STOP
·Long press <■> button until recording stops.
Caution:
. Please check the batteries before recording to make sure that recorder has enough battery power to record normally.
- 20 -
Beijing InfoMedia Electronic Technology Co., Ltd
Note:
The LS50 has 6 built-in folders, namely, A, B, C, D, E and MUSIC folders. You can choose any as the main storage folder,
the default folder of the recorder is [Folder A]. Please select as necessary.
The LS50 doesn’t allow new folder creation and it cannot recognize folders copied from a computer. If you need to copy
music files from a computer and listen to them on the LS50, please put the music files into root directory of 6 folders.
The LS50 can display the last 1000 record files.
The default file naming starts from USER0001 and increases by one each time record is selected, it jumps automatically if a
file name already exists.
The names of files are arranged in alphabetical order. The recorder displays the largest sequence number when starting or
finishing the recording.
You can listen to the live recording through headphone during recording process, adjust gain and other settings according to
requirements.
- 21 -
Beijing InfoMedia Electronic Technology Co., Ltd
3 ADDING BOOKMARKS DURING RECORDING
The LS50 allows bookmarks to be added during record or playback.
Each file can have up to 3 bookmarks.
Click < >< > button to jump quickly to the next marked position
during playback.
1.Click <●> button to start recording.
2.Click <MARK> button once to add a bookmark during record.
3.Long press <■> button until recording stops.
Caution:
. The minimum interval between bookmarks is 1 second, please do not click
the <MARK> button in rapid succession.
. You can add bookmarks again after they have been deleted.
. After adding a bookmark to a file, it generates the file with same file name in
the same folder. The suffix of this new file will be “.MAK” (i.e.
USER0001.MAK). If this file is deleted, the bookmark(s) corresponding to
BOOKMARKS IN
CURRENT FOLDER
the file will also be deleted.
- 22 -
Beijing InfoMedia Electronic Technology Co., Ltd
4 LEVELS
When large input gain is used, (i.e. the input signal level is very low)
the LS50 can amplify the sound level of the recorded file effectively,
thanks to the quality of the preamplifiers. However, larger input gain
increases the background noise simultaneously, which will affect the
overall recording quality.
1. Click <●> button to start recording.
2. Click <
> button (LEVEL+) to increase input gain during
recording process.
Click < > button (LEVEL-) to decrease input gain during
recording process.
3. Long press <■> button to stop.
RECORDING
LEVEL
Caution:
. You cannot use the LEVEL controls when the AGC is active. Please make
sure that AGC is OFF.
. We recommend that you use headphones to monitor the audio quality during
the recording process and adjust the LEVEL accordingly.
- 23 -
Beijing InfoMedia Electronic Technology Co., Ltd
5 AUTOMATIC GAIN CONTROL (AGC)
The AGC will adjust gain automatically according to the volume of
sound source. If the volume of sound is weak, AGC increases the
gain automatically. When the volume of sound is loud, AGC reduces
gain so that recording level will not exceed limits, to avoid distortion.
1. Long press the <FILE/MENU> button to enter the setup menu.
2. Click the < >< > button to choose [Recording setting] and
click the< > button to enter.
3. Click the < >< > button to choose [AGC] and click the < >
button to enter.
4. Click the < >< > button to choose [ON] and click < > button
to confirm
[OFF]:Turns off AGC
[ON]:Turns on AGC
AGC
5. Click the <■> button to return to previous menu or click the
<FILE/MENU> button to exit setting menu.
6. Click the <●> button to start recording.
When “AGC” is used, manual LEVEL adjustments will not work.
7. Long press on the <■> button to stop recording.
If you need to turn off AGC, please choose [OFF] in Step 4.
- 24 -
Beijing InfoMedia Electronic Technology Co., Ltd
6 CHANGE RECORDING FORMAT
The LS50 supports, PCM and MP3 file recording formats. PCM is 48
KHz 16 bit WAV lossless stereo. PCM format files are larger, but
have higher fidelity. MP3 format file has good recording quality, yet
smaller capacity; they can be copied to other players at any time.
1. Long press on the <FILE/MENU> button to enter setting menu.
2. Click on the < >< > button to select [Recording setting] and
press the < > button to enter.
3. Click on the < >< > button to select [Format] and press the
< > button to enter.
4. Click on the< >< > button to select the desired recording
format and press the < > button to confirm.
5. Click on the <■> button to return superior menu or click on the
<FILE/MENU> button to exit setting menu.
RECORDING FORMAT
- 25 -
Beijing InfoMedia Electronic Technology Co., Ltd
The file format, sampling rates and bit rates of different recording formats are as follows:
RECORDING
FILE FORMAT
FORMAT
PCM ST
Stereo
WAV-16bit
48KHz
1536Kbps
PCM MO
Mono
WAV-16bit
48KHz
768Kbps
HQ ST
Stereo
MP3
48KHz
320Kbps
MQ ST
Stereo
MP3
48KHz
256Kbps
LQ ST
Stereo
MP3
48KHz
128Kbps
HQ MO
Mono
MP3
48KHz
128Kbps
MQ MO
Mono
MP3
48KHz
64Kbps
LQ MO
Mono
MP3
48KHz
32Kbps
The recording times are as follows:
RECORDING
RECORDING TIME
FORMAT
(4G)
PCM ST
About 5 hrs, 45 m
PCM MO
HQ ST
About 11 hrs, 30 m
About 27 hrs
MQ ST
About 34 hrs
LQ ST
About 68 hrs
HQ MO
About 68 hrs
MQ MO
About 138 hrs
LQ MO
About 277 hrs
- 26 -
Beijing InfoMedia Electronic Technology Co., Ltd
7 STEREO OR MONO RECORDING
The LS50 has high quality built-in microphones that provide
excellent recording sensitivity. The directivity of the microphones
can be adapted by selecting MONO or STEREO operation.
1. Change recording format and choose STEREO or MONO.
When recording a STEREO files, you can select several
different formats [Recording format] such as:
[PCM ST] [HQ ST] [MQ ST] [LQ ST].
When recording a MONO file, you can select several
monophonic recording formats [Recording format] such as:
[PCM MO],[HQ MO],[MQ MO],[LQ MO]
2. Click on the <●> button to start recording.
3. Long press the <■> button to stop.
Note:
MONO recording is able to screen out some background noise and it is
suitable for recording single source sounds such as journalist reporting.
STEREO record is able to capture more background sound and it is suitable
for recording larger sounds such as music concerts, meetings etc.
- 27 -
Beijing InfoMedia Electronic Technology Co., Ltd
8 VOLUME OPERATED RECORDING (VOR)
By monitoring the input sound level, the LS50 can switch to record
mode automatically. The LS50 stops recording automatically when
sound level drops below a certain pre-set level. When the sound
level increases again, it restarts recording.
VOR can save storage space and compress recording content.
1. A long press on the <FILE/MENU> button to enter setting menu.
2. Click the < >< > button to select [Recording setting] and
press the < > button to enter.
3. Click the < >< > button to select [VOR] and press the < >
button to enter.
4. Click on the < >< > button to select sensitivity level and press
the < > button to confirm.
. [OFF]:Turn off VOR
. [L-Sensitivity]:Turn on VOR and sensitivity is set to low.
.
.
VOR
[M-Sensitivity]:Turn on VOR and sensitivity is moderate.
[H-Sensitivity]:Turn on VOR and sensitivity is high.
5. Click on the <■> button to step backwards in the menu or click
the <FILE/MENU> button to exit.
6. Click <●> button to start recording.
- 28 -
Beijing InfoMedia Electronic Technology Co., Ltd
. When the top of the screen displays “VOR” this indicates that VOR
is active.
7. VOR stop recording
. If sound volume is lower than the pre-set level for 10 seconds,
recording will stop and the LS50 returns to PAUSE RECORDING
so that you can save disk space and reduce empty file content.
8. Long press on the<■> button to stop.
If you need to turn off “VOR”, please select [OFF] in Step 4.
VOR SENSITIVITY
The greater VOR sensitivity that is applied, less level is needed to
start.
. L-Sensitivity: More volume needed to start recording.
. M-Sensitivity: Moderate volume will start recording.
. H-Sensitivity: Less volume needed to start recording.
Note:
AGC will not work when VOR is on.
- 29 -
Beijing InfoMedia Electronic Technology Co., Ltd
9 MICROPHONE POWER SUPPLY
Some external microphones require power to be supplied from the
recorder. The LS50 can provide 3V power to supply external electret
microphones. Please set this function when you need to turn on the
power supply.
1. Long press on the <FILE/MENU> button to enter setting menu.
2. Click the < >< > button to select [Recording setting] and
press on the < > button to enter.
3. Click the < >< > button to select [Mic Power] and press the
4.
.
.
5.
< > button to enter.
Click on the < >< > button to select [ON] and press the< >
button to confirm.
[OFF]:Turns off microphone power supply.
[ON]: Turns on microphone power supply.
Click on the <■> button to move backwards through the menu or
click the <FILE/MENU> button to exit.
If you need to turn off “MIC POWER SUPPLY”, please select [OFF]
in STEP 4.
Note:
. If you supply power unnecessarily to a microphone, it may cause noise
during the recording, and reduce battery life.
- 30 -
Beijing InfoMedia Electronic Technology Co., Ltd
10 NOISE CUT
Turn on NOISE CUT to decrease low-frequency noise during record.
Low-frequency noise, for instance, could be the low-frequency
sound of the wind or the “hum” noise from an electrical device.
1. Turn NOISE CUT on the rear side to [ON].
. [ON]:Turns on NOISE CUT.
. [OFF]:Turns off NOISE CUT.
2. Click the <●> button to start recording.
The top of screen displays "
" indicating NOISE CUT filter is on.
3. Long press on the <■> button to stop.
If you need to turn off NOISE CUT, please select [OFF] in Step 1.
Note:
NOISE
CUT
can
filter
low-frequency
noise.
It
doesn’t
influence
common-frequency sounds such as human voices, animal noises and
musical instrument performances. NOISE CUT has a high fidelity effect.
NOISE CUT can only filter low-frequency element from the noise of the wind,
but cannot filter out completely the sound of the wind.
- 31 -
Beijing InfoMedia Electronic Technology Co., Ltd
The LS50 supports, WAV, MPEG1-layerⅡ(MP2),
MPEG1-layerⅢ(MP3) and WMA playback formats.
There are various kinds of built-in playback functions, with
specific signal processing ability, which can guarantee
reproduction consistent with the originals during playback.
Abundant EQ can add more colour to your music
This chapter explains how to use the various playback
functions.
- 32 -
Beijing InfoMedia Electronic Technology Co., Ltd
1 PLAYBACK WINDOW
Click on the <DISP/DEL> button to check the information concerning the file format.
1 Current Status
Play:
Pause:
Stop:
6 USB
7 Battery
8 Creation DATE & TIME
9 Playback Time
2 EQ
3 Cycle Playback
Single cycle:
All cycle:
4 A-B Repeat
5 Current Folder
10 File Name
11 File Time
12 Bookmark number has been
read:
Total bookmarks
13 Run Status
- 33 -
Playback:
Pause:
Stop:
Speed playback:
14 Record Level Meter
15 PCM/MP3 Format
16 ST /MO
17 Sampling Rate
18 Bit Rate
19 Bit Width
Beijing InfoMedia Electronic Technology Co., Ltd
2 BASIC OPERATION
1. SELECT THE Folder
There are 6 built-in folders in the LS50 named [Folder A] [Folder B]
[Folder C] [Folder D] [Folder E] and [Folder MUSIC]
. Click on the <FILE/MENU> button and the folder list appears.
. Click on the < >< > button to select target folder, press the
< > button to confirm.
. Click <■> or <FILE/MENU> buttons to exit.
2. CLICK ON THE <
><
> BUTTON TO SECLECT THE
DESIRED FILE
3. START PLAYBACK
. Click on the < > button to playback the file.
4. PAUSE PLAYBACK
. Press < > to pause during playback process.
. Press < > again, to continue playback.
5. STOP PLAYBACK
. Press <■> to stop the file playback.
Note:
. Some WAV, MP2, MP3 and WMA files having specific formats, may not
playback.
- 34 -
Beijing InfoMedia Electronic Technology Co., Ltd
6. PREVIOUS TRACK/NEXT TRACK
. Press < > to skip to the start of the previous track.
. Press < > to skip to the start of the next track.
Note:
If you added bookmarks, click <
><
> button to jump between
bookmarks.
7. REWIND/FORWARD
. Press < > without letting go, then release button to stop rewind.
. Press < > without letting go, then release button to stop forward.
Note:
. LS50 keeps PLAYBACK status when rewind/forward during PLAYBACK
mode.
. LS50 keeps PAUSE mode when rewind/forward under PAUSE status.
. Rewind/Forward cannot work across tracks.
- 35 -
Beijing InfoMedia Electronic Technology Co., Ltd
3 ADD BOOKMARKS DURING PLAYBACK
Bookmarks can help you to note important points in files so that you
can jump to them quickly during playback.
Each recorded file in the LS50 can have up to 3 bookmarks. You
can add bookmarks during record and playback processes.
ADD BOOKMARKS
1. Click the < >< > button to select the file.
2. Click the < > to start playback.
3. Click the <MARK> button to add bookmarks.
Each click of the <MARK> button, the bookmark number, in the
left corner of the screen, will increment by 1.
4. Click the <■> button to stop.
Note:
. The minimum interval of adding bookmark is 1 second, please do not add
bookmarks too rapidly.
. Clicking the <MARK> button while in STOP mode, will add a bookmark at the
beginning of the file.
TOTAL BOOKMARKS IN FILE
- 36 -
Beijing InfoMedia Electronic Technology Co., Ltd
delete bookmark
1. Long press on the <DISP/DEL> button to show the delete popup
menu.
2. Click on the < >< > button to select [Delete bookmark] and
press the < > button.
3. Click the < >< > button to select [OK] and press the <
button.
. All the bookmarks in folder will be deleted.
>
Notes:
. Click [Delete bookmark] to delete all the bookmarks. After deleting, you can
add bookmarks again according to your requirements.
. After a bookmark is generated, it generates a file with same file name in the
same folder as the original file. The suffix is “.MAK” eg: USER0001.MAK.
If this file is deleted, the bookmark corresponding to the file will also be
deleted.
- 37 -
Beijing InfoMedia Electronic Technology Co., Ltd
4 A-B REPEAT
1. Click the < >< > button to select the file.
2. Click on < > to start playback.
3. Playback to the start of the portion to be repeated, click <A-B>
to set the start point A.
. Screen displays: A
4. Playback to the ending of the portion to be repeated, click <A-B>
button again to set-up the B point.
. Screen displays: A-B
5. Exit A-B repeat mode
. Click the <A-B> button at third time, exit A-B mode and continue
to playback the file
. Click the <■> button to exit A-B repeat mode and stop playback.
A-B REPEAT
Note:
. Rewind / Forward works normally under the A-B repeat mode.
. You cannot use A-B repeat mode across tracks.
. You can pause playback while in A-B repeat mode.
- 38 -
Beijing InfoMedia Electronic Technology Co., Ltd
5 REPEAT MODE
You can set the playback mode to three modes: [Sequency] , [Loop
One] or [Loop] .
1. Long press on the <FILE/MENU> button to enter setting menu.
2. Click < >< > to select [Playback Setting] and then press the
< > button to enter.
3. Press < >< > to select [Repeat] and press < > button to
enter.
4. Press < >< >> to select cycle mode and press the < >
button to confirm.
. [Sequency]: Playback all the files in the folder in order, Then
playback stops.
. [Loop One]: Repeat the file.
. [Loop]: Repeat all the files in folder.
5. Click on the <■> button to move back through the menu or click
<FILE/MENU> to exit the settings menu.
6. Click < > to playback the file.
. No icon when using Sequency.
. Icon displays
under Loop One mode
. Icon displays
under Loop mode
7. Press <■> button to stop.
- 39 -
Beijing InfoMedia Electronic Technology Co., Ltd
6 PLAYBACK SPEED
Speed playback function of LS50 is based on specific digital
processing system. The function can change playback speed
naturally and keep the original sound at a time. The tone doesn’t
increase or decrease noticeably so that the file sounds more natural
and comfortable.
The adjustable range of speed playback is 0.5 to 2.0 times nominal.
1. A long press on the <FILE/MENU> button to enter setting menu.
2. Click < >< > to select [Playback Setting] and press < > to
enter.
3. Click < >< > to select [Playback Speed] and press < > to
enter.
4. Click < >< > to select desired playback speed and press
< > to confirm.
. Low speed: [0.5x] , [0.6x] , [0.7x] , [0.8x]
. High speed: [1.2x] , [1.4x] , [1.6x] , [1.8x] , [2.0x]
5. Click <■> to back-step through the menu or click <FILE/MENU>
to exit the setting menu.
6. Set <SPEED> to [ON] and turn on PLAYBACK SPEED.
. [ON]: SPEED PLAYBAKC turns on.
. [OFF]: PLAYBACK SPEED turns off.
- 40 -
Beijing InfoMedia Electronic Technology Co., Ltd
7. Click < > to playback.
. Playback status icon on screen prompts to speed playback.
. Status icon displays:
8. Click <■> to stop.
Hint:
. During playback mode, long press <FILE/MENU> to enter
[Playback Setting] to adjust [Playback Speed].
. When playback speed is 1.0x, it shows that speed playback speed is on
but the playback speed doesn’t change.
PLAYBACK SPEED
- 41 -
Beijing InfoMedia Electronic Technology Co., Ltd
7 EQ
There are various built-in EQ possibilities in the LS50. Appropriate
EQ sounds mellow and make sound effects better.
EQ modes in the LS50 are Normal, Classic, Fullbass, Jazz, Pop,
Rock and Dance.
1. Long press <FILE/MENU> to enter setting menu.
2. Click < >< > to select [Playback Setting] and press <
enter.
3. Click < >< > to select [EQ] and press < > to enter.
> to
4. Click < >< > to select EQ mode and press < > to confirm.
. Optional EQ modes: [Normal] [Classic] [Fullbass] [Jazz] [Pop]
[Rock] [Dance]
5. Click <■> to return superior menu or click <FILE/MENU> to exit
setting menu.
6. Click < > to playback.
. Screen displays EQ mode:
7. Click <■> to stop playback.
- 42 -
Beijing InfoMedia Electronic Technology Co., Ltd
8 USE SPEAKER OR MICROPHONE
USE BUILT-IN SPEAKER AND LISTEN TO RECORDINGS
Set the [Speaker] option to [ON] in the [System Setting] menu,
remove the 3.5mm headphone connector. Record or music plays
through built-in speaker.
SPEAKER
USE MICROPHONE AND LISTEN TO RECORDING
Insert 3.5mm microphone to headphone connector <
speaker is automatically switched off.
- 43 -
>, built-in
Beijing InfoMedia Electronic Technology Co., Ltd
9 DELETE FILE
1. Long press <DISP/DEL> button to show the DELETE MENU.
2. Delete the file.
.Click < >< > to select [Delete the file] and press < > button.
.Click < >< > button to select [OK] and press < > button to
confirm.
Delete all the files in the folder
. Click < >< > to select [delete files in the folder] and press
< > button.
.Click < >< > to select [OK] and press < > to confirm.
Delete bookmark
.Click < >< > to select [delete bookmark] and press the < >
button.
. Click < >< > to select [OK] and press < > to confirm.
3. If you don’t need to delete the file, please select [CANCEL] at
STEP 2.
- 44 -
Beijing InfoMedia Electronic Technology Co., Ltd
This chapter introduces the use of the settings
menu in detail. You can set all record, playback and
system settings through the settings menu.
- 45 -
Beijing InfoMedia Electronic Technology Co., Ltd
1 OPERATIONAL APPROACH
1. Enter menu
. Long press <FILE/MENU> button to enter setting menu in STOP
mode.
. Long press <FILE/MENU> button to enter playback setting in
PLAYBACK mode.
2. Up/down through menus
. Click < > and scroll up to browse menu options.
. Click < >and scroll down to browse menu options.
3. Enter this option
. Click < > to select option and press < > to enter.
4. Set up parameter
. Click < > to set up parameter and press < > to confirm.
. When adjusting DATE & TIME, please use the <VOL> button to
change the settings.
5. Exit menu
. Click <■> to back-step through the menu.
. Click <FILE/MENU> to exit and return to STOP mode.
- 46 -
Beijing InfoMedia Electronic Technology Co., Ltd
2 OPTIONS
Recording setting
Format
Set recording format.
[PCM ST]: PCM Stereo Recording Mode
[PCM MO]:PCM Mono R Recording Mode
[HQ ST]:MP3 HQ Stereo Recording Mode
[MQ ST]:MP3 MQ Stereo Recording Mode
[LQ ST]:MP3 LQ Stereo Recording Mode
[HQ MO]:MP3 HQ Mono Recording Mode
[MQ MO]:MP3 MQ Mono Recording Mode
[LQ MO]:MP3 LQ Mono Recording Mode
AGC
Set up AGC “ON” or “OFF”.
[OFF]:Turn off AGC
[ON]:Turn on AGC
VOR
Set up VOR “ON” or “OFF”.
[OFF]:Turn off VOR
[L-Sensitivity]:Turn on VOR, Higher volume needed to start recording
[M-Sensitivity]:Turn on VOR, moderate volume needed to start recording
[H-Sensitivity]:Turn on VOR, lower volume needed to start recording
- 47 -
Beijing InfoMedia Electronic Technology Co., Ltd
MIC Power
Set up microphone power supply “ON” or “OFF”
[OFF]:Turn off microphone power supply
[ON]:Turn on microphone power supply
Hint:
. Recording settings can only be made before recording in the STOP mode, changes are not possible during record.
. Long press <FILE/MENU> in STOP mode to enter settings menu, which includes [Recording setting] [Playback Setting] and
[System Setting] .
. AGC and VOR cannot be used at the same time. If one of them turns on, the other cannot be used.
- 48 -
Beijing InfoMedia Electronic Technology Co., Ltd
Playback Setting
Repeat
Set up the repeat mode.
[Sequency]:Playback the files in order, until the last one. Then playback stops.
[Loop one]:Repeat the file.
[Loop]:Repeat all the files in folder.
Playback Speed
Set up the playback speed.
[0.5 x] [0.6 x] [0.7 x] [0.8 x] [1.0 x] [1.2 x] [1.4 x] [1.6 x] [1.8 x] [2.0 x]
EQ
Set up EQ mode.
[Normal] [Classic] [Fullbass] [Jazz] [Pop] [Rock] [Dance]
Hint:
.Playback Setting can be changed in STOP and PLAYBACK modes.
.Long press <FILE/MENU> button to enter [SETTINGS MENU] in STOP mode. [SETTINGS MENU] includes [Recording
setting] [Playback Setting] [System Setting] .
.Long press<FILE/MENU> button to enter [Playback Setting] in PLAYBACK mode. [Playback Setting] includes [REPEAT]
[Playback Speed] [EQ] .
- 49 -
Beijing InfoMedia Electronic Technology Co., Ltd
System Setting
DATE & TIME
During the recording process, screen displays DATE & TIME.
This sets the master system clock.
Recording Light
Set recording light “ON” or “OFF”.
[OFF]: During recording, record LED is OFF
[ON]: During recording, record LED flashes.
Beep
Beep is the sound when you press any button.
You can turn ON or OFF the beep function using this option.
[OFF]:Turn off beep
[ON]:Turn on beep
Notes:
. The beep tone can only be heard through headphones.
Speaker
Set up built-in speaker “ON” or “OFF”
[OFF]:Internal speaker OFF
[ON]:Internal speaker ON
Note:
. Built-in speaker will be cut when headphones are connected.
- 50 -
Beijing InfoMedia Electronic Technology Co., Ltd
Screen Timeout
Set the display backlight “ON” or “OFF”
[NEVER] :Screen backlight remains ON permanently.
[10 SECONDS]:Screen backlight goes off automatically after 10 seconds.
[30 SECONDS]:Screen backlight goes off automatically after 30 seconds
[60 SECONDS]:Screen backlight goes off automatically after 60 seconds
Note:
. Pressing any key will re-light the display for the selected time period.
ShutDown
Timeout
Set automatic shutdown time.
[NEVER] :Never turn off the recorder
[30 SECONDS]:Recorder turns off automatically after 30 seconds of no-operation.
[60 SECONDS]:Recorder turns off automatically after 60 seconds of no-operation.
[180 SECONDS]:Recorder turns off automatically after 3 minutes of no-operation.
[300 SECONDS]:Recorder turns off automatically after 5 minutes of no-operation.
Note:
. When recorder is in RECORD, PLAYBACK AND PAUSE modes, automatic shutdown is inhibited.
Battery Type
Please set according to the current batteries being used so that the LS50 can display
the correct remaining power accurately.
[DRY BATTERY]:Choose this option when using 2 regular alkaline “AA” dry batteries.
[RECHARGEABLE BATTERY]:Choose this option when using rechargeable
batteries.
- 51 -
Beijing InfoMedia Electronic Technology Co., Ltd
Disk Information
Check total capacity, available capacity and used capacity of the internal memory.
[CAPACITY]
[AVAILABLE]
[USED]
Version
Check software version, hardware version and loader program version.
[SOFTWARE]
[HARDWARE]
[LOADER]
Format Disk
Formatting disk can delete all files in recorder rapidly.
Notes:
. [A] [B] [C] [D] [E] [M] are system folders, they will be re-created after formatting.
System Reset
Reset the following functions to their default values.
[RECORDING FORMAT]:HQ ST
[AGC]:OFF
[VOR]:OFF
[MIC POWER SUPPLY]:ON
[REPEAT MODE]:Sequential playback
[Playback Speed]:1.0 x
[EQ]:NORMAL
[RECORDING LIGHT]:ON
[BEEP]:OFF
[SPEAKER]:ON
- 52 -
Beijing InfoMedia Electronic Technology Co., Ltd
[BACKLIGHT SETTING]:30 seconds
[AUTO POWER-OFF]:Never shut down
[BATTERY TYPE]:Dry battery
[RECOR Folder D]:A
[LEVEL]:15
[VOL]:-28
Note:
. System settings can only be accessed in STOP mode.
. Long press of the <FILE/MENU> button in STOP mode to enter settings menu. Settings menu includes [Recording setting]
[Playback Setting] and [System Setting] .
- 53 -
Beijing InfoMedia Electronic Technology Co., Ltd
This chapter covers how to use transfer data in
detail and using the LS50 as mobile mass
memory.
- 54 -
Beijing InfoMedia Electronic Technology Co., Ltd
1 SYSTEM AND HARDWARE REQUIREMENT
SYSTEM REQUIREMENT
Please connect LS50 to the computer installed with the following systems.
Windows operation system
Windows XP / Windows Vista / Windows 7
Macintosh OS system
It may be necessary to install a special driver program if using Windows 98 or Windows 2000 operating
system.
When connected for the first time, the system displays new hardware automatically and it appears as a
removable disk. If it does not appear, it is recommended to verify USB settings in CMOS or re-install the
operating system.
HARDWARE REQUIREMENT
USB connector, USB cable
- 55 -
Beijing InfoMedia Electronic Technology Co., Ltd
2 FOLDER STRUCTURE
The LS50 has 6 built-in default folders, they are [Folder A]
[Folder B] [Folder C] [Folder D] [Folder E] [Folder MUSIC].
These 6 folders are displayed as [A] [B] [C] [D] [E] [M]
. The LS50 can identify audio files stored in these 6 folders and
the root directory.
. Non audio files stored in [A] [B] [C] [D] [E] [M] and sub-folders
cannot be recognized.
. Other folders and internal files in the memory cannot be
recognized.
SWITCH FOLDER
1. Click <FILE/MENU>, popup folder list will appear.
2. Click the < >< > button to select target folder, click < >
to confirm.
3. To escape without saving changes, press <■> or
<FILE/MENU> buttons to return to the STOP mode.
Note:
.
[A] [B] [C] [D] [E] [M] are default system folders. Please note that
when deleting these 6 folders, they will automatically re-create upon
start-up.
- 56 -
Beijing InfoMedia Electronic Technology Co., Ltd
3 FILE TRANSFER
COPY RECORDED FILES TO A COMPUTER
You can copy recorded files from the LS50 to a computer for
back-up storage.
1. Turn on the LS50.
2. Plug one end of the USB cable to the USB connector of the LS50
and the other end to the USB connector
of the computer.
3. The computer recognizes the mobile disk, select the disk and
click the left mouse button twice. The 6 folders in the root
directory of the LS50, [A] [B] [C] [D] [E] [M] can be seen. Choose
a folder and click the left button twice to open it.
4. Click on the file you are trying to copy and then click the right
mouse button, select “COPY”.
5. Select the folder in computer and click the right mouse button,
select “PASTE”.
6. Click the left mouse button on “Safely Remove Hardware” in the
lower right hand corner of the taskbar. Click the left button
“Mobile Disk” to disconnect the recorder and computer.
7. Once completed, remove USB cable.
- 57 -
Beijing InfoMedia Electronic Technology Co., Ltd
Note:
. In a folder, any file with suffix “.MAK” is bookmark. When a bookmark is
added to an audio file a “.MAK” file corresponding to this audio will be
generated.
. “.MAK” files can only be recognized by the LS50 and will be used when
playing back the corresponding audio file.
COPY MUSIC FROM A COMPUTER TO THE LS50
AND PLAYING THEM BACK
You can copy audio files or music from a computer to the LS50,
which can playback audio formats WAV, MP2, MP3 and WMA.
1. Turn on the LS50
2. Plug one end of the USB cable to the USB connector of the LS50
and the other end to the USB connector
of the computer.
3. The computer recognizes the mobile disk, select the disk and
click the left mouse button twice. The 6 folders in the root
directory of the LS50, [A] [B] [C] [D] [E] [M] can be seen. Choose
a folder and click the left button twice to open.
4. Click on the file in the computer that you are trying to copy and
then click the right mouse button, select “COPY”.
5. Select the folder in the LS50 and click the right mouse button,
- 58 -
Beijing InfoMedia Electronic Technology Co., Ltd
select “PASTE”.
6. Click the left mouse button on “Safely Remove Hardware” in the
lower right hand corner of the taskbar. Click the left button
“Mobile Disk” to disconnect the recorder and computer.
7. Once completed, remove USB cable.
Hint:
. All 6 folders can be used to store recordings or audio files. We recommend
that you use [M] to store the copied audio files.
USING THE LS50 AS A MASS STORAGE
You can use recorder as mobile mass storage.
The LS50 can communicate with your computer so that you can copy files from computer to the LS50.
Hint:
. Please refer to “copy music in computer to LS50 and playback” while the recorder is communicating with computer.
- 59 -
Beijing InfoMedia Electronic Technology Co., Ltd
This chapter introduces common system prompts,
solutions of error messages and how to solve FAQ.
- 60 -
Beijing InfoMedia Electronic Technology Co., Ltd
1 SYSTEM TIPS
While using the LS50, some information tips or error messages may appear. Primary causes and solutions
are listed below.
Hint:
. You can try the following instructions to troubleshoot the problem yourself. Please contact to our customer support for
additional information.
SYSTEM TIPS
"Low Power"
Causes & Solution
. Batteries are exhausted
——Change internal batteries
"HOLD"
. HOLD ON
——Switch to HOLD switch to the OFF position and retry
"No File"
. No files in current folder
"Failed to record"
. System error
——Reinstall default settings and format disk
"Failed to open work folder"
. Disk or system error
——Turn off recorder, reboot and retry. If problem prevails, re-format disk
"Failed to scan file"
. Disk or system error
——Turn off recorder, reboot and retry. If problem prevails, re-format disk
- 61 -
Beijing InfoMedia Electronic Technology Co., Ltd
"Too many files in current
folder "
"Failed to open file"
"Low free space"
. The LS50 can read the first 1000 files in any folder.
——Delete some files
. File is damaged
. File format is unsupported
. Internal memory is full
——Delete some files
"Disk Error and power off"
"Format Failed"
. Error occurs
——Format disk
. Problem occurs when formatting disk. Cannot complete formatting
——Please retry formatting. If problem continues, use a computer to
format disk
"AGC is opening."
. Cannot adjust LEVEL or set VOR under this condition
——Retry to adjust LEVEL or set VOR after cancelling the AGC function
"VOR is opening. "
. Cannot open AGC under this condition
——Retry to open AGC after cancelling VOR function
" The file can't FF "
. Some WMA files do not support fast forward mode
" The file can't FB"
. Some WMA files do not support rewind mode
" The file can't set AB"
" The file can't mark"
. Some WMA files do not support A-B repeat mode
. Some WMA files cannot accept bookmarks
- 62 -
Beijing InfoMedia Electronic Technology Co., Ltd
" Can't set speed with WMA" . WMA files cannot use speed playback feature
" Can't set EQ with WMA"
. WMA files cannot use EQ selection
- 63 -
Beijing InfoMedia Electronic Technology Co., Ltd
2 FAQ
You can try the following instructions to troubleshoot problems. Please contact to our after-sales service department if the
problems continue.
FAULT PHENOMENON
Cannot Boot
CAUSES AND SOLUTION
. Wrong battery polarity
——Correct polarity
. Low battery
——Install new batteries
. HOLD ON
——Switch to HOLD OFF and reboot
Speaker Doesn’t Work
. Lowest volume is set
——Increase the volume
.Headphone inserted
——When inserting headphone, speaker stops working automatically.
Pulling out headphone connector, allows the internal speaker to work
again.
. The option “SPEAKER” in “System Setting” is “OFF”.
——Set the option “ON”
When Inserting Headphone, . Headphone failure
The headphone doesn’t
——Change a headphone
- 64 -
Beijing InfoMedia Electronic Technology Co., Ltd
work
Cannot Record
Recorded file empty
. Headphone not inserted correctly into the bottom jack socket
——Please insert headphone to the bottom of jack
. Not enough storage capacity
——Delete some files or format disk
. Recording level too low, MIC did not receive any sound
——increase record gain and record again
Recorded File Aborts
Automatically
. VOR is ON
——Record pauses automatically when level is below VOR trigger level.
Low Volume of Recorded
File
. Some audio details cannot be heard due to low volume
——Turn up volume
. Gain too low when recording causes level of recorded file to be too low
——External software may be used to enhance recorded level. Please be
careful to use a suitable record gain in future
Recorder Stop Functioning
Normally
. This may be caused by battery contact fault or low battery reserve. The
LS50 may crash
——Take out batteries and replace them with 2 new batteries and retry
. Disk or system error
——Recover system setting and format disk
Screen Time Display as
"□□□□-□□-□□ □□:□□:□□"
Incomplete Menu Display
. No file in recorder
——If there is no file in recorder, time information cannot be displayed
. In the playback process, “Recording setting” and “System Setting” are not
adjustable, so the menu will only display “Playback Setting”
- 65 -
Beijing InfoMedia Electronic Technology Co., Ltd
- 66 -
Beijing InfoMedia Electronic Technology Co., Ltd
1 SPECIFICATIONS
GENERAL
Storage capacity
4GB
Compression type
PCM ,MP3
Sampling rate
48KHz
Playback format
WAV ,MP2 ,MP3 ,WMA
Frequency response
20Hz ~22KHz,+-0.5dB
SNR(Playback)
94dB (bandwidth 20Hz~22KHz,ASA “A” weighted)
SNR (MIC channel)
90dB (Mic input +19dB Pre-amp + A/D, 20Hz to 22KHz,ASA “A”
weighted)
Dynamic range(Line in)
>90dB
MIC EIN
>122dB A weights
PHYSICAL
Weight
71g (without batteries)
Dimensions
133.3(L)*40.6(W)*18.6(H) mm
Operating temperature
0~70℃
Operating humidity
20%~80%
- 67 -
Beijing InfoMedia Electronic Technology Co., Ltd
INPUTS & OUTPUTS
MIC filter
20Hz~22KHz / 100Hz~22KHz
MIC Max. Gain
40dB
MIC Min. Gain
0dB
Headphone Max. outputs
30mW (left) + 30mW (right) (16Ω)
Built-in MIC
Built-in stereo microphone
MIC IN
3.5 mm stereo jack connector
LINE IN
3.5 mm unbalanced stereo jack connector
Stereo headphone output
3.5 mm stereo jack connector
USB
2.0
POWER SUPPLY
Battery
2 × “AA” dry or rechargeable batteries
USB
Mini USB jack
Consumption
170mW
- 68 -
Beijing InfoMedia Electronic Technology Co., Ltd
2 SAFETY STATEMENT
Product Safety
. Do not place any heavy item on the recorder
. Do not drop the recorder or accessories
. Do not use the LS50 in very wet environments
. Do not use chemicals or detergents to clean the recorder
. Do not use the recorder in excessively dusty or smoky areas
. Do not use the recorder when there is lightening
. Do not open / disassemble the recorder
. Do not use the LS50 close to ferromagnetic substances
Battery Safety
. Do not put the batteries into an open fire or heat the batteries excessively; this will lead to battery explosion.
. Do not invert battery polarity.
. Do not mix new batteries with the semi-used batteries
. If batteries appear hot, please stop using the LS50 immediately.
. Do not attempt to charge the alkaline batteries
. Please keep batteries out of the reach of the children.
. Do not use the damaged batteries.
- 69 -
Beijing InfoMedia Electronic Technology Co., Ltd
InfoMedia Electronic Technology Co., Ltd
Floor 4, B Building, Printing Academy
No. 2 Cuiwei Road, Haidian District
Beijing, China.P.R
Tel : 400 653 8168
www.lotoo.cn
[email protected]