1
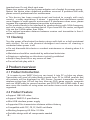
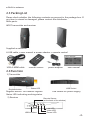
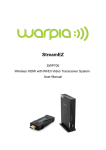
W207
User Manual
WHDI Wireless Video/Audio Transmission System
Contents
1. Important Information……….................................................................................1
1.1 Safety Precautions ……….................................................................................1
1.2 Declaration of Conformity ………..................................................................1
1.3 Trademark Information ………........................................................................2
1.4 Special Notice ……….........................................................................................2
1.5 Cleaning ………....................................................................................................3
2. Product Overview ……….........................................................................................3
2.1 Product Introduction ………............................................................................3
2.2 Product Feature ………......................................................................................3
2.3 Packing List ……..................................................................................................4
2.4 Function ………....................................................................................................4
3. Product Specification ………...................................................................................5
4. Installation ……….....................................................................................................5
4.1 Connection of Transmitter..............................................................................5
4.2 Connection of Receiver ..................................................................................6
5. WHDI Remote Control User Guide.....................................................................6
5.1 WHDI Remote Control Button Description .............................................6
5.2 Device Register or Add ...................................................................................7
5.3 Delete Devices ...................................................................................................7
5.4 Device Name Modification ...........................................................................8
5.5 Device Connection............................................................................................8
5.6 Disconnect Network ........................................................................................8
5.7 Video/Audio Cutover ......................................................................................8
6. Software Update ………...........................................................................................8
7. Troubleshooting ………............................................................................................9
8. FCC ID warning ………............................................................................................10
9. IC ID warning ………................................................................................................10
10. Other Information ………....................................................................................10
1 Important Information
Before you use transmitter W207 and receiver W200, it is important that you
read this user manual carefully to get instructions regarding this device.
Thank you for buying this quality product. Any defects or malfunctions
occurring during a specific period will be rectified or repaired free of charge,
but this warranty may not apply to following cases:
● Unauthorized modification to the products or repair by an unauthorized
technician.
● Breakage caused by accidents such as but not limited to fire, water
immersion and moisture.
● Use on incorrect voltage, use contrary to operating instructions.
● Product number got altered, removed or made illegible.
1.1 Safety Precautions
WARNING!
RISK OF ELECTRICAL
SHOCK DO NOT OPEN
WARNING:
TO REDUCE THE RISK OF ELECTRICAL SHOCK DO NOT REMOVE THE COVER
NO USER-SERVICEABLE PARTS ARE INSIDE REFER SERVICING TO QUALIFIED
PERSONNEL
Danger: Electricity Hazard
● Power must be switched off when not in use, any power adaptors connected
AV devices and TV should be plugged out.
● Power outlet: To prevent electricity shock, please check if the mains lead
used on the receiver and transmitter corresponds to the power outlet.
● Mains lead: Stepping or putting heavy stuffs on mains lead is prohibited.
● Power overloading: Do not overload the power outlets, otherwise electric
shock or fire could happen. If the power is overly loaded, please extend the
mains lead.
● Lighting stroke: Disconnect the power adaptor when product is not used for
a long time or in lighting stroke weather.
● Switch off the power when product is not in use to prevent electric shock or
fire.
Warning:
● Keep the product away from objects with liquids and splashing or dripping
on this product is strictly prohibited.
● Put the product in a well-ventilated space and keep it away from direct
sunlight or any source of heat.
● Do not expose the product to rain or moisture.
1.2 Declaration of Conformity
-1-
R&TTE This product complies with Part 15C and Part 15E of FCC Rules.
Part 15: Subpart C—Radiated Emission Limits, Additional Provisions.
Part 15: Subpart E---Unlicensed National Information Infrastructure Devices.
This device complies with relative criteria CE Certification.
EN 60950-1:2006
Information Technology
Equipment ---Safety--Part 1: General Requirements
EN 300440-01(V1.6.1)
Electromagnetic Compatibility and Radio Spectrum Matters (ERM)
Short Range Devices.
Radio equipment to be used in the 1GHz to 40GHz frequency.
Part 1: Technical Characteristics and Test Methods
EN 301489-03(V1.4.1)
Electromagnetic Compatibility and Radio Spectrum Matters (ERM);
Part 3: Specific conditions for Short-Range Device (SRD)
Operating on frequency between 9 kHz and 40 GHz
EN 301489-17(V2.1)
Electromagnetic Compatibility (EMC) Standard for Radio Equipment and
Services;
Part 17: Specific conditions for Broadband Data Transmission Systems
EN 301893(V1.5.1)
Broadband Radio Access Network (BRAN)
5 GHz high performance RLAN
Harmonized EN covering the essential requirements of article 3.2 of the
R&TTE Directive
1.3 Trademark Information
● HDMI,HDMI LOGO and High Definition Multimedia Interface are registered
logo by HDMI Licensing LLC in America and other countries
● WHDI, WHDI logo and Wireless Home Digital Interface are registered logo
by WHDI LLC in America and other countries.
1.4 Special Notices
Do not use this device nearby an aircraft or medical facilities otherwise
interference and undesired operation may occur. Place this device carefully to
prevent abnormal video/audio.
Keep this device away from metal furniture and explosive products. Don’t
put it on unsteady places. Ensure there is no danger hazard on joints of wires.
Do not put it on dusty or damp environment. Keep it away from too low or
too high temperature or any source of heat.
This device should be powered by direct current. Ensure battery used on it
meets the standard of 5V 2.5A/3A.
Putting heavy stuffs on this device is strictly prohibited. Place it on a well-
-2-
invented area. Do not block vent area.
Please turn power off and pull power adaptor out of socket for energy saving.
Restart the device when undesired problems occurred. If problems still exist,
please consult professionals for maintenance.
● This device has been manufactured and tested to comply with each
country’s safety regulations. It doesn’t guarantee that interference would
never happen in some specific environment. If interference does occur, please
increase the separation between transmitter and receiver.
● This product tends to be interfered by wireless device with 5GHz frequency,
such as a router or other wireless device. If you have 802.11n router, configure
it to use the 2.4GHz rather than 5GHz.
● The optimal operation distance between receiver and transmitter is from 1
meter to 10 meters.
1.5 Cleaning
Turn the power off and wipe the device using a soft cloth or a cloth moistened
with alcohol. Do not use chemical detergent and ensure all cleaning is
conducted when power is off.
● Do not dismantle this device or conduct maintenance or cleaning when it is
powered
● Maintainer should be conducted by authorized technician.
● Dripping or splashing on this device is strictly prohibited.
● Keep it away from fire or any source of heat.
● Do not let kids play with it.
2 Product overview
2.1 Product Introduction
It is easier to use W207 that you can insert it into PC or blue-ray player.
Transmitter will send all video/audio signals from PC to HDMI receiver and
all contents will be displayed on LED screen. Connect transmitter to wire/
wireless set-top box, HD set top box, blue-ray DVD, game console, computer
and use HDMI cable to connect receiver and LCD,PDP with HDMI cable. It can
save users the trouble of using wires and make rooms much more clean and
organized.
2.2 Product Feature
● Support 1080 HD video
● Support WHDI 1.0 specification
● Mini USB interface power supply
● Supported 10m transmission distance without latency
● Compatible with FCC, CE, IC, RoHS certificate
● Working frequency:4.9 GHz~5.9 GHz
● Portable design with all components needed
-3-
● Built-in antenna
2.3 Packing List
Please check whether the following contents are present in the package box. If
any item is missed or damaged, please contact the distributor.
Main parts:
W207 transmitter and receiver
Supplied accessories:
A USB cable, a user manual, a power adaptor, a remote control
USB A-MINI cable
remote control
power adaptor
user manual
2.4 Function
1) Transmitter
Register button
Status LED
Register button- for network register
USB Socket
USB socket-for power supply
Status LED-indicating working status
2) Receiver
Remote Sensor
(at the back of the window)
USB Interface
Link LED
Video LED
Power LED
-4-
Button
DC IN Jack
HDMI Interface
Link LED-indicating link status
DC IN Jack-power supply interface
Video LED- indicating video signal status
HDMI Interface-HDMI output interface
Power LED –indicating power supply status Button-for standby mode
3) Description of Indicating LED
Working status
Transmitter
Receiver
Status
Power
Video
Device register
and add
●
○
○
○
○
Normal working
status
○
Powered on
Remarks : ○ green LED stays on
○
Link
○
● green LED flashes
3 Product Specifications
Supported video
format
HDMI interface
Transmission
distance
1080P、1080i、720P
Support HDMI1.3 video/audio format, support HDCP
2.0 encrypted video technology
With a transmission distance of 10m
Working frequency
4.9 ~ 5.9GHz
Antenna
Power supply
Built in antenna
mini USB power supply
Working
temperature
Dimensions
0℃~ 50℃
71(L)×33.5(W)×16(H)
4 Installations
4.1 Connection of Transmitter
-5-
AC 100 ~ 240V ,5V
2.5A/3A DC power adapter
146(L)×93(W)×25mm(H)
● Connect W207 transmitter to smart devices(laptop,PS3)
● Insert the USB cable to USB socket for power supply
Remarks: it is advised that you set color mode of PC to FULL RGB.
4.2 Connection of Receiver
● Connect HDMI receiver to display equipment by HDMI cable
● Insert power adapter to power input interface for power supply
5 WHDI Remote Control User Guide
5.1 WHDI Remote Control Button Description
Number
1
Key
Function
PWR
Standby button, available to receiver and transmitter
when get into standby mode. Only available to receiver
when get out of standby mode
-6-
2
Add
To add source devices to device list, available to receiver
3
Delete
To delete receiver from device list or delete character of
the device name, available to receiver
4
MENU
To show all the items, available to receiver
5
Guest
Temporary visit key, available to receiver
6
To up, available to receiver
Down ,available to receiver
8
▽
7
△
▽
9
▽
To the right, available to receiver
To the left, available to receiver
10
OK
To confirm, available to receiver
11
Exit
Go back/exit, available to receiver
12
Source
To list all the video source, available to receiver
13
Next Source
To select next video source, available to receiver
14
Pre Source
To select previous video source, available to receiver
15~18
NA
5.2 Device Register or Add
1. Connect transmitter and receiver to output equipment and display
equipment separately.
● Use the remote control on receiver terminal.
-Click “Menu” button or “Add” button to show setup interface and
choose “Add new video source”
-Click “Add” button
●“Please Activate Registration on Transmitter Unit” item will be shown on
display equipment.
● Short press (within 1 s) register button of transmitter, and link LED flashes
● The receiver will show available device name and confirming information.
● Use WHDI remote control to press OK
● Display equipment will show progress bar about register.
● The register will complete in 3 minutes( depends on distance and
environment )
● Network will be connected automatically and transmit audio and video
signals after registration.
● A maximal of 8 devices can be added as the steps mentioned above.
5.3 Delete Devices
● Press “Source” button on remote control to choose the device you want
to be deleted.
● Press “Delete” or “MENU” to select “Remove video source”
● Select the device to be deleted and press “OK”
● After deleting the device, press “Source” to ensure the device has been
deleted.
● Other devices can be also deleted as the above procedures
-7-
5.4 Device Name Modification
● Press “MENU” button on remote control to show setup menu, choose
“Modify video source name” item.
● All available video sources will be displayed and use the navigation button
on remote control to locate the device name you want to be modified.
● Use the navigation button on remote control to locate the characters you
want to be modified.
● Press the “OK” button to submit the new name
5.5 Device Connection
● Press “Source” button on remote control to show all available devices
● Locate desired device and press “OK” button on remote control to start
connection
5.6 Disconnect Network
● Press menu button on remote control to show setup menu and choose
“Disconnect Wireless Link” item.
● Press “OK” button to disconnect network.
● If the disconnection is successful, the home screen will show “Wireless off”
5.7 Video/Audio Cutover
1.Make sure all devices are connected successfully.
2.Press “Source” button on remote control to choose video source.
3.Press “Next Source” to go to next.
4.Press “Pre Source” to go to previous video source.
6. Software Update
1) Open Bootloader Manager; connect WHDI transmitter to PC by USB cable
2) The device information will be shown on the software when the device is
successfully connected.
3) Click [browse] button in “update APP area”, then choose the file you want
to be updated; press [update APP], after system update is successful, there will
pop up a dialog box to inform update is complete.
4)If the system prompts failed update or other unsuccessful update
information, please check if the USB cable is connected and if W207 is
powered on.
5) The same way is also applied to MAC update. Click [browse] button in
“update Mac Area, and then choose the file you want to be updated. If the
update is successful, system will show a box to inform update is successful.
6) If the system prompts failed update or other unsuccessful update
information, please check if the USB cable is connected and try it again.
Please note: ① Software driver needs to be installed before you update
BootloaderManager.
② Please strictly follow the steps of “open BootloaderManager → connect
W207 to smart devices → turn power on”, otherwise Bootloader Manager
may not find devices.
③ To get more information about BootloaderManager software installation
-8-
and update, please refer to WHDI video transmitter BootloaderManager
software user manual.
7. Troubleshooting
Please make sure all the devices are properly connected and receiver is not in
standby mode before you follow the troubleshooting guide below.
No video
1. Check the status of LED, and check if the HD media player
works normally.
2. Check if the joints and wires are damaged and make sure
they are correctly connected to corresponding interface.
3. Ensure there is video on output devices.
4. Check the receiver is correctly connected to display
equipment.
5. make sure all devices are working on supported distance.
Draw them closer and try it again.
Power LED off
1. Make sure the power adaptor is correctly connected and
the voltage is 5V 2.5A/3A
2. Make sure the power supply would not be interrupted.
3. Make sure transmitter is fully powered.
1. Make sure video and audio signals can be transmitted to
receiver successfully.
Receiver video 2. If there are video and audio signal on output devices,
indicating LED please check the indicating LED to see if something got
wrong with it.
abnormal
3. Make sure the device is working within the supported
distance.
Bad picture
1. Ensure there is video on output devices.
2. Check if the receiver is correctly connected to display
equipment and there is no damage on joints and wires.
3. Make sure all devices are working on supported distance.
Draw them closer and try it again.
1. Check if registered devices is less than 8:
2. Check if transmitter and receiver are within supported
distance. Drew them closer and try it again.
Register failed
3. Make sure there is no information about the device
you want to register in the receiver. Delete all relative
information and try it again.
Connection fail
1. Put all devices within supported transmission distance. if
not, decrease the separation and make connection again.
2. Make device registration again when application updated.
3. Make sure transmitter and receiver have been registered.
4. Delete all registration information and try it again when
above suggestions didn’t work.
Bad picture or
no sound
1. Make sure there’s no interference within 1m from
receiver;
2. Make sure it is supported video format
3. Restart video devices and make connections again
Other problems
If any other problems occur, please restart the device and
make connections again.
-9-
8. FCC ID warning
This device complies with Part 15 of the FCC Rules. Operation is subject
to the following two conditions: (1) this device may not cause harmful
interference, and (2) this device must accept any interference received,
including interference that may cause undesired operation.
The user manual or instruction manual for an intentional or unintentional
radiator shall caution the user that changes or modifications not expressly
approved by the party responsible for compliance could void the user's
authority to operate the equipment. In cases where the manual is provided
only in a form other than paper, such as on a computer disk or over the
Internet, the information required by this section may be included in the
manual in that alternative form, provided the user can reasonably be expected
to have the capability to access information in that form.
For a Class B digital device or peripheral, the instructions furnished the user
shall include the following or similar statement, placed in a prominent location
in the text of the manual:
NOTE: This equipment has been tested and found to comply with the limits
for a Class B digital device, pursuant to Part 15 of the FCC Rules. These limits
are designed to provide reasonable protection against harmful interference
in a residential installation. This equipment generates, uses and can radiate
radio frequency energy and, if not installed and used in accordance with
the instructions, may cause harmful interference to radio communications.
However, there is no guarantee that interference will not occur in a particular
installation. If this equipment does cause harmful interference to radio or
television reception, which can be determined by turning the equipment off
and on, the user is encouraged to try to correct the interference by one or
more of the following measures:
-- Reorient or relocate the receiving antenna.
-- Increase the separation between the equipment and receiver.
-- Connect the equipment into an outlet on a circuit different from that to
which the receiver is connected.
-- Consult the dealer or an experienced radio/TV technician for help.
9. IC ID warning
Disclaimer:
Operation is subject to the following two conditions: (1) this device may not
cause interference, and (2) this device must accept any interference, including
interference that may cause undesired operation.
10. Other Information
We suggest a comprehensive read about this manual before you get started
to use this product.
-10-