1
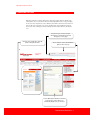
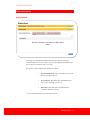
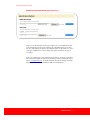
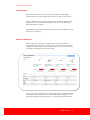
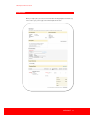
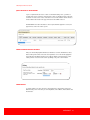
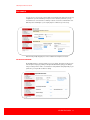
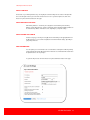
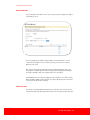
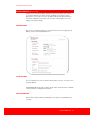
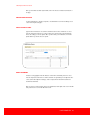
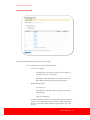
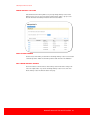
Office Depot Online User Guide
.WELCOME TO OFFICE DEPOT ONLINE
This user guide is designed to show you how to use the Office Depot Online to its full potential. Its aim is to give you
detailed instructions from logging in, to placing your first order. We’ve included some handy tips too, which will enable
you to speed up your shopping experience. Should you require additional help and assistance you will find the
following information useful.
Hours of operation
Monday - Thursday, 8am - 5:30pm and Friday, 8am - 4:30pm.
eSupport Helpdesk
Email us at [email protected]
Alternatively telephone us on:
Tel. 0844 11 00 00
Shipping and Deliveries
Monday to Friday:
Orders received by Office Depot before 5pm will be delivered next day*
Saturday and Sunday:
Orders placed on Saturday and or Sunday will be delivered on Tuesday
* Unless otherwise specified in your contract
Office Depot Online System Availability
To support our website upgrade and development programme, we sometimes need to take our systems offline for
short periods of time, which take place during non-operational hours. Any scheduled downtime will be published on
the website bulletin board (viewable after you log in) prior to the event to give you advance warning. Wherever
possible, we will endeavour to restrict such activities to night-time hours and during weekends.
WELCOME TO OFFICE DEPOT ONLINE 2
Office Depot Online User Guide
.TABLE OF CONTENTS
Technical Support
Next Business Day Delivery
System Maintenance
Table of Contents
2
2
Order Tracking Search Criteria
15
Order Detail
15
Order Returns
16
5 – My Profile
17
3
1 - Time Saving Features
4
2 - Getting Started
5
29
8 - Support
30
Helpdesk
30
17
Customer Service
30
Select Contacts
18
Frequently Asked Questions
30
Select Deliver to Locations
18
Select PO and Cost Centres
18
9 - Notes
32
User Information
18
5
Your Login ID and Password
19
Forgot Your Login
Name/Password
Bulletin Board
5
Proxy Approver Info
20
6
Save for Later
20
Editing the Bulletin Board
7
6 – User Profiles
21
Add New Users
21
8
Search the Catalogue
8
Login Settings
21
Category Search
8
User Information
21
View All Products from A to Z
8
Permissions
22
Order by Item Number
9
Editing User Profiles
23
My Shopping Lists
10
Select a User to Edit
23
Ink and Toner
11
Reset Password
23
Product Comparison
11
Active/Inactive Users
24
Tiered Approvals
24
Creating a Workflow
25
Workflow Approvals
26
7 – Manage Account for
Super Users
27
4 – Checkout
29
My Profile Overview
Login
3 - Order Entry
Add a PO Number or Cost
Centre
Edit a PO Number or Cost
Centre
12
Checkout Required Fields
13
Submitting Your Order
13
Order Confirmation
14
Order Tracking
14
Manage Contacts
27
Quick Release of Held
Orders
15
Add Contacts
27
14
Edit Contacts
27
14
Manage Deliver to Locations
28
15
Add a Delivery Address
28
15
Edit Current Delivery Address
28
16
Manage PO Numbers and Cost
Centres
29
TABLE OF CONTENTS 3
Office Depot Online User Guide
1 TIMESAVING FEATURES
Office Depot’s Business Solutions Division has enhanced its website with more intuitive, time
saving features for your convenience. We have added expandable menus to help you navigate
the site even faster. Popular tools such as “Order by Item Number” and “Ink & Toner Finder” are
all accessible on the homepage. You can also quickly manage your Shopping lists and keep
track of your orders, making your online purchasing experience better and more efficient than
ever.
Keep track of your selections and your
subtotal with our shopping basket preview
that appears on every page
Find items faster & with fewer clicks with
Enhanced Drop-Down Menus
Access new tools such as Recent Orders
right from the home page
Use the ‘Order by Item Number’ tool and the
product images and descriptions are
automatically displayed as you enter them
TIMESAVING FEATURES 4
Office Depot Online User Guide
2 GETTING STARTED
LOGIN
Point your browser to http://online.officedepot.ch
At the login screen, enter the login name and password (not case sensitive). Your Account
Manager or Super user can provide this information.
FORGOT YOUR LOGIN NAME/PASSWORD
At Office Depot, we take security seriously. If you have forgotten your password click on Forgot
Your Password? With this feature you can submit your email address to retrieve the required
information. You may also contact the eSupport Help Desk directly using the relevant contact
details at the beginning of this guide.
GETTING STARTED 5
Office Depot Online User Guide
2 GETTING STARTED
BULLETIN BOARD
Welcome to the New Look and Feel of Office Depot
Online
The first page after login displays a Bulletin Board that can be used by your Company to
communicate with end users. Your company’s logo can also be displayed on the Bulletin Board
and messages can be updated as often as necessary.
There are three separate Bulletin Board’s each with their own tab:
Customer Bulletin Board – Super Users will post messages and
important information to all users
Account Specific - Office Depot will use this Bulletin Board to
post messages specifically to your account
Office Depot – Office Depot will use this Bulletin Board to
communicate with all our customers.
Look out for important updates when new information is posted!
ORDER ENTRY
6
Office Depot Online User Guide
EDITING THE BULLETIN BOARD (Super Users Only)
Super Users can edit information and insert their company’s logo onto the Bulletin Board. Click
on the ‘Edit’ button that is located on the right-hand side of the Bulletin Board. You are able to
enter up to 4000 alphanumeric characters. The Bulletin Board also accepts HTML code – please
contact your IT department for assistance. Always click ‘update’ at the bottom of the page to
save changes.
To place your company’s logo onto the Bulletin Board, or change an existing logo, email either a
GIF or JPG formatted graphic, by clicking on the ‘Email Image’ button (to automatically send an
email to [email protected]). The eSupport Helpdesk will confirm the integrity of the image
and notify the sender when the image will be available on the Bulletin Board.
ORDER ENTRY
7
Office Depot Online User Guide
3 ORDER ENTRY
SEARCH THE CATALOGUE
You can search for products by keyword, Office Depot product code, Manufacturer code,
Customer’s code, Category or View all Products A-Z. Searching by product displays only one
item while searching by keyword might yield a page or more of results.
For your shopping convenience, the Search feature appears on every page on the website.
CATEGORY SEARCH
Select a product category to browse from the homepage by placing your cursor on a product
group, like Office Supplies, Furniture or Technology. The screen will expand to show a list of all
categories available. Select a category to view after which the screen will display a list of
subcategories, which you can select the items available to you.
VIEW ALL PRODUCTS A - Z
Click on ‘View all Products A-Z’ to search by categories in the index. Place your cursor on the
letters to view a list of categories after which subcategories will display.
PLEASE NOTE: On the search results screen each line item displays an ‘Add to Basket’ and an
‘Add to List’ button. ‘Add to Basket’ adds the item to your shopping basket and ‘Add to List’ adds
to the item to a shopping list.
You can narrow your search by clicking on the search modifiers located on the left side of the
screen
ORDER ENTRY
8
Office Depot Online User Guide
ORDER BY ITEM NUMBER
Our ‘Order by Item’ feature allows you to add products directly to your shopping basket or
shopping list. Simply enter the product codes, tab to see pictures and descriptions. Enter your
desired quantities, and then click ‘Add to Basket’ or Add to List’
ORDER ENTRY
9
Office Depot Online User Guide
MY SHOPPING LISTS
There are two different types of Shopping Lists for fast and efficient ordering.
•
‘Company Wide’ lists are created and maintained by your Company’s ‘Super User’.
They can be used for ordering by all users.
•
A ‘Personal’ List is only accessible to the user whom created it.
To begin working with a Shopping List, select ‘My Shopping Lists’ on the Shopping Basket view
at the top of the screen or under My Account. The ‘My Shopping Lists’ page appears with an
index of currently available shopping lists. Once you have opened the list you want you can
change the item quantities if needed, checkmark the box next to each item to select (or click
‘Select All’ at the top to purchase all items on the list) and click ‘Add to Basket’ at the bottom of
the page.
Please note: You can also click on ‘Create New List’ and the ‘Create a New Shopping List’ page will appear.
For more information on how to add items to a Shopping List or how to modify a saved one, click on ‘How to use and
Create Lists’ on the ‘My Shopping Lists’ page.
ORDER ENTRY
10
Office Depot Online User Guide
INK AND TONER
Our Ink & Toner Finder provides a hassle free way of replenishing your printing supplies,
perfectly matched to your machine. Simply select the ‘Ink & Toner’ option on the Home Page.
Select the brand, printer and model from the drop-down menu and click ‘GO’. When the results
appear you can even save your search, which means next time you have to order again the
website will remember your details.
PLEASE NOTE: The top ten printer manufacturers are listed at the top of the Manufacturer dropdown list for your convenience
PRODUCT COMPARISON
When searching for items you will see a compare check-box under each item image. To
compare the different product features of up to four items, check the compare box and click the
‘Compare Selected Items’ button to go to the product comparison screen. Remove an item from
the Comparison by clicking Remove just above the image.
You can add an item to your basket from the Product Comparison page by entering the quantity
and clicking on the Add to Basket button. You can also add the item to a shopping list. You can
delete all items that appear on the ‘My Comparisons’ screen by clicking on the Remove All link.
ORDER ENTRY
11
Office Depot Online User Guide
4 CHECKOUT
When you ready to place your order, click on Check Out in the Shopping Basket view at the top
of the screen to go to your one page order review and placement screen.
CHECKOUT 12
Office Depot Online User Guide
CHECKOUT REQUIRED FIELDS
Required fields are identified with a red asterisk and will have a ‘Select’ button next to it if there
are multiple selection/options.
The Payment Information section displays your payment method, either Credit Card or Account
Billing.
The Email Options section allows you to cancel your email order confirmation. It also enables
you to enter the email address of another individual who needs to receive a confirmation or alert
of an order being placed.
SUBMITTING YOUR ORDER
The bottom of the checkout screen displays the items you have selected. Verify that this
information is correct and click either ’Place Order’ or ‘Put Order on Hold’ button to finalise your
order.
PLEASE NOTE: If your order is automatically placed on hold for approval, the ‘Place Order’
button will not be available and will be replaced with ‘Send Order for Approval’.
Your order will not be processed until you click the ‘Place Order’ or ‘Send Order for Approval’
button.
CHECKOUT 13
Office Depot Online User Guide
ORDER CONFIRMATION
When ‘Place your Order’ is selected, the Order Confirmation screen will appear. This confirms
that your order has been successfully submitted to the Office Depot system. Your order can now
be tracked by using the order number displayed on this page.
ORDER TRACKING
The Order Tracking function, accessible under My Account, allows you to check the history and
view the details of the orders. With this feature, users have the ability to view all orders or to filter
orders using specific search criteria.
PLEASE NOTE: Depending on user profile settings, users may modify an order if the status is in
‘Held by Customer’, Held for Review’ or Held for Restrictions’ status.
CHECKOUT 14
Office Depot Online User Guide
QUICK RELEASE OF HELD ORDERS
If your user profile allows the release of orders on the Order Tracking screen, you will see a
checkbox in the ‘Select’ column for orders that have a status of ‘Held by Customers’ and ‘Held
for Review’. To release these orders, check the box for each order, and then click the ‘Release
Selected’ button at the bottom of the page. All orders checked will be released.
PLEASE NOTE: The ‘Held for Restrictions’ orders requires workflow approval. To release, the
approver has to click on the order to open it.
ORDER TRACKING SEARCH CRITERIA
Filter your order tracking by Order Number, Item Number, Cost Centre, PO Number, Contact,
Status, Delivery Point or Date. Select the search parameters to use and click the appropriate
Search By option. The Order Tracking screen reappears with the orders listed by the search
criteria you have selected. Sort these orders by clicking on any of the column headers.
ORDER DETAIL
To view the details of an order, click on the order number in the order number column of the
Order Tracking screen. From there you can modify Orders, Cancel Orders, Release Orders and
Reorder Items.
CHECKOUT 15
Office Depot Online User Guide
ORDER RETURNS
You may create a return request online by following these steps:
•
Click ‘Email Assistance’ at the foot of the website
•
Select ‘Returns’ from the Helpful Links on the left hand side
•
Complete the Returns form giving as much detail as possible then Submit
Alternatively contact Customer Services on tel. 0844 11 00 00.
CHECKOUT 16
Office Depot Online User Guide
5 MY PROFILE
For easy access to your account’s current settings, click on My Account option located on the top
navigation bar. If your Account Manager or Super User has restricted your defaults, you may
have limited access to view and choose: Delivery Locations, Cost Centres or PO Numbers. Your
Office Depot Account Manager or your company Super User will assist you if necessary.
Order Tracking and My Shopping Lists are also available from the My Account Screen.
MY PROFILE OVERVIEW
My Profile Overview is a one-page summary of your user settings. This feature can be accessed
from the My Account page, by clicking on the My Profile Overview link, giving you the ability to
view your settings. Click on View to see the details for each particular setting. Depending on your
permissions, you may be able to edit these settings.
OTHER FEATURES 17
Office Depot Online User Guide
SELECT CONTACTS
Find contacts on your Delivery Addresses by choosing My Account and clicking ‘Select Contacts’ in the My Profile
box. Select the right contact for your order in the Select Contact screen. To go back to My Account, click on the
‘Return to my Account’ link at the bottom of the page.
SELECT DELIVERY LOCATIONS
Find ‘Delivery Addresses’ locations by choosing My Account and clicking ‘Select Delivery
Address’ from the My Profile box. Search for and update Current and Default Delivery Address in
the Select Delivery Address Information screen, depending on your profile settings.
SELECT PO AND COST CENTRE
Select the category you need by choosing My Account and clicking on the appropriate link from
the My Profile box. You can search and update the Current and Default settings, depending on
your profile permissions.
USER INFORMATION
You can update your User Information such as email address and telephone number by clicking
on My Profile Overview under My Profile. Click on Edit or the User Information link and then click
the Update button to save any changes.
To go back to My Account, click on the Return to my Account link at the bottom of the page.
OTHER FEATURES 18
Office Depot Online User Guide
YOUR USERNAME AND PASSWORD
You can change your password by clicking on ‘Edit Login Info & Password’ under ‘My Profile
Overview’ from the My Profile box. Click on the Update button to save any changes.
OTHER FEATURES 19
Office Depot Online User Guide
PROXY APPROVER
If you are an approver and will be out of the office, you may assign a Proxy Approver to approve
orders while you are out.
Choose Proxy Approver by clicking on ‘My Proxy Approver’ in the My Profile box. You can
search by the Proxy Approver’s User Id or Name or you may select from a list of all Proxy
Approvers in the system.
Once selected, click the ‘Active’ radio button to begin sending Order Approval emails to your
Proxy Approver. Stop Order Approval emails from going to your Proxy Approver by clicking on
the ‘Inactive’ radio button. Click on the ‘Update’ button to save any changes.
PLEASE NOTE: Before choosing a Proxy Approver, make sure that the user is able to View all
Orders and will be available for order approvals. To go back to My Account, click on the ‘Return
to my Account’ link at the bottom of the page.
SAVE FOR LATER
Save an item in the Shopping Basket by clicking on the arrow under ‘Save for Later’. This timesaving feature allows items that are placed in the basket to be saved and ordered at a later date.
OTHER FEATURES 20
Office Depot Online User Guide
6 USER PROFILES (Super Users only)
A Super User is a user with the ability to maintain user and account settings online. A Super
User is able to Add New Users, Edit User Profiles, and Modify User Permissions and the
Approval Processes. A Super User also has the ability to add and modify Delivery Addresses,
Cost Centres, PO Numbers and Contacts on the account. To start managing user accounts,
simply go to the My Account page.
ADD NEW USERS
Once you are on the My Account page, you can add a new user to the account by going to the
Manage Users box and selecting Add New Users.
LOGIN SETTINGS
The screen prompts you to create a Username and Password for each user. You can also select
password expiration.
PLEASE NOTE: Office Depot online usernames must be unique. Passwords must be a minimum
of 6 and a maximum of 10 alphanumeric characters.
USER INFORMATION
Enter the name, telephone number and email address of the person associated with this new
user setup.
USER PROFILES 21
Office Depot Online User Guide
PERMISSIONS
You can set default values and permissions for a user by selecting the appropriate permissions
from the drop down menus. Click on View List link next to default fields to populate a particular
entry. Under the Order section you can determine if the user can Query (view) or Modify orders.
To give this new user the ability to add and edit account and other ‘user’ settings, check the box
that says Click here to make this a Super User.
You can determine the appropriate order permissions for the user.
1.
Workflow Template
If the user is assigned to a Tiered Approval, you must first set up a workflow template for the
user. (For more information on setting up workflow templates, please see the section on Tiered
Approvals on page 26). Enter the template name from the list of workflows. Once you have
entered a workflow template, click on ‘Add User’ button at the bottom of the page.
2.
Assign a Single Approver
Enter the User Name of the approver responsible for releasing the user’s orders.
Where it says ‘This User;’ you can
•
Determine if the user can Place and Release Orders or Place Orders on Hold Only.
•
Set restrictions for items by choosing from Cannot Override restrictions, Can Override
Restrictions with Approval, or can Override All Restrictions. If the user is able to
override restrictions with approval, the order will be placed on hold pending approval
and the approver will be notified by email.
•
Set spending limits for the user based on value
USER PROFILES 22
Office Depot Online User Guide
Once you have filled out all the required fields, click on the Create User button at the bottom of
the page.
EDITING USER PROFILES
To make modifications to existing user profiles, select Edit Active Users from the Manage Users
section on the My Account page.
SELECT A USER TO EDIT
Type the first few characters of a username and click Search for a list of valid users or select
from the complete list. Click on a User Id to modify a user’s profile. Click on View followed by
Next to the settings you need to update. Once you have made your modifications, click on the
Update button to go back to the user’s profile.
RESET PASSWORD
Select the user by typing the first few characters of their name and clicking ‘Search’ or select
from the complete list. Click on the Username and click on Login Settings on the right side of the
screen (under ‘Subscriptions & Settings’); enter a new password in the New Password and
Confirm Password fields.
Once you have reset the password, click on the Update button at the right of the screen. This will
take you back to the user’s Profile Overview screen.
USER PROFILES 23
Office Depot Online User Guide
ACTIVE/INACTIVE USERS
Click on the Active/Inactive Users link from Manage Users to review all active and inactive users.
If this user is Active, a checkmark will appear in the Active checkbox. To make a user Inactive,
remove the checkmark from the Active checkbox and click on the Update button at the bottom of
the screen.
TIERED APPROVALS
Create and edit Workflow templates by clicking on ‘Tiered Approvals’ under Manage Users.
USER PROFILES 24
Office Depot Online User Guide
CREATING A WORKFLOW
Click ‘Create a New Workflow’ and enter the name of the new template.
Use the following steps to set up your new workflow template.
•
Select one of the following:
−
Sequential Release: This will send an email to each of the approvers in
sequential order by value, lowest to highest.
−
Highest Approver Only: This will require only the approver who has the
highest approval amount greater than the total order to approve.
•
Workflow templates include:
-
-
Up to 10 approvers
Assign the value to each approver authorised to approve by creating a
permission profile
•
Assign an override approver
For orders containing only contract items, check the ‘Place any order containing noncontracts items on hold for approval’ box in the Permission Profile. This option will
allow for an order to bypass workflow settings if the placed order has only contract
items on it.
USER PROFILES 25
Office Depot Online User Guide
•
Click the ‘Save Workflow’ button at the bottom of the page to save your changes
Approvers can approve, disapprove, modify and add comments, which will be forwarded via
email to the order requester.
WORKFLOW APPROVALS
Approvers who receive HTML email notifications have the ability to approve the order directly
from the email. To approve the order, type in your login name and password in the appropriate
fields and click on the Approve, Disapprove or Release button.
USER PROFILES 26
Office Depot Online User Guide
7 MANAGE ACCOUNT (Super Users only)
MANAGE CONTACTS
Add or edit Contacts associated with your delivery locations by choosing ‘Manage Contacts’
under Manage Account.
ADD CONTACTS
Click the Create a New Contact link from the Manage Contacts screen to add a new Contact to
your delivery address. Add the desired Contact and click on the Add button.
EDIT CONTACTS
Click on the Contact Name from the list under the Manage Contacts screen. Enter the changes
to the contact information and click on the Update button.
MANAGE ACCOUNT FOR SUPER USERS 27
Office Depot Online User Guide
MANAGE DELIVERY LOACTIONS
Add, Edit and Search for Delivery Addresses by choosing ‘Manage Delivery Location’ under
Manage Account. You can search for a delivery location by Name, address, city or post code.
Enter the information in the blank provided and click on the Search button.
ADD A DELIVERY ADDRESS
Click the Create a New Delivery Location link from the Manage Delivery Location screen and add
a new delivery address. Add the desired delivery address details and click on the Add button.
EDIT CURRENT DELIVERY ADDRESS
Click on the addresses’ ID from the list to edit a Delivery Location. Enter address changes and
click on the ‘Update’ button. To go back to the Manage Delivery Location screen, click on the
Back to Delivery Location List link at the bottom of the page.
MANAGE ACCOUNT FOR SUPER USERS 28
Office Depot Online User Guide
MANAGE PO NUMBERS AND COST CENTRES
You can Add, Edit and Search for PO Numbers or Cost Centre Numbers on your account or
associated to your Deliver To locations by choosing either ‘Manage PO Number, or Cost Centre’
under Manage Account. Search for any of these by entering the relevant information and click
the Search button.
ADD A PO NUMBER OR COST CENTRE
Once you have the appropriate screen, click the ‘Create a New….’ link at the top of the page.
Add the desired information and click the ‘Add’ button.
EDIT A PO NUMBER OR COST CENTRE
Click on the specific item you want to edit from the list. Enter the changes to the information and
click the ‘Update’ button.
MANAGE ACCOUNT FOR SUPER USERS 29
Office Depot Online User Guide
8 SUPPORT
HELPDESK
Contact the Office Depot eSupport Helpdesk for technical support Monday - Thursday, 8am 5:30pm and Friday, 8am - 4:30pm on tel. 0844 11 00 00.
CUSTOMER SERVICE
Office Depot’s Customer Service Department is available to assist you with any questions you
may have concerning product, pricing, ordering, delivery, or support services. Call tel. 0844 11
00 00 or click on Email Assistance at the foot of the website
FREQUENTLY ASKED QUESTIONS
Q: When is the latest I can order to receive my delivery tomorrow?
A: Orders received by 5pm are processed for next day (unless otherwise specified
in your account contract).
Q: Why do I get a message about "Certificate Authority has expired?
A: Your browser's certificate for access to secure sites has expired. Please contact
your IT Support department to have the certificate deleted, or to have the browser
upgraded.
Q: What is the difference between a basket and a list?
A: The Shopping Basket is used to make purchases right away. Use My Shopping
List to create lists of commonly ordered items for future reference.
Q: How do I search for orders in Order Tracking by order number?
A: Click on My Account then Order Tracking and type the Order Number in the
‘Search By’ field.
Q: Why am I only able to see part of the screen on my monitor?
A: Settings in your browser control the way your screen is displayed. In Microsoft
Internet Explorer, change fonts under browser options: select View, select Fonts,
and select Smallest. In Netscape Navigator 6.0, change the fonts under browser
options: Options, select General Preferences, select Fonts tab, select Choose Font
for Proportional Font, select a font size of 10 or 11, select OK, and close remaining
windows.
Q: When printing an acknowledgment I am missing the right side of the page, why?
A: Settings in your browser control the printing function. In Microsoft Internet
Explorer, change margins under browser printing options: select File, select Page
Setup, change Margins (inches), Left to .25”, right to .20”. If you would like, you can
change the Top and Bottom to .25”.
SUPPORT 30
Office Depot Online User Guide
Q: How do I obtain my login information?
A: Login Information is provided by either your Account Manager or by a designated
Super User within your organisation. To reset a password, the eSupport Help Desk
can provide assistance in resetting the password and/or providing the login name
(after the caller's identity is verified). You can reach the eSupport Help Desk
Monday - Thursday, 8am - 5:30pm and Friday, 8am - 4:30pm on tel. 0844 11 00 00.
Q: Why do I have to change my password?
A: For security reasons, Office Depot gives you the option of changing your
password on a regular basis (30, 60 or 90 days). Enter the password in the New
Password & Confirm Password fields when prompted to change your password.
Contact your Office Depot Account Manager or Super User to have your password
set to never expire.
Q: I put the items in my shopping basket, why haven't you dispatched my order yet?
A: Putting items into your shopping basket is only the first step. Click View Basket
to verify your items and click Checkout. Click the Place Order button to submit your
order.
Q: What is the difference between a Company Wide Shopping List and a Personal
Shopping List?
A: A Company Wide List allows all Users on the account to view and select items
for purchase. A Personal List can only be viewed and modified under the login of
which it was created.
Q: How do I find the number for my Customer Service Centre?
A: For support, please use your main Customer Services number as provided to
you by Office Depot. If you don’t have this to hand, call our eSupport Helpdesk on
tel. 0844 11 00 00 for assistance.
Q: How do I compare items on the website?
A: When searching for items you will receive a compare box to the right hand side
of each item during your search. To compare the different product features check
the compare box and hit the Compare selected items button; bringing up the
comparisons of the items chosen.
Q: How do I access my shopping lists?
A: All shopping lists are located at the top right hand corner of the screen or by
clicking on My Account and then My Shopping Lists.
Q: Where on the website can I find Toner for my copy machine?
A: Located under the grey navigation bar, click on Ink and Toner
Q: How do I set up a Tiered Approval on my account?
A: Super Users can click on User Profiles located under My Account. Create or
Modify a new Tiered workflow by clicking the Tiered Approvals button.
SUPPORT 31
Office Depot Online User Guide
9 NOTES
NOTES 32