1
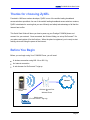
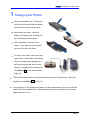
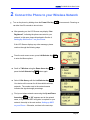
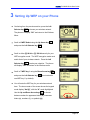
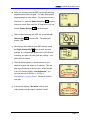
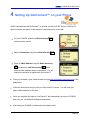
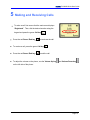
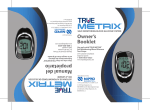
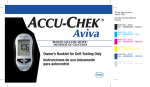
Quick Start Guide Prestige P-2000W VoIP Wi-Fi Phone Read This First Simple steps to make your first call ZyXEL P-2000W Quick Start Guide Page 2 ZyXEL P-2000W Quick Start Guide Thanks for choosing ZyXEL Founded in 1989 as a modem developer, ZyXEL is one of the world's leading broadband access solutions specialists. As one of the world's leading broadband access solutions vendors, ZyXEL is dedicated to ensuring that you can efficiently and safely take advantage of all that the Internet has to offer. This Quick Start Guide will show you how to power up your Prestige P-2000W phone and connect it to your network. Once connected, the Guide will help you set up GloConnect™ for your phone and register it for the first time. When the phone’s registered, you’re ready to start making voice calls using the power of the Internet. Before You Begin Before you can begin using Your P-2000W Phone, you will need: A wireless connection using 802.11b or 802.11g An Internet connection A web browser for GloConnect™ sign-up Internet Prestige P-2000W Phone Wireless Access Point Or Wireless Router Web browser (For GloConnect™ sign-up) Page 3 ZyXEL P-2000W Quick Start Guide Getting to Know Your Prestige P-2000W VoIP Wi-Fi Phone 1. LCD Screen: This screen is used to display information and navigate the phone’s menus. 2. Left Selector key: This key is used to select menu options from the LCD Screen. It is also a shortcut to the phone’s Menu system. 3. Right Selector key: This key is used to select menu options from the LCD Screen. It is also a shortcut to the phone’s Address Book. 4. Arrow keys: This key is used to navigate through the P-2000W’s menus using the LCD Screen 5. OK key: This key is used to select menu options from the LCD Screen 6. Call key: The green Call key is used to initiate or receive voice calls. 7. Power/ End key: The red Power/ End key is used to turn the phone On and Off. It is also used to end voice calls. 8. Alphanumeric keypad: These keys are used to enter letter, numbers and symbols into the phone. 9. Headset Jack: Connection for optional headset (located underneath rubber cover) 10. Volume keys: key increases earpiece volume, and the Volume Down The Volume Up earpiece volume. decreases 11. Power jack: Connect the phone’s power adapter here to charge the battery. Page 4 ZyXEL P-2000W Quick Start Guide Page 5 ZyXEL P-2000W Quick Start Guide Ready to start talking? Follow these quick steps to get started: 1 Charge your Phone 2 Connect the Phone to your Wireless Network 3 Setting Up WEP on your Phone 4 Setting Up GloConnect™ on your Phone 5 Making and Receiving Calls Page 6 ZyXEL P-2000W Quick Start Guide 1 Charge your Phone Remove the battery cover. Press down on the silver button and slide the battery cover with your other hand as shown. Insert battery as shown. Insert the bottom of the battery first, and push the top of the battery into the phone. Place the battery cover back on as shown. Then, slide the cover towards the top until it clicks into place. To charge your phone, remove the gray rubber cover on the bottom of the phone. Plug the included power adapter into a wall outlet, and plug the other end into the phone’s power jack as shown below. The OK key on the phone will turn bright red. The included battery comes fully depleted and takes 2 hours to fully charge. When fully charged, the red OK key will turn off. Once the phone is fully charged, the battery provides approximately 3.5 hours of talk time, and 21-22 hours of standby time. Please remember to reconnect the phone to its power adapter when not in use. Page 7 ZyXEL P-2000W Quick Start Guide 2 Connect the Phone to your Wireless Network Turn on the phone by holding down the Power/ End key for two seconds. Powering on can take from 30 seconds to two minutes. After powering on, the LCD Screen may display “Not Registered”, indicating the phone connected to your network. In this case, please skip ahead to Section 4, Setting Up GloConnect™ on your Phone. If the LCD Screen displays any other message, please continue through the following steps. From the main menu screen, press Left Selector key to enter the Menu options. Scroll to 7.Wireless using the Down Arrow key press the Left Selector key and button again. Select 1.Site Survey with the Left Selector key . Your device will now scan for all the available wireless networks. The number next to the network names indicates the signal strength percentage. Find your wireless network name using the Up and Down Arrow keys . If a “W” appears next to the network name, or if you know WEP encryption is required for your network, then skip to the next section, Setting up WEP on your Phone. Otherwise, continue to the next step. Page 8 ZyXEL P-2000W Quick Start Guide Press the Left Selector key to choose your wireless network. The phone will display “OK” and return to the Wireless Menu. Press the Right Selector key twice to save your new settings. An hourglass will appear on the LCD Screen, indicating your phone is saving the new settings. Your phone will now reboot. Once the phone reboots, it should connect to your wireless network and obtain an IP address. This can take from 30 seconds to two minutes. When finished, the LCD Screen will display “Not Registered”. If the screen displays “Net failed” with an error code, please retry the steps in this section. You can now skip to section 4, Setting Up GloConnect™ on your Phone. Page 9 ZyXEL P-2000W Quick Start Guide 3 Setting Up WEP on your Phone Continuing from the previous section, press the Left Selector key to choose your wireless network. The phone will display “OK” and return to the Wireless Menu. Scroll to 6.WEP Select using the Up Arrow key and press the Left Selector key . Scroll to either [2] 64-bit or [3] 128-bit security for your WEP encryption mode. The WEP encryption mode must match that of your wireless network. Press the Left Selector key to make your selection. The phone will display “OK” and return to the Wireless menu. Scroll to 7.WEP key 1 using the Down Arrow key and press the Left Selector key (most networks use WEP key 1 by default). You will enter the WEP key for your wireless network here. The lower center of the screen shows the keypad mode display “Aa1@”, with the “A” mode highlighted. Use the Up and Down Arrow keys to choose between modes for uppercase letters (A), lowercase letters (a), numbers (1), or symbols (@). Page 10 ZyXEL P-2000W Quick Start Guide Enter your wireless network WEP key through selecting keypad modes and the keypad. You may need multiple keypad presses to enter letters. For example, to enter a lowercase “b”, press the Down Arrow key to select lowercase mode, then press the “2” key twice. You can use the Power/ End key to remove typos. When finished entering your WEP key, press the Left Selector key to choose ‘OK.’ The phone will display “OK”. Now that you have entered your WEP settings, press the Right Selector key twice to save your new settings. An hourglass will appear on the LCD Screen, indicating your phone is saving the new settings. Your phone will now reboot. Once the phone reboots, it should connect to your wireless network and obtain an IP address. This can take from 30 seconds to two minutes. When finished, if the LCD Screen displays “Not Registered”, you can now proceed to Section 4, Setting Up GloConnect™ on your Phone. Otherwise, see the next step. If the screen displays “Net failed” with an error code, please retry the steps in Sections 2 and 3. Page 11 ZyXEL P-2000W Quick Start Guide 4 Setting Up GloConnect™ on your Phone ZyXEL has partnered with GloConnect™ to provide you with VoIP SIP Service, which you’ll need to connect your phone to the Internet to send and receive voice calls. On your P-2000W, press the Left Selector key to enter the menu options. Select 1.Information using the Left Selector key Scroll to 3.MAC Address using the Down Arrow key and press the Left Selector key . . Write down the MAC address shown on the phone. You will need this information to register with GloConnect™. From your computer, open a web browser and type http://officedepot.gloconnect.com in the address bar. Follow the instructions to sign up for your GloConnect™ account. You will need your phone’s MAC address for this step. Once you complete your sign-up, GloConnect™ will automatically set up your P-2000W phone for you. No additional settings are necessary. Start using your P-2000W to make and receive phone calls! Page 12 ZyXEL P-2000W Quick Start Guide 5 Making and Receiving Calls To make a call, first ensure that the main menu displays “Registered”. Then, dial the desired number using the keypad and press the green Call key . Press the red Power/ End key To receive a call, press the green Call key Press the red Power/ End key To adjust the volume on the phone, use the Volume Up key to terminate the call. . to end the call. and Volume Down key on the left side of the phone. Page 13 ZyXEL P-2000W Quick Start Guide Additional Settings For more information on how to set up your phone’s Address Book, Speed Dial, Multiple Profiles, and other advanced settings, please refer to the Prestige P-2000W’s included CD. Support If your phone is experiencing service or account related issues, please contact GloConnect™ for assistance. For further aid setting up your Prestige P-2000W phone, please contact ZyXEL Technical Support: ZyXEL Communications Inc. North America Toll Free: +1-800-978-7222 Fax: +1-714-632-0858 Email: [email protected] http://www.us.zyxel.com/support Thanks for choosing ZyXEL All contents copyright © 2005 ZyXEL Communications Corporation. Page 14