1
Documentation Area
ThinOX 9 for Ino SoC Series Guide
This document is exclusive property of Praim Srl.
Permission is granted to print and copy this document for noncommercial distribution.
Author:
Documentation
Date:
30-May-2013 09:31
URL:
http://wiki.praim.com/display/ThinOX923InoSoC
Page 1 of 104
ThinOX 9 for Ino SoC Series Guide
Table of Contents
1 Introduction ______________________________________________________________________________ 5
2 Initial Installation _________________________________________________________________________ 6
2.1 Language Selection __________________________________________________________________ 7
2.2 Welcome Window ____________________________________________________________________ 8
2.3 End User License _____________________________________________________________________ 9
2.4 IP Address __________________________________________________________________________ 10
2.5 Configure ThinMan Address _________________________________________________________ 11
2.6 Assigning a Static IP Address ________________________________________________________ 12
2.7 Name Resolution ____________________________________________________________________ 13
2.8 Screen Size, Video Refresh Frequency and Display Mode ____________________________ 14
2.9 Wizard Completion __________________________________________________________________ 15
2.9.1 I9010 - Thin Client Model dedicated to Citrix Infrastructure ____________________ 15
2.9.2 I9030 - Thin Client Model dedicated to RDS Infrastructure _____________________ 16
2.9.3 I9020 - Thin Client Model dedicated to VMware Infrastructure _________________ 16
3 Running Environment ___________________________________________________________________ 18
3.1 Power Management of the thin client ________________________________________________ 21
3.2 I9010 Model: User Interface after User Login ________________________________________ 22
3.3 I9020 Model: User Interface after User Login ________________________________________ 24
3.4 User Logout _________________________________________________________________________ 26
4 Configuration Settings ___________________________________________________________________ 27
4.1 General _____________________________________________________________________________ 28
4.1.1 Restore the Terminal to Factory-Default Property Setting ______________________ 28
4.2 Network ____________________________________________________________________________ 30
4.2.1 Ping Function _________________________________________________________________ 30
4.2.2 Advanced Parameters ________________________________________________________ 31
4.2.3 Hosts Table ___________________________________________________________________ 32
4.2.4 DHCP Log File ________________________________________________________________ 33
4.2.5 DHCP Leases _________________________________________________________________ 33
4.2.6 DHCP Renew _________________________________________________________________ 33
4.3 User Interface ______________________________________________________________________ 34
4.3.1 Mouse Settings _______________________________________________________________ 34
4.3.2 International Settings _________________________________________________________ 35
4.3.3 Screen Saver _________________________________________________________________ 36
4.3.4 Video Resolution ______________________________________________________________ 36
4.4 Security ____________________________________________________________________________ 40
4.5 Printers _____________________________________________________________________________ 42
4.5.1 Add Printer ___________________________________________________________________ 42
5 Control Panel ____________________________________________________________________________ 51
5.1 Citrix Receiver Options (I9010 model) _______________________________________________ 53
5.1.1 Citrix Receiver Options (I9010 model) _________________________________________ 53
5.1.2 ICA Global Settings ___________________________________________________________ 55
5.1.3 USB Options __________________________________________________________________ 58
5.2 Multimedia Codecs (I9010 model) ___________________________________________________ 61
Page 2 of 104
ThinOX 9.2.3 for Ino SoC Series Guide
5.2 Multimedia Codecs (I9010 model) __________________________________________________ 61
5.3 Webcam (I9010 model) _____________________________________________________________ 62
5.4 VMware View Options (I9020 model) ________________________________________________ 63
5.4.1 "Connection" tab _____________________________________________________________ 63
5.4.2 "Login" tab ___________________________________________________________________ 65
5.4.3 "Autostart" tab _______________________________________________________________ 66
5.4.4 "Options" tab _________________________________________________________________ 67
5.5 Microsoft RDS Options (I9030 model) _______________________________________________ 74
5.6 ThinMan ____________________________________________________________________________ 83
5.7 Imprivata OneSign Agent ___________________________________________________________ 85
5.8 PCSC Server ________________________________________________________________________ 86
5.9 Remote Assistance _________________________________________________________________ 87
5.10Sound Configuration ________________________________________________________________ 89
5.11Date and Time ______________________________________________________________________ 90
5.12OpenVPN Client _____________________________________________________________________ 91
5.12.1Preliminary Operation ________________________________________________________ 91
5.12.2ThinOX Control Panel _________________________________________________________ 91
5.12.3Running OpenVPN ____________________________________________________________ 94
5.13Port Based Authentication __________________________________________________________ 95
5.14SNMP Agent ________________________________________________________________________ 96
6 Connections Manager ___________________________________________________________________ 97
7 How To __________________________________________________________________________________ 98
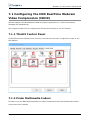
7.1 Configuring the HDX RealTime Webcam Video Compression (I9010) _________________ 99
7.1.1 ThinOX Control Panel _________________________________________________________ 99
7.1.2 Praim Multimedia Codecs _____________________________________________________ 99
7.1.3 Webcam module ____________________________________________________________ 100
7.1.4 ICA Global Settings __________________________________________________________ 100
7.1.5 Citrix HDX USB Redirection __________________________________________________ 101
7.1.6 Sound Configuration _________________________________________________________ 102
7.1.7 Supported Webcams ________________________________________________________ 103
7.2 About Certificates _________________________________________________________________ 104
ThinOX 9 Ino SoC Series
Page 3 of 104
ThinOX 9 for Ino SoC Series Guide
ThinOX 9 Ino SoC Series
User Guide
Version: 9.2.3
Revision: 1
Date: 29 May 2013
This document has been produced by Praim.
This guide, the software and the firmware are protected under international copyright laws,
with all rights reserved. It's forbidden to reproduce, adapt or translate this guide into any
language in any form or by any means, except documentation kept by the purchaser for
backup purposes, without explicit written permission of Praim Srl.
The information in this document is subject to change without notice. Praim Srl makes no
representations or warranties with respect to the contents hereof and specifically disclaim any
implied warranties of merchantability or fitness for any particular purpose. Further, Praim Srl
reserves the right to revise this publication and to make changes from time to time in the
content hereof without obligation of Praim Srl to notify any person of such revision or changes.
Unless otherwise specified, all references to company names, addresses and data appearing in
this guide or in screenshots and examples are fictitious and is only meant to illustrate the use
of the Praim product and are used only for identification or explanation and to the owner’s
benefit. All products and/or company names mentioned herein are trademarks or copyrights of
their respective owners.
Page 4 of 104
ThinOX 9.2.3 for Ino SoC Series Guide
1 Introduction
Praim ThinOX Terminals are based on the Linux embedded operating system (Linux based
Terminal design) and are designed for accessing servers and server based applications on a
network.
The Thin Client technology provides simple and secure access to server based resources and
applications, as well as a lower total cost of device ownership (TCO).
The installation of Praim ThinOX terminals can be performed in a matter of minutes and
requires virtually no technical experience.
On the first boot, a Wizard guides the user through the most basic terminal settings for the
network, keyboard, and display.
Page 5 of 104
ThinOX 9 for Ino SoC Series Guide
2 Initial Installation
The first time the ThinOX terminal is booted, a “Wizard” will appear which will guide the user
through the basic terminal settings.
Page 6 of 104
ThinOX 9.2.3 for Ino SoC Series Guide
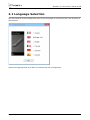
2.1 Language Selection
The first window of the configuration asks for the language to be used for the user interface of
the terminal.
Select the language and click "OK" to continue with the configuration.
Page 7 of 104
ThinOX 9 for Ino SoC Series Guide
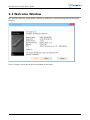
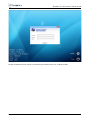
2.2 Welcome Window
The welcome window, shown below, displays a “Welcome” message along with the firmware
revision.
Click on "Next" to proceed to the first window of the setup.
Page 8 of 104
ThinOX 9.2.3 for Ino SoC Series Guide
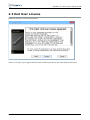
2.3 End User License
Read the End User License Agreement.
Click on "Accept" if you agree with the terms and to proceed to the next step of the setup.
Page 9 of 104
ThinOX 9 for Ino SoC Series Guide
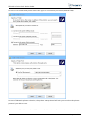
2.4 IP Address
The following screen allows the setting of the IP address in one of two ways:
Obtain an IP address automatically from a DHCP Server.
Assign a static IP address.
It also allows to configure the ThinMan Address.
Click on "Configure" to enter ThinMan Server information (see next chapter) or select the
desired IP address option and click "Next" to continue.
Page 10 of 104
ThinOX 9.2.3 for Ino SoC Series Guide
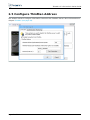
2.5 Configure ThinMan Address
The window allow to configure information related to the ThinMan Server. More information on
chapter ThinMan (see page 83).
Page 11 of 104
ThinOX 9 for Ino SoC Series Guide
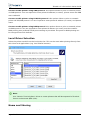
2.6 Assigning a Static IP Address
Whether "Insert Static IP Address" is selected, the following information must be completed:
IP Address: enter a static IP Address for the device. This address must be unique on the
network and no other device can have the same address.
Subnet Mask: enter the subnet mask for the terminal. The subnet mask will determine
the class of the network and therefore how network traffic will be routed to and from the
terminal.
Default Gateway: enter the IP Address of the gateway for access to IP addresses
outside of the subnet mask.
After entering the information click on "Next" to proceed with the configuration.
Page 12 of 104
ThinOX 9.2.3 for Ino SoC Series Guide
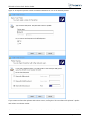
2.7 Name Resolution
DNS (Domain Name Service) and WINS (Windows Internet Naming Service) allow the resolution
of logical system names to IP addresses.
The parameters for Name Resolution are:
Activate DNS: enable DNS name resolution
Default Domain Name: the name of the default domain
IP address of Primary DNS server: enter the IP address of the primary DNS server
IP address of Secondary DNS server: enter the IP address of the secondary DNS
server (it will be used if the primary server is not available)
After entering the requested information click on "Next" to continue with the configuration.
Page 13 of 104
ThinOX 9 for Ino SoC Series Guide
2.8 Screen Size, Video Refresh Frequency and
Display Mode
Select the desired screen size and video frequency from the drop down list; this must be
compatible with the monitor being used.
Click on "Next" to continue.
Page 14 of 104
ThinOX 9.2.3 for Ino SoC Series Guide
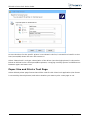
2.9 Wizard Completion
In the last window of the wizard users can decide whether to complete the installation or
change any previous settings by going "Back" in the process.
Whether you are configuring thin client model dedicated to single Virtual Desktop
Infrastructure, you may configure dedicated parameters depending from it. See next chapters
for detailed informations.
To complete the configuration, click on "Finish".
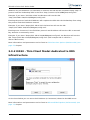
2.9.1 I9010 - Thin Client Model dedicated to Citrix
Infrastructure
On the last window you can enter the informations related on Citrix server.
By selecting "Retrieve PNAgent site URL from DHCP" you configure the thin client to use
the URL provided by the network via the DHCP Option 181.
By selecting "Enter PNAgent site URL" you have to insert the URL for the Citrix server in the
field.
The URL has to be inserted (or saved to the DHCP Option 181) in the correct form and depend
on the server type.
Whether only an IP Address (or hostname) is entered, the URL will be completed using "http" as
Page 15 of 104
ThinOX 9 for Ino SoC Series Guide
Whether only an IP Address (or hostname) is entered, the URL will be completed using "http" as
protocol and the XenDesktop URL in the form "http://<server>/Citrix/PNAgent/config.xml".
Example: if you enter "192.160.0.100" the Receiver will use the URL
"http://192.168.0.100/Citrix/PNAgent/config.xml".
Entering the protocol and the IP Address will complete the URL with the XenDesktop form using
the protocol and the IP Address entered.
Example: if you enter "https://192.160.0.100" the Receiver will use the URL
"https://192.168.0.100/Citrix/PNAgent/config.xml".
Entering more characters in the field than protocol and IP Address will use the URL as entered.
Pay attention to eventually errors.
Example: if you enter "https://192.160.0.100/dt/PNAgent/config.xml" the Receiver will use the
URL "https://192.160.0.100/dt/PNAgent/config.xml" (this example URL is valid for a
VDI-in-a-Box server).
More informations and parameters can be found on Citrix Receiver Options (I9010 model) (see
page 53) chapter.
2.9.2 I9030 - Thin Client Model dedicated to RDS
Infrastructure
On the last window you can enter the IP Address (or hostname) related to the RDS server.
More informations and parameters can be found on Microsoft RDS Options (I9030 model) (see
page 74) chapter.
2.9.3 I9020 - Thin Client Model dedicated to VMware
Page 16 of 104
ThinOX 9.2.3 for Ino SoC Series Guide
2.9.3 I9020 - Thin Client Model dedicated to VMware
Infrastructure
On the last window you can enter the IP Address (or hostname) related to the VMware
farm/server.
More informations and parameters can be found on VMware View Options (I9020 model) (see
page 63) chapter.
Page 17 of 104
ThinOX 9 for Ino SoC Series Guide
3 Running Environment
Once the device is powered on (or when the initial installation is terminated) the thin client will
connect to the single connection defined and is ready to accept credentials.
The wallpaper on the desktop reflect the Virtual Desktop Infrastructure used for the connection.
In this example the thin client is connecting to a Citrix Infrastructure on a I9010 model.
Page 18 of 104
ThinOX 9.2.3 for Ino SoC Series Guide
In this example the thin client is connecting to a RDS server on a I9030 model.
Page 19 of 104
ThinOX 9 for Ino SoC Series Guide
In this example the thin client is connecting to a VMware farm on a I9020 model.
Page 20 of 104
ThinOX 9.2.3 for Ino SoC Series Guide
3.1 Power Management of the thin client
The thin client can be powered off or rebooted by pressing the power icon placed on the
bottom right part of the screen.
A dialog window is shown requesting to select the type of operation to be executed. After 10
second if there is no interaction from the user, the device is powered off.
Page 21 of 104
ThinOX 9 for Ino SoC Series Guide
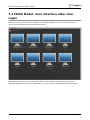
3.2 I9010 Model: User Interface after User
Login
When the user has inserted its credential in the login panel, the thin client will load the
resources from the Virtual Desktop Infrastructure.
The loaded applications or desktops will be presented on the central part of the screen and
arranged so that they are distributed on the screen.
Page 22 of 104
ThinOX 9.2.3 for Ino SoC Series Guide
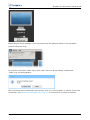
Hovering the mouse over an icon will highlight the icon and with a single click the selected
application/desktop will start.
Page 23 of 104
ThinOX 9 for Ino SoC Series Guide
3.3 I9020 Model: User Interface after User
Login
When the user has inserted its credential in the login window, the thin client will load the
resources from the Virtual Desktop Infrastructure.
Depending on the server rules and client options the VMware client will show the list of
available desktop. Double click a desktop icon to launch the corresponding virtual desktop.
Page 24 of 104
ThinOX 9.2.3 for Ino SoC Series Guide
Depending on server settings, hover the mouse over the protocol allows to change which
protocol has to be used.
To close the connection select "Quit" from "File" menu (or press hotkeys combination
"CTRL"+"Q" on the keyboard).
The connection will be restarted in 10 seconds. User can "Connect Now" or "Abort" (close) the
connection. See Connections Manager (see page 97) to reconnect to a closed connection.
Page 25 of 104
ThinOX 9 for Ino SoC Series Guide
3.4 User Logout
On the upper right part of the screen the user can logout from the running session clicking on
"Sign Out"
Logging out from the session will load the initial login interface.
Page 26 of 104
ThinOX 9.2.3 for Ino SoC Series Guide
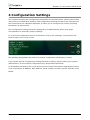
4 Configuration Settings
This chapter describes the configuration parameters for the ThinOX thin clients; these will be
referred to as Configuration Settings. The Configuration Settings window is the equivalent of
the Control Panel on a Windows based PC; it allows you to configure the various operating
parameters of the terminal.
The Configuration Settings window is displayed as a tabbed dialog, where each page
corresponds to a particular group of settings.
To access the configuration menus of the device click on the "Settings" icon placed in the
bottom-right corner of the screen.
The following paragraphs describes the terminal configuration parameters in detail.
If you cannot get the Configuration Settings window to display, please contact your system
administrator, as the terminal configuration may be password protected.
On the bottom-left side of the screen there are some useful information regarding the device
such as hostname, IP Address, MAC Address, Serial number, firmware Version and thin client
Model.
Page 27 of 104
ThinOX 9 for Ino SoC Series Guide
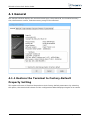
4.1 General
The General window displays the terminal model type, the product ID, the installed memory
size, the firmware version, and the memory usage of the terminal.
4.1.1 Restore the Terminal to Factory-Default
Property Setting
This option will reset all Terminal Properties to their factory default parameters. By selecting
this option, the terminal will reboot and the configuration Wizard displayed again at its restart.
Page 28 of 104
ThinOX 9.2.3 for Ino SoC Series Guide
Flagging the "Reset Network Setting..." parameter will also reset all information on network
settings (IP Address and ThinMan Server Address). To leave them untouched do not flag this
parameter.
Click “Yes” to start the reset to factory default operation.
Page 29 of 104
ThinOX 9 for Ino SoC Series Guide
4.2 Network
The Network page controls the parameters for the network interface.
Obtain IP Address from DHCP Server: use this setting if your network is configured to use a
DHCP server. The DHCP server will automatically provide the terminal with an IP address, a
network mask, a domain, and DNS servers.
Insert Static IP Address: use this setting if you will manually insert the IP address of the
terminal.
IP Address: enter the IP address of the terminal in this field
Subnet Mask: enter the subnet mask for the terminal in this field; the default value for
this parameter is 255.255.255.0
Default Gateway: enter the IP address of the server which routes traffic to and from the
local network of the terminal
Terminal Name: enter the name by which the terminal will be known on the network. This
name will be shown when using Praim ThinMan management software.
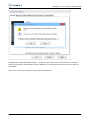
4.2.1 Ping Function
Page 30 of 104
ThinOX 9.2.3 for Ino SoC Series Guide
4.2.1 Ping Function
The Ping dialog box will help pinging other computers on the network and verifying network
connectivity.
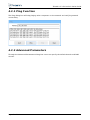
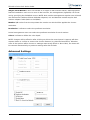
4.2.2 Advanced Parameters
Through the Advanced Parameters dialog box users can specify the default domain and DNS
servers.
Page 31 of 104
ThinOX 9 for Ino SoC Series Guide
Enable DNS: check this box if you want to use DNS for solving host names to IP addresses.
Default Domain: when DNS is enabled, enter the Name of the Domain you want to join.
DNS Address 1: when DNS is enabled, enter the IP address of the primary DNS server.
DNS Address 2: when DNS is enabled, enter the IP address of the secondary DNS server. This
DNS server is used if the primary DNS server is unavailable.
Network: if Static IP is enabled, enter the network where the terminal is.
Broadcast Address: if Static IP is enabled, enter the broadcast address for the network; the
broadcast address specifies the network class for special broadcast messages.
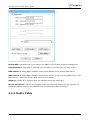
4.2.3 Hosts Table
Page 32 of 104
ThinOX 9.2.3 for Ino SoC Series Guide
Through the Hosts Table users can easily associate IP addresses to descriptive names without
having to use DNS; the format is to define one address/name association per line; the IP
address of the machine first and then the descriptive name for the host.
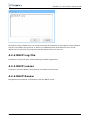
4.2.4 DHCP Log File
It allows to view the log file created during the DHCP negotiation.
4.2.5 DHCP Leases
It allows to view the DHCP configuration received from the server.
4.2.6 DHCP Renew
Renegotiate the network configuration with the DHCP server.
Page 33 of 104
ThinOX 9 for Ino SoC Series Guide
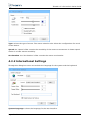
4.3 User Interface
The “User Interface” tab allows users to achieve a higher level of interface customization
according to their needs and preferences.
4.3.1 Mouse Settings
It allows to set the type of mouse in use and to customize both the pointer speed and
acceleration.
Page 34 of 104
ThinOX 9.2.3 for Ino SoC Series Guide
Type: selects the type of mouse. The mouse selection also allows the configuration of a touch
screen device.
Speed: the "Speed" slider controls the sensitivity of the mouse to movement. A slower speed
results in a lower mouse sensitivity.
Acceleration: the "Acceleration" slider controls the mouse acceleration.
4.3.2 International Settings
Through this dialog box users can set both the language for the system and the keyboard.
System Language: selects the language for the user interface.
Keyboard Layout: selects the language for the keyboard layout.
Page 35 of 104
ThinOX 9 for Ino SoC Series Guide
System Language: selects the language for the user interface.
Keyboard Layout: selects the language for the keyboard layout.
Edit: by clicking on “edit” users can customize the keyboard definition file.
Enable NumLock at Startup: it automatically enables NumLock when Thin Client starts.
Repeat Rate and Delay: this option allows to customize both the repeat rate key and delay.
The Repeat Rate controls the rate at which a key is repeated after being held. The Repeat
Delay controls the time delay before a key is repeated after being pressed; as the Repeat
Delay is increased, the time a key must be held before it is repeated increases accordingly.
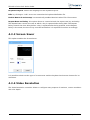
4.3.3 Screen Saver
This option enables the Screen Saver.
It is possible to both set the type of screen saver and the keyboard and mouse timeout for its
activation.
4.3.4 Video Resolution
The Video Resolution controller allows to configure many aspects of monitors, screen resolution
and color depth.
Page 36 of 104
ThinOX 9.2.3 for Ino SoC Series Guide
ThinOX Thin Clients support both single and dual monitor configurations.
Single / Dual Monitor: users can decide on a single or dual monitor station, defining specific
Page 37 of 104
ThinOX 9 for Ino SoC Series Guide
Single / Dual Monitor: users can decide on a single or dual monitor station, defining specific
features needed on each one. In case of dual monitor, the arrangement (right/left) can be set
out by specifying the SVGA/DVI source. NOTE: dual monitor arrangement requires one VGA and
one DVI monitor (without further DVI/VGA adaptors). Ino and Atomino models require dual
monitor adapter cable (DVI-I to SVGA/DVI).
Monitor 1/2: select from the drop down the monitor on which will be applied the chosen
resolution.
Resolution: it allows to select the preferred resolution.
In dual arrangement users can select the preferred resolution for each monitor.
Colors: it allows to define the color depth.
NOTE: changes will be effective after clicking on OK on the control panel. A pop-up will then
request either to confirm or restore the chosen features (e.g. Monitor Resolution). Whether
none of the options will be chosen or settings were wrong (black or blur video), the video will
be restored automatically to previous settings after 30 seconds.
Advanced Settings
“Advanced settings” allows to:
Page 38 of 104
ThinOX 9.2.3 for Ino SoC Series Guide
“Advanced settings” allows to:
Power Saving: enable power saving settings.
Font Server: enable to specify Font Server address and port.
Font via NFS: additional Fonts retrievable on specific Server through NFS protocol.
Users can also customize more specific video management features.
Enable DDC: through Display Data Channel users can receive identification data on their
screen.
Hardware Acceleration: it enables integrated video card acceleration.
VESA driver: it enables display management through VESA driver.
Enable Debug: it enables and allows debug information display.
Block X11 access from network: limit Thin Client access through X11 protocol.
Enable CVT: it enables display interface through “Coordinated Video Timings” protocol.
Page 39 of 104
ThinOX 9 for Ino SoC Series Guide
4.4 Security
The Security page enables controlled access to the terminal and its configuration screens. This
may be done from the system administrator by “locking down” the terminal; so, making the
terminal configuration unavailable to the normal user.
Deny Connection Modify: does not allow the user to edit or even access the configuration
menu of connections.
Enable SSH: will enable the SSH service on the thin client.
Enable USB Mass Storage: this option enable or disable the USB hotplug detection.
Enable PowerOff/Reboot: when flagged will show the Power icon on the desktop (see
Running Environment (see page 18) chapter) and the "Shut down" button on the Connections
Manager (see page 97) window.
Require a password to modify the configuration: this option password protects access to
the Terminal Properties dialog box.
User Parameters: it can be specified and configured which parameters can be modified by
users when the terminal is protected by a password.
User Authentication: this option password protects the access to the terminal on the startup
Page 40 of 104
ThinOX 9.2.3 for Ino SoC Series Guide
User Authentication: this option password protects the access to the terminal on the startup
and after the screensaver has been launched. At this point, you have to enter and confirm the
password.
Allow user to modify password: when checked, allows users to modify the password.
Page 41 of 104
ThinOX 9 for Ino SoC Series Guide
4.5 Printers
In the Printers page users can configures printers and printer sharing for the terminal.
The ThinOX thin client series support the "sharing" of locally attached printers using LPR, RAW,
or ThinPrint printing protocols.
Each of these protocols can be configured on any type of attached printer allowing the
terminals to be used as print servers.
In addition printers can be used and exported through RDP, ICS and other remote protocols.
4.5.1 Add Printer
To add and configure a printer click on the Add printer icon and follow the printer configuration
wizard instructions.
Page 42 of 104
ThinOX 9.2.3 for Ino SoC Series Guide
Select if you want to configure a local attached printer or a network shared printer.
Set Printer Server or Local Port
In case of network printer select the protocol to be used and the printer server address (see
below).
In case of local attached printer select the type of connection port used (default USB).
Page 43 of 104
ThinOX 9 for Ino SoC Series Guide
In case of local attached printer select the type of connection port used (default USB).
In case of Network printer selection, the printer setup wizard will ask you to select the printer
protocol you wish to use.
Connect to this printer using SMB protocol: this options allows to print on network printer
Page 44 of 104
ThinOX 9.2.3 for Ino SoC Series Guide
Connect to this printer using SMB protocol: this options allows to print on network printer
via SMB protocol. You are required to enter printer IP address (or name), printer name and SMB
user credential.
Connect to this printer using LPD/LPR protocol: this options allows to print on network
printer via LPD/LPR protocol. You are required to enter printer IP address (or name), and Queue
name.
Connect to this printer using RAW protocol: this options allows to print on network printer
via RAW protocol. You are required to enter printer IP address (or name), and Port number.
RAW printing uses prefixed TCP/IP ports starting at port 9100. The ports for RAW printing can
be changed from their defaults.
Local Driver Selection
Select the printer model from the local driver list. This can be used when printing directly from
thin client local applications (e.g. local Firefox browser).
Note
Use “Generic Text Only Raw” driver to create printers that will be exported in Terminal
Server environment (RDP / ICA).
Name and Sharing
Type or accept the printer name and define whether to use it as default printer.
Page 45 of 104
ThinOX 9 for Ino SoC Series Guide
Type or accept the printer name and define whether to use it as default printer.
If you want to share the printer with other users, unflag the “do not share this printer” option
and select one share mode:
Share with SMB protocol: This options allows the local printers to be shared using the SMB
Page 46 of 104
ThinOX 9.2.3 for Ino SoC Series Guide
Share with SMB protocol: This options allows the local printers to be shared using the SMB
protocol.
Share with LPD/LPR protocol: This option allows the local printer to be shared using
LPD/LPR protocols.
When enabled, the "Line Printer Daemon" (LPD) will be started on the terminal, and accept
requests for the enabled printers(only those printers which are enabled can accept LPR printing
requests).
Each printer has a default "queue" name which is used to differentiate the local printer from a
remote system. When the printer is enabled, the queue name can be changed if needed.
For those printers which have configuration parameters, a Configure button is displayed on the
right of the printer queue name. For COM port printers, the baud rate, flow control, parity, data
bits, and stop bits may be configured. For NET printers, the IP address and queue name of the
printer must be configured.
Example: a USB printer is connected to the terminal, LPD printing enabled, the USB printer is
checked, and the queue name is "usb". In this case only LPR "print jobs" with the port "usb" will
be printed on the local USB printer.
LPD/LPR printing uses TCP/IP port 515.
Share with RAW protocol: This options allows the local printers to be shared using also the
RAW protocol.
RAW printing uses predetermined TCP/IP ports starting at port 9100. The ports for RAW printing
may be changed from their defaults. It is possible to print RAW jobs locally on Parallel, Serial,
and USB printers using different ports.
Once the thin client is rebooted the shared printer can be reached via the network with the
selected protocol (SMB / LPD-LPR / RAW).
Note
Sharing the printer is not necessary to export it in Terminal Server environment.
Exporting and Selecting the Driver for Terminal Server
In case of remote connections using RDP, ICA or SSGD each connected printer can also be
“enabled” to the remote server. To enable select the specific check box and define server
printer driver name and description.
Page 47 of 104
ThinOX 9 for Ino SoC Series Guide
In case the driver for the specific printer is not shown in the list, is essential to install it on the
host (server/VM) where the user will connect to.
Select “Manual edit” and type a description of the driver (not the single printer) in the section
below as defined in the control panel/Host printers, recopying carefully spaces and differences
between upper and lower case.
Paper Size and Print a Test Page
Select default printer page format that will be used for thin client local application (the format
is not used by shared printers) and select whether you want to print a test page or not.
Page 48 of 104
ThinOX 9.2.3 for Ino SoC Series Guide
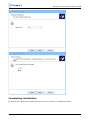
Completing Installation
Review all the configuration parameters and click on "Finish" to create the printer.
Page 49 of 104
ThinOX 9 for Ino SoC Series Guide
A new printer icon, with the printer name, will be shown in the Printers Panel.
Each printer configuration parameter can be modified after the wizard. To edit the printer
properties, right click on the printer icon and select “Properties” menu.
Page 50 of 104
ThinOX 9.2.3 for Ino SoC Series Guide
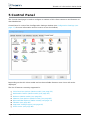
5 Control Panel
The Control Panel page is used to configure a number of thin client resources and features as
described below.
Control Panel is a tab of the Configuration Settings window (see Configuration Settings (see
page 27) for more information and for how to access its window).
Depending on the thin client model and on the available features some icons will not be
displayed.
The list of features currently supported is:
Citrix Receiver Options (I9010 model) (see page 53)
Multimedia Codecs (I9010 model) (see page 61)
Webcam (I9010 model) (see page 62)
VMware View Options (I9020 model) (see page 63)
Microsoft RDS Options (I9030 model) (see page 74)
ThinMan (see page 83)
Imprivata OneSign Agent (see page 85)
PCSC Server (see page 86)
Remote Assistance (see page 87)
Page 51 of 104
ThinOX 9 for Ino SoC Series Guide
Remote Assistance (see page 87)
Sound Configuration (see page 89)
Date and Time (see page 90)
OpenVPN Client (see page 91)
Port Based Authentication (see page 95)
SNMP Agent (see page 96)
Page 52 of 104
ThinOX 9.2.3 for Ino SoC Series Guide
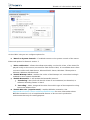
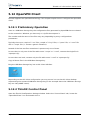
5.1 Citrix Receiver Options (I9010 model)
5.1.1 Citrix Receiver Options (I9010 model)
Citrix Receiver client requires a Citrix Server active on the network.
On this window you can enter the informations related on Citrix server.
By selecting "Retrieve PNAgent site URL from DHCP" you configure the thin client to use
the URL provided by the network via the DHCP Option 181.
By selecting "Enter PNAgent site URL" you have to insert the URL for the Citrix server in the
field.
The URL has to be inserted (or saved to the DHCP Option 181) in the correct form and depend
on the server type.
Whether only an IP Address (or hostname) is entered, the URL will be completed using "http" as
Page 53 of 104
ThinOX 9 for Ino SoC Series Guide
Whether only an IP Address (or hostname) is entered, the URL will be completed using "http" as
protocol and the XenDesktop URL in the form "http://<server>/Citrix/PNAgent/config.xml".
Example: if you enter "192.160.0.100" the Receiver will use the URL
"http://192.168.0.100/Citrix/PNAgent/config.xml".
Entering the protocol and the IP Address will complete the URL with the XenDesktop form using
the protocol and the IP Address entered.
Example: if you enter "https://192.160.0.100" the Receiver will use the URL
"https://192.168.0.100/Citrix/PNAgent/config.xml".
Entering more characters in the field than protocol and IP Address will use the URL as entered.
Pay attention to eventually errors.
Example: if you enter "https://192.160.0.100/dt/PNAgent/config.xml" the Receiver will use the
URL "https://192.160.0.100/dt/PNAgent/config.xml" (this example URL is valid for a
VDI-in-a-Box server).
"Auto connect if only one Desktop in list" will connect automatically the client to the
single Desktop whether there is only one available Desktop for the user.
"Auto-logoff at VD Logoff/disconnect" will automatically logoff the user from the thin client
session, when the user logoff or disconnect from the virtual desktop.
"Power-Off at VD Logoff/disconnect" will automatically power off the thin client when the
user logoff or disconnect from the virtual desktop.
"Auto Login" if enabled allows to insert credential that will be used to connect to the virtual
infrastructure.
"User Name" and "Password": enter the username and the password that will be used
to connect via auto login to the virtual infrastructure.
"Domain Name" can be precompiled with a domain name that will be used on login phase
(the domain name is not visualized on the login panel and can not be modified by the user on
login phase; the only way for the user to use a different domain in login phase is to insert in the
"User name" field on the login panel a string in the form "<domain>\<username>").
"Citrix Access Gateway": flag this option to use a Citrix Access Gateway to access the virtual
infrastructure.
"Token (Password2)": flag this option to allows the user to enter a the token in the login
phase (it adds an additional field in the login window).
More parameters can be entered clicking on "USB Options" or "ICA Global Settings". For a
detailed descriptions of this parameters refer to next chapters ICA Global Settings (see page
55) and USB Options (see page 58).
Once the parameters have been configured, when the thin client starts will ask credential
(username and password) and then query the specific server for a list of all Desktops/Published
Applications available to that user (see Running Environment (see page 18) for more
informations).
Page 54 of 104
ThinOX 9.2.3 for Ino SoC Series Guide
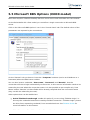
5.1.2 ICA Global Settings
This ICA Global Settings dialog window is used to configure settings for the Citrix connection.
Preferences Tab
MultiMonitor: in case of Dual Monitor the aspect is defined once connected:
Primary/Secondary or Stretched on both monitors.
Enable Windows Alert Sounds: it enables Windows Alert sounds in Citrix sessions.
Enable Audio Input Device: it enables audio input (phone jack) from the thin client towards
server.
Hot Keys Tab
Page 55 of 104
ThinOX 9 for Ino SoC Series Guide
Hot Keys: allows the mapping of special keys within the Citrix session.
Key combination management: through this tab users can decide whether Windows
Hotkeys (such as CTRL+ALT+Canc) are managed by the Thin Client operating system or
remotely within the connection.
Server Location Tab
This tab allows to specify protocols and addresses of XenApp servers that will be taken as
default values (during the Citrix session setup wizard).
Firewall Tab
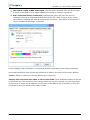
Page 56 of 104
ThinOX 9.2.3 for Ino SoC Series Guide
The Firewall tab allows to configure the Citrix settings to connect the server through a firewall
and/or using a proxy.
Ask your network administrator for the required information.
Devices Tab
"Export USB Mass Storage devices": allows to define whether USB Mass Storage devices,
connected to the Thin Client, are to be exported on the virtual desktop.
"Device" defines the local drive name exported to the virtual desktop. The USB mass storage
devices will be shared as directories under the same device name. The directory name is the
name of the USB mass storage device.
"Read" and "Write" defines whether the exported device can be read or written in the virtual
Page 57 of 104
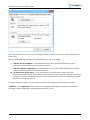
ThinOX 9 for Ino SoC Series Guide
"Read" and "Write" defines whether the exported device can be read or written in the virtual
desktop. Possible values are: "Yes" (the operation is allowed), "No" (the operation is NOT
allowed), "Prompt" (on the first access to the device a confirmation is required, the choice is
valid for the connection session).
Advanced Tab
"ICA Client Configuration files": user can access and modify Citrix Client configuration files.
"Force Window Manager to report Working Area (reboot)": reserved option. It needs a
reboot to be applied.
"Mouse Sends Control-V": allows to emulate a "CTRL + V" keyboard pressing on the clicking
of the central mouse button (the same to execute a paste operation). It emulates the same
behaviour for a mouse used under Linux O.S..
"PointerClickTime": allows to enter the value for the "ica.wfclient.pointerclicktime" option of
the registry. Leave unchanged if you do not have strong necessities to change it.
"Font Smoothing Type": allows to configure the font smoothing type. To have the best result
in visualization quality set it to "Clear Type". More information on Citrix site at this link
http://support.citrix.com/proddocs/topic/receiver-linux-blackfoot/linux-config-cleartype-font.html
.
"Add Certificate...": it allows users, whether necessary, to add and manage certificate to
access the Farm.
5.1.3 USB Options
It enables Citrix HDX USB Redirection. It allows to export, to the virtual desktop, the USB
resources connected on the Thin Client.
Page 58 of 104
ThinOX 9.2.3 for Ino SoC Series Guide
"Enable Citrix HDX USB Redirection": this parameter enable or disable the Citrix HDX USB
Redirection.
If enabled you have to decide to:
"Automatic share all plugged devices": selecting this parameter will share all USB devices
plugged in the thin client to the virtual desktop. Shared resources are not more visible
from the thin client. This is a not recommended option (e.g. all the USB devices will be
not more available locally on the thin client).
"Sharing device based on category": with this option it is possible to flag which
categories of device has to be exported via redirection. (e.g. in this case Human Interface
devices like mouse, pad, keyboard are not exported and remain available to the thin
client).
Page 59 of 104
ThinOX 9 for Ino SoC Series Guide
The first list report the device exception list, while the second report the currently plugged
device.
To add a device to the exclusion list select it from the list of plugged device and click on "Add
to Ex. list".
Define the type of exception by selecting to “Never export” or “Always export” the USB device,
then click "OK" to add the device to the exclusion list.
Page 60 of 104
ThinOX 9.2.3 for Ino SoC Series Guide
5.2 Multimedia Codecs (I9010 model)
The “Multimedia Codecs” panel allows users to enable the feature called HDX Mediastream
Redirection on Citrix and VMware connections (in this last case only with RDP protocol).
It installs and enables all the necessary video and audio codecs.
This feature is optional and has a separated license that has to be purchased from Praim.
Page 61 of 104
ThinOX 9 for Ino SoC Series Guide
5.3 Webcam (I9010 model)
This feature enable/disable the HDX Realtime Webcam Video Compression used by the Citrix
connection. It is enabled by default.
Once enabled you can:
"Force Loading Drivers": will load in memory all the device drivers present in the thin
client (useful for testing purpose and for initial testing of the HDX Realtime Webcam .
"Hotplug": try to load the appropriate driver depending on the connected webcam. If it
is not working try the other option.
Note
In the case you are using HDX Realtime Webcam be sure to not export webcam via
HDX USB Redirection.
Refer to Configuring the HDX RealTime Webcam Video Compression (see page 99) paragraph
for a detailed guide.
Page 62 of 104
ThinOX 9.2.3 for Ino SoC Series Guide
5.4 VMware View Options (I9020 model)
VMware View client requires a VMware View farm or server active and reachable over the
network.
On the Praim I9020 thin client model you can define a single VMware View connection.
Click on the "VMware View Options" icon in the "Control Panel" tab. The default values of the
parameters are reported by the screenshots.
5.4.1 "Connection" tab
On the "Connection" tab you have to insert the "View Server" address (can be an IP Address
or a hostname) where the VMware View server resides.
Other options that can be modified are:
"Port": the port on the server where the VMware infrastructure is listening for
connections.
"SSL":enable it if you are using an encrypted connection.
Page 63 of 104
ThinOX 9 for Ino SoC Series Guide
Clicking on "VMware options..." will open the dialog window above. Here the available options
are:
"Close Desktop library window at VD logoff/disconnect": ...
"VMware Kiosk mode (VMware client)": Kiosk Mode is a particular mode in which the
client can connect the VMware server. More information can be available at VMware
documentation site (e.g. consult
http://pubs.vmware.com/view-50/index.jsp#com.vmware.view.administration.doc/GUID-84E6E2DA-0C
)
"Enable Smart Card Login": allows login to be made via smart cards.
"Show Top bar": enable or not the top bar in the connection screen.
"Bitmap Cache size (MB)": the maximum amount of memory dedicated to cache
bitmap used by the client.
"Enable FIPS PCoIP encryption": ...
Clicking on "SSL Verification Mode..." will change the behaviour of the client depending on
certificates:
"Reject the unverifiable connection (Secure). ...": the connection to the server will
be rejected if certificates are not loaded on the client or they are not corresponding to
the server.
"Warn if the connection may be insecure (Default). ...": when connecting to a non
Page 64 of 104
ThinOX 9.2.3 for Ino SoC Series Guide
"Warn if the connection may be insecure (Default). ...": when connecting to a non
secure server the client warn and reject the connection if certificates are not valid.
"Allow the unverifiable connection (Not Secure). ...": in any case the connection to
the server is executed
Clicking on "OK" will close the window.
Clicking on "Import CA Certificate" will open the browsing window above. Use it to browse
where you save the Certification Authority certificate (e.g. on a USB mass storage key).
Selecting the certificate and clicking on "Import" will save the selected certificate on the thin
client. Once the certificate is copied the window will automatically close.
Click on "Cancel" will close the window when you do not import the certificate.
For more information on certificate format read "About Certificates (see page 104)" chapter.
5.4.2 "Login" tab
Page 65 of 104
ThinOX 9 for Ino SoC Series Guide
On the "Login" tab you will find settings about:
"Enable Auto Login": when this flag is enabled enabled, the user is not asked for
credentials by the connection. Credentials can be entered by the user using ThinMan
Login or can be embedded in the connection (see next parameters).
"ThinMan Login credentials pass-through": this flag force the connection to
use the credentials inserted before in the ThinMan Login (for more information on
ThinMan Login read the ThinMan User Guide). Enable this flag only if the thin client
is protected by the ThinMan Login, a connection error is returned if you try to use
this flag without ThinMan Login enabled.
"Username, Password, Domain Name": enter the embedded credentials for the
connection (credentials are not asked to the user). This credentials are used firstly
when the connection is executed; if the login phase fails, connection will ask for
new credentials (the new credentials are not stored).
"Thin Client Logoff at VDI user logoff": this property may be configured when the
thin client is protected under ThinMan Login. If the flag is enabled when the user logoff
from the remote desktop the thin client execute a logoff and the ThinMan Login windows
is displayed.
5.4.3 "Autostart" tab
Page 66 of 104
ThinOX 9.2.3 for Ino SoC Series Guide
On the "Autostart" tab the user can configure these options:
"Auto connect Desktop if single in list": if enabled and there is only a virtual desktop
available from the VMware farm, it will be automatically connected.
"Auto connect Desktop based on Display Name": it will connect to a specific virtual
desktop depending by:
"Client Host Name": it will connect to the virtual desktop whose name is the
same as the thin client hostname
"Client MAC Address": it will connect to the virtual desktop whose name is the
same as the thin client MAC Address
"Desktop Display Name": it will connect to the virtual desktop whose name is the
same as the string specified in the text field
5.4.4 "Options" tab
Page 67 of 104
ThinOX 9 for Ino SoC Series Guide
"Options" tab allows to configure various options.
"Force USB redirection disable...": disable the USB redirection feature independently
from the server configuration.
"Enable Redirection of already connected devices": allows to export to the USB
redirection already connected devices.
"Enable Printer Auto Connect (TCe-VDA agent required)": allows to export the
printer connected on the thin client (local or networked printer). It need the TCe-VDA
agent install on the Virtual Desktop.
"Enable connection debug": when flagged it activate the writing of a debug file. Use
only when requested by Praim Support team.
Clicking on "About..." will show information on VMware View client.
USB Options
It configure the VMware USB Redirection. It allows to export, to the virtual desktop, the USB
devices connected on the Thin Client.
Page 68 of 104
ThinOX 9.2.3 for Ino SoC Series Guide
You have to decide to:
"Automatic share all plugged devices": selecting this parameter will share all USB devices
plugged in the thin client to the virtual desktop. Shared resources are not more visible
from the thin client. This is a not recommended option (e.g. all the USB devices will be
not more available locally on the thin client).
"Sharing device based on category": with this option it is possible to flag which
categories of device has to be exported via redirection. (e.g. in this case Human Interface
devices like mouse, pad, keyboard are not exported and remain available to the thin
client).
The first list report the device exception list, while the second report the currently plugged
Page 69 of 104
ThinOX 9 for Ino SoC Series Guide
The first list report the device exception list, while the second report the currently plugged
device.
To add a device to the exclusion list select it from the list of plugged device and click on "Add
to Ex. list".
Define the type of exception by selecting to “Never export” or “Always export” the device, then
click "OK" to add the device to the exclusion list.
RDP Options
Clicking on "RDP Option" allow to change parameters used by the RDP protocol in the VMware
Infrastructure.
The "Local Resources" tab allows to configure which and how local devices are managed by the
connection.
On the "Keyboard" section select if combination key has to be apply:
"On the local computer": the combination keys are first intercepted in the local
computer and then passed to the remote session
"On the remote computer": the combination keys are first intercepted in the remote
session and then passed to the local computer
"In fullscreen mode only": if the connection run in full-screen mode, then the
combination keys are first intercepted in the remote session and then passed to the local
computer, else the combination keys are first intercepted in the local computer and then
passed to the remote session
On "Local devices" section you may select to share local devices on the remote session.
Page 70 of 104
ThinOX 9.2.3 for Ino SoC Series Guide
On "Local devices" section you may select to share local devices on the remote session.
"Printers" and "Clipboard" can be shared using appropriate options while pressing "More..."
will open a new configuration window allowing more choice.
More local device can be enabled to share with the remote session:
"Ports": will share parallel and serial port,
"Smart Cards": will share smart card devices,
"Disk Drives": will share disk drives
"Disk Letter": will share local disk under a single disk letter (that you may choose
from the list) if "Traditional Mode" is enabled,
"Traditional Mode": will share the disk drive devices under a single unit letter on
the remote desktop.
Clicking on "Audio Settings..." will open the window above.
Page 71 of 104
ThinOX 9 for Ino SoC Series Guide
Clicking on "Audio Settings..." will open the window above.
The audio generated by the remote session can be:
"Play on this computer": played on the thin client
"Do not play": not played
"Play on remote computer": played on the server
Only for RDP 7 protocol version (see below) the audio input can be:
"Record from this computer": recorded from the thin client in the remote session
"Do not record": not recorded anyway
The "Experience" tab allows to define which features has to be enabled or disabled on the
remote connection. These features affects bandwidth usage and local/remote CPU usage.
A list of predefined sets are available and can be selected using the combo box. The features
can be also individually flagged.
The parameter "Reconnect if the connection is dropped" retry to connect to the server if
the connection dropped for some reasons (e.g. network failure, etc.).
Page 72 of 104
ThinOX 9.2.3 for Ino SoC Series Guide
On the "Misc" tab you can configure options for:
"Attach to System Console": if enabled connect to the system console of the server.
Enhanced options for Protocol version 7:
"Video redirection": allows the software decoding, on the thin client, of the video file
played locally on the server (not used for flash format video). It is available when client
connects to Microsoft 2008 Server, Microsoft 2012 Server, Windows 7 Enterprise or
Ultimate, Windows 8 Professional.
"Enable Bitmap Cache": enables the cache of the bitmaps. It is convenient having it
enabled to save network bandwidth.
"Enable RemoteFX": it will enable the RemoteFX protocol.
"Rendering": Hard, Soft tell the thin client to use hardware (acceleration) or
software decoding. Better is 'Hard'.
"Decoding": Video, Image tell the thin client which type of decompression using.
Leave the default value.
"Enable NSCodec (experimental)": enables NSCodec extension. See
http://msdn.microsoft.com/en-us/library/ff635378.aspx for more information about
NSCodec extension. It is an experimental feature so do not use in production
environment but only for testing purpose.
Page 73 of 104
ThinOX 9 for Ino SoC Series Guide
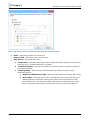
5.5 Microsoft RDS Options (I9030 model)
RDS client requires a Remote Desktop Services server active and reachable over the network.
On the Praim I9030 thin client model you can define a single connection to Microsoft RDS
server.
Click on the "Microsoft RDS Options" icon in the "Control Panel" tab. The default values of the
parameters are reported by the screenshots.
On the "General" tab you have to insert the "Computer" address (can be an IP Address or a
hostname) where the RDS server resides.
You can also insert a credential, "User name", "Password" and "Domain", that the
connection will use to login automatically to the server. In this case no information needs to be
entered by the user when the connection starts. It is also possible to pre-compile only "User
Name" and/or "Domain" so these fields will be already compiled when the connection starts
(they can be also altered by the user).
Other options that can be enabled are:
Praim ThinMan Passthrough: enable this option if you are using "ThinMan Login"; in
this way the credential entered are used by the RDS connection. "ThinMan Login" protect
the thin client, requesting credential, from unauthorized use. See ThinMan Guide for
more information on this feature.
Thin Client Logoff at RDP user logoff: use this option together with one of the other
Page 74 of 104
ThinOX 9.2.3 for Ino SoC Series Guide
Thin Client Logoff at RDP user logoff: use this option together with one of the other
to return to the login screen when the RDS connection is closed or logged off.
Ask Credentials before connection: enabling this option will asks the user for
credential (through a dedicated window) before the thin client connects to the server.
The entered credential will then be used by the connection. This option cannot be set if
"Praim ThinMan Passthrough" is enabled.
On the "Display" tab is possible to configure parameters regarding screen and presentation.
On a Praim I9030 thin client model the connection is always executed on full screen window.
"Colors" allows to select the color bit depth of the connection.
"Display the connection bar when in full screen mode" when enabled visualize on the top
a connection bar. The connection bar is shown when the mouse is placed near the top margin
of the screen. It shows the IP Address or host-name of the RDS server and allows to close the
connection and to pin the bar to be always visible.
Page 75 of 104
ThinOX 9 for Ino SoC Series Guide
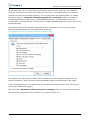
The "Local Resources" tab allows to configure which and how local devices are treated by the
connection.
On the "Keyboard" section select if combination key has to be apply:
"On the local computer": the combination keys are first intercepted in the local
computer and then passed to the remote session
"On the remote computer": the combination keys are first intercepted in the remote
session and then passed to the local computer
"In fullscreen mode only": if the connection run in full-screen mode, then the
combination keys are first intercepted in the remote session and then passed to the local
computer, else the combination keys are first intercepted in the local computer and then
passed to the remote session
On "Local devices" section you may select to share local devices on the remote session.
"Printers" and "Clipboard" can be shared using appropriate options while pressing "More..."
will open a new configuration window allowing more choice.
Page 76 of 104
ThinOX 9.2.3 for Ino SoC Series Guide
More local device can be enabled to share with the remote session:
"Ports": will share parallel and serial port,
"Smart Cards": will share smart card devices,
"Disk Drives": will share disk drives
"Disk Letter": will share local disk under a single disk letter (that you may choose
from the list) if "Traditional Mode" is enabled,
"Traditional Mode": will share the disk drive devices under a single unit letter on
the remote desktop
"Hotplug Mode": will share the disk drive devices using a name for every
connected device
"Redirect USB Mass Storage": will share the USB mass storage disk or key
"Disk Label": indicates which name is assigned to the connected devices if
"Hotplug Mode" is selected; "Mount point name" will use the name of the
connected device, "Incremental Letter" will start from the previously "Disk
Letter" parameter and assign a single letter for every connected devices.
Page 77 of 104
ThinOX 9 for Ino SoC Series Guide
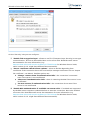
Clicking on "Audio Settings..." will open the window above.
The audio generated by the remote session can be:
"Play on this computer": played on the thin client
"Do not play": not played
"Play on remote computer": played on the server
Only for RDP 7 protocol version (see below) the audio input can be:
"Record from this computer": recorded from the thin client in the remote session
"Do not record": not recorded anyway
On the "Program" tab you may enter the pathname and file name that has to be executed
Page 78 of 104
ThinOX 9.2.3 for Ino SoC Series Guide
On the "Program" tab you may enter the pathname and file name that has to be executed
when the user log on the server (the desktop in this case is no visualized but it is possible to
interact only with the launched software). You can also define the working folder. To enable
this feature flag the "Start the following program on connection" option and insert the
requested parameters. (E.g. enter "C:\Windows\Notepad.exe" as path and file name and
"C:\Windows" as working folder will execute the notepad program when the user log on into the
remote desktop).
The effective start of the program may depend from parameters set in the server. Read
Microsoft documentation for more information at the link
http://technet.microsoft.com/en-us/library/cc770821.aspx.
The "Experience" tab allows to define which features has to be enabled or disabled on the
remote connection. These features affects bandwidth usage and local/remote CPU usage.
A list of predefined sets are available and can be selected using the combo box. The features
can be also individually flagged.
The parameter "Reconnect if the connection is dropped" retry to connect to the server if
the connection dropped for some reasons (e.g. network failure, etc.).
Page 79 of 104
ThinOX 9 for Ino SoC Series Guide
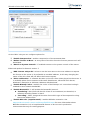
On the "Security" tab you can configure:
"Enable TLS encryption layer": allows to use TLS (Transport Layer Security) to encrypt
communication. TLS has to be enabled also on the server side. Read Microsoft server
documentation for more information (e.g.
http://technet.microsoft.com/en-us/library/cc770833.aspx for Windows Server 2008,
other version of O.S. might have different documentation).
"Server certificate check failure options": allows to decide depending from
certificates if the connection has to be executed (to manage certificates click on "Import
CA certificate", see below). Possible options are:
"Always connect even if authentication fails": the connection is executed
even if the server is not certificated
"Warn me if authentication fails": there is a warning window if the server is not
certificated
"Do not connect if authentication fails": the connection do not start if the
server is not certificated
"Enable NLA authentication if available on remote side": if enabled and supported
by the RDS server requests credential before to start the connection. Has to be enabled
on server side. Read Microsoft server documentation for more information (e.g.
http://technet.microsoft.com/en-us/library/cc732713.aspx for Windows Server 2008,
other version of O.S. might have different documentation).
Page 80 of 104
ThinOX 9.2.3 for Ino SoC Series Guide
Clicking on "Import CA certificate" will show this windows where the user can import server
certificates and CA certificates.
The certificates has to be copied onto a USB mass storage key that when inserted in a device
USB port will be listed and can be browsed until the certificate is selected. Click "Import" to
copy the certificate onto the device.
You can find more information in the About Certificates (see page 104) paragraph.
Clicking on "Manage RDP Licenses" shows licenses given by the server to the thin client. It is
possible to delete individual or all licenses.
Page 81 of 104
ThinOX 9 for Ino SoC Series Guide
On the "Misc" tab you can configure options for:
"Enable Compression": enables compression of the streamed data.
"Delete License at Boot": at every boot of the thin client the licenses present on it will
be deleted.
"Attach to System Console": if enabled connect to the system console of the server.
Enhanced options for Protocol version 7:
"RDP License unique ID": select to use the host name or the mac address to request
the license to the server. It is preferable to use MAC address, in this way changing the
name of the thin client will not affect the license request.
"Video redirection": it software decodes on the thin client video played on the server. It
is available when client connects to Microsoft 2008 Server, Microsoft 2012 Server,
Windows 7 Enterprise or Ultimate, Windows 8 Professional.
"Enable Bitmap Cache": enables the cache of the bitmaps. It is convenient having it
enabled to save network bandwidth.
"Enable RemoteFX": it will enable the RemoteFX protocol.
"Rendering": Hard, Soft tell the thin client to use hardware (acceleration) or
software decoding. Better is 'Hard'.
"Decoding": Video, Image tell the thin client which type of decompression using.
Leave the default value
"Enable NSCodec (experimental)": enables NSCodec extension. See
http://msdn.microsoft.com/en-us/library/ff635378.aspx for more information about
NSCodec extension. It is an experimental feature so do not use in production
environment but only for testing purpose.
Page 82 of 104
ThinOX 9.2.3 for Ino SoC Series Guide
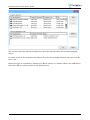
5.6 ThinMan
Users can address and configure access features to the ThinMan server. It needs to be
specified which is the referenced ThinMan. When configured, the thin client will use HTTPS
Protocol instead of TCP/UDP (reliable device status) and will send to ThinMan more information
on the Thin Client itself (Serial, Subnet, …).
This configuration is required for ThinMan Policy (Device and User) and Zero Config (see
ThinMan documentation for more information).
Enable Connection from ThinMan: allows the thin client to receive ThinMan
communications and commands. It has to be flagged if ThinMan is used to manage the thin
clients.
DHCP Option: is the number of DHCP Option configured on the DHCP Server to set ThinMan
Address. Default value is 163.
ThinMan Address: whether the DHCP Option is not configured the thin client will use this
address to communicate with ThinMan. Default value is PRAIM_THINMAN.
Timeout: timeout in number of seconds that is used to communicate with ThinMan.
Click "Test Connection" to try and confirm the information entered.
Page 83 of 104
ThinOX 9 for Ino SoC Series Guide
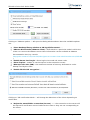
Authentication: it allows to use for the ThinMan Login the same credentials given to
Imprivata Agent. It allows also to define the actions taken in case ThinMan was not available or
reachable.
Page 84 of 104
ThinOX 9.2.3 for Ino SoC Series Guide
5.7 Imprivata OneSign Agent
Imprivata OneSign (www.imprivata.com) is an infrastructure that implements Single Sign On
and security features in enterprise environments.
ThinOX support Imprivata OneSign technology.
With this solution the user is enabled to perform a secure authentication with a proximity
Smart Card (RFID) or traditional Smart Card towards Citrix XenDesktop or VMware View VDI
infrastructures.
The strong integration of ThinOX with Imprivata OneSign allows a Single Sign On to the Virtual
Desktop in a few seconds. The user can thus access its desktop from any Praim Thin Client with
a single "Touch".
For a complete description of functionalities and configuration procedure see the related
documentation available at Imprivata ThinOX Integration.
Page 85 of 104
ThinOX 9 for Ino SoC Series Guide
5.8 PCSC Server
This function enables and implements the PC/SC stack needed to access local and remote
smartcard. It is used by PCoIP, RDP, ICA client and by Imprivata Agent. It allows to log in with
smartcard to XenDesktop and View broker.
Clicking on "Advanced..." will open a window that allows to change some PC/SC behaviour.
Leave parameters at their default values.
Page 86 of 104
ThinOX 9.2.3 for Ino SoC Series Guide
5.9 Remote Assistance
It enables the VNC service on the Thin Client. It is used by ThinMan Remote Assistance (see
ThinMan Guide for more information).
Enable VNC Server: it enables VNC service. When enabled parameters are modifiable.
Section "Start VNC Server"
On Demand (default): it allows remote control of the Thin Client when requested by ThinMan
management console. The VNC server is not always active and starts only when requested by
ThinMan.
On Boot: the VNC server will start at each terminal boots and any requests from VNC clients
will be accepted. The VNC server is always active.
Section "Accept Remote Control"
Accept Always: the VNC server will always accept remote VNC control requests.
Show Accept/Reject DialogBox: a dialog box will be displayed on the thin client user when
someone is trying to take remote control of the terminal over the network. The dialog box
allows the thin client user to either accept or reject the remote control request.
Auto Accept: it accepts automatically remote control requests whether the thin client user
has not responded to the Accept/Reject dialog box after a specific time interval (in seconds).
Warn on termination of Remote Control: display an information dialog box when the
Page 87 of 104
ThinOX 9 for Ino SoC Series Guide
Warn on termination of Remote Control: display an information dialog box when the
remote assistance session has terminated.
Section "Protected Logon"
Password and Confirm: it requires the remote user to enter a password in order to take
remote control.
Page 88 of 104
ThinOX 9.2.3 for Ino SoC Series Guide
5.10 Sound Configuration
Users can adjust audio output/input level and select which devices are used to reproduce or
capture audio signal.
In case you are attaching external sound device use this configurator to select where
reproduce audio. An example can be found in Configuring the HDX RealTime Webcam Video
Compression (I9010) (see page 99).
Page 89 of 104
ThinOX 9 for Ino SoC Series Guide
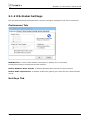
5.11 Date and Time
Users can specify Thin Client Date and Time and enable Time Server (Rdate or NTP protocols)
for automatic update.
Click on "Set Date and Time" to save previously entered values.
Page 90 of 104
ThinOX 9.2.3 for Ino SoC Series Guide
5.12 OpenVPN Client
ThinOX supports the OpenVPN technology. This chapter explain how to configure the OpenVPN
client.
5.12.1 Preliminary Operation
Save in a USB Mass Storage key the configuration files generated by OpenVPN that are related
to the connection. Whether you have only a *.zip file decompress it.
The number and the name of the files may vary depending by many configurations
parameters.
Typically there are: couple of "*.crt" files, couple of "*.key" files, a "*.pem" file, a "*.conf" file
and a "*.ovpn" file ("*" means a generic filename).
Instead of the last two files sometimes is present only one of them.
In case there is only one of the files with name "*.ovpn" or "*.conf", rename the single file in
"openvpn.cfg".
In case there are both, rename only the file with name "*.conf" in "openvpn.cfg".
Copy all these files in the USB Mass Storage key.
Plug the USB Mass Storage key into a thin client USB Port.
Depending on the thin client configuration you may see an icon on the thin client desktop
representing the mounted USB Mass Storage key (in the example above the USB Mass Storage
key has "NO_NAME" name).
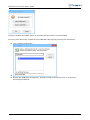
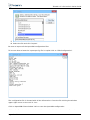
5.12.2 ThinOX Control Panel
Open the ThinOX Configuration Settings window. Select the "Control Panel" tab, locate the
"OpenVPN Client" icon and double-click it.
Page 91 of 104
ThinOX 9 for Ino SoC Series Guide
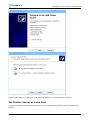
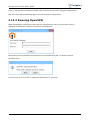
Flag the "Enable OpenVPN" option to activate the two buttons on the window.
For every files previously copied into the USB Mass Storage key execute this procedure:
Click "Import Config Files..."
Browse the USB Mass Storage key, double-clicking on the directories, to locate the
previously saved files
Page 92 of 104
ThinOX 9.2.3 for Ino SoC Series Guide
Select the file and click "Import"
Be sure to import all the OpenVPN configuration files.
To be sure that at least the "openvpn.cfg" file is copied click on "Edit Configuration".
The configuration file is showed with all the information. Close the file clicking the window
upper right corner on the red "X" icon.
Click on OpenVPN Client window "OK" to save the OpenVPN configuration.
Click on Configuration Settings window "OK" to save the thin client changed configuration.
Page 93 of 104
ThinOX 9 for Ino SoC Series Guide
Click on Configuration Settings window "OK" to save the thin client changed configuration.
The thin client will immediately apply the new changed configuration.
5.12.3 Running OpenVPN
When OpenVPN is enabled the client will run automatically every time the thin client is
rebooted and after the network connection is established.
Depending on the OpenVPN configuration the OpenVPN client will, if needed, request
authentication.
In case of error an error box is displayed with the error message.
Page 94 of 104
ThinOX 9.2.3 for Ino SoC Series Guide
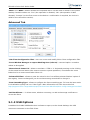
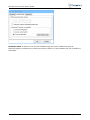
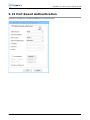
5.13 Port Based Authentication
It allows to enable the Port-Based IEEE802.1x Authentication.
Page 95 of 104
ThinOX 9 for Ino SoC Series Guide
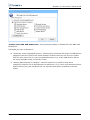
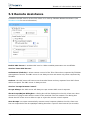
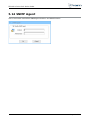
5.14 SNMP Agent
Users can enable and define SNMP Agent Position and Administrator.
Page 96 of 104
ThinOX 9.2.3 for Ino SoC Series Guide
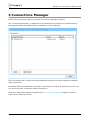
6 Connections Manager
Praim ThinOX terminals support a minimal Connections Manager interface.
The "Connections Manager" is displayed on the desktop of the terminal as shown below by
pressing the CTRL+ALT+END hotkeys combination on the keyboard.
The Connections tab is used to end the predefined connection (is this example the VMware
View connection).
Remember that the predefined connection is launched in autostart at system boot time. You
can also launch the connection double clicking on it.
When the "Shut down" button is enabled (see Security (see page 40) chapter) it allows to
power off or reboot the device.
Page 97 of 104
ThinOX 9 for Ino SoC Series Guide
7 How To
List of HOWTOs pages with detailed description of interesting articles for ThinOX Users.
Configuring the HDX RealTime Webcam Video Compression (I9010) (see page 99)
About Certificates (see page 104)
Page 98 of 104
ThinOX 9.2.3 for Ino SoC Series Guide
7.1 Configuring the HDX RealTime Webcam
Video Compression (I9010)
ThinOX supports the HDX Realtime Webcam Video Compression in a Citrix environment
(XenApp and XenDesktop).
This chapter explain how to configure the ThinOX environment to use this feature.
7.1.1 ThinOX Control Panel
In the ThinOX Control Panel there are many controls that has to be configured in order to use
the webcam.
7.1.2 Praim Multimedia Codecs
In order to use the HDX RealTime Webcam Video Compression the Praim Multimedia Codecs
control has to be enabled.
Page 99 of 104
ThinOX 9 for Ino SoC Series Guide
Praim Multimedia Codecs is not installed by default in the ThinOX environment, it is a paid
extension that has to be ordered together with the thin client.
Once licensed (you can also try it for 7 day period) you have to tick the "Enable PRAIM
Multimedia Codecs" option in order to enable it.
This module is mandatory in order to use HDX RealTime Webcam Video Compression.
7.1.3 Webcam module
Once you open the Webcam module tick the "Enable Webcam" option in order to use it.
The Webcam module is enabled by default in the thin client.
To be sure to use all the possible drivers for the connected webcam please select the "Force
Loading Drivers" option.
When testing phase is terminated try also to use "Hotplug" option. In this case ThinOX will try
to recognize the connected webcam. Eventually reverse to "Force Loading Drivers" if "Hotplug"
mode is not working.
7.1.4 ICA Global Settings
Open the "ICA Global Setting" module and select the"Advanced" tab.
Page 100 of 104
ThinOX 9.2.3 for Ino SoC Series Guide
On the "HDX Features" section, on the "WebCam FrameRate" field insert the appropriate value
that is depending on the webcam itself. A good value to start the testing phase is "15" frames
per sec. Depending on the webcam model it can be increased to 20 or 30. If none of this is
working try "0" value.
7.1.5 Citrix HDX USB Redirection
In order to prevent the redirection of the webcam via the "HDX USB Redirection" you have to
configure it correctly.
Open the "Citrix Receiver Options" module and click on "USB Options...".
From the "Citrix HDX USB Redirection" module unflag the two option "Audio Devices" and
"Video Devices". This configuration allows to manage the webcam (video device) and
eventually the microphone (audio device) directly by the thin client.
You can also click on "Exception list" to access the exception device list and configure more
Page 101 of 104
ThinOX 9 for Ino SoC Series Guide
You can also click on "Exception list" to access the exception device list and configure more
precisely not to share the device.
You will see the inserted webcam (and eventually the microphone mounted on it; this depends
on the webcam model); select the device and click on "Add to Ex.list".
Be sure to select the "Never Export" exception option and click on "OK". Repeat this operation
for the audio device mounted by the webcam (if present).
7.1.6 Sound Configuration
Some webcam will mount not only a video device but also an audio device (e.g. microphone).
To be sure to use the microphone correctly on the thin client you have to start the "Sound
Configuration" module.
Page 102 of 104
ThinOX 9.2.3 for Ino SoC Series Guide
From the "Input Device" list select the USB microphone and click on "OK".
7.1.7 Supported Webcams
List of webcam models who have had working positive feedback:
Logitech HD Pro WebCam C910 - M/N V-U0017 - P/N 860-000266
Logitech QuickCam Zoom - M/N V-UW21 - P/N 861139-2000
Logitech QuickCam Connect - M/N V-UCV39 - P/N 860-000114
Microsoft LifeCam HD 3000
Microsoft LifeCam VX 5000
Page 103 of 104
ThinOX 9 for Ino SoC Series Guide
7.2 About Certificates
Certificates can be related to server (e.g. RDS server) or related to a certification authority.
Depending on the configuration of the network you can import only the CA certificate or both of
them.
Certificates has to be generated in the "Base 64 X.509" (.cer) format. Certificates saved in
other formats cannot be read by the device.
Page 104 of 104