1
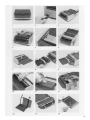
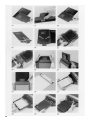
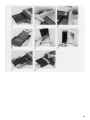
8 x 10 Film Processor
User Guide
HOW TO USE THE POLAROID 8 X 10 Information and technical assistance
FILM PROCESSOR, THE FILM HOLDER If you should require help with your Polaroid 8 x 10 film
system, or if you have any other photographic problem,
MODEL 81-O6, AND THE LOADING please call us toll free from within the U.S. at 1-800225-1618, Monday to Friday, 8 a.m. to 8 p.m. Eastern
TRAY MODEL 81-09
Introduction
Polaroid 8 x 10 photography provides a self-contained
larger format instant photographic system. You need
no darkroom, no chemical solutions and no timeconsuming processing procedures. The Polaroid 8x10
film holder can be used on most 8 x 10 cameras that
take standard 8 x 10 film holders, on specially adapted
copy cameras and other cameras of extra large format,
and on a variety of technical imaging devices.
The system described in this booklet consists of:
1.
2.
3.
4.
Polaroid 8 x 10 film.
The Polaroid 8 x 10 film holder Model 81-06.
The Polaroid 8 x 10 film processor.
The processor loading tray Model 81-09.
Please note that the film holder Model 81-06 cannot be
used without both the processor and the loading tray
Model 81-09, available separately. For the most up-todate film information, see the Film Data sheets at
www.polaroid.com (select Customer Support).
Camera adaptation
To adapt cameras or imaging devices of extra large
format for use with the Polaroid 8 x 10 film holder, some
basic requirements must generally be met:
1. The film holder must be centered on the lens axis.
2. It must lie perpendicular to the lens axis.
3. The film must lie in the same plane in the camera
as the ground glass screen at the time of focusing.
Power supply
The film processor should be operated only at the
voltage indicated on each unit. Processors intended for
use in the U.S. are designed for the 110-120 volt supply.
For countries with a 220-240 volt supply, appropriate
processors are provided.
A power cord is supplied with the processor. When
not in use, the cord can be stored in the special recess
in the base of the processor.
If electricity is not available, the processing rollers can
be operated manually with the manual drive arm.
Instructions for its use are packaged with it. A manual
timer or stopwatch must also be used, because the
electronic timer will not function.
2
Time. Outside the U.S.A., please contact the Polaroid
office nearest you.
Underwriters’ Laboratories, Inc. (UL) requires that
the following safety information be provided in the
U.S.
IMPORTANT SAFEGUARDS
AS WITH ANY ELECTRICALLY OPERATED
EQUIPMENT, BASIC SAFETY PRECAUTIONS
SHOULD BE OBSERVED IN THE USE OF THE
POLAROID 8 X10 FILM PROCESSOR. THESE ARE
PROVIDED AS A REMINDER:
1. FOLLOW ALL INSTRUCTIONS.
2. DO NOT LEAVE UNIT UNATTENDED WHILE IN
USE.
3. IF UNIT WILL NOT BE USED FOR EXTENDED
PERIOD OF TIME, UNPLUG FROM ELECTRICAL
OUTLET. GRASP PLUG, NOT CORD, AND PULL
TO DISCONNECT FROM OUTLET.
4. DO NOT OPERATE UNIT WITH DAMAGED CORD
OR UNIT WHICH HAS BEEN DROPPED OR
DAMAGED, UNTIL IT HAS BEEN EXAMINED BY
AUTHORIZED SERVICE REPRESENTATIVE.
5. DO NOT LET CORD HANG OVER FRONT EDGE
OF TABLE OR COUNTER OR TOUCH HOT
SURFACES.
6. UNIT MUST BE GROUNDED. POWER CORD HAS
THREE-PRONGED GROUNDING PLUG, WHICH
MUST BE PLUGGED INTO APPROPRIATE
OUTLET. DO NOT, UNDER ANY CIRCUMSTANCES, REMOVE GROUND PRONG FROM
PLUG.
7. IF EXTENSION CORD IS NEEDED, USE
GROUNDED CORD WITH SUITABLE CURRENT
RATING. CORDS RATED FOR LOWER
AMPERAGE THAN UNIT MAY OVERHEAT.
ARRANGE CORD SO THAT IT WILL NOT BE
TRIPPED OVER OR PULLED.
8. TO AVOID ELECTRIC SHOCK HAZARDS, DO NOT
ATTEMPT TO DISASSEMBLE UNIT. FOR
SERVICE OR REPAIR WORK, CONSULT AN
AUTHORIZED POLAROID SERVICE CENTER.
INCORRECT REASSEMBLY CAN CAUSE
ELECTRICAL SHOCK HAZARD WHEN
APPLIANCE IS USED SUBSEQUENTLY. DO NOT
IMMERSE UNIT IN WATER OR OTHER FLUIDS.
DO NOT OPERATE UNIT NEAR WATER OR WITH
WET HANDS.
The Polaroid 8 x 10 System
Please see the photos at the back of the booklet.
The film holder Model 81-06
A.
B.
C.
D.
E.
F.
G.
Buttons, to unlatch holder
Dark slide (partly removed)
Dark slide handle
Dark slide stop line
Orange tongue, to secure negative envelope
Negative guide lines
Felt strips (light seal)
The film processor
H.
L.
K.
L.
M.
N.
O.
P.
Q.
R.
Processing timer
Loading tray insertion slot
Process button
Processing compartment (extended)
Lid for processing compartment (partly open)
Roller assembly (removable unit)
Latches for roller assembly
Roller access lid
Processing rollers
Location for manual drive arm
The processor loading tray Model 81-09
S. Positive sheet insertion slot
T. Film holder insertion slot
The numbers throughout the text refer to
illustrations at the back of the booklet.
Set up the equipment
When the processor is in its operating position, it will
extend about 30 inches (75 cm) front to back. Select a
working surface which is deep enough. Be sure you also
have enough space to hold the negative and positive
film containers, and for loading the film holder.
Place the processor so that its insertion slot is facing
toward you and is about level with the front edge of the
table (fig. 1). Plug the power cord in at the rear of the
processor (fig. 2) and into the power supply socket.
Swing back the processing compartment and its lid
(fig. 3). The opened compartment must lie horizontally,
as shown, so be sure there is no obstruction behind the
processor which might prevent this.
If your processor is new, and has not been used before,
you must insert the processing roller assembly, which
is packaged separately. Carefully lower the rollers into
the well in the processor (fig. 4). Lower the side near
the timer into place first (fig. 5); the assembly will fit only
when the circular hole is aligned with the circular pin.
Then lower the right side. When the assembly is seated
properly, lock it in place by pushing back the two latches
(fig. 6). Be sure the roller access lid is seated properly
(fig. 7).
Hold the processor loading tray in front of the
processor in the way shown (fig. 8). Insert the tray into
the processor, easing it in gently as far as it will go. It
will then sit snugly against the front edge of the processor
(fig. 9).
The processor is now ready for operation.
Locate the processor in an area that is in subdued
lighting. Also protect the film holder and the film
from strong light as much as possible.
Unnecessarily bright and directional light on
photographic equipment always introduces the
possibility of some light leakage. The heat generated
by strong light can also be harmful to the film.
Cleanliness is important
To get the most satisfactory results, the equipment and
the film must be clean. The following require particular
attention:
1. Processing rollers
You should wipe the rollers before you process each
photograph, to be sure they are free from dust and
other foreign matter. Remove the roller access lid by
pressing down with the thumb at the point indicated (fig.
10) and then lifting it out. Press the process button and
hold it down and, while the rollers rotate, wipe a dry, lintfree cloth back and forth along the full length of each
roller (fig. 11) Release the process button. Replace the
lid.
Occasionally the rollers may need a more thorough
cleaning. Remove the roller assembly from the
processor and clean the entire length of the rollers (fig.
12), using a dampened cloth if necessary.
Before you reinsert the assembly, remove all dirt and
particles that may have collected in the processor, below
the rollers.
2. Felt strips on film holder
Before you load film, be sure the felt strips on the
film holder are clean. The felt strips (fig. 13) serve as
a light trap. During the use of the holder, these strips
may gradually gather dust. At regular intervals, gently
rub a finger back and forth along the strips, to remove
dust. Alternatively, wipe the full length of each strip very
lightly with the sticky side of a small piece of masking
tape. This will collect dust and other particles that may
have accumulated.
3. Felt strips on loading tray
Below each of the two protrusions indicated by the
arrows (fig.14) there is a short felt strip. These strip are
3
not easily visible, but can be easily located with a finger.
To keep these strips dust-free, periodically run a finger
gently back and forth along each of them.
4. The positive film sheet
Before you load each positive sheet into the loading
tray, inspect it to be sure it is clean. If necessary, gently
and lightly brush the image-receiving surface of the
sheet with an anti-static brush.
HOW TO USE THE SYSTEM
1. Load the negative
Place the film holder on a flat surface, with the dark
slide facing upwards and the dark slide handle facing to
your right. Depress the two blue rectangular buttons
(fig. 15), without at the same time trying to lift the cover
of the holder. Depressing the buttons will unlatch the
cover and automatically make it spring up slightly. You
can then open the holder. Open it all the way, so that it
lies flat.
Carefully lift the uppermost negative envelope from
its container. Do not press, fold or bend the negative
envelope.
With the printed side up and the three arrows on the
envelope pointing away from the orange tongue on the
film holder, place the negative into the film holder
(fig. 16). Slide the negative along the surface of the film
holder in the direction of the three arrows. In doing this,
the fold on the underside of the envelope must hook
securely onto the orange tongue on the film holder
(fig. 17) and the envelope must end up in the position
shown (fig. 18).
Be sure never to pull the negative tab or the other
end of the envelope. Doing so would separate the
negative from the envelope and render it unusable
(fig.19).
Be sure that the negative is centered between the two
blue guide lines on each side of the film holder (fig. 20).
Close the holder and press the cover down firmly to
latch it. Be sure that both ends are securely latched.
The three arrows at the base of the negative envelope
must protrude from the holder.
2. Remove the negative envelope
Pull out the negative envelope at the base of the film
holder, where you see the three arrows. Do this with
care, because incorrect envelope removal can result in
blemishes in the finished photograph.
Never press or squeeze the film holder; never bend
or crimp the protruding envelope; always pull the
envelope out straight (not up or down or sideways); pull
4
the envelope out slowly, all the way.
The following method of envelope withdrawal is easy
and safe.
Lay the film holder on the film processor with the edge
of the envelope just behind the roller assembly (fig. 21).
The dark slide and the three arrows on the envelope
must face upwards. Grip the envelope at each end
without bending it. Draw the envelope and holder forward
horizontally. Do not raise them. The holder will be held
back by the raised roller assembly (fig. 22) as the
envelope comes out.
Discard the envelope. Do not pull the negative tab
that protrudes from the upper end of the film holder.
A useful tip: When you load several film holders at
the same time, do not remove all the envelopes right
away. Remove each envelope just before you are ready
to load the holder involved into the camera. This will
enable you to easily distinguish between unexposed and
exposed negatives. It also serves as an added protection
against light leakage.
3. Insert the film holder into the camera or
imaging device
Do this in the way you would insert a conventional
8 x 10 film holder.
4. Remove the dark slide, make the exposure
and reinsert the dark slide
Pull the dark slide out by its blue handle (fig. 23). Pull
straight and slowly. You can remove the dark slide
completely from the film holder. Do not pull the paper
negative tab.
After making the exposure, reinsert the dark slide and
push it in all the way. Be sure to insert it into its proper
slot (fig. 24), and not into the slot which is already
occupied by the negative tab. The blue dark slide handle
must come to rest adjacent to the blue edge along the
top of the holder. Be careful not to fold or bend the
negative tab.
You need not necessarily remove the dark slide entirely
from the film holder, in order to make a photograph.
The stop line across the dark slide (fig. 25) indicates
clearly how far the slide must be withdrawn to ensure
that the whole image area will be exposed. Pull the slide
out until the stop line is just visible.
5. Load a positive sheet into the processor
loading tray
Do this just before you are ready to process the film,
and not earlier. A positive sheet lying face up for an
extended period might gather dust, which could affect
the quality of the photograph.
Carefully lift the uppermost positive sheet from its
container. Hold it so that the side with the imagereceiving layer, which is also the side with the processing
pod (fig. 26), faces upwards. Do not touch the surface
of the sheet and do not press on the processing pod
area.
Holding the sheet with the pod farthest away from you
and facing upwards, slide it into the tray, below all the
metal parts (fig. 27). Slide it in gently until you feel
distinct resistance. When the sheet is fully and correctly
inserted, its edges will lie within the recessed area of
the tray (fig. 28).
Do not attempt to load a positive sheet into the
film holder.
6. Remove the film holder from the camera or
imaging device and insert it into the processor
loading tray.
Be sure the paper negative tab is straight, and not
bent or folded.
With the dark slide facing down and the paper
negative tab toward the processor, place the film holder
into the tray and begin to slide it in. The tab must feed in
between the two metal parts (fig. 29). To enable the
holder to enter the tray, press down at the points
indicated (fig. 30) while you are pushing the holder in.
Push it in as far as it will go. The holder will be properly
and fully inserted when it is in the position shown
(fig. 31).
7. Set the timer and process the photograph
The processing time extends from the time the process
button is pressed to the moment the positive photograph
is separated from the negative. Set the timer (fig. 32),
following the processing directions in the film instruction
sheet.
For a processing time of up to 90 seconds, set the
timer switch to “sec.” The green light will go on. Set the
green scale on the dial to the appropriate time. For
processing times longer than 90 seconds, set the switch
to “min.” The red light will go on. Set the red minute
scale to the required time.
Press the process button (fig. 33) and hold it down for
about one second. The green or red light will begin to
blink. The negative and positive sheets will be drawn
together and transported between the processing rollers.
The rollers will break the pod and spread the processing
chemicals evenly between negative and positive. The
film “sandwich” will be automatically deposited in the
processing compartment.
Some film types are light-tight during the processing
cycle, making it permissible for you to open the
processing compartment lid at any time. Other films are
light-sensitive during processing, and require that the
compartment lid remain closed for the full processing
time. For specific details, see your film instruction sheet,
or contact us.
8. Peel the positive photograph from the
negative
At the end of the processing time a signal will sound,
and the green or red light will stop blinking (and glow
continuously). Lift the processing compartment lid (but
not the entire compartment) and remove the film (fig.
34). Immediately peel the positive photograph from the
negative in one continuous motion. Start at one of
the corners near the tab end (fig. 35), and not at the
other end. Hold the positive by its corner and the negative
by the black paper strip. Begin the peel diagonally
and end it in such a way that the entire extent of the
longer border of the positive separates at the same
moment (fig. 36). This will ensure that the mask and
chemical remnants stay on the negative, leaving you
with a clean positive. Fold the negative, moist side in,
and dispose of it. Avoid all contact with the remaining
chemicals on the negative.
Close the processing compartment lid in readiness
for the processing of the next photograph.
To remove the empty film holder from the loading tray,
slide the holder out by simultaneously pushing forward
on the tray and toward the rear on the holder, as
indicated by the arrows (fig. 37). Do not try to lift the
film holder out or to slide the holder out with the tray.
Caution
This process uses a caustic paste. Avoid contact with
skin, eyes and mouth and keep away from children and
animals. If you get some paste on your skin, wipe it
off immediately and wash with water to avoid an
alkali burn. If eye or mouth contact occurs, quickly wash
the area with plenty of water and see a doctor. Keep
discarded materials away from children, animals,
clothing, and furniture.
Handling and care of photographs
Until the separated positive photographs are completely
dry, do not lay them on top of each other or touch the
image surface. (The drying may take from a few minutes
up to about one hour, depending on the film type and
the humidity.)
Once dry, the photograph is best stored in a suitable
individual protective sleeve, designed to protect it from
abrasion as well as from unfavorable chemical action.
For details about suitable sleeves, please contact us
(see INFORMATION AND TECHNICAL ASSISTANCE). Do not
stack photographs on top of each other without
protection. Store photographs in as dry and cool an
environment as possible.
5
How to remove the loading tray
The loading tray can only be removed when the film
holder is not in the tray. With your thumb, depress the
tray at the point indicated by the indentation (fig. 38)
and, at the same time, pull the tray out in the direction
of the arrow.
Storage of the equipment
Keep your Polaroid 8 x 10 film system clean. When the
equipment is not in use, remove the loading tray. Close
the processor and the film holder. Store the equipment
in a dust-free place.
pay the transportation cost to and from the Service
Center.
This warranty does not cover damage caused by
accident, misuse or tampering with the equipment, and
a charge will be made for such repairs.
For warranty service, the equipment must be returned
to, and repaired by, a Polaroid Service Center.
This warranty excludes all consequential damages.
Before you return your equipment for repair,
please contact us. We can advise you how you can
get service in the quickest and most convenient way.
We can also advise you on proper packaging. In the
U.S., use our toll free number 1-800-225-1618.
Processing photographs in rapid
Warranty (outside the U.S.)
succession
If you wish to process a number of pictures in rapid
succession, you will not be able to use the timer in the
normal way. The processing of each picture will have to
be timed with a separate timer or clock.
This method can only be used with film which can
safely be processed in the light (such as Polacolor film)
Any film type which is required to be in darkness
during processing must remain in the closed
processing compartment for the full processing
time. See the film instruction sheet or contact us. (See
INFORMATION AND TECHNICAL ASSISTANCE.)
Set the timer on the processor to 15 seconds. Insert
the positive sheet and the film holder into the processor
loading tray in the normal way and press the process
button. When the timer sounds after 15 seconds, remove
the film from the processing compartment. You can then
process the next picture. (Never insert a picture for
processing while one is lying in the compartment.)
Repeat this procedure for all the pictures you have to
process, removing each from the compartment when
you hear the timer. Remember that each picture must
be timed separately.
Handle all film very carefully during processing. Be
sure the entire negative and positive remain in contact
with each other. Reset the timer before you process
individual pictures again. (See also CLEANLINESS IS
IMPORTANT.)
Warranty (U.S.only)
Each Polaroid 8 x 10 film processor, Polaroid 8 x 10 film
holder, and processor loading tray has been thoroughly
inspected and tested before shipment. All parts are
guaranteed against defects in material and workmanship
for one full year from the date of original purchase.
During this period, any such defects will be remedied
by Polaroid Corporation without charge and Polaroid will
6
Each Polaroid 8 x 10 film processor, Polaroid film holder,
and processor loading tray has been thoroughly
inspected and tested before shipment. All parts are
guaranteed against defects in material and workmanship
for one full year from the date of original purchase.
During this period, any such defects will be remedied
by Polaroid Corporation without charge and Polaroid will
pay the transportation cost to and from the Service
Center.
This warranty does not cover damage caused by
accident, misuse or tampering with the equipment, and
a charge will be made for such repairs.
For warranty service, the equipment must be returned
to, and repaired by, a Polaroid Service Center.
The above warranty and provisions do not affect
your statutory rights.
Before you return your equipment for repair, please
contact the nearest Polaroid Service Center. We can
advise you how you can get service in the quickest and
most convenient way. We can also advise you on proper
packaging.
Registration
Please complete the registration card which is included
with your equipment, and return it to us. We will put you
on our mailing list, so that we can keep you informed of
the latest developments in Polaroid films and equipment,
and their applications. In this way you can be sure that
you will always get the best and most effective results
from your Polaroid photography.
Possible picture problems and their cause
Black picture
•
•
•
•
Negative envelope not removed
Dark slide not pulled
Extreme underexposure
Shutter faulty
White print or clear transparency
•
•
•
Negative loaded backwards
Extreme overexposure
Shutter open or faulty
Repeated dot pattern (yellow with color film)
•
Dirty processing rollers
Single yellow or white dot
•
Dirt particle on positive sheet
Random white specks
•
•
Dust on positive sheet
Felt strips on film holder or loading tray not clean
Black line along narrow edge of picture
•
•
Negative not engaged on holder tongue
Dark slide not pulled far enough
Positive-negative misregistration after processing
•
Positive sheet not loaded properly into tray
Film assembly fails to pass into processor
•
•
Negative tab is bent
Negative not loaded between blue guide lines in film
holder
Blotch or V-shape in picture
•
Negative probably not handled with sufficient care
(was squeezed or kicked)
Poor color quality
•
•
•
Mismatch of positive-negative code number
Processed for too short time
Unsuitable processing temperature
Negative protruding from bottom end of holder
•
Negative not engaged on holder tongue
Picture protruding from bottom end of holder
•
Excessive curl of positive, caused by improper
(extremely dry) environment
Mask adheres to picture border
•
Photograph not peeled correctly (see PEEL THE
POSITIVE PHOTOGRAPH FROM THE NEGATIVE)
7
8
9
10
11