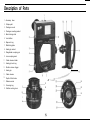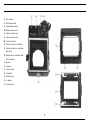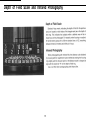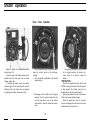
1
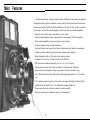
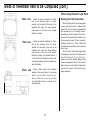
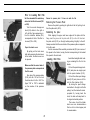
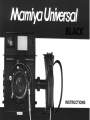
Contents
Special Pointers for Using Mamiya Universal ..........................................
Main Features ..................................................................................................
Specifications ...................................................................................................
Description of Parts ........................................................................................
Assembling ........................................................................................................
Attaching the Lens.. ..................................................................................
Pulling Out the Lens from i t s Retracted Position.. ............................
Attaching the Hand Grip .........................................................................
Stabilizing Plate ........................................................................................
2
3
4
5
7
7
7
8
8
Loading Roll Film .....................................................................................
..........................................................................................
Photographing
Roll Film Holder Model K ...........................................................................
21
22
23
Prior to Loading Roll Film Holder.. ......................................................
Loading Roll Film ....................................................................................
Focusing Hood ................................................................................................
Polaroid Land Pack Film Holder ................................................................
Short Course on Photography ...............................................................
23
23
24
25
25
Accessories for Polaroid Land Pack Film Holder ..................................
Focusing Hood Model P ........................................................................
Optical Viewfinder Model P ..................................................................
Format Gauge ..........................................................................................
Focusing Screen Holder ..............................................................................
26
26
26
26
27
28
29
30
31
Attaching the Back ..................................................................................
M Adapter ...................................................................................................
G Adapter.. .................................................................................................
Polaroid
Land Camera Back.. .............................................................
Operating the Viewfinder .................................................................................
Selecting Brilliant Frame in the Viewfinder .......................................
9
9
10
10
10
11
Focusing with Coupled Rangefinder.. .................................................
Areas of Viewfinder Field to b e Composed .............................................
When Using Roll Film Holder ...............................................................
11
12
12
Right-angle and Magnifying Focusing Backs .........................................
Composing the Picture by Ground Glass Focusing Screen for
Cut Film ......................................................................................................
Cut Film/Plate Holder Type J .....................................................................
Cut Film/Plate Holder Type A .....................................................................
Distance Range Composed by Brilliant Frame ................................
When Using Polaroid Land Pack Film Holder .................................
Depth of Field Scale and Infrared Photography
....................................
Depth of Field Scale .............................................................................
Infrared Photography
..............................................................................
Shutter Operation ..........................................................................................
12
13
15
Extension Rings .............................................................................................
Spacer Set ......................................................................................................
Life-size Photocopying Set ........................................................................
32
33
36
15
15
.16
Tetraphoto Adapter ........................................................................................
Accessories for the Viewfinder
..................................................................
Grip and T r i p o d Adapter ..............................................................................
Cases .................................................................................................................
37
38
39
41
Press Focus Operation
..........................................................................
................
Using Flash ....................................................................................
ACCESSORIES ................................................................................................
Acceptable Photosensitive Material and Actual Picture Size ...............
Roll Film Holder ( 6 x 9, 6 x 7) ...................................................................
Description of Parts .................................................................................
Prior to Loading Roll Film ....................................................................
16
17
18
19
.20
20
.21
1
Special Pointers for Using Mamiya Universal
Refer to the following pages for further details.
l
I
The 100 mm f/3.5 lens is a retracting type. When the lens
has been retracted, focusing cannot be effected although
the two images on the rangefinder coincide.
When taking photographs with the vertical format camera
position, on a tripod, use a tripod adapter on the hand grip
socket for vertical format photography.
Page 7
Page 40
Be sure to cock the shutter before keeping the shutter
open with the press focus lever. Disengage the lever lock
button and turn the lever in the same direction as the shutter
cock; then the shutter will remain open.
By pushing the lever back to its original position, the shutter
will close.
I
When using the roll film holder for Mamiya RB or the various
film holders and adapters for the 2 1/4 x 3 1/4 Graflok® back,
made by GRAFLEX® , Inc., use the G adapter instead of the
M adapter.
Page 10
Page 16
When framing a 6x9 or 6x7 composition with the finders
brilliant frame, compose it within the inner edges of the
frame width for short distances; use the outer edges as a
guide for long distances.
Page 12
2
Main Features
The Mamiya Universal, the same unique breed as the Mamiya Press used by professional
photographers both at home and abroad, is a large 6 x9 film format camera with the functional
features listed below. It offers the distinct advantage of its large film size not only for general
photography, but also for news photography, commercial work, and scientific application.
* Large film size presents sharp, fine rendition of every detail.
* Variety of interchangeable lenses ranging from 50 mm wide angle to 250 mm telephoto.
* Quick interchangeability of lenses with bayonet ring mounting.
* Accurate focusing through coupled rangefinder.
* Finder with bright, easy-to-see brilliant frame, featuring automatic parallax compensation.
* Further accurate focusing through ground glass focusing screen possible.
* Quick photography with roll film holder (lever winding system).
Available in 6 x 9 and 6 x 7 format for both 120 and 220 films.
* Roll film holder K enables photography in 6 x 9, 6 x 6, or 6 x 4.5 format.
* Also accepts dry plates and cut films, providing for single shots with these films.
* Extreme close-up photography through using spacer set and/or extension rings.
* Use of Polaroid Land pack film holder offers instant photographic prints in 3¼
X
4¼ inch for-
mat.
* The G adapter enables using the roll film holder and various film holders for Mamiya RB, in
addition to the film holders of 2¼ x 3¼ Graflok back made by Graflex, Inc.
* Easy-to-grasp hand grip with cable release for added versatility.
* Many other accessories available for any type of photography.
3
Specifications
Type
Picture size
: Interchangeable lens type 6 x 9 format camera
Back mount
: Photography with 6 x 9, 6 x 7, and 6 x 4.5
G adapter, and Polaroid Land camera back)
formats by using various holders. When using
can be attached.
the POLAROID LAND pack film holder, actual
Grip
: Removable hand grip with cable release.
picture size is 73 x 95 mm.
Others
: Flashgun mounting socket, accessory shoe,
Lens mount
: Breech lock bayonet mount type.
Shutter
: SEIKO
camera body stabilizing plate, and tripod
#0 shutter
socket are provided.
Shutter speed B, 1 -1/500 second
Standard lens
Physical dimensions
Height: 6 19/32 in. (167 mm)
With press focus device (shutter blade arrest-
Width:
4 25/32 in. (121 mm)
without hand grip
ing)
: 100 mm f/3.5 retracting type, minimum aper-
Depth: 4 1/2 in. (114 mm)
ture f/32, with lens hood.
lens in retracted position, distance
scale at infinity
hood.
(Camera body with 127mm f/4.7 lens)
: Reversed Galileian telescope, couples double-
Height: 6 19/32 in. (167 mm)
image coincidence type, instant coupling to
Width: 4 25/32 in. (121 mm)
selected lens.
Viewfinder
: (Camera body, with 100 mm f/3.5 lens)
Flash synchronization, M and X selecting type.
127 mm f/4.7, minimum aperture f/64, with lens
Rangefinder
: Interchangeable back, three types (M adapter,
without hand grip
: Adjustable brilliant frame fields for 100 mm,
Depth: 6 in. (152 mm)
150 mm, and 250 mm lenses; 6 x 9 and 6 x 7
Weight: Camera body: 2 Ibs. 1 1/2oz. (950 gr.)
formats; Automatic parallax compensation.
100 mm f/3.5 lens: 1 lb. 1 oz. (480 gr.)
Use exclusive optical viewfinders for 50 mm
and 75 mm lenses. When photographing
127 mm f/4.7 lens: 1 lb. 9/16 oz.
(470 gr.)
through the Polaroid Land film pack size, use
Hand grip: 10 9/16 oz. (300 gr.)
the optical viewfinder model P for 75, 100,
and 127 mm lenses.
4
Description of Parts
1. Accessory shoe
2. Strap eyelet
3. Flashgun mount
4. Flashgun mounting socket
5. Back locking slide
5' Lock button
6. Bayonet ring
7. Stabilizing plate
8. Hand grip socket
8
9. Rangefinder coupling pin
1 0 . Lens coupling mark
1 1 . Cable release holder
1 2 . Hand grip lock ring
1 3 . Shutter release trigger
1 4 . Hand grip
1 5 . Cable release
1 6 . Depth of field scale
.4
1 7 . Distance scale
1 8 . Focusing ring
1 9 . Shutter cocking lever
26
19
21
I8
17
16
20
26'
25
27
28
29
30
20.
. M-X selector
21. Shutter speed dial
22. Synchroflash terminal
223
3 . Shutter release lever
24. Aperture control lever
25. Cable release socket
226
6 . Press focus lever
26' Press focus lever lock button
32
27. Indicator window for viewfinder
field frame
28. Slide button for viewfinder field
frame selection
29. Eyecup
30. Eyepiece
31. Tripod socket
32. M adapter
33. Locking knob
34. G adapter
35. Locking slide
6
Assembling
By rotating the bayonet ring counter clockwise until it stops, the red
dot of the lens coupling mark on the bayonet ring comes to the top, and
the dust cap on the front of the camera body can be removed. At this
position of the bayonet ring, insert the lens, matching the red mark on
the lens to the red mark on the bayonet ring. Then turn the bayonet ring
clockwise, locking the lens in place.
Detaching the lens is done in a reverse order to that described
above.
When using the 100mm f/3.5 standard lens, the lens-shutter assembly
must be pulled out from its retracted position before taking general
photographs. Grip the lens-shutter assembly firmly, turn it slightly counterclockwise, and pull it out; then, turn it clockwise (in the arrow direction)
and secure it in place.
If the lens-shutter assembly is left in its retracted position, the
coupled rangefinder will not function even when the two images coincide and form a single image.
Although the lens is not used for normal photography with the lensshutter assembly in its retracted position, the lens is designed to allow
its lens-shutter assembly to remain retracted so that it can be used even
when extension rings are used.
Also lens retraction is necessary, when using this lens with another
camera whose back mount can be extended, when taking a picture with
the back mount tilted.
PRECAUTION !
Do not touch the pin (9) on the camera body used to couple the lens
to the rangefinder.
If the lens is changed while a loaded film holder is attached to the
camera, be sure to insert a dark slide into the holder.
7
Attaching the Hand Grip
Stabilizing Plate
To attach the hand grip, insert the hand grip into the grip socket (8)
of the camera body, and firmly turn the hand grip lock ring (12).
Screw the end of the cable release (15) extending from the hand grip
into the release socket (25) of the lens-shutter assembly.
While dismounting a lens, hang the cable release on the cable
release holder (11).
Pull out the stabilizing plate (7) on the bottom of the camera body
when resting the camera on a desk, table, or other surface.
8
Assembling
M Adapter
Before attaching the back, confirm that both side locking slides (5)
are kept at their lowest position. If not, push down the locking slide
while pushing in the lock button (5’).
Align the red point on the M adapter, G adapter, or Polaroid Land
camera back (Polaroid Land pack film holder and focusing hood model
P) with the red point on the camera body, inserting both sides of the
protruded portions to the indented portions on the camera body.
Securely push up the locking slide on both sides. While pushing
up the slide, the lock button will spring out automatically. The lock button
functions to prevent the back from being detached unexpectedly from
the camera body.
Secure both sides of the back by using the locking slides (5). Do
not raise the camera by holding the back in a condition that only one
side is secured.
To remove the back, depress both side locking slides (5) while the
lock buttons (5’) are pushed in.
When installing the M adapter on the camera back, the roll film
holder for Mamiya Press, focusing screen holder, and so on can be
used.
To attach the above-mentioned accessories to the adapter, keep the
flattened edges of the two locking knobs of the M adapter parallel with
the bottom line of the picture format, insert the top of the holder in the
upper groove, and push in the bottom: then rotate the two knobs 90
degrees either to the right or left.
9
G Adapter
Polaroid ® Land Camera Back
_ \
When the G adapter is attached instead
of the M adapter, the roll film holder for
Mamiya RB can be used. Furthermore, the
roll film holder and the focusing panel made
by GRAFLEX, Inc., and accessories for the
GRAFLOK back can be employed.
Remove the camera back adapter and
attach the Polaroid Land camera back directly to the camera body. The Polaroid Land
pack film holder and the focusing hood
model P are available.
With the Polaroid Land pack film holder,
use a Polaroid a-exposure, 3¼ x 4¼ inch Land
film pack. For color photography, use
Polaroid Polacolor® film type 108 or 668, for
black-and-white photography, use Polaroid
Land film type 107, 665 or 667
By attaching the focusing hood model P,
direct focusing through the ground glass
focusing screen of 3¼ x 4¼ inch format (ef-
1100
fective picture size of 2 7/8 x 3 3/4 inch, 73mm x
95mm) becomes possible. On the ground
glass focusing screen are 6 x 9 and 6
x 7 format indicating lines.
NOTE :
The back attaching system used on this
camera is exclusive with Mamiya; thus, do not
attempt to use other Polaroid Land camera
backs.
Operating the Viewfinder
Selecting Brilliant Frame in the
Viewfinder
\
Focusing
with
Coupled
Rangefinder
Within the small circle in the center of the
viewfinder field two images of the subject are
visible. Turn the focusing ring so that these
two images coincide.
When focusing, coincide the double images
at the center of the circle. Looking through
the center of the eyepiece is also a key point
in accurate focusing. When turning the focusing ring of the lens barrel, be careful not to
turn the bayonet ring of the camera body.
When the lens-shutter assembly is in a
retracted position, or when extension rings
are used, the rangefinder will not function
even though the double images coincide.
The viewfinder field frame, indicating the
field for 6 x 9 and 6 x 7 formats, is adjustable
for 100mm, 150mm and 250mm focal length
lenses. By sliding over the slide button (28),
adjust the number in the indicator window
(27) to match the focal length of the using
lens.
When using the 50mm or 75mm lens,
attach the exclusive optical viewfinder of
each lens to the accessory shoe on the
camera body.
Parallax
Brilliant frames in the viewfinder for 100
mm, 150mm and 250mm lenses are coupled
with the rangefinder to automatically correct
parallax.
11
Areas of Viewfinder Field to be Composed
When using Roll Film Holder
When composing the 6 x 9 or 6 x 7 format with
the viewfinder frame, employ inside edges of the
frame for subjects at close distance; use the
outer edges of the frame for subjects further
away.
6x9
6x7
For close range
For close range
For distances further away
For distances further away
Distance Range Composed by Brilliant
Frame
Focal length
of lens
100mm :;;;
150mm
f/5.6
250mm f/5
I
For close ranges,
use inside
edges of frame
For distances further
away, use outside
edges of frame
3.5ft to approx. 6ft
(2m)
(1m)
approx. 6ft. to infinity
(2m)
6ft. to approx. 9ft.
(2m)
(3m)
approx. 9ft. to infinity
(3m)
approx. 12ft. to infinity
(4m)
The 250mm f/5 lens interlocks with the rangefinder from distances of 20 ft (7m) to CO (infinity).
When photographing with the 6 x 6 format or
6 x 4.5 format by employing the roll film holder
model K, use the attached finder mask. See page
24 for details.
12
Areas of Viewfinder Field to be Composed (cont.)
When Using Polaroid® Land Pack
50mm Lens
Attach the optical viewfinder for 50mm
lens on the accessory shoe. To correct
parallax, turn the knob at the back of the
viewfinder and select the same distance
scale shown on the dial as the focused
distance to subject.
75mm Lens
Attach the optical viewfinder for 75mm
lens to the accessory shoe. To correct
parallax, turn the knob at the back of the
viewfinder and select the same distance
scale shown on the dial as the focused
distance to subject. (The brilliant frame of 3
¼ x 4¼ inch format indicates the field of view
when photographing with the Polaroid Land
pack film holder).
127mm Lens
Attach a finder mask to the viewfinder
window of the camera body. For correcting
parallax, select the brilliant frame of the viewfinder for 250mm lens, moving your eye about
until the brilliant frame is centered in the
viewfinder field.
13
Deciding the Field Composition
Since the Polaroid film pack photographs
a wider area than does the viewfinder field
frame of the 6 x 9 cm format, compensate the
field composition in the following manner,
depending on the focal length of the lens to
be used. For accurate field composition, use
the focusing hood model P. Also, the optical
viewfinder model P for 75mm, 100mm and
127mm lenses is available to ensure accurate
field of view.
The 75mm and 127mm focal length lenses
are designed to cover the entire picture area
of the Polaroid film pack (3¼ x 4¼ ) inch format).
However, since other ordinary Mamiya Press
lenses are designed for the 6 x 9 cm format, if
these lenses are used with the Polaroid film
pack, the four corners of the format may be
slightly darkened.
Film Holder
With the 100 mm lens :
With the 75mm lens:
Use the viewfinder entire area. In this case,
the actual picture area covers a slightly wider
field.
Use the brilliant frame for 3¼ x 4 ¼ format in
the optical viewfinder for 75mm lens.
With the 127mm lens:
By observing the camera viewfinder, determine the field of view by using the 6 x 7
format brilliant frame for 100 mm lens as a
guide.
With the 150mm lens:
Determine the field of view by covering the
viewfinder mask for 3 ¼ x 4 ¼ format on the
camera finder window,
With the 50mm lens:
Attach the optical viewfinder for 50 mm lens
on the accessory shoe and observe the viewfinder entire area.
With the 250mm lens:
Determine the field of view by inserting the
mask for 250mm lens in the finder mask for
150mm lens.
14
Depth of Field Scale and Infrared Photography
15
Shutter Operation
Press Focus Operation
Cock the shutter by moving the shutter
cocking lever (19).
Screw the end of the cable release which
extends from the hand grip into the cable
release socket (25).
To release the shutter, press the shutter
release trigger of the hand grip with the left
forefinger. Also, the shutter can be released
by tripping the shutter release lever (23).
By pushing the press focus lever back
to its original position, the shutter will
close. There is no need to reset the
shutter.
When focusing through the ground glass,
keep the shutter open by the following
method.
1 . Cock the shutter, regardless of the shutter
speed setting.
PRECAUTION :
2. Disengage the lock button by thoroughly
pushing it to the camera body side and
turn the press focus lever in the shutter
cock direction; then the shutter will remain
open.
Be sure to operate the press focus lever
AFTER cocking the shutter. While the shutter
is kept opened, the shutter cannot be released with the shutter release button.
Applying an excessive force to the release
button may cause shutter damage.
When the press focus lever is not used,
be sure to engage the lock button to prevent
inadvertently moving the lever.
16
Using Flash
Flash
Synchronizing
17
Table
Acceptable Photosensitive Material and Actual Picture Size
Photosensitive
Type of holder
Type
material
Nominal size
120
6 X 7 cm roll film holder
8
220
n
16
120
2 XX 2 Xin. 56 X 68mm
10
220
r,
20
2 ‘XX 2 Xin. 56 X 84mm
8
2 b$‘,,X 2 xin. 56 X 56mm
12
1xX 2’~in.41.5X56nn
16
Roll film
Roll film holder model K
(6 X 9, 6 X 6, 6 X 4.5cm)
Roll film
Cut film/plate holder (type J)
Polaroid Land pack film holder
2 ‘AX 3 x&t. 56X84mm
Roll film
6 X 9 cm roll film bolder
Cut film/plate holder (type A)
Number of
exposures
Actual picture size
120
Plate
2%X 3xin.6.5X
9cm
2 K X 3 xin. 57 X 84mm
Cut film
2%X3%in.6.5X9cm
Cut film
4 XX 6 %in. size
divided into 4 equal parts
2 XX 3 %i;in. 57 X 77mn
Plate
2 XX 3 xin.6.5X 9 cm
2 %X 3 Xin.57X84mm
Cut film
2 XX 3 Xin.
2%X 3I/in52X79mm
3 XX 4 Kin. (8.3X10.8cm)
2 XX 3 Kin.73X95mm
’
N
1
Polaroid film pack
series 100 or 660
119
9
;
8
Roll Film Holder (6 x 9, 6 x 7)
R-14
R-15
I
R-10
I
R-12
R-11
20
R-10 R-9
Prior to Loading Roll Film
R-4
R-3
Set the automatic film wind stop
device for the film to be used (120
or 220).
Turn the counter change-over
knob (R-4) either to the right or
left until the figure appearing in
the film indicator window (R-5)
corresponds to that of the film to
be used (120 or 220).
Reverse the pressure plate if it does not match the film
Removing the Pressure Plate:
Remove the plate by pushing its right side to the left, pulling it out
from the plate catch (R-15).
Reattaching the plate :
Open the back cover
By pulling out the back cover
latch while pressing the back cover
to the holder, the back cover can
be opened.
Make sure that the correct side of
the pressure plate corresponds to
the film used.
One side of the pressure plate
(R-14) is for No. 120 roll film and
the other side IS for No. 220. The
figure “120” or “220” is indicated
on the window of the pressure
plate.
21
While aligning the upper and lower edges of the plate with the
flange, insert the groove into the plate catch (R-13) on the left, then hook
the plate catch (R-15) on the right while pushing it slightly to the left
Always ascertain that the correct side of the pressure plate corresponds
to the film used.
Use the convenient film sensitivity reminder dial (R-3) as a memo of
film speed in the holder, turning the dial corresponding to the loaded
film speed to the red mark.
Loading Roll Film
Avoid direct sunlight while loading or unloading film. Do it in the
shade.
Pull out the spool change knob
(R-10) and place an empty spool
into the spool chamber (R-12),
Pull out the other spool change
knob (R-10) and place a roll film
into the film chamber (R-8).
By turning the spool change
knob either to the right or left after
pulling it out, the knob will remain
projected. By turning back the
knob, the knob will snap back to
its original retracted position.
The memo clip at the holder
back cover can accommodate a
film box lid or a blank paper pad
for memorandum.
Photographing
Attach the loaded roll film holder to
the camera body.
Pull out the dark slide (R-6); now,
start taking photographs,
Draw out the end of the leader
paper of the film, inserting the tip
into the slit of the take-up spool.
If the spool is not in the proper
position or the leader paper of the
film is not correctly inserted into
the take-up spool slit, film winding
cannot be operated properly or
smoothly.
After each exposure, by moving
the film wind-stop release lever (R-7)
in the direction of the arrow, the film
can be advanced by turning the film
advance lever.
Wind the film advance lever
(R-1) gradually until the start mark
on the leader paper aligns with
the start marks (R-11) on the holder.
Since the film will not advance far
enough with only one stroke of the film
advance lever, turn the lever until it
stops at the second stroke. Winding
may be accomplished by moving the
lever with several short, definite
strokes until the lever stops, although
never wind the lever too rapidly.
Close the back cover and push
in the back cover latch, keeping
the back cover pressed to the
holder.
When the back cover is closed,
the start marks will be slightly
separated; however, this implies
no bad effect whatsoever.
After all frames have been exposed, move the wind-stop release
lever (R-7) once, then continue turning the film advance lever until you
feel tension on the advance lever lessen as the leader end of the film
slips off the spool, finally turning it freely in the take-up chamber. Now
open the back cover and remove the film.
Fully insert the dark slide when the roll film holder is to be detached
or when the lens is interchanged before completing a roll of film,
Without a film loaded, turning the film advance lever will not advance
the film counter which remains at the start (S) mark. When some other
mark is visible in the film counter window, it is your assurance that a film
is loaded.
As the film advance lever is carefully wound, figure “1” appears in the
film counter window and the lever stops winding. Even before figure “1”
appears in the film counter window, a heavy drag may be felt; however,
continue winding until the lever actually stops. Now the first film frame
is ready to be exposed
22
Roll Film Holder Model K
This holder is for taking 6 x 9, 6 x 6 and 6
x 4.5 format pictures with a 120 roll film. The
film is advanced by turning the knob. The
number of exposures are read on the back
of the holder.
The memo clip at the holder back cover
can accommodate a film box lid or a blank
paper pad for memorandum.
Prior to Loading Roll Film
Loading Roll Film
Unless photographing in 6 x 9 format, the
viewfinder field as well as the picture format
of the holder must be changed.
When loading or unloading a film, avoid
direct sunlight. Do it in the shade.
By pulling out the back cover latch while
pushing the back cover toward the holder,
the back cover can be opened.
Pull out the spool change knob and place
a roll film in the film chamber.
Pull out the leader paper of the film, insert
the edge of the leader paper into the slit of
the take-up spool and wind it around the
spool once; then close the back cover. When
closing the back cover, press the back cover
toward the holder, pushing into the back
cover latch.
While observing the window for the
picture format to be photographed, turn the
film advance knob clockwise until figure "1 "
appears in the window.
Avoid direct sunlight when opening the
back window.
Installing the Picture Frame
Attach the picture frame for 6 x 6 or 6 x 4.5
format into the holder while a dark slide is
inserted in the holder. Insert the picture frame
so that the folded portion enters the dark
slide side (inner side). Insert the claws on
both ends into the grooves of the picture
frame of the holder while slightly bending
the picture frame lengthwise (as shown in the
photo).
23
Focusing Hood
Attach the holder to the camera body, pull
out the dark slide, and start to photograph.
After each exposure, open the back
window, and turn the film advance knob until
the next figure appears in the window.
When removing the holder from the
camera or changing the lens while the film is
loaded, be sure to insert the dark slide.
Viewfinder Field for Photographing in 6 x
6 or 6 x 4.5 Format.
Attach a finder mask for 100 mm lens to
the viewfinder window of the camera body
(this mask is for 6 x 6 format). For photographing in 6 x 4.5 format, insert the mask
for 6 x 4.5 format into the back of the 6 x 6
format mask.
For accurate focusing or for confirming
the depth of field, use the focusing hood. A
Fresnel lens is used with this focusing hood
to make the whole image brighter and easier
to focus.
To attach the mask to the camera body,
raise the flat spring attached in front of the
mask by holding it with the thumb and forefinger, and apply the mask to the top cover
front frame and releasing the raised flat
spring.
To correct parallax, select the brilliant
frame for 250mm lens, moving the eye
around while looking into the viewfinder until
the brilliant frame is centered in the entire
viewfinder field.
24
Polaroid® Land Pack Film Holder
“Short Course” on photography
Install a holder containing film pack
on the camera.
Pull out the white tab, then a yellow
tab pops out and take a picture after
pulling out the dark slide.
,..(
-...:
,)
~,.,~
_\
._’
:\:
.I
:.
:
:
‘\_
:..
_,
\\(
:,: .L
With a Polaroid Land film pack, you can
obtain a color print in 60 seconds, and a blackand-white print in 15 seconds.
For color pictures, use Polaroid Polacolor
film, Type 108 or 668.
For black and white pictures, use Polaroid
Land film Type 107, 665 or 667.
Both color and black-and-white films are
eight-exposure film packs.
Actual picture size is 2 7/8 x 3 ¾ inches (73 x
95mm). Install this holder directly on the camera
body after removing the M adapter.
Pull the yellow tab straight out of the
holder and at a constant speed. Development starts from this operation.
After the recommended development
time, strip off the white paper (the
print). The photo will be completed.
* Further detailed explanation is provided with the purchased holder.
25
Accessories for Polaroid® Land Pack Film Holder
Focusing Hood Model P
Optical Viewfinder Model P
Format gauge
for 75mm, 100mm, and 127mm Lenses
7
This focusing hood has the same size
format as the Polaroid Land film pack. The
focusing screen has a Fresnel lens, offering
a bright, sharp image on the screen. Use this
focusing hood to confirm accurate focus or
the actual picture format.
Since this focusing screen has indicating lines for 6 x 9 and 6 x 7 formats, it can be
used as a focusing screen for composing
with the roll film holder.
The hood can be separated from the
focusing screen panel, by sliding the locking
slides on both upper and lower edges.
This optical viewfinder is especially
designed for 75mm, 100mm and 127mm
lenses to permit observing an accurate field
of view when taklng pictures with the
Polarold Land film pack; series 100 or 660
(3¼ x 4 ¼ inch).
By attaching the viewfinder to the accessory shoe, and looking through the viewfinder eyepiece, the field of view corresponding to the lens used can be determined.
To compensate for parallax, turn the knob
on the back of the viewfinder, and set the
focused distance to subject.
26
As a preparatory test when taking an important photograph, make a trial exposure
with the Polaroid film pack to confirm lighting and composition of the actual object;
then photograph the final picture on roll film
and so on.
Employing this procedure, unexpected
failures can be prevented.
In these cases, when placing this format
gauge on the photographed subject, composition when photographing with a 6x9 format
or 6 x 7 format can be ascertained in advance.
Since four corners of the outline indicating the respective size are perforated, the
picture can be cut and checked after being
marked through these holes.
Focusing Screen Holder
Focusing
ss cc rr ee ee nn
.*
release lever
Immediately after focusing with the focusing screen, a cut film/plate holder can be
inserted from one side of the focusing screen
holder.
How to Open the Back Cover
By moving the back cover catch button at
the bottom of the back cover in the direction
of the arrow, the back cover will open. With
the opening angle adjustment slide kept UP,
the back cover will open horizontally; and
with the opening angle adjustment slide kept
DOWN, the cover will open upward.
To focus with the ground glass image,
keep the shutter open and the lens at its
fullest aperture, focusing by rotating the
focusing ring.
(When keeping the shutter open, follow
the instructions on Page 16.)
Depth of field can be observed on the
ground glass screen through stopping down
the diaphragm by turning the aperture control
lever.
Full size of the focusing ground glass is
for 6 x 9cm format, the light vertical lines
indicating the 6 x 7cm format.
27
After focusing, press the focusing screen
release lever to permit the screen to retract,
and insert the cut film/plate holder from one
side of the focusing screen holder
To remove the film holder, press the
focusing screen release lever with your left
hand, hold the film holder and draw it out by
pulling it toward you.
Be sure to close the shutter before attaching the film holder. Pull out the dark slide
before photographing. Insert the dark slide
before removing the film holder.
Right-angle and Magnifying Focusing Backs
Right-angle focusing back
r7 Eyecup
Focusing screen
- release lever
This device enables observing the image on the
ground glass from the rightangle direction against the
optical axis. The right-angle
magnifier can
be very
simply turned upward or
sideward, facilitating focusing from any camera angle.
Attaching and Detaching the Right-angle Magnifier
Magnifying focusing back
This back is provided
with an eye-level, totally
enclosed box instead of the
right-angle magnifier of the
right-angle focusing back.
Precise focusing is possible
by directly observing the
image on the ground glass
focusing screen through the
eyepiece magnifier.
The right-angle magnifier can be removed by swinging it around the
bottom of the housing while depressing the button of the right-angle
magnifier.
To attach the right-angle magnifier, match the projections at the
bottom of the magnifier to the holes of the holder, and press in the
upper part. When attaching the magnifier, the button does not need to
be pressed.
The right-angle magnifier can be attached for up, down, right, and
left directions. Merely attach it in the direction necessary for the camera
angle employed.
When looking from above or below, the image assumes the correct
right-side-up position, but the right and left will be reversed. When
looking from the side, right and left are correct but the image will be
upside down.
Since a Fresnel lens is used on both focusing backs, the entire
ground glass is very bright, and focusing can be easily accomplished
because extraneous light is blocked out. The ground glass has light
lines which indicate a 6 x 7 format.
After focusing, insert a cut film/plate holder as well as the focusing
screen holder for photographing.
28
Composing the Picture by Ground Glass F o c u s i n g Screen for
screen.
When “one-quarter size” cut films or 2-1/4 x3-1/4 inch cut films are
used, since the actual picture size of these films is a little smaller than
the ground glass focusing screen, compose the picture within the frame
of the broken lines as shown in the drawings.
For “one-quarter site” cut film taken from 4 ¾ x 6½ inch
(12 x 16.5cm) cut film;
For 2 ¼ x 3¼ inch c
Cut Film/Plate Holder (Type J)
I-
When Using a Dry Plate 2 ½ x 3 ½
inch (6.5 x 9 cm) :
When Using a Cut Film 2½ x 3 ½
inch (6.5 x 9cm):
When Using a Cut Film Taken by
Cutting a 4¾ x 6½ inch Cut Film
into Four One-quarter Sizes:
Remove the film sheath from
the holder, insert the dry plate
with the emulsion side facing the
dark slide, close the back lid, and
push it back to its original position.
In this case, the film sheath is not
used.
Remove the film sheath from
the holder, place the cut film with
its emulsion side facing the dark
slide, then place the film sheath
with the film catch side up, and
close the back lid. Instead of the
film sheath, a discarded dry plate
may be used
Insert the cut film in the film
sheath with its emulsion side up,
placing the sheath in the holder.
When a color film is cut,
sometimes the film is not developed at a developing laboratory. For color photography,
therefore, use factory-cut 2½ x 3 ½
inch (6.5 x 9cm) color film.
B a c k lid c a t c h
Dark slide
Open the Back Lid:
By pulling out the back lid
catch, the back lid can be swung
open by applying finger pressure
to the finger grip.
Memo plate:
Use the memo plate for
recording on the holder your file
number, the film type, and so on,
Correct recorded letters or
figures by rubbing the plate with
a finger tip, soft cloth, or tissue.
When Using a Dry Plate 2 ½ x 3 ½
inch (6.5 x 9cm):
When Using a Cut Film 2 ¼ x 3¼
inch:
Remove the film sheath from
the holder, insert the dry plate
with the emulsion side facing the
dark slide, close the back lid, and
push it back to its original position. In this case, the film sheath
is not used.
Use the cut film/plate holder
(type A). Insert a film in the film
sheath, place it in the holder, and
close the back lid. This film sheath
is exclusive for type A; do not use
it with a type J holder.
4
31
31
Extension Rings
The values in the table represent those
when the five extension rings are attached
and the lens distance scale is set at the
closest distance.
The lens-to-subject distance represents
the distance of the subject from the front
extremity of the lens barrel.
Subject coverage is the area of the subject
registered on the focusing screen (2 ¼ x 3 5/16
in 57 x 84mm).
Precaution
When using many extension rings for
photographing in the 6 x 9cm format, certain
lenses may produce pictures with darker
corners. By stopping down the aperture while
looking into the focusing screen, how much
darker the corners appear can be observed,
The 75mm f/5.6 and 250mm f/5 lenses
cannot be mounted with extension rings.
Maximum Close-up Photographing Table
Use a set of five extension rings in various
combinations between the lens-shutter assembly and the camera body for close-up
photography.
32
Spacer Set
Polaroid Land
Pack Film Holder
A spacer is a device for close-up photography by extending the camera back by
installing a spacer between the camera back
and the film holder.
Since two types (No. 1 spacer and No. 2
spacer) are combined as one set, the photographing range can be varied by changing
the combination or the lens to be used.
Extreme close-up photography can be
achieved by combining with the extension
rings.
The Polaroid Land pack film holder can
When
be directly installed on the spacer.
using an M-adapter or G-adapter, photography through all holders installable on these
adapters can be achieved.
Spacer
Indication Sheet for Subject Coverage
Indication sheet for subject coverage
for 6 x 9 and 6 x 7 cm format
for 3 ¼ x 4¼ inch format
On the vinyl sheet in the spacer set,
subject coverages varying according to the
combination of lenses (75mm f/5.6, 100mm
f/3.5, and 127mm f/4.7) and spacers are indicated through color indentification.
Close-up Photographing Table
The left-side values is each column of the
close-up photography table indicate values
when setting the lens distance scale to oc,
(infinity). The right-side values indicate when
extending the lens to the nearest close-up
distance scale.
The lens-to-subject distance indicates the
distance from the front edge of the lens
barrel to the subject.
Magnification indicates the ratio of image
and the subject size
33
Close-up Photographing Table for 75 mm f/5.6 Lens
Close-up Photographing Table for 127 mm f/4.7 Lens
Life-size Photocopying Set
The life-size photocopying set is used for
actual size photography by using the 75 mm
f/5 6 or 100 mm f/3 5 lens and the spacers.
.A sheet for determining the position of
subject to be copied and a nonglare glass
which prevents reflection are included.
When using the 75 mm f/5.6 lens:
When using the 100 mm f/3.5 lens:
Use spacer No. 1.
Set lens distance scale to infinity (~0).
Install only the four long legs to the photocopying stand.
Use spacers No. 1 and No. 2.
Retract the lens and set the distance scale
to 3m.
Install long legs and extension legs on the
photocopying stand.
Nonglare glass
Extension legs
36
Tetraphoto Adapter
Polaroid Land film pack 100 or 660 series
is used for the tetraphoto adapter, whereby
quadruple photos can be obtained by a single exposure. Ideal for taking photos for
drrver’s licenses and identification cards.
Lens and Accessories to be used
127mm f/4.7 lens
Polaroid Land pack film holder
Tripod adapter (for vertical format)
Photographing
Set the height (optical axis) of the camera
on which the tetraphoto adapter is installed
to the height of eyes of the subject to be
photographed, placing the camera in front
of the subject; then adjust the distance.
After confirming whether or not the adapter
is inclined, position the center of the subject’s
face in the center of the adapter finder field
of view.
As shown in the sketch, prepare a white
background for use only as the photographing range, and use back which reflects
negligible light from other portions and on
the floor.
H: Height of eyes of the subjec
Accessories for the Viewfinder
Sports Finder
Extension Eyepiece
Eyecup
For both Mamiya Universal and the Mamiya
Press Super 23, this is available in 6x9 and
6x7 formats, both with wire frames for 100
mm and 150 mm lenses.
Really an indispensable accessory for
photographing quick-moving subjects.
Maintains the correct
Prevents extraneous light
viewfinder from the back
the viewfinder. Attach this
eye position and
from entering the
when looking into
to the eyepiece.
Eye-correction Lens
The finder image is adjusted for those
people with normal eyesight. Nearsighted or
farsighted people without glasses, or those
with improper glasses, will have difficulty
looking into the image. Use this lens in such
cases.
There are eight diopter lenses available
(+3, +2, +1 -0.5, -1, -2, -3, and -4).
To attach the lens to the eyepiece, turn
the ring on the eyepiece counterclockwise
and remove it, insert the lens, and screw the
ring back in as it was.
38
An Extension Eyepiece (magnification of
0.75X) is available for use with the 70mm Film
Holder. Even with the holder attached to the
Mamiya Universal camera, the entire field of
the viewfinder is clearly visible when the Extension Eyepiece is used.
To attach the Extension Eyepiece to the
camera, merely unscrew the Eyepiece
Retainer Ring of the camera by turning
counterclockwise, and then screw in the
Extension Eyepiece in its place.
In addition to being a necessary accessory for the 70mm Film Holder, the Extension Eyepiece will also prove to be a
valuable aid when used with other Mamiya
Press Film Holders.
Grip and Tripod Adapter
Rotating Grip
Rotating Adapter
This is a unique grip whose angle is freely adjusted according to the photographing posture.
This grip rotates approximately 180°, centering
the installation point to the camera; however, when
grasping the center belt of the grip, the grip is
secured at an optional angle.
This is a convenient universal head
which can be freely changed over from
a vertical photographing position to a
horizontal photographing position (or
vice versa) by revolving the camera
installed on the tripod, centering the
camera optical axis.
39
\,.-\
\\\
a
\
“~
.\,
‘\.
\/\\\
\._..\
:.
Tripod Adapter
Quick-shoe Model 2
(For Vertical Format)
For photographing vertical format pictures
on a tripod, remove the hand grip from the
camera body and attach this tripod adapter
to the socket.
A two piece set in which one piece is attached to the camera and the other to the
tripod. When this is done, the camera can
instantly be mounted to, or removed from, a
tripod without the need to fumble with
screws.
40
Case
Mamiya Aluminum Custom Case
The Mamiya Custom Case is a smartly portable, luggage-type aluminum case.
The Custom Case is designed to accommodate and to easily handcarry normally required interchangeable lenses and accessories as well
as standard equipment. By changing the inserts, the Custom Case conveniently accommodates the Mamiya Press, Mamiya C, or Mamiya RB
and related equipment.
The interchangeable inserts, made of sponge rubber, provide effective shock absorption and sufficient protection of the equipment.
Dimensions(outer): 18%“x13%“x6%”
(47 x 35 x 17cm)
Weight: 8lbs, 2 ½ oz.,(3.7kg).
Soft Leather Case
A flexible and convenient soft case for lens protection and carrying,
Can be used for accommodating one of lenses from 50mm to 150mm,
or extension rings or accessories, and so on.