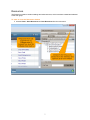
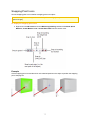
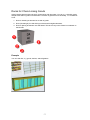
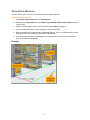
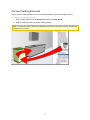
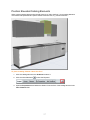
1
P'X5 Store Solution
User's Guide
Version 1.2
Copyright
© Copyright 2012 Perspectix AG. All Rights reserved.
No part of this publication may be reproduced or transmitted in any form or for any purpose without the
written permission of Perspectix AG. The information contained herein may be changed without prior
notice. Perspectix AG shall not be liable for errors or omissions with respect to this publication.
P'X™, P'X5™ and the corresponding logos are registered trademarks of Perspectix. Other company,
product, and service names may be registered trademarks of others.
Perspectix AG
Hardturmstrasse 253
CH-8005 Zurich
Switzerland
Phone: +41 44 445 95 95
Fax: +41 44 445 95 96
Website: www.perspectix.com
Email: [email protected]
CONTENT
Introduction
1
User Management
3
User Interface and Interaction
4
Store List and Catalog List
Resources
Stores and Catalogs
Maximize and Move Tabs
Search and Filter
View Options
Snapping Point Icons
Navigation in the 3D Scene
Handles
5
6
7
9
10
13
14
15
17
Building Catalogs
Catalogs
Release Catalogs
Import and Export Catalogs
Print Catalogs
Catalog Elements
Build Catalog Elements
Place Catalog Elements in 3D Scene
Place Generic Parts in 3D Scene
Place Geometries in 3D Scene
Place Images in 3D Scene
Place 2D Illustrations in 3D Scene
Add Articles to Catalog Elements
Position Catalog Elements
Add Name to Catalog Elements
Geometry Requirements
Docks
Docks with one Degree of Freedom (DOF Docks)
Docks with two Degrees of Freedom (Planar Docks)
Docks for Chain-Linking Goods
Docktypes
Connect Parts
Stack Parts
Rotate Parts
Move Parts on Surface
Dock Inspector
Assemblies
Create Family Nodes
Define Article Numbers
18
19
21
22
23
28
29
30
31
35
36
38
39
40
41
42
43
45
45
46
48
51
52
53
54
55
56
58
59
Create Tags
Attach Documents
Catalog Element Inspector
60
60
61
Best Practice - Catalog Building
62
Planning Stores
68
Create Stores
Create Configurations and Subconfigurations
Load Floor Plan
Place Walls, Doors, Windows and Columns
Place Assortment Areas
Compare Assortment Segmentation
Place Catalog Elements
Place Planograms
Insert Catalog Elements in Article List
Copy Catalog Elements
Insert Passageways
Create Part Labels
Position Catalog Elements Relatively
Set Distance Between Parts
Show Quick Measure
Assign Categories to Product Carriers and Goods
Show Categories of Goods
Connect Catalog Elements
Position Elevated Catalog Elements
Change Catalog Elements
Change Display Quality
Assign Position and Element Numbers
Show Information about Catalog Elements
Show Changed Catalog Elements
Import and Export DWG/DXF Files
Send Requests
Import and Export Stores
69
69
71
72
73
76
77
77
77
78
79
80
81
82
84
85
85
86
87
88
89
90
93
93
94
97
102
Analysis and Reporting
103
Bar Graph Reports
Grid Reports
Category Grid Reports
105
106
107
GLOSSARY
108
INDEX
110
Introduction
The P'X5 Store Solution supports the entire store planning and optimization process in the retail industry, from the utilisation survey via assortment planning, master planning, and merchandise planning to
the implementation, and the reporting and change management.
Note: Even the best software does not solve all problems. To achieve the best results, processes
must also be optimized and adapted.
Store and Catalog Projects
There are two project types: Stores and catalogs. See pages 5 and 7.
Note: Your role determines which user interface elements you can see and which functions you can
use. See pages 4 and 3.
Catalogs
Catalogs are made up of elements, i.e. product carriers (shelves, refrigerators) and planograms (visual assortment representations), which can be used for further planning and centrally stored. See page 19.
Elements
Elements consist of objects, which have their own docks (i.e. connection points) to other objects and
which have their own parameters (e.g. length and width). See pages 28 and 43. Catalog elements can
be built from elements from other catalogs. See page 62.
Creating and Maintaining Catalogs
Catalogs are created and released, so that they can be used for planning stores:
1. Create elements. Drag & drop elements from other catalogs or basic elements and images
(VRML). See page 29.
2. Adjust elements. Set parameters and connect elements with other elemnts using docks (define
docks). See page 51.
3. Release catalog. The catalog is transferred to the server and can be used by other users. See
page 21.
Stores
Stores are made up of floor plans and areas (or zones) with elements. See pages 71, 73 and
77.
Processes
The following retail processes can be modeled in the P'X5 Store Solution:
n
Assortment representation (creating articles)
n
Assortment presentation (building product carriers and type sheets / planograms, visual merchandising)
n
Project planning (planning product carriers and assortments)
1
n
Implementation (printing parts lists and project catalogs, ordering, implementing)
n
Reporting (analysis and optimization)
2
User Management
Users are managed using work groups and they have roles and rights.
Work Groups
A user group is a logical grouping of users, who share the same information. A user group defines some
basic user information (e.g. company name, group code, etc.), information that can be used when creating different documents.
A user group can give a user, who belongs to the user group, specific rights, e.g. on the server side a
member of the master user group has administrative rights in all other user groups.
A user can only hand a project over to another user in the same work group. To hand a project over to a
user in a different workgroup, the project must be exported as a ZIP file and then imported into the other
work group.
A user can have more than one role in the same user group.
Roles
The following user roles are available:
n
catalog_builder Catalog Creator (can create and edit catalogs)
n
catalog_manager Catalog Manager (can release catalogs for use)
n
superuser System Administrator
n
admin Key User
n
supervisor Head of Sales (has the right to make important decisions in the workflow)
n
fieldsales Normal user
n
backoffice Sales Back Office (user support)
n
engineer Application Engineer
Note: Your role determines which elements of the user interface you can see, e.g. only users with
catalog rights can see the Catalog List tab.
Rights
A role can have several rights. The rights are predefined in the P'X5 Store Solution.
3
User Interface and Interaction
To log in to the P'X5 Store Solution, you need a user name, a password and a user group.
Note: If you don't want to enter your credentials every time you start the application, select the Stay
Logged In checkbox in the Log In window.
Note: Your role determines which elements of the user interface you can see, e.g. only users with
catalog rights can see the Catalog List tab. See page 3.
4
Store List and Catalog List
The Store List tab shows all stores and the Catalog List tab shows all catalogs.
Icons (
,
) show if projects can be opened and edited. To update the Store/Catalog List, press F5.
Every user can open any store or catalog in his own work group, but only the editor can edit it. See page
3.
To open a store or a catalog
n
Double-click the store or catalog in the Store List or Catalog List.
5
Resources
The Resources window contains catalogs and other resources, which have been created and released
to the work group.
To open or close the Resources window
n
Choose View > Show Resources or Close Resources from the main menu.
6
Stores and Catalogs
A store or catalog opens in its own tab.
7
An open store or catalog contains, i.a. the following user interface elements:
1. The Structure tab shows the project structure in a tree hierarchy. The star symbol shows
nodes that are not yet saved and the plus symbol + shows nodes that are not yet released.
2. Use the Add and Delete icons
to create and delete folders and configurations. To open a
configuration, double-click the configuration in the Structure tab.
Note: In a catalog project, a configuration is a catalog element. In a store project, a configuration is a store, or a store floor, or a store section.
3. The Preview tab shows a preview of the configuration, which is selected in the Structure tab.
4. The Left Panel button opens tabs, e.g. for importing floor plans (DWG/DXF files), creating
areas, walkways, and rooms (for stores); with generic store fitting parts and properties (for catalogs).
5. Vertical tabs:
a. Information Contains location information, opening hours, etc.
b. Configuration Here you can build catalog elements and plan stores. See pages 18 and 68.
c. Article List Lists every element (with article number) of the configuration.
d. Documents Here you can attach documents to stores, catalogs, catalog elements and
assemblies (e.g. specifications, pictures, assembly instructions, plans, etc.). See page 60.
e. Print Settings Here you can define settings for printing documents.
The following tabs are only available for stores:
f. Assortment Planning Shows the required and planned assortment data. See page 73.
g. 3D Reports Here you can create 3D reports to analyze your business data. See page 103.
h. Energy and Operating Costs Shows the required energy data for the planned cooling systems. (This feature is not available yet.)
i. Info/Offer/Order Request Here customers can send information, offer, and order requests
to suppliers.
8
Maximize and Move Tabs
You can move and maximize/minimize the Structure and Preview tab, the vertical tabs, and the tabs in
the Resources window.
To maximize/minimize a tab
n
Double-click the tab.
To move a tab
n
Drag & drop the tab down/up.
9
Search and Filter
To show or hide a column
n
Right-click the header of a column and choose the columns that you want to show/hide from the
context menu.
To widen a column
n
Move the edge of a column to the right.
To sort a column
n
Click the header of a column. An arrow shows the sorting direction.
To sort several columns
1. Click the header of a column.
2. Press and hold down the CTRL key while you click the header of another column.
To filter a column
1. Right-click the column header and choose Show Filter Fields from the context menu. Filter
fields appear above the column headers.
2. Type your filter criteria in the filter fields and press ENTER.
To filter a hierarchy tree
n
Write your search term in the filter field and press ENTER.
Example
The Project List (left) shows all entries, which are identical to the search term 'milano'. The Resources
window (right) shows all entries, which are smaller than or equal to the search term '4'.
10
To search for tags
1. Click the Add icon
in the Resources window and choose the tag (e.g. shelf board meter)
you want to search for from the context menu. See page 60. A search field with the tag (e.g. shelf
board meter) for which you are searching opens and in the Resources window and only entries,
which contain the tag (e.g. shelf board meter) for which you are searching are shown.
2. Enter the value (e.g. 3.9) of the tag in the tag search field and press ENTER. In the Resources
window only entries, which contain the tag (e.g. shelf board meter) with the value (e.g. 3.9) you
are searching for are shown.
Example
11
Search Aid
Use the following search aids to find specific combinations.
Search Aid
Description
text
Finds all entries, which contain this string of characters (i.e. *text*).
text1,text2
Finds all entries, which contain either one or the other search term (i.e. OR).
=text1
Finds all entries, which are identical to your search term (e.g. =10).
-text
Finds all entries, which are smaller or equal to your search term (e.g. -12).
text-
Finds all entries, which are greater or equal to your search term (e.g. 12-).
text1-text2
Finds all entries, which lie between or are equal to your search term (e.g. 10-12).
text1,text2,text5text10
Finds all entries, which contain both search terms and which lie between or are equal to your
search term (e.g. 1, 2, 5-10).
*
Replaces a string of characters (i.e. wildcard).
12
View Options
Use the View Options to switch between different views (3D, DWG/DXF blocks, etc.), change the display quality, show and hide measurement and grid lines, and show categories of goods.
13
Snapping Point Icons
Use the snapping point icons to define a snapping point on an object.
Note: Not all options are always active. Inactive options are slightly transparent and selected
options are gray.
To display the snapping point icons
n
Right-click in the 3D Scene and choose Measuring/Labeling and then either Show Quick
Measure, Create Measure Line or Create Part Label from the context menu.
Example
Click a snapping point icon and then click on the desired position on the object to position the snapping
point. See page 43.
14
Navigation in the 3D Scene
15
16
Handles
Handles are interactive user elements, which you can click or drag to trigger specific operations.
The various handles have different shapes and colors, which indicate the purpose of a handle:
n
Green Change
n
Red Delete
n
Yellow Move
The following handles are used:
Dockhandle
The dockhandle is a special handle. The rings are for rotation and the cones are for translation. You can
also position docks using the numeric input fields.
17
Building Catalogs
Tip: Before you build catalogs, familiarize yourself with the best practices. See page 62.
To build a catalog
1. Create catalog First, create a catalog project and define the basic information in the Information
tab. See page 19.
2. Build catalog elements Then, create and build catalog elements using already created or
imported parts, generic parts (articles, shopfitting parts, refrigerators), geometries (3D VRML
files), images, 2D illustrations and articles without a 3D representation. See pages 28 and 29.
Caution: Always position catalog elements on the origin point in the 3D Scene, otherwise the
position of the element in the store could change when you update the catalog version. See
page 40.
Use docks (snapping points) to connect parts. See page 43. Group connected parts into
assemblies and product families into family nodes. See pages 56 and 58. You can assign article
numbers, add tags, and attach documents to catalog elements. See pages 59, 60 and 60.
Use the Catalog Element Inspector to see detailed information about a catalog element. See
page 61.
3. Release catalog Finally, release the catalog in order to plan a store with the catalog. See pages
21 and 68.
After you have built a catalog, you can also print and export the catalog. See pages 23 and 22.
18
Catalogs
Catalogs are used to plan stores or to build further catalogs.
Catalogs contain elements (parts, assemblies, family nodes), which are organised in a tree structure
and versioned. You can add tags to catalog elements (assemblies and single parts) and search for the
data, you can drag catalog elements from the catalog into the 3D Scene or directly into the article list,
and you can attach documents to catalogs and catalog elements (e.g. specifications, pictures,
assembly instructions, plans, etc.).
To create a catalog
1. Click the New Catalog button in the Catalog List.
2. Enter a name for the new catalog.
Note: Only users with the catalog_builder role can create and edit catalogs. See page 3.
19
Nested Catalogs
Catalogs can be nested. See page 62. A catalog contains parts, which can be assembled with other
parts. These parts can be used to create other catalogs, whose catalog elements can be included in
another catalog, etc. This way you can build different variants, from general goods catalogs, via category-specific catalogs, to POS-typical catalogs.
Example
The first catalog is created from single parts (1). Parts from the first catalog (2) are supplemented with
new parts (3) (e.g. an assembly is built from single parts using docks) and a second catalog is created
(4). New parts are added to the second catalog (5) and a third catalog is created (6).
20
Release Catalogs
To be able to use a catalog in the Resources window (and within the entire Central Repository Server
user group) you must release the catalog.
To release a catalog
n
Select the catalog in the Structure tab and click the Release Catalog button.
Note: Only users with the catalog_manager role can release catalogs. See page 3.
After releasing a catalog, the version number of the catalog (e.g. Release 2 = r2) and the changed catalog elements it contains (e.g. Version 2 = v2) are increased. All users, within one's own work group in
the Central Repository Server, that use the catalog element are notified by email about the change.
When users open a store or a catalog, which contains a catalog element to be updated by a new catalog
release, they can accept, view and check the changes, or reject the changes.
You can check where any catalog element is directly used (i.e. not nested in a catalog) in your workgroup. Used catalog elements, their article numbers and their positioning, are saved on the Central
Repository Server and are available in an SQL database for analysis.
To see where a catalog element is used
n
Right-click the catalog element in the Structure tab and choose Show Element Usage from the
context menu.
21
Import and Export Catalogs
Catalogs can be distributed to partners and customers. The catalog contains version information to
ensure that partners do not work with old catalog data.
Partners or customers can use catalogs (also from other partners/manufacturers) within their work
group to plan in 3D or to create article lists. The article lists, grouped per catalog manufacturer, can be
exported from the P'X5 Store Solution as XML files to the manufacturer.
The catalog creator can load the exported list in the P'X5 Store Solution and dissolve the article
numbers so that he can create offers or orders, also through interfaces to his own ERP system.
To export a catalog
1. Open the Catalogs tab and then the Product Carriers tab in the Resources window.
2. Right-click an entry and choose Export Catalog from the context menu.
3. Enter a name for the catalog and click Save.
Note: To export a catalog, the catalog must contain configurations, the catalog and all configurations
must be saved, and the catalog must be released.
To import a catalog
1. Use a web browser to connect to the Central Repository Server.
2. Log in with your user group.
3. Open the Catalogs tab.
4. Click the Import/Update Catalog link.
5. Select an already exported catalog file (*.pxcz).
6. Click Submit. The catalog is imported into the selected user group.
22
Print Catalogs
Note: To print a catalog that belongs to another user, you must first create a copy of the catalog.
Select the desired catalog in the Catalog list and click the Duplicate button.
To print a catalog
1. Select the project folder in the Structure tab.
2. Open the (vertical) Print Settings tab and define the print layout, e.g.:
n
n
n
n
Optional Horizontal Text Prints a title text on the front side of the catalog, which can be
illustrated with an image to the left. If you don't select an image, the text is printed across the
entire width. If no text is printed, the image can be printed across the entire width.
Optional Print Image 1 Prints an image to the left of the title text.
Optional Vertical Text Prints a vertical text, which can be illustrated with an image, on the
front page of the catalog underneath the title text. The image is placed on top of the text. If the
image is not printed, the vertical text starts underneath the title text.
Optional Print Image 2 Prints an image accompanying the vertical text.
3. Click the Print Catalog button. The catalog opens as a PDF file.
23
Print Layout Page 1/4
24
Print Layout Page 2/4
25
Print Layout Page 3/4
26
Print Layout Page 4/4
27
Catalog Elements
A catalog element consists of single articles, family nodes or assemblies. See pages 58 and 56.
A catalog element can contain the following information:
n
Article data - The article numbers list is integrated in the catalog. See page 59.
n
Using the article number, you can attach additional data from an ERP system.
n
You can add your own article numbers.
n
You can define a catalog element as an assembly with a corresponding assembly article
number.
n
2D/3D representation - Abstract logic defined on docks (snapping points). See page 43.
n
Tags - Calculated or manually added data, e.g. shelf board meter, etc. See page 60.
n
Attached documents - Specifications, images, assembly instructions, plans, etc. See page 60.
Note: Catalog elements are versioned and can be released by certain users. See page 3.
To create a catalog element
n
Click the Add icon
in the Structure tab and choose Configuration.
28
Build Catalog Elements
You can build catalog elements by dragging and dropping:
1. Catalog elements from the Resources window into the 3D Scene.
2. Generic shopfitting parts from the iCatalog into the 3D Scene.
3. Geometries, i.e. 3D images (VRML files) from the Explorer into the 3D Scene.
4. Images and contours from the Explorer into the 3D Scene.
5. 2D illustrations (DWG/DXF files) from the Explorer into the 3D Scene.
6. Articles (without a 3D representation) from the Resources window into the article list.
29
Place Catalog Elements in 3D Scene
To place a catalog element in the 3D Scene
n
Drag a catalog element from the Resources window to the 3D Scene and snap it with the origin
point.
Caution: Always dock (snap) catalog elements to the origin point in the 3D Scene, otherwise the
position of the element in the store could change when you update the catalog version. See page 40.
30
Place Generic Parts in 3D Scene
The iCatalog tab contains parameterized generic (store-typical) parts, e.g. articles, shopfitting parts,
refrigerators, which you can use to build catalog elements. Simply drag the generic part from the iCatalog into the 3D Scene.
You can assign materials and textures from the material catalog to generic parts. Material types contain
different materials, e.g. metal contains steel, aluminum, etc., which have various finishes and various
colors. Certain materials have textures, e.g. plywood.
Note: All images for textures must be in PNG or JPG format.
To place a generic part in the 3D Scene
1. Click the show/hide button
to show the left panel.
2. Open the iCatalog tab.
3. Drag a generic part from the iCatalog tab and drop it into the 3D Scene and snap it with the
origin point.
4. Click the part to select it.
5. Open the Properties tab and change the properties of the selected part if required.
Caution: Always dock (snap) catalog elements to the origin point in the 3D Scene, otherwise the
position of the element in the store could change when you update the catalog version. See page 40.
To assign a material to a part
1. Click a part in the 3D Scene to select it.
2. Open the Materials tab in the Resources window.
3. Double-click a material in the Materials tab to assign the material to the selected part.
31
Generic Shopfitting Parts
The Shopfitting area in the iCatalog tab contains parameterized generic shopfitting parts (e.g. shelves,
tables, clothes racks, decoration elements).
You can connect parts using docks (snapping points). See pages 43 and 51. Every part has docks with
the appropriate degrees of freedom. You can therefore, e.g. equip a shelf with a shelf board (e.g. board
with bracket) and move it in the Z-direction.
Some parts already have a connection logic. You can, e.g. create a chain of shelves from a basic shelf.
See page 46. You can then save configured parts or groups of connected parts from the iCatalog as catalog elements.
You can add textures to parts, e.g. to a bracket and create different bracket types by using only one
basic bracket, i.e. you don't need a separate 3D geometry for each bracket.
32
Generic Articles
The Articles section in the iCatalog tab contains dummy articles (box, bottle).
You can chain-link the articles and copy, move, etc. the articles in a chain using handles. In the Properties tab, you can define, e.g. the article dimensions, the distance between the elements, and the rotation around the x-, y-, and z-axes. You can also drag and drop textures onto articles.
To edit an article in a chain
n
Click an article in a chain to select it and use the handles to edit it.
33
Generic Refrigerators
The Refrigerator section in the iCatalog tab contains catalog elements, which you can use to build refrigerators, complete modules, shelf elements for creating planograms and various add-ons (front grid, mirror, dividers, covers).
There are casings with vertical and horizontal access. You can chain-link casings and separate them
again. This also separates the floor plans of the casings (2D view). You can add and delete casings,
dividers, and side parts.
Planograms for refrigerators consist of an L-shaped carrier with a variable number of shelf boards. You
can move the shelf boards up and down and place goods on the base area of the carrier.
The width, depth, and height of an empty planogram adjusts to the casing when the planogram docks to
the casing. If you drag a planogram onto a planogram, which is already in a casing, the new planogram
will replace the old planogram.
34
Place Geometries in 3D Scene
You can drag geometries, i.e. 3D images (VRML files) from a folder and drop them in the 3D Scene. See
page 42.
To place a geometry in the 3D Scene
1. Drag a VRML file from the Explorer into the 3D Scene.
To see the bounding box of the geometry, choose View > DWG/DXF Blocks in the View
Options. See page 13.
2. Click the show/hide button
to show the left panel.
3. Open the Properties tab to define the properties of the converted geometry.
Example
35
Place Images in 3D Scene
You can drag images from a folder into the 3D Scene or onto an existing catalog element. You can also
create 3D objects from images.
Note: All images for textures must be in PNG or JPG format.
To place an image onto a catalog element
n
Drag an image from the Explorer onto a catalog element in the 3D Scene. To transfer the article
proportions to the box, press and hold down the SHIFT key while you drag the texture onto the
article.
To create a 3D object (extruded) from an image
n
Press and hold down the SHIFT key while you drag an image from the Explorer into the 3D
Scene or onto a cube with a transparent background. When you select the object later, handles
appear.
Use the blue-green arrow combination to draw a frame around the article. The frame is used to
define the cutout later. Use the yellow arrow cross to move the article within the frame. Thereby
you can create a cutout. When the frame is visible, you can define the dimensions in the Properties tab. By clicking the blue-green arrow combination again, you confirm the cutout.
To create a 3D object (rotated) from an image
n
Press and hold down the ALT+SHIFT keys while you drag an image from the Explorer into the
3D Scene. The 3D object is created through a rotation around the center axis. This assumes that
at least one pixel along the center axis is not transparent.
You can also create a 3D object from several images on the front, top, and side. The intersections from
the projections of the images are calculated and the extracted object is created from the number of intersections.
To create a 3D object from several images
1. Right-click in the 3D-Szene and choose Generate Bitmap Intersection Object from the context menu. A transparent cube appears.
36
2. Drag the images onto the surfaces of the cube.
3. Click the cube to select it. Handles appear.
4. Click the handle, to extract the 3D object.
If you click the handle again, you can switch back to the cube and change the images.
37
Place 2D Illustrations in 3D Scene
You can drag 2D illustrations (DWG/DXF files) from a folder and drop them on a catalog element in the
3D Scene. The layers and colors of the illustration are transferred.
To place a 2D illustration (DWG/DXF file) in the 3D Scene
n
Press and hold down the SHIFT key while you drag a DWG/DXF file from the Explorer onto a
catalog element in the 3D Scene.
38
Add Articles to Catalog Elements
You can add articles without a 3D representation to catalog elements. You can save these catalog elements as an assembly with its own price and article number. See pages 56 and 59.
Note: Catalog elements with articles without a 3D representation from the catalog may not be dissolved, because these articles will be lost. The 'Can be Exploded' and 'Explode on Drop' checkboxes in the 'Article List' tab are therefore not active.
To add an article without a 3D representation to a catalog element
n
Drag an article from the Resources window and drop it into the Article List.
39
Position Catalog Elements
Caution: Always dock (snap) catalog elements to the origin point, otherwise the position of the element in the store could change when you update the catalog version. When you edit catalog elements, do not move them later relative to the origin point, because the position of all catalog
elements in the store would change.
Example
1. A product carrier is created as a catalog element and positioned on the origin point.
2. The catalog element is placed in a store.
3. The catalog element is edited and moved away from the origin point.
4. If a new version of the catalog element has been released, a message appears when you open
the store. Before you accept changes to a catalog element, you can view them first. The new
position of the catalog elements are clearly visible. Click the green handle to accept the
changes.
5. If you accept the new version of the catalog element, this version is placed in a new location
because the catalog element was moved. The displacement of the catalog element in the catalog relative to older versions is transferred to all stores.
40
Add Name to Catalog Elements
You can add a name to a catalog element, to give the catalog element a name in a CAD software.
To add a name to a catalog element
1. Click the origin point in the 3D Scene to select it.
2. Click the show/hide button
to show the left panel.
3. Open the Properties tab and then the Catalog Element Name section.
4. Enter the name of the catalog in the Catalog Element Name field. The catalog element name is
shown at the origin point in the 3D Scene. The catalog element name, which is shown in the hierarchy tree in the Structure tab, is used by default.
5. Move the sliders to move the text field at the origin point on the x- and y-axis.
Note: To restore the default settings, click the Default Settings button . The catalog element
name for the data sheet and planogram catalog types is shown by default, not for the other catalog
types.
41
Geometry Requirements
Geometry Structure and Orientation
The geometry file should contain the entire part – provided it is not parametrizable anymore and the component parts of the part cannot be moved (e.g. doors and arms of machines).
The part should be positioned and rotated in the geometry file in such a way that the part stands
"upright" on the "floor", i.e. the z-axis should point up and the part should stand with its real "base" on
the x/y-level with z=0. Parts which are not positioned on the floor, should have their "natural" hanging/placing point set on the z=0 level in the Properties tab.
Select the origin point in the geometry in such a way that it represents the natural attachment point to
neighboring attachment parts at the same time (at least in one of the two coordinate axes).
Data Formats
The following data formats are acceptable:
n
VRML (.wrl) version 1.0/2.0
n
DWG
Detailing and Visualisation Quality
The P'X5 Store Solution is often used by sales people on laptops or computers outside the office. That
is why it is necessary to "build" the geometries as light as possible, i.e. to reduce the assembly to only
the most relevant information that a sales/service employee needs (the geometry should not contain
any details that are not relevant for the configuration).
To ensure a high quality import of data into the P'X5 Store Solution and to achieve good visualisation
speed, the geometries that you import into the P'X5 Store Solution must fulfill the following requirements.
Geometries that are not relevant are, e.g. spacers, screws, casing embossments, small bores, etc.
However, you must consider how the object looks when you reduce the geometry. The goal is to make
the object look as real as possible, while at the same time keeping it as reduced as possible.
Depending to the usage scenario, you should reduce the number of polygons to a minimum:
n
Larger parts (e.g. cashier's desks / sales counters, cabinets, etc.), of which there are not many
in a configuration, should have 2000 to 5000 polygons.
n
Smaller parts (e.g. shopping baskets and carts, palettes, other attachment elements), which
occur often, but whose geometric details are usually not very relevant for the configuration,
should have 200 to 500 polygons.
n
Complex parts, which are important configuration elements (especially if the geometric details
make information about the selected option visible) should have between 300 and maximum
1000 polygons.
Docking Points
Docks (snapping points) are used to connect and build parts. For docks, define their position (in x/y/zcoordinates relative to the origin point of the geometry file), as well as the rotations around the three
axes. In most cases, at least one of the dock points will coincide with the origin point or will be out of
alignment in only one of the two axes.
42
Docks
Docks are snapping points, which define possible connections between parts. The connection possibilities usually correspond to a real physical connection possibility, e.g. a screw connection.
Docks have a position in space. The position of a dock regarding rotation and translation is defined relative to the object origin.
Note: To connect two parts, make sure to drag the mouse cursor over the second part, otherwise the
two parts will not connect.
Partnerdocks
A dock usually has a partnerdock, i.e. a counterdock, which is defined as a partner. To define a possible
connection between two parts, a dock is assigned to one part and an appropriate partnerdock is
assigned to the other part.
Two docks connect (i.e. they "snap") only if they have the same position in space. The moved part
adjusts to the stationary part relative to translation and rotation, so that both docks lie on top of each
other.
43
To assign a dock to a part
1. In the 3D Scene right-click the part and choose Docks and the desired docktype from the context menu.
2. A blue circle appears on the mouse pointer and an iconbar appears in the lower left corner. See
page 14.
3. Select the snapping point type from the Iconbar.
4. Click on the desired position on the part where you want to position the dock.
To change the properties of a dock
1. Click the dock to select it. The dock handles appear.
2. Click the show/hide button
to show the left panel.
3. Open the Properties tab and change the properties of the dock.
Note: Make sure that the dock type in the Properties tab is correctly set and that the corresponding
partner is selected when you set the partner dock.
44
Docks with one Degree of Freedom (DOF Docks)
A connection can allow movement, e.g. rotating a cup on a saucer, placing a plate on a table, moving a
shelf board up and down. That means that the docks are active even when a rotation (turning around one
of the three axes) or a translation (moving along one of the three axes) occurs.
If a dock is supposed to dock in different positions, it receives a degree of freedom (DOF). A degree of
freedom means that the dock can not only dock in one position, but in all positions within a specified
range.
Docks with two Degrees of Freedom (Planar Docks)
Planar docks have two degrees of freedom, which are both translations (e.g. on the x- and y-axis) and
therefore form a surface of possible positions.
A degree of freedom is defined:
n
Using steps ("step": from 0 to 1000 step 10)
n
Continuously ("continous": from 0 to 1000) in a specified range
n
Using a set of valid values ("discrete": 0, 100, 200, 300, 600, 900, 1000)
45
Docks for Chain-Linking Goods
Certain catalog elements have docks for chain-linking with other parts. You can, e.g. chain-link goods
and place the chain of goods on a shelf board. The chain of goods forms an assembly, i.e. is treated as
a unit.
1. Dock for inserting an element into a chain of goods.
2. Dock (left and right) for chain-linking an element with neighbor elements.
3. Dock for placing an element on a shelf board. This dock is only active if there is no element on
the left side.
Example
You can chain-link, e.g. goods, shelves, and refrigerators.
46
Insert Parts in Chain of Goods
1. If you insert an element on the left side of a chain of goods, the new element takes the place of
the leftmost element. The dock for the shelf board is transferred to the new leftmost element,
because only that position of the chain is docked to the shelf board.
2. If you insert an element between two elements in a chain, the chain is broken up at this point and
the new element is inserted between its neighbors to the left and right.
3. If you insert an element on the far right side of a chain of goods, the docks and partnerdocks connect.
Delete Parts in Chain of Goods
1. If you delete the leftmost part in a chain of goods...
2. ...the dock for the shelf board is transferred to the part to the right of the deleted part...
3. ...and the part moves to the left and docks with the shelf board at the position of the deleted element.
47
Docktypes
Generic Standard Dock
Docks without degrees of freedom for connecting two parts with each other:
n
Dock: A_2_B and its partnerdock: B_2_A
Generic DOF Dock
Docks with one or two degrees of freedom in translation and/or rotation:
n
Dock with one degree of freedom in translation (Translation dock): tdofA_2_B and its partnerdock: B_2_tdofA
n
Dock with one degree of freedom in rotation (Rotation dock): rotdofA_2_B and its partnerdock:
B_2_rotdofA
n
Dock with one degree of freedom in translation and one degree of freedom in rotation (Planar
dock): pdofA_2_B and its partnerdock: B_2_pdofA
Product Dock
Docks for placing products on hooks or shelf boards:
n
Dock for placing products on hooks: dummy_2_hook and its partnerdock (Shelf Part Dock):
hook_2_dummy
n
Dock for placing products on shelf boards: dummy_2_displayarea and its partnerdock (Shelf
Part Dock): displayarea_2_dummy
Shelf Part Dock
Partnerdocks for placing products on shelf boards:
48
n
Dock for placing products on shelf boards: displayarea_2_dummy and its partner dock (Product Dock): dummy_2_displayarea
n
Dock for placing products on hooks: hook_2_dummy and its partner dock (Product Dock):
dummy_2_hook
Dock for attaching parts on the mounting field:
n
Dock for product carriers on a mounting field: addons_2_addon_field
Special docks for hooks and dividers:
n
Dock for connecting brackets to the floor: shelf2console and its partner dock: console2shelf
n
Dock for connecting hooks to walls: hook2hookpanel and its partner dock: hookpanel2hook
n
Dock for connecting dividers to the floor: divider_2_shelf and its partner dock: shelf_2_
divider
Shelf Field Dock
Docks for shelves and fields (L = left; R = right):
n
Dock: addon_field_2_addons
n
Dock: addon_field_2_base_field and its partner dock: base_field_2_addon_field
n
Dock: base_field_L_2_base_field_R and its partner dock: base_field_R_2_base_
field_L
n
Dock: head_field_2_base_field_L
n
Dock: head_field_2_base_field_R
Dock Blocker
This dock can snap to any dock and prevents the blocked dock from snapping to other docks.
49
Quote Dock
This dock shows the dock's z-position, while preventing all other docks from docking to it.
Special Docks
There are two types of special docks:
n
Docks for Measuring Measuring points are set as docks.
n
Floorkeeper Each part only has one floorkeeper, which assures that parts stay on the floor when
they are not docked.
Dock Features
Dock features are values for the automatic adjustment of width, height, and depth and an associated
text. The following dock features are available:
n
f_dockpart_df_field_width (Number)
n
f_dockpart_df_field_heigth (Number)
n
f_dockpart_df_field_depth (Number)
n
f_dockpart_df_connection string (Text)
Note: Only docks which have the same dock feature values snap with each other.
50
Connect Parts
To connect two parts
n
Drag the part onto the desired position on the other part.
Note: To connect two parts, make sure to drag the mouse cursor over the second part, otherwise the
two parts will not connect.
If you want to snap a part with a different dock of the same type, press and hold down the TAB key
while you drag one part over another part. The dragged part jumps from one free dock to the next free
dock of the same type.
The window jumps from one wall to another wall, from one free dock to the next free dock of the same
type.
Note: When grabbing parts, make sure that you grab the right part, e.g. the add-on field and not the
back panel.
51
Stack Parts
You can stack parts with the dock pair A_2_B and B_2_A.
Each part receives two docks, one on top and one on the bottom. The location of the docks on the top
and the bottom also defines the space between stacked parts.
Example
Pallets with the dimensions "x=800, y=1200, z=140" are stacked on top of each other.
1. The generic_A_2_B dock is placed on the top and in the center of the pallet. In the Properties
tab, the position of the dock is set to "xyz=400/-600/140".
2. The generic_A_2_B dock is placed on the bottom and in the center of the pallet. In the Properties tab, the position of the dock is set to "xyz=400/-600/0".
3. The parts can now be stacked on top of each other.
52
Rotate Parts
You can place a part on another part and rotate it using the DOF dock pair generic_rdofA_2_B and
B_2_generic_rdofA.
Example
A cup is placed on a saucer so that it can rotate around the z-axis.
1. The generic_rdofA_2_B dock is placed on the part that doesn't rotate, i.e. the saucer.
2. The B_2_generic_rdofA dock is placed on the part that rotates, i.e. the cup.
3. When the parts dock with each other, the cup can rotate around the z-axis. When you place the
mouse cursor on the cup, the cursor changes and you can rotate the cup.
53
Move Parts on Surface
You can move a part on a surface using the planar dock pair generic_dock_pdofA_2_B and
generic_dock_B_2_pdofA.
Example
A saucer is placed on a table, so that the saucer can be moved freely on the table.
1. The generic_dock_pdofA_2_B is positioned on the table.
2. The generic_dock_B_2_pdofA dock is positioned on the saucer.
54
Dock Inspector
In the Dock Inspector you can see which docks are assigned to a catalog element and block those
docks.
When you click a dock in the Dock Inspector, the dock on the catalog element is shown in the 3D
Scene.
To open the Dock Inspector
1. Click a catalog element in the 3D Scene to select it.
2. Right-click the catalog element and choose Dock Inspector from the context menu.
To block a dock
1. Click a dock in the Dock Inspector to select it.
2. Right-click the dock and choose Block free Dock to block the selected dock or Block all free
Docks to block all free docks from the context menu. The Dock Blocker dock type is assigned to
the selected dock.
To unblock a dock, right-click the blocked dock in the Dock Inspector and choose Unblock Dock or
Unblock all Docks from the context menu.
55
Assemblies
You can build assemblies from single parts. An assembly is a set of parts with its own article number
(e.g. bracket with shelf board and screws) or a unit that is ordered often (e.g. ordering samples from the
catalog). Since assemblies are usually pre-assembled and kept in stock, they make ordering easier. An
assembly can contain parts from different catalogs.
You can add articles without a 3D representation, an article number, a price, tags, a 2D floor plan, as
well as attach documents (specifications, images, assembly instructions, plans, etc.) to an assembly.
By default, the total price is calculated from the sum of the prices of the single parts, but you can overwrite the price.
Assemblies have a reduced assembly logic: Only selected docks and characteristics are accessible.
The assembly logic allows the planning of complex and large configurations through data reduction.
Product families (similar product elements) can be grouped as family nodes. You can define a "change
assembly" option in a catalog. This way, a catalog element can be exchanged with another (predefined,
non-flexible) variant (e.g. a shelf board in a different color).
56
To select an assembly
n
Click the assembly.
To select a single part of an assembly
n
Double-click the single part. Each double-click selects a part one level deeper into the structure.
To select the innermost level of an assembly
n
Press and hold down the CTRL key while you click the innermost part.
To unfreeze an assembly
n
Right-click the assembly and choose Unfreeze Catalog Element from the context menu. Now,
you can move the single parts of the assembly.
To dissolve an assembly
1. Right-click the assembly and choose Unfreeze Catalog Element from the context menu.
2. Right-click the assembly again and choose Explode from the context menu. Now, you can
delete single parts or add new parts.
57
Create Family Nodes
Use family nodes to combine parts of the same kind, i.e. parts with similar properties or parts within a
product family (e.g. blue, yellow, and red cups). This way, after the parts have been placed, you can
quickly and easily exchange parts with other parts within the same product family.
You can create several configurations within one family node (a configuration should contain only one
catalog element. Family nodes are marked with a green circle with a white "F".
To create a family node
1. Click the Add icon
in the Structure tab and choose Family Node.
2. Enter a name for the family node.
3. Click the Add icon
and choose Configuration.
4. Create the necessary configurations in the family node.
To exchange one part of a family node
1. In the 3D Scene, click the part that you want to exchange. A handle appears above the selected
part.
2. Click the handle of the part. The Family Node Switcher window appears and shows all parts of
the family node.
3. Double-click the desired part in the Family Node Switcher window.
To exchange several parts of a family node simultaneously
1. In the 3D Scene, press and hold down the SHIFT key while you click all the parts that you want
to exchange. Handles appear above the selected parts.
2. Click a handle. The Family Node Switcher window appears and shows all parts of the family
node.
3. Double-click the desired part in the Family Node Switcher window.
To exchange all parts of a family node simultaneously
1. In the 3D Scene, press and hold down the SHIFT key while you click all the parts that you want
to exchange. Handles appear above the selected parts.
2. Click a handle. The Family Node Switcher window appears and shows all parts of the family
node.
3. Double-click the desired part in the Family Node Switcher window.
Tip: To select several parts, press and hold down the mouse button while you draw a selection rectangle around all the parts.
58
Define Article Numbers
Article numbers are displayed in the article list and can be overwritten.
Article Numbers from ERP System
You can import articles with article numbers from an ERP system. The article numbers are integrated in
the catalog as lists and form the connection to the ERP system. Additional data can be attached to the
ERP system using the defined article number.
Article Numbers from Materialmaster
Catalog elements without article number from the materialmaster are marked in red in the article list.
When you type the appropriate article number from the materialmaster in the article number field, the
field is marked in yellow and the corresponding price is shown. You can overwrite the price.
Article Numbers for Assemblies
When you create an assembly from several single parts, you can define an article number for the
assembly.
Caution: If you add additional articles, which are not visually depicted, to an assembly, i.e. articles
that are only visible in the article list, you should not dissolve this assembly later, since the additional
articles will be lost. The 'Can be Exploded' checkbox in the article list defines if an assembly can be
exploded.
Article Numbers for Other Articles
If you want to use catalog elements from other catalogs, you can overwrite the article numbers with
your own article numbers and set your own price.
To overwrite an article number
1. Create a new catalog element.
2. Drag the desired catalog area from the catalog in the Resources window and drop it into your catalog, which is located in the Structure tab. This way, you can copy the structure without having
to manually create a new configuration for each catalog element.
3. Open the Article List tab and overwrite the article numbers.
59
Create Tags
You can create tags (i.e. metadata) and add them to projects, folders, and configurations. In the
Resources window you can search for tags. See page 10.
To create a tag
1. In the Structure tab, right-click a folder or a configuration and choose Tags > New Tag from the
context menu.
2. Define the name, the type, and optionally the value of the tag in the Tag Specification window.
3. Click the Set Tag button.
Example
Define the tag test on the project level. Select string as the type and leave the value blank.
Now you can set the tag value for every element in the project structure. Right-click a level within the
project structure and choose Tags and then choose the newly created tag test from the context menu.
Enter a value for the selected element, e.g. tested.
The newly created tag appears in the context menu when you click the Add icon
in the Filter section
underneath the project structure. Select the tag and enter tested in the filter entry field.
The project structure changes and only the elements with the tag value tested remain visible.
Attach Documents
You can attach additional documents (specifications, images, assembly instructions, plans, etc.) to
stores, catalogs, catalog elements, and assemblies. These documents are synchronized with the
server and can be accessed by all users.
Note: When you distribute catalog elements, the attached documents are not distributed along with
the catalog elements.
To attach a document
1. Select a store, catalog, or catalog element in the Structure tab.
2. Open the Documents tab.
3. Do one of the following:
n
Click the Add icon
and select the file that you want to attach in the Explorer.
n
Drag the file you want to attach from the Explorer into the Documents tab.
60
Catalog Element Inspector
The Catalog Element Inspector shows detailed information about a catalog element:
n
The Information tab shows a 3D view and the properties of the catalog element.
n
The Article List tab shows a list of all articles of the catalog element.
n
The Usage tab shows where a catalog element is used in the stores.
n
The Resources tab shows the 3D view, side view, and front view of the catalog element.
To open the Catalog Element Inspector
1. Click a catalog element in the Resources window or in the Structure tab to select it.
2. Right-click the catalog element und choose Catalog Element Inspector from the context menu.
Note: A catalog element can only be displayed if it has been released (i.e. the data is available on the
server). A connection to the server is necessary for displaying information in the Catalog Element
Inspector.
61
Best Practice - Catalog Building
Catalogs are built from catalog elements. The base level catalog usually contains single parts. All other catalogs have elements that are built from these single
parts. This means that you start with the base parts and use them to build the first catalog.
Catalog Building Hierarchy
Catalog levels are built hierarchically and consist of catalog levels, i.e. parts from lower levels can only be assembled with parts from higher levels. For example,
you can assemble parts from a level 1 catalog in a level 2 or 4 catalog. If you, e.g. create a level 6 catalog, you can only assemble parts from levels 5, 4, 3, 2, 1, or
0 in this catalog.
This hierarchy is necessary, because when the catalog elements are updated, elements on higher levels are updated from parts on lower levels, so that no circular
references exist.
To define a catalog type and a catalog level
n
Open the Information tab and select a catalog type in the Catalog Type field and a catalog level in the Catalog Level field.
Note: Generally, select the lowest possible level for a catalog, defined by the highest catalog level of the used catalogs. If you change the catalog level later,
you can only select a higher catalog level.
62
63
Ordering Catalog Types and Catalog Levels
The following table shows the best practices for ordering catalog types and catalog levels.
Part type
Single
parts
Suggested
catalog
name
Catalog
type
Level
Can be Can be dissolved
exploded with drag & drop
Description
Example
Auxiliary parts Hidden
(Dummies)
0
No
No
Parts, which help you to
arrange parts in the 3D space.
Add-on fields (you can attach shelf boards to
these fields).
The auxiliary parts must always be used. You cannot create planograms without auxiliary parts.
Single elements
1
No
No
Parts, which cannot be disassembled into other parts.
Brackets, shelf boards, stud bars, stand feet,
adjustable screws, rollers
Product carriers
Hooks, support frames
Product floors, floor dividers, product inserts, partition walls
Flat bars, fasteners, connecting pieces, assembly
elements
Products
Products
1
No
No
Articles, which can be built
from different shapes and
images.
64
Bottles, boxes, cans, parcels
Food, textiles, leisure articles, household goods
Pictures
Part type
Suggested
catalog
name
Deco parts
Catalog
type
Product carriers
Level
1
Can be Can be dissolved
exploded with drag & drop
No
No
Description
Parts for decoration or information purposes.
Example
Information boards, signs, special offer boards,
guiding signs
Display dummies, decoration figures, busts, torsos
Assemblies Extension ele- Product carments
riers
2
Yes
No
Pre-assembled product carriers.
Shelf boards with bracket
Clothing frames with hooks
Product floors with dividers
Basic elements
Product carriers
2
No
No
Pre-assembled product carriers.
Shelf racks with back panel and/or auxiliary panel
Shelf racks with perforated back panel
Planning
elements
Data sheets
Data sheets
4
Yes
No
Pre-assembled data sheets.
Auxiliary panel + perforated panel with hooks
and/or clothing frames
Auxiliary panel + rear panel with brackets and
shelf boards
65
Pictures
Part type
Shortcut
catalog
Suggested
catalog
name
Catalog
type
Level
Planograms
Planograms
6
No
No
Planning catalog
Product carriers
8
Yes
Yes
Can be Can be dissolved
exploded with drag & drop
Description
Data sheets filled with products.
Example
Planograms of different products
Assemblies for fast planning:
Shelf racks, podiums, tables, counters, display
cases
Product table systems, cube systems, clothing
racks, POS systems, cabinet systems, wall systems
Refrigeration units, changing rooms, lighting
equipment
DWG/DXF cat- DWG/DXF
alog
catalog
9
Yes
No
66
Pictures
Assembling Parts from Different Catalog Levels
The following table shows the parts and the catalog levels that can be assembled.
Auxiliary parts
Level 0
Single elements Products
Level 1
Level 1
Deco
parts
Level 1
Extension elements
Level 2
Basic elements
Level 2
Auxiliary parts
Level 0
Single elements
Level 1
Data
sheets
Level 4
Yes
Yes
Planograms
Level 6
Planning catalog
Level 8
DWG/DXF catalog
Level 9
Yes
Yes
Products
Level 1
Yes
Deco parts
Level 1
Extension elements
Level 2
Yes
Yes
Basic elements
Level 2
Yes
Yes
Data sheets
Level 4
Planograms
Level 6
Planning catalog
Level 8
DWG/DXF catalog
Level 9
67
Yes
Yes
Yes
Yes
Planning Stores
You can plan stores using catalogs from the Resources window. See pages 19 and 6.
To plan a store
1. Create store Create a store and enter the basic information in the Information tab. See page 69.
2. Create configuration Create configurations (and optionally subconfigurations) in the store. See
page 69.
Note: A configuration is a store, or a store floor, or a store section. A subconfiguration is a section of a store that you want to treat or furnish as a unit, e.g. a shop-in-shop.
3. Load floor plan Load a DWG/DXF plan as a floor plan. See page 71. You can import and export
DWG/DXF files at any time. See page 94.
4. Place walls, doors, windows, and columns Place walls, doors and windows, and columns on
the floor plan. See page 72.
5. Place assortment areas Define your assortment of goods and place assortment areas on the
floor plan or sketch zones for the different categories of goods and assign categories of goods to
the zones. See page 73.
6. Compare area segmentation with assortment segmentation Compare the planned areas
with the required areas for the different categories of goods and adjust the walkways and zones.
7. Place catalog elements on areas Place product carriers on the sales areas, planograms on the
product carriers, and assign categories to the product carriers and goods. See pages 77, 77 and
85. You can copy, connect, and change catalog elements, position elevated catalog elements,
assign a position and element number to them and insert catalog elements into the article list.
68
Create Stores
To create a store
1. Click the New Store button in the Store List tab.
2. Open the Information tab and define the basic store information.
Create Configurations and Subconfigurations
After you created a store, you can create configurations. Optionally, you can create subconfigurations.
A configuration is a store, or a store floor, or a store section. A subconfiguration is a section of a store
that you want to treat or furnish as a unit, e.g. a shop-in-shop.
Subconfigurations improve performance and allow you to divide stores into different construction segments. This way, you can edit each construction segment in its own subnode, independently of all other
nodes. You can see subconfigurations in the configuration that contains them, but you cannot edit them.
To edit a subconfiguration, you must open the subconfiguration.
Example
A store is split up into a configuration and several subconfigurations. Each subconfiguration contains a
construction segment.
Note: If you split a configuration into subconfigurations, the configuration must be based on a
DWG/DXF plan. DWG/DXF plans are displayed at the same position in every configuration and its
subconfigurations and also serve for orientation purposes.
To create a configuration
1. Select a folder in the Structure tab.
2. Click the Add icon
and select Configuration.
3. Enter a name for the configuration.
To create a subconfiguration
1. Select a configuration in the Structure tab.
2. Click the Add icon
and select Subconfiguration.
3. Enter a name for the subconfiguration.
69
To extract a subconfiguration from a configuration
1. In the 3D Scene, select all parts, which you want to extract into a subconfiguration.
2. Click the Extract icon
.
A subconfiguration containing the selected construction segment only is created in the project
structure in the Structure tab.
70
Load Floor Plan
You can load a DWG/DXF plan as a floor plan.
To load a DWG/DXF plan as a floor plan
1. Double-click a configuration in the Structure tab.
2. Click the show/hide button
to show the left panel.
3. Open the Import tab.
4. Click the Load New Plan button.
5. Select the DWG/DXF plan in the Explorer and click Open.
6. Define the properties of the DWG/DXF plan:
n
Import flat on ground Switches the 3D DWG/DXF plan to 2D.
n
Scale Defines the scale (if the DWG/DXF plan has been drawn in a different measuring unit).
n
Offset Positions the DWG/DXF plan in the 3D Scene.
n
Show Layer Shows or hides the selected layers.
n
Snap to Layer Objects snap on the lines of the DWG/DXF plan.
n
Change Layer Color Defines the color of the selected layer.
71
Place Walls, Doors, Windows and Columns
To place a wall
1. Click the show/hide button
to show the left panel.
2. Open the Rooms tab.
3. Drag a wall from the Rooms tab and drop it in the 3D Scene.
4. Drag the yellow arrows to lengthen, turn, and move the wall.
5. Select the wall and click the blue arrows to add new walls.
6. Change the properties (e.g. size, thickness, color) of the wall in the Properties tab.
To insert a door or window into a wall
1. Click the show/hide button
to show the left panel.
2. Open the Rooms tab.
3. Drag a door or a window from the Rooms tab and drop it on a wall in the 3D Scene.
4. Double-click the door or the window in the wall to select it.
5. Drag the door or the window to move it.
6. Drag the yellow arrows to make the door or window larger or smaller. The size of the door or wall
is shown.
To place a column
1. Click the show/hide button
to show the left panel.
2. Open the Rooms tab.
3. Drag a column from the Rooms tab and drop it in the 3D Scene.
4. Click the column.
5. Drag the column to move it.
6. Drag the yellow arrows to turn the column
7. Double-click the column.
8. Click the blue arrows to add walls to the column.
9. Drag the yellow arrows to lengthen the wall.
10. Change the properties (e.g. size, thickness, color) of the column in the Properties tab.
72
Place Assortment Areas
After loading a floor plan, you can either place assortment areas (with default values) on the floor plan,
or you can sketch assortment zones and then assign categories of goods to the zones. You can also
sketch walkways on the floor plan.
Product groups are assigned to areas. These areas are defined in the assortment module in the Assortment Planning tab. These values are empirical values, gathered by the person responsible for the assortment and are available as system files on the Central Repository Server. These predefined area types
help you control the allocation of categories of goods when planning a store. If you place the mouse cursor on a category of goods in the Classification tab in the Resources window, the default assortment
values are shown.
To define your assortment
1. Open the Assortment Planning tab.
2. Write the total available area in the Total available m² field.
3. Select the assortment module (e.g. A, B, C) in the Required Assortment Module field.
4. Open the Classification tab in the Resources window.
5. Drag the required categories from the Classification tab and drop them in the Assortment Segmentation table in the Assortment Planning tab.
To place an assortment area
1. Open the Classification tab in the Resources window.
2. Press and hold down the SHIFT key while you drag a category of goods from the Resources window into the 3D Scene.
The predefined square meters of the product group are shown on the area.
To adjust an assortment area
n
Click the area in the 3D Scene and drag the green arrows to change the area while keeping the
shape, or press and hold down the SHIFT key while you drag the green arrows to change the
shape while keeping the area.
-or-
n
Double-click the area in the 3D Scene and drag the edges and the corner points of the area.
The area of the zone is continuously calculated and displayed on the area.
To sketch a zone
1. Click the show/hide button
to show the left panel.
2. Open the Zones tab.
3. Click the Insert New Zone button.
4. Click in the 3D Scene to set the first corner point of the zone.
5. Drag the mouse and click in the 3D Scene again to set the next corner point, an so on.
6. Double-click in the 3D Scene to close the zone.
73
Note: After you set the first corner point of the zone, you can also use the following keys to set the
next corner point:
• Press X, type the coordinates of the next corner point on the X-axis, and press ENTER.
• Press Y, type the coordinates of the next corner point on the Y-axis, and press ENTER.
• Press D, type the distance from the first corner point to the next corner point, and press ENTER.
Your input is shown in the lower left corner of the application:
To change a zone
1. Double-click a zone to select it.
2. Drag the edges and the corner points of the zone.
3. Double-click anywhere on the edge of the zone to create another corner point and then drag the
corner point to change the shape of the zone.
The area of the zone is continuously calculated and displayed on the label of the zone.
To move a zone
1. Double-click an empty area, so that no zone is selected.
2. Drag the zone to the desired position.
To assign a category of goods to a zone
1. Open the Classification tab in the Resources window.
2. Drag and drop the category of goods from the Resources window onto the zone in the 3D
Scene.
The zone assumes the color and the name of the category of goods and flows into the calculation
of the assortment segmentation.
To sketch a walkway
1. Click the show/hide button
to show the left panel.
74
2. Open the Zones tab.
3. Click the Create Walkway button.
4. Click in the 3D Scene to set the starting point of the walkway.
5. Click in the 3D Scene to set the midpoint of the walkway.
6. Double-click in the 3D Scene to set the endpoint of the walkway.
Note: After you set the starting point of the walkway, you can also use the following keys to set the
next midpoint:
• Press X, type the coordinates of the next midpoint on the X-axis, and press ENTER.
• Press Y, type the coordinates of the next midpoint on the Y-axis, and press ENTER.
• Press D, type the distance from the starting point to the midpoint, and press ENTER.
Your input is shown in the lower left corner of the application:
To change a walkway
1. Double-click walkway to select it.
2. Drag the corner points and midpoints of the walkway.
3. Double-click anywhere on the midline of the walkway to create another midpoint and then drag
the midpoint to change the shape of the walkway.
The area of the walkway is continuously calculated.
To move a walkway
1. Double-click an empty area, so that no walkway is selected.
2. Drag the walkway to the desired position.
75
Compare Assortment Segmentation
To compare the planned areas with the required areas
1. Open the Assortment Planning tab.
2. Select the assortment module in the Required Assortment Module field.
3. Compare the sums of the required areas and the planned areas in the Analysis Overview table.
4. Compare the required areas and the planned areas, per group of goods, in the Assortment Segmentation table. The areas are automatically calculated from the 3D Scene.
76
Place Catalog Elements
After you have placed areas, you can place catalog elements on the areas.
To place a catalog element
1. Open the Product Carriers tab in the Resources window.
2. Drag the catalog element from the Resources window and drop it into the 3D Scene.
3. Click the catalog element.
4. Grab the handle above the catalog element and turn the catalog element in the desired direction.
5. Click the green arrowshaft to copy the catalog element once or drag the green arrowhead to copy
the catalog element several times.
Place Planograms
After you have placed a product carrier on an area, you can place a planogram on the product carrier.
To place a planogram on a product carrier
1. Open the Planograms tab in the Resources window.
2. Drag and drop the planogram from the Resources window onto a product carrier in the 3D
Scene.
3. Drag the yellow circular arrow to rotate the planogram.
To change a planogram
n
Drag the new planogram from the Resources window onto the old planogram on the product carrier.
Insert Catalog Elements in Article List
You can insert catalog elements without a 3D representation in the article list.
To insert a catalog element in the article list
1. Open the Article List tab.
2. Drag and drop a catalog element from the Resources window into the Article List.
77
Copy Catalog Elements
You can copy catalog elements in the 3D-Scene using a window, drag & drop, or handles.
To copy a catalog element using a window
1. Click a catalog element to select it or press and hold down the SHIFT key while you click several
catalog elements to select them.
2. Right-click a catalog element and select Copy/Position > Copy / Multiple Copy from the context menu.
3. Enter the number of copies and the distance to the original in the window and click OK.
The catalog elements are copied according to the number and the distance you entered.
To copy a catalog element using drag & drop
1. Click a catalog element to select it.
2. Press and hold down the SHIFT key while you drag the catalog element.
To copy a catalog element using handles
1. Click a catalog element to select it.
2. Click the green arrowshaft to copy the catalog element once or drag the green arrowhead to copy
the catalog element several times.
78
Insert Passageways
You can insert passageways between catalog elements.
To insert a passageway
1. Click the show/hide button
to show the left panel.
2. Open the Zones tab.
3. Drag the passageway symbol in the 3D Scene and snap it to a catalog element.
4. Snap another catalog element to the passageway symbol.
Example
A passageway between two product carriers.
79
Create Part Labels
You can create labels for parts.
To create a part label
1. Right-click in the 3D Scene and choose Measuring/Labeling > Create part label from the context menu.
2. Click the part for which you want to create a label.
3. Position the part label in the desired location in the 3D Scene.
4. Click the part label to select it.
5. Click the show/hide button
to show the left panel.
6. Open the Properties tab and define the part label (text, height, leading line) in the Labels area.
Example
80
Position Catalog Elements Relatively
You can position catalog elements relative to a base point or relative to other catalog elements.
To position a catalog element relatively
1. Right-click in the 3D Scene and choose Copy/Positioning > Relative Positioning from the
context menu.
2. Click the catalog element to set the base point for the translation.
3. Click in the 3D Scene or click a catalog element to set the translation of the catalog element.
4. Enter the relative coordinates in the window and click OK.
Example
A catalog element is positioned relative to its base point.
A catalog element is positioned relative to another catalog element.
81
Set Distance Between Parts
You can create measure lines to accurately set the distance between two parts.
To create a measure line
1. Right-click in the 3D Scene and choose Measuring/Labeling > Create measure line from the
context menu.
2. Select the snapping point type of the measure line in the Iconbar. See page 14.
3. Click on a part to set the starting point and then click on another part to set the endpoint of the
measure line.
4. Drag a part to set the length of the measure line.
Note: After you set the starting point of the measure line, you can also use the following keys to set
the endpoint:
• Press X, type the coordinates of the endpoint on the X-axis, and press ENTER.
• Press Y, type the coordinates of the endpoint on the Y-axis, and press ENTER.
• Press D, type the distance from the starting point to the endpoint, and press ENTER.
82
Your input is shown in the lower left corner of the application:
To change the properties of a measure line
1. Click the measure line.
2. Open the Properties tab and change the properties in the Measurements section:
n
n
n
n
Label The label of the measure line.
Leading Line Offset The distance between the part (on which the starting point of the measure line lies) and the measure line.
Coordinate System Sets the measure line to the global or local measuring system.
Arrow Head The checkbox shows/hides the arrowheads of the measure line. The button
resets the setting to its default value.
To change the measure mode
n
Click the measure line to select it and press TAB to toggle through the measure modes.
To set the length of a measure line
1. Double-click the measure line. A window opens.
2. Enter the length of the measure line in the Distance field. One of the parts is anchored, while the
other part is offset by the desired distance.
3. Press ENTER to preview the new length in the 3D Scene and then click either OK to set the
new length or Revert to revert to the old length.
4. Click the button next to the Distance field to swap the anchored part. The anchored part is highlighted in the 3D Scene.
To lock the length of a measure line
1. Double-click the measure line. A window opens.
2. Enter the length of the measure line in the Distance field.
3. Select the Lock Measure Line checkbox.
4. Click OK.
If you move the parts, the length of the measure line does not change. To change the length of
the measure line, deselect the Lock Measure Line checkbox.
83
Show Quick Measure
You can use the "quick measure" to check the position of catalog elements.
To show the quick measure
1. Click Switch measurement on in the View Options.
2. Right-click in the 3D Scene and choose Measuring/Labeling > Show quick measure from the
context menu.
3. Select the snapping point type of the measure line in the Iconbar. See page 14.
4. Click the catalog element to set the starting point of the measure line.
5. Drag the endpoint of the measure line to the desired endpoint. The X, Y, and Z distances from the
starting point are shown relative to the position of the endpoint.
6. Click the catalog element to set the endpoint of the measure line. As soon as you set the endpoint, the measure line disappears.
Example
84
Assign Categories to Product Carriers and Goods
After you have placed product carriers and goods, you can assign categories to the product carriers.
To assign a category to a product carrier and goods
1. Open the Classification tab in the Resources window.
2. Select one or more product carriers in the 3D Scene.
3. Double-click the desired category in the Classification tab.
The category type is assigned to the product carrier. Running meters, shelf board meters, and
the number of articles flow into the assortment planning calculation in the Assortment Planning
tab.
Show Categories of Goods
Use the View Options to see which catalog element is assigned to which category of goods. See page
13.
To switch the category bounding box on
n
Click the Switch Category BBox On/Off button in the View Options.
The bounding boxes of the catalog elements in the 3D Scene are shown in the color of the classification category.
Example
85
Connect Catalog Elements
You can connect catalog elements, which have appropriate docks, with other catalog elements.
To connect two catalog elements
1. Drag a catalog element from the Resources window into the 3D Scene.
2. Drag the catalog element onto another catalog element.
Note: To connect two parts, make sure to drag the mouse cursor over the second part, otherwise the
two parts will not connect.
86
Position Elevated Catalog Elements
When you drag catalog elements into the 3D Scene, they "fall to the floor". Some catalog elements
must however be positioned at a specific distance from the floor, e.g. kitchen elements.
To place a catalog element "above the floor"
1. Click the catalog element in the 3D Scene to select it.
2. Click the show/hide button
to show the left panel.
3. Open the Properties tab and define the distance from the floor of the catalog element in the
Floor Distance field.
87
Change Catalog Elements
You can exchange catalog elements, which are part of a family node (i.e. a product family), with other
members of the family. See page 58.
To exchange one part of a family node
1. In the 3D Scene, click the part that you want to exchange. A handle appears above the selected
part.
2. Click the handle of the part. The Family Node Switcher window appears and shows all parts of
the family node.
3. Double-click the desired part in the Family Node Switcher window.
To exchange several parts of a family node simultaneously
1. In the 3D Scene, press and hold down the SHIFT key while you click all the parts that you want
to exchange. Handles appear above the selected parts.
2. Click a handle. The Family Node Switcher window appears and shows all parts of the family
node.
3. Double-click the desired part in the Family Node Switcher window.
To exchange all parts of a family node simultaneously
1. In the 3D Scene, press and hold down the SHIFT key while you click all the parts that you want
to exchange. Handles appear above the selected parts.
2. Click a handle. The Family Node Switcher window appears and shows all parts of the family
node.
3. Double-click the desired part in the Family Node Switcher window.
Tip: To select several parts, press and hold down the mouse button while you draw a selection rectangle around all the parts.
88
Change Display Quality
Use the View Options to select different levels of detail of the 3D display. See page 13.
The level of details of 3D objects, especially in larger stores with many planograms, influences the
speed at which they are displayed and therefore the response time of the application. In a large store,
which is looked at from a distance, not every detail must be displayed in a high resolution. A low level of
details increases the performance of the application and allows you to work faster. The level of details
of the display is usually adjusted automatically, depending on the distance of the viewer.
To change the display quality of the catalog elements
n
Click the View button in the View Options and select one of the following options:
n
LOD Dynamic Mode - The resolution is chosen dynamically depending on the distance
(default).
n
LOD Dynamic - Objects are either displayed as a bounding box or on the 'LOD Good Quality'
level.
n
LOD High Quality - Objects are displayed in the highest resolution.
n
LOD Good Quality - Objects are displayed in a medium resolution.
n
n
LOD Low Quality - Objects are displayed in low resolution (i.e. only the surfaces are displayed in a low resolution).
LOD Bounding Boxes - Only the casing of an object is displayed.
89
Assign Position and Element Numbers
You can assign position numbers and element numbers, which indicate the location of the catalog element, to catalog elements.
If you export a configuration with position numbers to a CAD system (click the configuration in the
Structure tab and then click the DWG/DXF Export button), the configuration is frozen in a layer and a
block and cannot be changed, i.e. the position is assigned in the P'X5 Store Solution and not in the CAD
system.
To assign a position number and an element number to a catalog element
1. In the 3D Scene, select the catalog element to which you want to assign the position and element number to.
2. Click the show/hide button
to show the left panel.
3. Open the Properties tab and enter the position and element number in the Positioning section.
The element number is shown on the part and in the tooltip and the position number is only
shown in the tooltip. For large configurations the position number is assigned to the shelf rows
from the lower left to the upper right.
Note: The element number does not have to start at 1, but can also start at, e.g. 10.
90
Note: To restore the default settings, click the defaults button
.
Tip: Press F5 to automatically calculate and show the position number of the part.
To assign a position number
n
Right-click the catalog element and choose Position Number > Assign Position Number
from the context menu.
Note: If you have already assigned a position number to a catalog element, e.g. 5, position
numbers starting at 6 will be assigned to the catalog elements that do not have a position
number assigned.
To show a position number
n
Right-click the basic element and choose Position Number > Show Position Number from
the context menu.
The position number is shown in a circle next to the catalog element. To turn the circle with the
position number, click the circle and turn the yellow handle in the desired direction.
To restore the default settings, click the red dot.
91
Note: The position numbers of catalog elements are shown in the project tree in the Structure
tab. Click the position number in the hierarchy tree to zoom the catalog element in the 3D
Scene.
To align the position numbers
n
Choose Position Number > Align Position Number from the context menu.
92
Show Information about Catalog Elements
To show information about catalog elements
n
Place the mouse cursor on a catalog element in the 3D Scene.
A tooltip with information about the catalog element appears. You can create some of this information, e.g. the description, while other information is automatically generated, e.g. the version
number.
Show Changed Catalog Elements
When a catalog element has been changed, a message appears when you start the application. You
can view a list of the changed catalog elements and then export the list as an Excel file.
To view a list of changed catalog elements
n
Click the Show Update List button in the Catalog element updates available window. The
Library elements that need to be updated window appears.
n
n
The upper table shows i.a. the old and the new version number of the changed catalog elements.
The lower table shows i.a. if the changed catalog element has been added, edited or deleted.
To export a list of changed catalog elements
n
Click the left Export icon
n
Click the right Export icon
to export the upper table as an Excel file.
to export the lower table as an Excel file.
93
Import and Export DWG/DXF Files
You can import and export DWG/DXF files from/to the P'X5 Store Solution.
When you export a DWG/DXF file, the underlying floor plans of objects are integrated into the
DWG/DXF file and also exported. These floor plans can be edited (e.g. copied, moved, rotated, deleted)
in a CAD system as closed blocks. When you reimport the DWG/DXF file back into the P'X5 Store
Solution, the edited objects are reimported. After the DWG/DXF file has been exported, the project is
temporarily locked, until the DWG/DXF file is reimported. This ensures that the project cannot be used
for further planning.
You can use the view options to switch between the 3D View and the DWG/DXF Blocks View. See
page 13.
94
Workflow Example
The following example shows the workflow during the exchange of DWG/DXF files from/to the P'X5
Store Solution and a CAD system.
1. Drag a DWG/DXF file from the Explorer onto a catalog element in the 3D Scene. The defined layers of the DWG/DXF file are preserved in the P'X5 Store Solution.
2. Release the catalog and distribute it to the workgroup.
3. Use the catalog element in the P'X5 Store Solution, e.g. drag the element onto a background
plan and position it. The element snaps to the DWG/DXF lines.
4. Use the catalog element in the CAD system, e.g. drag the catalog element from the P'X5 catalog
and drop it onto the plan. No additional software is required.
5. Export the plan as a DWG/DXF file from the P'X5 Store Solution to the CAD system for further
processing.
6. Import the plan as a DWG/DXF file from the CAD system into the P'X5 Store Solution. All P'X5
catalog elements are recognized and can be used for planning. All changes that were made in the
CAD system are displayed. The changes can be accepted or rejected when the background plan
is imported in the P'X5 Store Solution.
95
To import a DWG file in the P'X5 Store Solution
1. Create a catalog element and a configuration in the Structure tab.
2. Create a 3D illustration in the 3D Scene.
3. Drag a DWG file from the Explorer and drop it onto the 3D illustration in the 3D Scene. The
defined layers of the DWG file are preserved.
Note: Use the View Options to switch between the 2D view and the 3D view.
4. Open the Information tab and select DWG/DXF Catalog in the Catalog type field.
5. Save the catalog element.
6. Click the Release Catalog button to release the catalog (as an DWG/DXF catalog type). You
can use the catalog element in the P'X5 Store Solution or export it.
Note: When you create catalog levels and nest catalogs, you can define if the 2D illustration is copied to the next catalog level.
To import a catalog element into a CAD system
1. Press and hold down the SHIFT key while you drag the catalog element from the DWG/DXF Catalog in the Resources window onto a plan in a CAD system.
Note: The catalog element contains metadata, including a unique ID, which defines it as a
P'X5 catalog element.
2. You can edit the catalog element in the CAD system, e.g. copy, move, delete.
Note: After the catalog element is exported from the P'X5 Store Solution, it is locked, i.e. as
long as the catalog element is not reimported, it cannot be changed in the P'X5 Store Solution.
To import a store from a CAD system into the P'X5 Store Solution
1. Create a store and a configuration in the Structure tab.
2. Click the DWG/DXF Import button and select the store (DWG file) that you want to import in the
Explorer. All P'X5 catalog elements are recognized and can be used for planning.
3. Accept or reject the changes in the window.
To export a store from the P'X5 Store Solution to a CAD system
1. In the Structure tab, select the configuration that you want to export.
2. Click the DWG/DXF Export button.
3. Enter a name for the configuration and click Save.
96
Send Requests
Using the Info/Offer/Order Request tab, customers can communicate with suppliers, i.e. customers
can send information, offer, and order requests to suppliers or partners.
Process
1. Customer: Create project
2. Customer: Send information request to supplier (this step is optional)
3. Customer: Send offer request to supplier
4. Supplier: Receive offer request
5. Supplier: Send offer to customer
6. Customer: Modify or cancel project, or send order to supplier
7. Supplier: Receive order
8. Supplier: Send order confirmation to customer
9. Supplier: Deliver order
10. Supplier: Close project
Example
A customer needs new parts for his store.
1 - 2. The customer creates a project and sends an information request to the supplier. The supplier
responds by email or phone.
3. When the customer and the supplier agree, the customer sends an offer request (e.g. with article list,
or pictures, or description) to the supplier.
4 - 5. The supplier receives the request, imports the article list in his ERP system, creates an offer and
sends the offer to the customer.
6. The customer sends the order for the new parts to the supplier.
7 - 8. The supplier receives the order, creates an order confirmation in his ERP system and sends the
order confirmation to the customer.
9 - 10. The supplier delivers the order to the customer and closes the project.
Note: During the process, the project is transferred between customer and supplier. Once the sender
transfers the project, he can read but not edit it anymore.
97
Create Project
Customer: To create a project
1. Click the New Project button in the Store List tab.
2. Open the Information tab and fill in the fields.
3. Click the Add icon
in the Structure tab and choose Configuration. You can create folders
and configurations and thereby structure your project.
4. Open the Information tab and fill in the fields.
Create Article List
Customer: To create an article list
1. Select a configuration in the Structure tab.
2. Open the Article List tab and fill the article list. You can add:
n
Parts from a catalog: Drag parts from a catalog from the Resources window and drop them
in the Reference List.
n
Parts from an imported article list: Click the Import icon
and import an article list (as an XLS, CSV, or XML file).
n
Special articles (articles without article number): Click the Add icon
and define the special articles in the Reference List.
next to the Article List tab title
above the article list
Note: If you want to order special articles (articles without article number), create a separate
project, which only contains special articles. Otherwise, the project cannot automatically be
imported into the ERP system, which can cause follow-up inquiries and slow down the order
process.
Information Request
Customer: To send an information request
1. Open the Info/Offer/Order Request tab and fill in the fields.
2. Write your request in the Request field, e.g. "When can you deliver the parts in the article list?"
3. Select Info in the Request Type field and click the Letter icon
next to it.
Note: Location data from the Location section in the Information tab are also transferred during the request.
If the request does not contain an article list:
n
An entry is automatically created in the history table.
n
An email is sent to the supplier.
n
The project is transferred to the supplier and the customer cannot change it anymore.
n
The supplier answers by email or phone.
If the request contains an article list WITHOUT special articles (articles without article number):
n
An entry is automatically created in the history table and an article list as an Excel file is
attached.
98
n
An email is sent to the supplier.
n
The project is transferred to the supplier and the customer cannot change it anymore.
n
The supplier answers by email or phone.
If the request contains an article list WITH special articles (without article numbers):
n
The customer is asked if he wants to continue (i.e. if he wants to transfer the project to the
supplier).
n
An entry is automatically created in the history table and the current article list is attached.
n
The supplier answers by email or phone and then processes the information request with special articles (see below).
Supplier: To edit an information request with special articles (articles without article numbers)
1. Choose Administration > Synchronize Projects from the main menu to update your store list.
2. Search for the project in the Store List tab and double-click the project to open it. See page 10.
3. Open the Article List tab and enter article numbers for the special articles (if necessary, dummy
article numbers) in the Reference List or delete the items.
Note: The project can only be processed further if it exclusively contains valid article
numbers, i.e. on the ERP list (Materialmaster).
4. Select the project (i.e. the folder and not the configuration) in the Structure tab.
5. Open the Information tab and select the customer in the Responsible field to transfer the
project back to the customer.
Offer Request
Caution: You can only send offer requests if all articles have a valid article number.
Customer: To send an offer request
1. Select a configuration in the Structure tab.
2. Open the Article List tab and fill the article list (see "Create Article List" above).
3. Open the Info/Offer/Order Request tab.
4. Type a comment in the Request field.
5. Select Offer in the Request Type field and click the Letter icon
next to it.
n
An entry is automatically created in the history table and an article list (Excel file) is attached.
n
The offer status is changed to Offer request sent.
n
The offer request is sent to the supplier and the customer receives an email.
n
The project is transferred to the supplier and the customer cannot change it until it is transferred back to him.
Supplier: To receive a request
1. Choose Administration > Synchronize Projects from the main menu to update your store list.
2. Search for the project in the Store List tab and double-click the project to open it.
3. Open the Info/Offer/Order Request tab and select Offer in progress in the Offer Status field.
99
4. Open the Article List tab and click the Export icon
the article list (as an Excel file).
next to the Article List tab title to export
5. Import the article list in your ERP system.
Supplier: To send an offer
1. Create an offer (as a PDF file) in your ERP system.
2. Open the Info/Offer/Order Request tab and select Offer sent in the Offer Status field.
n
An entry is automatically created in the history table and the offer is attached as a PDF file.
n
An email with the attached offer is sent to the customer.
n
The project is transferred to the customer and the supplier cannot change it until it is transferred back to him.
Customer: To process a project
1. Choose Administration > Synchronize Projects from the main menu to update your store list.
2. Search for the project in the Store List tab and double-click the project to open it.
3. Open the Info/Offer/Order Request tab and select In progress in the Offer Status field.
4. Double-click the Offer icon
in the history table to open the offer (PDF file).
5. Edit the project.
6. Click the Letter icon
next to the Request Type field to send the project back to the supplier.
Customer: To cancel a project
1. Select Offer rejected in the Offer Status field and select a rejection reason (for statistical purposes).
n
An email is sent to the supplier.
n
The canceled project stays with the customer.
Order
Caution: You can only send orders if all articles have a valid article number.
Customer: To send an order
1. Type a comment in the Request field.
2. Select Order in the Request Type field and click the Letter icon
next to it.
n
An entry is automatically created in the history table and the current article list is attached.
n
The offer status is changed to Order request sent.
n
The order is sent to the supplier and the customer receives an email confirmation.
n
The project is transferred to the supplier and the customer cannot change it until it is transferred back to him.
Supplier: To receive an order
1. Choose Administration > Synchronize Projects from the main menu to update your store list.
2. Search for the project in the Store List tab and double-click the project to open it.
3. Open the Info/Offer/Order Request tab and select Order in progress in the Offer Status field.
100
4. Open the Article List tab and click the Export icon
the article list (as an Excel file).
next to the Article List tab title to export
5. Import the article list in your ERP system.
n
An email is sent to the customer that the order is in progress.
Supplier: To send an order confirmation
1. Create an order confirmation (as a PDF file) in your ERP system
2. Open the Info/Offer/Order Request tab and select Order confirmed in the Offer Status field.
n
An entry is automatically created in the history table and the order confirmation is attached as
a PDF file.
n
An email with the attached order confirmation is sent to the customer.
n
The project stays with the supplier.
Supplier: To close a project
1. After the order has been delivered to the customer, select Order completed in the Offer Status
field.
n
The project stays with the supplier.
101
Import and Export Stores
To export a store
n
Select a store in the Store List tab and click the Export button.
Note: You can only export a store if the store project has already been opened once. Then the data is
saved locally.
To import a store
1. Choose File > Create a New Project from a Project pxpa File from the main menu.
2. Select the file you want to import in the Explorer.
102
Analysis and Reporting
To get an overview of your store data (store size, store running meters, store shelf board meters,
number of articles), you can print store lists.
To print a store list
n
Click the Print button in the Store List tab.
To analyze your business data, you can create 3D reports directly in the P'X5 Store Solution. In a 3D
report the sales data is displayed above the goods, either horizontally for the individual groups of goods
on a shelf (bar graph reports), or vertically in a grid above the entire sales area (grid reports, category
grid reports).
Example
A bar graph report.
103
To create a 3D report
1. Prepare an Excel table.
n
The first two columns must contain the item_number heading for the article numbers and
the id_store heading for the store ID in any order.
Note: The store ID is a character string, not a number (i.e. 002 is not the same as 2).
n
All other columns can have any headings (e.g. earning for earning per article and margin for
margin per article) and contain the actual data to be analysed.
2. Open the 3D Reports tab.
3. Click Load Data.
4. Select the Excel table in the Explorer and click Open.
5. Click Show loaded data. The data is displayed in a table.
6. Select the sales data (columns in the Excel table) you want to see in the Displayed Report
Field field.
7. Define your settings in the following fields:
n
Mode The report type, e.g. bar graph report.
n
Settings If you select Advanced, more fields appear (see below).
n
Data Scale Factor The scale factor of the analyzed data.
n
Max. Bar Height The maximum height of the bars.
n
Grid Raster The size of the grid (only for the grid and category grid report).
n
Style The way the report is displayed, e.g. blue and transparent (only for the bar graph and
grid report). You can select multiple entries.
The following fields are only displayed if you select the bar graph report in the Mode field and if
you select the Advanced radio button:
n
Show Report Data on The axis on which the report data is shown.
n
Positioning The displacement axis of the article.
n
Displacement The displacement along the displacement axis.
8. Click Generate 3D Report. The report is shown in the Configuration tab.
Note: The displayed data is deleted when you close the application, i.e. no sensitive business data
is saved locally.
104
Bar Graph Reports
The bar graph report shows the sales data of every article in the form of a bar for each article.
Color coding for the compare_bargraph mode: blue = 0, green > 0, red < 0.
Example
The are two articles (X,Y) on a shelf:
n
Article X: Sales quantity 300 pieces
n
Article Y: Sales quantity 1000 pieces
Note: The desired product carrier must be selected for the analysis, otherwise all product carriers
will be analyzed (because of performance reasons the number of analyzed product carriers is limited).
105
Grid Reports
The grid report shows the data (e.g. sales quantity and revenue) of all articles per grid field. You can
define the grid size in the Grid field.
Example
There are two articles (X,Y) in one grid field:
n
Article X: Sales quantity 500 pieces, revenue 300.-
n
Article Y: Sales quantity 1000 pieces, revenue 700.-
106
Category Grid Reports
The category grid report shows the data (e.g. sales quantity) of every article per article category (percentage-wise in their respective category color) and per grid field. You can define the grid size in the
Grid field.
Example
There are three articles (X,Y,Z) in a grid field:
n
Article X: Sales quantity 1000 pieces, category CAT1
n
Article Y: Sales quantity 1000 pieces, category CAT2
n
Article Z: Sales quantity 1000 pieces, category CAT1
107
GLOSSARY
configuration is a store, or a store floor,
or a store section.
A
D
Assortment
All the goods that a retail store offers.
The assortment can be further hierarchically broken down into groups of
goods, subgroups of goods, article
groups, articles, etc.
Dock
Snapping point, which defines connection possibilities between parts.
DOF
(Degree of Freedom) Docks can have
one or two degrees of freedom.
Assortment module
Empirical values, which are gathered
by the person responsible for the assortment. These values are available as
master data, in the form of system files,
on the Central Repository Server.
These predefined areas help you control the allocation of categories of goods
when you plan a store.
DWG
(Drawing) An AutoCAD file format.
DXF
(Drawing Interchange Format) An AutoCAD file format for exchanging data
with other CAD programs.
E
B
Extrude
A surface is extruded to create a body.
BOM
(Bill of Materials) A list of the raw materials, sub-assemblies, intermediate
assemblies, sub-components, components, parts and the quantities of
each needed to manufacture an end
product.
F
Family Node
A grouping, where parts of the same
type, i.e. parts of a product family or
parts with similar properties (e.g. blue,
yellow, and red cups) can be grouped.
This allows the easy exchange of parts
with other parts within the same Family
Node.
Bounding Box
A closed volume that completely contains the union of the objects in the set.
Bounding boxes are used to improve
the efficiency of geometrical operations
by using simple volumes to contain
more complex objects. Normally, simpler volumes have simpler ways to test
for overlap.
G
Generic parts
Typical shop fitting parts (e.g. articles,
shelves, tables, refrigerators, walls,
windows, columns, etc.) for building catalog elements.
C
Center-to-center distance
Distance or dimension between center
lines.
I
iCatalog
Catalog with generic shop fitting parts.
Configuration
In a catalog project, a configuration is a
catalog element. In a store project, a
108
Subconfiguration
A section of a store that you want to
treat or furnish as a unit, e.g. a shop-inshop. Benefits: Less furniture that
blocks the view and the performance is
better.
O
ODBC
(Open Database Connectivity) A standard software interface for accessing
database management systems
(DBMS). The designers of ODBC
aimed to make it independent of programming languages, database systems, and operating systems. Thus,
any application can use ODBC to query
data from a database, regardless of the
platform it is on or the DBMS it uses.
T
Translation
Displacement along an axis.
V
P
Planogram
A visual representation of a store's products or services considered as a tool of
visual merchandising. According to the
Oxford dictionary, "A planogram is a diagram or model that indicates the placement of retail products on shelves in
order to maximize sales. Planograms
(aka POG=plano-gram or plan-o-gram)
help organizations to plan how their
stores are going to look like.
R
Revolve
A surface is rotated around its axis to
create a body.
Rotation
Rotation around an axis.
Running meter
A unit of measurement for determining
a product or product category's allotment of space.
S
Shelf board meter
One meter of horizontal storage space;
the depth and height are not taken into
account.
109
VRML
(Virtual Reality Modeling Language) A
standard file format for representing 3dimensional (3D) interactive vector
graphics, designed particularly with the
World Wide Web in mind.
INDEX
list of 5
nested 20
print 23
release 21
types and levels 62
2
2D illustrations 38
Categories of goods 85
Change view 13
A
Columns 72
Article numbers 59
Configurations 69
Articles
D
add to catalog elements 39
chain-link 47
generic 33
Display quality 89
Docks 43
Assemblies 56
block 55
DOF 45
for chain-linking goods 46
planar 45
position 14
types of 48
attach documents to 60
Assortment areas
compare 76
place 73
C
Doors 72
CAD plan 71
DWG/DXF Files 94
Catalog Element Inspector 61
F
Catalog elements 28
Family Nodes 58
add articles to 39
add name to 41
articles of 61
assign categories to 85
assign numbers to 90
attach documents to 60
build 29
build assemblies from 56
change 88
connect 86
copy 78
insert in article list 77
place 77
place in 3D Scene 30
position 40
position elevated 87
properties of 61
show changed 93
show information about 93
usage of 61
view of 61
Filter 10
G
Geometries
place in 3D Scene 35
requirements for 42
H
Handles 17
I
Images 36
Information request 98
M
Materials and textures 31
Catalogs 19
attach documents to 60
build - Best Practice 62
building hierarchy 62
elements 28
How to build 18
import and export 22
N
Navigation in the 3D Scene 15
110
create reports of 103
How to plan 68
import and export 102
list of 5
load floor plan of 71
print 103
O
Offer request 99
Order 100
Subconfigurations 69
P
Partnerdocks 43
T
Parts
Tabs 9
chain-link 47
connect 51
connect with docks 43
create labels for 80
generic 31
insert passageways between 79
move on surface 54
position relatively 81
rotate 53
set distance between 82
show measure between 84
stack 52
Tags
create 60
search for 11
U
User interface 4
W
Walkways 74
Planograms 77
Walls 72
Print layout 24
Windows 72
Product families 58
Work groups 3
R
Z
Refrigerators
Zones
build 34
chain-link 46
assign categories to 74
sketch 73
Reports
bar graph 105
category grid 107
create 103
grid 106
Requests 97
Resources 6
Rights 3
Roles 3
S
Search 10
Shopfitting parts 32
Snapping point 14
Stay logged In 4
Stores 7
attach documents to 60
create 69
111