1
Zend Core for i5/OSTM
Zend Core for i5/OS
User Guide
By Zend Technologies
w
w
w
.
z
e
n
d
.
c
o
m
Disclaimer
The information in this document is subject to change without notice and does not represent
a commitment on the part of Zend Technologies Inc. No part of this manual may be
reproduced or transmitted in any form or by any means, electronic or mechanical, including
photocopying, recording, or information storage and retrieval systems, for any purpose
other than in accordance with the Zend Core for i5/OS End User License Agreement (EULA).
© 1999-2006 Zend Technologies Inc. All rights reserved.
Zend Core for i5/OS User Guide issued September 2006.
Product Version: 1.5
DN: ZCI5OS-UG-111006-1.5-007
In This Guide
This guide is intended for System Administrators and PHP developers who manage the PHP
Web Servers in their organization. This guide covers the functional aspects of Zend Core
for i5/OS along with in-depth explanations on how to get support and other services from
Zend Technologies.
Throughout this guide, are instructions for guiding the reader to extra reference information
about various products featured or implemented in Zend Core for i5/OS.
Table of Contents
Zend Core ................................................................................................................ 1
Introduction .......................................................................................................... 1
Installation and Updates ........................................................................................... 2
i5/OS Installation Instructions ................................................................................ 2
SUPPORT TOOL ................................................................................................... 6
Zend Core for i5/OS Support Tool ............................................................................... 12
Opening the Support Tool..................................................................................... 12
Getting Started ..................................................................................................... 19
General Information ........................................................................................... 19
Permissions and Security ...................................................................................... 19
System Features ................................................................................................ 20
Functional Overview ............................................................................................... 22
User Interface ....................................................................................................... 23
User Interface ................................................................................................... 23
Control Center .................................................................................................. 24
Configuration ................................................................................................... 30
Documentation.................................................................................................. 41
PHP Code Example ................................................................................................. 42
Example — i5 Program Call ................................................................................... 42
i5 PHP API Toolkit .................................................................................................. 44
Connection Management ...................................................................................... 44
CL Calls........................................................................................................... 46
Program Calls ................................................................................................... 48
Data Retrieval................................................................................................... 49
Native File Access .............................................................................................. 52
Data Queues ..................................................................................................... 59
System Values ................................................................................................... 61
User Spaces ...................................................................................................... 62
Job Log List...................................................................................................... 63
Data Areas ....................................................................................................... 64
Spooled File ..................................................................................................... 66
Object Listing ................................................................................................... 68
Defining Data Structure via PHP ................................................................................. 69
Command Constants ........................................................................................... 70
Errors ............................................................................................................. 70
Data Retrieval Errors .......................................................................................... 71
Function Errors ................................................................................................. 72
ii
Zend Core
Introduction
Zend Core™ supports businesses using PHP and managing information in Databases for
mission critical Web applications. It provides a seamless out-of-the-box experience
delivering a stable, easy to-install and supported PHP development and production
environment.
Presented in a browser-based environment, Zend Core provides a highly stable and efficient
means for installing and managing PHP servers. Resources and reference information are
bundled into Zend Core for “one click” access to a wide range of information, configurations
and reference documents (PHP and PEAR).
Using Zend Core ensures that organizations work with a stable, certified, binary distribution
of PHP. In other words, Zend Core provides a constantly supported and updated generic
code base. Therefore, an organization’s PHP will be easily understood so that newcomers or
external consultants can quickly get up to speed with the new environment.
1
Zend Core
Installation and Updates
i5/OS Installation Instructions
1. Verify that the old library ZendCore from all previous restores, as well as the
following directories, are deleted or renamed:
/usr/local/Zend
/www/zendcore
2. Create a SAVF in QGPL under the name ZCORESAVF.
3. Download the Installation file from the Zend site. Transfer it by binary FTP to
the SAVF ZCORESAVF in QGPL.
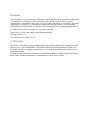
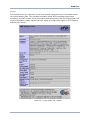
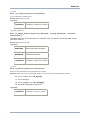
4. When the SAVF is loaded into the i5 QGPL library:
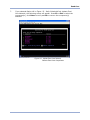
RSTLICPGM LICPGM(1ZCORE5) DEV(*SAVF) SAVF(QGPL/ZCORESAVF)
Figure: 1 - Restore Licensed Program
5. The installation screens will load automatically.
2
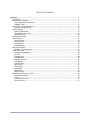
Zend Core
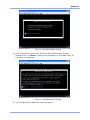
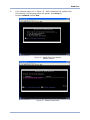
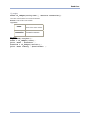
Figure: 2 - Welcome Screen
6. Click Enter to continue or F3 to decline.
Figure: 3 - License Agreement
7. Click Enter to accept the agreement and continue the installation (or click F3
to decline and stop the installation process without completion). The Zend
Core Web Administration Console password screen will open.
3
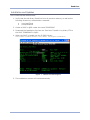
Zend Core
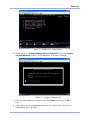
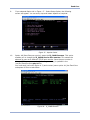
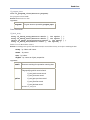
Figure: 4 - Web Administration Console
8. Enter a Password to create your Zend Core Web Administration Console
password now; click Enter to continue the installation (or click F3 to Exit). Do
not forget your password.
Figure: 5 - Web Administration Console
9. The Zend Network ID password screen will appear.
4
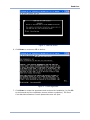
Zend Core
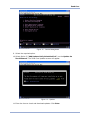
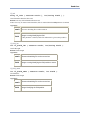
Figure: 6 - Zend Network ID
10. Enter your Zend Network ID and click Enter to continue.
Figure: 7 - Installation Completed
11. This completes installation of Zend Core for i5/OS. Click Enter to continue to
the Support Tool. You can start the Support Tool at anytime using the
command: GO ZENDCORE/ZCMENU.
5
Zend Core
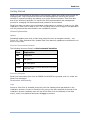
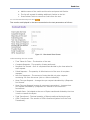
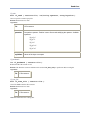
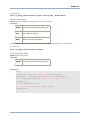
SUPPORT TOOL
The Zend Core for i5/OS Support Tool Main Menu has four options:
Menu Screen
Explanation
1
Set the Zend Core Web
Administration Console
password
Provide a password for accessing the Zend
Core Web Administration Console.
2
Update via Zend Network
The Zend Core for i5/OS update mechanism is
used to upgrade installations. The Zend
Network update mechanism enables
automatic downloads and installation of
updates.
3
Support Tool
The Zend Support Tool is a tool for gathering
information about user configurations and
setup. This tool allows the Zend Support
Team to solve problems in a more
comprehensive and efficient way.
4
Service Management
Manages all required services, e.g., Zend
Subsystem, Apache Control, i5_comm,
pseudo random number generator.
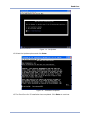
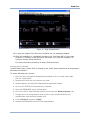
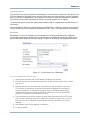
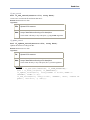
1. Select the required service from the screen below (we are selecting the Set
Zend Core Web Administrative Console password, option).
Figure: 8 - Zend Core for i5/OS Setup Tool
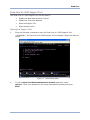
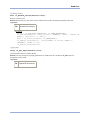
2. The Zend Core Web Administrative Console password screen will open. The
6
Zend Core
password you enter now will become your new Zend Core Web Administrative
Console password. Do not forget it.
Figure: 9 - Zend Core Web Administrative Console Password Screen
3. Enter the Zend Core Web Administrative Console password and press Enter
or press F3 to Exit without setting it.
4. Restart Apache in order for the password to take effect.
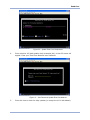
5. Select the option “Update via Zend Network menu”. The Update via Zend
Network menu screen will open.
7
Zend Core
Figure: 10 - Support Tool - Network Menu
6. Select Option 1 (“Change Network ID user/password”) from the Update
via Zend Network screen. The Zend Network ID screen will appear.
Figure: 11 - Change Zend Network ID
7. Enter the new password to create it now. Click Enter to continue (or F3 to
Exit).
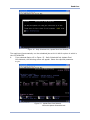
8. Select Option 5 (Service Management) from the Support Tool. The Service
Management Menu will open.
8
Zend Core
Figure: 12 - Service Management
9. Select the required option.
10. Select Option 2 (“Add Updater Daily Scheduled Job”) on the Update via
Zend Network. The Zend Core Updater screen will appear.
Figure: 13 - Updater
11. Enter the time to check and download updates. Click Enter.
9
Zend Core
Figure: 14 - Set Updater
12. Select the Update options and click Enter.
Figure: 15 - Installation Completed
13. The Zend Core for i5 Installation has completed. Click Enter to continue.
10
Zend Core
Figure: 16 - Daily Scheduled Jobs
14. To open the Support Tool from the command line: Go zendcore/zcmenu.
15. After the installation is completed, connect to the Zend Core GUI via your web
browser. To connect, to the Zend Core GUI enter your i5/OS the machine's IP
and port number: 8000/ZendCore.
For more information, please go to http://www.zend.com/
Changing the Port Number
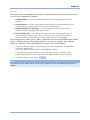
In cases where port number 8000 is already in use, follow these instructions to designate an
alternate port number:
To set an alternate port number:
1. Open the file /usr/local/Zend/apache2/conf/httpd.conf in an editor and locate
the line "Listen 8000".
2. Replace 8000 with the port number you need.
3. Restart apache: /usr/local/Zend/apache2/bin/apachectl restart
4. Go to the i5 HTTPD web administration interface.
5. Open the ZENDCORE server configuration.
6. Go to the "Proxy" administration screen and choose the "Reverse proxy" tab.
7. Change the Core configurations which point to http://localhost:8000/ and
replace them with the newly chosen port.
8. Click "Continue" and then "Apply".
9. Restart the ZENDCORE server via the web interface.
11
Zend Core
Zend Core for i5/OS Support Tool
The Zend Core for i5/OS Support Tool can be used to:
Update the Web Administration Console
Update the Zend Core Network
Open the Support Tool
Open Apache Control
Opening the Support Tool
1.
Enter the following command to open the Zend Core for i5/OS Support Tool:
<COMMAND>. The Zend Core for i5/OS Support Tool will appear. Select the required
option.
Figure: 17 - Select Setup Option
2.
To set the Zend Core Web Administration Console password, select
Option 1. Enter your password in the screen that appears (below) and press
Enter.
12
Zend Core
Figure: 18 - Update Web Administration Console
3.
To update via the Zend Core Network, select Option 2 from the Option screen (
Figure: 17 - Select Setup Option); the Update Zend Core Network screen will
appear. Select the required option.
Figure: 19 - Update Zend Core Network
13
Zend Core
Figure: 20 - Update Zend Core Components
4.
Enter selection #2 (Add Updater daily scheduled job). A User ID screen will
appear. Enter your Zend Core Network User Password.
Figure: 21 - User Password; Update Zend Core Network
5.
Enter the time to check for daily updates (or accept the 01:00 AM default).
14
Zend Core
Figure: 22 - Daily Scheduled Job; Update Zend Core Network
The machine will automatically run the scheduled jobs at 01:00 AM for option #1 which is
the LIST UPDATES
6.
If you selected Option #3 in Figure: 22 - Daily Scheduled Job; Update Zend
Core Network, the following screen will appear. Select the required parameter
or job.
Figure: 23 - Update Zend Core Network;
Work with Updater Scheduled Jobs
15
Zend Core
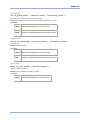
7.
If you selected Option #6 in Figure: 22 - Daily Scheduled Job; Update Zend
Core Network, the following screen will appear. Press F3 to Exit or select the
component(s), click Enter to verify and F8 to remove the component(s)
selected.
Figure: 24 - Update Zend Core Network;
Remove Zend Core Components
16
Zend Core
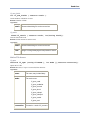
8.
If you selected Option #7 in Figure: 22 - Daily Scheduled Job; Update Zend
Core Network, the following screen will appear. Press Enter to
continue/rollback or F3 to Exit.
Figure: 25 - Update Zend Core Network;
Rollback Options
Figure: 26 - Rollback Components
17
Zend Core
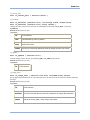
9.
If you selected Option #4 in Figure: 17 - Select Setup Option, the following
screen will appear. You can start, stop and restart Apache as required.
Figure: 27 - Apache Control
10.
Option #8 (Start Easycom service) starts the i5_COMD Daemon. This option
enables you to change the i5_COMD Service Port number. This causes the
daemon to open on a different TCP/IP port number. Once the port number is
changed. The new port number (i5comm.port entry) is updated in the
/usr/loc/Zend/Core/etc/php.ini file.
You must stop (use menu option # 2) and re-start (menu option #1) the Zend Core
subsystem for this to take effect.
Figure: 28 - i5_COMD Daemon
18
Zend Core
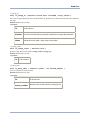
Getting Started
Zend Core is a Certified PHP distribution that includes a stable and reliable environment for
managing PHP. This environment improves PHP development by removing the current
hardship in manually building and setting up an entire PHP environment. Zend Core also
acts as an “efficiency facilitator” to improve the PHP implementation and management
process for managing PHP development and production environments.
Zend Core does not require any complicated configurations or settings in order to run. After
installation, Zend Core is ready to run. The only thing left to do is to login to the application
with the password that was created in the installation process.
General Information
Updates
Scheduled Updates now work in batch and (unless the time is changed manually – see
Figure: 22 - Daily Scheduled Job; Update Zend Core Network) updates are scheduled to run
at 01:00 AM, daily.
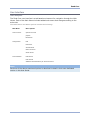
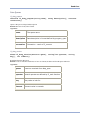
Zend Core Environmental Variables
The following items are Zend Core Environmental Variables.
Item
Explanation
SBS
Subsystem
JOBQ
Job Queue
JOBD
Job Description
CLASS
Responsible for process attribute time slots
from the CPU.
Zend Core Subsystem
Zend Core auto startup jobs such as PRNGD and APACHE are grouped, and run, under the
Zend Core subsystem.
Permissions and Security
Login
Access to Zend Core is available exclusively with the Password that was defined in the
installation process. Connect to Zend Core by going to the URL specified at the end of the
installation process (windows users will see a link either from the desktop or the Start
menu), enter your password and press Next
to continue.
19
Zend Core
System Features
The following is a list of primary system buttons included with Zend Core:
To see the product version and a list of products installed in Zend Core
(including their proprietary copyright information).
To log out from the application.
Refresh the display.
Restart the Web Server.
Apply settings to the server after changing configurations.
Do not apply settings to the server after changing configurations.
Extension Status - Indicates that an extension is on - click on the icon to disable
the extension.
Extension Status - Indicates that an extension is off - click on the icon to enable
the extension.
Note:
Extensions marked with '!' indicate that an inconsistency occurred between the server state
and the php.ini state. Possible causes are that the php.ini was changed earlier and the
server was not restarted, or that the extension failed to load. To test this, try to restart the
server. If the extensions remain unloaded, then these extensions could not be loaded
because of some failure.
Extensions and directives marked '*' have different values (or loaded/unloaded state in case
of Extensions) in the php.ini file and in the running server instance. To synchronize their
state/value, restart the Web Server.
Extension State – Indicates that the extension is not Loaded.
Extension State – Indicates that the extension is Loaded or Built-in (a tool tip
indicate which extension is Loaded or Built-in).
Open the context sensitive Help.
Open reference information in the relevant Reference Document.
Search for information in one of the Reference Documents and the Online Help.
20
Zend Core
21
Zend Core
Functional Overview
Zend Core provides a “single point of access” for configuration, documentation, support,
monitoring and control over your PHP and Web Server as follows:
PHP Configuration - configure and view existing configurations and changes in
a phpinfo display.
Reference Information - search reference information included in Zend Core to
get immediate answers to questions. Zend Core provides advanced search
functionality, for searching across all included reference information at once.
Server Monitoring and Control - view the overall condition of the server and
control server start/stop directly from Zend Core.
Extension Configuration - control the memory footprint of the PHP solution.
Benchmarking - build and deploy database-driven Web applications.
22
Zend Core
User Interface
User Interface
The Zend Core user interface is a tab based environment for navigation through the Main
Menus. Each of the Main Menus includes tabbed sub-menus that change according to the
active tab.
The Main Menus and Menu Options include the following:
Main Menu
Menu Options
Control Center
System Overview
phpinfo
Benchmark
Configuration
PHP
Extensions
Zend Products
Other Directives
Studio Server
Documentation
PHP Manual
Pear Manual
Additional Documentation per Zend Core flavor.
Note:
Each one of the above-mentioned options is described in detail in their own dedicated
section in this User Guide.
23
Zend Core
Control Center
The Control Center is the main system-profiling component for monitoring, testing and
configuring server performance and activity.
The tabs included under the Control Center are:
System Overview - Displays information about the server’s
environment and activities.
phpinfo - Displays information about the current state of PHP.
Benchmark - A performance standard for measuring Web Server
performance and durability.
Together these tabs provide System Administrators with an overall display, essential
information, and URL testing capabilities.
Chapter 1 - System Overview
The System Overview tab is a server-monitoring screen that provides valid information
regarding the server’s environment and activities. This screen collects information for
immediate display that would otherwise require the time consuming task of searching for
these details.
24
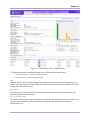
Zend Core
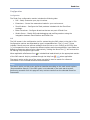
Figure: 29 - Control Center Tab – System Overview
The following actions can be performed from the System Overview screen:
Refresh display - select the Refresh button.
Restart server - select Restart Server.
PHP
The PHP section of this screen displays information about the PHP version installed on the
server. The information includes which Server API the PHP uses and the location of the PHP
configuration file on the server.
Web Server
The Web Server section of this screen displays the Web Server’s name details about the
Operating System’s environment.
Server Configuration
The Server Configuration section of this screen displays the Web Server’s port number, root
directory and connection time-out durations, along with the location of the Server
Configuration file.
25
Zend Core
Server Status
The Server Status section of this screen is an accumulated list detailing the various activities
on the server.
Disk Space
The Disk Space section of this screen shows bar charts of the partitions and free disk space
that gives an easy view of the server’s disk space status.
Web Server Processes and Threads
This bar graph display shows a snapshot of the various threads that are running on the
server.
The System Overview screen also includes a Restart Server button to easily restart the Web
Server directly from Zend Core.
Note:
The Restart Button is only applicable when PHP works as an Apache Module and will not be
visible when using CGI and FastCGI SAPIs.
26
Zend Core
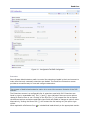
phpinfo
The phpinfo screen is a read-only screen that outputs a large amount of information about
the current state of PHP. This includes information about PHP compilation options and
extensions, the PHP version, server information and environment, the PHP environment, OS
version information, paths, master and local values of configuration options, HTTP headers,
and the PHP License.
Figure: 30 - Control Center Tab – phpInfo
27
Zend Core
Changing phpInfo
The phpinfo is an easily accessible representation of information contained in the php.ini file.
This file resides on the Web Server and the information and configurations can be modified
directly from the Configuration Tab. Changes to the php.ini file are automatically updated in
the phpinfo screen after restarting the server using the Restart Server button.
To restart the server press the restart server button that is located in the top left corner of
the screen.
More information about the phpinfo display and directions on how to configure your phpinfo
can be found in the PHP Manual (Documentation Tab - PHP - PHP Options and Information).
Benchmark
Benchmark is part of the Zend Core environment for building and deploying, databasedriven Web applications. Benchmark is a performance standard for measuring Web Server
performance and durability while providing a means for analyzing Web page performance.
Figure: 31 - Control Center Tab – Benchmark
To run a benchmark test on a URL:
1. Specify the complete URL to be tested including port number.
2. Choose the amount of requests to perform or the duration (how long) for the
test to run.
3. Specify the amount of concurrent connections to be simulated in the test.
The number of permitted concurrent connections depends on the testing
system’s capacity. To prevent the system from overloading and thereby
making the system the actual bottleneck, make sure to run a reasonable
amount of concurrent connections in a test.
4. The Use Keep Alive option pertains to Web sites that support the HTTP Keep
Alive option. Selecting this option keeps the connection open while running
the test. This is as opposed to opening and closing connections for every
request.
5. Add header lines to the request if necessary.
6. To add a cookie:
28
Zend Core
a. Add the name of the cookie and its value and press Add Cookie.
b. The list will expand for adding additional Cookies to the list.
c. Press Delete Cookie to remove a Cookie from the test.
To run the Benchmark press Run
.
Test results are displayed in the same screen below the test parameters as follows:
Figure: 32 - Benchmark Result Screen
Understanding the test results
Time Taken for Tests - The duration of the test.
Complete Requests - The quantity of tests performed.
Requests Per Second - Sum of completed tests divided by the time taken for
each request.
Failed Requests - The quantity of failed tests out of the sum of complete
requests.
Non-2xx Responses - The amount of tests that did not get a response
containing 2xx from the server (this is a failure indication).
Mean Time per Request - Average time per request calculated by 1/Requests
Per Second.
Mean Time per Request (across all concurrent connections) - Average time
per request calculated by 1/Requests Per Second for all concurrent
connections.
Transfer Rate - Calculated as the sum of Bytes transferred divided by the time
it took to transfer the Bytes.
Total Transferred - The total quantity of Bytes transferred during the test.
HTML Transferred - The amount of HTML transferred (taken from the Total
Transferred).
29
Zend Core
Configuration
Configuration
The Zend Core configuration section includes the following tabs:
PHP - Easily customize your php.ini values.
Extensions - Control the extensions loaded in your environment.
Zend Products - Configure the Zend products included with the Zend Core
package.
Other Directives - Configure directives that are not part of Zend Core.
Studio Server - Enable PHP code debugging and profiling sessions using the
integration between Zend Platform and Zend Core.
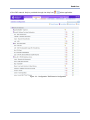
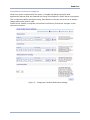
PHP
The PHP screen is the configuration tool for customizing the PHP values in the php.ini file.
Configuration options are separated by type in expandable lists. The [+] and [-] signs
indicate if there are more options related to that list item or not. Clicking on the Plus Icon
[+] will expand the list to expose the different options and where applicable, input fields are
added to change an options value. Alternatively, clicking the Minus Icon [-] will contract the
list leaving only the option type visible.
When applicable a Reference Icon
is included that leads directly to the appropriate section
of the PHP manual. Help is provided through the Help Icon
when applicable.
The search option at the top of the screen can also be used to search for reference
information in the included reference documentation.
Note:
The search option on this screen performs searches according to the main search options
(Documentation Search). If the PHP option is not selected in the main search screen,
performing a search from this page will only retrieve results from the selected Resource
Documents.
30
Zend Core
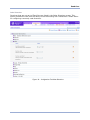
Figure: 33 - Configuration Tab PHP Configuration
Extensions
Some System Administrators prefer to control the extensions loaded in their environment to
make sure that only necessary extensions are loaded. The Zend Core Extensions screen
provides a convenient way to view and configure extensions.
Note:
The purpose of load/unload extension option is to control the memory footprint of the PHP
solution.
The Extensions screen is a configurable list of extensions used with PHP. Extensions are
listed by type in expandable lists. The [+] and [-] signs indicate if there are more options
related to that list item or not. Clicking on the Plus Icon [+] will expand the list to expose
the different options and where applicable input fields are added to change an options value.
Alternatively, clicking the Minus Icon [-] will contract the list leaving only the option type
visible.
When applicable a Reference Icon
is included that leads directly to the appropriate section
31
Zend Core
of the PHP manual. Help is provided through the Help Icon
when applicable.
Figure: 34 - Configuration Tab Extension Configuration
32
Zend Core
Extension Statuses
Extensions can have one of three statuses according to different requirements and the
environment running PHP.
The statuses are as follows:
Unloaded - The extension is not running on the machine.
Loaded - The extension is running on the machine.
Built-in - The extension has dependencies or, was complied with the PHP
and cannot be removed. Built-in extensions do not have an enable/disable
icon next to them.
To change an extensions status (Module mode only):
1. Press the Disable or Enable extension Switch.
A notice will appear to restart the server.
2. Go to the top right corner of the screen and press Save Settings
.
3. To apply the changes press Restart Server
.
Several settings can be applied to different extensions at the same time. Use the Discard
Changes button when you want to clear the Extension Configuration screen before saving
the settings.
Both loaded and unloaded extensions can be configured by editing their parameters in the
Extension Configuration screen.
33
Zend Core
Zend Products
The Zend Products tab, displays the Zend products included with the Zend Core package.
Zend products are listed by type in expandable lists. The [+] and [-] signs indicate if there
are more options related to a product. Clicking on the Plus Icon [+] will expand the list to
expose the different options and where applicable input fields are added to change an
options value. Alternatively, clicking the Minus Icon [-] will contract the list leaving only the
option type visible. Items that do not have any configurable details will not include the [+]
and [-] icons.
Through this screen, users can configure the following Zend products.
Zend Core
Zend Debugger
Zend Extension Manager
Zend Optimizer (The Zend Optimizer is a free application that runs the PHP
scripts encoded by the Zend Guard for enhancing PHP application running
speed. Read more about the Zend Optimizer at
http://www.zend.com/store/products/zend-optimizer.php
Zend Product Statuses - provides a general overview of how to change the
status of an extension.
Figure: 35 - Configuration Tab Installed Zend Products List
34
Zend Core
Zend Core
Zend Core user-interface configuration options:
zend_core_allow_restart
Enable to restart the server from the Zend Core restart button.
Note:If this option is disabled in Module Mode. To apply further settings
restart the server manually.
zend_core_default_gui_language
Determines the user interface language (supported languages will vary
according to product version).
Zend Debugger
The Zend Debugger is Zend Platform's Server extension for debugging PHP with Zend
Studio. This extension provides the initial framework needed for initiating debug sessions
with Zend Studio.
Using the Zend Debugger with Zend Studio provides advanced debugging features,
including: Conditional Breakpoints, Stack Trace View, Advanced Watches, Variables and
Output Buffer.
Zend Studio does not have to be installed on the Web Server and can be used for debugging
with a remote Client over SSL. Remote connections are secure ensuring maximum
protection for remote debugging with offsite locations or across the Internet.
For more information on Zend Studio and to download the product, go to:
http://www.zend.com/store/products/zend_studio/.
For more information on Zend Platform and to download the product, go to:
http://www.zend.com/store/products/zend_platform/.
Note:
The settings in the Studio Server Tab are only applicable when the Debugger extension is
loaded.
Zend Extension Manager
The Zend Extension Manager is in charge of loading the Zend modules according to their
appropriate versions.
Zend Optimizer
Zend Optimizer goes over the intermediate code generated by the standard Zend run-time
compiler and optimizes it for faster execution. In addition, the Zend Optimizer enables PHP
to load and execute files encoded by the Zend Guard.
35
Zend Core
Zend Optimizer Settings:
zend_optimizer.disable_licensing
If you do not need to use any licensing features then you can disable
the Zend Optimizer license request.
zend_optimizer.enable_loader
If you do not plan to use the Zend Optimizer to load encoded files, you
can slightly improve the Optimizers performance by adding the
zend_optimizer.enable_loader = 0. This disables the transparent autoloading mechanism that is built into the Zend Optimizer.
zend_optimizer.licence_path
A license file is required to load encoded PHP scripts that were encoded
with a require-license option. If you turn off this option, encoded scripts
on your server that require a license may not load.
zend_optimizer.optimization_level
enable optimization bitmask
Zend Product Statuses
Zend Products can have one of three statuses according to different requirements and the
environment running PHP.
The statuses are as follows:
Unloaded - The product is not running on the machine.
Loaded - The product is running on the machine.
Built-in - The product has dependencies or, was complied with the PHP and
cannot be removed. Built-in products do not have an enable/disable icon next
to them.
To change a product's status (Module mode only):
1. Press the Disable or Enable extension Switch.
A notice will appear to restart the server.
2. Go to the top right corner of the screen and press Save Settings
.
3. To apply the changes press Restart Server
.
Several settings can be applied to different product at the same time. Use the Discard
Changes button when you want to clear the product Configuration screen before saving the
settings.
Both loaded and unloaded products can be configured by editing their parameters in the
Installed Zend Products Configuration screen.
36
Zend Core
Other Directives
Directives that are not part of Zend Core are listed in the Other Directives screen. This
option provides the user with the ability to use the existing user interface as a Smart Editor
for configuring commonly used directives.
Figure: 36 - Configuration Tab Other Directives
37
Zend Core
The available directives are separated by type in expandable lists. The [+] and [-] signs
indicate if there are more options related to a directive. Clicking on the Plus Icon [+] will
expand the list to expose the different options and where applicable input fields are added
to change a directives value. Alternatively, clicking the Minus Icon [-] will contract the list
leaving only the directives name visible. Directives that do not have any configurable details
will not include the [+] and [-] icons.
When applicable a Reference Icon
is included that leads directly to the appropriate section
of the PHP manual. Help is provided through the Help Icon
when applicable.
The search option at the top of the screen can also be used to search for reference
information in the included reference documentation.
Note:
The search option on this screen performs a search according to the main search options. If
the PHP option is not selected in the main search screen, performing a search from this
page will not retrieve results from the PHP reference document.
38
Zend Core
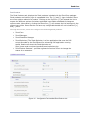
Zend Platform's Studio Server Component
Zend Core comes complete with the option, to enable the debug and profile Web
applications features that are obtained with using Zend Platform's Studio Server component.
This component enables developers using Zend Studio to connect with a server to analyze
(debug and profile) and fix code.
Studio Server creates a complete environment to efficiently fix and test changes in their
native environment.
Figure: 37 - Configuration Tab Zend Studio Server Settings
39
Zend Core
Settings
The Studio Server tab displays the settings for the Studio Server that resides on the server.
There are four categories of settings:
1. Allowed Hosts - Lists the hosts allowed to initiate Debugging and Profiling
sessions.
2. Denied Hosts - Lists the hosts that are not allowed to initiate Debugging and
Profiling sessions, even if they are on the Allowed Hosts list.
3. Allowed Hosts for Tunneling - Lists the hosts allowed to use the Zend
Studio Tunnel for debugging across a firewall.
4. Expose Remotely - This setting determines whether the Debug Server will
expose itself to remote clients. This is required if you want the Zend Studio
Browser Toolbar to automatically detect pages that can be debugged.
The Settings screen, allows you to: Add, or Remove a host from the Allowed Hosts, Denied
Hosts, or Allowed Hosts for Tunneling categories. You can also assign a value (Always,
Selective, or Never) to the Expose Remotely setting for the selected node.
To add an Allowed, Denied or Tunneling Host, enter the address and Net Mask
and press "Add Server".
A new line with the Hosts details will be added to the list.
To change an Allowed, Denied or Tunneling Host, press the "Remove Host"
button to delete the host and enter the new Address and Net Mask settings.
To apply changes press "Save"
.
Note:
The settings in the Studio Server tab are only applicable when the Debugger extension is
loaded.
40
Zend Core
Documentation
The Documentation tab is the main source for reference information. The reference
information included in this tab is automatically updated when new additions or revisions
occur (HotFixes and new versions).
Using the Search sub-menu considerably reduces the time it takes to obtain information for
two reasons:
1. Several reference documents can be searched at once.
2. No need for Internet search - all necessary reference information is locally
available.
Reference Information
The following information is accessed directly from the Documentation Tab:
PHP - The PHP Manual consists primarily of function references, but also
contains language references, explanations of some of PHP’s major features,
and other supplemental information.
PEAR - Explains the general structure, layout, and conventions used in PEAR.
Searching for Information
The Documentation Tab includes a tab for each reference document and a Search Tab for
locating information contained in the reference documents. The advanced search options,
included in the Search Tab are for performing an overall search of the reference documents.
Use the search options and categories to customize the search options.
Figure: 38 - Main Search Criteria
There is also a search field for each of the individual reference document tabs.
The search criterion for queries is determined by the search criteria in the Search Tab.
If the Search tab is set to PHP and PEAR. running a search query will look only for the
specific phrase in the PHP and PEAR manual.
The same goes for each individual Reference Document search field, regardless of the
selected document.
For example, if you only select the PEAR manual and search for a word in the search field on
that page; the search results will only include this manual.
Reference information, is also accessed from the following Configuration Tab options: PHP,
Extensions and Other Directives. These tabs are intended for configuring different
extensions.
When an extension has a particular reference in one of the reference documents the
, appears. Pressing this icon will open the relevant reference
Reference Information icon
document in the relevant location.
41
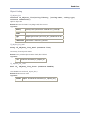
PHP Code Example
Example — i5 Program Call
The i5 program call process contains the following PHP functions:
1. i5_connect
2. i5_program_prepare
3. i5_program_call
4. i5_close
The sample PHP script below invokes an i5 program.
<?
/* Connect to i5 Machine */
$conn = i5_connect($i5_server_ip, $i5_uname, $i5_pass); if ($conn ===
false) {
print ("FAIL : Failed to connect to server : $i5_server_ip, with
user name : $i5_uname and password : $i5_pass");
$errorTab = i5_error();
var_dump($errorTab);
die();
}
/* Prepare File for execution */
$desc = array (
array ("name"=>"city", "io"=>I5_IN, "type" => I5_TYPE_CHAR,
"length"
=> "15"),
array ("name"=>"zip", "io"=>I5_IN, "Type" => I5_TYPE_CHAR,
"length"
=> "5"),
array ("name"=>"result", "io"=>I5_INOUT, "type" => I5_TYPE_CHAR,
"length" => "40")
);
$prog = i5_program_prepare("EACDEMO/RPCVBDEMO", $desc); if ($prog ===
FALSE){
$errorTab = i5_error();
echo 'Program prepare failed \n';
var_dump($errorTab);
die();
}
/* Execute Program */
$params = array ("city" => "Ramat Gun",
"zip" => "12",
"result" => " ");
$retvals = array("result" => "result");
$ret = i5_program_call($prog,$params, $retvals) ; if ($ret === FALSE){
$errorTab = i5_error();
echo 'FAIL : i5_program_call failure code \n';
var_dump($errorTab);
die();
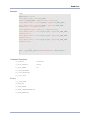
42
Zend Core
}
$exp_res = sprintf ("RSLT :%-15s AND %-5s",$params["city"],
$params["zip"]);
if (strcmp ($result, $exp_res) != 0)
{
print ("FAIL : The program returned \"$result\" \n where it
should have been \"{$exp_res}\""); } $close_val = i5_program_close
($prog); if ($close_val === false ) {
print ("FAIL : i5_program_close returned fales, closing an open
prog.\n");
$errorTab = i5_error();
var_dump($errorTab);
}
i5_close($conn) || print ("FAIL : Failed to disconnect from server :
$i5_server_ip");
?>
43
Zend Core
i5 PHP API Toolkit
The purpose of the PHP ToolKit is to allow Zend Core for i5/OS to interact with native i5/OS
services.
The PHP APIs enable PHP programs to access System objects, such as RPG/COBOL/Java
programs, CL commands, Data Queue, Spooled file, etc. These APIs expose the PHP Object
Oriented programming interface.
From an architectural standpoint - PHP functionality is implemented as an PHP extension
that is enabled during the Zend Core for i5/OS installation.
The extension implements the client side of the interface.
A server side, implementing the native i5/OS interface, is installed on the i5/OS machine as
a native i5/OS service.
i5 PHP Connector API
All API calls start with the same prefix ( i5 ).
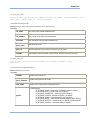
Connection Management
i5_connect
resource i5_connect(string server, string user, string password[, array
options]).
Connects to the AS/400 server.
Returns: AS/400 connection resource or false on failure.
Arguments:
server
Name of the server to connect, can be either symbolic name or IP
user
Username to use for connecting
password
Password for the username
options
Connection options.
EXAMPLE:
$conn = i5_connect("1.2.3.4", "MYUSER", "MYPWD") ||
die(i5_errormsg());.
echo "Connection OK!<br>\n";.
i5_close($conn);.
Connection Options
I5_OPTIONS_JOBNAME : Machine name by default
I5_OPTIONS_SQLNAMING : To use dotted (.) or slashed (/) notation in SQL requests.
I5_OPTIONS_DECIMALPOINT : To use dot or comma as decimal separator.
I5_OPTIONS_CODEPAGEFILE . To use a specific code page.
I5_OPTIONS_EACUNLOCK* :. Program to call to allow connection.
I5_OPTIONS_ALIAS : Enables naming a connection.
I5_OPTIONS_INITLIBL : Specifies initial library.
44
Zend Core
i5_close
bool i5_close([resource connection]).
Closes connection to AS/400 server.
Returns: Boolean success value.
Arguments:
connection
Connection - result of i5_connect
i5_adopt_authority
bool i5_adopt_authority(string username, string password[, resource
connection]).
Changes authority of the connection to a specific user. All actions will be executed as this
user from now on.
Returns: Boolean success value.
Arguments:
username
Name of the user to change to
password
Password for the user
connection
Connection - result of i5_connect
i5_error
bool i5_error([resource connection]).
Retrieves error information for last action that was executed.
Returns: If there was no error, returns false. Otherwise, returns an array with the following elements:
0 - error number, as in i5_errno().
1 - error category.
2 - error message, as in i5_errmsg().
3 - detailed description of the error.
Arguments:
connection
Connection - result of i5_connect
45
Zend Core
i5_errormsg
string i5_errormsg([resource connection]).
Gets error message for last executed action.
Returns: Error message string.
Arguments:
connection
Connection - result of i5_connect.
CL Calls
i5_command
bool i5_command(string command[, array inputs, array outputs, resource
connection]).
Calls CL command.
Returns: Boolean success value.
Arguments:
inputs
Array of name => value parts, name describing the call input parameters.
Names should match i5 cl command parameter names.
If the array is empty or not provided, no input parameters are given. If the value is integer,
integer is passed, if the value is string, quoted string is passed. If the value is an array, the
list of contained values is passed.
outputs
Array which describes output parameters of the command. If not provided, no
output parameters are defined.
Key of the array defined i5 cl command parameter name
"rc" is a predefined name containing the result of the command.
Value can be string. If so - it defines a php variable name to accept the parameter or array;
it should have 2 elements:
connection
•
A php variable name to accept the parameter.
•
Description of the parameter
Connection - result of i5_connect.
The i5_cmdget should work with output parameters after this command. The command still can be given the old
way, defining all the parameters inline.
EXAMPLE:
i5_command("rtvjoba", array(), array("curlib" => "curl",.
"user"=>"user",.
"usrlibl" => "userlib",.
"syslibl" => array("syslib",
"char(165)"), .
).
);.
print "User : $user<br>" ;.
print "User library : $userlib<br>" ;.
print "System libs list : $sysbibl<br>" ;.
print "Current library : $curl<br>" ;.
46
Zend Core
i5_cmdget
mixed i5_cmdget(string name [, resource connection]).
Get return value from the last executed command.
Returns: Value of the return variable.
Arguments:
name
connection
Name of the return variable
Connection resource
EXAMPLE:
i5_command("rtvjoba");.
$user = i5_cmdget("user");.
print "User : $user<br>" ;.
$userlib = i5_cmdget("usrlibl");.
print "User library : $userlib<br>" ;.
47
Zend Core
Program Calls
i5_program_prepare
resource i5_program_prepare(string name[, array description][, resource
connection]).
Opens a program and prepares it to be run.
Returns: Resource if open succeeded, false if open failed.
Arguments:
name
description
Program name. If a service procedure call is made done, the procedure
name is given in parentheses, e.g., Lib/Service_Program(PROC)
PHP-format program description. This should be provided if the program is not
described on server.
See PHP data description
connection
Connection – result of i5_connect
i5_program_call
bool i5_program_call(resource program, array params[, array retvals]).
Calls the program and optionally accepts results.
Returns: Boolean success value.
Arguments:
program
Program resource opened by program_open
Parameters according to description.
params
Can be given as flat array, then parameters are assigned in order, or
as key => value pairs then the values are assigned to the parameter
named by the key
retvals
Array of key => value pairs where keys describe output parameter name and
values name PHP variable that would receive the parameter
Fetch should still work even if the return parameters are defined and assigned.
EXAMPLE:
$prog = i5_program_prepare("DEMOPGM");.
if(i5_program_call($prog, array(1,2,"abc"))) {.
$result = each_fetch_assoc($prog);.
print "result is $result['retval']<br>";.
} else {.
print "Program call failed.<br>";.
}.
48
Zend Core
i5_program_close
void i5_program_close(resource program).
Frees program resource handle.
Returns: Boolean success value.
Arguments:
program
Program resource opened by program_open.
Data Retrieval
i5_fetch_array
array i5_fetch_array(resource result [, int option ] ).
array i5_fetch_assoc(resource result [, int option ] ).
object i5_fetch_object(resource result [, int option ] ).
array i5_fetch_row(resource result [, int option] ).
Fetches a row of data from the resource.
Returns: According to the specific fetch function used, it returns either an array or an object containing the data.
array - by index and name.
assoc - by name.
row - by index.
object - by name as object properties.
Arguments:
result
Resource resulting from operation returning data
Flag specifying which record to fetch.
i5_read_seek current record.
i5_read_next next record.
option
i5_read_prev previous record.
i5_read_first first record.
i5_read_last last record.
Default is i5_read_next.
49
Zend Core
i5_info
array i5_info ( resource result [, int/string field ] ).
Gets information about the file/record.
Returns: An array with information about record:
If there is no way to return whole information; false is returned when the field parameter is omitted.
Arguments:
result
field
Resource describing file or other record set
Integer or string identifying the field.
If this parameter is omitted, whole file information is given (when possible).
i5_field_len
int i5_field_len ( resource result, int/string field ).
Gets field length.
Returns: field's length.
Arguments:
result
field
Resource describing file or other record set
Integer or string identifying the field position or name.
i5_field_name
int i5_field_name ( resource result, int field ).
Get field name.
Returns: field's length.
Arguments:
result
field
Resource describing file or other record set
Integer identifying the field position.
50
Zend Core
i5_field_scale
int i5_field_scale ( resource result, int/string field ).
Gets field scale - number of digits for numeric fields.
Returns: The number of digits of the field. If the field is not numeric, returns –1.
Arguments:
result
field
Resource describing file or other record set
Integer or string identifying the field position or name.
i5_field_type
string i5_field_type ( resource result , int/string field ).
Gets field type.
Returns: Field's type string.
Arguments:
result
Resource describing file or other record set .
field
Integer or string identifying the field position or name.
i5_list_fields
array i5_list_fields ( resource result ).
Gets list of fields for resource.
Returns: Array containing field names, in order.
Arguments:
result
Resource describing file or other record set.
51
Zend Core
i5_num_fields
int i5_num_fields ( resource result ).
Get the numbers of fields for resource.
Returns: Number of fields.
Arguments:
result
Resource describing file or other record set.
i5_result
mixed i5_result ( resource result, int/string field]).
Gets one field of the result.
Returns: Field's contents in current record.
Arguments:
result
Resource describing file or other record set.
field
Integer or string identifying the field position or name.
Native File Access
i5_open
resource i5_open (string fileName [, int mode ][,resource connection]).
Opens native i5 file.
Returns: Resource, if “open” is successful, false otherwise.
Arguments:
name
File name, may include library
mode
File mode to use:
i5_open_read.
i5_open_readwrite.
i5_open_commit.
i5_open_shrrd.
i5_open_shrupd.
i5_open_shrnupd.
i5_open_exclrd.
i5_open_excl
connection
Connection - result of i5_connect
52
Zend Core
i5_addnew
bool i5_addnew ( resource file [, int mode] ).
Creates new record in the file. Use setvalue() to set values in new record, then update() to write it to file.
i5_new_record() is an atomic function doing all the work.
Returns: Resource if open succeeded, false if “open” failed.
Arguments:
file
Opened i5 file.
mode
If to clean the record.
i5_addnew_clear:
clear.
i5_addnew_noclear: do not clear
i5_edit
bool i5_edit ( resource file [, int mode] ).
Sets editing mode for the record. In order for a value to be changed, it should be set in edit mode. This locks the
record so that other users cannot edit it simultaneously.
Returns: Boolean success value. Returns false if the record is already being edited by other used.
Arguments:
file
i5 file resource.
mode
Editing mode.
i5_edit_one leaves edit mode after i5_update() and also after reading or
i5_delete().
i5_edit_always remains in editg mode until i5_cancel_edit() is called.
i5_edit_auto_update is called automatically therefore there is no need to call
i5_update() after setting values.
i5_delete
bool i5_delete ( resource file ).
Remove current record.
Returns: Boolean success value. Return is false if the record is already being edited by other used.
Arguments:
file
i5 file resource.
53
Zend Core
i5_cancel_edit
bool i5_cancel_edit ( resource result ).
i5_setvalue
bool i5_setvalue (resource file, int/string field, mixed value).
bool i5_setvalue (resource file, array values ).
Changes the value of the current record. The record should be in edit mode after i5_edit() or created by
i5_addnew().
Returns: Boolean success value.
Arguments:
file
i5 file resource.
field
Field identifier by name or position.
value
Value for the field.
values
Set of key=>value parts describing fields to change and their new values.
i5_update
bool i5_update ( resource file ).
Commits changes done to the file record after i5_edit() or i5_addnew() into the file.
Returns: Boolean success value.
Arguments:
file
i5 file resource.
i5_range_from
bool i5_range_from ( resource file,bool included,array values).
Sets an upper range bound for the file. Once the bound is set, the first line for all seeks becomes the line defined by
the range.
Returns: Boolean success value.
Arguments:
file
i5 file resource.
included
True if the field with this key should be included in the range, false otherwise.
values
Values for the key fields - array of key=>value pairs.
54
Zend Core
i5_range_to
bool i5_range_to (resource result,bool included, array values ).
Sets a lower range bound for the file. Once the bound is set, the last entry for all seeks becomes the entry defined by
the range.
Returns: Boolean success value.
Arguments:
file
i5 file resource
included
True if the field with this key should be included in the range, false otherwise.
values
Values for the key fields - array of key=>value pairs.
i5_range_clear
bool i5_range_clear ( resource file ).
Removes range. Reverses the action of range_from() and range_to().
Returns: Boolean success value.
Arguments:
file
i5 file resource
i5_data_seek
bool i5_data_seek ( resource result, int record_number ).
Seeks to a specific record of the result.
Returns: Boolean success value.
Arguments:
file
i5 file resource.
Record_number
Number of the record to seek to, starting from 0.
55
Zend Core
i5_seek
bool i5_seek ( resource file, int/string operator, array keyValue ).
Goes to a specific record in query/file.
Returns: Boolean success value.
Arguments:
file
i5 file resource
operator
Comparison operator. Position is set to first record satisfying the operator. Available
operators:
i5_eq "=".
i5_gt ">".
i5_lt "<".
i5_ge ">=".
i5_le "<="
keyValue
values of the keys to compare
i5_bookmark
int i5_bookmark ( resource file ).
Returns the ID of the current record.
Returns: The ID of the current record that can be used with i5_data_seek() to position on this record again.
Arguments:
file
i5 file resource.
i5_free_file
bool i5_free_file ( resource file ).
Closes file handle and frees file resources.
Returns: Boolean success value.
Arguments:
file
i5 file resource.
Additional functions to the existing API.
56
Zend Core
i5_new_record
bool i5_new_record(resource file, array data).
Creates a new record in the file and inserts data into it.
Returns: Boolean success value.
Arguments:
file
data
Opened i5 file resource.
Array of data fields conforming to file description.
Can be either a flat array or key-value pairs, e.g., i5_setvalue arguments.
i5_update_record
bool i5_update_record(resource file, array data).
Updates the current row with given data.
Returns: Boolean success value.
Arguments:
file
Opened i5 file resource.
data
Array of data fields conforming to file description.
Can be either flat array or key-value pairs, like i5_setvalue arguments.
EXAMPLE:
$file = i5_open("API/TESTFILE", i5_OPEN_READWRITE);.
$rec = i5_fetch_row($file, i5_READFIRST);.
i5_update_record($file, array("CODE" => "C-02", "NOM" =>
"DUPONT", "TYPE" => 3));.
i5_new_record($file, array('C-105', 'DUPOND', 'Jean', 'Avenue du
Qubec', 'Les Ulis', 3, 'FR'));.
57
Zend Core
i5_delete_record
bool i5_delete_record(resource file).
Removes current record.
Returns: Boolean success value. False value is returned if the record is already being edited by other used.
Arguments:
File
Opened i5 file resource.
EXAMPLE:
$file = i5_open("API/TESTFILE", i5_OPEN_READWRITE);.
i5_new_record($file, array('C-105', 'DUPOND', 'Jean', 'Avenue du
Qubec', 'Les Ulis', 3, 'FR'));.
$rec = i5_fetch_row($file, i5_READFIRST);.
i5_update_record($file, array("CODE" => "C-02", "NOM" =>
"DUPONT", "TYPE" => 3));.
i5_delete_record($file);
i5_get_keys
array i5_get_keys(resource file).
Gets information about key fields in the file.
Returns: An array of integers specifying positions for key fields in the file. Can then use i5_info to discover
descriptions of these fields.
Arguments:
file
Opened i5 file resource.
58
Zend Core
Data Queues
i5_dtaq_prepare
resource i5_dtaq_prepare(string name[, array description][, resource
connection])
Opens a data queue with optional description.
Returns: Resource if OK, false if failed.
Arguments:
name
The queue name
description
Data description in format defined by program_open
connection
Connection - result of i5_connect
i5_dtaq_receive
mixed i5_dtaq_receive(resource queue[, string/int operator, string
key][, int timeout])
Reads data from the data queue.
Returns: False if could not read because of error or timeout, the data read from the queue otherwise.
Arguments:
queue
resource received from dtaq_open
operator
search operator as defined by i5_seek function
key
key value to look for
timeout
timeout value in seconds
59
Zend Core
i5_dtaq_send
bool i5_dtaq_send(resource queue, string key, mixed data)
Puts data to the data queue.
Returns: False if could not be written because of error, true otherwise.
Arguments:
queue
resource received from dtaq_open
key
key value to look for
data
data to put into the queue
The data should conform to the description format, and can be either in flat array or key->value pair array.
i5_dtaq_close
bool i5_dtaq_close(resource queue)
Free program resource handle.
Returns: Bool success value.
Arguments:
queue
resource received from dtaq_open
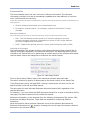
Example 1:
<?php
$description = array("Name"=>"DATA", "Type"=>I5_TYPE_CHAR);
$dtaqHdl_KEY = i5_dtaq_prepare("EACDEMO/DTAQ_KEY", $description);
$ret = i5_dtaq_put($dtaqHdl_KEY, "mykey", "the dataqueue test data");
var_dump($ret);
if(!$ret) var_dump(i5_error());
$ret = i5_dtaq_read($dtaqHdl_KEY, "EQ", "mykey");
var_dump($ret);
?>
60
Zend Core
Example 2:
<?php
$descriptionC = array("DSName"=>"PS", "DSParm"=>array(
array("Name"=>"PS1", "Type"=>I5_
TYPE_CHAR, "Length"=>"10"),
array("Name"=>"PS2", "Type"=>I5_
TYPE_PACKED, "Length"=>"10.4"),
array("Name"=>"PS3", "Type"=>I5_
TYPE_CHAR, "Length"=>"10")
)
);
$dtaqHdl_KEY = i5_dtaq_prepare("EACDEMO/DTAQ_KEY", $descriptionC);
$parameter = array("PS1"=>"test1", "PS2"=>13.1415, "PS3"=>"test2
");
$key = "abcd";
$ret = i5_dtaq_put($dtaqHdl_KEY, $key, $parameter);
var_dump($ret);
$ret = i5_dtaq_read($dtaqHdl_KEY, "EQ", $key);
var_dump($ret);
?>
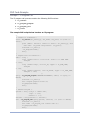
System Values
i5_get_system_value
string i5_get_system_value(string name[, resource connection]).
Retrieves system value
Returns: System value, false if not found.
Arguments:
name
Name of the system value.
connection
Connection - result of i5_connect.
EXAMPLE:
print "Date is: ".i5_get_system_value("QDATE");.
61
Zend Core
User Spaces
Note: Please verify the updated information for “User Spaces” functions on the Zend
website. (Open the PDF file of the “Zend Core for i5 User Guide”).
i5_userspace_create
bool i5_userspace_create(string name, int size[, resource connection])
Creates a new userspace object.
Returns: Boolean success value
Arguments:
name
size
connection
name of the userspace
size of the userspace in bytes
connection - result of i5_connect
i5_userspace_get
resource i5_userspace_get(string name, resource program[, array
description])
Gets the userspace pointer after the program call.
Returns: Resource if OK, false if data not available (e.g. program was not called or did not return data for this
userspace)
Arguments:
name
Name of the user space.
program
Resource representing the program after the call. Same connection that called program
will be used.
description
Data description (in data description format) for the record in the space.
Resource received from i5_userspace_get can be used by i5_fetch_array functions. The functions would
automatically call program again with needed offsets if it is required.
62
Zend Core
i5_userspace_delete
bool i5_userspace_delete(string name[, resource connection])
Delete the userspace
Returns Boolean success value
Arguments:
name
name of the userspace
connection
connection - result of i5_connect
Job Log List
i5_jobLog_list
resource i5_jobLog_list( [array elements, resource connection] )
Opens job log.
Returns: The resource for fetching job log list if OK and false if failed.
Arguments:
elements
JobName, JobUser, JobNumber, MaxMsg, Direction (default is current job)
connection
Result of i5_connect
Use i5_jobLog_list_read function to retrieve the job entries from this handle.
i5_jobLog_list_read
array i5_jobLog_list_read(resource list)
Get an array for a job log entry .
Returns: Array with the message element if OK, false if failed.
Arguments:
List
Resource returned by i5_jobLog_list function
63
Zend Core
i5_jobLog_list_close
bool i5_jobLog_list_close (resource handle)
Close handle received from i5_jobLog_list().
Returns Boolean success value
Arguments:
handle
Job list handle as returned by i5_jobLog_list()
Data Areas
i5_data_area_create
bool i5_data_area_create(string name, int size[, resource connection]).
Creates data area of given size
Returns: Boolean success value.
Arguments:
name
Name of the data area.
size
Size in bytes of the data area.
connection
Connection - result of i5_connect .
i5_data_area_read
string data_area_read(string name[, int offset, int length][, resource
connection]).
Reads data from the area
Returns: String data if read successful, false if read failed (including when offset is wrong).
Arguments:
name
Name of the data area.
offset
Offset for the data.
length
Length of the data to read, -1 means whole area.
connection
Connection - result of i5_connect.
If not offset is specified, all the area is read.
64
Zend Core
i5_data_area_write
bool data_area_write(string name, string value[, int offset, int
length][, resource connection]).
Writes data to the area
Returns: Boolean success value.
Arguments:
name
Name of the data area.
value
Value to write.
Offset
Offset for the data.
length
Length of the data to read.
connection
Connection - result of i5_connect .
If not offset is specified, all the area is written. If value is shorter than length it is padded to the length. If it's longer it
is truncated.
i5_data_area_delete
bool data_area_delete(string name[, resource connection]).
Delete the data area
Returns: Boolean success value.
Arguments:
Name
Name of the data area.
connection
Connection - result of i5_connect.
65
Zend Core
Spooled File
i5_spool_list
resource i5_spool_list([array description][, resource connection])
Create an spool file lists, of certain output queue or for all queues.
Returns: resource if OK, false if failed
Arguments:
The data by which the sppol files will be filtered, array with following keys:
description
•
•
•
username - username that created the job
outq - qualified name for the output queue containing the spool file
userdata - the user-supplied key data for the spool file
All keys are optional and can be provided together
connection
Connection - result of i5_connect.
i5_spool_list_read
array i5_spool_list_read(resource spool_list)
Gets spool file data from the queue.
Returns: next spool file data array in the list, or false if queue is empty.
The data will be formated using SPLF0300 format. See following link for more details:
http://publib.boulder.ibm.com/infocenter/iseries/v5r4/index.jsp?topic=/apis/QUSLSPL.htm
Arguments
Spool_list
resource received from i5_spool_list
:
i5_spool_list_close
void i5_spool_list_close(resource spool_list)
Free spool list resourse
Returns: Boolean success value
Arguments
Queue
resource received from i5_spool_list
66
Zend Core
i5_spool_get_data
string i5_spool_get_data(string jobname, integer job_number, string username, string
spool_name, integer spool_id [,string filename])
Get the data from the spool file.
Returns: String if no file name passed as parameter, false if function failes
Arguments
job_name
The name of the job that created the file
job_number
The number of the job that created the file
username
The username of the job that created the file
spool_name
The spool file name
spool_id
ID of the spool file in the queue (as returned by outq_read)
filename
IFS filename to store the data. If not provided, the data is returned as string
i5_spool_from_file
bool i5_spool_from_file(string filename, string spool_filename, [array
options])
Create spool file from regular stream file.
Returns: Boolean success value
Arguments
filename
Name of the source file
Spool_filename
Name of the spool file to create
outq_name
Name of the output queue to add spool file to
options
Create options
I5_OPTIONS_USER – User name (*CURRENT name is default)
I5_OPTIONS_OUTQ – OutQ (user outq is default)
I5_OPTIONS_FORMTYPE – Form type (STD is default)
I5_OPTIONS_COPIES – Number of copies (1 is default)
I5_OPTIONS_HOLD – Hold spooled file (*NO is default)
I5_OPTIONS_SAVE – Save spooled file after printing (*NO is default)
I5_OPTIONS_OUTPTY – Output priority (on OUTQ) (*JOB is default)
I5_OPTIONS_USRDTA – User data (Blank is default)
67
Zend Core
Object Listing
i5_objects_list
resource i5_objects_list(string library, [string name, string type,
resource connection])
Open an object list.
Returns: Resource for fetch if everything is OK, false on error.
Arguments:
library
Library name (can be also *CURLIB or I5_CURLIB)
name
Name or wildcard of objects to read, default is “all”.
type
Object type to fetch (*ALL or I5_ALL_OBJECTS for all)
connection
Connection - result of i5_connect
i5_objects_list_read
array i5_objects_list_read (resource list)
Get an array for an object list entries.
Returns: Array with the object element if OK; false if failed.
Arguments:
List
Resource returned by i5_objects_list
i5_ objects_list _close
bool i5_ objects_list_close (resource handle)
Close handle received from i5_ objects_list ().
Returns Boolean success value
Arguments:
handle
Object list handle as returned by i5_ objects_list ()
68
Zend Core
Defining Data Structure via PHP
Data structures are defined via PHP as follows:
Main data is the array of values, having the following fields:
•
•
•
•
•
•
Name - name of the field
Type - type of the field, can be:
o I5_TYPE_CHAR
o I5_TYPE_INT
o I5_TYPE_PACKED
o I5_TYPE_ZONED
o I5_TYPE_FLOAT
o I5_TYPE_BYTE
o I5_TYPE_STRUCT
Length
o for CHAR, BYTE - integer describing length. Length can be number or
name of the variable holding the length in the data structure.
o for PACKED, ZONED - string "NUMBER.NUMBER" defining length and
precision
o for STRUCT - array containing data definition of the structure
o for INT, FLOAT - ignored
IO
o I5_IN
o I5_OUT
o default is input, these values can be OR'ed together to get input-output
value
Count (optional) - repetition count if the field is an array
CountRef (optional) - reference to the repetition count if the field is an array
Data structure is defined via PHP as follows:
•
•
DSName - name of the parameter
DSParm (optional) - array of the parameter of the Data structure. Each
parameter is defined by a simple data definition.
69
Zend Core
Example:
<?php
$description = Array(
array("Name"=>"P1", "IO"=>I5_INOUT,
"Type"=>I5_TYPE_CHAR, "Length"=>"10", "count"=>5),
array("Name"=>"P2C", "IO"=>I5_INOUT, "Type"=>I5_TYPE_LONG),
array("Name"=>"P2", "IO"=>I5_INOUT, "Type"=>I5_TYPE_CHAR,
"Length"=>"1", "countRef"=>"P2C"),
array("DSName"=>"PS", "count"=>2, "DSParm"=>array(
array("Name"=>"PS1", "IO"=>I5_IN|I5_OUT, "Type"=>I5_TYPE_CHAR,
"Length"=>"10"),
array("Name"=>"PS2", "IO"=>I5_IN|I5_OUT, "Type"=>I5_TYPE_CHAR,
"Length"=>"10"),
array("Name"=>"PS3", "IO"=>I5_IN|I5_OUT, "Type"=>I5_TYPE_CHAR,
"Length"=>"10"),
)
)
);
$prg = i5_program_prepare("MYLIB/PERSONPGM", $description);
?>
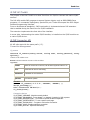
Command Constants
I5_CURLIB
"*CURLIB"
I5_ALL_OBJECTS
"*ALL"
I5_ALL_NAMES
"*"
I5_LIST_MINIMAL
I5_LIST_DETAILED
I5_LIST_FULL
Errors
I5_TYPE_CHAR
I5_ERR_OK
I5_ERR_ERROR
I5_ERR_TOOMUCHOPENFILE
I5_ERR_MEMALLOC
70
Zend Core
Data Retrieval Errors
I5_ERR_INVALIDPTR
I5_ERR_NOLINKDEFINED
I5_ERR_FIELDNOTFOUND
I5_ERR_NOCURRENTRECORD
I5_ERR_INVALIDFIELDNBR
I5_ERR_NULLNOTALLOWED
I5_ERR_INVALIDKEYLEN
I5_ERR_BADSESSION
I5_ERR_INVALIDKEYNBR
I5_ERR_WRONGLOGIN
I5_ERR_NOTENABLETOUPDATE
I5_ERR_NOTENOUGHRIGHTS
I5_ERR_INVALIDOPENMODE
I5_ERR_FIELDNULL
I5_ERR_RECORDNOTFOUND
I5_ERR_INVALIDTYPE
I5_ERR_RECORDLOCKED
I5_ERR_INVALIDINFO
I5_ERR_BEOF
I5_ERR_NOTTYPEPROPERTY
I5_ERR_FILELIMITS
I5_ERR_RECORDCHANGED
I5_ERR_NOTCONNECTED
I5_ERR_ALLREADYINTRAN
I5_ERR_INVALIDSEQ
I5_ERR_NOTINTRAN
I5_ERR_NORANGESET
71
Zend Core
Function Errors
I5_ERR_PHP_HDLDFT
I5_ERR_PHP_NO_ZVALUE
I5_ERR_PHP_HDLCONN
I5_ERR_PHP_COMMAND_ERROR
I5_ERR_PHP_HDLBAD
I5_ERR_PHP_DATAREA_READ
I5_ERR_PHP_OPTIONSTYPE
I5_ERR_PHP_GET_SYSVAL
I5_ERR_PHP_OPTIONSNUMBER
I5_ERR_PHP_ELEMENT_MISSING
I5_ERR_PHP_RESOURCE_BAD
I5_ERR_PHP_BAD_DEF
I5_ERR_PHP_TYPEPARAM
I5_ERR_PHP_BAD_KEYNAME
I5_ERR_PHP_NBPARAM_BAD
I5_ERR_PHP_NO_DS_VALUE
I5_ERR_PHP_TYPEGET
I5_ERR_PARAMNOTFOUND
I5_ERR_PHP_OPERATOR_BAD
I5_ERR_ENDOFOCC
I5_ERR_PHP_BOOKMARK
I5_ERR_PHP_BAD_DS_INPUT
I5_ERR_PHP_NOT_BOOKMARK
I5_ERR_DESC_UNEXP
I5_ERR_PHP_CALL_BINDPARAM
I5_ERR_DQDESC_UNSUPP
I5_ERR_PHP_GETPARAM
I5_ERR_DESC_WRONG_DATAOP
I5_ERR_PHP_BINDPARAM
I5_ERR_INCORRECTVALUE
I5_ERR_PHP_PARAM_DESC
I5_ERR_PHP_BAD_PROG_NAME
I5_ERR_PHP_BLOBSIZE
I5_ERR_PHP_AS400_MESSAGE
I5_ERR_PHP_VARIABLE
I5_ERR_PHP_NOT_DTAQ_KEY
I5_ERR_PHP_INTERNAL
I5_ERR_PHP_DTAQ_BADKEY
I5_ERR_PHP_EXECUTE
I5_ERR_PHP_DESC_EMPTY
I5_ERR_PHP_NO_COMMAND
I5_ERR_PHP_BAD_LEN_PROP
I5_ERR_PHP_EMPTY_ARRAY
I5_ERR_PHP_LIST_PROP
I5_ERR_PHP_NO_KEYNAME
I5_ERR_PHP_SPOOL_FILE_FOPEN
I5_ERR_PHP_NO_PARMNAME
I5_ERR_PHP_API_LENGTH
72
Zend Core
73