1
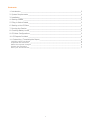
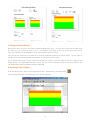
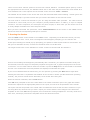
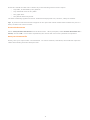
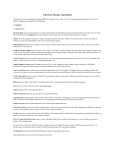
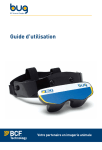
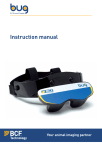
COBRA
CO BReath Analysis Software
User’s Guide
1
Contents
1. Introduction________________________________________________________________2
2. System Requirements ________________________________________________________2
3. Installation_________________________________________________________________2
4. Starting COBRA _____________________________________________________________2
5. Filling in Patient Details________________________________________________________3
6. Starting a Live CO Blow _______________________________________________________3
7. Running the Session _________________________________________________________4
8. Checking Battery Levels_______________________________________________________5
9. CO Meter Configurations ______________________________________________________5
10. CO Reports Provided ________________________________________________________6
11. Customizing / Translating the Report____________________________________________6
Load the report into Word ______________________________________________________
Unprotect the document _______________________________________________________
Make the required changes _____________________________________________________
Protect the document__________________________________________________________
Save your document file _______________________________________________________
1
6
6
6
7
7
1. Introduction
COBRA is a user-friendly interface for Carbon Monoxide Testing. If you need a professional looking report
and real time display of expired CO, you will find that COBRA is a very handy desktop tool. Being based on
a Microsoft Word document, you can easily customise your Carbon Monoxide Report (CO report) by
changing logos, headings and various other information (e.g. translating the document to a different
language).
Once the CO report is loaded into Microsoft Word, it automatically loads macros, which enhance the Word
menus and toolbars. This will enable you to launch a live CO recording from a single mouse button click.
By connecting the MicroCO to your PC via a serial port you can produce a real-time graph, which is
automatically inserted into the Word document, when your live session is completed. You can then print
the report and/or save the normal Word document you’ve created. This could then be stored along with
other reports, faxes and letters relating to the same patient.
Please read the MicroCO Meter operating manual before use.
2. System Requirements
In order to use COBRA, you must have a Windows based PC with the following minimum specification:
o
Microsoft Windows 2000 or XP
o
486 Processor or above
o
8 Mb of RAM
o
CD ROM drive
o
2Mb of free hard disk space
o
Microsoft Word 97 or later
o
A free serial port for connecting your MicroCO
NB: COBRA will work with any version of MicroCO, provided that it is fitted with a serial port.
3. Installation
COBRA is supplied as a web download to your PC. Run cobrasetup.exe and follow the on screen
instructions.
4. Starting COBRA
Before running COBRA for the first time, you may have to lower the virus protection level offered by Word.
To do this, just open Word and select Tools, then Macro, and Security.
In the dialog box, select the
medium security level, then click OK. Now you are ready to use COBRA by double-clicking the CO Report
icon from your desktop.
The selected blank carbon monoxide report appears as shown on the next page.
2
5. Filling in Patient Details
On the CO report, there are a number of fields highlighted in grey. You can move from field to field using
the tab key or by clicking on each in turn. Two fields are provided at the top of the report that can be
used, for example, for the hospital or clinic name and the doctor’s name.
The rest of the document is protected to prevent accidental deletion of critical areas.
If you want to
change any of the protected parts, see Section 11 ‘Customising the report’.
If you will be performing a series of tests on the patient in future, you may want to save the report at this
stage, giving it an appropriate filename. When you next need to perform a test on the same patient, you
can load the file with their details already completed.
6. Starting a Live CO Blow
From the Word menu, select Tools, then Run CO Test. Alternatively, click the button
on the standard toolbar. The following screen will be displayed.
3
There are two colour scheme options to choose from: Bands, Rainbow. The Bands option (above) is set to
the appropriate CO unit levels, the Rainbow effect acts in the same way but mixes the colour bands for a
more aesthetic look. These options can be selected on the menu bar: View – Colours.
The taskbar at the bottom of the screen will show the Microsoft Word button flashing. Please ignore this
and do not attempt to go back to Word until you click the Exit button on the CO Test screen.
You now need to connect the MicroCO to your PC using the RS232 cable provided.
The cable must be
connected to a free serial port on your computer (usually labelled COM 1 or COM 2); a 9-pin ‘D’ shaped
connector. On some computers, the serial port may have 25 pins, in which case you will need to use a 25
to 9 way adapter available from most computer stores.
Once you have connected the spirometer, select Communication from the menu on the COBRA screen,
and ensure that the corresponding COM port is selected.
7. Running the Session
Click the Start button on the toolbar in the COBRA screen. Depending on the MicroCO version you have,
the unit might be reset. If not, then a message box should appear prompting you to reset the unit.
At this point a dialog box should pop up prompting your patient to hold his/her breath for 20 seconds. The
bar gives an indication of time, as does the countdown timer on the MicroCO.
The length of this timer is user definable on certain versions of the MicroCO. See Section 9.
Hold your breath dialog box
As soon as this dialog box disappears (automatically after countdown), the patient must blow slowly into
the MicroCO, until their lungs are completely emptied. During the test, a graph is displayed on the screen
in real time. You can either wait for about 30 seconds or press the Stop button on the toolbar to terminate
the test. The results and a brief interpretation are displayed underneath the graph.
If you are not satisfied with the latest blow, you can repeat it by pressing the Start button again after
allowing the CO meter to equilibrate with ambient air for at least 1 minute (see MicroCO meter operating
manual). The previous results will be discarded, so be careful when doing this.
When the session is finished, click the Exit button.
Click OK when prompted to save the results back to the carbon monoxide report. The graph and results
will then be copied into the appropriate places on the report, as well as an interpretation of the results.
The report can then be printed out or saved under a suitable file name to disk for future reference. If you
are using Word 97, the first time you save a report you will be asked to save changes to the document
template as well. Click Yes when prompted, and overwrite the existing template file. This only needs to be
done once, and simply converts the template macros into Word 97 format.
4
8. Checking Battery Levels
A battery check can be performed by selecting CO Meter-Battery Check, or pressing
on the toolbar.
Two levels will be displayed: the main battery level, and the internal cell battery level. If the first one is
low, just replace the 9V battery. If the second one is low, you may have to return your MicroCO for
servicing. Should one of these cases occur a message box would notify you.
Battery check dialog box
9. CO Meter Configurations
The software classifies the current Carbon Monoxide level into one of four categories. Non-Smoker (Green);
Light Smoker (Yellow/Amber); Heavy Smoker (Red); Suspected Poisoning (Red + Alarm). Selecting CO
Meter-Change Levels will bring up the following screen to allow these levels to be changed.
The countdown timer, used for the Breath Holding Time, can also be changed on this page.
Co Meter Configurations box dialog box
5
10. CO Reports Provided
COBRA v1.01 provides two different Word templates (or Carbon Monoxide Reports). They will appear as CO
Report 1 and 2 on your desktop.
CO Report 1 (page 6) can be used for a single CO test.
CO Report 2 (page 6) is more suitable if you want to follow the evolution of a patient’s CO level. The first
time you will run the CO test by clicking the
button for example, you will enter a baseline value. If the
CO breath test is validated, the next time you will carry out a CO test, the second graph will be updated,
which will make the comparison very easy.
11. Customizing / Translating the Report
One of the main benefits of COBRA is that the report is simply a document file, which can easily be edited
and customised within Word. During normal operation, the main body of the report is protected to prevent
accidental modification or deletion of critical parts. However, with care, it is possible to modify many of
the features of the report to suit your needs.
Because some aspects of the report are essential to its operation, there are certain items that must not be
altered. Be careful to follow the guidelines below, and save your report under a new file name. Do not
attempt to modify the original document template supplied with the software.
Load the report into Word
Either start with a new blank report, or load in a previously saved report file.
Unprotect the document
Select Tools/Unprotect document from the Word menu.
Make the required changes
Before starting to make changes, please ensure that table gridlines are displayed within Word. If not,
select Table/(Show) Gridlines from the main menu.
You can safely make the following changes:
o
Change the font, style or alignment of any part of the report.
o
Modify any of the fixed text on the report (e.g. to translate into another language).
o
Add other fixed text or images (e.g. clinic logo) to the report.
o
Add other data entry fields, which can be modified during normal operation (e.g. patient notes or
diagnosis). These should be added as text form fields; see your Word documentation for further
details.
o
Delete one or both of the data entry fields on the heading line (e.g. to replace with fixed text).
o
Resize the graph area on the report.
o
Insert a page break to produce a two-page report.
Translations:
For translation purposes, you will need to modify the drop-down lists provided (i.e. Male/Female, Cigarette
Consumption, etc…). To do this, simply right-click the list you want to modify. Select the Properties Line
on Word 2000 / Form Field Options Line on older versions of Word. Add the translated items by typing
them and clicking on Add. Then remove the English words by selecting them and clicking on Remove.
Make sure your new items are listed in the same order as their English equivalents were.
You might also want to change the help text provided which is displayed at the bottom of the Word
window. To do this, right-click the selected field, then select the Properties / Form Field Options Line, and
then click on the Add Help text button. All you need to do is to replace the English text by its translation.
6
Great care should be taken not to delete any of the following items from the report:
o
Any table, as indicated by the gridlines.
o
Any individual cell from any table.
o
The graph area.
o
The patient data entry fields.
The table containing signature areas for technician and physician can, however, safely be deleted.
Tip: If you don’t want some items to appear on the report but cannot delete them because they are in a
table, set their text colour to white.
Protect the document
Select Tools/Protect document from the Word menu. When prompted, select Protect document for...
Forms, and click OK. Do not enter a password; the macros will not work if a password is specified.
Save your document file
Finally, save your report under a new filename. For future sessions, start Word, then load this report file
rather than starting from the CO Report icon.
7
CareFusion UK 232 Ltd.,
Quayside
Chatham Maritime
Kent ME4 4QY
U.K.
0086
DRG NO. 073-07
ISSUE 1.2
APRIL 2010
©CAREFUSION 2010
8