1
Tivoli Common Reporting Version 3.1 Beta
User Guide
Tivoli Common Reporting Version 3.1 Beta
User Guide
Note
Before using this information and the product it supports, read the information in Notices.
Second edition
This edition applies to Tivoli Common Reporting and to all subsequent releases and modifications until otherwise
indicated in new editions.
© Copyright IBM Corporation 2007, 2012.
US Government Users Restricted Rights – Use, duplication or disclosure restricted by GSA ADP Schedule Contract
with IBM Corp.
Contents
Chapter 1. Overview . . . . . . . . . 1
Technical overview . . . .
Web resources . . . . . .
Getting started with reports .
Logging on to the reporting
Single sign-on (SSO) . .
. . .
. . .
. . .
interface
. . .
.
.
.
.
.
.
.
.
.
.
.
.
.
.
.
.
.
.
.
.
.
.
.
.
.
1
4
5
6
7
Chapter 2. Installing . . . . . . . . . 9
Hardware and software requirements . . . . .
Installation scenarios and installation modes . .
Tivoli Common Reporting installation paths . .
Preparing to install . . . . . . . . . . .
Verify the environment . . . . . . . .
Preparing installation media . . . . . . .
Validation of additional disk space required for
the installation process . . . . . . . .
Installing Tivoli Common Reporting Beta . . .
Installing Tivoli Common Reporting mobile
application . . . . . . . . . . . . .
Installing the mobile application for a
single-computer Tivoli Common Reporting . .
Installing the mobile application for distributed
Tivoli Common Reporting . . . . . . .
Installing Framework Manager . . . . . . .
Verifying the installation . . . . . . . . .
Post-installation tasks . . . . . . . . . .
Starting the Tivoli Common Reporting server .
Stopping Tivoli Common Reporting server . .
Configuring Tivoli Common Reporting content
store for an enterprise database. . . . . .
Enabling Cognos Application Firewall . . .
Uninstalling . . . . . . . . . . . . .
Uninstalling using the silent mode. . . . .
Uninstalling Tivoli Common Reporting for
mobile devices . . . . . . . . . . .
Uninstalling manually . . . . . . . . .
Verifying the uninstallation . . . . . . .
.
.
.
.
.
. 9
11
12
13
13
14
. 15
. 16
. 17
. 18
.
.
.
.
.
.
19
20
20
20
21
21
.
.
.
.
22
23
23
23
. 24
. 25
. 26
Chapter 3. Configuring . . . . . . . . 29
Configuring LDAP or Microsoft Active Directory .
Configuring Tivoli Common Reporting Server .
Configuring Cognos-based Tivoli Common
Reporting engine with LDAP . . . . . .
Configuring Cognos-based Tivoli Common
Reporting engine with Active Directory . . .
Configuring Framework Manager connection . .
Configuring database connection . . . . . .
Connecting to a DB2 database . . . . . .
Connecting to an MS SQL database . . . .
Connecting to an Oracle database . . . . .
Setting up the dynamic query mode . . . . .
Configuring security permissions . . . . . .
Authentication and authorization in Tivoli
Common Reporting . . . . . . . . .
Constraining access to reports . . . . . .
© Copyright IBM Corp. 2007, 2012
. 29
. 31
. 33
.
.
.
.
.
.
.
.
34
36
37
38
39
40
40
41
. 43
. 43
Configuring Tivoli Integrated Portal portlet
functions . . . . . . . . . . . .
.
.
. 44
Chapter 4. Common Reporting . . . . 45
BIRT reports in Cognos . . . . . . . . .
BIRT reports in Cognos - overview . . . .
Running BIRT reports . . . . . . . . .
Saving a BIRT report . . . . . . . . .
Creating a Report View of a BIRT report. . .
Scheduling reports . . . . . . . . . .
Importing BIRT reports . . . . . . . .
Retrieving the user name from within a BIRT
Report . . . . . . . . . . . . . .
Converting BIRT reports to Cognos reports . .
Known limitations . . . . . . . . .
Setting up JDBC for BIRT reports . . . . .
Configuring JDBC data sources using JNDI.
Configuring JDBC data sources for direct
access . . . . . . . . . . . . .
Working with reports . . . . . . . . . .
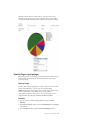
Running the sample overview report . . . .
Sample overview report . . . . . . .
Importing Cognos report packages . . . .
Exporting Cognos report packages. . . . .
Copying report images to the Tivoli Common
Reporting server. . . . . . . . . . .
Emailing reports . . . . . . . . . . .
Scheduling reports . . . . . . . . . .
Performing ad hoc reporting. . . . . . .
Web-based report authoring . . . . . . .
Using Tivoli Common Reporting template .
Using parametrized URLs to perform tasks
outside Tivoli Common Reporting . . . . .
Search path . . . . . . . . . . . .
Checking the search path of a report . . .
.
.
.
.
.
.
.
45
45
46
47
47
48
48
.
.
.
.
.
48
49
51
51
51
.
.
.
.
.
.
52
52
53
54
55
56
.
.
.
.
.
.
56
56
57
57
58
58
. 59
. 61
. 63
Chapter 5. Troubleshooting and
support . . . . . . . . . . . . . . 65
Using log files for troubleshooting . . . . . . .
Enabling detailed log and trace information . .
Troubleshooting the installation. . . . . . . .
Installation fails because the Deployment Engine
fails to initialize . . . . . . . . . . . .
Non-root installation fails. . . . . . . . .
Installation using the install.sh script fails . .
Installation fails on a system with Turkish locale
The Work with reports panel displays an error
Cognos Business Intelligence does not install on
Linux . . . . . . . . . . . . . . .
UDA-SQL-0031 Unable to access database:
QE-DEF-0285 Logon failure . . . . . . . .
User interface does not work after installing in
distributed scenario. . . . . . . . . . .
Deployment Engine does not support
libstdc++.so.6 on Linux . . . . . . . . .
65
65
66
66
67
68
68
69
69
69
69
70
iii
Error cannot create ././@LongLink: Permission
denied when installing Tivoli Common Reporting
Installation on Solaris fails . . . . . . . .
During Cognos Mobile installation, the
installation script fails with an exception . . .
Troubleshooting Common Reporting . . . . . .
Browsing images does not work in Report Studio
Your login session expires while working with
the Common Reporting portlet . . . . . . .
ODBC System DSN connections fail to test from
the Tivoli Common Reporting server . . . . .
When starting Framework Manager you are
prompted to supply your login details twice . .
Drill-through definitions in BIRT reports do not
work . . . . . . . . . . . . . . .
The Work with reports window is blank . . .
An error UDA-SQL-0569 appears while starting
Cognos server . . . . . . . . . . . .
An error occurs when starting Framework
Manager . . . . . . . . . . . . . .
Logon fails in Turkish locale . . . . . . . .
Error QE-DEF-0368: Unable to decrypt user name
and password credentials from the content store .
Unable to locate libcoguador on Linux with
Oracle . . . . . . . . . . . . . . .
Oracle environment variables for non-Oracle
default user . . . . . . . . . . . . .
The Common Reporting portlet does not work
properly in Internet Explorer 8 . . . . . . .
No content displayed in Common Reporting
portlet in Internet Explorer 7 . . . . . . .
Charts in reports do not appear . . . . . .
Cognos Configuration does not open . . . . .
Cannot open the sample overview report . . .
Error after running a sample overview report . .
When trying to find users in user repository, an
error appears . . . . . . . . . . . . .
iv
User Guide
70
72
73
73
73
74
74
Connection with the datasource fails . . . . .
Cannot save IBM Cognos Configuration settings
The reporting engine fails to start with the
SQLCODE=286 and SQLSTATE=42727 . . . . . .
Report Studio does not work with Internet
Explorer 8 . . . . . . . . . . . . . .
Reports do not run with SELinux Security
enabled. . . . . . . . . . . . . . .
BIRT drill-through definitions do not work in
Cognos . . . . . . . . . . . . . . .
Scheduled reports do not run after changing user
password . . . . . . . . . . . . . .
81
81
81
82
83
83
84
74
75
75
75
76
76
77
77
78
78
78
79
80
80
80
81
Chapter 6. Reference
. . . . . . . . 85
Commands . . . . . . .
Command-line authentication
trcmd -access . . . . . .
trcmd -checkstatus . . . .
trcmd -convert . . . . .
trcmd -datasource . . . .
trcmd -delete . . . . . .
trcmd -distribute . . . .
trcmd -import . . . . .
trcmd -list . . . . . . .
trcmd -modify . . . . .
trcmd -run. . . . . . .
trcmd -version . . . . .
stopTCRserver . . . . .
startTCRserver . . . . .
.
.
.
.
.
.
.
.
.
.
.
.
.
.
.
.
.
.
.
.
.
.
.
.
.
.
.
.
.
.
.
.
.
.
.
.
.
.
.
.
.
.
.
.
.
.
.
.
.
.
.
.
.
.
.
.
.
.
.
.
.
.
.
.
.
.
.
.
.
.
.
.
.
.
.
.
.
.
.
.
.
.
.
.
.
.
.
.
.
.
. 85
. 86
. 86
. 87
. 88
. 90
. 92
. 93
. 94
. 95
. 97
. 99
. 100
. 101
. 101
Notices . . . . . . . . . . . . . . 103
Trademarks .
.
.
.
.
.
.
.
.
.
.
.
.
. 104
Index . . . . . . . . . . . . . . . 105
Chapter 1. Overview
Tivoli® Common Reporting provides an
integrated reporting solution for the products
in the Tivoli portfolio. You can link multiple
reports across various Tivoli products to
simplify the report navigation and accelerate
access to key reporting information.
Tivoli Common Reporting provides the following advantages for the users:
Simplified interaction
Simplified interfaces and interactions for report writers with which you can
create, customize, and publish reports faster and easier.
Cross-product report linking
Extend the capability of cross-product report linkage for seamless flow
between related reports of various Tivoli products.
On-demand reporting
Enable report users to create and save ad hoc reports, without the need for
professional report writer's involvement.
Tivoli Common Reporting 3.1 is based on Cognos® Business Intelligence Reporting
version 10.1.1. The following Cognos components are available with Tivoli
Common Reporting:
v Framework Manager - a modeling tool that allows you to create data models.
v Query Studio - a reporting tool for creating simple queries and reports.
v Report Studio - a web-based tool for creating sophisticated reports against
multiple databases.
v Connection - an application where you can view and manage all your reports.
Tivoli Common Reporting 3.1 is based on Tivoli Integrated Portal 2.2.
Technical overview
IBM® Tivoli Common Reporting consists of data stores, reporting engines, their
corresponding web user interfaces displayed in Tivoli Integrated Portal, and a
command-line interface.
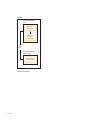
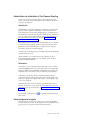
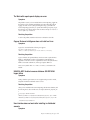
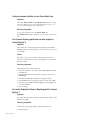
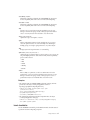
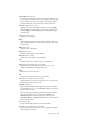
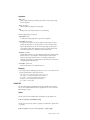
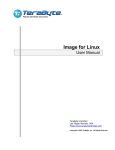
Tivoli Common Reporting provides a flexible structure that can be adapted for
load balancing. The following diagrams illustrate the possible distributions of the
product components:
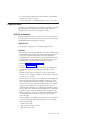
Single computer:
© Copyright IBM Corp. 2007, 2012
1
System A
Tivoli Common Reporting
server
Tivoli Common
Reporting console
Cognos-based
Tivoli Common
Reporting engine
Cognos-based
reporting
portlet
Tivoli Common Reporting
console (closeup)
Tivoli Integrated Portal
- Common Reporting
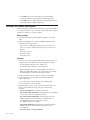
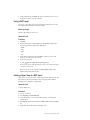
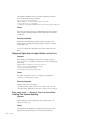
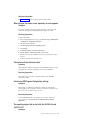
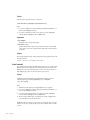
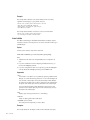
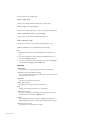
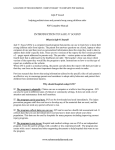
Distributed environment:
2
User Guide
System A
System B
Tivoli Common Reporting
server
Tivoli Common
Reporting console
Tivoli Common Reporting
Cognos Application Tier server
Cognos-based
Tivoli Common
Reporting engine
Cognos gateway
Cognos
Content Store
Cognos-based
reporting
portlet
Tivoli Common Reporting
console (closeup)
Tivoli Integrated Portal
- Common Reporting
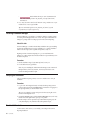
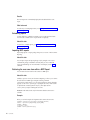
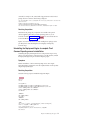
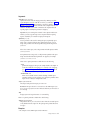
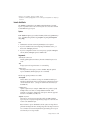
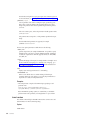
Integration with an existing Cognos instance:
System A
System B
Tivoli Common Reporting
server
Tivoli Common
Reporting console
Cognos
Cognos-based
reporting
portlet
Tivoli Common Reporting
console (closeup)
Tivoli Integrated Portal
- Common Reporting
Chapter 1. Overview
3
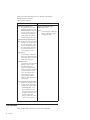
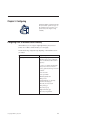
Note: Tivoli Common Reporting version 3.1 is based on Cognos Business
Intelligence Server version 10.1.1.
Table 1. Software components
Core components
Optional components
Tivoli Common Reporting Server
The application server is a J2EE
lightweight implementation of the
embedded WebSphere® Application
Server. It provides a single sign-on
service based on the WebSphere
security module and Lightweight
Third-Party Authentication (LTPA).
Tivoli Common Reporting Cognos
Application Tier Server
Cognos
An existing instance of IBM Cognos
BI Server or IBM Cognos Business
Intelligence Reporting.
Cognos-based Tivoli Common Reporting
engine The dispatcher is the entry point for
IBM Cognos service requests sent
by a web server gateway or other
software. The dispatcher handles
the routing requests and balances
the load of user requests to the
various IBM Cognos services.
Cognos gateway
A portal enabling communication
between Tivoli Common Reporting
Server and the Cognos-based Tivoli
Common Reporting engine.
Cognos Content Store
A database that contains data which
IBM Cognos needs to operate.
These data include report
specifications, published models,
and the packages that contain them;
connection information for data
sources; information about the
external namespace, and the
Cognos namespace itself; and
information about scheduling and
bursting reports.
Tivoli Integrated Portal web user interface
Based on Tivoli Integrated Portal,
the following web user interface is
available for the reporting solution:
v Common Reporting - a web
portal for IBM Cognos and a
component which interacts with
the Cognos Content Store. It is a
frontend to publish, find,
manage, organize, and view the
reports for your organization.
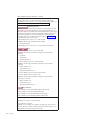
Web resources
Check out other useful web resources for Tivoli Common Reporting.
4
User Guide
Common Reporting
For more information about using the product or for technical assistance, visit the
IBM Cognos Resource Center at Cognos support site. This site provides
information about support, professional services, and education.
Take a look at the Cognos 10.1.1 information center at http://
publib.boulder.ibm.com/infocenter/cbi/v10r1m1/index.jsp.
You can also visit Tivoli Common Reporting developer Works at
http://www.ibm.com/developerworks/spaces/tcr.
For Beta information, forum, and code download, visit: https://
tivolibeta.lotus.com/tcr31.
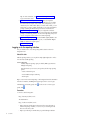
Getting started with reports
Perform the necessary actions to use the reporting options in Tivoli Integrated
Portal as the common integrated reporting platform for products across the Tivoli
portfolio. With the portfolio, you can link multiple reports across various Tivoli
products to simplify the report navigation and accelerate access to key reporting
information.
Before you begin
1. Install Tivoli Common Reporting.
2. Install Framework Manager to be able to create your own data models.
3. Configure the Framework Manager connection to Tivoli Common Reporting.
About this task
After you install Tivoli Common Reporting, prepare your report packages to be
able to generate, publish, and edit your reports.
Procedure
1. If you have the report packages ready, import the report packages:
v Import Cognos report packages.
v Import BIRT report packages.
a. Create or update your data sources:
v For Cognos report packages, configure the database connection.
v For BIRT report packages, ensure that the report package data sources
point to the existing data sources. Use the “trcmd -list” on page 95
command to see your data source settings, and the “trcmd -modify” on
page 97 command to modify them, if necessary.
Tip: BIRT reports are separate from Cognos, predefined reports to which
you can make simple changes. You can also create or modify report
designs with the use of an open source BIRT report designer. The
designer is not shipped with Tivoli Common Reporting but is available
for downloading.
2. To create a report package:
a. Configure the database connection.
b. Create a data model in Framework Manager.
Chapter 1. Overview
5
Tip: For more instructions, see the Framework Manager User Guide in
Cognos information center.
c. Import the metadata from your data sources. When you import the
metadata, you can start modeling in Framework Manager. You can define
the relations between objects such as tables, views, and queries, you can
select the layers to define which objects you want to make visible, you can
define what you want to publish, and finally, you can create and publish a
package containing the model and reports. For more information, see
Framework Manager User Guide. When you configure the connection
between Framework Manager and Tivoli Common Reporting, the published
package is automatically pushed to Tivoli Common Reporting and you can
see it in its respective folder inside Tivoli Common Reporting.
d. Log on to the reporting interface and select Launch → Query Studio to test
your model and create simple ad hoc reports, or select Launch → Report
Studio to create more complex reports.
e. Create a final package.
Logging on to the reporting interface
Use your web browser to access the reporting interface based on the Tivoli
Integrated Portal.
About this task
With the reporting interface, you can perform simple lightweight tasks as well as
more advanced scalable reporting.
Common Reporting
Scalable, enterprise reporting option provided by IBM Cognos Business
Intelligence Reporting.
Using this feature you can access, among others, the following reporting
options:
v Create on-demand reports.
v Use the Web-based report authoring.
v Email reports.
Tip: To access Tivoli Common Reporting or Tivoli Integrated Portal documentation
from the user interface, click Help in the upper right corner. To access Cognos
Administration and Security guide, click
guides, click
in the console. For more Cognos
.
Procedure
1. Browse to the following URL:
http://hostname:port/ibm/console
The default URL is:
http://localhost:16310/ibm/console
v Replace hostname with the TCP/IP host name of the system whereTivoli
Common Reporting is installed, or localhost if you are running the web
browser on the same system.
v Replace port with the port number that you specified during installation.
6
User Guide
2. On the Tivoli Integrated Portal login page, log in with a user ID that has access
to Tivoli Common Reporting. Access is determined by user roles associated
with user IDs. The role that you need to access Tivoli Common Reporting is
tcrPortalOperator. It might be the user ID and password you specified during
the installation process, or a user ID and password provided to you by an
administrator. The Tivoli Integrated Portal navigation window opens.
Tip: To eliminate the security warnings when logging on to the user interface,
install a certificate on the Tivoli Common Reporting server. To install the
certificate, follow the instructions in WebSphere information center.
3. In the navigation pane on the left side of the window, click the plus sign +
beside Reporting to expand the tree.
4. Choose Common Reporting to work with the enterprise reporting options.
Single sign-on (SSO)
Single sign-on (SSO) is the ability of a user to log on once and access multiple
applications without having to log on to each application separately. Multi-server
session-based authentication allows web application users to log on to WebSphere
Application Server, and then access WebSphere Application Server of another
application (in the same DNS domain) that is enabled for single signon without
having to log in again.
The server is configured to use the Lightweight Third-Party Authentication (LTPA)
authentication. When logging in, the user is prompted for a name and password
which can later be reused. When the user is authenticated, the browser receives a
token which is stored for a specific session. When the LTPA token is received and
the user tries to access the server in the same security domain, the authentication is
automatic. This means that the user is not prompted for a name and password, if
the browsing session was not terminated.
IBM Tivoli Common Reporting is available from the enhanced WebSphere
Application Server. This is why a client requesting that application can be required
to perform multiple logons when accessing other secure applications, such as
advanced reporting. Each logon might require different logon identities.
Chapter 1. Overview
7
8
User Guide
Chapter 2. Installing
A complete Tivoli Common Reporting
installation comprises multiple components.
Before installing one or more of these
components, you must understand them and
the installation process.
Hardware and software requirements
Tivoli Common Reporting is available on a range of operating systems and
supports several browser types.
CAUTION:
Before you install Tivoli Common Reporting, run Prerequisite Scanner to ensure
that you meet all the necessary hardware and software requirements.
Prerequisite Scanner is a tool that checks the configuration of your environment
and detects missing prerequisites. Extract the package, and run the TCR.sh script.
Table 2. Hardware and software requirements.
Hardware requirements:
v Main memory - 3 GB
v Processor speed - for best performance, processor speeds must be at least 2 GHz for
Intel® architectures. Choosing faster processors results in improved response time,
greater throughput, and lower processor utilization.
v Disk storage:
– For single-computer installation - up to 4.5 GB, depending on installation options
selected.
– Temporary directory - 2 GB.
Note: The optional, separately installed IBM Cognos 10 Business Intelligence Framework
Manager component requires additional disk space of 700 MB.
© Copyright IBM Corp. 2007, 2012
9
Table 2. Hardware and software requirements. (continued)
Supported operating systems:
Tip: The platform on which you install Tivoli Common Reporting might limit the
supported data sources for reporting. For a list of supported data sources by platform, see:
https://www-304.ibm.com/support/docview.wss?uid=swg27021368#db.
Linux
Red Hat
Red Hat Enterprise Linux
Important: Because Tivoli Common Reporting installs some 32-bit binary files even with
64-bit installers, you must install the 32-bit versions of the prerequisite libraries, even on
64-bit systems. Otherwise, the installation fails. Run Prerequisite Scanner to ensure that you
meet all the necessary hardware and software requirements. Prerequisite Scanner is a tool
that checks the configuration of your environment and detects missing prerequisites.
Download the latest version of Prerequisite Scanner for UNIX from IBM Support Site,
extract the package, and run the TCR.sh script.
v Red Hat Enterprise Linux versions 5.1 to 5.7 32-bit and 64-bit
Restriction: The following system libraries must be installed:
– Compatibility Libraries
v Red Hat Enterprise Linux versions 5.2 to 5.7 - zSeries/System z 31-bit and 64-bit
Linux
SUSE
SUSE
v SUSE Linux Enterprise Server 10.0 - x86 32-bit and 64-bit
Restriction: The following system libraries are required to run Tivoli Common
Reporting:
– compat-32bit
– compat-libstdc++
– openmotif-libs-32bit-2.2.4
v SUSE Linux Enterprise Server 11.0 - x86 32-bit and 64-bit
Restriction: The following system libraries are required to run Tivoli Common
Reporting:
– llibstdc++33-32bit-3.3.3-11.9
– compat-32bit-2009.1.19-2.1
– openmotif22-libs-32bit-2.2.4-138.18.1
v SUSE Linux Enterprise Server 10.0 System z® 31-bit and 64-bit
v SUSE Linux Enterprise Server 11.0 System z 64-bit
Restriction: The following system libraries are required to run Tivoli Common
Reporting on SUSE systems:
– libstdc++33-32bit-3.3.3-11.9
– compat-32bit-2009.1.19-2.1
– openmotif22-libs-32bit-2.2.4-138.18.1
Windows
Microsoft Windows
v Microsoft Windows Server 2003 R2 Enterprise Edition 32-bit and 64-bit
v Microsoft Windows Server 2008 R2 Standard Edition 64-bit
v Microsoft Windows Server 2008 Standard Edition 32-bit and 64-bit
v Microsoft Windows Server 2008 Enterprise Edition 32-bit and 64-bit
Deployment Engine:
400 MB in the /usr directory or your home directory
at least 1 MB in the /var directory
Important: If you are installing on a non-Windows operating system, and you have the
var and usr directories mounted on a different partition, ensure that the partition is not
empty. Otherwise, the Deployment Engine will not install.
10
User Guide
Table 2. Hardware and software requirements. (continued)
Supported web browsers:
v Windows Internet Explorer version 7 or 8 on Microsoft Windows
Tip: For some operations, the browser security settings are too restrictive. See the
Troubleshooting Internet Explorer 7 section of the information center for additional
security configuration of the Internet Explorer browser.
v Mozilla Firefox version 3.6
Installation scenarios and installation modes
You can choose from the following installation modes:
v Install new instance of Tivoli Common Reporting
You can install Tivoli Common Reporting version 3.1 using either a 64-bit installer
or a 32-bit installer.
Important: The 64-bit installer can only be used for a stand-alone Tivoli Common
Reporting installation
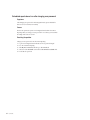
The following installation scenarios are available:
v Single-computer installation
When you install Tivoli Common Reporting, you must use the Federated
Repository to authenticate users. The authentication mechanism can be the built-in
default repository, LDAP, Active Directory, or other repository supported by the
WebSphere Federated Repository. For more information about adding a repository,
see “Configuring LDAP or Microsoft Active Directory” on page 29.
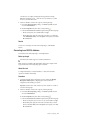
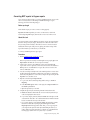
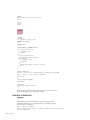
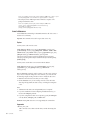
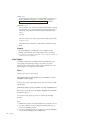
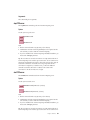
Scenario A: Single-computer installation
System A
Tivoli Common Reporting
server
Tivoli Common
Reporting console
Cognos-based
Tivoli Common
Reporting engine
Cognos-based
reporting
portlet
Tivoli Common Reporting
console (closeup)
Tivoli Integrated Portal
- Common Reporting
Chapter 2. Installing
11
Use this scenario for non-scalable, lightweight reporting with all the components installed
on a single system.
By default a file-based user registry from embedded WebSphere Application Server is used
as a user repository and the communication takes place using Anonymous access. After
installing Tivoli Common Reporting, you can configure a different user repository and
disable anonymous access.
Tivoli Common Reporting installation paths
Learn about the location of the Tivoli Common Reporting installation directories
that depends on the installation scenario. The installation paths in version 3.1
remain the same as the installation paths in version 2.1 and 2.1.1.
Changes in Tivoli Common Reporting version 3.1
The structure of the directories into which Tivoli Common Reporting 3.1 is
installed is the same as in version 2.1.1 and results from Tivoli Integrated Portal on
which Tivoli Common Reporting is based. The installation directory is divided into
two catalogs - one containing Tivoli Integrated Portal only, and the other
containing Tivoli Integrated Portal-based components and products. This solution
makes upgrading to a higher version of Tivoli Integrated Portal easier.
During the installation of the reporting engine, only one directory is created, as the
reporting engine is not a Tivoli Integrated Portal-based component.
Installation directories
The following installation directories are created for default Tivoli Common
Reporting stand-alone installation:
v The directory that contains the uninstaller and the installation log files. In
documentation, it is referred to as TCR_install_dir.
Windows operating systems: C:\IBM\tivoli\tcr
Non-Windows operating systems: /opt/IBM/tivoli/tcr
v Tivoli Integrated Portal installation directory, referred to as TIP_install_dir:
Windows operating systems: C:\IBM\tivoli\tipv2
Non-Windows operating systems: /opt/IBM/tivoli/tipv2
v TIP_components_dir directory containing Tivoli Integrated Portal components.
Tivoli Common Reporting is one of Tivoli Integrated Portal components but
there might be others installed as well:
Windows operating systems: C:\IBM\tivoli\tipv2Components
Non-Windows operating systems: /opt/IBM/tivoli/tipv2Components
v Tivoli Common Reporting is in the TCRComponent directory, in the documentation
referred to as TCR_component_dir:
Windows operating systems: C:\IBM\tivoli\tipv2Components\TCRComponent
Non-Windows operating systems: /opt/IBM/tivoli/tipv2Components/
TCRComponent
Cognos installation directory
The directory that Cognos is installed into is called c10_locations and can be
found in the following locations:
12
User Guide
v For a single-computer installation and for the user interface of the distributed
installation: TCR_component_dir\cognos.
v For the reporting engine of a distributed installation: TCR_install_dir\cognos
Preparing to install
Verify that your environment meets basic requirements for an IBM Tivoli Common
Reporting installation. The installation program automatically verifies most
requirements but you must check some prerequisites manually.
Verify the environment
Tivoli Common Reporting comprises a collection of components and applications
that work together to form a powerful reporting system. You must ensure that you
meet the requirements for all the product components.
About this task
These steps help you prepare for Tivoli Common Reporting installation.
Procedure
v Make sure that you meet the prerequisites before you start to install the product.
Run Prerequisite Scanner available in the Tivoli Common Reporting package to
verify if your configuration meets hardware and software requirements.
Prerequisite Scanner is a tool that checks you environment and detects missing
prerequisites before you start installing Tivoli Common Reporting. To run the
Prerequisite Scanner, extract the package and run the TCR.sh script.
v Verify the Hardware and software requirements.
v Choose your installation scenario.
v To install Tivoli Common Reporting into an existing Cognos BI infrastructure,
you will require the URL to the existing Cognos engine that you want to
integrate.
v On UNIX operating systems, ensure that your localhost network address
resolves to 127.0.0.1 during the installation. To do this, edit the /etc/hosts file
to contain 127.0.0.1 localhost.
v Make sure that you have a range of 14 port numbers free, starting with the port
number you enter during an interactive installation wizard (GUI or console
mode). The default port number for the installation program which starts the
sequence is 16310. However, in the silent installation mode, you can manually
assign ports for each application server component. Therefore, the server
installed in silent mode might not use 14 subsequent port numbers. In that case,
make sure all the ports selected during silent installation are free. Additionally,
by default, port 1527 is used by the embedded Content Store database of the
IBM Cognos application, and port 9300 is used during a distributed installation
on the reporting engine system. Also the 9362 port is used for reporting
component logging.
v If you are installing on a non-Windows operating system, it is recommended to
have the following settings applied to the system where you want to install
Tivoli Common Reporting:
– Ulimit Stack set to 2048
– Max user processes limit set to 256000
– Open files limit set to 32768
Chapter 2. Installing
13
Linux
HPUX
Solaris
For
,
, and
values with the ulimit command:
operating systems, you can set these
ulimit -n
The maximum number of open file descriptors.
ulimit -s
The maximum stack size.
ulimit-u
The maximum number of processes available to a single user.
Tip: On Linux operating system, you can configure the open file limits globally.
To do this, open the /etc/security/limits.conf file and add the following line:
* hard unfile 2048.
AIX
operating systems:
For
– Change or add the nofiles=XXXXX parameter in the /etc/security/limits
file, or use the chuser nofiles= XXXXX user_id command.
– Change the stack option in the /etc/security/limits file.
– Set the AIX® maxuproc device attribute by running the following command:
chdev -1 sys0 -a maxuproc='256000'.
Preparing installation media
IBM Tivoli Common Reporting includes installation media for the Cognos-based
Tivoli Common Reporting engine version 10.1.1 and prerequisite software.
There are two forms of installation media:
v Product disks.
v Installation images which licensed customers can download from the IBM
Passport Advantage® website.
Tivoli Common Reporting installation media for Windows operating systems also
contain Framework Manager installer.
Tivoli Common Reporting 3.1 installation media contain a 32-bit and a 64-bit
installer.
Procedure
Linux
UNIX
and
Log on as the same user used to install the full Tivoli
Common Reporting product.
2. Place all the downloaded installation images in a single directory on the
computer where you are installing. For example
1.
Windows
C:\install_images
UNIX
and
/install_images
3. Extract the contents of all installation images to the directory that you created.
Linux
14
User Guide
UNIX
Attention:
On UNIX platforms, it is best to extract the installation
files using the Gnu tar command. The standard tar command cannot handle
long path names in the download package and a tar expansion error might
occur. To avoid this, install the GNU tar package for your platform. You can
AIX
: Download the GNU tar
download it from the Tar download page.
from the IBM AIX Toolbox website.
Verify that the system path variable contains both native UNIX tar and GNU
tar paths, and that the GNU tar path is defined before the native UNIX tar
path. For example, the native tar utility is installed in /usr/bin and the GNU
tar utility is installed in /opt/freeware/bin/tar. If you set a symbolic link to
overwrite the native UNIX tar command with the GNU tar command, you will
encounter an error.
What to do next
The installation images are now ready.
Validation of additional disk space required for the installation
process
Installing Tivoli Common Reporting involves the validation of additional disk
space required for both temporary directory (TEMP) and the target installation
directory in which Deployment Engine is installed.
Important: This topic describes additional disk space required to successfully
finish the installation process. The main disk space required for the installation of
Tivoli Common Reporting is described in the Hardware and software
requirements section of the Installation Guide.
Procedure
1.
:
a. Disk space required for the TEMP folder is checked - the space required is
800 MB.
UNIX
Note: Additional disk space in the TEMP folder is required only for the
time of the installation.
b. Disk space required for the installation of Deployment Engine is checked:
Note: Deployment Engine drives the installation process and stores
information about the installed components after the process is finished.
Note: Deployment Engine might already exist on your hard disk drive.
v If you are installing as root and /var and /usr are on the same partition,
the disk space required is 255 MB.
v If you are installing as root and /var and /usr are on different partitions,
the disk space required is 5 MB on the /var partition and 250 MB on the
/usr partition.
v If you are installing as non-root, the disk space required is 255 MB on the
home partition (for example, /home).
2.
:
a. Additional disk space required for the installation of Deployment Engine in
the target installation location is 255 MB.
Windows
Chapter 2. Installing
15
b. If the TEMP folder is on the same partition as the target installation
directory, the installation requires additional 800 MB on this partition.
c. If the TEMP folder is on a different partition than the installation directory,
the installation requires 800 MB on that partition.
Installing Tivoli Common Reporting Beta
Install the reporting component to start working with your reports. The installation
is a silent process that uses a response file. Once you edit the file with the required
parameters, no interaction on your part is required.
Before you begin
1. Install open service delivery platform WebSphere Application Server 8.0.0.2
64-bit.
2. Install Tivoli Integrated Portal 3.1 64-bit in a WebSphere Application Server
profile with the following parameters:
v Profile location: /opt/IBM/WebSphere/AppServer/profiles/TIPProfile for
Linux or C:\Program Files\WebSphere\AppServer\profiles\TIPProfile for
Windows.
v Profile name: TIPProfile
v Node name: TIPNode
v Server name: server1
Procedure
1. Download a Tivoli Common Reporting Beta installation image specific to your
operating system from the FTP server. The following images are available:
For Linux platforms: IBM-TCR-3.1-beta-linux64.tar.gz
For Windows platforms: IBM-TCR-3.1-beta-windows64.zip
Framework Manager: IBM-TCR-3.1-frameworkmanager-beta-windows.zip
IBM Cognos Mobile: IBM-CognosMobile-multiplatform64.tar.gz containing
the mobile application for both Linux and Windows platforms.
2. Extract the installation image to a temporary directory on your computer.
3. Run Prerequisite Scanner to ensure that you meet all the hardware and
software requirements:
a. Go to the PrerequisiteScanner directory of the installation image.
b. Run TCR.sh (Linux) or TCR.bat (Windows).
v
v
v
v
4. Edit the TCR_sample_response_osdp.txt response file from the TCRInstaller
directory of the extracted image using a text editor. Set the following
parameters:
v LICENSE_ACCEPTED=true to accept the software license.
v TCR_INSTALLATION_DIRECTORY=. The default directory is /opt/IBM/TCR
for Linux and C:\Program Files\IBM\TCR for Windows.
v WAS_INSTALLATION_DIRECTORY=, which must point to the actual
WebSphere Application Server home directory. The default location is
/opt/IBM/WebSphere/AppServer for Linux and C:\Program
Files\WebSphere\AppServer for Windows.
v OSDP_HOME_DIRECTORY=. The default open service deliver platform
installation directory is /opt/IBM/IOSDP for Linux and C:\Program
Files\IBM\IOSDP.
v WAS_USER_NAME= and WAS_PASSWORD=
16
User Guide
Do not change the port numbers.
5. Issue the following command to start the installation:
v
Windows
v
UNIX
install.bat -f full_path_to_response_file -i silent
install.sh -f full_path_to_response_file -i silent
Results
After the installation, the following directories are created:
v Tivoli Common Reporting installation directory (by default, /opt/IBM/TCR for
Linux and C:\Program Files\IBM\TCR for Windows.
v Tivoli Common Reporting component directory (by default,
/opt/IBM/WebSpher/AppServerComponents/TCRComponent for Linux and
C:\Program Files\WebSphere\AppServerComponents\TCRComponent for Windows.
What to do next
If you do not see the Reporting → Common Reporting menu in the Tivoli
Integrated Portal navigation bar, configure the tcrPortalOperator role so that it is
mapped on to the administrative user:
1. Log on to the Tivoli Integrated Portal.
2. From the navigation on the left, select Console Settings → Roles → Roles.
3.
4.
5.
6.
Select the tcrPortalOperator role and click the Add icon.
Search for the administrative user.
Select the user and click the Add icon.
Save your settings.
To
1.
2.
3.
verify if the role was assigned correctly:
Log out of Tivoli Integrated Portal and then log in again.
Go to Console Settings → Roles → User Roles.
Search for the administrative user. The tcrPortalOperator role shows as one of
the roles assigned to the administrative user.
4. Check if you can see the Reporting → Common Reporting menu.
Installing Tivoli Common Reporting mobile application
Work with your reports on your mobile device such as a smartphone or a tablet
computer. Install Tivoli Common Reporting together with IBMCognos Mobile and
take the reports with you anywhere you go.
About this task
With the mobile application, you can view your reports and interact with them on
your mobile device. Install Cognos Mobile on the same computer where you
installed Tivoli Common Reporting 3.1. Then, access your reports from a web
browser on your mobile device.
The installation is a silent process that does not require your interaction. You can
install Cognos Mobile for Tivoli Common Reporting installed on a single-computer
or in distributed environment.
Chapter 2. Installing
17
Installing the mobile application for a single-computer Tivoli
Common Reporting
Install the mobile application for Tivoli Common Reporting installed on a
single-computer and work with your reports anywhere and any time you want.
You can keep your mobile application up to date by installing available fix packs.
Before you begin
v Install Tivoli Common Reporting 3.1 on a single computer and ensure that it is
working properly.
v Buy a license for Cognos Mobile.
v Download the installation images.
v Extract the installation images on the same computer on which your Tivoli
Common Reporting 3.1 instance is installed.
Procedure
1. Open the TCR_component_dir\mobile\response.ats file and accept the license
by entering I Agree=y in the IBM License Agreement and Non IBM License
Agreement fields.
v Run the following command to install the Cognos Mobile application:
–
Windows
installMobile.bat Cognos_mobile_install_dir tipusername tippassword
–
UNIX
Linux
installMobile.sh Cognos_mobile_install_dir tipusername tippassword
v Run the following command to install a Cognos Mobile fix pack:
–
Windows
installMobileFP.bat Cognos_mobile_fixpack_dir tipusername tippassword
–
UNIX
Linux
installMobileFP.sh Cognos_mobile_fixpack_dir tipusername tippassword
Cognos_mobile_install_dir is the path to the Cognos Mobile installation
image that you downloaded. The path must contain the name of the
operating system on which you are installing, for example: C:\Cognos
10.1.1\CognosMobile-32bit\cogmobmp_10.1.1_ml\win32.
Cognos_mobile_fixpack_dir is the path to the Cognos Mobile fix pack
installation image. The directory must contain the name of the operating
system on which you are installing.
Tip: To see the usage and syntax information for the command, run it with
-help as the only parameter, for example:
installMobile.bat -help
2. Verify if you can access the Cognos Mobile documentation:
v
Windows : Check whether IBM Cognos Mobile is visible in Start → All
Programs → Tivoli Common Reporting 3.1.0 → Documentation → IBM
Cognos Mobile.
Check whether the mob_mtoc.html documentation file
exists in the following location: TCR_component_dir/cognos/webcontent/
documentation.
3. Go to http://hostname:16310/tarf/m/index.html using a web browser on your
mobile device to access Cognos Mobile.
v
18
User Guide
UNIX
Linux
Tip: You can find the log files in: TCR_component_dir\mobile\logs and
TCR_component_dir\cognos\logs\mob.log.
Installing the mobile application for distributed Tivoli Common
Reporting
Use these instructions to install the mobile application for Tivoli Common
Reporting 3.1 installed on separate computers or systems. You can also update the
mobile application that you already installed with available fix packs.
Before you begin
v Install Tivoli Common Reporting 3.1 in distributed installation and ensure that it
is working properly.
v Buy a license for Cognos Mobile.
v Download the installation images.
v Extract the installation images on each of the computers were Tivoli Common
Reporting components are installed.
Procedure
1. On the computer where the Tivoli Common Reporting server is installed, open
the TCR_component_dir\mobile\response.ats. Accept the license by entering I
Agree=y in the IBM License Agreement and Non IBM License Agreement fields.
v Run the following command to install the Cognos Mobile application:
–
Windows
installMobile.bat Cognos_mobile_install_dir
–
UNIX
Linux
installMobile.sh Cognos_mobile_install_dir
v Run the following command to install a Cognos Mobile fix pack:
–
Windows
installMobileFP.bat Cognos_mobile_fixpack_dir
–
UNIX
Linux
installMobileFP.sh Cognos_mobile_fixpack_dir
Cognos_mobile_install_dir is the path to the Cognos Mobile installation
image that you downloaded. The path must contain the name of the
operating system on which you are installing, fox example: C:\Cognos
10.1.1\CognosMobile-32bit\cogmobmp_10.1.1_ml\win32.
Cognos_mobile_fixpack_dir is the path to the Cognos Mobile fix pack
installation image. The directory must contain the name of the operating
system on which you are installing.
2. Repeat the procedure from Step 1 on the computer where the Tivoli Common
Reporting user interface is installed.
Attention: Specify the tipusername and tippassword when running the
command to install Cognos Mobile.
3. Verify if you can access the Cognos Mobile documentation:
v
: Check whether IBM Cognos Mobile is visible in Start → All
Programs → Tivoli Common Reporting 3.1.0 → Documentation → IBM
Cognos Mobile.
Windows
Chapter 2. Installing
19
v
UNIX
Linux
Check whether the mob_mtoc.html documentation file
exists in the following location: TCR_component_dir/cognos/webcontent/
documentation.
4. Go to http://hostname:16310/tart/m/index.html using a web browser on your
mobile device to access Cognos Mobile.
Tip: You can find the log files in: TCR_component_dir\mobile\logs and
TCR_component_dir\cognos\logs\mob.log.
Installing Framework Manager
Framework Manager is a modeling tool available for Windows operating systems
for creating and modifying business views of data. The output of the Framework
Manager is a package used for creating reports in Tivoli Common Reporting.
About this task
Framework Manager is a Windows-based utility included in the Cognos Modeling
product. The installation image for Cognos Modeling is on a separate installation
media in the following location: \CognosModeling\win32\issetup.exe.
Beginning with Tivoli Common Reporting 2.1.1, you can install Framework
Manager on a 64-bit computer but it must be installed in a separate directory from
the 64-bit components.
Procedure
1. Run the installation image: \CognosModeling\win32\issetup.exe
2. Provide all the necessary parameters.
Note: If you are installing the 64-bit Framework Manager, create a Framework
Manager directory in the TCR_component_dir directory and select it as the
Framework Manager installation path.
Verifying the installation
After you install the reporting solution, access it in a web browser to verify its
installation.
Procedure
1. Log on to the Tivoli Integrated Portal, and verify that the reporting section is
present in the navigation bar under Reporting. For instructions on logging in to
the reporting interface, see the information center.
Tip: You are prompted for user ID and password when accessing the console
from the Tivoli Integrated Portal.
2. Expand the Reporting section, click the Common Reporting section, and verify
that the view in the right window opens up a new portlet.
3. Run the sample overview report that is provided with the reporting tool, and
verify that it displays only information about this particular report.
Post-installation tasks
See this section to find out how you can modify your existing Tivoli Common
Reporting installation.
20
User Guide
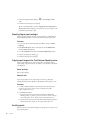
Starting the Tivoli Common Reporting server
Start the Tivoli Common Reporting server to begin working with reports.
About this task
Note: To start the server, log in as the same user that you used to install Tivoli
Common Reporting.
Procedure
1. Open the command-line interface.
2. Go to the following directories:
v
Windows
v
UNIX
TCR_component_dir\bin and run startTCRserver.cmd
Linux
TCR_component_dir/bin and run startTCRserver.sh
It might happen that after starting Tivoli Common Reporting, the reporting
engine is still initializing. For this reason, you can optionally specify the time to
wait until the reporting engine initializes completely by providing the
maximum timeout that you want to wait. To specify the waiting time use the
wait number of minutes flag, for example:
startTCRserver.sh wait 5
to wait 5 minutes until the reporting engine initializes. If the reporting engine
does not initialize in the specified number of minutes, the script stops
monitoring the engine and exits. If the reporting engine initializes before the
timeout, the script exists when it detects that the reporting engine has
initialized.
Tip: The startTCRserver.cmd and startTCRserver.sh scripts start both the
Tivoli Common Reporting server and the Cognos Content Store. You can start
the server using Tivoli Integrated Portal scripts or other scripts, however those
scripts do not start the Content Store. To start the server using a script other
than the startTCRserver script, before you start the server, you must run
additional commands to start the Content Store. For details, see the content of
the startTCRserver.cmd and startTCRserver.sh scripts.
Stopping Tivoli Common Reporting server
Stop the Tivoli Common Reporting server using the command-line interface.
About this task
Note: To stop the server, log in as the same user that you used to install Tivoli
Common Reporting.
Procedure
1. Open the command-line interface.
2. Go to the following directories:
v
Windows
TCR_component_dir\bin and run stopTCRserver.cmd user_name
password
v
UNIX
Linux
TCR_component_dir/bin and run stopTCRserver.sh
user_name password
Chapter 2. Installing
21
Tip: The stopTCRserver.cmd and stopTCRserver.sh scripts stop both the Tivoli
Common Reporting server and the Cognos content store. You can stop the
server using Tivoli Integrated Portal scripts or other scripts, however those
scripts do not stop the content store. If you want to stop the server using a
script other than the stopTCRserver script, before you stop the server, you must
run additional commands. For details, see the content of stopTCRserver.cmd
and stopTCRserver.sh scripts.
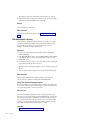
Configuring Tivoli Common Reporting content store for an
enterprise database
Tivoli Common Reporting installs an embedded lightweight database to house
reporting artifacts. However, it is recommended to use an enterprise database, such
as DB2® instead. After Tivoli Common Reporting installation, configure the content
store for an enterprise database.
Procedure
1. Select a database that you want to use for the content store. See IBM Support
website for supported databases.
2. Create the database.
3. Configure the database connectivity for the content store database.
4.
5.
6.
7.
Note: The directories for JDBC drivers are:
v For single-computer Tivoli Common Reporting installation:
TIP_install_dir\profiles\TIPProfile\installedApps\TIPCell\IBM
Cognos.ear\p2pd.war\WEB-INF\lib and TCR_component_dir\cognos\webapps\
p2pd\WEB-INF\lib
v For distributed installation, on the reporting engine systems:
TCR_install_dir\cognos\webapps\p2pd\WEB-INF\lib
Set the flag in the web user interface to allow inclusion of user configuration
in content store exports.
Export the entire content store.
CAUTION:
Select the Include user settings box.
Stop Tivoli Common Reporting server.
Open IBM Cognos Configuration by:
v
Windows
Going to Start → All Programs → Tivoli Common Reporting 3.1 →
IBM Cognos Configuration.
v
Running the following command on a 32-bit installer::
TCR_component_dir/cognos/bin/tcr_cogconfig.sh, and the following
command on a 64-bit installer: TCR_component_dir/cognos/bin64/
tcr_cogconfig.sh
UNIX
Linux
For distributed installation, open IBM Cognos Configuration on each of the
reporting engines.
8. Remove the existing content store in Cognos Configuration by right-clicking
IBM Cognos Content Store in the left navigation area and selecting Delete.
9. Add the new content store into the Tivoli Common Reporting configuration.
10. Save your settings and exit Configuration.
11. Start the Tivoli Common Reporting server.
22
User Guide
Tip: Wait around 15 minutes for the new tables to be created. If you do not
see any new tables created in the database, check for errors in the
TCR_component_dir\cognos\logs\cogserver.log.
12. Import the content store that you added in step 9.
CAUTION:
Ensure that you selected to Include user settings.
13. Edit the default user profile and set Tivoli as the default style.
14. Restart Tivoli Common Reporting. If it is a distributed installation, restart the
reporting engine systems.
a. Stop the server.
b. Start the server.
Related information
IBM Cognos Information Center - Guidelines for creating the content store.
Enabling Cognos Application Firewall
After installing Tivoli Common Reporting, you can optionally enable the Cognos
Application Firewall.
About this task
After installing Tivoli Common Reporting, the Cognos Application Firewall is by
default disabled. You can enable and configure the firewall. To find out more about
the firewall and how to enable it, visit Cognos information center.
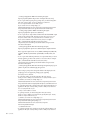
Uninstalling
You can uninstall the report components using the graphical user interface,
command-line interface, or in silent mode. It is also possible to remove
components manually, for example if the uninstallation program was accidentally
deleted or not completely installed.
Remember: Run the uninstallation procedure on each computer on which you
installed the program components.
Uninstalling using the silent mode
Use the silent uninstallation procedure for unattended uninstallation. It can be
performed with the use of a response file. You can choose the silent mode of
uninstallation by using silent argument for the -i parameter.
Procedure
1. From the following location TCR_install_dir/_uninst/TIPInstall22, open, and
edit the TCR_sample_response_uninstall.txt file with the user ID and
password:
Tip: If WebSphere Application Server was stopped, you will not be asked for
your password. If you forgot your password, you can stop Tivoli Common
Reporting processes first, and then run the uninstallation. Your password will
not be required.
############################################################### {COPYRIGHT-TOP} ###
# OCO Source Materials
# 5724-T69
#
# © Copyright IBM Corp. 2011
Chapter 2. Installing
23
#
# The source code for this program is not published or otherwise
# divested of its trade secrets, irrespective of what has been
# deposited with the U.S. Copyright Office.
############################################################### {COPYRIGHT-END} ###
###############################################################
##
## InstallAnywhere variables to configure the installation of Tivoli
## Common Reporting for Asset and Performance Management
##
## Usage: uninstall[.sh|.exe] -f<full path to this file> -i<installation mode>
##
available modes: silent
##
console
##
gui
##
## On Windows, uninstall.exe will return immediately. To avoid
## this, you should wrap the uninstall.exe command in a batch
## file.
##
## # sign is used here to comment out the lines that follow it
##
###############################################################
#---#---- Enter a WebSphere Application Server password.
#---- If the password is not provided, the uninstaller will fail.
IAGLOBAL_WASUserID=tipadmin
IAGLOBAL_WASPassword=
Save the file.
2. Evoke the silent uninstallation from a command-line interface by:
v
Windows
Navigating to TCR_install_dir\_uninst\TIPInstall22, and
running the uninstall.exe -i silent -f TCR_install_dir\_uninst\
TIPInstall22\TCR_sample_response_uninstall.txt command.
v
UNIX
and
Navigating to /TCR_install_dir/_uninst/
TIPInstall22, and running the uninstall -i silent -f
TCR_install_dir/_uninst/TIPInstall22/TCR_sample_response_uninstall.txt
command.
Linux
Important: Provide the full path to the response file in your command.
Results
You have now uninstalled Tivoli Common Reporting without any user interaction.
You can verify the uninstallation procedure by going through the verification steps.
Uninstalling Tivoli Common Reporting for mobile devices
Uninstall the Cognos Mobile application from your environment. The
uninstallation is a silent process that does not require your interaction.
Procedure
1. Go to the TCR_component_dir\mobile directory.
2. Run the following script:
v
Windows
uninstallMobile.bat tipusername tippassword
UNIX
Linux
uninstallMobile.sh tipusername tippassword
v
3. Restart your computer to complete the uninstallation.
Tip: You can find the log files in: TCR_component_dir\mobile\logs.
24
User Guide
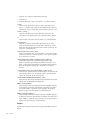
Uninstalling manually
In most cases, it is best to follow one of the other choices for uninstalling Tivoli
Common Reporting. However, if the uninstallation program is not present or if an
cancelled installation did not create a complete and functional uninstallation
program, you can manually uninstall the product. Follow this procedure only on
the computer where Tivoli Common Reporting Server was installed.
About this task
Perform the manual uninstallation only when none of the standard uninstallation
methods are possible.
Procedure
1. Stop the Tivoli Common Reporting Server by navigating to the following
directory in the command-line interface:
v
cd TCR_component_dir\bin, and running the stopTCRserver.cmd
user_name password command.
v
Linux
UNIX
and
TCR_component_dir/bin, and running the
stopTCRserver.sh user_name password.
Windows
Note:
v If the server does not stop, terminate Tivoli Common Reporting processes.
v To stop the server, you must log in with the same user that you used to
install Tivoli Common Reporting.
2. Remove the Deployment Engine by navigating to the following directory in the
command-line interface:
CAUTION:
Removing this component if you have other Tivoli Common Reporting or
Tivoli Integrated Portal instances installed on your computer will prevent
you from performing upgrades or reusing the programs. If you have other
programs that use the Deployment Engine, they might not work properly
after removing it. In this case, see: Uninstalling the Deployment Engine.
Windows
a. Open the command-line interface, and source the DE environment by
evoking C:\%Program Files%\IBM\Common\acsi\setenv.cmd.
b. Uninstall DE - C:\%Program Files%\IBM\Common\acsi\bin\si_inst.bat -r
-f.
Note: If a DE operation ends abnormally, the command might fail. In such
case, go to DE_install_dir\asci\logs and delete all files whose file names
begin with .lock then repeat the uninstallation of DE: /usr/ibm/common/
acsi/bin/si_inst.sh -r -f.
c. Remove database backup - rmdir /s C:\%Program Files%\IBM\Common\acsi.
Linux
and
UNIX
Note: For a non-root user Deployment Engine is at <USER_HOME_DIR>/.acsi*.
Follow the same steps modifying your file paths.
a. Source the DE environment by evoking the following command:
. /var/ibm/common/acsi/setenv.sh.
Chapter 2. Installing
25
Important: Make sure that you include the . (dot and space) characters
when running the command.
b. Uninstall DE - /usr/ibm/common/acsi/bin/si_inst.sh -r -f.
Note: If a DE operation ends abnormally, the -r -f command might fail. In such
case, go to DE_install_dir\asci\logs and delete all files whose file names
begin with .lock, then repeat the uninstallation of DE: /usr/ibm/common/acsi/
bin/si_inst.sh -r -f.
3.
Remove the registered services by following the steps:
a. Open Control Panel → Administrative Tools → Services, and find the
following services:
v Tivoli Integrated Portal - TIPProfile_Port_XXX service
v Any IBM Cognos Content Database service.
b. Right-click on the service, and choose Properties.
c. Copy the property name enclosed in parentheses, for example
"IBMWAS70Service - TIPProfile_Port_16310", and "IBM Cognos Content
Database", and "IBM Cognos 8".
Windows
d. Open the command-line interface, and run the following command: sc
delete "IBMWAS70Service - TIPProfile_Port_16310", and sc delete "IBM
Cognos Content Database", and sc delete "IBM Cognos 8".
4. In the file system, depending on the components that you want to remove,
delete the following files:
v To remove Tivoli Integrated Portal and Tivoli Common Reporting, delete:
– TCR_install_dir
– TIP_install_dir
– TIP_components_dir
v To remove Tivoli Common Reporting and leave Tivoli Integrated Portal,
delete:
– TCR_install_dir
– TCR_component_dir
5.
6.
Windows
Remove the shortcuts from menu Start. Right-click the Tivoli
Common Reporting 3.1 in the menu, and select to delete it.
Windows
(Recommended) Restart your computer.
Results
You have now finished performing manual cleanup of your environment.
Verifying the uninstallation
Verify the uninstallation after you uninstalled using the graphical user interface,
console, or silent mode.
Procedure
1. Check that the Tivoli Common Reporting installation directories contain log
files only, and the size of the remaining content does not exceed 30 MB.
2.
26
User Guide
Windows
Check if there are any services registered for the program by opening
Control Panel → Administrative Tools → Services, and searching for Tivoli
Integrated Portal - TIPProfile_Port_XXX service.
3. If your Tivoli Common Reporting instance was the only component in
Deployment Engine registry, verify if the Deployment Engine was removed
completely.
4. If the Deployment Engine registry contained other components than Tivoli
Common Reporting, verify that there are no entries related to Tivoli Common
Reporting in the Deployment Engine registry, by listing the existing
components:
5.
v
Windows
v
Linux
Windows
C:\%Program Files%\IBM\Common\acsi\bin\listIU.cmd
and
UNIX
/usr/ibm/common/acsi/bin/listIU.sh
Verify that there is no Tivoli Common Reporting entry in menu Start.
What to do next
If any of the items were not removed correctly by the uninstallation procedure,
remove them manually.
Chapter 2. Installing
27
28
User Guide
Chapter 3. Configuring
Configure the IBM Tivoli Common Reporting
that you installed to optimize its usage. Use
the configuring section to learn how to set
up data sources, and configure for high
availability.
Configuring LDAP or Microsoft Active Directory
After installation, you can configure a Lightweight Directory Access Protocol
(LDAP) server or Microsoft Active Directory as a user registry.
Perform the following configuration steps depending on the installation scenario
you selected:
Installation scenario
Configuration path
Single-computer installation
v See the "Configuring Tivoli Common
Reporting server" topic to configure the
server to communicate with an external
repository.
If you choose to configure the Lightweight
Directory Access Protocol (LDAP) user
repository, gather the following LDAP server
information:
v Server host name
v Server port number
v Bind distinguished name
v Bind password
v Distinguished name of a base entry
v PersonAccount entity type
v Base entity for PersonAccount
v Group entity type
v Base entry for group
v OrgContainer entity type
v Base entry for OrgContainer
© Copyright IBM Corp. 2007, 2012
29
Installation scenario
Configuration path
Distributed installation
v On the computer with Tivoli Common
Reporting user interface installed,
configure the reporting server. See
"Configuring Tivoli Common Reporting
server".
v On the computer with Cognos-based
Tivoli Common Reporting engine
installed, configure the reporting engine.
See "Configuring the Tivoli Common
Reporting engine.
If you choose to configure the Lightweight
Directory Access Protocol (LDAP) user
repository, gather the following LDAP server
information:
v Server host name
v Server port number
v Bind distinguished name
v Bind password
v Distinguished name of a base entry
v PersonAccount entity type
v Base entity for PersonAccount
v Group entity type
v Base entry for group
v OrgContainer entity type
v Base entry for OrgContainer
30
User Guide
Installation scenario
Configuration path
Integrating existing Cognos BI infrastructure v On the computer with Tivoli Common
Reporting user interface installed,
configure the reporting server. See
"Configuring Tivoli Common Reporting
server"..
v On the computer with IBM Cognos
installed, configure the reporting engine.
See "Configuring the Tivoli Common
Reporting engine.
Important: The configuration of the existing
IBM Cognos might already be set to a
specified user repository. By performing
these instructions you can modify it.
If you choose to configure the Lightweight
Directory Access Protocol (LDAP) user
repository, gather the following LDAP server
information:
v Server host name
v Server port number
v Bind distinguished name
v Bind password
v Distinguished name of a base entry
v PersonAccount entity type
v Base entity for PersonAccount
v Group entity type
v Base entry for group
v OrgContainer entity type
v Base entry for OrgContainer
You must use the Federated Repository to authenticate users. You can use the
built-in default repository, LDAP, Active Directory, or other repository supported
by the WebSphere Federated Repository as the authentication mechanism.
Configuring Tivoli Common Reporting Server
Configure the Tivoli Common Reporting Server to communicate with an external
repository such as Lightweight Directory Access Protocol (LDAP) or Microsoft
Active Directory.
Before you begin
If you want all LDAP communications to be encrypted, you can specify SSL
communications. If so, be sure to import the LDAP signer's certificate into the
truststore of the Tivoli Common Reporting Server before starting this task:
1. Issue the following command:
wsadmin -profileName server_profile_name
-username tipadmin -password password
2. Run the following command to retrieve the certificate:
wsadmin>
$AdminTask retrieveSignerFromPort -host ldap_server_host_name
-port ldap_secure_port -keyStoreName trust_key_store_name
-certificateAlias alias
Chapter 3. Configuring
31
where
v ldap_server_host_name is the host name of your LDAP server
v ldap_secure_port is the secure port of your LDAP server
v trust_key_store_name is the name of the trust keystore in your WebSphere
trust keystore.
3. Issue the following command to save the changes that you made to the
configuration:
wsadmin> $AdminConfig save
4. Run wsadmin>exit to quit.
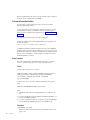
Procedure
1. Log in as an administrative user.
2. To add an LDAP repository, open the Tivoli Integrated Portal administrative
console by direct link: https://hostname:port_number/ibm/console/secure/
securelogon.do (the default port number is 16316) or from Tivoli Common
Reporting user interface: https://hostname:port_number/ibm/console (the
default port number is 16311), from the navigation tree on the left, select
Settings → WebSphere Administrative Console, and Launch WebSphere
Administrative Console. When the console opens in a new window, perform
the following steps:
a. Go to Security > Global security.
b. Select Federated repositories from the available realm definitions, then click
Configure.
c. Click Manage repositories under Related Items. Then click Add to add an
LDAP Repository.
d. Enter LDAP security setting information. The primary host name and the
distinguished name must contain no spaces.
e. Select Require SSL communications for all LDAP communications to be
encrypted.
f. Select Centrally managed.
g. Click OK
3. Return to Global security > Federated repositories and add an entry to the
base realm:
a. Click Add Base entry to Realm.
b. Enter the distinguished name (DN) of a base entry that uniquely identifies
this set of entries in the realm. This base entry must uniquely identify the
external repository in the realm.
c. Click OK.
If multiple repositories are included in the realm, use the DN field to define an
additional distinguished name that uniquely identifies this set of entries within
the realm. For example, repositories LDAP1 and LDAP2 might both use
o=ibm,c=us as the base entry in the repository. So o=ibm,c=us is used for
LDAP1 and o=ibm2,c=us for LDAP2. The specified DN in this field maps to the
LDAP DN of the base entry within the repository (such as o=ibm,c=us b). The
base entry indicates the starting point for searches in this LDAP directory
server (such as o=ibm,c=us).
4. Click Global security, and then click Set as current to mark the federated
repository as the current realm. The Mark Federated repository must be set as
current.
5. Apply and save the changes.
32
User Guide
6. Restart the server to enable the configuration.
a. Stop the server.
b. Start the server.
7. Verify that the federated repository is correctly configured:
a. Go to the Tivoli Common Reporting user interface (https://
hostname:port_number/ibm/console, expand the navigation tree, and click Users
and Groups > Manage Users.
b. Select User ID from the Search by list.
c. Click Search to search Users in federated repository. This list includes users
from both LDAP and the local file registry.
On the Tivoli Common Reporting Server, LDAP users are queried only by the
userid attribute. When users are imported into LDAP using an LDIF file, an
auxiliary class of type eperson and uid attribute is added to the LDAP user ID.
8. If you want to create a user in LDAP, click Users and Groups > Manage Users,
then click Create and continue as for the previous step: Enter user ID, given
name, family name, e-mail, and password.
What to do next
If you intend to enable single sign-on (SSO) so that users can log in one time and
then traverse to other applications without having to reauthenticate, see the Tivoli
Integrated Portal information about how to configure SSO.
Configuring Cognos-based Tivoli Common Reporting engine
with LDAP
Configure the engine to use the same user repository as the Tivoli Common
Reporting Server with the user interface. This procedure is recommended for large
user repositories.
About this task
If you installed your Tivoli Common Reporting on a single computer, the Tivoli
Common Reporting VMMProvider is used for LDAP by default, and no additional
LDAP configuration is required. In the case of distributed installation, you must
configure LDAP on both computers.
Procedure
1. Open the IBM Cognos Configuration by running:
v
UNIX
and
TCR_component_dir/cognos/bin/tcr_cogconfig.sh
for 32-bit installations, and TCR_component_dir/cognos/bin64/
tcr_cogconfig.sh for 64-bit installations.
In the Explorer navigation on the left, go to Security, and right-click the
Authentication section.
Select New resource → Namespace....
Type in a name, select the registry type from the expandable list, and click OK.
New user registry is added to the list.
Select the entry that you created, and edit the fields required for configuration.
You must provide different values depending on the type of user registry
v
2.
3.
4.
5.
Windows
Start → All Programs → Tivoli Common Reporting 3.1 → IBM
Cognos Configuration
Linux
Chapter 3. Configuring
33
selected. For details on how to configure the user registry, see Configuring IBM
Cognos Components to Use an Authentication Provider of IBMCognos
information center.
a. Set Use external identity? to True to enable single sign-on from the console
to the reporting engine systems.
b. Set External identity mapping to (uid=${environment("REMOTE_USER")}). If
you use your email address instead of a user ID to log on to the console, set
the value to: (mail=${environment("REMOTE_USER")}).
c. Select Environment in the navigation tree and ensure that host names are
set to be fully qualified.
6. Right-click the entry that you created, and select Test to verify it before saving.
7. Select Cognos entry, and edit the Allow anonymous access? field, changing it
to False.
8. Save the new configuration.
Results
Important: When you configure LDAP, the reporting portlet can no longer be used
by users that are not contained in the configured LDAP and do not have the
tcrPortalOperator role assigned.
Configuring Cognos-based Tivoli Common Reporting engine
with Active Directory
Configure the reporting engine to use the same user repository as the user
interface. This procedure is recommended for large user repositories.
About this task
If you installed Tivoli Common Reporting on a single-computer, no additional
configuration is required. However, if you chose distributed installation, you must
configure Active Directory on both computers.
Important: When you configure the user repository, the reporting portlet can no
longer be used by users not contained in the configured user repository.
Procedure
1. Open the IBM Cognos Configuration by running:
v
Windows
Start → All Programs → Tivoli Common Reporting 3.1 → IBM
Cognos Configuration
Linux
UNIX
and
TCR_component_dir/cognos/bin/tcr_cogconfig.sh
v
2. In the Explorer navigation on the left, go to Security, and right-click the
Authentication section.
3. Select New resource → Namespace....
v
Windows
If you are using a Windows operating system:
a. Enter a name, select Active Directory as the Type, and click OK. The new
user registry is displayed in the Explorer window, under the
Authentication component.
b. Select the entry that you created, go to the Properties window and in the
NamespaceID field, specify a unique identifier for the namespace.
Tip: Do not use colons (:) in the Namespace ID property.
34
User Guide
c. Specify the Host and port. The host and port values must point to Active
Directory Domain Controller host.
d. Specify the Binding credentials.
v
If you are using a non-Windows operating system:
a. Enter a name, select LDAP as the Type, and click OK. The new user
registry is displayed in the Explorer window, under the Authentication
component.
b. Select the entry that you created, go to the Properties window and in the
NamespaceID field, specify a unique identifier for the namespace.
Linux
UNIX
Tip: Do not use colons (:) in the Namespace ID property.
c. Specify the values for all other required properties to ensure that IBM
Cognos components can locate and use your existing authentication
provider.
The following settings are examples:
– For User lookup, specify (sAMAccountName=${userID}).
– If you use a single sign-on, set the Use external identity value to True
and specify (sAMAccountName=${environment("REMOTE_USER")}) for
External identity mapping. To remove the domain name from the
REMOTE_USER variable, specify
(sAMAccountName=${replace(${environment("REMOTE_USER")},
"domain\\","")}).
– Enter user@domain for Bind user DN and password.
– Specify objectGUID for Unique identifier.
d. If you want the LDAP authentication provider to bind to the directory
server using a specific Bind user DN and password when performing
searches, then specify these values. If no values are specified, the LDAP
authentication provider binds as anonymous.
e. If you do not use external identity mapping, use bind credentials for
searching the LDAP directory server:
– Ensure that Use external identity is set to False.
– Set Use bind credentials for search to True.
– Specify the user ID and password for Bind user DN and password.
f. To configure the LDAP advanced mapping properties for use with the
Active Directory Server objects, use the values specified in the following
table:
Table 3. Values for advanced mapping properties
Mappings
LDAP Property
LDAP Value
Folder
Object class
organizationalUnit,
organization, container
Description
description
Name
ou, o, cn
Object class
group
Description
description
Member
member
Name
cn
Group
Chapter 3. Configuring
35
Table 3. Values for advanced mapping properties (continued)
Mappings
LDAP Property
LDAP Value
Account
Object class
user
Business phone
telephonenumber
Content locale
Leave this field blank
Description
description
Email
email address
Fax/Phone
facsimiletelephonenumber
Given name
givenname
Home phone
hometelephonenumber
Mobile phone
mobiletelephonenumber
Name
displayName
Page phone
pagernumber
Password
unicodePassword
Postal address
postaladdress
Product locale
Leave this field blank
Surname
surname
User name
sAMAccountName
These mapping properties represent changes based on a default Active
Directory Server installation. If you modified the schema, you might need
to make additional mapping changes.
Note: LDAP attributes that are mapped to the Name property in Folder
mappings, Group mappings, and Account mappings must be accessible
to all authenticated users. In addition, the Name property must not be
blank.
g. From the File menu, click Save.
4. Go to the Explorer window, right-click the new authentication resource under
Authentication, and click Test to test the connection to a new namespace.
5. Select the Cognos entry and edit the Allow anonymous access? field changing
it to False.
Configuring Framework Manager connection
Framework Manager is a separately installable application used to model reports.
If you installed it in a location different from the default one, you need to
configure it to run with the Cognos-based Tivoli Common Reporting engine and
user interface. This step is especially important if you installed Framework
Manager on a separate computer.
Before you begin
Make sure that you extracted and installed the Framework Manager component
available from the installation media on the computer where you want to model
reports. Before you install Framework Manager, ensure that the JAVA_HOME
environment variable is not set. Framework Manager is delivered together with its
own version of Java, so if you have JAVA_HOME set to Java version already
installed on your computer, Framework Manager configuration might fail to start.
36
User Guide
If you installed Framework Manager on a system other than the system where
Tivoli Common Reporting engine is installed, the data source must exist on this
Framework Manager system and on the Tivoli Common Reporting engine system.
Procedure
1. Open the Framework Manager configuration program by running
Framework_Manager_install_dir\bin\cogconfigw.exe
Tip: The default Framework Manager installation directory is c:\%Program
Files%\cognos\bin\cogconfigw.exe
2. In the Explorer navigation on the left, go to Environment section. Group
Properties panel opens on the right.
3. Go to Gateway Settings, and locate Gateway URI. Click the value field, and
update it with the URI to your Tivoli Common Reporting server.
Tip: The default value for a single-computer installation is
https://localhost:16311/tarf/servlet/component.
The URIs in Step 3 and Step 4 must match the values in the Tivoli Common
Reporting, IBM Cognos Configuration manager. You can check those values by
running tcr_cogconfig.bat (Windows) or tcr_cogconfig.sh (UNIX) on the
Tivoli Common Reporting server in the TCR_component_dir\cognos\bin.
4. In the Other URI Settings, edit the value for Dispatcher URI for external
applications to match the location of your Tivoli Common Reporting engine.
Tip: The default value for Dispatcher URI for external applications is
http://TCRServerHostname:16310/tarf/servlet/dispatch for a single-computer
installation, and http://TCRServerHostname:9300/p2pd/servlet/dispatch for
the distributed installation.
5. Save the new configuration.
What to do next
You can now start modeling your reports with the use of Framework Manager. You
will need to log in twice because Framework Manager does not support single
sign-on.
Configuring database connection
Configure the connection to a database to access your data. Tivoli Common
Reporting supports several database types. The instructions presented in these
sections refer to the most commonly used databases.
Chapter 3. Configuring
37
Related information
IBM Cognos Administration and Security Guide 10.1.1 - Data Sources and
Connections
Cognos Business Intelligence 10.1.1 Software Environments - Relational
Databases
Cognos Business Intelligence 10.1.1 Software Environments - Dynamic Query
Mode
Cognos Business Intelligence 10.1.1 Software Environments - ODBC
Connecting to a DB2 database
Connect Tivoli Common Reporting to a DB2 database.
Before you begin
Perform this task with the support of a database administrator.
Make sure that you installed the DB2 database client on the computer where
Cognos-based Tivoli Common Reporting engine is installed. You can use either the
32-bit or 64-bit client, however, if you decide to use the 64-bit DB2 client, you must
use the 32-bit versions of the library files from the directory sqlib/lib32. The
version of the client must match the version of your database.
About this task
To configure the database, connect it to a client, and activate the optional
cross-database functionality.
Procedure
1.
Linux
Windows
Connect the DB2 database client to the database server by
running the Configuration Assistant and configuring the local net service
name configuration. For other operating systems, see Configuring
client-to-server connections in the DB2 information center.
Important: Note the name of the connection you have created as it is used in
one of the following steps.
Additionally, for non-Windows platforms, the Tivoli Common Reporting must
be able to find the local DB2 libraries. To ensure this, check if the DB2 directory
containing libraries exists before starting the Tivoli Common Reporting server.
Then, configure the system library path to point to the database client library
directory by modifying the following environment variable:
v
AIX
LIBPATH
v
HPUX
SHLIB_PATH
v
Linux
Solaris
LD_LIBRARY_PATH
For example, you can modify the startTCRserver.sh script by inserting the
following line before starting WebSphere Application Server:
export LD_LIBRARY_PATH=/opt/ibm/db2/V9.5/lib32:$LD_LIBRARY_PATH
For non-Windows systems, you might also need to source the DB2 profile in
the Tivoli Common Reporting environment before starting the server, for
example . /home/db2 user/sqllib/db2profile. You can modify the
38
User Guide
startTCRserver.sh script by inserting the following line before starting
WebSphere Application Server: . /home/db2 user/sqllib/db2profile, where
db2 user is your local DB2 user ID.
2. Create new database connection for Cognos by following the steps:
a. From the Common Reporting portlet, go to Launch expandable list, and
choose the Administration.
.
b. On the Configuration tab, add a data source by clicking
c. Follow the New Data Source wizard as required noting the following steps:
v On the second panel, choose an DB2 database as Type.
v On the third panel, specify the name of the connection you noted before
as the DB2 database name, and in the Signon section specify a new User
ID and Password.
Results
You have now connected your Tivoli Common Reporting to a DB2 database
instance.
Connecting to an MS SQL database
Connect the Tivoli Common Reporting to an MS SQL database.
Before you begin
Perform this task with the support of a database administrator.
Make sure that you installed an MS SQL database client on the computer where
Cognos-based Tivoli Common Reporting engine is installed.
About this task
To configure the database, connect the database to a client, and activate the
optional cross-database functionality.
Procedure
1. Connect the MS SQL client to the database server by running the MS SQL
Management Studio Express, configuring the local net service name
configuration, and restarting your system.
Important: Note the name of the connection you have created as it is used in
one of the following steps.
2. Create new database connection for Cognos by following the steps:
a. From the Common Reporting portlet, go to Launch expandable list, and
choose the Administration.
.
b. On the Configuration tab, add a data source by clicking
c. Follow the New Data Source wizard as required noting the following steps:
v On the second panel, choose an Microsoft SQL Server database as Type.
v On the third panel, specify the name of the connection that you noted
before as the Server name, and in the Signon section specify a new User
ID and Password.
Chapter 3. Configuring
39
Results
You have now connected your Tivoli Common Reporting to an MS SQL database.
Connecting to an Oracle database
Connect the Tivoli Common Reporting to an Oracle database.
Before you begin
Perform this task with the support of a database administrator.
Make sure that you installed the 32-bit Oracle database client on the computer
where Cognos-based Tivoli Common Reporting engine is installed.
Important: You might need to export the TNS_ADMIN environment variable
before starting the Tivoli Common Reporting server. The TNS_ADMIN variable in
the startTCRserver.sh script must be set to point to the location of Oracle
tnsnames.ora file. See the Oracle documentation for details.
About this task
To configure the database, connect it to a client, configure calculations for Oracle
functions, and activate theoptional cross-database functionality.
Procedure
1. Connect the Oracle database client to the database server by running the Oracle
Net Configuration Assistant, configuring the local net service name
configuration, and restarting your system.
Important: Note the name of the connection you have created as it is used in
one of the following steps.
2. Create new database connection for Cognos by following the steps:
a. From the Common Reporting portlet, go to Launch expandable list, and
choose the Administration.
.
b. On the Configuration tab, add a data source by clicking
c. Follow the New Data Source wizard as required noting the following steps:
v On the second panel, choose an Oracle database as Type.
v On the third panel, specify the name of the connection that you noted
before as the SQL*Net connect string, and in the Signon section specify a
new User ID and Password.
Results
You have now connected your Tivoli Common Reporting to an Oracle database.
Setting up the dynamic query mode
Configure JDBC connectivity, create data source connections, and enable
Framework Manager models and packages to use the dynamic query mode.
40
User Guide
Before you begin
For a list of databases supported by the dynamic query mode, see Dynamic query
mode.
About this task
The dynamic query mode is an enhanced Java-based query execution mode that
optimizes your queries to address their complexity. To find out more about the
dynamic query mode, visit IBM Cognos information center.
Attention: Existing report packages will not use the dynamic query mode. To use
the dynamic query mode, enable the report packages in Framework Manager to
allow it. You can also allow the dynamic query mode when publishing from
Framework Manager.
Procedure
1. Configure JDBC connectivity:
a. Ensure that JDBC drivers are in the following locations:
v TCR_component_dir\cognos\webapps\p2pd\WEB-INF\lib
v TIP_install_dir\profiles\TIPProfile\installedApps\TIPCell\IBM
Cognos.ear\p2pd.war\WEB-INF\lib
b. Restart Tivoli Common Reporting.
2. Create a data source connection.
3. Enable Framework Manager models and packages to use the dynamic query
mode.
Configuring security permissions
Increase the security settings for the Common Reporting user permissions. By
default, all the users created, including the one specified during the installation
process, have full administrative privileges. You can modify them in
Administration.
Before you begin
If you installed Tivoli Common Reporting in distributed scenario, by default,
anonymous access to the reporting engine is enabled. Before you configure security
permissions, you must configure a user repository such as LDAP and disable the
anonymous access. To disable the anonymous access, open Configuration by
running:
v
Start → All Programs → Tivoli Common Reporting → IBM Cognos
Configuration
v
Linux
UNIX
on the computer with user interface installed:
TCR_component_dir/cognos/bin/tcr_cogconfig.sh, on the computer with the
reporting engine installed: TCR_component_dir/cognos/bin/tcr_cogconfig.sh
Windows
About this task
To learn more about Tivoli Common Reporting, version 3.1, security settings for
authorizations, see “Authentication and authorization in Tivoli Common
Reporting” on page 43, and Cognos Administration and Security Guide.
Chapter 3. Configuring
41
From the Tivoli Integrated Portal level, you can hide the Tivoli Common Reporting
portal from certain users or groups by not assigning to them the
tcrPortalOperator role. If users are assigned to this role, by default inside Cognos,
they have full administrative privileges. You can change these settings in Tivoli
Common Reporting Administration.
All new users created for the Common Reporting portlet are assigned to Everyone
user group, which, by default, is a member of the System Administrators role. To
increase the security of your reporting solution, edit the members of the System
Administrators role.
Procedure
1. Log on to Tivoli Integrated Portal:
a. Go to the following URL: http://hostname:port/ibm/console. The default
URL is http://localhost:16310/ibm/console. Replace hostname with the
TCP/IP host name of the system where Tivoli Common Reporting is
installed, or localhost if you are running the web browser on the same
system. Replace port with the port number that you specified during
installation.
Tip: On a Windows system where Tivoli Common Reporting is installed
locally, you can click Start → Tivoli Common Reporting → Launch
Reporting Browser to open the default browser with the correct URL.
b. On the Tivoli Integrated Portal login page, log in with a user ID that has
access to Tivoli Common Reporting. Access is determined by user roles
associated with user IDs. This might be the user ID and password you
specified during the installation process, or a user ID and password
provided to you by an administrator. The Tivoli Integrated Portal navigation
window opens.
2.
3.
4.
5.
Tip: Only one logon is required when accessing the reporting interface. The
single sign-on option is enabled between the two reporting options.
Go to Reporting → Common Reporting.
Open the Launch expandable list, and choose Administration.
On the Security tab, go to Users, Groups, and Roles, and click the Cognos user
namespace.
Locate the System Administrators, and set properties for the role by clicking
More → Set properties.
Tip: You might need to go to the last page to be able to see the System
Administrators role.
6. On the Members tab, click Add to add an individual administrative user.
7. Add the administrative user of your choice from the VMMProvider namespace,
and click OK to save the settings.
Tip: Select to Show users in the list to be able to see the users. Beginning with
Tivoli Common Reporting 2.1.1, the default is not to return all groups and
users that require the administrator to use the search function.
8. Remove the Everyone user group from the System Administrators role by
checking the check box, and clicking Remove.
9. Click OK to save the new settings.
42
User Guide
Authentication and authorization in Tivoli Common Reporting
Security in Tivoli Common Reporting is based on Tivoli Integrated Portal and
Cognos. Learn about how they work together and how to authorize specific users
or groups to reporting items.
Authentication
During installation, Tivoli Common Reporting is configured to use the Federated
Repository, which is required for authentication to work successfully in Tivoli
Common Reporting. You must use the Federated Repository to authenticate users.
The authentication mechanism can be the build-in default repository, LDAP, Active
Directory, or other repository supported by the WebSphere Federated Repository.
For more information about adding a repository, see “Configuring LDAP or
Microsoft Active Directory” on page 29.
When installing Tivoli Common Reporting, the Federated Repository is configured
to use Internal File Repository. This repository contains users and groups and is
built into Tivoli Common Reporting. It does not require the users or groups to
exist anywhere outside Tivoli Common Reporting.
Users and groups in the File Repository are managed under the Users and Groups
navigation item in the console.
After the installation, you can add an LDAP or Active Directory into Tivoli
Common Reporting Federated Repository as an additional source. This step is
required for distributed installation.
Authorization
Authorization to common reporting navigation items in the console is controlled
with the tcrPortalOperator role. You can manage this role by accessing Users and
Groups → User Roles or Users and Groups → Group Roles in the navigation. Any
assignments that you make in this area have no effect on the reporting artifacts.
Authorization to the reporting artifacts is performed completely within the
Common Reporting pane. This reporting portlet contains reporting-related roles to
which users or groups can be mapped. In this portlet, you can also directly assign
access to users and groups.
Additionally, by default, all users are reporting system administrators and have
full access. You must remove everyone from the system administrator role to limit
authorization access. For more information, see “Configuring security permissions”
on page 41.
For more details on authorization, click
authorization.
to open Help and search the Help for
Constraining access to reports
Manage permissions granted to users or user groups for reports and capabilities
for reports, report sets, or folders. By default, permissions and capabilities that user
groups or reports are assigned are inherited from the parent entry.
Chapter 3. Configuring
43
About this task
You can change the default permissions that specific groups or users have to
reports or report packages. You can also change capabilities for reports, report sets,
and folders.
Procedure
1. Log on to Tivoli Integrated Portal.
2. Go to Reporting → Common Reporting.
3. Navigate to the report for which you want to change user permissions and
select it.
4. Click Actions → Set properties.
5. Go to the Permissions tab. The table shows default permissions set for user
groups.
6. Select Override the access permissions acquired from the parent entry and
choose the types of permissions that you want to grant to specific user groups.
7. Go to the Capabilities tab. In the table you can see what capabilities are
assigned to reports, report sets or folders.
8. Select Override the capabilities acquired from the parent entry to grant and
deny capabilities.
What to do next
To find out more about permissions and capabilities, see IBM Cognos
Administration and Security Guide - Permissions and Capabilities.
Configuring Tivoli Integrated Portal portlet functions
You can perform further Tivoli Integrated Portal configuration, such as security or
user registry configuration.
About this task
To access the advanced Tivoli Integrated Portal configuration, read the Tivoli
Integrated Portal information center.
44
User Guide
Chapter 4. Common Reporting
The Common Reporting component provided
by IBM Cognos Business Intelligence
Reporting application embedded in Tivoli
Integrated Portal interface contains several
additional advanced reporting functions.
Common Reporting functions
See the top tasks you can perform with the embedded Cognos Business
Intelligence Reporting application.
v “Emailing reports” on page 56
v “Performing ad hoc reporting” on page 57
v “Web-based report authoring” on page 58
Using the Common Reporting within the Tivoli Integrated Portal
interface
Signing in to the interface
You can now use one login and password to access Common Reporting
application while keeping the security options. For details, see “Single
sign-on (SSO)” on page 7.
Viewing the advanced reports in the interface context
Launch the Cognos reports within the context of Tivoli Integrated Portal
framework. They can now be displayed with the use of launch in context
logic, which generates the appropriate report URLs.
Tip: To view reports in PDF or Microsoft Excel format, ensure that you
have a PDF or Excel Viewer installed.
Mapping the advanced reporting interface to the original Cognos Business
Intelligence Reporting application
The original Cognos interface is modified to match the Tivoli Integrated
Portal look and feel.
BIRT reports in Cognos
IBM Cognos supports BIRT reports.
BIRT reports in Cognos - overview
IBM Tivoli Common Reporting supports BIRT reports known from the previous
version.
You can generate BIRT reports in the same way as Cognos reports:
© Copyright IBM Corp. 2007, 2012
45
You can identify BIRT reports by the BIRT icon:
.
Import BIRT reports into Cognos with the “trcmd -import” on page 94 command.
You can use the report packages created for Tivoli Common Reporting, version
1.1.1, 1.2, and 1.3.
The operations you can perform on BIRT reports are the same as the ones for
Cognos reports. You can run, copy, cut, paste, and rename the reports. You can also
schedule them and send them via email. You can create report views and save
your reports.
Restriction: Reports cannot be edited using the Report Studio.
Important: IBM Tivoli Common Reporting supports BIRT versions 2.2.1 and 2.2.2
only.
Running BIRT reports
BIRT reports are generated in the same way as Cognos reports. Run a report and
check your infrastructure status.
Before you begin
You can set file location to save copy of report output to use it again later or for
archive purposes. If you decide to use a post-processing script, it must include two
parameters:
v Parameter 1 specifies the name of the file that is the report
v Parameter 2 specifies the name of the file that is the XML descriptor file.
About this task
Note: Drill Through is supported.
Procedure
1. Log on to Tivoli Common Reporting and select Reporting → Common
Reporting
icon.
2. Click the
3. The options window is displayed. Choose the options you prefer and click
Run.
46
User Guide
4. Set the parameters and click Finish. The report is generated. You can now save
the report to be able to view it at a later time.
Saving a BIRT report
You can save a report that you previously generated to instantly view it at a later
time with the data from the time of the report creation.
Before you begin
Generate a report that you want to save.
About this task
Procedure
1. Select Run.
2. In the Run with options - Reporting Overview select Save the report option.
The following formats are supported for BIRT reports:
v HTML
v PDF
v DOC
v XLS
3. Specify the report parameters and click Finish to confirm your choice. The
report was saved and you can now view it.
4. To view the saved report:
View the output versions for this report icon.
a. Select
b. Choose the version of the report that you want to view and open the report.
Report overview opens.
Note: You can also save the report by selecting Keep this version → Save
report in the Reporting Overview pane.
Creating a Report View of a BIRT report
A Report View is a saved version of a report using data from a particular time. The
Report View has the same specification as the source report, but has different
properties, such as schedules or output formats.
About this task
To create a Report View:
Procedure
1. Log on to Connection.
2. Go to Reporting → Common Reporting.
3. Locate the report you want to run using the Navigation or Search tab and
select the report.
4. Click Keep this version and select Save as a Report View from the expandable
list.
5. Specify the name and the location for the Report View.
Chapter 4. Common Reporting
47
Results
The new Report View is immediately displayed in the table under the source
report.
What to do next
For other ways of creating Report Views, visit IBM Cognos Connection User Guide
- Create a Report View.
Scheduling reports
A report schedule is a schedule for running a report at some time in the future.
You can create a schedule to run a report one time or repeatedly.
About this task
To learn how to schedule reports, go to IBM Cognos Connection User Guide Schedule Management.
Importing BIRT reports
Import single reports or report packages from previous versions of Tivoli Common
Reporting.
About this task
You can import reports and report packages only by using the trcmd -import
command. The package is installed in a directory that you choose within the
Cognos Content Manager. For more information and examples, see the import
command.
Retrieving the user name from within a BIRT Report
You can retrieve the user name from the context of a BIRT report.
About this task
Similarly to previous versions, Tivoli Common Reporting 3.1 allows you to retrieve
the user name from a BIRT report. Using the following command:
reportContext.getAppContext(), you can use the application context to obtain the
property com.ibm.tivoli.reporting.api.reportEngine.IUserInfo, which contains
an object that has a method getUserPrincipal(). This object returns a
security.Principal object containing the user name.
Restriction: This method works only if information about the current user is
available.
Example
Below you can find a sample code fragment used to retrieve the user name:
TCR_IUSER = "com.ibm.tivoli.reporting.api.reportEngine.IUserInfo";
userInfo = reportContext.getAppContext().get(TCR_IUSER);
userName = "unknown";
if (userInfo != null) {
userName = userInfo.getUserPrincipal();
}
48
User Guide
Converting BIRT reports to Cognos reports
Use Conversion Assistant to help you convert your BIRT reports into Cognos. This
action is necessary because of the change from BIRT technology to Cognos
technology in Tivoli Common Reporting, 3.1.
Before you begin
Ensure that the report you want to convert is working properly.
Important: The BIRT report that you want to convert must be a valid Tivoli
Common Reporting BIRT report, otherwise the conversion tool will not work.
About this task
Conversion Assistant converts a BIRT report output to Cognos report specification.
It transfers the report layout, images, and data, however there are certain actions
that you must perform manually to finish the conversion. Conversion Assistant
facilitates the manual part of the process by placing annotations and tips in the
report which instruct you what actions you should take.
To convert your BIRT report into Cognos report:
Procedure
1. Run the “trcmd -convert” on page 88 command.
Note: A report that was recently converted might not run properly. Open it in
Report Studio and finish the conversion process manually.
2. Create a data source in Cognos. BIRT data sources are incompatible with
Cognos data sources. Cognos data source must connect to the same database as
BIRT reports. It is recommended for a Cognos data source to have the same
name as a BIRT data source.
3. Associate a model provided by Tivoli for the intended product or create a data
model in the Framework Manager, add the data source that you created to the
data model, and publish it on a server. Then, configure the report using the Set
Properties icon to be able to use it.
4. Open the converted report in Report Studio:
a. Log on to the Tivoli Common Reporting interface and go to Common
Reporting.
b. In the Work with reports window on the right, choose Report Studio from
the Launch expandable list.
c. Open the report that you converted.
5. Complete the report layout with missing elements from the data model:
a. Header and Footer are blank after the conversion. Add any items that you
want to be displayed in these sections.
b. If you want to display static text, delete the HTML item and replace it with
a text item from the toolbox. Do not delete the block item with the text item
because it contains the CSS style of the text item.
c. If you want to display a script, delete the HTML item and replace it with a
text item from the toolbox by changing the Source Type from Text to
Report Expression in the properties editor. Then, you can copy and paste
your script into the expression editor by double-clicking the item. If you
want to display JavaScript, ensure that you placed your script between the
following tags: <SCRIPT TYPE=’text/javastcript’> </SCRIPT>.
Chapter 4. Common Reporting
49
d. To display HTML, edit the HTML text within the editor by double-clicking
it.
e. Create a query for each dynamic parameter in your report. During the
conversion, a stylized parameter prompt page is created containing all the
BIRT parameters grouped by parameter group. The grouping is for
aesthetics only. Static parameters are converted completely, dynamic
parameters must be linked to a query. Use the parameter query annotation
to create a query for each dynamic parameter.
If you want to apply parameters to the data generated for the report, add
filters to the appropriate queries.
If your report contains Report Period and Start/End Date parameters,
replace the parameter prompts with the TCR Date Range Prompt that you
can find in the toolbox. To keep the same style, copy and paste the Date
Filter into the old Report Period prompt cell and the Date Range prompt
into the old Start Date prompt cell. Delete the End Date parameter row and
follow the instructions for applying the query filter.
f. If you want to display the parameter values dynamically, change the Source
Type property of the static text item in the properties from Text to Report
Expression. Double-click the text item and select the Parameters tab in the
editor, then drag the appropriate parameter and drop it into the editor.
g. Organize your data into charts by creating or editing a query that references
the data set annotations. To do this, select the Query tab, then drag the data
items and drop them into the series, categories, and measures where
applicable. Ensure that the Query property value matches the name of the
query that you want to use. You can use the image beside each chart as a
reference. Stylize the chart using the properties editor.
h. Create tables by creating or editing a query referencing the data set
annotations. Select the Query tab in the report editor, then drag the data
items into the columns of the Cognos list. Ensure that the Query property
value matches the name of the query that you want to use. Stylize the chart
using the properties editor.
i. Create heat charts and cross tabs for your report by creating or editing a
query referencing the data cube annotations. To do this, select the Query tab
in the report editor, then drag the data items into the columns, rows, and
corner of the cross tab. Ensure that the Query property value matches the
name of the query that you want to use.
For heat charts, you must delete the list that was generated during report
conversion and add a cross tab item in its place. Note any styles applied to
the list so you can add them to the new cross tab.
Add conditional styling to the cross tab by right clicking the cross tab
intersection and selecting Style → Conditional styles to use different styles
for different values. Use advanced conditional styling when using
expressions to define the styles for each value; otherwise use a regular
conditional style.
j. Create queries for your reports. Charts, tables, and parameters require a
query to retrieve and display data. Each chart and table contains an
annotation that states which data set it used in the BIRT report. You can find
the detailed annotations for each data set at the bottom of the report. These
annotations contain the data set SQL query before and after the data set
open script was run, and all filters and computer columns.
To create a query go to the Query explorer page and drag a query item from
the toolbox into the editor. Double-click a query to edit it and drag data
items from the model into the Data Items editor.
50
User Guide
To add a filter to a query, go to the Query explorer page and select a query.
Select Data → Filters from the menu or click Filters.
k. If your Tivoli Common Reporting is installed in distributed environment,
copy the report images to all computers with user interface installed to the
following location: TCR_install_dir\profiles\TIPProfile\installedApps\
TIPCell\IBM Cognos 10.ear\p2pd.war\tivoli and to all computers with the
reporting engine installed to the following location: CR_install_dir\cognos\
webcontent\tivoli.
6. Test if the converted reports work properly. For more information, see “trcmd
-run” on page 99 and “trcmd -distribute” on page 93.
What to do next
To find out more, go to IBM Cognos Business Intelligence information center.
Known limitations
This section describes Conversion Assistant limitations caused by technology
changes in Tivoli Common Reporting, 3.1
At the present moment, the following limitations are known to exist:
v Because of the incompatibility issues, BIRT data source script and data sources
are not transferred to Cognos reports. Additionally, transferring items such as
inserting SQL directly into Cognos report would lose the added benefit this
technology brings.
v The new Cognos format does not support JavaScript during report generation.
v Web services data sources are not automatically moved from BIRT to Cognos
reports.
v Globalization is not supported. The converted report is in the language in which
it was generated. However, you can globalize the new report in the Report
Studio after the conversion.
v oda data cube is not supported in Cognos reports.
Setting up JDBC for BIRT reports
Some reports might require that you configure JDBC data sources to provide report
data. You can use either of two methods to configure JDBC data sources for these
reports.
BIRT and Cognos reports have separate data sources that are created and managed
differently.
Configuring JDBC data sources using JNDI
You can use WebSphere Application Server scripting to configure JDBC providers
and data sources for your reports, and to configure JNDI names for reports to use
when accessing data sources. If you use this method, the data source properties for
reports can access the data source using JNDI without directly specifying the JDBC
information.
Before you begin
Data sources are configured in the embedded WebSphere Application Server
environment. To use scripting, you must start the WebSphere wsadmin tool. For
more information, see the WebSphere Application Server documentation at
http://publib.boulder.ibm.com/infocenter/wasinfo/v7r0/topic/
com.ibm.websphere.nd.iseries.doc/info/iseriesnd/ae/txml_script.html?.
Chapter 4. Common Reporting
51
Any JDBC driver properties required by your database vendor must also be set as
data source properties in the WebSphere Application Server configuration. For
more information, see the WebSphere Application Server documentation and the
documentation for your database software.
If you have Tivoli Common Reporting installed in distributed environment, the
reporting engine runs on a Tomcat web server. In such case, the JNDI data sources
must be configured on that server. For more details, see Tomcat documentation.
Procedure
1. Configure a JDBC provider.
2. Configure a JDBC data source and its JNDI name.
Configuring JDBC data sources for direct access
You can configure JDBC drivers for direct access by reports without using JNDI.
About this task
To set up direct JDBC access:
Procedure
1. Copy the required JDBC driver files to the following directory:
TCR_component_dir\lib
\birt-runtime-2_2_2\ReportEngine\plugins\
org.eclipse.birt.report.data.oda.jdbc_2.2.2.r22x_v20071206\drivers
(Replace tcr_install_dir with the name of the Tivoli Common Reporting
installation directory.)
2. For a DB2 data source, copy the DB2 JDBC drivers and the license JAR file to
the same location. You can copy db2jcc.jar and db2jcc_licence_cu.jar file on
the DB2 server system from location:
C:\%Program Files%\IBM\SQLLIB\java
or download it from the website.
3. Use the “trcmd -modify” on page 97 command to specify the required JDBC
information (including the URL, driver, user ID, and password).
Working with reports
This section contains topics that provide
instructions on how to work with reports
using IBM Cognos Business Intelligence
Reporting.
Use the Common Reporting user interface to navigate the reports.
About this task
This is a simple reference instruction for creating, publishing, importing, and
running your reports.
Note: The report server component is provided in both 32-bit and 64-bit versions.
The default option is 32-bit. The 64-bit version of report server is for use only with
52
User Guide
dynamic query mode reports. If you are using non-dynamic query mode reports,
then you must also have a server installed with the report server running in 32-bit
mode.
Procedure
1. Create a data source for your reports with IBM Cognos Framework Manager
and publish your report package.
Note: Creating data sources and publishing report packages requires report
modeling experience. Use IBM Cognos Framework Manager to model reports.
This is a separately installed component of Tivoli Common Reporting available
from your installation media. For information about how to create data sources
and publish packages, see IBM Cognos Framework Manager User Guide.
2. Import your report package.
3. Run and distribute your reports.
Running the sample overview report
After you installed Tivoli Common Reporting 3.1, you can run a check on the
reporting functionality by running your first sample report. The report can also be
run for an overall reporting overview.
Before you begin
You can set file location to save copy of report output to use it again later or for
archive purposes. If you decide to use a post-processing script, it must include two
parameters:
v Parameter 1 specifies the name of the file that is the report
v Parameter 2 specifies the name of the file that is the XML descriptor file.
About this task
Tip: To improve the performance when running a report, upgrade your reports.
You can upgrade your reports by selecting to Upgrade all report specifications to
the latest version when importing the reports in the report wizard.
Procedure
1. Log on to your reporting interface by following the login instructions.
2.
3.
4.
5.
Navigate to the Common Reporting. A new tab opens on the right.
Open the Common Reporting package in your Public Folders view.
Click Reporting Overview report to run it.
Specify the date parameters to limit the time frame of the report.
See the description of the parameters.
Date Range
You can select a date range for your report from the expandable list. You
can choose from the following values:
All
Select this value to run a report with 1970-01-01 as the start date and
the day when you run the report as the end date.
Date Range (below)
Select this option to enter the start and end date for the report
manually in the fields below the expandable list.
Chapter 4. Common Reporting
53
Today
Runs a report for data collected today.
Yesterday
Select this option to run the report for data collected the day before.
Last 7 days, Last 30 days, Last 90 days, Last 365 days
Select one of these options to run the report for data collected during
the last 7, 30, 90, or 365 days from the day when you ran the report.
Current® week
Runs a report with Monday of the current week as the start date and
the day when you run the report as the end date. For example, if you
run the report on Wednesday, the date range for the report is Monday
to Wednesday.
Current month
Runs a report with the first day of the current month as the start date
and the day when you run the report as the end date.
Current year to date
Runs a report with the first day of the year as the start date and the
day when you run the report as the end date.
Last week, Last month, Last year
Select one of these values to run a report for last week, month, or year.
Start Date
Select this field to choose a specific day from the calendar and hour as
the start date for the report. Ensure that you selected Date Range
(below) from the expandable list for this parameter to work.
Earliest date
Runs the report with the earliest date for which data is available as the
start date of the report.
End Date
Select a specific day and hour as the start date for the report. Ensure
that you selected Date Range (below) from the expandable list to
ensure that this parameter is taken into account when generating the
report.
Latest Date
Runs the report for the latest date for which data is available as the end
date of the report.
Filters
Filters allow you to limit the scope of data of the report to a specific
package or folder, a specific report, or a report owner. Specify the name
of a package, folder, report, or a report owner to which you want to
limit the scope of the report. % is the wildcard.
6. Click Finish. The report is now generated.
Sample overview report
Tivoli Common Reporting comes with a sample report to allow you to monitor
your reporting activity.
Tivoli Common Reporting: Reporting Overview
The report available from the Common Reporting panel shows an inventory of
report packages and reports created in the time period specified with date
54
User Guide
parameters. The parameters are visible at the top of the report. The pie chart
shows the percentage value of reports from one package in the overall number of
all the reports and the table below gives the number of reports per given package.
Importing Cognos report packages
Import report packages to your workspace using the user interface and start using
an existing report model and reports. This importing method can be used for
Cognos reports only.
Before you begin
You must obtain a report package that you want to work with. You can download
packages from ISML library, or you can create one using the Content
Administrator interface. All the packages that you want to import must be stored
in the deployment folder in TCR_component_dir\cognos\deployment for
single-computer installation, and TCR_install_dir\cognos\deployment on the
computer with the reporting engine installed for distributed installation.
Procedure
1. Log on to the Tivoli Common Reporting interface, and go to Common
Reporting.
2. In the Work with reports window, choose the Administration from the Launch
expandable list.
3. Go to Configuration tab, and open the Content Administration section.
Chapter 4. Common Reporting
55
4. Create new package import by clicking
opens.
5. Follow the wizard to import a new package.
. The New Import wizard
Tip: It is recommended that you select to Upgrade all report specifications to
the latest version when importing your reports. This way you can improve the
performance when running a report.
Exporting Cognos report packages
Export your report package to be able to use it for example, on a different Tivoli
Common Reporting instance. You can use this method for Cognos reports only.
Procedure
1. Log on to the Tivoli Common Reporting user interface, and go to Common
Reporting.
2. In the Work with reports window on the right, choose the Administration
from the Launch expandable list.
3. Go to the Configuration tab, and open the Content Administration section.
.
4. Export a new package by clicking
5. Follow the wizard to export a package.
Copying report images to the Tivoli Common Reporting server
Cognos report packages do not contain images. After you imported a Cognos
report package, copy the static images to a folder on your computer for the images
to be displayed.
Before you begin
Import a report package.
About this task
Cognos report packages do not contain images. You must copy the images
manually. The image location depends on the installation scenario that you chose.
Procedure
1. For single-computer installation: Copy the images to the following location:
TIP_install_dir\profiles\TIPProfile\installedApps\TIPCell\IBM
Cognos.ear\p2pd.war\tivoli\
2. For distributed installation:
a. Copy the images to all computers with user interface installed to the
following location: TIP_install_dir\profiles\TIPProfile\installedApps\
TIPCell\IBM Cognos Servlet Gateway.ear\ServletGateway.war\tivoli
b. Copy the images to all computers with Tivoli Common Reporting engine, to
the following location: TCR_install_dir\cognos\webcontent\tivoli
Emailing reports
Email your reports to share them with the group of people who do not have access
to the reporting portal.
56
User Guide
Before you begin
Set the SMTP information for emailing to work:
1. Open IBM Cognos Configuration by:
v
Windows
Going to Start → All Programs → Tivoli Common Reporting 3.1 →
IBM Cognos Configuration
v
UNIX
and
running the following command
TCR_component_dir/cognos/bin/tcr_cogconfig.sh for 32-bit installations, and
TCR_component_dir/Cognos/bin64/tcr_cogconfig.sh for 64-bit installations.
Linux
2. Go to Notification in the navigation tree on the left and provide the SMTP
information such as the mail server, credentials, and default sender.
3. Save the configuration and restart Tivoli Common Reporting:
a. Start the server.
b. Stop the server.
Procedure
1. After you ran your report, you can distribute it by clicking Keep this version,
and choosing Email report from the expandable list.
2. Set the email options, and checking off whether you want to include a link to
the report or attach it.
3. Click OK to distribute the report.
What to do next
Learn about other ways to distribute reports, by looking at Connection User Guide.
Scheduling reports
A report schedule is a schedule for running a report at some time in the future.
You can create a schedule to run a report one time or repeatedly.
About this task
To learn how to schedule reports, go to IBM Cognos Connection User Guide Schedule Management.
Performing ad hoc reporting
Create reports ad hoc by using simple queries and formatting.
Before you begin
To perform ad hoc reporting you must have some report packages imported.
Procedure
1. Log on to the Tivoli Common Reporting interface, and go to Common
Reporting.
2. In the Work with reports window, choose the Query Studio from the Launch
expandable list.
3. Select a package to work with. ANew window where you can create a report
opens.
4. Select and insert items from the navigation tree to complete the report.
Chapter 4. Common Reporting
57
Tip: Change the appearance of the data by using the menu icons at the top.
5. When the report data and appearance is edited, save the report by specifying a
Name, and optionally a Description, and a Screen tip.
Results
You have created your ad hoc report.
What to do next
Learn more about authoring the reports in the IBM Cognos Query Studio User
Guide.
Web-based report authoring
Create reports in a Web-based tool that professional report authors use to build
sophisticated, multiple-page, multiple-query reports against multiple databases.
You can create any reports that your company requires, such as invoices,
statements, and weekly sales and inventory reports.
Procedure
1. Log on to the Tivoli Common Reporting interface, and go to Reporting →
Common Reporting.
2. In the Work with reports window, choose the Report Studio from the Launch
expandable list. After you select a report package that you want to use, the
Report Studio opens.
3. Use the menu controls to create a report or edit existing ones by formatting the
layout and manipulating the data in the report.
Tip: Use Tivoli Common Reporting template to ensure consistency among your
reports.
4. Save your report, and run it anytime you need to present its underlying data.
What to do next
Learn more about Web-based report authoring in Report Studio Professional
Authoring User Guide available on clicking F1 from the Report Studio.
Using Tivoli Common Reporting template
Tivoli Common Reporting report template contains a standard layout pattern that
you can use to create your reports. Use the template to ensure consistency among
your reports and give them a common look and feel.
About this task
The Tivoli Common Reporting template contains a prompt page and a proper
report page. You can manage the pages in the Page Explorer pane on the left side.
You can use the prompt page to add filters to your reports. By default, it allows
you to specify the date range of the report but you can also customize the filters
according to your needs. The proper report page contains an IBM Tivoli header,
page number, and date and time when the report was created.
Procedure
1. Log on to the Tivoli Common Reporting interface.
58
User Guide
2. Go to Reporting → Common Reporting and select Launch → Report Studio.
After you select the package that you want to use, Report Studio opens.
3. Select Create new and then TCR Template.
4. Customize the parameters to suit your needs. Open the Toolbox by clicking
and drag items onto the report pages.
5. Save your report to be able to run it anytime you need.
Using parametrized URLs to perform tasks outside Tivoli
Common Reporting
Build a parametrized URL to perform various tasks from a web application
without opening Tivoli Common Reporting. You can place a customized URL in
your web application to create a shortcut to a specific task. Authentication with
Tivoli Integrated Portal user name and password is required.
Before you begin
To build a parametrized URL, you must know what your IBM Cognos Gateway
URI is. You can check it in one of the following ways:
v Run IBM Cognos Configuration by going to Windows Start → All Programs →
Linux
UNIX
Tivoli Common Reporting → IBM Cognos Configuration or
running the TCR_component_dir/cognos/bin/tcr_cogconfig.sh. Go to Local
Configuration → Environment → Gateway Settings → Gateway URI.
v Select a report in Tivoli Common Reporting, and click the Set properties icon
. The General tab opens. Click View the search path, ID and URL. The Cognos
Gateway URI is the first part of the Default action URL, for example
https://cs-blade67.tivlab.austin.ibm.com:16311/tarf/servlet/component.
v To perform a task on a specific report with the use of a parametrized URL,
check the search path of the report. To do this, select the report, click the Set
and then View the search path, ID and URL in the General
properties icon
tab. The search path is displayed in the Search path field.
About this task
You can use parametrized URLs to:
v Create a custom start page with links to reports, folders, and other areas
v Provide quick links within an application to launch IBM Cognos studios or
reports
v Provide a list of related reports to quickly move between them.
With parametrized URLs, you can perform tasks such as viewing a previously
saved report, running a report, or opening Query Studio and Report Studio.
Procedure
v To view a previously saved report, place the following URL in your application:
IBM Cognos Gateway URI?b_action=xts.run&m=portal/launch.xts
&ui.tool=CognosViewer&ui.action=view&ui.object=defaultOutput
(Report Search Path). For example: https://csblade67.tivlab.austin.ibm.com:16311/tarf/servlet/component?b_action=xts.run
&m=portal/launch.xts&ui.tool=CognosViewer&ui.action=view
&ui.object=defaultOutput
Chapter 4. Common Reporting
59
(/content/package[@name='IBM Tivoli Monitoring OS Agents
Reports']/reportView[@name='Report View of Enterprise Resources List']).
v To run a report without passing in any prompt values, use the following URL:
IBM Cognos Gateway URI?b_action=xts.run&m=portal/launch.xts
&ui.tool=CognosViewer&ui.action=run&ui.object=
Report Search Path. For example: https://csblade67.tivlab.austin.ibm.com:16311/tarf/servlet/component?b_action=xts.run
&m=portal/launch.xts&ui.tool=CognosViewer&ui.action=run&ui.object
=/content/package\[@name='IBM Tivoli Monitoring OS Agents
Reports']/report[@name='Top Resources Utilization']
v To run a report whose output format is different from the default HTML output
format, use the following URL: IBM Cognos Gateway URI?b_action=xts.run
&m=portal/launch.xts&ui.tool=CognosViewer&ui.action=run&ui.object=
Report Search Path&run.outputFormat=desired format, for example:
https://cs-blade67.tivlab.austin.ibm.com:16311/tarf/servlet/
component?b_action=xts.run&m=portal/launch.xts&ui.tool=CognosViewer
&ui.action=run&ui.object=
/content/package\[@name='IBM Tivoli Monitoring OS Agents
Reports']/report[@name='Top Resources Utilization']&run.outputFormat=PDF
Note: Supported output formats are: CSV, HTML, HTMLFragment, MHT, PDF,
singleXLS, XHTML, layoutDataXML, spreadsheetML, rawXML, XLWA, and
XML.
v To run a report with additional parameters, for each parameter that you want to
include, append &p_parameter name=parameter value to the URL, for example:
https://cs-blade67.tivlab.austin.ibm.com:16311/tarf/servlet/
component?b_action=xts.run&m=portal/launch.xts&ui.tool=CognosViewer
&ui.action=run&ui.object=
/content/package\[@name='IBM Tivoli Monitoring OS Agents Reports']/report
[@name='Top Resources Utilization']&p_OS Type=Unix
Note: Passing in prompt values changes the default values displayed on the
prompt page. You can suppress the prompt page by appending
&run.prompt=false to the URL.
v To open Query Studio, use the following URL: IBM Cognos Gateway
URI?b_action=xts.run&m=portal/launch.xts&ui.tool=QueryStudio&ui.object=
/content&ui.action=new, for example: https://csblade67.tivlab.austin.ibm.com:16311/tarf/servlet/component?b_action=xts.run
&m=portal/launch.xts&ui.tool=QueryStudio&ui.object=/content&ui.action=new
v To open Query Studio with a specific package, place the following URI in your
application: IBM Cognos Gateway URI?b_action=xts.run&m=portal/launch.xts
&ui.tool=QueryStudio&ui.object=
Package Search Path&ui.action=new
v To open Report Studio, use the following URL: IBM Cognos Gateway
URI?b_action=xts.run&m=portal/launch.xts&ui.gateway=IBM Cognos Gateway
URI&ui.tool=ReportStudio&ui.object=
/content&ui.action=new. For example: https://csblade67.tivlab.austin.ibm.com:16311/tarf/servlet/component?b_action=xts.run
&m=portal/launch.xts&ui.gateway=https://csblade67.tivlab.austin.ibm.com:16311/tarf/servlet/component
&ui.tool=ReportStudio&ui.object
=/content&ui.action=new
v To open Report Studio with a specific report, place the following URL in your
application: IBM Cognos Gateway URI?b_action=xts.run&m=portal/launch.xts
60
User Guide
&ui.gateway=IBM Cognos Gateway URI&ui.tool=ReportStudio&ui.object=
Report Search Path&ui.action=edit, for example: https://csblade67.tivlab.austin.ibm.com:16311/tarf/servlet/component?b_action=xts.run
&m=portal/launch.xts&ui.gateway=https://csblade67.tivlab.austin.ibm.com:16311/tarf/servlet/component
&ui.tool=ReportStudio&ui.object=
/content/package\[@name='IBM Tivoli Monitoring OS Agents
Reports']/report[@name='Top Resources Utilization']&ui.action=edit
v To open Report Studio with a specific report inside the same web browser or
frame, append &launch.openJSStudioInFrame=true, as in the example:
https://cs-blade67.tivlab.austin.ibm.com:16311/tarf/servlet/
component?b_action=xts.run&m=portal/launch.xts&ui.gateway=https://csblade67.tivlab.austin.ibm.com:16311/tarf/servlet/component
&ui.tool=ReportStudio&ui.object=
/content/package\[@name='IBM Tivoli Monitoring OS Agents
Reports']/report[@name='Top Resources Utilization']&ui.action=edit
&launch.openJSStudioInFrame=true
v To hide the report viewer header, append &cv.header=false to the URL. For
example: https://cs-blade67.tivlab.austin.ibm.com:16311/tarf/servlet/
component?b_action=xts.run&m=portal/launch.xts&ui.tool=CognosViewer
&ui.action=view
&ui.object=defaultOutput(/content/package[@name='IBM Tivoli Monitoring OS
Agents Reports']
/reportView[@name='Report View of Enterprise Resources List'])
&cv.header=false
v To hide the toolbar at the top of the report, append &cv.toolbar=false to the
URL as in the example: https://cs-blade67.tivlab.austin.ibm.com:16311/tarf/
servlet/component?b_action=xts.run&m=portal/launch.xts
&ui.tool=CognosViewer&ui.action=view&ui.object=defaultOutput
(/content/package[@name='IBM Tivoli Monitoring OS Agents
Reports']/reportView
[@name='Report View of Enterprise Resources List'])&cv.toolbar=false
Search path
A search path is a basic expression in IBM Cognos that allows you to find objects.
It is one of the parameters that you need for performing operations on reports
using commands.
You can use the search path to find one particular object or a set of objects within a
folder using an asterisk * as a wildcard character. If you want to search for a
report or a report package whose full name you do not know, you can use the
contains function to search for all reports or report packages that contain the
specified expression. The basic parameters of a search path are location steps that
reflect the structure of catalogs on your computer. Location steps are separated by
a slash / and can be followed by one or more predicate. A predicate is an
expression that filters an object set. It is enclosed in square brackets: [].
All predicates within a location step must be true for an object to be found. You
can use logical or comparison operators and searchable properties as a predicate
expression. Use @ to specify the property name.
The following list contains examples and descriptions of search path parameters
that you can use to construct your search path:
~
Selects the account object associated with the current user.
Chapter 4. Common Reporting
61
~~ Selects the session object associated with the current user.
/
Selects the root.
/* Selects the child objects of the root. The asterisk (*) is a wildcard character.
//folder
Selects all folder objects in the content store. When a path starts with two
slashes (//), all objects in the content store that fulfill the specified criteria are
selected. In this case, the selected objects must be instances of the class folder.
//folder | //report
Selects all folder objects and all report objects in the content store. The
vertical bar (|) means that the results of two search paths will be combined.
//*
Selects all objects in the content store. The asterisk (*) is a wildcard character.
/configuration//*
Selects the configuration object and all its descendants. The two slashes
specify all descendant objects of the current object (configuration), and the
current object itself. The text between the slashes is called a location step. The
asterisk (*) is a wildcard character.
/content//folder/report/ parent::folder
Selects every descendant of the content object that is a folder object and that
has at least one child report object. In the parent::folder expression, parent is
an axis and folder is a node test.
/content/package/folder [@name=' Documentation Report Samples']/*
Selects all child objects in the Documentation Report Samples folder.
Expressions enclosed in square brackets are predicates used to filter a set of
objects. /content/package/folder [@name=' Documentation Report Samples']/*
The at sign (@) specifies a property name. The asterisk (*) is a wildcard
character.
/content/package/folder/ report[contains (@name, 'Product List')]
Selects all report objects in the path /content/package/folder with names that
contain the string Product List. The predicate contains a call to the function
contains. The at sign (@) specifies a property name.
storeID ("1e08b01ef26b496aac06a14f5ae9a572")/ /report
Selects all report objects that are descendants of the object that has the storeID
with the value "1e08b01ef26b496aac06a14f5ae9a572".
CAMID(":")/*[@routingHints]
Selects all objects in the Cognos namespace where the routingHints property is
not nil. Expressions enclosed in square brackets are predicates used to filter a
set of objects. CAMID(":") specifies the Cognos namespace. The at sign (@)
specifies a property name. The asterisk (*) is a wildcard character.
CAMID(":")/*[not(@routingHints)]
Selects all objects in the Cognos namespace where the routingHints property is
nil. Expressions enclosed in square brackets are predicates used to filter a set of
objects. CAMID(":") specifies the Cognos namespace. The at sign (@) specifies a
property name. The asterisk (*) is a wildcard character.
Example
The following search path can be used to find a report named Order Product List
Report:
62
User Guide
/content/package[@name='GO Sales and Retailers']/
folder[@name='Documentation Reports']/report[@name='Order Product List
Report']
The following search path finds all reports whose name contains the Product List
expression:
/content/package[@name='GO Sales and Retailers']/
folder[@name='Documentation Reports']/report[contains(@name, 'Product
List')]
If you replace the report name with a wildcard character, you can use the search
path to select all objects in the Documentation Reports folder:
/content/package[@name='GO Sales and Retailers']/
folder[@name='Documentation Reports']/*
Checking the search path of a report
If you do not know the search path of a particular report, you can check it using
Cognos Connection.
Procedure
1. Log on to Tivoli Common Reporting console.
2. Select the report whose search path you want to check and click the Set
. The General tab opens.
properties icon
3. Click View the search path, ID and URL. The search path is displayed in the
Search path field.
Chapter 4. Common Reporting
63
64
User Guide
Chapter 5. Troubleshooting and support
This section provides information to help
you identify and resolve problems that might
occur when using Tivoli Common Reporting.
Learn how to use log files to determine the
problem.
Using log files for troubleshooting
You can troubleshoot problems by enabling the collection of detailed log and trace
information also within WebSphere Application Server.
About this task
By default, only Cognos 10 Business Intelligence Reporting errors are logged in the
logs folder in the Cognos installation directory. To enable more detailed tracing:
Procedure
1. Open the PogoLogkitConfig.FullDebug.xml file from the following location:
v For the distributed environment - the machine with the Cognos-based Tivoli
Common Reporting engine installed: <Cognos_install_dir>\webapps\p2pd\
WEB-INF
v For the single-computer installation - TIP_install_dir\profiles\
TIPProfile\installedApps\TIPCell\IBM Cognos.ear\p2pd.war\WEB-INF
2. Change the name of the file to PogoLogkitConfig.xml, and save it.
3. Restart the Cognos to apply the changes.
Enabling detailed log and trace information
You can troubleshoot problems by enabling the collection of detailed log and trace
information.
About this task
To enable detailed tracing:
Procedure
1. In the Tivoli Integrated Portal navigation panel, click Settings → WebSphere
Administrative Console.
2. Click the WebSphere Administrative Console button and select
Troubleshooting → Logs and trace in the newly open window..
3. In the Logging and Tracing console module, click serverName Change Log
Detail Levels. The default server name is server1.
4. Click either the Configuration or Runtime tab:
v Click the Configuration tab if you want to make persistent changes to the log
and trace levels. These changes will take effect after the next server restart.
© Copyright IBM Corp. 2007, 2012
65
v Click the Runtime tab if you want to make changes to the log and trace
levels for the current session. These changes take effect immediately and do
not require a server restart.
If you use the Runtime tab, you can select the Save runtime changes to
configuration as well check box to make the changes persistent as well as
applying to the current session.
5. Expand the list of installed packages and click com.ibm.tivoli* →
com.ibm.tivoli.reporting*.
6. From an expandable list, select Message and Trace Levels finest and confirm
your choice.
7. If you are making persistent configuration changes, click Save when prompted
to save the changes to the master configuration.
8. If you changed any settings in the Configuration tab, stop and restart the
Tivoli Common Reporting server.
Results
Log and trace files are located in the TIP_install_dir/profiles/TIPProfile/logs/
serverName subdirectory of the Tivoli Common Reporting installation directory.
Standard informational log messages are written to the SystemOut.log file; detailed
trace messages are written to the trace.log file.
Troubleshooting the installation
Identify and resolve problems that might occur when you are installing, upgrading
or uninstalling the product.
Installation fails because the Deployment Engine fails to
initialize
Symptoms
Installation or upgrade fails with the following error: Deployment Engine failed
to initialize.
Resolving the problem
1. Go to DE_install_dir/logs and remove all .lock_* files.
2. Ensure that all installer processes are closed. To do this run the following
commands:
v
Linux
v
Windows
UNIX
ps -ef | grep java | grep -v grep
tskmgr, look for Java processes pointing to the tmp parameter
and kill the processes.
3. Remove the temporary files from previous unfinished installations.
4. Ensure that the Java process connected with Deployment Engine derby is
closed by running the following command:
v
v
Linux
UNIX
tskmgr, and look for Java process with a parameter pointing to
the derby database and Deployment Engine installation directory
Windows
and kill the processes.
66
User Guide
ps -ef | grep derby | grep -v grep
Non-root installation fails
Symptoms
When running the Tivoli Common Reporting installer on a RedHat Linux
operating system, the following link error is reported:
java.lang.UnsatisfiedLinkError: java/awt/Component.initIDs()V
at java.awt.Component.<clinit>(Component.java:595)
at java.lang.J9VMInternals.initializeImpl(Native Method)
at java.lang.J9VMInternals.initialize(J9VMInternals.java:192)
at java.lang.J9VMInternals.initialize(J9VMInternals.java:157)
at java.lang.J9VMInternals.initialize(J9VMInternals.java:157)
at com.zerog.ia.installer.util.BidiUtilImpl.setDefaultLocale(DashoA10*..)
at ZeroGay.a(DashoA10*..)
at com.zerog.ia.installer.LifeCycleManager.j(DashoA10*..)
at com.zerog.ia.installer.LifeCycleManager.e(DashoA10*..)
at com.zerog.ia.installer.LifeCycleManager.a(DashoA10*..)
at com.zerog.ia.installer.LifeCycleManager.a(DashoA10*..)
at com.zerog.ia.installer.Main.main(DashoA10*..)
at sun.reflect.NativeMethodAccessorImpl.invoke0(Native Method)
at sun.reflect.NativeMethodAccessorImpl.invoke(NativeMethodAccessorImpl.java:64)
at sun.reflect.DelegatingMethodAccessorImpl.invoke(DelegatingMethodAccessorImpl.java:43)
at java.lang.reflect.Method.invoke(Method.java:615)
at com.zerog.lax.LAX.launch(DashoA10*..)
at com.zerog.lax.LAX.main(DashoA10*..)
Causes
The problem is in the InstallAnywhere code that requires extra libraries to be
installed into the system.
Resolving the problem
Run the installer in debug mode to discover what kind of library is missing:
1. Set the installer for DEBUG mode by running the export LAX_DEBUG=1
command.
2. Run the installer.
3. Collect the output.
Below is an exemplary system output:
Exception in thread "main" java.lang.UnsatisfiedLinkError:
/tmp/install.dir.20635/Linux/resource/jre/jre/bin/xawt/libmawt.so
(libXft.so.2: cannot open shared object file: No such file or directory)
at java.lang.ClassLoader.loadLibraryWithPath(ClassLoader.java:957)
at java.lang.System.load(System.java:441)
at java.lang.ClassLoader.loadLibraryWithPath(Native Method)
at java.lang.ClassLoader.loadLibraryWithPath(ClassLoader.java:949)
at java.lang.ClassLoader.loadLibraryWithClassLoader(ClassLoader.java:926)
at java.lang.System.loadLibrary(System.java:453)
at sun.security.action.LoadLibraryAction.run(LoadLibraryAction.java:77)
at java.security.AccessController.doPrivileged(AccessController.java:193)
at sun.awt.NativeLibLoader.loadLibraries(NativeLibLoader.java:75)
at sun.awt.DebugHelper.<clinit>(DebugHelper.java:57)
at java.lang.J9VMInternals.initializeImpl(Native Method)
at java.lang.J9VMInternals.initialize(J9VMInternals.java:192)
at java.awt.Component.<clinit>(Component.java:582)
at java.lang.J9VMInternals.initializeImpl(Native Method)
at java.lang.J9VMInternals.initialize(J9VMInternals.java:192)
at java.lang.J9VMInternals.initialize(J9VMInternals.java:157)
at java.lang.J9VMInternals.initialize(J9VMInternals.java:157)
at com.zerog.ia.installer.util.BidiUtilImpl.setDefaultLocale(DashoA10*..)
at ZeroGay.a(DashoA10*..)
at com.zerog.ia.installer.LifeCycleManager.j(DashoA10*..)
Chapter 5. Troubleshooting and support
67
at com.zerog.ia.installer.LifeCycleManager.e(DashoA10*..)
at com.zerog.ia.installer.LifeCycleManager.a(DashoA10*..)
at com.zerog.ia.installer.LifeCycleManager.a(DashoA10*..)
at com.zerog.ia.installer.Main.main(DashoA10*..)
at sun.reflect.NativeMethodAccessorImpl.invoke0(Native Method)
at sun.reflect.NativeMethodAccessorImpl.invoke(NativeMethodAccessorImpl.java:64)
at sun.reflect.DelegatingMethodAccessorImpl.invoke(DelegatingMethodAccessorImpl.java:43)
at java.lang.reflect.Method.invoke(Method.java:615)
at com.zerog.lax.LAX.launch(DashoA10*..)
at com.zerog.lax.LAX.main(DashoA10*..)
java.lang.UnsatisfiedLinkError: java/awt/Component.initIDs()V
at java.awt.Component.<clinit>(Component.java:595)
at java.lang.J9VMInternals.initializeImpl(Native Method)
at java.lang.J9VMInternals.initialize(J9VMInternals.java:192)
at java.lang.J9VMInternals.initialize(J9VMInternals.java:157)
at java.lang.J9VMInternals.initialize(J9VMInternals.java:157)
at com.zerog.ia.installer.util.BidiUtilImpl.setDefaultLocale(DashoA10*..)
at ZeroGay.a(DashoA10*..)
at com.zerog.ia.installer.LifeCycleManager.j(DashoA10*..)
at com.zerog.ia.installer.LifeCycleManager.e(DashoA10*..)
at com.zerog.ia.installer.LifeCycleManager.a(DashoA10*..)
at com.zerog.ia.installer.LifeCycleManager.a(DashoA10*..)
at com.zerog.ia.installer.Main.main(DashoA10*..)
at sun.reflect.NativeMethodAccessorImpl.invoke0(Native Method)
at sun.reflect.NativeMethodAccessorImpl.invoke(NativeMethodAccessorImpl.java:64)
at sun.reflect.DelegatingMethodAccessorImpl.invoke(DelegatingMethodAccessorImpl.java:43)
at java.lang.reflect.Method.invoke(Method.java:615)
at com.zerog.lax.LAX.launch(DashoA10*..)
at com.zerog.lax.LAX.main(DashoA10*..)
Invocation of this Java Application has caused an InvocationTargetException.
This application will now exit. (LAX)
In this example, the missing library is the following:
libXft.so.2: cannot open shared object file: No such file or directory
Install the rpm related to this library.
Installation using the install.sh script fails
Symptoms
When running the install.sh script using the relative path, the installation fails
and the following error occurs: Deployment Engine failed to initialize.
Resolving the problem
Run the installation command again specifying the absolute path to the install.sh
script.
Installation fails on a system with Turkish locale
Symptoms
The installation of Tivoli Common Reporting fails on a system with Turkish locale.
Resolving the problem
Change your system locale to English for the time of the installation. When the
installation has finished, change the locale back to Turkish.
68
User Guide
The Work with reports panel displays an error
Symptoms
This problem occurs if you have installed Tivoli Common Reporting, logged into
the reporting console and then uninstalled Tivoli Common Reporting without
logging out of the console. If, after performing these steps, you install Tivoli
Common Reporting again and try to open the Work with reports panel, you get
the following error: PRS-CSE-1258 Problem encountered during verification of
session capability information.
Resolving the problem
To resolve the problem, restart the web browser or delete the cookie files.
Cognos Business Intelligence does not install on Linux
Symptoms
Cognos does not install and the following error appears:
Error while loading shared libraries:
libXm.so.3: cannot open shared object file: No such file or directory.
Resolving the problem
Cognos is linked to the openmotif library 2.2.X that contains a symbolic link to
libXm.so.3. When libXm.so.3 library is upgraded, the openmotif library is
upgraded as well. Newer versions of openmotif do not have the symbolic link to
libXm.so.3 but rather to libXm.so.4, while Cognos requires libXm.so.3.
Create a new symbolic link: ln -s libXm.so.4 libXm.so.3 and return to the
installer.
UDA-SQL-0031 Unable to access database: QE-DEF-0285
Logon failure
Symptoms
Testing a database signon returns an error saying that the password is invalid,
despite the fact that the credentials used are correct.
Resolving the problem
After you have installed Tivoli Common Reporting and the remote database, add
the following lines to the startTCRserver.sh script located in TCR_component_dir:
#
# Setup Cognos and DB2 Environment
#
LIBPATH=/opt/IBM/tivoli/tipv2Components/TCRComponent/cognos/bin; export LIBPATH
PATH=$PATH:/opt/IBM/tivoli/tipv2Components/TCRComponent/cognos/bin; export PATH
. /home/db2inst1/sqllib/db2profile
User interface does not work after installing in distributed
scenario
Symptoms
Chapter 5. Troubleshooting and support
69
After installing in distributed scenario, Tivoli Common Reporting user interface
does not work and the following error displays:
Error 500: javax.servlet.ServletException:
CAM-CRP-1114 Unable to find the Certificate Authority self-signed
certificate with alias ’ca’ in the keystore
’/opt/IBM/tivoli/tipComponents/TCRComponent/cognos/configuration/signkeypair/jCAKeystore’
Causes
The Tivoli Common Reporting engine is of different bitness than the user interface.
All Tivoli Common Reporting components must be installed either in 32-bit mode
or 64-bit mode.
Resolving the problem
Install Tivoli Common Reporting user interface with the same bitness as the
reporting engine. For example, if the reporting engine is 32-bit, the user interface
must be 32-bit as well.
You can also install the whole infrastructure again with an installer of the same
bitness.
Deployment Engine does not support libstdc++.so.6 on Linux
Symptoms
When installing on Red Hat Enterprise Linux 5 whose standard C++ library is
/usr/lib/libstdc++.so.6 or higher, the installation process fails with the following
error message:
ACUOSI0050E External command action failed with return code 1.
Invocation string: [/usr/ibm/common/acsi/bin/wscanhw,
-o,/tmp/collector6121817250515411664.tmp,
-c/usr/ibm/common/acsi/dat/config/scanconfig/xml]
Causes
The problem occurs because libstdc+.so.6 or higher is not supported and
libstdc+.so.5 is missing from your system.
Resolving the problem
Install the compat-libstdc+-33 packages:
v On 32-bit and 64-bit systems, run: $yum install compat-libstdc++-33.i686.
v On 64-bit systems, additionally run: $yum install compat-libstdc++-33.x86_64.
Error cannot create ././@LongLink: Permission denied when
installing Tivoli Common Reporting
Symptoms
When installing Tivoli Common Reporting on UNIX operating systems, a tar
expansion error may occur.
Causes
on UNIX platforms, the WebSphere Service Registry and Repository download
package must be extracted using the Gnu tar command. The standard tar
70
User Guide
command, for example on AIX, cannot handle long path names in the download
package and an error similar to the following is displayed:
tar: 0511-188 Cannot create ././@LongLink: The file access permissions do not allow the
specified action.
x JDK/jre.pak/repository/package.java.jre/
java/docs/launchpad/skins/expressLaunchpadModernSkin/images
tar: 0511-169 A directory checksum error on media; -265813056 not equal to 29292.
Resolving the problem
Install the Gnu tar package for your platform. It is available in the optional
software supplied together with your UNIX operating systems or you can
AIX
: You can download the Gnu
download it from the Tar download page.
tar from the IBM AIX Toolbox web site.
Replace /usr/bin/tar with the Gnu tar. After installing the tar package, use the
gtar binary file to extract the WebSphere Service Registry and Repository
download image.
Uninstalling the Deployment Engine to complete Tivoli
Common Reporting manual uninstallation
Uninstalling the Deployment Engine if there are other products using it is risky
and may cause the products to work improperly. To avoid this situation, uninstall
the Deployment Engine using Tivoli Common Reporting scripts.
Symptoms
Manual uninstallation of Tivoli Common Reporting involves removing the
Deployment Engine, and therefore cannot be completed if there are other products
using the Deployment Engine.
Resolving the problem
Create the following scripts to uninstall the Deployment Engine:
Windows
@echo off
setlocal
SET TCR_HOME=%1%
SET COMMON_SETENV1="%ProgramFiles%\IBM\Common\acsi\setenv.cmd"
SET COMMON_SETENV2="%ProgramFiles(x86)%\IBM\Common\acsi\setenv.cmd"
IF EXIST %COMMON_SETENV1% GOTO COMMONSET1
IF EXIST %COMMON_SETENV2% GOTO COMMONSET2
GOTO EMPTYSET
:COMMONSET1
CALL %COMMON_SETENV1%
GOTO FOUND
:COMMONSET2
CALL %COMMON_SETENV2%
:FOUND
call listIU -v | findstr -v SoftwareIUTypeID | findstr RootIUTypeID |
findstr /i %TCR_HOME% > %TEMP%\tempDE.file
for /F "tokens=4 delims=[,]" %%j
IN (%TEMP%\tempDE.file) do call deleteRootIU %%j %TCR_HOME%
GOTO endlocal
Chapter 5. Troubleshooting and support
71
:EMPTYSET
echo Deployment Engine not installed on the system
exit /b 1
:endlocal
exit /b 0
endlocal
Linux
UNIX
#!/bin/sh
TCR_HOME=$1
arch=`uname -s`
if [ `echo $arch | grep SunOS` ]; then
USERNAME=`/usr/ucb/whoami`
else
USERNAME=`whoami`
if
setenvcmd="$HOME/.acsi_$USERNAME/setenv.sh"
# First look in the users location
if [ -f $setenvcmd ]; then
. "$setenvcmd"
else
# Then try the common location
setenvcmd=’/var/ibm/common/acsi/setenv.sh’
export setenvcmd
if [ -f $setenvcmd ]; then
. "$setenvcmd"
else
echo ’Deployment Engine not installed on the system’
exit 3
if
if
tmpTCRfile="/tmp/$$.out"
listIU.sh -v | grep TCR | grep -v SoftwareIUTypeID | grep RootIUTypeID | grep $TCR_HOME
| awk -F[ ’{print $3}’ | awk -F, ’{print $1}’ > $tmpTCRfile
while read line
do
deleteRootIU.sh $line $TCR_HOME
done<$tmpTCRfile
rm $tmpTCRfile
echo ’Operation completed successfully’
exit 0
Run the script twice, for the first time specifying TCR_install_dir as path, and for
the second tme specifying TCR_component_dir as path.
Installation on Solaris fails
Symptoms
When installing Tivoli Common Reporting on Solaris operating system, the
installation fails because of too low physical memory or not enough swap space.
The following error is displayed:
Execute failed: java.io.IOException:
Cannot run program "chmod" (in directory "/opt/IBM/tivoli/tipv2/profileTemplates/default/actions"):
error=12, Not enough space
72
User Guide
Resolving the problem
Add swap space:
1. Run the following command: mkfile 3072m /var/newswap to create a 3 GB file
which will be used as swap.
2. Add the swap by running the swap -a /var/newswap command.
3. Clean the environment and run theTivoli Common Reporting installer again.
During Cognos Mobile installation, the installation script fails
with an exception
Symptoms
When installing Cognos Mobile, the script fails with the following exception:
Exception in thread "main" java.lang.NoClassDefFoundError: org.apache.tools.ant.
Main
Caused by: java.lang.ClassNotFoundException: org.apache.tools.ant.Main
at java.net.URLClassLoader.findClass(URLClassLoader.java:434)
at java.lang.ClassLoader.loadClass(ClassLoader.java:653)
at sun.misc.Launcher$AppClassLoader.loadClass(Launcher.java:358)
at java.lang.ClassLoader.loadClass(ClassLoader.java:619)
Could not find the main class: org.apache.tools.ant.Main. Program will exit.
Causes
The mobile installation scripts use ANT libraries from the Deployment Engine
libraries location. The installMobile.bat script uses the libraries located in
ANT_LIB=C:\Progra~1\IBM\common\asci\lib, and the installMobile.sh script uses
libraries from ANT_LIB=/usr/ibm/common/acsi/lib. These scripts will not run if
Deployment Engine has been removed from the system.
Resolving the problem
If you have removed Deployment Engine from your system, download and install
any ANT 1.7.1 or later and point to its libraries from the mobile installation scripts.
Troubleshooting Common Reporting
Identify and resolve problems that might occur when you are using the product.
This section contains problems that might occur when working with your reports,
as well as Cognos-related problems.
Browsing images does not work in Report Studio
Symptoms
When adding image to a report in Report Studio, you cannot browse images. The
image directory is displayed as empty.
Causes
WebSphere Application Server does not support WebDav.
Resolving the problem
Type the image URL as a relative path. For example: ../tivoli/tcr_common/
images/tivoli.gif
Chapter 5. Troubleshooting and support
73
Your login session expires while working with the Common
Reporting portlet
Symptoms
While working with Common Reporting portlet, your session expires and a
Cognos authentication window appears asking you to provide your user name and
password.
Resolving the problem
Click Cancel, return to Tivoli Integrated Portal login screen, provide your
credentials, and open the Common Reporting portlet again.
ODBC System DSN connections fail to test from the Tivoli
Common Reporting server
Symptoms
On 64-bit Windows operating systems, ODBC System DSN connections test
successfully from the Windows ODBC utility, but fail to test successfully from the
Tivoli Common Reporting server when creating a data source. The following error
message is displayed: UDA-SQL-0532 Data Source is not accessible.
Causes
64-bit Windows contains both a 32 and 64-bit version of the ODBC utility:
v The 32-bit version of the Odbcad32.exe file located in the system_drive\Windows\
SysWoW32 folder.
v The 64-bit version of the Odbcad32.exe file located in the system_drive\Windows\
SysWoW64 folder.
64-bit applications only see the data sources defined from the 64-bit Windows
ODBC utility. The same happens for 32-bit. The ODBC utility launched from
Administrative Tools is the 64-bit version. Tivoli Common Reporting is a 32-bit
application so it does not see the 64-bit ODBC data sources.
Resolving the problem
Use the 32-bit version of the Windows ODBC utility to define the data sources. The
32-bit version of the Odbcad32.exe file is located in the system_drive\Windows\
SysWoW32 folder.
For more information, see http://support.microsoft.com/kb/942976
When starting Framework Manager you are prompted to
supply your login details twice
Symptoms
When you initiate Framework Manager, you are required to provide your login
credentials. When you have done that, a Framework Manager login panel is
displayed with the following text: Provide valid credentials. The user or
password your provided is not valid.
Causes
74
User Guide
Framework Manager requires you to login twice because it does not support single
sign-on.
Resolving the problem
Ignore the message about invalid user or password and provide your login
credentials again.
Drill-through definitions in BIRT reports do not work
Symptoms
From time to time, drill-throughs in BIRT might not be working.
Resolving the problem
Restart the Tivoli Common Reporting server:
1. Stop the server by navigating to the following directory in the command-line
interface:
v
v
TCR_component_dir\bin, and running the stopTCRserver.bat
command.
Windows
UNIX
Linux
TCR_component_dir/bin,, and running the
stopTCRserver.sh
2. Start the server from the command-line interface by navigating to:
v
v
Windows
TCR_component_dir\bin, and running the startTCRserver.bat
command.
UNIX
Linux
TCR_component_dir/bin,, and running the
startTCRserver.sh
The Work with reports window is blank
Symptoms
After restarting Tivoli Integrated Portal server and navigating to Common
Reporting, the Work with reports window on the right is blank.
Causes
This happens because when Tivoli Integrated Portal server is starting, all the
applications installed in embedded WebSphere Application Server start as well,
which takes some time.
Resolving the problem
Wait for all the applications to load.
An error UDA-SQL-0569 appears while starting Cognos server
Symptoms
When starting Cognos server, the error: UDA-SQL-0569 - Unable to load the
driver manager library (db2cli.dll) occurs. The server does not start.
Causes
Chapter 5. Troubleshooting and support
75
Cygwin is installed on Windows Server and the bin directory is added to the
PATH variable.
Diagnosing the problem
You can find the error in the log file or directly in the details of Cognos startup
dialog, which is displayed by the Configuration tool (cogconfigw).
Resolving the problem
Remove the Cygwin/bin entry from your system PATH and restart the system.
An error occurs when starting Framework Manager
Symptoms
An error BME-EX-0047 Unable to read preferences for the requested.. appears
when opening or creating a project in Framework Manager and Framework
Manager no longer works properly.
Resolving the problem
Overwrite the bmt.ini file that you can find in the configuration directory. You can
find a working copy of this file on other computer or from the backup.
Logon fails in Turkish locale
Symptoms
When installing Tivoli Common Reporting on an unsupported locale, errors related
to database connection may appear.
Causes
This problem occurs if you have the following configuration:
v You have DB2 installed, and when testing the connection from DB2 client, the
connection test succeeds.
v You have created a native connection to Cognos Business Intelligence.
v The locale settings for your server machine is Turkish. You can verify this from
shell by typing: enx | grep LANG. The system output for Turkish is:
LANG=tr_TR.UTF-8.
v When testing the connection to Cognos, you get the error:
UDA-SQL-0031 Unable to access the "testDataSourceConnection" database.
UDA-SQL-0040 A syntax error was detected while parsing "{0}" in the file "{1}"
UDA-SQL-0038 S syntax error was detected while parsing the line number "574" near
"insert" in the file "opt/IBM/tivoli/TIP21Components/TCRComponent/Cognos/c8/./bin/./
cogdmd2.ini
In this case, Cognos uses a meta SQL code, independent from the vendor, and
the problem is in the conversion process from Cognos SQL to native SQL. At
line 574 of the cogdmd2.ini file that maps each Cognos SQL command to native
DB2 SQL the statement:
Insert="insert"
is wrongly translated because of the toLowerCase() and toUpperCase() functions
of String class for the letters I and i that in Turkish have special meaning.
76
User Guide
Resolving the problem
Change the environment language to en_US.UTF-8.
Error QE-DEF-0368: Unable to decrypt user name and
password credentials from the content store
Symptoms
User name and password cannot be decrypted from the Cognos Content Store. If
you point Framework Manager to a new Tivoli Common Reporting installation,
you may get the following error: QE-DEF-0368 Unable to decrypt user name and
password credentials from the content store
Causes
This happens when old credential keys are cached in Framework Manager
Resolving the problem
1. Close Framework Manager together with its configuration user interface.
2. Navigate to the FM_install_dir\Configuration directory.
3. Back up the following directories: csk, encryptkeypair, signkeypair and
delete them.
4. Open Configuration, click Save, and Apply.
Unable to locate libcoguador on Linux with Oracle
Symptoms
If you are using Cognos on Linux with Oracle data source, and you try to test the
Cognos connection from the user interface, you may get an error that Cognos is
unable to locate the libcoguador gateway.
Resolving the problem
Cognos does not support 64-bit systems so if you are using a 64-bit system, and
the Oracle client is a 64-bit version, install a 32-bit version of the Oracle client and
see the following instructions to configure it Cognos Oracle connection problems.
Fast path:
1. Install 32-bit Oracle client.
2. Restart your computer.
3. Set the variable COGNOS_HOME to point to the base directory of the Oracle
client installation.
4. Configure the system library path to point to the Oracle client libraries (32-bit
version). You must modify the following variables:
v
Solaris
LD_LIBRARY_PATH
v
Linux
LD_LIBRARY_PATH
v
HPUX
SHLIB_PATH
v
AIX
v
Windows
LIBPATH
PATH
Chapter 5. Troubleshooting and support
77
Oracle environment variables for non-Oracle default user
Symptoms
The variables ORACLE_HOME and LD_LIBRARY_PATH necessary to correctly
connect to an Oracle data source are set automatically by the /etc/profile.d/
oracle.sh script. This happens only for an Oracle user.
Resolving the problem
If you are using non-Oracle user, set the ORACLE_HOME and
LD_LIBRARY_PATH manually or modify the oracle.sh script to set them for all
users.
The Common Reporting portlet does not work properly in
Internet Explorer 8
Symptoms
When opening Tivoli Common Reporting in Internet Explorer 8, the Common
Reporting portlet does not display properly. Some of the windows do not open or
are not editable.
Causes
This problem occurs if you access Tivoli Common Reporting from the Local
intranet zone of Internet Explorer and the security settings for Local intranet and
Internet zones differ.
Resolving the problem
Change Internet Explorer security configuration:
1. In the Internet Explorer 8 window, go to Tools → Internet Options and select
the Security tab.
2. Select the Local intranet zone and change the security level for this zone to
Medium-high.
3. Click Sites, then Advanced and add the Tivoli Integrated Portal site.
4. Select the Internet zone and change the security level for this zone to High.
5. On the same tab, click Custom level, find Scripting → Active scripting in the
tree, and select Enable.
6. Save your settings.
No content displayed in Common Reporting portlet in Internet
Explorer 7
Symptoms
The Common Reporting portlet is blank when opened in Internet Explorer 7 with
default security settings.
Resolving the problem
Customize the browser security settings to match the portlet demands.
To change the settings:
78
User Guide
v In Internet Explorer 7 window, go to Tools → Internet Options, and on the
Security tab in the Security level for this zone section, click Custom level....
v On the list, find the Miscellaneous category, and disable the Access data sources
across domains option.
v Click OK to apply the changes.
Charts in reports do not appear
Symptoms
When rendering a report, charts do not appear and an error appears in the log
files. The log file is in the directory TCR_install_dir/profiles/TIPProfile/logs in
the form YYYY MM DD hh mm ss.log, where YYYY is the year, MM is the month, DD
is the day, hh is the hour, mm is the minute, and ss is the second. The file reports
the following error: May 19, 2010 2:09:43 PM
org.eclipse.birt.chart.exception.ChartException logThis WARNING: Exception
org.eclipse.birt.chart.exception.ChartException: CREATE_EXTENSION_FAIL at
org.eclipse.birt.chart.util.PluginSettings.getPluginXmlObject(PluginSettings.java:987)
at org.eclipse.birt.chart.util.PluginSettings.getDisplayServer
(PluginSettings.java:545)at
org.eclipse.birt.chart.device.swing.SwingRendererImpl.init
(SwingRendererImpl.java:130)at
org.eclipse.birt.chart.device.swing.SwingRendererImpl.<init>
(SwingRendererImpl.java:122)at
org.eclipse.birt.chart.device.image.JavaxImageIOWriter.<init>
(javaxImageIOWriter.java:123)at
org.eclipse.birt.chart.device.image.PngRendererImpl.<init>
(PngRendererImpl.java:18).
The error appears on UNIX operating system.
Causes
BIRT requires a graphical user interface API to render charts. This error appears
only on UNIX-like systems, where a graphical user interface is an optional
component. It does not appear on Windows, where the Win32 API always contains
the graphical user interface API.
Resolving the problem
Install the X system. Below is a list of packages that help for SUSE Linux (for other
distributions, similar packages are available:
Linux SLES (9.156.46.78) [10:44] root /usr/lib # rpm -qa | grep xorg
v xorg-x11-server-6.9.0-50.58
v xorg-x11-fonts-75dpi-6.9.0-50.58
v
v
v
v
v
xorg-x11-6.9.0-50.58
xorg-x11-fonts-100dpi-6.9.0-50.58
xorg-x11-Xvnc-6.9.0-50.58
xorg-x11-driver-video-radeon-6.6.3-0.19
xorg-x11-server-glx-6.9.0-50.58
v xorg-x11-libs-6.9.0-50.58
v xorg-x11-driver-video-nvidia-6.9.0-46.51
Chapter 5. Troubleshooting and support
79
v
v
v
v
xorg-x11-fonts-scalable-6.9.0-50.58
xorg-x11-libs-32bit-6.9.0-50.58
xorg-x11-Xnest-6.9.0-50.58
xorg-x11-driver-video-6.9.0-46.51
Cognos Configuration does not open
Symptoms
Launching Cognos Configuration fails.
Causes
This happens when the JAVA_HOME environment variable points to a different
Java than the Cognos Java.
Resolving the problem
To resolve the problem, you can:
v Follow the steps in IBM Cognos information center to update your Java
environment.
v Open the IBM Cognos Configuration by running:
–
Windows
–
Linux
TCR_component_dir\cognos\bin\tcr_cogconfig.bat
UNIX
TCR_component_dir/cognos/bin/tcr_cogconfig.sh
The script sets the correct Java.
Cannot open the sample overview report
Symptoms
After installing Tivoli Common Reporting, when opening the sample overview
report, an error message appears and the report does not open.
Resolving the problem
To
1.
2.
3.
resolve the problem:
Locate the file \WEB-INF\services\reportservice.xml.
In the file, locate the section that refers to async_wait_timeout_ms.
Modify the setting to increase the timeout from the default (30 seconds) to a
larger setting, for example 90 seconds (90000 ms).
4. Save the file.
5. Restart the IBM Cognos service.
Error after running a sample overview report
Symptoms
After running a sample overview report, an error with the ID UDA-SQL-0114 is
displayed.
Causes
This error is caused by a memory issue.
80
User Guide
Resolving the problem
See the IBM web page for most common solutions to this problem.
When trying to find users in user repository, an error appears
Symptoms
If you have configured a large user repository, and then you are trying to find
users in this user repository, a NullPointerException appears as a result.
Resolving the problem
To resolve the problem:
1. In the Tivoli Integrated Portal console, select Launch → Cognos Administration
→ Configuration → Dispatchers and Services.
2. Click the link to the dispatcher.
3. Click Set Properties to the Content Manger Service.
4. Select Settings.
5. In Advanced Settings, select Edit to Environment.
6. Enter CM.CMREQUEST_PERFALARM_THRESHOLD as the parameter.
7. Enter 3600000 as the value. 3600000 is an hour, you can increase this value if
necessary.
8. Confirm your settings and restart the service.
Connection with the datasource fails
Symptoms
When testing the connection with the datasource, the DPR-ERR-2002 error message
is displayed. The connection with the data source cannot be established.
Resolving the problem
Remove the hard_drive\work\tools\windk\bin directory from the PATH
environment variable.
Cannot save IBM Cognos Configuration settings
Symptoms
When trying to save IBM Cognos Configuration settings, the following error
message appears: The cryptographic infromation cannot be encrypted. Do you
want to save the configuration in plain text?.
Resolving the problem
Go to the Environment section and specify http://localhost:16315/tarf/
servlet/dispatch for the Gateway URI and Dispatcher URI for external
applications.
The reporting engine fails to start with the SQLCODE=286 and
SQLSTATE=42727
Symptoms
Chapter 5. Troubleshooting and support
81
After you have installed Tivoli Common Reporting and configured it to use DB2 as
the content store database, the reporting engine does not start with SQLCODE=286
and SQLSTATE=42727.
Causes
The DB2 user that was used for connecting to DB2 and creating all the databases is
the only user that can access this table space. An error occurs when a different
used is used to connect to DB2.
Resolving the problem
Use the DB2 user name and password that you previously used to create the
database. If you do not know this user name or password:
1. Run the following command to check if the user has access to the temporary
user table space:
db2 connect to database_name user_id using password
db2 declare global temporary table t1 (c1 char(1))
with replace on commit preserver rows not logged
db2 disconnect database_name
If this command fails, it means that the user cannot access the temporary user
table space in the database, In such case, move on to Step 2.
2. Run the following command to create a new temporary table space for the
user:
db2 connect to database_name user_id using password
db2 create user temporary tablespace usertmp2 managed by system using (’usertmp2’)
db2 disconnect database_name
For more information, consult DB2 information center.
Report Studio does not work with Internet Explorer 8
Symptoms
When trying to open Cognos 8.4.1 reports in Internet Explorer 8, the following
error message appears:
CM-REQ-4158 The search path "/content/folder[@na#e=’folder’]/report[@name=’report’] is invalid
Causes
The Internet Explorer 8 XSS filter scrambles the Cognos search path rendering it
invalid.
Environment
All Windows operating systems.
Resolving the problem
Apply the following changes to Internet Explorer 8:
1. Add Cognos URL to Trusted Sites list.
2. Modify the options of the Trusted Sites zone and set the "Enable XSS Filter"
property to "Disable".
3. Restart the web browser.
82
User Guide
Note: Turning off the browser's XSS filter has little or no risk when done only on
the Trusted Sites zone. The IBM Cognos BI application has an internal firewall
which protects it from XSS attacks, so the browser's filter is redundant.
Reports do not run with SELinux Security enabled
Symptoms
On Red Hat Enterprise Linux, reports do not run when SELinux Security is
enabled. When running a report, the following error is displayed:
DPR-ERR-2056: The Report Server is not responding
You can view the details of the error in the TCR_Component_dir/Cogserver.log file:
./mfwlibxpathparser.so: cannot restore segment prot after reloc: Permission denied
Resolving the problem
On Red Hat Enterprise Linux operating systems, SELinux is an extra layer of
security which blocks many ports causing problems in server communication.
Disable the SELinux security setting the SELINUX parameter in
/etc/selinux/config to SELINUX=disabled.
BIRT drill-through definitions do not work in Cognos
Symptoms
When importing BIRT reports with drill-through definitions referencing a report
located in another directory to Cognos, the import operation is successful but the
drill-through definitions do not work
Resolving the problem
In a drill-through definition, when referencing a report from another folder, the
definition includes the folder name, as in the following example:
<report_dir>/target_BIRT_report.rptdesign
Modify the definition by removing the <report_dir> so that it points directly to
the referenced report, such as target_BIRT_report.rptdesign. For example, if your
definition contained the following path:
<data id=’10004222">
<property name="resultSetColumn">MODIFIEDDATE</property>
<structure name="action">
<property name="linkType">drill-through</property>
<property name="reportName">Device Configuration/itncm_device_config.rptdesign</property>
<property name="targetWindow">_blank</property>
<property name="targetFileType">report-design</property>
<list-property name="paramBindings">
remove the Device Configuration folder to obtain:
<data id=’10004222">
<property name="resultSetColumn">MODIFIEDDATE</property>
<structure name="action">
<property name="linkType">drill-through</property>
<property name="reportName">itncm_device_config.rptdesign</property>
<property name="targetWindow">_blank</property>
<property name="targetFileType">report-design</property>
<list-property name="paramBindings">
Chapter 5. Troubleshooting and support
83
Scheduled reports do not run after changing user password
Symptoms
After changing user password for Tivoli Integrated Portal, reports scheduled for
that user do not work unless run manually.
Causes
There are two permission systems - Tivoli Integrated Portal and Tivoli Common
Reporting. When you change your user password in one of them, you must refresh
the settings in the other one as well.
Resolving the problem
Change your user password for Tivoli Common Reporting:
1. Log in to Tivoli Integrated Portal with the user whose password changed.
2. Go to Tivoli Common Reporting.
3. Select My Area → Preferences and then go to the Personal tab.
4. Scroll down to the Credential section and click the Renew the credentials link.
5. Provide the new password.
84
User Guide
Chapter 6. Reference
Reference information supports the tasks that
you want to complete. It includes system
messages.
Commands
This section contains topics that provide
information about command-line interface in
IBM Tivoli Common Reporting .
C:\>
The trcmd command provides access to the Tivoli Common Reporting
command-line interface. Use this command to perform administrative tasks related
to reports, report sets, and report designs.
The command-line interface is available only on the system where Tivoli Common
Reporting is installed. To use the trcmd command, go to the tipv2Components/
TCRComponent/bin subdirectory of theTivoli Integrated Portal installation directory.
Each command function is accessed using a command flag, which must be the first
command-line argument following trcmd (trcmd.sh on Linux and UNIX systems).
Each command flag might have multiple flag sets; a flag set is a set of
command-line arguments used together to perform a specific task. For example,
different flag sets for trcmd -import are used to import reports.
To see syntax and usage information for any trcmd command flag, use the -help
flag. For example, to see information about the -list command flag, use this
command:
trcmd -list -help
The command reference topics in this section use special characters to define
command syntax:
[]
Identifies an optional argument. Arguments not enclosed in brackets are required.
...
Indicates that you can specify multiple values for an argument.
|
Indicates mutually exclusive arguments. Specify either the argument to the left of
the separator or the argument to the right of the separator, but not both.
{}
Encloses a set of mutually exclusive arguments separated by |.
© Copyright IBM Corp. 2007, 2012
85
Tip: The documentation in this section shows the command usage for a Windows
system. On a Linux or UNIX system, use trcmd.sh.
Command-line authentication
You must supply a valid user ID and password to use the Tivoli Common
Reporting command-line interface.
For some operations, your user ID must have sufficient permissions to access the
specified objects; for example, you might need access to a particular report or
report set. For more information about authorization, see Constraining access to
BIRT reports.
You can specify the user ID and password in the following way:
On the command line, use the -user userID -password password arguments, as in
the following example:
trcmd -list -reports -user tipAdmin -password adminPassword
For distributed installation with LDAP configured you must use the -namespace
parameter, which is optional for other installation scenarios. If you do not provide
it, default value will be used. Its default value depends on the installation scenario
that you chose. For installation on a single computer, it is VMMProvider, and for
distributed installation, it is LDAP.
trcmd -access
The -access command flag for the trcmd command grants, removes or denies
access for a particular user, group, or role to access a specified resource.
Syntax
Use this syntax to change access to a resource:
trcmd -access {-grant | -remove | -deny} -permissions permission1 permission 2..
{-entity cognosSearchPath | -reportSet cognosSearchPath} {-accessIdentity
cognosSearchPath | -accessUser cognosSearchPath | -accessGroup
cognosSearchPath}[-help]
Use this syntax to cause a resource to inherit all its permissions from a parent
object:
trcmd -access -inheritPermissions -entity cognosSearchPath
Note:
1. Authentication with -user userID and -password password is required in all
cases.
2. If you have installed Tivoli Common Reporting in distributed installation, you
must use the -namespace parameter.
3. If you have configured more than one user repository, specify the -namespace
value. By default, the -namespace parameter points to VMMProvider.
Parameters
-accessIdentity identityName
The name of entity for which authorization is to be changed. It can be a user,
group, or role.
86
User Guide
-accessGroup groupName
The function of this flag is identical to the -accessIdentity flag. Its presence
ensures compatibility with earlier versions of Tivoli Common Reporting.
-accessUser userName
The function of this flag is identical to the -accessIdentity flag. Its presence
ensures compatibility with earlier versions of Tivoli Common Reporting.
-deny
Prevents a user or group from accessing the specified resource. If a user
belongs to more than one group, and any of these groups has been denied
access to a resource, the user will not be able to access this resource.
-entity cognosSearchPath
Specifies the Cognos search path to a resource.
-grant
Adds an authorization permission for the specified user, role, or group to
access the specified resources. If a user has multiple roles and belongs to
multiple groups, it is enough to grant permission to any of these objects.
-help
Displays syntax and usage information of a command flag.
-permissions permission1 permission 2..
Specifies the type of permission that you want to grant to a user or group. You
can grant multiple permissions at the same time. They must be separated by
space. Possible values are:
v read
v write
v execute
v setPolicy
v traverse
-remove
Removes deny on a permission, as well as an authorization role for the
specified user or group to access the specified resources. However, if a user
belongs to more than one group, and any of these groups has access to a
specified resource, the user will still be able to access this resource.
Examples
v This example grants user CAMID('VMMProvider:tester') setPolicy and write
permissions to the object /content/package[@name='Common
Reporting']/report[@name='Reporting Overview']:
trcmd.bat -user tipadmin -password tipadmin -access -grant
-permissions write setPolicy
-entity "/content/package[@name=’Common Reporting’]/
report[@name=’Reporting Overview’]"
-accessIdentity "CAMID(’VMMProvider:tester’)"
v This example lists authorizations that the user tipadmin has to the object
/content/package[@name='Package1']:
trcmd.bat -list -authorizations -entity "/content/package[@name=’Package1’]"
-user tipadmin -password tipadmin
trcmd -checkstatus
Use the -checkstatus command flag for the trcmd command to check the status of
a specific Tivoli Common Reporting component.
Chapter 6. Reference
87
Syntax
Use this syntax to check the status of a component:
trcmd -checkstatus-reportingEngine [minutesToWait minutes]
Note:
1. If you have installed Tivoli Common Reporting in distributed installation, you
must use the -namespace parameter.
2. If you have configured more than one user repository, specify -namespace
value. By default, -namespace points to VMMProvider.
Arguments
-reportingEngine
Checks the status of the reporting engine.
-minutesToWait minutes
Specifies the maximum component response time in minutes. 0 is the default
value used if no other value is specified and it means that an instant response
is expected.
Sample
This example checks the status of the reporting engine. The expected response time
should be 2 minutes.
trcmd.bat -checkstatus -reportingEngine -minutesToWait 2
trcmd -convert
The -convert command flag for the trcmd command allows you to convert existing
BIRT reports into Cognos draft reports. A draft report includes some elements of
BIRT reports, such as layout and style, and is used as a basis for the creation of a
fully-fledged Cognos report. It cannot be used for Cognos reports.
Syntax
trcmd -user userID -password password -namespace authentication namespace
-convert -report cognosSearchPath [-parameters p1 p2 p3..] imagesDir
images_directory [-help]
Note:
1. Authentication with -user userID and -password password is required.
2. If you have installed Tivoli Common Reporting in distributed installation, you
must use the -namespace parameter.
3. If you have configured more than one user repository, specify -namespace
value. By default, -namespace points to VMMProvider.
4. Before converting a BIRT report, ensure that it has properly configured data
sources and that it can be run without errors.
Restriction: After the conversion, a report may not run properly. This is a normal
situation. In such case, complete the report conversion in Report Studio to be able
to run it.
88
User Guide
Arguments
-imagesDir images_directory
Specifies the location where the images generated by a BIRT report will be
copied during the conversion. After the conversion. you will need to copy the
images to the right folders. This parameter is optional for single-box
installation and when you run this command on the computer where the user
interface is installed. If you run this command on the computer where the
reporting engine is installed, this parameter is obligatory.
Important: If you are running this command on the computer with the user
interface, you must copy the images to the computer where the reporting
engine is installed if you want them to display in PDF reports.
-parameters p1 p2 p3..
A list of parameter values used for running the report, separated by spaces.
These values override any default values specified in the report or report
design. Each parameter value must be specified using the following format:
param=value
If the value contains spaces, enclose the parameter in double quotation marks:
"param=spaced value"
Each parameter must correspond to a valid parameter specified in the report
design. Note that the multivalued parameters are supported, for example:
-parameters color=blue color=red
There are two optional parameters available. These are the following:
-locale
Specifies the language of the report, for example -locale en for English. To
see the list of ISO codes for languages, or to search by code or language ,
go to http://www.loc.gov/standards/iso639-2/langhome.html. Find the
2-character ISO 639-1 code for your language.
-validateParams true
When set to its default value true, enables checking of default report
parameters. When set to false, requires you to specify the parameters that a
report will use in detail, for example date format.
-report cognosSearchPath
The unique search path of the report you want to run.
Restriction: The report chosen for conversion has to be a BIRT report. If you
choose a Cognos report, the conversion will be aborted and you will receive an
error message.
-help
Displays syntax and usage information of a command flag.
There is an optional parameter available. This is the following:
-package cognosSearchPath
This parameter allows you to choose the location where the converted report is
saved, different from the original one. The package name specified must exist
in Cognos.
Examples
v This example converts a BIRT report named "IT Finances":
Chapter 6. Reference
89
trcmd -user tipadmin -password your password -namespace VMMProvider -convert -report
/content/package[@name=’’Sales and Retailers’]/report[@name=’IT Finances’]
v This example converts a BIRT report named "IT Finances" and places it in a
package named "Business Plan":
trcmd -user tipadmin -password your password -namespace VMMProvider
-convert -report content/package[@name=’Sales and Retailers’]/
report[@name=’IT Finances’]
-package /content/package[@name=’Business Plan’]
trcmd -datasource
Use the -datasource command flag for the trcmd command to add a data source or
test data source connectivity.
Important: This command can be used for Cognos data sources only.
Syntax
Use this syntax to add a new data source:
trcmd -datasource -add data_source_name [-connectionName connection_name]
[-connectionString connection_string] [-dbType DB2 | ORACLE | ODBC | XML
-dbName database_name[-collation collation_sequence]] [-signonName signon_name]
[-dbLogin database_login -dbPassword database_password] [-users
namespace1:username1 namespace2:username2] [-groups namespace1:groupname1
namespace2:groupname2] [-roles namespace1:rolename1 namespace2:rolename2] [-force]
[-hidden] [-help]
Use this syntax to test the data source connection with the database:
trcmd -datasource -test data_source_name [-connectionName connection_name]
[-signonName signon_name] [-dbLogin database_login -dbPassword
database_password]
Tip: The -datasource command is used for creating a new data source connection.
If you want to modify and existing data source connection, you can do this with
the -force flag using the existing connection's name. To modify the data source:
1. Obtain the name of the data source that you want to change.
2. Run the -datasource as if you were creating a new data source and use the
-force flag. The flag modifies the data source by overwriting the existing data
source.
Note:
1. Authentication with -user userID and -password password is required.
2. If you have installed Tivoli Common Reporting in distributed scenario, you
must use the -namespace parameter.
3. If you have configured more than one user repository, specify the -namespace
value. By default, -namespace points to VMMProvider.
Restriction: Testing XML data sources is not supported by the command line.
Arguments
-add data_source_name
Adds a new data source. When used with -force, overrides the existing data
source.
90
User Guide
-connectionName connection_name
The name of the connection between the data source and the database. If you
do not specify it when adding a new data source, the data source name will be
used as connection name. If you do not specify it when testing the database
connection with the data source, the first found connection will be used.
-connection string connection_string
Specifies the parameters of the database connection. If you specify -dbType,
-connectionString must contain database specific connection string. If you do
not specify -dbType, -connectionString must contain fully qualified Cognos
connection string.
-collation collation_sequence
Specifies the collation sequence.
-dbType
Specifies the type of the database such as DB2, Oracle, ODBC, or XML. If you
specify a database other than one of these, you must provide the exact Cognos
connection string.
-dbName database_name
Specifies the name of the database.
-dbLogin database_login
The database login needed to access the database.
-dbPassword database_password
Specifies the password needed to access the database.
-force
Overrides the data source, connection or sign-on if it already exists.
-groups namespace1:groupname1 namespace2:groupname2
Specifies the names of groups that can access the sign-on. If you omit
namespace, the default Cognos namespace will be used.
-hidden
Hides the data source from other users.
-help
Displays syntax and usage information of a command flag.
-roles namespace1:rolename1 namespace2:rolename2
Specifies the names of roles that can access the sign-on. If you omit namespace,
the default Cognos namespace will be used.
-signonName signon_name
When used with the -add parameter, it specifies the sign-on name needed to
access the database. If you do not use -signonName, database_login name will
be used as the sign-on name.
When used with the -test parameter, it specifies the sign-on name needed to
access the tested database. If you do not specify it, the -dbLogin and
-dbPassword parameters will be used as the sign-on name. If you omit
-signonName, -dbLogin, and -dbPassword, the first sign-on on the list will be
used to test the data source.
-test data_source_name
Tests the connection between the data source and the database.
-users namespace1:username1 namespace2:username2
Specifies users that can access the sign-on. If you omit namespace, the default
Cognos namespace will be used.
Chapter 6. Reference
91
Example
This example adds a DB2 data source named "ITM" that can be accessed by
"tipadmin" users belonging to a group named "Everyone":
trcmd.bat -user tipadmin -password XXX -dataSource -add ITM
-dbType DB2 -connectionName TDW -dbname ITM
-dblogin db2inst1 -dbpassword XXX -groups Everyone
-users VMMProvider:tipadmin
This example tests the database connection of a data source named "ITM":
trcmd.bat -user tipadmin -password XXX -dataSource
-test ITM -dbLogin otherdbuser -dbPassword XXXX
trcmd -delete
The -delete command flag for the trcmd command deletes an arbitrary object in
Content Store based on its search path. You can use this command for both Cognos
and BIRT objects.
Syntax
Use this syntax to delete an object from Content Store:
trcmd -delete -searchPath cognosSearchPath [-recursive] [-force] [-help]
Note:
1. Authentication with -user userID and -password password is required in all
cases.
2. If you have installed Tivoli Common Reporting in distributed scenario, you
must use the -namespace parameter.
3. If you have configured more than one user repository, specify the -namespace
value. By default, the -namespace parameter points to VMMProvider.
Arguments
-force
Forces deletion of an object in case of problems by specifying whether Content
Manager can consider the setPolicy permissions of a user when deciding if the
user can delete a selected object. If used, the selected object will be deleted if
the current user has either write or setPolicy permission for the selected object,
the parent of the selected object, and every descendant of the selected object.
If not used, the selected object will be deleted if the current user has write
permission for the selected object, the parent of the selected object, and every
descendant of the selected object.
-help
Displays syntax and usage information of a command flag.
-recursive
Deletes an object together with its child objects.
-searchPath cognosSearchPath
The search path to the object that you want to delete.
Examples
This example deletes the "Test Reports" folder and all its subfolders and reports.
92
User Guide
tcrmd.bat -user tipadmin -password tipadmin -delete
-searchPath "/content/package[@name=’Tivoli Products’]/folder[@name=’Test Reports’]"
-recursive
trcmd -distribute
The -distribute command flag for the trcmd command distributes a formatted
report to a specified location on the server file system. You can use this command
for both BIRT and Cognos reports.
Syntax
trcmd -distribute -report cognosSearchPath -location publishLocation [-parameters p1
p2 p3 ...] [-format format] [-locale locale] [-imageDir imagePath] [-baseImageURL
URL] [-help]
Note:
1. Authentication with -user userID and -password password is required.
2. If you have installed Tivoli Common Reporting in distributed scenario, you
must use the -namespace parameter.
3. If you have configured more than one user repository, specify the -namespace
value. By default, -namespace points to VMMProvider
Arguments
-location publishLocation
The fully qualified path to the directory where the formatted report is to be
saved.
-help
Displays syntax and usage information of a command flag.
-report report
The unique name of the report you want to distribute. Only the specified
report is distributed (drill-through reports are not included).
The following optional parameters are available:
-baseImageURL
The base URL to use in references to images in an HTML formatted report.
This URL should reflect the location of the image files at the time the report is
viewed. The default value is ./ (images are read from the same directory as
the HTML file).
- format format
Specifies output format, for example: -format HTML. It is possible to specify
multiple formats at one time, for example -format PDF HTML. If this
parameter is not used, the output format of the report is PDF. The supported
formats are: PDF, HTML, CSV, XML, XLS.
-imageDir imagePath
The location to use when saving image files used by an HTML formatted
report. If you do not specify an image directory, images are saved in the same
location as the distributed report.
Note: Each time a report is distributed to the file system, new image files are
generated with unique file names. Existing image files in the target location are
not overwritten. You must manually delete files generated by previous report
runs when they are no longer needed.
Chapter 6. Reference
93
-locale locale
Specifies the language of the report, for example -locale en for English. To see
the list of ISO codes for languages, or to search by code or language, go to
http://www.loc.gov/standards/iso639-2/langhome.html and find the
two-character ISO 639-1 code for your language.
-parameters p1 p2 p3 ...
A list of parameter values used for producing the distributed report, separated
by spaces. These values override any default values specified in the report or
report design. Each parameter value must be specified using the following
format:
param=value
If the value contains spaces, enclose the parameter in double quotation marks:
"param=spaced value"
Each parameter must correspond to a valid parameter specified in the report
design.
Examples
v This example distributes a formatted PDF version of the DBAvail report,
specifying several parameter values and the output location for the PDF file.
trcmd –distribute –report DBAvail -format PDF –location C:\tmp\reports\Q3Avail.pdf
–parameters quarter=3 type=NTServers
trcmd -import
The -import command flag for the trcmd command imports BIRT and Cognos
report packages and report designs. The type of a package is recognized
automatically. This command can be used for single-box installation and on the
reporting engine. It is not supported for other scenarios.
Syntax
Use this syntax to import a report package:
trcmd -import -bulk pkgFile [-reportSetBase rsBase] [-resourceBase resourceBase]
[-designBase designBase] [-help]
Use this syntax to import a report design and also create a new report associated
with the design:
trcmd -import -design designPath [-resourceDir resourcePath] -reportSetBase rsBase
During Cognos reports import, the -resourceBase, -designBase, and -resourceDir
parameters are ignored.
You can import a single Cognos report from an .xml file using the -design
parameter.
Note:
1. Authentication by -user userID and -password password is required in all cases.
2. If you have installed Tivoli Common Reporting in distributed scenario, you
must use the -namespace parameter.
3. If you have configured more than one user repository, specify the -namespace
value. By default, -namespace points to VMMProvider.
94
User Guide
Arguments
-bulk pkgFile
The local path and file name (including .zip extension) of the report package
file to be imported.
-design designPath
The local path of the design file to be imported.
-help
Displays syntax and usage information of a command flag.
The following parameters are optional:
-reportSetBase rsBase
A search path to the package where a report is to be imported.
-resourceBase resourceBase
An optional base name for any resource directories imported from a report
package. The base name for a resource directory is used as the name of the
top-level parent directory for the resources in the package. Use this option to
avoid naming conflicts when importing resources in a package that have the
same names and locations as existing resources in the data store.
-designBase designBase
An optional base name for any report designs imported from a report package.
The base name for a report design is used as the top-level location for the
designs in the package. Use this option to avoid naming conflicts when
importing report designs in a package that have the same names and locations
as existing designs in the data store.
-resourceDir resourcePath
The path in the data store for imported resources.
Examples
v This example imports a BIRT package named avail_skills.zip with its resource
directory imported from C:\download\sth\report.
trcmd -import -bulk C:\download\sth\report\avail_skills.zip
-reportSetBase "/content/package[@name=’myReportSetBase’]"
-resourceBase "/content/package[@name=’myResourceBase’]"
-designBase "/content/package[@name=’myDesignBase’]"
-user tipadmin -password admin
trcmd -list
The -list command flag for the trcmd command lists available items in the data
store or shows detailed information about a specific item. You can use it for both
BIRT and Cognos reports.
Syntax
Use this syntax to list all available folders and packages, also the hidden ones:
trcmd -list {-reportSets [-showHidden} [-help]
Use this syntax to list reports, folders, or packages associated with a specific folder
or a package:
trcmd -list -reportSet congnosSearchPath {-reportSets | -reports} [-help]
Chapter 6. Reference
95
Use this syntax to list all available reports:
trcmd -list -reports [-help]
Use this syntax to display detailed information about a specific report:
trcmd -list -report cognosSearchPath [-help]
Use this syntax to display authorizations to reports or packages for specified users.
trcmd -list -authorizations -entity cognosSearchPath [-help]
Use this syntax to list the data sources defined in Content Store:
trcmd -list -dataSources [-help]
Use this syntax to list the connections defined in the specified data source:
trcmd -list -connections cognosSearchPathOrDataSourceName [-help]
Note:
1. Authentication with -user userID and -password password is required in all
cases.
2. If you have installed Tivoli Common Reporting in distributed scenario, you
must use the -namespace parameter.
3. If you have configured more than one user repository, specify the -namespace
value. By default, -namespace points to VMMProvider.
Arguments
-authorizations
Lists authorizations to reports, packages, and folders for specified users.
-connections cognosSearchPathOrDataSourceName
Lists connections defined for the specified data source. You can use the Cognos
search path or data source name.
-dataSources
Lists data sources defined in Content Store.
-entity cognosSearchPath
The search path of an object in the Cognos Content Store.
-help
Displays syntax and usage information of a command flag.
-report cognosSearchPath
The Cognos search path of an existing report. The search path of each report
can be found in the web interface in Properties view.
-reports
Lists available reports. When used with the -reportSet command flag, this
argument displays the reports associated with the specified folder or package.
-reportSet cognosSearchPath
The search path of an existing folder or package.
96
User Guide
-reportSets
Lists available folders and packages. When used with the -reportSet flag, this
argument displays the folders and packages that are children of the specified
folder or package.
-showHidden
Use this flag to see hidden reports and report sets, which by default are not
shown in command line.
Examples
v This example lists all available reports.
trcmd.sh -username tipadmin -password tipadmin –list -reports
v This example lists all child folders or packages of the Monitoring folder.
trcmd.sh -username tipadmin -password tipadmin –list
–reportSet "/content/package[@name=’Sales and Retailers’]/
folder[@name=’Monitoring’]"
-reportSets
v This example displays detailed information about the IT Finances report.
trcmd.sh -username tipadmin -password tipadmin –list
–report "/content/package[@name=’Sales and Retailers’]/folder
[@name=’Documentation Reports’]/report[@name=’IT Finances’]"
v
This example lists authorization to the Reporting Overview report for user
tipadmin.
trcmd.sh -user tipadmin -password tipadmin -list -authorizations
-entity "/content/package[@name=’Common Reporting’]/report[@name=’Reporting Overview’]"
trcmd -modify
The -modify command flag for the trcmd command allows you to configure Tivoli
Common Reporting with your data source information, so that the reports can use
external data sources. Use this command for BIRT reports only.
Syntax
Use this syntax to modify data sources associated with one or more reports:
trcmd -modify -dataSources -reports [-reportName cognosSearchPath]
[-displayName displayNameQuery] [-dataSource p1 p2 p3] [-caseSensitive]
-setDatasource p1 p2 p3 [-help]
Tip: To get the unique report name used in this command, run the “trcmd -list” on
page 95 command. If reports from packages use a common library for the data
source definition, you need to only run the command against one report.
Note:
1. Authentication with -user userID and -password password is required.
2. If you have installed Tivoli Common Reporting in distributed scenario, you
must use the -namespace parameter.
3. If you have configured more than one user repository, specify the -namespace
value. By default, -namespace points to VMMProvider.
Arguments
-caseSensitive
Specifies that case is respected when matching the search query.
Chapter 6. Reference
97
-dataSource p1 p2 p3 ...
A list of data source properties separated by spaces. Use this argument to
restrict the search results to include only data sources whose properties match
any of the specified values. Each property value must be specified using the
following format:
property=value
If the value contains spaces, use double quotation marks:
"property=spaced value"
Each property must be one of the following:
v name
v displayName
v comments
v odaDriverClass
v odaURL
v odaUser
v odaPassword
v odaJndiName
-dataSources
Modifies the properties of data sources matching the specified search criteria.
-displayName
Specifies the report or report set display name query to use when searching for
matching reports or report sets.
-help
Displays syntax and usage information of a command flag.
-reportName cognosSearchPath
Specifies the search path to use when searching for matching report sets.
-reports
Specifies that you want to modify the properties of the data sources associated
with reports that match the specified search criteria.
-setDataSource p1 p2 p3 ...
A list of new data source property values separated by spaces. Each property
value must be specified using the following format:
property=value
If the value contains spaces, enclose the property in double quotation marks:
"property=spaced value"
Each property must be one of the following:
v name
v displayName
v comments
v odaDriverClass
v odaURL
v odaUser
v odaPassword
v odaJndiName
98
User Guide
Examples
This example changes the odaDriverClass, odaURL, odaUser, and odaPassword
properties of the data source in the ITM: Top Resources by Utilization Summary
report:
./trcmd.sh -user tipadmin -password tipadmin -modify -datasources -reports -reportname
"/content/package[@name=’Tivoli Products’]/folder[@name=’ITM 6.2 Reports’]/
folder[@name=’Utilization’]/
report[@name=’ITM: Top Resources by Utilization Summary’]"
-setdatasource odaDriverClass=com.ibm.db2.jcc.DB2Driver
"odaURL=jdbc:db2://9.167.29.78:60000/WAREHOUS:currentSchema=ITMUSER;"
odaUser=db2inst1 odaPassword=tcr123test
/content/package[@name='Tivoli Products']/folder[@name='ITM 6.2
Reports']/folder[@name='Utilization']/report[@name='ITM: Top Resources by
Utilization Summary']"
is the report that will be used as the base for changing the JDBC
information. The report name is enclosed in double quotation marks
because it contains spaces.
-setdatasource
is the keyword specifying which parameters are to be changed in the JDBC
datasource. All the parameters are in the NAME=VALUE format. Specify
your own parameters.
What to do next
You can now verify if the JDBC datasource was changed correctly using the list
command. The example below lists the properties of the ITM: Top Resources by
Memory Utilization report::
./trcmd.sh -user tipadmin -password tipadmin -list -report
"/content/package[@name=’Tivoli Products’]/folder[@name=’ITM 6.2 Reports’]
/folder[@name=’Utilization’]/report[@name=’ITM: Top Resources by Memory Utilization’]"
Report information is displayed including the properties that you changed.
trcmd -run
The -run command flag for the trcmd command runs a report and saves the result
as an output version. You can use this command for BIRT and Cognos reports.
Syntax
trcmd -run -report cognosSearchPath [-format format] [-locale locale] [-parameters p1
p2 p3 ...] [-validateParams true] [-help]
Note:
1. Authentication with -user userID and -password password is required.
2. If you have installed Tivoli Common Reporting in distributed scenario, you
must use the -namespace parameter.
3. If you have configured more than one user repository, specify the -namespace
value. By default, -namespace points to VMMProvider.
4. To run BIRT reports, use Cognos search path as a report name.
Arguments
-report cognosSearchPath
The unique search path of the report you want to run.
Chapter 6. Reference
99
Note that the search path for every Cognos report can be found in Cognos UI.
For more information, see “Checking the search path of a report” on page 63.
-parameters p1 p2 p3 ...
A list of parameter values used for running the report, separated by spaces.
These values override any default values specified in the report or report
design. Each parameter value must be specified using the following format:
param=value
If the value contains spaces, enclose the parameter in double quotation marks:
"param=spaced value"
Each parameter must correspond to a valid parameter specified in the report
design.
Note that multivalued parameters are supported, for example:
-parameters color=blue color=red
There are four optional parameters available. These are the following:
-format format
Specifies output format, for example: -format HTML. It is possible to specify
multiple formats at one time, for example: -format PDF HTML. If -format is
not used, the output format is PDF. The supported formats are: PDF, HTML,
CSV, XML, XLS
-locale
Specifies the language of the report, for example: -locale en for English. To see
the list of ISO codes for languages, or to search by code or language , go to
www.loc.gov/standards/iso639-2/langhome.html. Find the 2-character ISO
639-1 code for your language.
-help
Displays syntax and usage information of a command flag.
-validateParams true
When set to its default value true, enables checking of default report
parameters. When set to false, requires you to specify the parameters that a
report will use in detail, for example date format.
Examples
v This example creates a snapshot of the DBAvail report, specifying several
parameter values.
trcmd –run –report "/content/package[@name=’package.zip’]/
report[@name=’DBAvail’]" –parameters "quarter=3" "type=NTServers"
Note: On UNIX-like operating systems, it is essential that you add double
quotation marks for the parameters, even thought there is no space in them.
trcmd -version
The -version command flag for the trcmd command shows current version and
build information for Tivoli Common Reporting.
Syntax
trcmd -version
100
User Guide
Arguments
This command flag has no arguments.
stopTCRserver
The stopTCRserver command stops the Tivoli Common Reporting server.
Syntax
Use this syntax to stop the server:
Windows
stopTCRserver.cmd.
UNIX
Linux
startTCRserver.sh.
Note:
1. Run this command from the TCR_component_dir\bin directory.
2. Authentication with -user userID and -password password is required. Use the
same user that you used to install Tivoli Common Reporting.
3. If you have installed Tivoli® Common Reporting in distributed installation, you
must use the -namespace parameter
Tip: The startTCRserver.cmd and startTCRserver.sh scripts start both the Tivoli
Common Reporting server and the Cognos Content Store. You can start the server
using the Tivoli Integrated Portal scripts or other scripts, however those scripts do
not start the Content Store. To start the server using a script other than the
startTCRserver script, before you start the server, you must run additional
commands to start the Content Store. For details, see the content of the
startTCRserver.cmd and startTCRserver.sh scripts.
startTCRserver
The startTCRserver command starts the Tivoli Common Reporting server.
Syntax
Use this syntax to start the server:
Windows
startTCRserver.cmd [wait number of minutes]
UNIX
Linux
startTCRserver.sh [wait number of minutes]
Note:
1. Run this command from the TCR_component_dir\bin directory.
2. Authentication with -user userID and -password password is required. Use the
same user that you used to install Tivoli Common Reporting.
3. If you have installed Tivoli® Common Reporting in distributed installation, you
must use the -namespace parameter
Tip: The startTCRserver.cmd and startTCRserver.sh scripts start both the Tivoli
Common Reporting server and the Cognos Content Store. You can start the server
Chapter 6. Reference
101
using the Tivoli Integrated Portal scripts or other scripts, however those scripts do
not start the Content Store. To start the server using a script other than the
startTCRserver script, before you start the server, you must run additional
commands to start the Content Store. For details, see the content of the
startTCRserver.cmd and startTCRserver.sh scripts.
Parameters
wait number of minutes
Specifies the time to wait until the reporting engine initializes completely. If
the reporting engine does not initialize in the specified number of minutes, the
script stops monitoring the engine and exits. If the reporting engine initializes
before the timeout, the script exists when it detects that the reporting engine
has initialized.
Examples
v This example starts the Tivoli Common Reporting server and waits 5 minutes
until the reporting engine initializes:
startTCRserver.sh wait 5
102
User Guide
Notices
This information was developed for products and services offered in the U.S.A.
IBM may not offer the products, services, or features discussed in this document in
other countries. Consult your local IBM representative for information on the
products and services currently available in your area. Any reference to an IBM
product, program, or service is not intended to state or imply that only that IBM
product, program, or service may be used. Any functionally equivalent product,
program, or service that does not infringe any IBM intellectual property right may
be used instead. However, it is the user's responsibility to evaluate and verify the
operation of any non-IBM product, program, or service.
IBM may have patents or pending patent applications covering subject matter
described in this document. The furnishing of this document does not grant you
any license to these patents. You can send license inquiries, in writing, to:
IBM Director of Licensing
IBM Corporation
North Castle Drive
Armonk, NY 10504-1785 U.S.A.
For license inquiries regarding double-byte character set (DBCS) information,
contact the IBM Intellectual Property Department in your country or send
inquiries, in writing, to:
Intellectual Property Licensing
Legal and Intellectual Property Law
IBM Japan, Ltd.
3-2-12, Roppongi, Minato-ku, Tokyo 106-8711 Japan
The following paragraph does not apply to the United Kingdom or any other
country where such provisions are inconsistent with local law:
INTERNATIONAL BUSINESS MACHINES CORPORATION PROVIDES THIS
PUBLICATION “AS IS” WITHOUT WARRANTY OF ANY KIND, EITHER
EXPRESS OR IMPLIED, INCLUDING, BUT NOT LIMITED TO, THE IMPLIED
WARRANTIES OF NON-INFRINGEMENT, MERCHANTABILITY OR FITNESS
FOR A PARTICULAR PURPOSE. Some states do not allow disclaimer of express or
implied warranties in certain transactions, therefore, this statement may not apply
to you.
This information could include technical inaccuracies or typographical errors.
Changes are periodically made to the information herein; these changes will be
incorporated in new editions of the publication. IBM may make improvements
and/or changes in the product(s) and/or the program(s) described in this
publication at any time without notice.
Any references in this information to non-IBM Web sites are provided for
convenience only and do not in any manner serve as an endorsement of those Web
sites. The materials at those Web sites are not part of the materials for this IBM
product and use of those Web sites is at your own risk.
© Copyright IBM Corp. 2007, 2012
103
IBM may use or distribute any of the information you supply in any way it
believes appropriate without incurring any obligation to you.
Licensees of this program who wish to have information about it for the purpose
of enabling: (i) the exchange of information between independently created
programs and other programs (including this one) and (ii) the mutual use of the
information which has been exchanged, should contact:
IBM Corporation
2Z4A/101
11400 Burnet Road
Austin, TX 79758 U.S.A
Such information may be available, subject to appropriate terms and conditions,
including in some cases, payment of a fee.
The licensed program described in this information and all licensed material
available for it are provided by IBM under terms of the IBM Customer Agreement,
IBM International Program License Agreement, or any equivalent agreement
between us.
Information concerning non-IBM products was obtained from the suppliers of
those products, their published announcements or other publicly available sources.
IBM has not tested those products and cannot confirm the accuracy of
performance, compatibility or any other claims related to non-IBM products.
Questions on the capabilities of non-IBM products should be addressed to the
suppliers of those products.
This information contains examples of data and reports used in daily business
operations. To illustrate them as completely as possible, the examples include the
names of individuals, companies, brands, and products. All of these names are
fictitious and any similarity to the names and addresses used by an actual business
enterprise is entirely coincidental.
IBM Corp. 2012
Trademarks
IBM, the IBM logo, and ibm.com are trademarks or registered trademarks of
International Business Machines Corp., registered in many jurisdictions worldwide.
Other product and service names might be trademarks of IBM or other companies.
A current list of IBM trademarks is available on the Web at www.ibm.com/legal/
copytrade.shtml.
104
User Guide
Index
A
access to reports 44
Active Directory 34
architecture
overview 1
authenticating to command-line
interface 86
authentication 43
authorization 43
B
BIRT reports 45
commands 85
configuration
JDBC for BIRT 51
converting BIRT to Cognos
known limitations 51
converting to Cognos 49
known limitations 51
importing 48
JDBC 51
report view 47
retrieving user name 48
running 46
saving 47
BIRT reports in Cognos 45
BIRT to Cognos conversion 49
configuration (continued)
database (continued)
MS SQL 39
Oracle 40
datasources 51
direct access configuration 52
Framework Manager connection 36
JDBC 51
JDBC for direct access 52
JNDI 51
LDAP 31
Cognos-based Tivoli Common
Reporting engine 33
Tivoli Common Reporting
Server 31
overview 29
portlet functions 44
reporting engine
Active Directory 34
security 44
access to reports 44
security permissions 41
configuring
content store 22
enterprise database 22
converting BIRT to Cognos 49
copying report images 56
creating parametrized URLs 59
creating report view 47
IBM Tivoli Common Reporting
description 1
importing BIRT reports 48
installation
hardware requirements 9
installation paths 12
preparing 13
installation media 14
verifying the environment 13
prerequisites 9
hardware requirements 9
software requirements 10
supported browsers 11
required
disk space 15
scenarios 11
installing
Framework Manager 20
mobile application 17
overview 9
single-computer mobile
application 18
troubleshooting 66
verifying 20
J
JDBC 51
JDBC configuration
JNDI 51
C
D
capabilities 44
checking report search path 63
Cognos support for BIRT 45
command-line authentication 86
commands 85
command-line authentication 86
startTCRserver 101
stopTCRserver 101
Common Reporting
ad-hoc reports
performing 57
commands 85
copying report images 56
emailing reports 57
exporting report packages 56
overview 45
report packages
importing 55
report template 58
reports
scheduling 48, 57
Web-based authoring 58
working 52
sample report 54
running 53
troubleshooting 73
configuration
database 38
DB2 38
database
configuring 38
database configuration 38
datasource configuration 51
DB2 database
configuring 38
DB2 database configuration 38
© Copyright IBM Corp. 2007, 2012
I
51, 52
L
emailing reports 57
enabling firewall 23
exporting
report packages 56
LDAP
configuring 31
Cognos-based Tivoli Common
Reporting engine 33
Tivoli Common Reporting
Server 31
LDAP configuration 31
Cognos-based Tivoli Common
Reporting engine 33
Tivoli Common Reporting Server 31
log files 65
F
M
E
Framework Manager connection
configuration 36
Framework Manager installation
G
Gateway URI
59
20
managing permissions and
capabilities 44
manual uninstallation 25
mobile application uninstallation 24
MS SQL database
configuring 39
MS SQL database configuration 39
O
on-line resources
5
105
Oracle database
configuring 40
Oracle database configuration
Tivoli Common Reporting
components 4
troubleshooting
overview 65
using log files 65
troubleshooting Common Reporting
troubleshooting installation 66
40
P
parametrized URLs 59
performing tasks with parametrized
URLs 59
permissions 41
portlet functions 44
post-installation tasks 21
preparing to installation 13
U
R
report images 56
report search path 63
report template 58
report view 47
reporting
getting started 5
reporting interface
logging in 6
Tivoli Integrated Portal
logging on 6
reports
direct access configuration 52
restarting Tivoli Common Reporting 21
retrieving user name from reports 48
running BIRT reports 46
S
saving BIRT reports 47
scheduling reports 48, 57
search path 61
checking 63
security
authentication 43
authorization 43
configuring 44
configuring permissions 41
enabling firewall 23
security configuration 44
security permissions configuration
server
starting 101
stopping 101
silent mode uninstallation 23
single sign-on 7
software requirements 10
SSO 7
starting server 21
starting the server 101
stopping server 21
stopping the server 101
supported browsers 11
supported operating systems 10
T
technical overview 1
template for reports 58
106
User Guide
41
uninstallation
installMobile.bat 24
installMobile.sh 24
manual 25
mobile application 24
overview 23
silent mode 23
verifying 26
URLs 59
user name in report 48
V
verifying installation 20
verifying uninstallation 26
W
Web resources 5
what to do after installation
21
73
Printed in USA