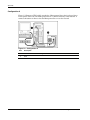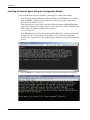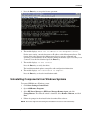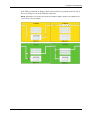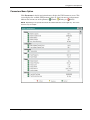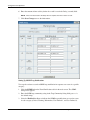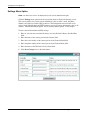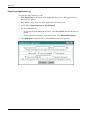
1
HP Power Manager 3.1
User Guide
October 2003 (Second Edition)
Part Number 333101-002
HP CONFIDENTIAL Codename: Fish Stick Part Number: 333101-002 Last Saved On: 10/27/03 10:27 AM
© Copyright 2003 Hewlett-Packard Development Company, L.P.
Confidential computer software. Valid license from HP required for possession, use or copying. Consistent with
FAR 12.211 and 12.212, Commercial Computer Software, Computer Software Documentation, and Technical
Data for Commercial Items are licensed to the U.S. Government under vendor’s standard commercial license.
The information contained herein is subject to change without notice. The only warranties for HP products and
services are set forth in the express warranty statements accompanying such products and services. Nothing herein
should be construed as constituting an additional warranty. HP shall not be liable for technical or editorial errors
or omissions contained herein.
Microsoft®, Windows®, and Windows NT® are U.S. registered trademarks of Microsoft Corporation.
Intel®, Pentium®, and Itanium® are trademarks of Intel Corporation in the U.S. and other countries and are used
under license.
© 2002 GoAhead Software, Inc. All rights reserved.
© 1998-2003 The OpenSSL Project
This product includes software developed by the OpenSSL Project for use in the OpenSSL Toolkit
(http://www.openssl.org/).
© 1998-2003 The OpenSSL Project. All rights reserved.
Redistribution and use in source and binary forms, with or without modification, are permitted provided that the
following conditions are met:
1. Redistributions of source code must retain the above copyright notice, this list of conditions and the
following disclaimer.
2. Redistributions in binary form must reproduce the above copyright notice, this list of conditions and the
following disclaimer in the documentation and/or other materials provided with the distribution.
3. All advertising materials mentioning features or use of this software must display the following
acknowledgment: “This product includes software developed by the OpenSSL Project for use in the
OpenSSL Toolkit. (http://www.openssl.org/)”
4. The names “OpenSSL Toolkit” and “OpenSSL Project” must not be used to endorse or promote products
derived from this software without prior written permission. For written permission, please contact
[email protected].
5. Products derived from this software may not be called “OpenSSL” nor may “OpenSSL” appear in their
names without prior written permission of the OpenSSL Project.
6. Redistributions of any form whatsoever must retain the following acknowledgment: “This product includes
software developed by the OpenSSL Project for use in the OpenSSL Toolkit (http://www.openssl.org/).”
THIS SOFTWARE IS PROVIDED BY THE OpenSSL PROJECT “AS IS” AND ANY EXPRESSED OR
IMPLIED WARRANTIES, INCLUDING, BUT NOT LIMITED TO, THE IMPLIED WARRANTIES OF
MERCHANTABILITY AND FITNESS FOR A PARTICULAR PURPOSE ARE DISCLAIMED. IN NO EVENT
SHALL THE OpenSSL PROJECT OR ITS CONTRIBUTORS BE LIABLE FOR ANY DIRECT, INDIRECT,
INCIDENTAL, SPECIAL, EXEMPLARY, OR CONSEQUENTIAL DAMAGES (INCLUDING, BUT NOT
LIMITED TO, PROCUREMENT OF SUBSTITUTE GOODS OR SERVICES; LOSS OF USE, DATA, OR
PROFITS; OR BUSINESS INTERRUPTION) HOWEVER CAUSED AND ON ANY THEORY OF
LIABILITY, WHETHER IN CONTRACT, STRICT LIABILITY, OR TORT (INCLUDING NEGLIGENCE OR
OTHERWISE) ARISING IN ANY WAY OUT OF THE USE OF THIS SOFTWARE, EVEN IF ADVISED OF
THE POSSIBILITY OF SUCH DAMAGE.
HP CONFIDENTIAL Codename: Fish Stick Part Number: 333101-002 Last Saved On: 10/27/03 10:27 AM
This product includes cryptographic software written by Eric Young ([email protected]). This product
includes software written by Tim Hudson ([email protected]).
Original SSLeay License
© 1995-1998 Eric Young ([email protected])
All rights reserved.
This package is an SSL implementation written by Eric Young ([email protected]). The implementation was
written so as to conform with Netscape SSL.
This library is free for commercial and non-commercial use as long as the following conditions are adhered to.
The following conditions apply to all code found in this distribution, be it the RC4, RSA, lhash, DES, etc., code;
not just the SSL code. The SSL documentation included with this distribution is covered by the same copyright
terms except that the holder is Tim Hudson ([email protected]).
Copyright remains Eric Young’s, and as such any Copyright notices in the code are not to be removed. If this
package is used in a product, Eric Young should be given attribution as the author of the parts of the library used.
This can be in the form of a textual message at program startup or in documentation (online or textual) provided
with the package. Redistribution and use in source and binary forms, with or without modification, are permitted
provided that the following conditions are met:
1.
Redistributions of source code must retain the copyright notice, this list of conditions and the following
disclaimer.
2.
Redistributions in binary form must reproduce the above copyright notice, this list of conditions and the
following disclaimer in the documentation and/or other materials provided with the distribution.
3.
All advertising materials mentioning features or use of this software must display the following
acknowledgement: “This product includes cryptographic software written by Eric Young
([email protected]).” The word ‘cryptographic’ can be left out if the routines from the library being used
are not cryptographic related.
4.
If you include any Windows specific code (or a derivative thereof) from the apps directory (application
code) you must include an acknowledgement: “This product includes software written by Tim Hudson
([email protected]).”
THIS SOFTWARE IS PROVIDED BY ERIC YOUNG “AS IS” AND ANY EXPRESS OR IMPLIED
WARRANTIES, INCLUDING, BUT NOT LIMITED TO, THE IMPLIED WARRANTIES OF
MERCHANTABILITY AND FITNESS FOR A PARTICULAR PURPOSE ARE DISCLAIMED. IN NO EVENT
SHALL THE AUTHOR OR CONTRIBUTORS BE LIABLE FOR ANY DIRECT, INDIRECT, INCIDENTAL,
SPECIAL, EXEMPLARY, OR CONSEQUENTIAL DAMAGES (INCLUDING, BUT NOT LIMITED TO,
PROCUREMENT OF SUBSTITUTE GOODS OR SERVICES; LOSS OF USE, DATA, OR PROFITS; OR
BUSINESS INTERRUPTION) HOWEVER CAUSED AND ON ANY THEORY OF LIABILITY, WHETHER
IN CONTRACT, STRICT LIABILITY, OR TORT (INCLUDING NEGLIGENCE OR OTHERWISE) ARISING
IN ANY WAY OUT OF THE USE OF THIS SOFTWARE, EVEN IF ADVISED OF THE POSSIBILITY OF
SUCH DAMAGE.
The license and distribution terms for any publicly available version or derivative of this code cannot be changed,
i.e. this code cannot simply be copied and put under another distribution license (including the GNU Public
License.)
©1999, 2000 Boris Fomitchev
This material is provided “as is,” with absolutely no warranty expressed or implied. Any use is at your own risk.
Permission to use or copy this software for any purpose is hereby granted without fee, provided the above notices
are retained on all copies. Permission to modify the code and to distribute modified code is granted, provided the
above notices are retained, and a notice that the code was modified is included with the above copyright notice.
The Licensee may distribute binaries compiled with STLport (whether original or modified) without any royalties
or restrictions. The Licensee may distribute original or modified STLport sources, provided that: the conditions
indicated in the above permission notice are met, the following copyright notices are retained when present, and
conditions provided in accompanying permission notices are met:
©1994 Hewlett-Packard Company
©1996, 97 Silicon Graphics Computer Systems, Inc.
©1997 Moscow Center for SPARC Technology
Permission to use, copy, modify, distribute and sell this software and its documentation for any purpose is hereby
granted without fee, provided that the above copyright notice appear in all copies and that both that copyright
notice and this permission notice appear in supporting documentation. Hewlett-Packard Company makes no
representations about the suitability of this software for any purpose. It is provided “as is” without express or
implied warranty. Permission to use, copy, modify, distribute and sell this software and its documentation for any
purpose is hereby granted without fee, provided that the above copyright notice appear in all copies and that both
that copyright notice and this permission notice appear in supporting documentation. Silicon Graphics makes no
representations about the suitability of this software for any purpose. It is provided “as is” without express or
implied warranty. Permission to use, copy, modify, distribute and sell this software and its documentation for any
purpose is hereby granted without fee, provided that the above copyright notice appear in all copies and that both
that copyright notice and this permission notice appear in supporting documentation. Moscow Center for SPARC
Technology makes no representations about the suitability of this software for any purpose. It is provided “as is”
without express or implied warranty.
HP Power Manager 3.1 User Guide
October 2003 (Second Edition)
Part Number 333101-002
HP CONFIDENTIAL Codename: Fish Stick Part Number: 333101-002 Last Saved On: 10/27/03 10:27 AM
Contents
About This Guide
Intended Audience........................................................................................................................................ix
Symbols in Text............................................................................................................................................ix
Text Conventions .........................................................................................................................................ix
Related Documents........................................................................................................................................x
Getting Help ..................................................................................................................................................x
Technical Support ...................................................................................................................................x
HP Website .............................................................................................................................................x
Authorized Reseller ...............................................................................................................................xi
Reader’s Comments .....................................................................................................................................xi
Chapter 1
Overview
Introduction ............................................................................................................................................... 1-1
HPPM Overview ....................................................................................................................................... 1-2
HPPM Architecture............................................................................................................................. 1-3
Management Server ............................................................................................................................ 1-4
Remote Agent ..................................................................................................................................... 1-5
Supported Hardware Configurations .................................................................................................. 1-5
Chapter 2
Installation
System Requirements ................................................................................................................................ 2-1
Browser Requirements........................................................................................................................ 2-2
Installation Overview ................................................................................................................................ 2-3
Installing Components on Windows Operating Systems .......................................................................... 2-4
Installing the Management Server Using the GUI Installation Method ............................................. 2-5
Installing the Remote Agent Using the GUI Installation Method..................................................... 2-16
Installing the Management Server Using the Silent Installation / Upgrade Method ........................ 2-25
Installing the Remote Agent Using the Silent Installation Method .................................................. 2-25
Reconfiguring Components on Windows Operating Systems ................................................................ 2-26
Installing Components on Linux Operating Systems .............................................................................. 2-26
Installing the Management Server Using the Installation Script ...................................................... 2-26
Installing the Remote Agent Using the Installation Script................................................................ 2-28
Installing the Management Server Using the Silent Installation Method ......................................... 2-29
Installing the Remote Agent Using the Silent Installation Method .................................................. 2-29
Reconfiguring Components on Linux Operating Systems ...................................................................... 2-29
Installing Components on NetWare Operating Systems ......................................................................... 2-29
Installing the Remote Agent Using the Configuration Module ........................................................ 2-30
HP Power Manager 3.1 User Guide
HP CONFIDENTIAL Codename: Fish Stick Part Number: 333101-002 Last Saved On: 10/27/03 10:27 AM
v
Contents
Uninstalling Components from Windows Systems .................................................................................2-31
Uninstalling Components from Linux Systems .......................................................................................2-32
Uninstalling Components from NetWare Systems ..................................................................................2-32
Chapter 3
Access and Navigation
Accessing HPPM .......................................................................................................................................3-1
Web Browser.......................................................................................................................................3-1
System Tray Icon.................................................................................................................................3-2
Regarding the Browser Security Alert .......................................................................................................3-2
Establishing a Secure Session for Internet Explorer ...........................................................................3-3
Establishing a Secure Session for Mozilla ..........................................................................................3-4
Logging into HPPM...................................................................................................................................3-4
Navigating HPPM......................................................................................................................................3-5
Chapter 4
Configuration and Operation
Home Tab ..................................................................................................................................................4-1
Overview Menu Option.......................................................................................................................4-2
Alarms Menu Option...........................................................................................................................4-7
Identification Menu Option .................................................................................................................4-8
Parameters Menu Option.....................................................................................................................4-9
Attached Devices Menu Option ........................................................................................................4-11
Power Fail Menu Option ...................................................................................................................4-15
Shutdown Events Menu Option.........................................................................................................4-17
Event Settings Menu Option .............................................................................................................4-19
Manual Control Menu Option ...........................................................................................................4-26
Settings Menu Option........................................................................................................................4-28
Chapter 5
Data Logs
Logs Tab ....................................................................................................................................................5-1
UPS Summary Menu Option...............................................................................................................5-1
UPS Detailed Menu Option.................................................................................................................5-3
UPS Data Menu Option.......................................................................................................................5-5
Application Menu Option....................................................................................................................5-7
Chapter 6
Account Setup and Help
Setup Tab ...................................................................................................................................................6-1
My Account Menu Option...................................................................................................................6-1
User Accounts Menu Option ...............................................................................................................6-2
Help Tab ....................................................................................................................................................6-4
About Menu Option.............................................................................................................................6-4
Contents Menu Option ........................................................................................................................6-5
Info & Updates Menu Option..............................................................................................................6-6
vi
HP Power Manager 3.1 User Guide
HP CONFIDENTIAL Codename: Fish Stick Part Number: 333101-002 Last Saved On: 10/27/03 10:27 AM
Contents
Chapter 7
Troubleshooting
Appendix A
Alert Messages
Appendix B
Using HPPM with Insight Manager 7
Configuring Insight Manager 7 .................................................................................................................B-2
Configuring HPPM....................................................................................................................................B-2
Index
HP Power Manager 3.1 User Guide
HP CONFIDENTIAL Codename: Fish Stick Part Number: 333101-002 Last Saved On: 10/27/03 10:27 AM
vii
About This Guide
This guide provides information about HP Power Manager (HPPM) 3.1 including installation,
configuration, operation, and troubleshooting.
Intended Audience
This guide is intended for individuals requiring information about the management of HP
Uninterruptible Power Systems (UPSs).
Symbols in Text
These symbols may be found in the text of this guide. They have the following meanings.
CAUTION: Text set off in this manner indicates that failure to follow directions could result in
damage to equipment or loss of information.
IMPORTANT: Text set off in this manner presents clarifying information or specific instructions.
NOTE: Text set off in this manner presents commentary, sidelights, or interesting points of information.
Text Conventions
This document uses the following conventions:
•
Italic type indicates complete titles of manuals or variables. Variables include
information that varies in system output, in command lines, and in command parameters
in text.
•
Bold type is used for emphasis of selected onscreen elements (menu options, command
names, dialog box names, and so on) and keyboard keys.
•
Monospace typeface indicates code examples, screen displays, and user input.
•
Sans serif typeface is used for uniform resource locators (URLs).
HP Power Manager 3.1 User Guide
HP CONFIDENTIAL Codename: Fish Stick Part Number: 333101-002 Last Saved On: 10/27/03 10:27 AM
ix
About This Guide
Related Documents
For additional information on the topics covered in this guide, refer to the following
documents:
•
Product user guides
•
Product installation instructions
•
HP Power Products Glossary
These documents are located on the Power Products Documentation CD or at
http://www.hp.com/products/ups.
Getting Help
If you have a problem and have exhausted the information in this guide, you can get further
information and other help in the following locations.
Technical Support
In North America, call the HP Technical Support Phone Center at 1-800-652-6672. This
service is available 24 hours a day, 7 days a week. For continuous quality improvement, calls
may be recorded or monitored. Outside North America, call the nearest HP Technical Support
Phone Center. For telephone numbers of worldwide Technical Support Centers, go to
http://www.hp.com.
Have the following information available before you call:
•
Technical support registration number (if applicable)
•
Product serial number
•
Product model name and number
•
Applicable error messages
•
Add-on boards or hardware
•
Third-party hardware or software
•
Operating system type and revision level
•
Power management software type and version
HP Website
For information on this product as well as the latest drivers, firmware updates, and service
packs, go to http://www.hp.com/products/ups.
x
HP Power Manager 3.1 User Guide
HP CONFIDENTIAL Codename: Fish Stick Part Number: 333101-002 Last Saved On: 10/27/03 10:27 AM
About This Guide
Authorized Reseller
For the name of your nearest authorized reseller:
•
In the United States, call 1-800-345-1518.
•
In Canada, call 1-800-263-5868.
•
Elsewhere, see the HP website for locations and telephone numbers.
Reader’s Comments
To comment on this guide, send an e-mail to [email protected].
HP Power Manager 3.1 User Guide
HP CONFIDENTIAL Codename: Fish Stick Part Number: 333101-002 Last Saved On: 10/27/03 10:27 AM
xi
1
Overview
Introduction
HP Power Manager (HPPM) is software that enables users to monitor, manage, and control
power environments through comprehensive control of individual HP Uninterruptible Power
Systems (UPSs). A familiar browser interface provides secure remote access to Management
Servers anywhere on the network. HPPM enables users to schedule system shutdowns,
control power failure settings, and define UPS load segments to allow maximum uptime of
critical servers.
For a detailed list of supported UPSs, refer to the Supported Hardware matrix on the HP
Power Manager Product Overview page at http://www.hp.com/products/UPS.
HPPM software can be configured to send alert traps to Insight Manager 7 or other
SNMP-management programs or run as a stand-alone power management system. This
flexibility enables you to monitor, manage, and control the power environments of HP Six
Port Cards and single, serially attached UPSs, regardless of the system management method.
To facilitate day-to-day maintenance tasks, the software provides detailed system logs and
system diagnostics, including UPS battery checks.
HP Power Manager 3.1 User Guide
HP CONFIDENTIAL Codename: Fish Stick Part Number: 333101-002 Last Saved On: 10/27/03 10:56 AM
1-1
Overview
Use HPPM to:
•
Customize alerts
— Send e-mail notification messages
— Send broadcast notification messages
— Send SNMP traps
— Issue computer commands at power failure
•
Monitor, manage, and control UPSs
— Manage a graceful shutdown of attached equipment during utility power failures
— Manage independent UPS load segments to provide separate power control of
connected equipment
— Prioritize the timing of equipment shutdowns and reboot connected equipment by
load segment
— Delay restart by load segment after a power outage to sequence the startup of system
components
— Display logs for analysis
— Monitor the status of UPSs and perform diagnostics
— Communicate with single serial cards (RS-232) and multi-server serial cards
(Six Port Card)
HPPM Overview
HPPM is a Web-based application that enables administrators to manage an HP UPS from a
browser-based management console. Administrators can monitor, manage, and control each
UPS both locally and remotely.
During a utility power failure, the UPS switches to battery mode. HPPM can issue an e-mail
alert to the system administrator and begin a prioritized system shutdown based on
user-defined settings for that specific UPS. After power is restored, HPPM can facilitate a
prioritized power up for connected equipment.
The UPS can be configured to extend runtimes for critical devices during utility power
failures. For most UPSs, the receptacles on the rear panel can be divided into two or more
groups, called load segments, which can be controlled independently. By shutting down a
load segment that is connected to less critical equipment, the runtime for more critical
equipment is extended, providing additional protection.
1-2
HP Power Manager 3.1 User Guide
HP CONFIDENTIAL Codename: Fish Stick Part Number: 333101-002 Last Saved On: 10/27/03 10:56 AM
Overview
HPPM Architecture
HPPM consists of two major components:
•
Management Server
•
Remote Agent
Figure 1-1: HPPM architecture
Item
Description
1
HPPM Management Server
2
A UPS that is serially attached to and managed by the Management Server
3
Remote Agent Server
4
Intranet
5
A remote workstation browsing into the Management Server over the network
6
Insight Manager 7 receiving alert traps from HPPM (optional)
HP Power Manager 3.1 User Guide
HP CONFIDENTIAL Codename: Fish Stick Part Number: 333101-002 Last Saved On: 10/27/03 10:56 AM
1-3
Overview
Management Server
One Management Server is needed for each UPS that is monitored, managed, and controlled
by HPPM. This server must be serially connected to the UPS. Specific features of the
Management Server include:
•
Controlling security and authentication, such as:
— Supporting multiple users and associating each login with specific device access
(access categories are regular user and administrator)
— Providing the option of Secure Socket Layer (SSL) security
•
Performing specified actions when alarms are set or cleared. The following unattended
actions are supported:
— Sending e-mail notifications, broadcast messages, and SNMP traps
— Executing system batch jobs during shutdown (on Management Server or Remote
Agent)
— Performing operating system shutdown
— Shutting down and restarting by load segment, if applicable
— Performing UPS shutdown
•
Performing a graceful, remote shutdown of the local operating system after a specified
delay
NOTE: System hibernation (if supported by the operating system) is used to allow the system to
be restored to its same state when the power returns.
•
Maintaining event logs. Logs include the following types:
— UPS event log, which contains UPS-related events, such as the UPS going on battery
— Application event log, which contains application-related events, such as failed
logins or settings changes
•
Logging data variables. The following data values are logged:
— Input voltage
— Output voltage
— Output load
— UPS temperature
— Battery voltage
— Output power
— Battery capacity
1-4
•
Providing shutdown information to the Remote Agent
•
Providing content for the user interface using an embedded Web server. The user
interface is accessed using a supported Web browser. For more information on supported
browsers, refer to the section, “Browser Requirements,” in Chapter 2.
HP Power Manager 3.1 User Guide
HP CONFIDENTIAL Codename: Fish Stick Part Number: 333101-002 Last Saved On: 10/27/03 10:56 AM
Overview
The Management Server has been tested on the following operating systems:
•
Microsoft® Windows NT® 4.0 Server with Service Pack 6
•
Microsoft Windows® 2000 Server with Service Pack 4
•
Microsoft Windows Server 2003
•
Red Hat Linux 7.3, 8.0
IMPORTANT: Power protection for the Management Server is essential. The Management Server is
the central point of control of the power management environment. If the Management Server goes
down, the ability to gracefully shut down attached servers is lost.
Remote Agent
The Management Server provides both status and shutdown information to the Remote
Agent. The Remote Agent runs on a server and allows HPPM to gracefully shut down the
operating system of that server and issue computer commands during power failure. Install
the Remote Agent on any server that is powered by the UPS and on any server that HPPM
uses to initiate a command.
The Remote Agent has been tested on the following operating systems:
•
Microsoft Windows NT 4.0 Server with Service Pack 6
•
Microsoft Windows 2000 Server with Service Pack 4
•
Microsoft Windows Server 2003
•
Red Hat Linux 7.3, 8.0
•
Novell NetWare 5.1 with Support Pack 6
•
Novell NetWare 6.0 with Support Pack 3
Supported Hardware Configurations
HPPM requires that the Management Server be connected to the network. UPSs can be
attached in any of the following configurations:
•
Configuration A—One UPS is serially attached to a Management Server.
•
Configuration B—Several Management Servers are serially attached to a Six Port Card
on a single UPS.
•
Configuration C—One Management Server is serially attached to a UPS and
communicates to several Remote Agents over the network.
HP Power Manager 3.1 User Guide
HP CONFIDENTIAL Codename: Fish Stick Part Number: 333101-002 Last Saved On: 10/27/03 10:56 AM
1-5
Overview
Configuration A
Figure 1-2 illustrates a UPS serially attached to a Management Server that is plugged into a
load segment of the UPS. The Management Server is connected directly to the network. A
remote workstation can browse into the Management Server over the network.
Figure 1-2: Configuration A
Item
1-6
Description
1
Remote workstation and Management Server
2
UPS
HP Power Manager 3.1 User Guide
HP CONFIDENTIAL Codename: Fish Stick Part Number: 333101-002 Last Saved On: 10/27/03 10:56 AM
Overview
Configuration B
In Figure 1-3, each server is a Management Server and is serially attached to the UPS through
a Six Port Card. The Six Port Card makes each server operate as if it is the only Management
Server attached to the UPS. This option card supports up to three attached servers, and these
servers do not communicate with each other.
NOTE: Attached Remote Agents are not tested or supported in this configuration.
Figure 1-3: Configuration B
Item
Description
1
Remote workstation browsing into the Management Server over the network
2
UPS with Six Port Card installed
3
HPPM Management Servers
4
Network
HP Power Manager 3.1 User Guide
HP CONFIDENTIAL Codename: Fish Stick Part Number: 333101-002 Last Saved On: 10/27/03 10:56 AM
1-7
Overview
Configuration C
In Figure 1-4, only one server is a Management Server and is serially attached to the UPS.
This Management Server communicates to the Remote Agent servers over the network to
begin a graceful shutdown in the event of a power failure or other configured shutdown
events.
NOTE: Up to 15 Remote Agent servers can be managed by one Management Server.
Figure 1-4: Configuration C
Item
1-8
Description
1
Remote workstation browsing into the Management Server over the network
2
UPS
3
Remote Agent Servers
4
HPPM Management Server
5
Network
HP Power Manager 3.1 User Guide
HP CONFIDENTIAL Codename: Fish Stick Part Number: 333101-002 Last Saved On: 10/27/03 10:56 AM
2
Installation
System Requirements
Table 2-1 lists the minimum HPPM hardware and software requirements.
NOTE: For the latest system requirements, refer to the Supported Hardware matrix on the HP Power
Manager Product Overview page at http://www.hp.com/products/UPS.
Table 2-1: HPPM Minimum System Requirements
HPPM Component
Hardware and Software
Suggested Minimum Requirements
Management Server
Hardware
500-MHz Pentium® computer
Disk space
25 MB free disk space
System memory
128 MB of RAM
Operating system
•
Microsoft Windows NT 4.0 Server with
Service Pack 6
•
Microsoft Windows 2000 Server with
Service Pack 4
•
Microsoft Windows Server 2003
•
Red Hat Linux 7.3, 8.0
•
A supported operating system with a
static IP address (recommended), TCP/IP
installed and configured
•
SNMP services installed and active
(optional)
Server software
continued
HP Power Manager 3.1 User Guide
HP CONFIDENTIAL Codename: Fish Stick Part Number: 333101-002 Last Saved On: 10/27/03 11:00 AM
2-1
Installation
Table 2-1: HPPM Minimum System Requirements continued
HPPM Component
Hardware and Software
Suggested Minimum Requirements
Remote Agent
Hardware
200-MHz Pentium computer
Disk space
10 MB free disk space
System memory
64 MB of RAM
(180 MB for NetWare 6.0)
Operating system
•
Microsoft Windows NT 4.0 Server with
Service Pack 6
•
Microsoft Windows 2000 Server with
Service Pack 4
•
Microsoft Windows Server 2003
•
Red Hat Linux 7.3, 8.0
•
Novell NetWare 5.1 with Support Pack 6
•
Novell NetWare 6.0 with Support Pack 3
Browser Requirements
Table 2-2 lists the minimum HPPM browser requirements.
Table 2-2: Minimum Web Browser Requirements
Software
Browser
Web browser on a client
Microsoft operating systems
•
Microsoft Internet Explorer 6.0 Service Pack 1
Linux operating system
•
Monitor resolution
Mozilla 1.4
Minimum supported resolution of 1024 x 768, 16-bit high
color (maximize browser window for optimal display)
Note: Browsing requires the use of Macromedia Flash Player 6.0, which is included in the HPPM
Management Server installation. If you do not have Flash Player installed, you are prompted to
install it. Click the link and follow the installation prompts.
2-2
HP Power Manager 3.1 User Guide
HP CONFIDENTIAL Codename: Fish Stick Part Number: 333101-002 Last Saved On: 10/27/03 11:00 AM
Installation
Mozilla Settings
When using SSL with Mozilla, a browser session with the HPPM Management Server might
hang. To resolve the problem, make the following change to the Mozilla settings:
1. From the folder into which Mozilla was installed, under the defaults directory, open the
pref subdirectory.
2. Using a text editor, open the file all.js.
3. Change the entry:
pref("network.http.max-connections-per-server", 8)
to read
pref("network.http.max-connections-per-server", 1)
4. Save the file, and restart Mozilla.
Installation Overview
NOTE: Two paths can be taken when installing HPPM software. Follow the instructions below for
upgrading and fresh installations.
A graphical or command line installer is used for installing HPPM on Windows operating
systems. A script is used for installing HPPM on Linux operating systems. You have the
option to install either the Management Server or the Remote Agent. Follow these guidelines
when installing the components:
•
Management Server—Install the Management Server on the computer that is serially
attached to the UPS and responsible for managing other systems and devices connected
to the UPS.
•
Remote Agent—Install the Remote Agent on any computer that is powered by the UPS.
For each component of HPPM, there are three installation options:
•
Graphical user interface (GUI) installation—A series of dialog boxes and prompts guide
you through the installation process.
•
Non-GUI installation—A series of commands are necessary to complete the installation.
•
Silent installation—A preconfigured initialization file is specified during installation.
This file is placed into the proper directory, and you are not prompted for any
information.
Silent installation is typically used by system administrators that have many installations
that are configured identically and require minimal user interaction. To use this method in
HPPM:
a. Install an HP Power Management Server or Remote Agent through the assisted
installation method that is appropriate for the operating system.
b. Configure the server or agent exactly as the final replicated systems should be
configured. Use the exact same UPS model and thoroughly test the configuration,
including any alarm or notification events.
HP Power Manager 3.1 User Guide
HP CONFIDENTIAL Codename: Fish Stick Part Number: 333101-002 Last Saved On: 10/27/03 11:00 AM
2-3
Installation
c. Use the .INI file that is generated in the directory of the application as a template in
the Silent install process.
d. Change any items that should be unique, such as Device Name, Management Server
Name, or Remote Agent Name, through the normal operation of HPPM.
A user setup program is launched automatically when the installation is complete.
Table 2-3 summarizes the available installation options for each operating system.
Table 2-3: Installation Options
Operating System
GUI
Installation
Non-GUI
Installation
Silent
Installation
Microsoft Windows NT 4.0 Server
Available
-
Available
Microsoft Windows 2000 Server
Available
-
Available
Microsoft Windows Server 2003
Available
-
Available
Red Hat Linux 7.3, 8.0
-
Available
Available
Novell NetWare 5.1, 6.0
-
Available
-
Installing Components on Windows Operating Systems
The Management Server and Remote Agent can be installed using the GUI installation
method on any supported Windows operating system.
IMPORTANT: The HPPM Management Server and Remote Agent components cannot be installed on
the same computer.
NOTE: You might need to reboot after installing the Remote Agent on Windows.
The Management Server and Remote Agent can be installed using the silent installation
option on any supported Windows operating system.
2-4
HP Power Manager 3.1 User Guide
HP CONFIDENTIAL Codename: Fish Stick Part Number: 333101-002 Last Saved On: 10/27/03 11:00 AM
Installation
Installing the Management Server Using the GUI Installation Method
To install the Management Server on a Windows system using the GUI installation method:
1. Insert the Rack and Power Management Pack CD (shipped with each UPS) into the
CD-ROM drive of the computer. If the AutoPlay feature is enabled, the Welcome screen
appears.
If the AutoPlay feature is disabled, explore the CD and double-click AUTORUN.EXE in
the root folder. Follow the on-screen prompts to install.
If the HPPM software has been downloaded from the HP website, follow the instructions
to unpack the files, then locate and run SETUP.EXE for the Windows Management
Server.
2. If upgrading from a previous version, click Upgrade. If not, continue to step 3.
NOTE: Upgrading does not delete any custom settings. All custom settings are saved upon
running Setup.exe.
HP Power Manager 3.1 User Guide
HP CONFIDENTIAL Codename: Fish Stick Part Number: 333101-002 Last Saved On: 10/27/03 11:00 AM
2-5
Installation
3. Read the introduction and click Next.
The License Agreement screen appears.
2-6
HP Power Manager 3.1 User Guide
HP CONFIDENTIAL Codename: Fish Stick Part Number: 333101-002 Last Saved On: 10/27/03 11:00 AM
Installation
4. Read the license agreement, select I accept the terms in the license agreement, and
click Next.
The Customer Information screen appears.
HP Power Manager 3.1 User Guide
HP CONFIDENTIAL Codename: Fish Stick Part Number: 333101-002 Last Saved On: 10/27/03 11:00 AM
2-7
Installation
5. Verify or change the customer information, select whether to install for all users or only
the current user, and click Next.
The Destination Folder screen appears.
2-8
HP Power Manager 3.1 User Guide
HP CONFIDENTIAL Codename: Fish Stick Part Number: 333101-002 Last Saved On: 10/27/03 11:00 AM
Installation
6. Click Next to install the Management Server in the default folder that is displayed below
the Install HP Power Manager to: field. To specify a different folder, click Change,
navigate to the appropriate folder, and click Next.
The Ready to Install the Program screen appears.
HP Power Manager 3.1 User Guide
HP CONFIDENTIAL Codename: Fish Stick Part Number: 333101-002 Last Saved On: 10/27/03 11:00 AM
2-9
Installation
7. Click Install. The wizard installs the software and launches a separate configuration
process.
2-10
HP Power Manager 3.1 User Guide
HP CONFIDENTIAL Codename: Fish Stick Part Number: 333101-002 Last Saved On: 10/27/03 11:00 AM
Installation
8. Click Finish to exit the install wizard.
NOTE: This is the final step in the upgrade process. Continue with step 9 for the installation.
HP Power Manager 3.1 User Guide
HP CONFIDENTIAL Codename: Fish Stick Part Number: 333101-002 Last Saved On: 10/27/03 11:00 AM
2-11
Installation
9. Click Next to use the standard HTTP protocol and port for Web browser access to the
Management Server.
To use the SSL on the standard port, select Use SSL to connect to Manager. To use a
non-standard port for browser access, change the value in the Web Server Port: field.
Verify the port you specify is not already being used.
Click Next.
IMPORTANT: The common Web server port is port 80. The default port for SSL is 443. Verify no
other Web servers are currently running on these ports or the port that you select. The port you
select must be unique. Make note of the port number for future reference.
NOTE: To reconfigure the Web connection, communications port, or to change to a different UPS, refer
to the section, “Reconfiguring Components on Windows Operating Systems,” in this chapter.
2-12
HP Power Manager 3.1 User Guide
HP CONFIDENTIAL Codename: Fish Stick Part Number: 333101-002 Last Saved On: 10/27/03 11:00 AM
Installation
10. Select the serial (COM) port that the computer uses to communicate with the UPS. Click
Next.
HP Power Manager 3.1 User Guide
HP CONFIDENTIAL Codename: Fish Stick Part Number: 333101-002 Last Saved On: 10/27/03 11:00 AM
2-13
Installation
11. Information about the discovered UPS appears.
If the information is correct, select Use this device. Click Finish to close the configurator
and return to the install wizard.
If the information is incorrect or no UPS was detected, click Back to check your
selections.
2-14
HP Power Manager 3.1 User Guide
HP CONFIDENTIAL Codename: Fish Stick Part Number: 333101-002 Last Saved On: 10/27/03 11:00 AM
Installation
12. Click Yes to start the service. Wait until the tray icon displays a green check mark to
begin using the software.
NOTE: An icon in the Windows system tray shows the status of the Management Server. It might take
a few moments for the icon to change. A green check mark displays if the Management Server is
communicating with the UPS without errors. If there are problems, the
icon displays. Hover over the
icon with the mouse pointer, and a tool tip displays a status message. For more information about the
system tray icon status messages, refer to the section, “System Tray Icon,” in Chapter 3.
HP Power Manager 3.1 User Guide
HP CONFIDENTIAL Codename: Fish Stick Part Number: 333101-002 Last Saved On: 10/27/03 11:00 AM
2-15
Installation
Installing the Remote Agent Using the GUI Installation Method
To install the Remote Agent on a Windows system using the GUI installation method:
1. Insert the Rack and Power Management Pack CD into the CD-ROM drive of the
computer. If the AutoPlay feature is enabled, the installation menu automatically starts.
If the AutoPlay feature is disabled, explore the CD and double-click AUTORUN.EXE in
the root folder.
If the HPPM software has been downloaded from the HP website, follow the instructions
to unpack the files, then locate and run SETUP.EXE for the Windows Remote Agent.
2. If upgrading from a previous version, click Upgrade. If not, continue to step 3..
NOTE: Upgrading does not delete any custom settings. All custom settings are saved upon
running Setup.exe.
2-16
HP Power Manager 3.1 User Guide
HP CONFIDENTIAL Codename: Fish Stick Part Number: 333101-002 Last Saved On: 10/27/03 11:00 AM
Installation
3. Read the introduction and click Next.
The License Agreement screen appears.
HP Power Manager 3.1 User Guide
HP CONFIDENTIAL Codename: Fish Stick Part Number: 333101-002 Last Saved On: 10/27/03 11:00 AM
2-17
Installation
4. Read the license agreement, select I accept the terms in the license agreement, and
click Next.
The Customer Information screen appears.
2-18
HP Power Manager 3.1 User Guide
HP CONFIDENTIAL Codename: Fish Stick Part Number: 333101-002 Last Saved On: 10/27/03 11:00 AM
Installation
5. Verify or change the customer information, select whether to install for all users or only
the current user, and click Next.
The Destination Folder screen appears.
HP Power Manager 3.1 User Guide
HP CONFIDENTIAL Codename: Fish Stick Part Number: 333101-002 Last Saved On: 10/27/03 11:00 AM
2-19
Installation
6. Click Next to install the Remote Agent in the default folder that is displayed below the
Install HP Power Manager Remote Agent to: field. To specify a different folder, click
Change, navigate to the appropriate folder, and click Next.
The Ready to Install the Program screen appears.
2-20
HP Power Manager 3.1 User Guide
HP CONFIDENTIAL Codename: Fish Stick Part Number: 333101-002 Last Saved On: 10/27/03 11:00 AM
Installation
7. Click Install. The wizard installs the software and launches a separate configuration
process.
HP Power Manager 3.1 User Guide
HP CONFIDENTIAL Codename: Fish Stick Part Number: 333101-002 Last Saved On: 10/27/03 11:00 AM
2-21
Installation
8. Click Finish to exit the install wizard.
NOTE: This is the final step in the upgrade process. Continue with step 9 for the installation.
2-22
HP Power Manager 3.1 User Guide
HP CONFIDENTIAL Codename: Fish Stick Part Number: 333101-002 Last Saved On: 10/27/03 11:00 AM
Installation
9. For the most security, enter the host name or IP address of the Management Server. This
setting ensures only that particular Management Server executes commands and
operating system shutdowns on the computer running the Remote Agent.
If security is not a concern, leave this field as is.
Click Finish to close the configurator and return to the install wizard.
HP Power Manager 3.1 User Guide
HP CONFIDENTIAL Codename: Fish Stick Part Number: 333101-002 Last Saved On: 10/27/03 11:00 AM
2-23
Installation
10. Click Yes to start the service. Wait until the tray icon displays a green check mark to
begin using the software.
NOTE: An icon in the Windows system tray shows the status of the Remote Agent. It might take a few
moments for the icon to change. A green check mark displays if the Management Server is
communicating with the UPS without errors. If there are problems, the
icon displays. Hover over the
icon with the mouse pointer, and a tool tip displays status message. For more information about the
system tray icon status messages, refer to the section, “System Tray Icon,” in Chapter 3.
To reconfigure the web connection, communications port, or to change to a different UPS, refer to the
section, “Reconfiguring Components on Windows Operating Systems,” in this chapter.
2-24
HP Power Manager 3.1 User Guide
HP CONFIDENTIAL Codename: Fish Stick Part Number: 333101-002 Last Saved On: 10/27/03 11:00 AM
Installation
Installing the Management Server Using the Silent Installation/Upgrade
Method
To install the Management Server on a Windows system using the silent installation method:
1. If you do not have the configuration .INI file, refer to the section, “Installation
Overview,” in this chapter for instructions.
NOTE: The configuration .INI file is required for silent installations but is optional for upgrading.
2. Run Setup.exe /s /f “<path>\DevManBE.ini” to install silently. Replace
<path> with the DevManBE.ini file location.
NOTE: If you are installing to a location other than the default path
(szDir=C:\Program Files\HP\PowerMgr), edit the destination path in the Setup.iss file.
The following command line parameters can be specified and are applicable for both
interactive and silent modes.
Table 2-4: Command Line Parameters
/s
Performs a silent install or upgrade.
/r
Reboots the computer at completion of setup. This option is supported
only on Windows and only for a silent install/upgrade.
/log
Creates an installation log (/usr/local/DevMan/setup.log). Default is
disabled for interactive mode and enabled for silent mode. This option is
supported only on Linux. The installation log is created automatically for
Windows during silent installations in \%systemdrive%\setup.log.
/f DevManBE.ini
Specifies a configuration .INI file used for both upgrades and clean
installs. When this option is specified, the device detection and
configuration step is omitted. If this option is specified for the upgrade, it
overwrites any saved .INI file settings. This parameter is required for
silent installations but is optional for upgrading.
Installing the Remote Agent Using the Silent Installation Method
To install the Remote Agent on a Windows system using the silent installation method:
1. If you do not have the configuration .INI file, refer to the section, “Installation
Overview,” in this chapter for instructions.
NOTE: The configuration .INI file is required for silent installations but is optional for upgrading.
2. Run Setup.exe /s /f “<path>\DevManRA.ini” to install silently. Replace
<path> with the DevManRA.ini file location.
HP Power Manager 3.1 User Guide
HP CONFIDENTIAL Codename: Fish Stick Part Number: 333101-002 Last Saved On: 10/27/03 11:00 AM
2-25
Installation
Reconfiguring Components on Windows Operating Systems
To reconfigure the Web connection or communications port or to change to a different UPS:
•
Right-click the system tray icon to display a context menu from which the Management
Server service can be stopped or started. In this menu, you can also configure
communication settings using the Configure option or launch a browser session using the
Connect option.
•
Select HP Power Manager Configure from the HP Power Manager option in the Start
Programs menu.
Installing Components on Linux Operating Systems
The Management Server and Remote Agent can be installed using an installation script on
any supported Linux operating system.
NOTE: The Management Server and Remote Agent components cannot be installed on the same
computer.
The Management Server and Remote Agent can also be installed using the silent installation
option on any supported Linux operating system.
Installing the Management Server Using the Installation Script
NOTE: The HPPM Linux package (PowerManager-3.1-x.i586.rpm) requires that the
compat-libstdc++7.3-2.96.110.i386.rpm file is installed.
To install the Management Server on a Linux system using the installation script:
1. Insert the Rack and Power Management Pack CD into the CD-ROM drive of the
computer. From the console or a terminal window, go to the HPPM/…/Linux/Manager
subdirectory. Execute the following installation script:
./Setup
If the HPPM software has been downloaded from the HP website, follow the instructions
to unpack the files. Locate the Linux Management Server installation script (Setup) and
execute it as previously indicated.
The script installs the Management Server component and requests information to
configure the application. Default values or valid options are shown in brackets following
each prompt.
2-26
HP Power Manager 3.1 User Guide
HP CONFIDENTIAL Codename: Fish Stick Part Number: 333101-002 Last Saved On: 10/27/03 11:00 AM
Installation
2. The installer launches a separate configuration program.
3. The script displays: Do you wish to use SSL to communicate with HP Power
Manager?
To use the standard HTTP protocol for Web browser access to the Management Server,
enter N. To use the Secure Sockets Layer (SSL), enter y.
4. The script displays: Please enter a port to use for web communications.
To use the standard TCP/IP port (80 for HTTP, 443 for SSL) with the selected protocol
for Web browser access to the Management Server, press the Enter key. To use a
non-standard port for browser access, enter a valid numerical value for the port number.
5. The script displays: Please select a serial port to search for a UPS
device on.
If the serial cable from the UPS is connected to serial port /dev/ttyS0 on the computer,
press the Enter key. If it is connected to another serial port, enter the number
corresponding to that serial port from the displayed list.
If a UPS is discovered, the type of communications protocol and baud rate is displayed. If
no UPS is detected, verify that the cable is connected securely from the serial port to the
UPS and that the correct port was selected before trying again.
6. The script displays: Would you like to start HP Power Manager?
To start the HPPM Management Server, enter Y. If you do not want to start the
Management Server now, enter n.
HP Power Manager 3.1 User Guide
HP CONFIDENTIAL Codename: Fish Stick Part Number: 333101-002 Last Saved On: 10/27/03 11:00 AM
2-27
Installation
Installing the Remote Agent Using the Installation Script
To install the Remote Agent on a Linux system using the installation script:
1. Insert the Rack and Power Management Pack CD into the CD-ROM drive of the
computer. From the console or a terminal window, go to the HPPM/…/Linux/Agent
subdirectory. Execute the following installation script:
./Setup
If the HPPM software has been downloaded from the HP website, follow the instructions
to unpack the files. Locate the Linux Remote Agent installation script (Setup) and
execute it as previously indicated.
The script installs the Remote Agent component and requests information to configure
the application. Default values or valid options are shown in brackets following each
prompt.
2. The install launches a separate configuration program.
3. The script displays: Please enter a server to allow connections from.
For the most security, enter the host name or IP address of the Management Server. This
configuration ensures only that particular Management Server executes commands and
operating system shutdowns on the computer running the Remote Agent. If security is not
a concern, leave this line blank and press the Enter key.
4. The script displays: Would you like to start HP Power Manager Remote
Agent?
To start the HPPM Remote Agent, enter Y. If you do not want to start the Remote Agent
now, enter n.
2-28
HP Power Manager 3.1 User Guide
HP CONFIDENTIAL Codename: Fish Stick Part Number: 333101-002 Last Saved On: 10/27/03 11:00 AM
Installation
Installing the Management Server Using the Silent Installation Method
NOTE: The HPPM Linux package (PowerManager-3.1-x.i586.rpm) requires that the
compat-libstdc++7.3-2.96.110.i386.rpm file install.
To install the Management Server on a Linux system using the silent installation method:
1. If you do not have the configuration .INI file, refer to the section, “Installation
Overview,” in this chapter for instructions.
NOTE: The configuration .INI file is required for silent installations but is optional for upgrading.
2. Run ./Setup /s /f “<path>/DevManBE.ini” to install silently. Replace <path>
with the DevManBE.ini file location.
Installing the Remote Agent Using the Silent Installation Method
To install the Remote Agent on a Linux system using the silent installation method:
1. If you do not have the configuration .INI file, refer to the section, “Installation
Overview,” in this chapter for instructions.
NOTE: The configuration .INI file is required for silent installations but is optional for upgrading.
2. Run ./Setup /s /f “<path>/DevManRA.ini” to install silently. Replace <path>
with the DevManRA.ini file location.
Reconfiguring Components on Linux Operating Systems
To reconfigure the Web connection, SSL, or communications port, run
/etc/init.d/DevMan setup.
Installing Components on NetWare Operating Systems
The Remote Agent can be installed using a configuration module or the silent installation
option on any supported NetWare operating system.
NOTE: If domain name server (DNS) is not being used, verify the host name and IP address are added
to the hosts file (sys:etc\hosts).
HP Power Manager 3.1 User Guide
HP CONFIDENTIAL Codename: Fish Stick Part Number: 333101-002 Last Saved On: 10/27/03 11:00 AM
2-29
Installation
Installing the Remote Agent Using the Configuration Module
To install the Remote Agent on a NetWare system using the configuration module:
1. Insert the Rack and Power Management Pack CD into the CD-ROM drive of a computer.
From the HPPM/…/NetWare/Agent subdirectory of the CD, copy the contents into a
directory on the NetWare server.
From the NetWare system console, load the configuration module (PMCONFIG.NLM)
using the default path. For example, if the files were copied into a folder called HP on the
SYS: volume, the module would be loaded as follows:
SYS:HP/PMCONFIG
If the HPPM software has been downloaded from the HP website, follow the instructions
to unpack the files. Copy the files to the NetWare server and load the configuration
module as previously indicated. The module displays information about the configuration
process.
2. Press the Enter key to continue the installation. The license agreement screen appears.
2-30
HP Power Manager 3.1 User Guide
HP CONFIDENTIAL Codename: Fish Stick Part Number: 333101-002 Last Saved On: 10/27/03 11:00 AM
Installation
3. Press the Enter key to accept the license agreement.
4. The module displays: Enter the IP address of the Management Server.
For the most security, enter the host name or IP address of the Management Server. This
feature allows only that particular Management Server to execute commands and
operating system shutdowns on the computer running the Remote Agent. If security is not
a concern, leave this line blank and press the Enter key.
5. The module displays: Is this correct?
Press the Enter key to verify the choice.
The installation module updates startup files with configuration information.
6. The module displays: The installation is complete.
Press the Enter key to close the installation module.
Uninstalling Components from Windows Systems
To remove HPPM from a Windows system:
1. Click Start>Settings>Control Panel.
2. Open Add/Remove Programs.
3. Select HP Power Manager or HP Power Manager Remote Agent, and click
Change/Remove. The uninstall wizard is launched. Select Remove Choicem, and click
Next.
4. Follow the prompts in the uninstall wizard to uninstall the software.
NOTE: Some files might remain following the uninstallation and can be removed manually.
HP Power Manager 3.1 User Guide
HP CONFIDENTIAL Codename: Fish Stick Part Number: 333101-002 Last Saved On: 10/27/03 11:00 AM
2-31
Installation
Uninstalling Components from Linux Systems
To remove HPPM from a Linux system, execute the uninstall script (Uninstall).
NOTE: Some files might remain following the uninstallation and can be removed manually.
Uninstalling Components from NetWare Systems
To remove HPPM from a NetWare system, navigate to the directory into which HPPM was
installed and load PMCONFIG.NLM with the -u option:
For example: SYS:HPPM/PMCONFIG –u
NOTE: Some files might remain following the uninstallation and can be removed manually.
2-32
HP Power Manager 3.1 User Guide
HP CONFIDENTIAL Codename: Fish Stick Part Number: 333101-002 Last Saved On: 10/27/03 11:00 AM
3
Access and Navigation
Accessing HPPM
You can access HPPM in the following ways:
•
Remotely through a Web browser
•
Locally from the system tray icon in Windows
Web Browser
To access HPPM through a Web browser:
1. Launch a supported browser. The browser window appears.
2. In the Address field (Microsoft Internet Explorer) or the Location field (Mozilla), enter
an IP address. Follow the examples below, where hostname is the IP address or the
machine name of the computer on which the Management Server software component is
installed.
— If you installed the software to use the default port numbers of 80 (standard HTTP) or
443 (SSL), then enter one of the following:
http://hostname
https://hostname
— If you installed the software to use a specific port number that is different from the
defaults, then use the following example with the port number you selected.
http://hostname:1234/
https://hostname:1234/
NOTE: If you are using a proxy server, you might need to add the server hosting HPPM to the No
Proxy list of servers in the Internet settings for your browser. Refer to the browser help for more
information about changing the configuration.
HP Power Manager 3.1 User Guide
HP CONFIDENTIAL Codename: Part Number: 333101-002 Last Saved On: 10/27/03 11:01 AM
3-1
Access and Navigation
System Tray Icon
To access HPPM through the system tray in Windows:
1. Right-click the HPPM system tray icon on a computer with one of the HPPM
components installed to display a context menu.
2. Select Connect to access HPPM.
Table 3-1: System Tray Icon Status
Icon
Status
HPPM service/daemon is running.
The agent and Management Server are communicating.
UPS status is normal.
HPPM service/daemon is not running.
UPS issues a warning alarm.
HPPM is not configured, the UPS is not connected, or the agent and Management
Server are not communicating.
UPS issues a critical alarm.
NOTE: If the
icon appears, the Connect option is unavailable because the service is unavailable.
Regarding the Browser Security Alert
NOTE: The information in this section is only applicable if SSL is chosen during software configuration.
Secure browsing to HPPM requires the use of SSL. SSL is a protocol layer that lies between
HTTP and TCP. It provides secure communication between a server and a client and is
designed to provide privacy and message integrity. SSL is commonly used in Web-based
transactions to authenticate the Web server, which indisputably identifies the server to the
browser. SSL also provides an encrypted channel of communication between the server and
the browser. This channel ensures integrity of the data between the Web server and the
browser, so that data can neither be viewed nor modified while in transit. HPPM uses a
system generated and unique key.
3-2
HP Power Manager 3.1 User Guide
HP CONFIDENTIAL Codename: Part Number: 333101-002 Last Saved On: 10/27/03 11:01 AM
Access and Navigation
An integral part of SSL is a security certificate, which identifies the HPPM Management
Server. If your browser displays a security alert when browsing to HPPM, it can be for one of
several reasons:
•
The certificate is untrusted, meaning it was signed by a certifying authority that is
unknown to your browser.
•
The certificate has expired or is not yet valid. This condition can occur if you issue your
own certificate and it has expired.
•
The name on the certificate does not match the name of the site in the browser address
field.
Establishing a Secure Session for Internet Explorer
The first time you browse to HPPM, the Secure Session screen appears. To ensure a secure
connection to HPPM, verify that you are browsing to the desired Management Server.
1. Click View Certificate.
2. Verify that the name in the Issued To field is the name of your Management Server.
3. Perform any other steps necessary to verify the identity of the Management Server.
CAUTION: If you are not sure this is the desired Management Server, do not proceed.
Importing a certificate from an unauthorized server relays your login credentials to that
unauthorized server. Exit the certificate window and contact the HPPM administrator.
After verifying the Management Server, do one of the following:
•
Import the certificate and proceed.
a. Click View Certificate. The certificate appears.
b. Click Install Certificate. The Certificate Import Wizard runs.
c. Click Next. The Certificate Store screen appears.
d. Select Automatically select the certificate store based on the type of certificate,
and click Next.
e. Click Finish. A message appears, asking for verification of the root store.
f.
Click Yes.
•
Proceed without importing the certificate by clicking Yes at the Security Alert window.
You continue to receive the Security Alert each time you log in until you import the
certificate. Your data is still encrypted.
•
Exit and import the certificate into your browser from a file provided by the
administrator.
a. Click No at the Security Alert window.
b. Obtain an exported HPPM server certificate file from the administrator.
NOTE: If using Internet Explorer, you can manually import the file into the browser by clicking
Tools>Internet Options>Content>Certificates>Import.
HP Power Manager 3.1 User Guide
HP CONFIDENTIAL Codename: Part Number: 333101-002 Last Saved On: 10/27/03 11:01 AM
3-3
Access and Navigation
Establishing a Secure Session for Mozilla
The first time you browse to HPPM, the Secure Session screen appears. To ensure a secure
connection to HPPM, verify that you are browsing to the desired Management Server.
1. Click Examine Certificate.
2. Verify that the name in the Issued To field is the name or IP Address of your
Management Server.
3. Perform any other steps necessary to verify the identity of the Management Server.
4. After verifying the Management Server, do one of the following:
a. Click on either Accept this certificate permanently or Accept this certificate
temporally for this session.
b. Click OK.
NOTE: If using Mozilla, manually import the file into your browser by clicking
File>Preferences>Certificates>Privacy & Security>Manage Certificates>Authorities>Import.
Logging into HPPM
Before using HPPM, log in with a user name and password. The first time you log in, enter
admin as the user name, and enter admin as the password. Click Submit Login to log in.
After you are logged in, you can change your password. For more information, refer to the
section, “My Account Menu Option,” in Chapter 6.
NOTE: Passwords are case-sensitive.
After a successful login, the HPPM Overview screen under the Home tab appears. For more
information on the Overview screen, refer to the section, “Overview Menu Option,” in
Chapter 4.
3-4
HP Power Manager 3.1 User Guide
HP CONFIDENTIAL Codename: Part Number: 333101-002 Last Saved On: 10/27/03 11:01 AM
Access and Navigation
Navigating HPPM
The HPPM interface is divided into three frames:
•
Top frame—Contains the HP logo, Home, Logs, Setup, and Help tabs, as well as a
Logout hyperlink.
— Click the HP logo to access the HP website.
— Click the Home tab to see the menu options for configuring and operating the
software. For more information, refer to the section, “Home Tab,” in Chapter 4.
— Click the Logs tab to see the menu options for displaying UPS data logs. For more
information, refer to the section, “Logs Tab,” in Chapter 5.
— Click the Setup tab to see the menu options for setting up and modifying user
accounts. For more information, refer to the section, “Setup Tab,” in Chapter 6.
— Click the Help tab to access the software help section. For more information, refer to
the section, “Help Tab,” in Chapter 6.
— Click the Logout hyperlink to log out of HPPM.
NOTE: An indicator in the upper right-hand corner of the screen displays information about the
UPS, such as the number of active alarms or whether or not the UPS is connected.
•
Left navigation frame—Contains a list of menu options on the left side of the screen.
The menu is dynamic, and the menu options change depending on the tab selected and
your access rights.
•
Main frame—Contains the various screens of HPPM based on the menu option selected.
The screens are discussed in detail later in this guide.
NOTE: The Overview screen appears in the main frame the first time you log in to HPPM. The
screen might vary depending on the UPS model connected.
HP Power Manager 3.1 User Guide
HP CONFIDENTIAL Codename: Part Number: 333101-002 Last Saved On: 10/27/03 11:01 AM
3-5
Access and Navigation
3-6
HP Power Manager 3.1 User Guide
HP CONFIDENTIAL Codename: Part Number: 333101-002 Last Saved On: 10/27/03 11:01 AM
4
Configuration and Operation
Before HPPM can manage attached devices, the settings must be properly configured. To
view a list of menu options for configuring HPPM settings, click the Home tab in the top
frame of the HPPM interface. The available menu options appear in the left navigation frame.
Home Tab
Menu options listed under the Home tab include:
•
Overview
•
Alarms
•
Identification
•
Parameters
•
Attached Devices
•
Power Fail
•
Shutdown Events
•
Event Settings
•
Manual Control
•
Settings
HP Power Manager 3.1 User Guide
HP CONFIDENTIAL Codename: Fish Stick Part Number: 333101-002 Last Saved On: 10/27/03 11:02 AM
4-1
Configuration and Operation
Overview Menu Option
Click Overview in the left navigation frame to display the Overview screen. This screen
displays overall views of the UPS status and contains the following tabs:
•
Meter Display
•
UPS Animation
•
Alarms (x)
NOTE: The variable x indicates the number of active alarms. For example, Alarms (2) means that the
UPS has two active alarms.
Meter Display Tab
NOTE: Depending on the specific UPS model, the Meter Display screen might vary. The screen shown
is only an example.
4-2
HP Power Manager 3.1 User Guide
HP CONFIDENTIAL Codename: Fish Stick Part Number: 333101-002 Last Saved On: 10/27/03 11:02 AM
Configuration and Operation
Under the Meter Display tab, the status of the UPS is shown in graphical and text format.
Input Voltage, Output Voltage, and Output Load information is displayed graphically on the
left side of the screen, with the colors on the meter representing the current state of the UPS.
Table 4-1: Meter Colors
Color
Device Status
Green
Normal
Yellow
Warning
Red
Critical
Battery, Input, and Output parameters are listed as text on the right side of the screen. A
status icon indicates the current state of each parameter.
Table 4-2: Status Icons
Icon
Parameter Status
Normal
Warning
Critical
HP Power Manager 3.1 User Guide
HP CONFIDENTIAL Codename: Fish Stick Part Number: 333101-002 Last Saved On: 10/27/03 11:02 AM
4-3
Configuration and Operation
UPS Animation Tab
The UPS Animation tab provides an animated view of the flow of power into and out of the
UPS. Battery, Input, and Output parameters are listed as text on the right side of the screen. A
status icon next to each parameter indicates the current state of the parameter ( Normal,
Warning, or Critical).
The animation graphic changes based on the current UPS status. The following screen is an
example of the UPS On Utility power.
4-4
HP Power Manager 3.1 User Guide
HP CONFIDENTIAL Codename: Fish Stick Part Number: 333101-002 Last Saved On: 10/27/03 11:02 AM
Configuration and Operation
If the UPS goes into Battery, Bypass, Buck, or Boost modes, the graphic on the left side of
the screen changes to one of the following animations.
NOTE: Depending on the specific UPS model, the animations might or might not be supported. The
screen shown is only an example.
HP Power Manager 3.1 User Guide
HP CONFIDENTIAL Codename: Fish Stick Part Number: 333101-002 Last Saved On: 10/27/03 11:02 AM
4-5
Configuration and Operation
Alarms Tab
The Alarms (x) tab displays a list of active alarms for the UPS, where x is the current number
of active alarms. Click an alarm to see a description of the alarm. If there are no active
alarms, the screen indicates No Active Alarms. A status icon next to each alarm indicates the
severity of the alarm ( Warning or Critical).
4-6
HP Power Manager 3.1 User Guide
HP CONFIDENTIAL Codename: Fish Stick Part Number: 333101-002 Last Saved On: 10/27/03 11:02 AM
Configuration and Operation
Alarms Menu Option
Click Alarms in the left navigation frame to display the Alarms screen. This screen lists all
possible alarms (active and normal) specific for each UPS model. The active alarms are listed
at the top of the screen with the date and time on which the alarm most recently occurred.
Click an active alarm to see a description of the alarm. A status icon next to each alarm
indicates the current state of the alarm ( Normal, Warning, or Critical).
HP Power Manager 3.1 User Guide
HP CONFIDENTIAL Codename: Fish Stick Part Number: 333101-002 Last Saved On: 10/27/03 11:02 AM
4-7
Configuration and Operation
Identification Menu Option
Click Identification in the left navigation frame to display the Identification screen. This
screen displays specific device and contact information.
NOTE: Depending on the specific UPS model, the Identification screen might vary. The screen shown
is only an example.
You can enter or change the contact information and device name on the Settings screen. For
more information, refer to the section, “Settings Menu Option,” in this chapter. Only users
with administrator rights can enter this information.
4-8
HP Power Manager 3.1 User Guide
HP CONFIDENTIAL Codename: Fish Stick Part Number: 333101-002 Last Saved On: 10/27/03 11:02 AM
Configuration and Operation
Parameters Menu Option
Click Parameters in the left navigation frame to display the UPS Parameters screen. This
screen displays the available UPS parameter values. A status icon next to each parameter
indicates the current state of the parameter ( Normal, Warning, or Critical).
NOTE: Depending on the specific UPS model, the UPS Parameters screen might vary. The screen
shown is only an example.
HP Power Manager 3.1 User Guide
HP CONFIDENTIAL Codename: Fish Stick Part Number: 333101-002 Last Saved On: 10/27/03 11:02 AM
4-9
Configuration and Operation
Battery Self-Test Results Summary
•
In Progress—The battery self-test is in progress.
•
Passed—The battery self-test has completed successfully.
•
Test Aborted—The battery self-test was not performed at this time because of one of the
following:
— The UPS is already On Battery.
— The battery is not presently charged.
— In some implementations, the battery self-test is scheduled and begins when the
batteries are fully charged.
•
Test Failed—A Bad Battery is detected, or the battery self-test failed.
•
Test Scheduled—The battery self-test was not performed at this time but will be
performed when the system has the proper conditions.
•
Battery Disconnect—All batteries have been disconnected.
•
Battery Not Installed—No batteries were connected to the system at last power up.
•
Unknown—Unable to determine the status of the last test.
NOTE: Battery self-test results are cleared after the UPS is reset.
4-10
HP Power Manager 3.1 User Guide
HP CONFIDENTIAL Codename: Fish Stick Part Number: 333101-002 Last Saved On: 10/27/03 11:02 AM
Configuration and Operation
Attached Devices Menu Option
NOTE: The link to this screen is not displayed if you do not have administrative rights.
Click Attached Devices in the left navigation frame to display the Attached Devices screen.
NOTE: Depending on the specific UPS model, load segments and UPS Runtime might not be
supported. The screen shown is only an example.
Table 4-3: Attached Devices Status Icons
Icon
Status
Agent is communicating with the Management Server, and
the versions are compatible.
Agent version is not compatible. Upgrade agent.
Agent is not communicating with the Management Server.
For more information, refer to Chapter 7, “Troubleshooting.”
HP Power Manager 3.1 User Guide
HP CONFIDENTIAL Codename: Fish Stick Part Number: 333101-002 Last Saved On: 10/27/03 11:02 AM
4-11
Configuration and Operation
This screen enables you to:
•
View attached devices and load segment power status
•
Control load segments (turn off, on, or cycle power)
•
Add or delete attached devices
•
Edit attached device configuration
The estimated UPS runtime appears at the top of the screen. The total time required to shut
down the entire UPS is recalculated when attached devices are added, deleted, or modified.
This time is determined by totaling the time required to shut down each device on the UPS.
Controlling a Load Segment
To control a load segment, do one of the following:
•
Click Off to shut down a load segment.
•
Click On to turn on a load segment.
•
Click Cycle to gracefully shut down and turn on a load segment.
NOTE: Off and On are not available for the load segment to which the Management Server is attached.
Adding an Attached Device
To add an attached device:
1. Click Add New Device on the Attached Devices screen. The Add Device screen appears.
NOTE: Depending on the specific UPS model, UPS Runtime might not be supported. The screen
shown is only an example.
2. Enter the device name or description in the Device Description/Name field.
4-12
HP Power Manager 3.1 User Guide
HP CONFIDENTIAL Codename: Fish Stick Part Number: 333101-002 Last Saved On: 10/27/03 11:02 AM
Configuration and Operation
3. Select the type of device (Remote Agent or Other Device) in the Device Type dropdown
box.
NOTE: Select the Other Device option for any unmanaged device, such as a router or hub.
Unmanaged devices are either on or off and are not shut down gracefully.
4. If output power is supplied by controllable load segments, select the load segment to
which the device is attached in the Load Segment dropdown box.
NOTE: If output power is not supplied by load segments, the Load Segment dropdown box does
not display on the screen.
5. If the device type is Remote Agent, enter the host name or IP address in the Host Name
or IP Address field.
6. If the device type is Remote Agent or Management Server, enter the estimated time
required to shut down the server in the Shut Down OS field.
7. If the command procedure SDScript is run at shutdown (such as running a script to back
up files to tape or to shutdown the database):
— Select Run Command Procedure (SDScript)? at shutdown.
— Edit the SDScript file in the HPPM program folder.
— Enter the estimated time required to complete the procedure in the Execute
Command field.
8. Click Save Changes to save the information.
9. The newly added device displays under the specific load segment. The status icon in front
of the device link indicates the attached device agent is communicating with the
Management Server, and the versions are compatible. For a detailed description of the
agent status, refer to the section, “System Tray Icon,” in Chapter 3.
Editing or Deleting an Attached Device
To edit information for an attached device:
1. Click the link for the device you want to edit on the Attached Devices screen. The
Edit/Delete Device screen appears.
2. Enter the device name or description in the Device Description/Name field.
3. Select the type of device (Management Server, Remote Agent, or other device) in the
Device Type dropdown box.
4. If output power is supplied by controllable load segments, select the load segment to
which the device is attached in the Load Segment dropdown box.
NOTE: If output power is not supplied by load segments, the Load Segment dropdown box does
not display on the screen.
5. If the device type is Remote Agent, enter the host name or IP address in the Host Name
or IP Address field.
6. If the device type is Remote Agent or Management Server, enter the estimated time
required to shut down the server in the Shut Down OS field.
HP Power Manager 3.1 User Guide
HP CONFIDENTIAL Codename: Fish Stick Part Number: 333101-002 Last Saved On: 10/27/03 11:02 AM
4-13
Configuration and Operation
7. If the command procedure SDScript is run at shutdown (such as running a script to back
up files to tape or to shutdown the database):
— Select Run Command Procedure (SDScript)? at shutdown.
— Edit the SDScript file in the HPPM program folder.
— Enter the estimated time required to complete the procedure in the Execute
Command field.
8. Click Save Changes to save the information, or click Delete Device to delete the device.
9. The newly added device displays under the specific load segment. The status icon in front
of the device link indicates the attached device agent is communicating with the
Management Server, and the versions are compatible. For detailed descriptions of the
agent status, refer to the section, “System Tray Icon,” in Chapter 3.
NOTE: The Delete Device button only displays for devices other than the Management Server.
NOTE: Depending on the specific UPS model, UPS Runtime might not be supported. The screen
shown is only an example.
4-14
HP Power Manager 3.1 User Guide
HP CONFIDENTIAL Codename: Fish Stick Part Number: 333101-002 Last Saved On: 10/27/03 11:02 AM
Configuration and Operation
Power Fail Menu Option
NOTE: The link to this screen is not displayed if you do not have administrative rights.
Click Power Fail in the left navigation frame to display the Power Fail Settings screen. This
screen enables you to configure how the system should shut down attached devices in the
event of a power failure.
NOTE: Depending on the specific UPS model, load segments and UPS Runtime might not be
supported. The screen shown is only an example.
HP Power Manager 3.1 User Guide
HP CONFIDENTIAL Codename: Fish Stick Part Number: 333101-002 Last Saved On: 10/27/03 11:02 AM
4-15
Configuration and Operation
Configuring the Shutdown Delay for the Management Server Load Segment
To configure the shutdown delay for the Management Server load segment:
1. Configure the Initiate Shutdown options.
a. Select After Delay (in Minutes) to specify a time delay before the load segment
shuts down. Enter the amount of time that HPPM should wait before initiating the
shutdown.
NOTE: The shutdown delay for the Management Server load segment must be as long as or
longer than the shutdown delay for all other load segments.
b. Select At Runtime Limit (maximize runtime) to maximize the UPS runtime before
shutdown. HPPM initiates the load segment shutdown when the value in the UPS
Runtime field reaches required shutdown time.
c. The following matrix shows the possible settings for the Never (on low battery) and
Shutdown on low battery? options.
Shutdown on low battery?
Selected
Shutdown on low battery?
Not Selected
Never (on low battery)
Selected
The system shuts down only when it
receives a low battery alarm from
the UPS based on the time set in
the low battery delay minutes.
The system does not shut down
even in a low battery event.
This results in the ungraceful
shutdown of the operating
system.
Never (on low battery)
Not Selected
The system shuts down when the
timer or runtime expires, unless the
UPS battery becomes low. If a low
battery event occurs, the system
shuts down based on the time set in
the low battery delay minutes.
The system shuts down when
the timer or runtime expires. If a
low battery alarm is generated,
it is ignored.
2. Select Shutdown on low battery? and optionally enter the amount of delay in minutes.
If the UPS runtime expires or a low battery event occurs, shutdown begins.
3. Enter the amount of time to wait before restarting the Management Server load segment
in the Restart Delay (Seconds) field.
4. If you want to edit Management Server information, click the link in the Attached
Devices column.
The Edit/Delete Device screen appears. For more information, refer to the section,
“Editing or Deleting an Attached Device,” in this chapter.
5. If you want to change the shutdown time for the Management Server, click the link in the
Required Shutdown Time column.
The Attached Devices screen appears. For more information, refer to the section,
“Adding an Attached Device,” in this chapter.
6. Click Save Changes to save the information.
IMPORTANT: It is not recommended to use the Runtime Limit option for the HP UPS R3000 XR or
R12000 XR models.
4-16
HP Power Manager 3.1 User Guide
HP CONFIDENTIAL Codename: Fish Stick Part Number: 333101-002 Last Saved On: 10/27/03 11:02 AM
Configuration and Operation
Configuring Shutdown for All Other Load Segments
To configure load segment shutdown for other attached devices:
1. Select After Delay (in Minutes) to specify a time delay before the attached device shuts
down. Enter the amount of time for the delay.
2. Select When Management Server Shuts Down to shut down the attached device load
segment at the same time the Management Server shuts down.
3. Enter the amount of time to wait before restarting the attached device in the Restart Delay
(Seconds) field.
4. If you want to edit the device information, click the link in the Attached Devices column.
The Edit/Delete Device screen appears. For more information, refer to the section,
“Editing or Deleting an Attached Device,” in this chapter.
5. If you want to change the shutdown time for the device, click the link in the Required
Shutdown Time column.
The Attached Devices screen appears. For more information, refer to the section,
“Adding an Attached Device,” in this chapter.
6. Click Save Changes to save the information.
Shutdown Events Menu Option
Click Shutdown Events in the left navigation frame to display the Shutdown Events screen.
In addition to the typical events (such as power fail events) causing shutdowns, this screen
enables you to configure other events for shutdown.
When a shutdown event occurs, HPPM gracefully shuts down all attached devices and UPS
load segments.
NOTE: The list of events on this screen might vary depending on the UPS.
To specify an event for shutdown:
1. Select Shutdown? for the event.
2. Enter the number of minutes to wait between the time the event occurs and the time the
device shuts down in the Delay (Minutes) field.
3. Click Save Changes to save the information.
HP Power Manager 3.1 User Guide
HP CONFIDENTIAL Codename: Fish Stick Part Number: 333101-002 Last Saved On: 10/27/03 11:02 AM
4-17
Configuration and Operation
4-18
HP Power Manager 3.1 User Guide
HP CONFIDENTIAL Codename: Fish Stick Part Number: 333101-002 Last Saved On: 10/27/03 11:02 AM
Configuration and Operation
Event Settings Menu Option
NOTE: The link to this screen is not displayed if you do not have administrative rights.
Click Event Settings in the left navigation frame. The screen that appears contains the Event
Notifications and Event Categories tables.
The Event Notifications table enables you to define the event notifications (EMail, SNMP, or
Broadcast) HPPM takes for each event by category (Critical, Warning, Information, User
Defined 1, or User Defined 2).
NOTE: You must define the severity of each event according to your environment.
The Event Categories table enables you to create up to two additional event categories, which
can be used to define the event notifications. (The added categories are displayed as column
headings on the Event Notifications table and Event Severities screen.)
HP Power Manager 3.1 User Guide
HP CONFIDENTIAL Codename: Fish Stick Part Number: 333101-002 Last Saved On: 10/27/03 11:02 AM
4-19
Configuration and Operation
Creating User-Defined Event Categories
Creating user-defined categories enables you to categorize alarms so that specific alerts are
sent to a certain groups of people. To create a user-defined event category:
1. In the Event Categories table on the main screen, enter the name of the new category in
the Name field.
2. Select the SNMP severity level of the new category in the Severity dropdown box.
3. Click Save Changes to save the added information. The added category appears as a
column heading on the Event Notifications table and Event Severities screen.
Categorizing Individual Events by Severity
To designate a category for an event:
1. In the Event Notifications table on the main screen, click any of the category column
heading links (Critical, Warning, Information, User Defined 1, or User Defined 2).
The Event Severities screen appears with the events listed in the Event column.
2. Select the radio button for the category into which each event should be placed.
4-20
HP Power Manager 3.1 User Guide
HP CONFIDENTIAL Codename: Fish Stick Part Number: 333101-002 Last Saved On: 10/27/03 11:02 AM
Configuration and Operation
3. Click Save Changes to save the information.
Selecting Notification Actions for Events by Category
You can specify an event notification by clicking one of the event notification links (EMail,
SNMP, or Broadcast) on the left side of the Event Notifications table on the main screen.
Setting Up E-mail Notifications
To set up the software to send an e-mail notification in response to an event in a specific
category:
1. Click the EMail link on the Event Notifications table in the main screen. The EMail
Setup screen appears.
2. Enter the mail server IP address or host name in the SMTP Server field.
3. Enter the e-mail address that HPPM marks messages as being sent from in the SMTP
From Address field.
4. Select the Enabled checkbox to indicate that e-mail notifications are sent for events in
each category (Critical, Warning, Information, User Defined 1, and User Defined 2).
5. Enter up to six e-mail addresses in the EMail Address(es) field for the persons who
should receive e-mail notifications of events that occur in each category.
HP Power Manager 3.1 User Guide
HP CONFIDENTIAL Codename: Fish Stick Part Number: 333101-002 Last Saved On: 10/27/03 11:02 AM
4-21
Configuration and Operation
6. Enter the amount of time to delay before the e-mail is sent in the Delay (seconds) field.
NOTE: If the event clears before the delay time has expired, then the e-mail is not sent.
7. Click Save Changes to save the information.
Setting Up SNMP Trap Notifications
To set up the software to send an SNMP trap notification in response to an event in a specific
category:
1. Click the SNMP link on the Event Notifications table in the main screen. The SNMP
Setup screen appears.
2. Enter the SNMP trap community string in the Trap Community String field (public is
the default string).
3. Select the Enabled checkbox to indicate that SNMP trap notifications are sent for events
in each category (Critical, Warning, Information, User Defined 1, and User Defined 2).
4-22
HP Power Manager 3.1 User Guide
HP CONFIDENTIAL Codename: Fish Stick Part Number: 333101-002 Last Saved On: 10/27/03 11:02 AM
Configuration and Operation
4. Enter up to six trap recipients in the SNMP Address(es) field for the computers that
receive SNMP trap notifications of events that occur in each category.
5. Enter the amount of time to delay before the trap is sent in the Delay (seconds) field.
NOTE: If the event clears before the delay time has expired, the SNMP trap is not sent.
6. Click Save Changes to save the information.
NOTE: For more information on using SNMP to send traps to Insight Manager 7, refer to Appendix B of
this guide.
HP Power Manager 3.1 User Guide
HP CONFIDENTIAL Codename: Fish Stick Part Number: 333101-002 Last Saved On: 10/27/03 11:02 AM
4-23
Configuration and Operation
Setting Up Broadcasts
To set up the software to send a broadcast notification in response to an event in a specific
category:
1. Click the Broadcast link on the Event Notifications table in the main screen. The
Broadcast Setup screen appears.
2. Select the Enabled checkbox to indicate that broadcast notifications are sent for events in
each category (Critical, Warning, Information, User Defined 1, and User Defined 2).
3. Enter up to six broadcast recipients in the Broadcast Address(es) field for the persons
who should receive broadcast notifications of events that occur in each category. The
broadcast recipient can be an IP address, user name, computer name, or messaging name.
NOTE: If the recipient is a computer name that contains spaces, the name must be enclosed in
quotation marks.
4. Enter the amount of time to delay before the broadcast is sent in the Delay (seconds)
field.
NOTE: If the event clears before the delay time has expired, the broadcast is not sent.
5. Click Save Changes to save the information.
IMPORTANT: Any computer running Windows and sending or receiving broadcasts must have the
Messenger service enabled. The Messenger service can be accessed from the Services option in the
Administrative Tools section of the Control Panel. The Messenger service is turned off by default in
Windows Server 2003.
IMPORTANT: Any computer running Linux that is sending or receiving broadcasts must have the
Samba packages installed, configured, and running. If the computer running Linux is to receive
broadcasts, Samba must be set to display the received message by adding a message command
statement to the Global Settings section of the SMB.CONF file, such as the following:
message command = /bin/csh -c 'cat %s | wall; rm %s' &
This statement sets Samba to route the broadcast message to the wall command, which displays the
message on the system (either in a terminal window, at the console, or in a pop-up message,
depending on the display environment), then delete the message. The Samba processes must be
restarted after editing the SMB.CONF file to enable the changes. For more information, refer to the
Samba documentation at http://www.samba.org.
In addition, for a Linux Management Server to send broadcasts to either Windows or Linux systems (or
both), entries must be added to the /etc/hosts file on the Management Server for each host name to
which it broadcasts.
For example, to broadcast from a Linux Management Server to a Windows workstation named “george”
at IP address 143.85.41.121, add the following line to the hosts file:
143.85.41.121
4-24
george
HP Power Manager 3.1 User Guide
HP CONFIDENTIAL Codename: Fish Stick Part Number: 333101-002 Last Saved On: 10/27/03 11:02 AM
Configuration and Operation
HP Power Manager 3.1 User Guide
HP CONFIDENTIAL Codename: Fish Stick Part Number: 333101-002 Last Saved On: 10/27/03 11:02 AM
4-25
Configuration and Operation
Manual Control Menu Option
NOTE: The link to this screen is not displayed if you do not have administrative rights or if the UPS
does not support any control commands.
Click Manual Control in the left navigation frame. The screen that displays contains the
Select Command and Execute Command boxes. These boxes enable you to select and
execute UPS commands manually.
NOTE: The available list of controls is dependent on the controls supported by the specific UPS. The
screen shown is only an example.
4-26
HP Power Manager 3.1 User Guide
HP CONFIDENTIAL Codename: Fish Stick Part Number: 333101-002 Last Saved On: 10/27/03 11:02 AM
Configuration and Operation
Executing the Battery Test Command
To run a manual test on the UPS battery:
1. Select Battery Test in the Select Command box. The Execute Battery Test box appears.
2. Enter the amount of time that the device runs on battery while running the test in the
Duration In Seconds field.
3. Click Execute Command to execute the control command and start the test. The results
of the test are on the UPS Parameters screen in the Test Results Summary field, and a log
entry is created in the Application Log. For more information on this screen, refer to the
section, “Parameters Menu Option,” in this chapter.
IMPORTANT: Do not run a battery test while the UPS is On Battery.
NOTE: Depending on the specific UPS model, the Duration In Seconds field might not be available.
The screen shown is only an example.
HP Power Manager 3.1 User Guide
HP CONFIDENTIAL Codename: Fish Stick Part Number: 333101-002 Last Saved On: 10/27/03 11:02 AM
4-27
Configuration and Operation
Settings Menu Option
NOTE: The link to this screen is not displayed if you do not have administrative rights.
Click the Settings menu option in the left navigation frame to display the Settings screen.
This screen enables you to enter contact information (such as name, e-mail, and phone
number) and values for settable UPS parameters. The information entered on this screen
appears on the Identification and UPS Parameters screens. For more information, refer to the
sections, “Identification Menu Option” and “Parameters Menu Option,” in this chapter.
To enter contact information and UPS settings:
1. Enter or select the date on which the battery was installed in the Battery Installed Date
field.
2. Enter the name of the contact person in the Contact field.
3. Enter the e-mail address of the contact person in the Contact Email field.
4. Enter the phone number of the contact person in the Contact Phone field.
5. Enter the name of the UPS in the Device Name field.
6. Click Save Changes to save the information.
4-28
HP Power Manager 3.1 User Guide
HP CONFIDENTIAL Codename: Fish Stick Part Number: 333101-002 Last Saved On: 10/27/03 11:02 AM
5
Data Logs
After the HPPM settings are properly configured and devices are being managed, you can
access and export several types of logs. These logs provide various types of data on UPS
events, as well as more general application events.
Logs Tab
Menu options listed under the Logs tab include:
•
UPS Summary
•
UPS Detailed
•
UPS Data
•
Application
UPS Summary Menu Option
Click UPS Summary in the left navigation frame to display the UPS Summary screen. This
screen displays a graphical view of the events that have occurred on the UPS for a selected
time period. A status icon on the left side of each event indicates the current state of the event
( Warning or Critical). The number on the right side indicates the number of times the
alarm has been reported in the time period (for example, the Battery Low alarm has occurred
10 times in the last 24 hours).
HP Power Manager 3.1 User Guide
HP CONFIDENTIAL Codename: Fish Stick Part Number: 333101-002 Last Saved On: 10/27/03 11:04 AM
5-1
Data Logs
To change the time period displayed, click one of the following buttons:
•
Last 24 Hours
•
Last Week
•
Last Month
•
Last Year
NOTE: The time period ends the moment you click the button. For example, if you click Last 24 Hours,
the software counts back 24 hours from the time you clicked the button and displays the events that
occurred during that time period.
Click an event name to display more information about the selected event and recommended
actions to take.
5-2
HP Power Manager 3.1 User Guide
HP CONFIDENTIAL Codename: Fish Stick Part Number: 333101-002 Last Saved On: 10/27/03 11:04 AM
Data Logs
UPS Detailed Menu Option
Click UPS Detailed in the left navigation frame to display the UPS Detailed screen. This
screen displays a log of the events that have occurred on the UPS, such as the UPS switching
to battery power. The following information is displayed for each event:
•
Severity—An icon indicating the severity or status of the alarm (
Information, or Cleared)
•
Description—The name of the event (click the event name to display more information,
such as a detailed description and recommended actions to take)
•
Date/Time—The date and time at which the event occurred
Critical,
Warning,
NOTE: The log can be sorted by clicking any of the column headings.
Click Clear Logs to clear the log files, or click Refresh Page to update the screen with
current log information.
HP Power Manager 3.1 User Guide
HP CONFIDENTIAL Codename: Fish Stick Part Number: 333101-002 Last Saved On: 10/27/03 11:04 AM
5-3
Data Logs
Exporting a UPS Event Log
To export the UPS event log to a file:
1. Click Export Logs at the bottom of the UPS Detailed screen. The Event Log Export
screen appears.
2. Enter the date range of the data in the Export data from and to fields.
3. Select either Comma-Separated or Tab Delimited.
4. Do one of the following:
— To save the file to the Management Server, select Save to File and enter the name of
the file.
— To download the document to a specified location, select Download Document.
5. Click Do Export to export the file, or click Cancel to cancel the operation.
5-4
HP Power Manager 3.1 User Guide
HP CONFIDENTIAL Codename: Fish Stick Part Number: 333101-002 Last Saved On: 10/27/03 11:04 AM
Data Logs
UPS Data Menu Option
Click UPS Data in the left navigation frame to display the UPS Logs screen. This screen
displays a log of all UPS data that has been recorded, such as Input Voltage, Temperature,
and Battery Capacity.
1. Select the frequency of obtaining device data in the Log Interval: dropdown box. (For
example, an interval of 10 minutes means that new data is retrieved from the device every
ten minutes.)
2. Click Save Settings to save the updated log interval time, click Clear Logs to clear the
log files, or click Refresh Page to update the screen with current log information.
NOTE: Depending on the specific UPS model, some of the data columns might not be supported. The
screen shown is only an example.
HP Power Manager 3.1 User Guide
HP CONFIDENTIAL Codename: Fish Stick Part Number: 333101-002 Last Saved On: 10/27/03 11:04 AM
5-5
Data Logs
Exporting a UPS Data Log
To export the UPS data log to a file:
1. Click Export Logs at the top of the UPS Logs screen. The Data Log Export screen
appears.
2. Enter the date range of the data in the Export data from and to fields.
3. Select either Comma-Separated or Tab Delimited.
4. Do one of the following:
— To save the file to the Management Server, select Save to File and enter the name of
the file.
— To download the document to a specified location, select Download Document.
5. Click Do Export to export the file, or click Cancel to cancel the operation.
5-6
HP Power Manager 3.1 User Guide
HP CONFIDENTIAL Codename: Fish Stick Part Number: 333101-002 Last Saved On: 10/27/03 11:04 AM
Data Logs
Application Menu Option
Click Application in the left navigation frame to display the Application Logs screen. This
screen displays a log of all application events that have occurred, such as a user logging in.
The following information is displayed for each application event:
•
User—The login name of the user who performed the action
•
Description—A description of the application event
•
Date/Time—The date and time at which the event occurred
NOTE: The log can be sorted by clicking any of the column headings.
Click Clear Logs to clear the log files, or click Refresh Page to update the screen with
current log information.
HP Power Manager 3.1 User Guide
HP CONFIDENTIAL Codename: Fish Stick Part Number: 333101-002 Last Saved On: 10/27/03 11:04 AM
5-7
Data Logs
Exporting an Application Log
To export the application log to a file:
1. Click Export Logs at the bottom of the Application Logs screen. The Application Log
Export screen appears.
2. Enter the date range of the data in the Export data from and to fields.
3. Select either Comma-Separated or Tab Delimited.
4. Do one of the following:
— To save the file to the Management Server, select Save to File and enter the name of
the file.
— To download the document to a specified location, select Download Document.
5. Click Do Export to export the file, or click Cancel to cancel the operation.
5-8
HP Power Manager 3.1 User Guide
HP CONFIDENTIAL Codename: Fish Stick Part Number: 333101-002 Last Saved On: 10/27/03 11:04 AM
6
Account Setup and Help
For security purposes, HPPM provides each user with a login account that is associated with
specific device access. Administrators may manage and change this information when
needed.
An online help system is also available to all HPPM users.
Setup Tab
Menu options listed under the Setup tab include:
•
My Account
•
User Accounts
My Account Menu Option
Click My Account in the left navigation frame to display the My Account screen. This screen
enables you to change your login password.
To change a password:
1. Enter your password in the Password field.
2. Enter your password again in the Verify Password field.
3. Click Save Changes to save the new password.
HP Power Manager 3.1 User Guide
HP CONFIDENTIAL Codename: Fish Stick Part Number: 333101-002 Last Saved On: 10/27/03 11:05 AM
6-1
Account Setup and Help
User Accounts Menu Option
NOTE: The link to this screen is not displayed if you do not have administrative rights.
Click User Accounts in the left navigation frame to access the User Accounts screen. This
screen enables administrators to manage user accounts.
Adding a User Account
To add a new user account:
1. Enter the user’s login name in the Name field.
2. Enter the user’s password in the Password field.
3. Enter the password again in the Verify Password field.
4. If the new user is given administrator rights, select the Administrator checkbox.
5. Click Save Changes to save the new user account information.
6-2
HP Power Manager 3.1 User Guide
HP CONFIDENTIAL Codename: Fish Stick Part Number: 333101-002 Last Saved On: 10/27/03 11:05 AM
Account Setup and Help
Modifying a User Account
If you have administrator rights, you can change a user’s login name or password. You can
also add or remove administrator rights to the user’s account.
Changing a User Login Name
To change a user’s login name:
1. Enter the changed name in the Name field.
2. Enter the user’s password in the Password field.
3. Enter the password again in the Verify Password field.
4. If the user has administrator rights added or removed, select or deselect the
Administrator checkbox.
5. Click Save Changes to save the updated user account information.
Changing a User Password
To change a user’s password:
1. Enter the user’s login name in the Name field.
2. To change the password:
a. Enter the changed password in the Password field.
b. Enter the password again in the Verify Password field.
3. If the user has administrator rights added or removed, select or deselect the
Administrator checkbox.
4. Click Save Changes to save the updated user account information.
Deleting a User Account
To delete a user account:
1. Select the Delete checkbox for the user account that is to be removed.
2. Click Delete Selected Users to delete the user account. The account is removed and no
longer appears on the User Accounts screen.
HP Power Manager 3.1 User Guide
HP CONFIDENTIAL Codename: Fish Stick Part Number: 333101-002 Last Saved On: 10/27/03 11:05 AM
6-3
Account Setup and Help
Help Tab
Menu options listed under the Help tab include:
•
About
•
Contents
•
Info & Updates
About Menu Option
Click About in the left navigation frame to display the About HP Power Manager screen.
This screen displays information about the company and product.
The screen contains a link to http://www.hp.com/products/UPS, as well as the following
hyperlinked logos:
6-4
•
HP Invent—Connects to http://www.hp.com
•
Macromedia Shockwave/Flash—Connects to http://www.macromedia.com
•
GoAhead—Connects to http://www.goahead.com
HP Power Manager 3.1 User Guide
HP CONFIDENTIAL Codename: Fish Stick Part Number: 333101-002 Last Saved On: 10/27/03 11:05 AM
Account Setup and Help
Contents Menu Option
Click Contents in the left navigation frame to display the Contents screen. This screen
provides a list of links to help topics.
HP Power Manager 3.1 User Guide
HP CONFIDENTIAL Codename: Fish Stick Part Number: 333101-002 Last Saved On: 10/27/03 11:05 AM
6-5
Account Setup and Help
Info & Updates Menu Option
Click Info & Updates in the left navigation frame to access the Info & Updates screen. This
screen displays UPS information, online registration, and links to HP.
6-6
HP Power Manager 3.1 User Guide
HP CONFIDENTIAL Codename: Fish Stick Part Number: 333101-002 Last Saved On: 10/27/03 11:05 AM
7
Troubleshooting
Table 7-1 lists troubleshooting items that can occur during HPPM installation or operation.
Table 7-1: Troubleshooting
Issue or Symptom
Possible Cause
Suggested Action
You cannot access HPPM
after installation.
You exited the system
tray icon in Windows and
must restart the HPPM
icon.
From the Start menu, select
Programs>HP Power Manager>HP
Power Manager Status.
You need the SNMP MIB
file for HPPM.
The file is named CPQRPM.MIB and
should be version 1.5 or greater. The file
can be found on the HP Rack and
Management Pack CD and in the install
folder of the HPPM Management Server.
This MIB is shared with other HP power
management applications such as HP
Rack and Power Manager.
You chose an HTTP port
number other than the
default (80) during
installation.
Be sure to include this port number when
browsing to HPPM. For example, if you
chose port 1234 during installation,
enter the following in your browser for
HPPM access:
http://hostname:1234
Note: hostname can be either a machine
name or an IP address.
Other Web servers or
Web-based applications
are running on the same
port.
Do one of the following:
•
Ensure that no other Web servers or
Web-based applications are running
on the same port.
•
Try using another port during
installation or reconfiguration.
For a list of the Well Known Port
Numbers that could be in use, refer to
http://www.iana.org/assignments/
port-numbers.
continued
HP Power Manager 3.1 User Guide
HP CONFIDENTIAL Codename: Part Number: 333101-002 Last Saved On: 10/27/03 11:06 AM
7-1
Troubleshooting
Table 7-1: Troubleshooting continued
Issue or Symptom
Possible Cause
Suggested Action
You cannot access HPPM
after installation
(continued).
The Management Server
software might not be
running.
Start the Management Server software:
For Linux, run
/etc/rc.d/init.d/DevMan
start.
For Windows, right-click the icon in the
system tray and select Start Service, or
select Programs>HP Power
Manager>Configure HP Power
Manager from the Start Menu.
You chose SSL during
installation.
Be sure to use HTTPS instead of HTTP
in your browser to access HPPM.
For example, https://hostname:1234
would establish a secure socket layer
link to HPPM running on port 1234.
Selecting Exit from the
system tray menu only
removes the HPPM icon
from the system tray.
Restart the system tray icon by selecting
Programs>HP Power Manager>HP
Power Manager Status from the Start
Menu. Right-click the system tray icon
and select Stop Service from the
context menu.
You are not able to reboot
the machine.
The system hangs when
the InstallShield wizard
for the Remote Agent is
left open and minimized
during the attempted
reboot.
Manually power off the machine.
When you are preparing
to install silently, the
DevManRA.ini or
DevManBE.ini files cannot
be located.
The DevManRA.ini and
DevManBE.ini files are
automatically created in
the top-level program
directory.
For Linux, both files can be found at
/usr/local/DevMan.
You are unable to start
service for Linux or the
error message
The server name and IP
address are incorrect.
Update the server name and IP address
on /etc/hosts.
This is a function of the
browser.
Save the Flash Player setup file to the
local drive and run it from there.
For Windows, if installed to the default
location, the files are located at /Program
Files/HP/Power Manager on the
Management Server, and at /Program
Files/HP/Power Manager Remote Agent
on the Remote Agent.
Segmentation
fault /usr/local/
DevMan displays.
Linux shows a page with
garbage characters and
cannot install the Flash
Player utility.
continued
7-2
HP Power Manager 3.1 User Guide
HP CONFIDENTIAL Codename: Part Number: 333101-002 Last Saved On: 10/27/03 11:06 AM
Troubleshooting
Table 7-1: Troubleshooting continued
Issue or Symptom
Possible Cause
Suggested Action
You are unable to browse
into HPPM.
The Mozilla default
settings are incorrect.
Open the all.js file in the
mozilla/defaults/pref folder and change
the lines as indicated in the section,
“Mozilla Settings,” in Chapter 2 of this
guide.
You are unable to start
service for Linux.
Files are missing.
The HPPM Linux package
(PowerManager-3.1-X.i586.rpm)
requires the file compat-libstdc++7.32.96.110.i386.rpm to install.
You are not able to
discover a UPS during
initial or subsequent
configurations.
The UPS is not
connected to the correct
communications port.
Verify that the UPS is connected to the
correct communications port (COM1,
COM2, etc.).
Other software or
processes are accessing
the communications port
to which the UPS is
attached.
Verify that no other software or
processes are accessing the
communications port to which the UPS is
attached.
You are using the wrong
communications cable.
Verify that you are using the
communications cable that came with
the UPS.
Resources for the
communications port are
shared with other
devices.
Verify that resources for the selected
communications port (such as I/O port or
IRQ) are not shared with other devices.
The wrong
communications port is
connected.
Try a different communications port.
The broadcast setup
under HP Power
Manager is incorrect.
For broadcast messages from Linux to
Windows, the Netbios name of the
recipient must be used. Also, refer to the
configuration information regarding Linux
broadcasts in Chapter 4 of this guide.
The Messenger service
is not enabled.
Enable the Messenger service. The
Messenger service is accessed from the
Services option in the Administrative
Tools section of the Control Panel.
Broadcasts from HP
Power Manager are not
displaying on the
expected recipient.
continued
HP Power Manager 3.1 User Guide
HP CONFIDENTIAL Codename: Part Number: 333101-002 Last Saved On: 10/27/03 11:06 AM
7-3
Troubleshooting
Table 7-1: Troubleshooting continued
Issue or Symptom
Possible Cause
Suggested Action
After adding a Remote
Agent on the Attached
Devices screen, a red
status icon continues to
display for that Remote
Agent.
The Remote Agent
software might not be
running.
Start the Remote Agent software:
The Remote Agent might
not be configured to
allow management from
the address of the
Management Server.
After changing UPS
hardware the
Management Server
shows No Device or UPS
Not Connected.
The Management Server
cannot communicate
with the UPS due to the
change.
•
For Linux, run
/etc/rc.d/init.d/DevMan
start.
•
For Windows, right-click the icon in
the system tray and select Start
Service.
•
For Netware, load the agent from
the directory to which it was
installed, such as
SYS:HPPM/DEVMANRA.NLM,
using forward slashes to separate
directories.
Configure the Remote Agent to allow
management by the Management
Server:
•
For Linux, run
/etc/rc.d/init.d/DevMan
setup.
•
For Windows, right-click the icon in
the system tray and select
Configure, or select Programs>HP
Power Manager>Configure HP
Power Manager from the Start
Menu.
•
For Netware, uninstall and reinstall
the Remote Agent according to
instructions in Chapter 2 of this
guide.
Reconfigure the UPS with the new
settings:
•
For Linux, run
/etc/rc.d/init.d/DevMan setup.
•
For Windows, right-click the icon in
the system tray and select
Configure.
Verify the connection is the same as
previously installed.
Low battery.
The battery is low on
voltage.
Allow the battery to recharge for 24
hours. Rack and Power Manager sends
a low battery warning approximately two
to five minutes before UPS shutdown.
This warning is approximate, and the
actual time to shutdown can vary
significantly.
Replace the battery. Refer to the
documentation that came with the UPS.
7-4
HP Power Manager 3.1 User Guide
HP CONFIDENTIAL Codename: Part Number: 333101-002 Last Saved On: 10/27/03 11:06 AM
Troubleshooting
Table 7-1: Troubleshooting continued
Issue or Symptom
Possible Cause
Suggested Action
On battery.
The UPS system is
operating on battery
power.
The UPS continues to run on battery
power until the battery is completely
discharged (or until utility power is
restored), unless the shutdown
parameters specify to turn off both the
system and the UPS.
On buck.
The input voltage is too
high for the UPS. The
UPS bucks the voltage
down to acceptable
limits.
For information on Buck mode, refer to
the UPS documentation.
On boost.
The input voltage is too
low for the UPS. The
UPS boosts the voltage
up to acceptable limits.
For information on Boost mode, refer to
the UPS documentation.
Overload.
The device load has
exceeded the UPS
power rating.
Verify all equipment is drawing within the
rated requirements. If necessary, reduce
the equipment connected to the UPS.
The UPS might need to be reset.
The UPS is in Bypass
mode.
The load is being
powered by utility power.
However, utility power
continues to be passively
filtered by the UPS.
Battery protection is not
available while in Bypass
mode.
Refer to the UPS front panel for alarm
indications. If the UPS does not return to
normal operation soon, refer to the UPS
documentation for troubleshooting
information.
Battery test completed.
The battery test of the
UPS has completed.
View the results of the battery test on the
Logs and Reports screen.
No power.
A power failure occurred.
Verify that the UPS is connected to a
working outlet and that the UPS is
powered up.
Battery test did not run
when executed.
The UPS is On Battery.
The UPS must be in a certain state
before the battery test runs. Refer to the
section, “Parameter Menu Option,” in
Chapter 4.
The attached device did
not shut down gracefully.
The Runtime Limit
estimate was not
accurate.
Verify the Shutdown on low battery?
option is selected.
No shutdown warning
messages on the
NetWare 6 System
Console.
Broadcast messages do
not display on NetWare 6
System Console.
View the Power Manager Remote Agent
screen for broadcast messages.
continued
HP Power Manager 3.1 User Guide
HP CONFIDENTIAL Codename: Part Number: 333101-002 Last Saved On: 10/27/03 11:06 AM
7-5
Troubleshooting
Table 7-1: Troubleshooting continued
Issue or Symptom
Possible Cause
Suggested Action
During a battery test the
input frequency shows
zero, but the input voltage
is showing regular line
voltage.
When executing a
battery test, the
parameters might show
incorrect information.
Check parameters after the battery test
is complete.
Receiving Security Error:
Domain Name mismatch
message when trying to
browse with SSL.
The IP address or server
name has changed.
Stop the service, delete the certificate
file, and restart the service.
Task bar menu does not
clear when clicking off the
menu onto the Windows
desktop.
Known Windows
behavior.
Start another application or open a new
window, and the issue disappears.
Servers running Windows
Server 2003 do not restart
upon power restoration
following a power fail
shutdown.
Known Windows Server
2003 behavior on some
servers.
Refer to the Microsoft Knowledge Base
article 819760.
User is forced to cold boot
system when trying to
restart the operating
system minimizing the
InstallShield wizard of
Power Manager/Remote
Agent.
InstallShield is active or
running.
Close InstallShield and reboot the
system.
Intermittent red warning
status for Output
Frequency on the
R3000 XR On Battery.
Output frequency
fluctuations are
occurring.
None required.
For the R3000 XR, turning
off the UPS from the front
panel does not result in
"Manual Load Dumped"
alarm.
Alarm not supported for
this model.
None required.
R3000 XR/R12000 XR
UPS Animation Page
does not match the Active
Alarms Page.
Animation does not
reflect all alarms.
Use animation page only for monitoring
battery and power status.
HPPM shows shutdown
events succeeded
message when entering a
valid or an invalid entry for
delay without selecting the
Shutdown checkbox.
Delay in application.
Delay can be saved before selecting the
Shutdown checkbox.
continued
7-6
HP Power Manager 3.1 User Guide
HP CONFIDENTIAL Codename: Part Number: 333101-002 Last Saved On: 10/27/03 11:06 AM
Troubleshooting
Table 7-1: Troubleshooting continued
Issue or Symptom
Possible Cause
Suggested Action
Power Manager will allow
multiple status icons at the
system tray.
Multiple status tray icons
on Windows.
Close each icon individually.
DevManRA.nlm does not
load correctly.
Install is unable to
retrieve the hostname.
Verify the host file and ensure no leading
zeros are in the IP address (for example
172.025.240.230), which can cause
failure to obtain the host name.
Silent install did not
execute successfully.
An error occurred during
the silent installation.
Verify the command line parameters are
correct.
Verify the configuration .INI file is valid.
Verify the Setup.iss destination path is
correct.
Refer to the InstallShield Knowledge
Base article 101901 for the setup.log
result code.
HP Power Manager 3.1 User Guide
HP CONFIDENTIAL Codename: Part Number: 333101-002 Last Saved On: 10/27/03 11:06 AM
7-7
A
Alert Messages
HPPM enables you to execute a command, send an e-mail, send a broadcast notification, and
send SNMP traps to specified recipients if a certain alert situation prevails.
A list of all message texts and a description of each alarm is provided in Table A-1.
Table A-1: HPPM Alarm Messages
Alarm Text
Description
Battery Discharged
The battery is not fully charged.
The battery has been discharged to its maximum discharged state.
The UPS was on battery for long enough to exhaust the battery
capacity and has shut down.
Batteries Disconnected
The UPS detects that at least one of the batteries is not connected.
Backup power is either gone or considerably reduced.
Battery Failure
The battery contactor/breaker is open.
The battery voltage has exceeded a predetermined limit. Operating
with this alarm set can cause permanent battery or system
damage.
A battery problem has been detected.
A battery test has been executed, and the battery failed the test.
The charger circuit has detected possible bad batteries or an open
circuit in connections to the batteries.
Battery Low
The battery voltage level has dropped below the predetermined
“low battery warning” level.
Bypass Failure
The bypass input voltage is not available for transfer. This might be
caused by over or under voltage, over or under frequency, out of
phase lock, or other reasons.
Bypass ON Auto
The UPS is on bypass, and the critical load does not have power
protection.
Bypass ON Manual
A user has flipped a switch (for example, Maintenance Bypass) that
bypasses the UPS.
continued
HP Power Manager 3.1 User Guide
HP CONFIDENTIAL Codename: Fish Stick Part Number: 333101-002 Last Saved On: 10/27/03 11:07 AM
A-1
Alert Messages
Table A-1: HPPM Alarm Messages continued
Alarm Text
Description
Check Breaker
The inverter output contactor/breaker is open.
The rectifier/charger input breaker is open.
Electronics Module Failure
For an “n+1” p arallel system, one of the power modules has failed.
EPO Initiated
The UPS has shut down because of the activation of the remote
EPO signal.
Input Out of Range
Input (Utility) fault: Measured input voltage has exceeded the upper
voltage limit specification for normal operation.
Input (Utility) fault: Measured input voltage is less than the lower
voltage limit specification for normal operation.
Input (Utility) fault: Measured input frequency is outside either the
upper or lower frequency limit specification for normal operation.
Rectifier fault: Measured rectifier input current exceeds the upper
current limit specification for normal operation.
The utility input power is not within predetermined limits. This is
possibly caused by over voltage, under voltage, over frequency,
under frequency, or over current.
The utility input is not present, and detected voltage is zero.
Internal Failure
An attempt to automatically recalibrate the UPS has failed.
Charger fault: The battery charger has failed.
DC Link fault: Measured DC link voltage has exceeded the upper
voltage limit specification for normal operation.
At least one fan in the UPS has failed.
At least one fuse in the UPS has failed and must be replaced.
Inverter fault: Measured inverter output voltage has exceeded the
upper voltage limit specification for normal operation.
Inverter fault: Measured inverter output voltage is less than the
lower voltage limit specification for normal operation.
The inverter module has failed its power up self-test or its
continuous self-test.
Inverter fault: The inverter has failed.
The inverter output has failed, and cannot support the load. The
reasons for this alarm are, for example: inverter over or under
voltage, over or under frequency, distorted waveform, and output
out-of window.
Inverter fault: The measured inverter output current exceeds the
upper current limit specification for normal operation.
The inverter output voltage sensor has not been calibrated.
For a parallel system, this module has detected that the sync bus is
not active.
continued
A-2
HP Power Manager 3.1 User Guide
HP CONFIDENTIAL Codename: Fish Stick Part Number: 333101-002 Last Saved On: 10/27/03 11:07 AM
Alert Messages
Table A-1: HPPM Alarm Messages continued
Alarm Text
Description
Internal Failure, continued
A test of the device EEPROM has detected a checksum failure.
The device either has not been programmed or contains suspicious
data.
A test of the device ROM has detected a checksum or CRC error.
The device’s operating code is suspicious and should be replaced
or reflashed.
In a multi-module system or internally to a UPS with multiple
controllers, the firmware versions in place are not compatible with
each other.
Manual Load Dumped
The load power is off. This alarm is used to record the date and
time of an EPO event.
On Battery
The UPS is using the battery to power the load.
Output Out of Range
Measured output voltage has exceeded the upper voltage limit
specification for normal operation.
Measured output voltage is less than the lower voltage limit
specification for normal operation.
Measured output frequency is outside the upper or lower frequency
limit specification for normal operation.
Overload
Overload alarms are sent based on the individual UPS model
overload protection specifications that are available in the UPS
documentation.
The load on the UPS output phase exceeds its rated current or
power by more than a small margin over 100%. The inverter can
only sustain this overload for a short time without shutting down
because of overheating.
Shutdown Imminent
The UPS has entered a state where it might abruptly shut down
without further notice. It might continue to operate indefinitely, even
with this alarm being asserted.
Shutdown Pending
A condition in the UPS will lead to the loss of power to the loads in
less than the Low Battery Time, unless the condition is cleared or
removed.
Site Wiring Fault
There is a fault in the input wiring, other than Phase Rotation (for
example, Ground/Neutral reversed).
Temperature Out of Range
An ambient temperature probe has detected that the temperature is
above its upper limit.
A heatsink at an unspecified location in the UPS has failed.
An input or output transformer used by the UPS has exceeded its
upper temperature limit.
UPS Started On Battery
The UPS has been started on battery when AC input power is not
present. This alarm is used to record the date and time of this
event.
HP Power Manager 3.1 User Guide
HP CONFIDENTIAL Codename: Fish Stick Part Number: 333101-002 Last Saved On: 10/27/03 11:07 AM
A-3
B
Using HPPM with Insight Manager 7
HPPM software can be configured to send alert traps to Insight Manager 7, as well as other
SNMP management applications. To send event alert traps to Insight Manager 7:
•
Configure Insight Manager 7 to receive a trap from HPPM.
•
Configure HPPM to send the appropriate event alert traps.
If HPPM is installed using the default HTTP on Port 80, a link to the software is displayed on
the device home page in Insight Manager 7 SP2 for the computer with HPPM.
If the defaults are not used, a new entry can be made to the additionalwsdisc.props file
located in the CONFIG directory in the Insight Manager 7 install directory to correctly
discover and identify HPPM running on any computer. Beginning with the SP2 release,
Insight Manager 7 is installed in the C:\Program Files\HP\Insight Manager 7 directory by
default. For more information on editing the additionalwsdisc.props file, refer to the
additionalwsdisc.txt file located in the same directory.
Example B-1: ADDITIONALWSDISC.PROPS file with HPPM Entry
# --------------------------------------------------------------------------# Additional Web Server Discovery Properties
#
# --------------------------------------------------------------------------# NOTE: See "additionalWsDisc_README.txt" for a description of entries in
# this file and how to add or remove additional web server ports used for
# discovery and identification.
# --------------------------------------------------------------------------#
# --------------------------------------------------------------------------# The following are actual web server ports enabled by default.
# To remove them from the discovery process, comment out the line with a '#'
# or remove it. You will need to restart the Insight Manager 7 service for
# the changes to take effect. In addition you will need to run the Device
# Identification task to find any new ports that were defined.
# --------------------------------------------------------------------------411=Director Agent, ,true,false, ,http
3201=Compaq TaskSmart, ,true,false, ,https
8008=Default Home Page, ,true,false, ,http
1311=Server Administrator, ,true,false, ,https
1234=HP Power Manager, ,true,false, ,https
The last entry allows Insight Manager 7 to detect HPPM installations that are running on
Port 1234 and that are using HTTPS (Secure Socket Layer Protocol).
HP Power Manager 3.1 User Guide
HP CONFIDENTIAL Codename: Fish Stick Part Number: 333101-002 Last Saved On: 10/27/03 11:07 AM
B-1
Using HPPM with Insight Manager 7
Configuring Insight Manager 7
Verify that the HPPM MIB (CPQRPM.MIB) is registered in Insight Manager 7:
1. Upload the HPPM MIB. The HPPM MIB (CPQRPM.MIB) can be found on the HP Rack
and Power Management Pack CD and in the install folder of the HPPM Management
Server.
2. Register the HPPM MIB.
NOTE: For additional information on uploading and registering an MIB in Insight Manager 7, refer to
the HP Insight Manager Technical Reference Guide located on the HP Management CD.
Configuring HPPM
To configure HPPM to send traps to Insight Manager 7:
1. Add the Insight Manager 7 server as an SNMP Trap recipient.
2. Configure HPPM to send alert notifications to Insight Manager 7 as SNMP traps.
B-2
HP Power Manager 3.1 User Guide
HP CONFIDENTIAL Codename: Fish Stick Part Number: 333101-002 Last Saved On: 10/27/03 11:07 AM
Index
A
B
About HP Power Manager screen 6-4
accessing software 3-1, 3-2
accounts
adding 6-2
changing passwords 6-3
deleting 6-3
editing 6-3
managing 6-1, 6-2
active alarms 4-6, 4-7
Add Device screen 4-12
adding
attached devices 4-11, 4-12
user accounts 6-2
agents See Remote Agent
alarms
active 4-6, 4-7
types of A-1
Alarms screen 4-7
Alarms tab 4-6
alerts
browser security 3-2
sending notifications 4-21
types of 1-2
Application Log Export screen 5-8
Application Logs screen 5-7
architecture 1-3
assigning
load segments 4-13
user rights 6-2
attached devices
adding 4-11, 4-12
deleting 4-13
editing 4-13
shutting down 4-15
Attached Devices screen 4-11
authorized reseller xi
batteries
alarm messages A-1
charging 7-4
entering date installed 4-28
testing 4-27
Boost mode 7-5
Broadcast Setup screen 4-24
browser
requirements 2-1, 2-2
security alert 3-2
browsing to software 3-1
Buck mode 7-5
Bypass mode 7-5
HP Power Manager 3.1 User Guide
C
cautions, defined ix
certificate, security 3-3
changing
load segments 4-13
login names 6-3
passwords 6-1
user accounts 6-3
charging UPS batteries 7-4
COM port 2-13, 7-3
command line parameters 2-25
command procedures
executing manually 4-26
running 4-13, 4-14
components
installing 2-3
reconfiguring 2-26, 2-29
software 1-3
uninstalling 2-31, 2-32
configurations
network 1-6
Remote Agent 1-8
Six Port Card 1-7
supported 1-5
UPS 1-6, 1-7, 1-8
configuring
broadcast notifications 4-24
Index-1
Index
e-mail notifications 4-21
event categories 4-20
event notifications 4-19
Insight Manager B-1
load segment shutdown 4-16
mail server 4-21
Remote Agents 7-4
shutdown events 4-17
SNMP trap notifications 4-22, B-1
UPS parameters 4-28
user-defined event categories 4-20
contact information, setting 4-28
controlling load segments 4-12
D
Data Log Export screen 5-6
date, battery installation 4-28
default password 3-4
default ports 2-12
deleting
attached devices 4-13
user accounts 6-3
devices
adding attached 4-12
attached 4-11
deleting attached 4-13
editing attached 4-13
naming 4-28
supported 1-1
unmanaged 4-13
disk space requirements 2-1, 2-2
displaying
active alarms 4-6, 4-7
application logs 5-7
data logs 5-5
detailed logs 5-3
estimated runtime 4-12
online help 3-5, 6-4
power flow 4-4
security certificate 3-3
UPS information 6-6
UPS status 4-2
Mozilla 3-4
estimated runtime 4-12
event categories
list 4-19
user-defined 4-20
Event Categories screen 4-19, 4-20
Event Log Export screen 5-4
event notifications
broadcast 4-24
configuring 4-19
e-mail 4-21
SNMP trap 4-22
Event Notifications screen 4-19, 4-20
Event Severities screen 4-20
events
categorizing 4-20
sending notifications 4-21
shutdown 4-17
types of 4-20
examples
functionality 1-2
network configurations 1-5
executing manual UPS commands 4-26
exporting
application event logs 5-8
data logs 5-6
UPS event logs 5-4
F
features
Management Server 1-4
overview 1-2
Remote Agent 1-5
frames 3-5
functionality example 1-2
G
GUI installation
Management Server 2-5
overview 2-3
Remote Agent 2-16
E
H
Edit/Delete Device screen 4-13
editing
attached devices 4-13
login names 6-3
user accounts 6-3
E-mail Setup screen 4-21
e-mail, sending event notifications 4-21
entering battery installation date 4-28
establishing secure sessions
Internet Explorer 3-3
hardware
installation requirements 2-1, 2-2
supported configurations 1-5
help
related documents x
viewing online 3-5, 6-4
Help tab 3-5, 6-4
hibernation 1-4
Home tab 3-5, 4-1
HP website x
Index-2
HP Power Manager 3.1 User Guide
Index
HPPM
accessing 3-1, 3-2
adding a user account 6-2
architecture 1-3
changing a user login name 6-3
changing a user password 6-3
changing passwords 6-1
components 1-3
configuring 4-1
deleting a user account 6-3
features 1-2
Help tab 6-4
Home tab 4-1
installing 2-3
interface 3-5
introduction 1-1
logging in 3-4
logging out 3-5
Logs tab 5-1
managing login accounts 6-1
managing user accounts 6-2
modifying a user account 6-3
operating 4-1
overview 1-2
Setup tab 6-1
supported configurations 1-5
system requirements 2-1
uninstalling 2-31, 2-32
using with Insight Manager B-1
I
icons
status 4-3, 4-11
system tray 3-2
importing security certificates 3-3
Info & Updates screens 6-6
Insight Manager
introduction 1-1
using with HPPM B-1
installation
Linux non-GUI 2-26, 2-28
Linux Silent 2-29
Management Server 2-5, 2-25, 2-26, 2-29
NetWare non-GUI 2-30
options 2-3, 2-4
overview 2-3
Remote Agent 2-16, 2-25, 2-28, 2-29, 2-30
summary 2-4
Windows GUI 2-5, 2-16
Windows Silent 2-25
interface, navigating 3-5
introduction 1-1
HP Power Manager 3.1 User Guide
L
left frame 3-5
Linux
browser requirements 2-2
installing components 2-26
installing the Management Server 2-26, 2-29
installing the Remote Agent 2-28, 2-29
reconfiguring components 2-29
supported versions 2-1, 2-2
uninstalling components 2-32
list, No Proxy 3-1
load segments
assigning 4-13
changing 4-13
controlling 4-12
shutting down 4-17
shutting down Management Server 4-16
viewing power status 4-12
logging out of HPPM 3-5
login name, changing 6-3
Login screen 3-4
logs
application 5-7
data 5-5
UPS detailed 5-3
Logs tab 3-5, 5-1
M
Macromedia Flash Player, requirements 2-2
mail server, setting up 4-21
main frame 3-5
Management Server
disk space requirements 2-1
features 1-4
installation overview 2-3
installation requirements 2-1
installing on Linux server 2-26, 2-29
installing on Windows server 2-5, 2-25
memory requirements 2-1
operating systems 1-5, 2-1
power protection 1-5
required browsers 2-1
shutting down 4-16
starting the software 7-2
upgrading on Windows server 2-5
managing accounts 6-1
memory requirements 2-1, 2-2
menu options
About 6-4
Alarms 4-7
Application 5-7
Attached Devices 4-11
Event Settings 4-19
Help 6-4
Index-3
Index
Info & Updates 6-6
Logs 5-1
Manual Control 4-26
My Account 6-1
Overview 4-2
Power Fail 4-15
Settings 4-28
Setup 6-1
Shutdown Events 4-17
UPS Data 5-5
UPS Detailed 5-3
UPS Summary 5-1
User Accounts 6-2
messages
alarm A-1
browser security 3-2
Meter Display tab 4-3
MIB files 7-1
Microsoft Windows See Windows
modes, UPS 7-5
modifying a user account 6-3
module, installation 2-30
monitor resolution requirements 2-2
Mozilla, settings 2-3
My Account screen 6-1
N
naming devices 4-28
navigating the software interface 3-5
NetWare
installing components 2-29
installing the Remote Agent 2-30
supported versions 2-2
uninstalling components 2-32
network configurations 1-5
No Proxy list 3-1
non-GUI installation
Management Server 2-26
overview 2-3
Remote Agent 2-28, 2-30
notifications, event 4-19
Novell NetWare See NetWare
O
online help 3-5, 6-4
online registration 6-6
operating systems
estimated shutdown time 4-13
Management Server 1-5
Remote Agent 1-5
supported 2-1, 2-2
overview 1-2
Overview screen
Alarms tab 4-6
Index-4
UPS Animation tab 4-4
P
parameters, UPS
setting 4-28
viewing 4-3
passwords
changing 6-1, 6-3
default 3-4
ports
COM 2-13
default 2-12
troubleshooting 7-1, 7-3
well known 7-1
Power Fail Settings screen 4-15
power flow 4-4
power protection 1-5
problems, solving 7-1
R
reconfiguring components
Linux 2-29
Windows 2-26
Red Hat Linux See Linux
registering online 6-6
related documents x
remote access 3-1
Remote Agent
configuring 7-4
disk space requirements 2-2
features 1-5
installation overview 2-3
installation requirements 2-2
installing on Linux server 2-28, 2-29
installing on NetWare server 2-30
installing on Windows server 2-16, 2-25
memory requirements 2-2
operating systems 1-5, 2-2
starting the software 7-4
upgrading on Windows server 2-16
requirements
browser 2-2
disk space 2-1, 2-2
installation 2-1, 2-2
Macromedia Flash Player 2-2
memory 2-1, 2-2
monitor resolution 2-2
operating system 2-1, 2-2
resolution requirements 2-2
restarting the system tray icon 7-1
rights, assigning 6-2
running command procedures 4-13, 4-14
runtime, estimated 4-12
HP Power Manager 3.1 User Guide
Index
S
screens
About HP Power Manager 6-4
Add Device 4-12
Alarms 4-7
Application Log Export 5-8
Application Logs 5-7
Attached Devices 4-11
Broadcast Setup 4-24
Data Log Export 5-6
Edit/Delete Device 4-13
EMail Setup 4-21
Event Categories 4-19, 4-20
Event Log Export 5-4
Event Notifications 4-19, 4-20
Event Severities 4-20
Info & Updates 6-6
Login 3-4
My Account 6-1
Overview 4-2
Power Fail Settings 4-15
Settings 4-28
Shutdown Events 4-17
SNMP Setup 4-22
UPS Detailed 5-3
UPS Logs 5-5
UPS Summary 5-1
User Accounts 6-2
script, installation 2-28
secure sessions
establishing for Internet Explorer 3-3
establishing for Mozilla 3-4
Secure Socket Layer See SSL
security, browser 3-2
segments, load
assigning 4-13
changing 4-13
controlling 4-12
shutting down Management Server 4-16
viewing power status 4-12
sending
broadcast notifications 4-24
e-mail notifications 4-21
SNMP trap notification 4-22
Server, Management See Management Server
sessions, establishing secure
Internet Explorer 3-3
Mozilla 3-4
setting up
broadcast notifications 4-24
COM port 2-13
e-mail notifications 4-21
event categories 4-20
event notifications 4-19
Insight Manager B-1
HP Power Manager 3.1 User Guide
load segment shutdowns 4-16
mail server 4-21
Mozilla 2-3
shutdown events 4-17
SNMP trap notifications 4-22, B-1
UPS parameters 4-28
user-defined event categories 4-20
Web connection 2-12
Settings screen 4-28
Setup tab 3-5, 6-1
Shutdown Events screen 4-17
shutting down attached devices 4-15
shutting down the Management Server 4-16
shutting down UPS load segments 4-17
Silent installation
Management Server 2-25, 2-29
overview 2-4
Remote Agent 2-25, 2-29
Six Port Card 1-1, 1-7
SNMP Setup screen 4-22
SNMP, setting up 4-22, B-1
software
accessing 3-1, 3-2
adding a user account 6-2
changing a user login name 6-3
changing a user password 6-3
changing passwords 6-1
components 1-3
configuring 4-1
deleting a user account 6-3
features 1-2
installing 2-3
interface 3-5
introduction 1-1
logging in 3-4
logging out 3-5
managing login accounts 6-1
managing user accounts 6-2
modifying a user account 6-3
operating 4-1
overview 1-2
requirements 2-1, 2-2
supported configurations 1-5
system requirements 2-1
uninstalling 2-31, 2-32
using with Insight Manager B-1
solving problems 7-1
SSL
default port 2-12
overview 3-2
status
icons 4-3, 4-11
load segment power 4-12
supported configurations 1-5
supported devices 1-1
symbols
Index-5
Index
in text ix
status 4-3, 4-11
system hibernation 1-4
system requirements 2-1
system tray icon
accessing software 3-2
restarting 7-1
T
tabs
Alarms 4-6
Help 3-5, 6-4
Home 3-5, 4-1
Logs 3-5, 5-1
Meter Display 4-3
Overview 3-5
Setup 3-5, 6-1
UPS Animation 4-4
technical support x
telephone numbers x, xi
testing UPS batteries 4-27
text conventions ix
traps, SNMP 4-22, B-1
troubleshooting 7-1
U
uninstalling components 2-31, 2-32
Uninterruptible Power Systems See UPSs
unmanaged devices 4-13
upgrading
Management Server 2-5
Remote Agent 2-16
UPS Animation tab 4-4
UPS Detailed screen 5-3
UPS logs
application events 5-7
detailed events 5-3
exporting a data log 5-6
exporting a UPS event log 5-4
exporting an application event log 5-8
graphical summary 5-1
UPS data 5-5
UPS Logs screen 5-5
UPS Summary screen 5-1
UPSs
active alarms 4-6, 4-7
animated view of power flow 4-4
attached devices 4-11
defined 1-1
example 1-2
executing commands 4-26
features 1-2
Index-6
meter display 4-3
network configuration 1-6, 1-7
normal alarms 4-7
overall status 4-2
Remote Agent configuration 1-8
shutting down load segments 4-17
Six Port Card configuration 1-7
testing the battery 4-27
user accounts
adding 6-2
changing passwords 6-3
deleting 6-3
editing 6-3
managing 6-1, 6-2
User Accounts screen 6-2
user rights, assigning 6-2
V
viewing
active alarms 4-6, 4-7
application logs 5-7
attached devices 4-12
data logs 5-5
detailed logs 5-3
estimated runtime 4-12
load segment power status 4-12
online help 3-5, 6-4
power flow 4-4
security certificate 3-3
UPS information 6-6
UPS parameters 4-3
UPS status 4-2
W
Web browser requirements 2-2
Web browser, required 2-1
Web server port 2-12
website, HP x
well known ports 7-1
Windows
browser requirements 2-2
installing components 2-4
installing the Management Server 2-5, 2-25
installing the Remote Agent 2-16, 2-25
reconfiguring components 2-26
supported versions 2-1, 2-2
uninstalling components 2-31
upgrading Management Server 2-5
upgrading Remote Agent 2-16
HP Power Manager 3.1 User Guide