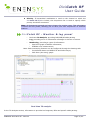
1
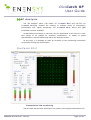
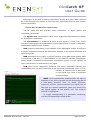
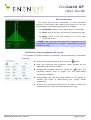
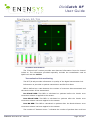
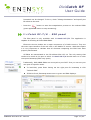
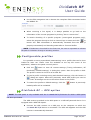
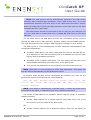
Baseband Converters ¨ Network Adapters þ DiviCatch RF USER GUIDE ENENSYS Technologies Le Germanium 80 avenue des Buttes de Coesmes 35700 Rennes FRANCE Office (+33) 2 99 12 79 06 Fax (+33) 2 99 12 79 05 www.enensys.com [email protected] DVB is a Trade Mark of the DVB Digital Video Broadcasting Project (1991 to 1996) – DVB Product ID: 4937/4938 2007 11 - Subject to change without notice – Rev 4.3 Live RF and ASI to USB2.0 pocket adapter and stream analyzer DiviCatch RF User Guide Table of Contents INTRODUCTION........................................................................................................................... 3 Product Overview..................................................................................................................... 3 Related Documents................................................................................................................... 3 PC/Laptop minimum requirements.............................................................................................. 4 INSTALLATION............................................................................................................................. 5 Software installation............................................................................................................... 5 Plug DiviCatch for the first time (Windows XP or Windows 2000 only)............................................ 5 Very interesting remarks......................................................................................................... 5 RUNNING DIVICATCH SOFTWARE FOR THE FIRST TIME.................................................................................................................... 6 DiviCatch RF – General panel..................................................................................................... 6 DiviCatch RF-C – Signal tuning................................................................................................... 7 DiviCatch RF-T/H – Signal tuning................................................................................................ 7 DiviCatch RF - Monitor & log panel.............................................................................................. 8 DiviCatch RF - DVB-H Analysis.................................................................................................. 19 Burst structure........................................................................................................................ 20 FER and MFER......................................................................................................................... 20 Delta_T information................................................................................................................. 21 RF Analysis............................................................................................................................. 22 DiviCatch RF-C........................................................................................................................ 22 DiviCatch RF-T/H..................................................................................................................... 25 DiviCatch – Record & video panel.............................................................................................. 27 DiviCatch RF-T/H – ESG panel................................................................................................. 31 Configurable profiles............................................................................................................... 32 DiviCatch RF – GPS option....................................................................................................... 32 External cartographic applications.............................................................................................. 34 DiviCatch application and device status..................................................................................... 36 Notes and remarks................................................................................................................. 36 REGULATORY & STATUTORY NOTICES........................................................................................... 37 EMC and safety declaration...................................................................................................... 37 Environmental specifications.................................................................................................... 37 TECHNICAL DATA....................................................................................................................... 38 Interfaces Specifications.......................................................................................................... 38 ANNEX...................................................................................................................................... 39 Installation of VideoLan........................................................................................................... 39 ENENSYS DiviCatch RF - Manual Page 2 / 40 DiviCatch RF User Guide INTRODUCTION Product Overview DiviCatch RF refers to all RF-enabled DiviCatch devices. This manual covers DiviCatch RF-C and DiviCatch RF-T/H devices. ENENSYS' DiviCatch RF was designed to catch a live modulated signal or an MPEG2 Transport Stream from any application and turn it into a USB2.0 link to be received by a laptop equipped. DiviCatch RF is equipped with an RF tuner and a demodulator for signal analysis. DiviCatch RF also integrates an ASI input to allow for MPEG2 TS monitoring and analysis. When connected to an MPEG2 source, DiviCatch is able to record it on the hard drive of a PC (provided that source is valid), and also to monitor displayed services. DiviCatch is self-powered. It gets its power from USB bus, thus does not require any external power supply. Related Documents [1] [2] [3] [4] [5] ETSI EN 300 468 “Digital Video Broadcasting (DVB); Specification for Service Information (SI) in DVB systems.” (DVB-SI) EN 50083-9 Interfaces for CATV/SMATV Headends and similar Professional Equipment ETSI EN 300 429 Digital broadcasting systems for television, sound and data services; Framing structure, channel coding and modulation for cable systems TR 101 891 Digital Video Broadcasting (DVB); Professional Interfaces: Guidelines for the implementation and usage of the DVB Asynchronous Serial Interface (ASI). USB Specification Universal Serial Bus Specification Revision 2.0 (April 27, 2000) [6] ATSC A65 PROGRAM AND SYSTEM INFORMATION PROTOCOL FOR TERRESTRIAL BROADCAST AND CABLE [7] ITU-T J83 Digital multi-programme systems for television, sound, data and services for cable distribution [8] ETSI EN 300 744 Digital Video Broadcasting (DVB); Framing structure, channel coding and modulation for digital terrestrial television [9] ETSI EN 302 304 Digital Video Broadcasting (DVB); Transmission System for Handheld Terminals (DVB-H) [10] ETSI TR 101 290 Digital Video Broadcasting (DVB); Measurement guidelines for DVB systems ENENSYS DiviCatch RF - Manual Page 3 / 40 DiviCatch RF User Guide PC/Laptop minimum requirements Any PC equipped with USB2.0 interface and an application running on Windows OS (Windows 2000 or Windows XP), at least PIII @ 300MHz supported by 256 MB RAM. Depending on bit rates to process and analyze, higher configurations may be required, especially with DiviCatch RF devices. The more analysis modules are started, the more memory and CPU are used: Always check CPU and memory usage. Recommended configuration for all types of streams is CPU @ 1.66GHz and 0,99GB RAM. Depending on bit rates to record, hard drive speed is a determinant factor. For input bit rates lower than 80Mbps, a 5400 RPM disk is enough. For higher throughputs, it is recommended to mount a faster disk (7200 RPM or above, with eventually Serial ATA or SCSI interface). DirectX 9.0 (or higher) library is required so that audio/video services can be displayed in the Analysis window. DirectX 9.0 is provided with Windows XP. It can also be downloaded and installed from Windows' website. ENENSYS DiviCatch RF - Manual Page 4 / 40 DiviCatch RF User Guide INSTALLATION Software Install DiviCatch software from installation Companion CD. Execute the setup file from the folder ENENSYS Software\DiviCatch\GUI and follow instructions. NOTE: It is important that no DiviSeries device is attached to the computer during the installation. Plug DiviCatch for the first time (Windows XP or Windows 2000 only) Once the installation process has completed, connect the DiviCatch RF device to a USB2.0 port on the – computer using the USB cable shipped with the DiviCatch RF device. Windows system finds new hardware and launches a new hardware wizard automatic driver installation – wizard. Choose “No, not this time”, and click Next. Then choose “Install the software automatically”, and click Next. Continue until installation is complete. – Wait for a couple of seconds (no need to unplug/replug); Windows system will re-enumerate the device and will ask for a second driver installation. Same as previous step and continue until install is complete. – When driver installation is done, DiviCatch RF led gets red. Then launch the application (DiviCatch RF led gets orange). • Very interesting remarks... Driver installation is only valid for the very USB2.0 port the DiviCatch RF device is connected to. If DiviCatch RF is connected to any other USB2.0 port, Windows system will start another device enumeration and behave as if a new USB device was detected. Companion CD will not be required and Windows re-enumeration wizard will self complete. In order to be able to use the DiviCatch RF device from any USB2.0 port, installation must be done for each USB2.0 port. • DiviCatch application is not workable when no DiviCatch device is connected to the USB2.0 port of the PC. • If you have purchased the GPS option, check the “GPS drivers” box at installation time without the GPS receiver being connected to the PC. •Meaning of LED colors on device: OFF: no driver installed, happens when DiviCatch RF is plugged for the 1st time. Red: Driver installed and device is recognized Orange: DiviCatch application is launched (SW and device are connected), DiviCatch is ready to run Green: receiving a stream (slow blink=188, fast blink=204 bytes/packet TS) ENENSYS DiviCatch RF - Manual Page 5 / 40 DiviCatch RF User Guide RUNNING DIVICATCH SOFTWARE FOR THE FIRST TIME DiviCatch RF – General panel This panel gives information about the device attached to the PC via the USB2.0 link in order to: • Check graphically if receiving one stream (arrow blinks green meaning that the device is synchronized and receiving TS packets), • Get general information such as DiviCatch RF Serial Number and FW/SW versions, • Check through a single click if a new software release is available for your product (requires an Internet connection to access Enensys' web site). Blinks green when receiving stream packets (ASI input) General information Blinks green when locked to a modulated signal (RF input) Check if new release is available (requires Internet connection) Sample General Panel for DiviCatch RF-C ENENSYS DiviCatch RF - Manual Page 6 / 40 DiviCatch RF User Guide RF and ASI inputs All DiviCatch RF feature both an ASI input and an RF input. Either can be used to receive a stream (live for RF and baseband for ASI) and analyze or process it. Switching between RF and ASI inputs is operated through the general panel by graphically selecting the input to be used (click on the arrow). DiviCatch RF-C – Signal tuning The DiviCatch RF-C must lock the cable input signal. The Tuning section in the RF Cable panel lets you specify all the necessary information to tune the device to the desired signal. ● Mode: specify the Annex used (A, B or C) to modulate the signal ● Modulation: specify the type of modulation applied to the signal (default value: automatic for auto-detection) ● Symbol rate: specify the symbol rate (expresses in Msymbols/s) ● RF Frequency: specify the frequency on which the signal is received (expressed in MHz) Then, click the “Tune” button. If the device is tuned to a signal, the Tuning led turns green and the message Front-End locked is displayed. On the DiviCatch RF-C device, the led also turns to blinking green. Note: All frequencies entered are kept in history for quicker reuse. This information is saved into the profile, allowing you to have your own frequencies on different stations. DiviCatch RF-T/H – Signal tuning Note: The portable antenna provided with the product is intended as a “starter” antenna. Depending on environmental conditions and network topology, this antenna may not be powerful enough to tune to all signals. If this is the case, it is recommended that a more powerful antenna (offering gain) is used. The DiviCatch RF-T/H must lock the DVB-T or DVB-H input signal. The Tuning section in the RF-T/H panel lets you specify all the necessary information to tune the device to the desired signal. ● Channel bandwidth: Specify the channel bandwidth occupied by the multiplex you would like to connect to. Choose between 5, 6, 7 or 8 (expressed in MHz). ● RF Frequency: Specify the frequency on which the signal is received (expressed in MHz). Then, click the “Tune” button. If the device is tuned to a signal, the Tuning led turns green and the message Front-End locked is displayed. On the DiviCatch RFT/H device, the led also turns to blinking green. ENENSYS DiviCatch RF - Manual Page 7 / 40 DiviCatch RF User Guide ● Priority: If hierarchical modulation is used on the channel to which the DiviCatch RF-T/H is locked, this drop-down list is used to specify which priority should be monitored. Note: All frequencies entered are kept in history for quicker reuse. This information is saved into the profile, allowing you to have your own frequencies on different stations. DiviCatch RF - Monitor & log panel • Real time TS Analysis, providing PSI/PSIP/SI table parsing • Log, providing error or information messages on device or stream. • Monitoring, providing 4 types of information: • Real-time graph of bitrate information, • ETR290 error measurement, Note: Both monitoring features can be configured through the Settings tab. • Pre-defined alarms on MPEG2-TS and DVB-H layer, • PCR Jitter (Accuracy) graph. Real time TS analysis In the TS Analysis section, information is provided on Programs, PIDs and specific table parsing. ENENSYS DiviCatch RF - Manual Page 8 / 40 DiviCatch RF User Guide Analysis modes: DVB and ATSC Two modes for interpreting MPEG2-TS signalling are available: DVB and ATSC. DVB Mode is used for interpreting PSI/SI signalling, and ATSC mode is used for interpreting PSIP/SI signalling. Switching between modes is performed through the TS Mode dropdown list General use All tabs can be detached for a more comfortable viewing through a drag-and-drop of the tab outside of the TS analysis section. This viewing is especially useful to realtime monitor a specific table at the same time as a different table or RF parameter. All tabs can be detached and become independent windows. Close a detached tab to reintegrate it to the list of tabs inside the TS Analysis section. “Programs” tab displays all the services contained within the stream. In this case, 3 programs (“Cambodia”, “Kenya” are and detected “USA” video). Several information are given such as PID, stream_id, scrambled or not... DVB Mode (PSI/SI Signalling) Other tabs provide advanced analysis. SDT, CAT, BAT, NIT, TDT and TOT tabs provide PSI/SI table parsing. The MIP tab provides parsing of Mega Frame Initialization Packets that are used to synchronize all transmitters making up a single frequency network. Real time PID monitoring ENENSYS DiviCatch RF - Manual Network Information Table analysis Page 9 / 40 DiviCatch RF User Guide Service Description Table analysis Conditional Access Table analysis Bouquet Association Table analysis Mega Frame Initialisation Packet analysis (including real-time Synchro Time Stamps info) Note: Not relevant for Cable-modulated signals Time and Date Table Embedded UTC time and date stamp in the TS. Time Offset Table Embedded indication of local time offset The last tab, “INT” provides information about all the parameters contained inside the IP/MAC Notification Table, which is a DVB-H specific table providing a description of IP streams contained within the multiplex. Note: Only available for DVB-H formatted signals ENENSYS DiviCatch RF - Manual Page 10 / 40 DiviCatch RF User Guide ATSC Mode (PSIP/SI Signalling) Some signalling tables are common in ATSC mode and DVB mode: CAT and NIT. The follwing tables, specific to PSIP signalling, are available for parsing in Divicatch application. MGT (Master Guide Table) STT (System Time Table) RRT (Rating Region Table) CVCT (Cable Virtual Channel Table) How to use Log information? Log view By default, log information consists of the log view in the Monitoring & Log panel. This view can store up to 1,000 messages. This log view ENENSYS DiviCatch RF - Manual Page 11 / 40 DiviCatch RF User Guide can be cleared (Clear Log View) or saved (Save Log View). Depending on the level of information required, the type of messages to be displayed can be selected. Also, for the comfort of viewing, log font color can also be selected for each level of log information. ● Click Config Log. A “Log configuration” window opens. ● Select the level of information to be logged: Check each level for which you would like to view log messages. “Error” (Stream reception errors, etc.), “Information” (stream reception info, settings changes, etc.), “ETR290” (ETR290 logs requested individually from the ETR290 tab), “GPS alarms” (GPS log information, only available with DiviCatch RFT/H GPS option). ● Click the colored square at the right of the log level. A color selection dialog opens. Choose the color to be used for the associated state. ● Click Ok. The “Log configuration” window closes. Settings are applied. Log file (Continuous monitoring) A log file feature is also available for continuous monitoring needs. ● Click Config Log. A “Log configuration” window opens. ● As for the log view (see previous section), select the level of information to be logged. ● Check the “Use log file” box. ● Enter a path and file name for the log files to be created. ● Choose between logging file size and duration for the creation of a new log file. For example, choosing a “Max file size” of 1MB will create a new log file every time 1MB is reached. File names are incremented with numbers (eg, file_name1.log, file_name2.log, etc.) Note: Log files will be created as long as the Use log file box is checked. To stop the logging of information, open the log configuration dialog and ENENSYS DiviCatch RF - Manual Page 12 / 40 DiviCatch RF User Guide uncheck “Use log file”. Click Ok. The “Log configuration” window closes. The log file is created. ● How to Monitor MPEG2-TS streams? Settings • ETR290 Settings ETR290 settings window is used to set thresholds for raising errors on ETR290 parameters. Min and Max possible values are indicated for reference. The nominal value correpsonds to the default value (most often the value recommended in the TR 101 290 DVB Guidelines). To change your personalized thresholds back to DVB standard / default values, click the “Restore Default” button. • Monitoring Setup Monitoring setup window is used to personalize the refresh frequency of the bitrate monitoring graph. Smoothing changes the frequency at which data is updated (default is “No smoothing” at 1 second). Length changes the total time monitored in the graph (default is 1 minute). When length parameter is changed, smoothing is changed accordingly. NOTE: When monitoring setup is changed, bitrate monitoring graphs are reset. ENENSYS DiviCatch RF - Manual Page 13 / 40 DiviCatch RF User Guide Monitoring Monitoring section's aim is to provide a graphical view of the different services. Several types of bitrates can be displayed: Overall bitrate is the pipe allocated for the services listed. Net bitrate is the sum of all services detected, including PSI/SI tables. Obviously, net bitrate cannot be greater than overall bitrate. Drag & Drop: In addition to Overall and net bitrate, you can visualize the instant bitrate of one or more services (TS streams) using the Drag & Drop function: Click on one of the services (“Programs” tab, “TS analysis” section), drag this service until you reach the “Monitoring” window, and drop it. Instant bitrate will appear. In case higher resolution is required (z-scale) for the dragged & dropped service, just mask Overall bitrate and/or Net bitrate. Masks instant bitrate graphical view Indicates that associated bitrate stream is hidden. Deletes associated TS stream previously added using the Drag&Drop function. ETR290 ETR290 is standardized guidelines issued by the DVB organization for measurements in DVB systems. These guidelines are intended to provide an exhaustive overview of elements that matter for the transmission of a stream. All parameters tested in ETR290 are split over three priorities. First-level priority lists a basic set of parameters which are considered necessary to ensure that the TS can be decoded. Second-level priority lists additional parameters which are recommended for continuous monitoring. And third-level priority lists further optional parameters covering varied interests. To start ETR290 monitoring on the stream received, click “Start Monitoring”. The ETR290 analysis starts and is real-time based. As soon as an error is detected, the ENENSYS DiviCatch RF - Manual Page 14 / 40 DiviCatch RF User Guide LED of the corresponding parameter turns to red, and the counter increments. If further information is needed on a specific parameter, it is possible to raise a log event for each error raised. Check the log box corresponding to the parameter requested. Then, each time an error raised (second-based), a message appears in the log window with the following format: hh:mm:ss: Name_Of_Error (number of errors in the second) on packet(s) #packet_number Time for the error is based on the clock of the workstation attached to the DiviCatch device. NOTE: The packet number indicated in the log message is given for estimation purposes : It is accurate at +/- 100 packets. To stop ETR290 monitoring, click “Stop Monitoring”. To start a new monitoring, you can either resume and add up to all existing errors, or reset existing monitoring by clicking “Reset All Counters”. For detailed information on ETR290 parameters, please refer to document TR 101 290 from ETSI at http://webapp.etsi.org/action/PU/20010515/tr_101290v010201p.pdf. PCR Jitter A PCR jitter graph showing PCR Accuracy is available from the PCR tab in the Monitoring section. NOTE: ETR290 Monitoring must be started to view the PCR jitter graph. PCR Jitter is not available on DVB-H formatted signals as there are no PCRs in DVB-H. ● First, from the PID list, select for which PID you would like to monitor the PCR Jitter. If the list of PIDs is not available, click Update to refresh the PIDs on the current stream. The graph starts automatically. NOTE: The first 5 seconds of PCR graph are not valid for measurement: They correspond to initialization time. ENENSYS DiviCatch RF - Manual Page 15 / 40 DiviCatch RF User Guide PCR realtime graph Zoom pre-sets Switch PCR density/PCR history PCR detailed information PCR history graph ● Select the Zoom pre-set to be used for watching PCR jitter: 1 second, 5 seconds, 10 seconds, 30 seconds or 1 minute. ● To access detailed information on a specific PCR, pass the mouse over the line and point representing the PCR. Detailed information on the accuracy and PCR repetition is available. Minimum and maximum PCR accuracy over the monitored period are also displayed. Passing the mouse on the PCR graph freezes the display for more convenient browsing. NOTE: To zoom in and out on the upper graph, click the graph and then use the scroll wheel of your mouse to zoom in and out. ● The graph at the bottom shows PCR history over last 10 minutes. To navigate through the history, switch from real-time to history mode in the PCR jitter view mode. The zoom range on the history graph can now be moved along the history graph to monitor past PCRs: Details of the zoomed area are shown in the upper graph. NOTE: The zoom range for the history graph is also based on the zoom pre-set. ● A graph showing density of PCRs based on their accuracy is also available thourgh a click on the Display density button. The density histogram displays instead of the history graph. For example, this graph shows that the majority of PCRs over the period monitored had an accuracy between -100 and 100ms. ENENSYS DiviCatch RF - Manual Page 16 / 40 DiviCatch RF User Guide Alarms The Alarms tab offers continuous monitoring on varied aspects of the transport stream. NOTE: If min and max values are kept to default value None, the alarm is disabled. Bitrate monitoring The Bitrate monitoring section of Alarms is used to monitor real-time bitrate. Two predefined alarms on Net bitrate (that means overall bitrate minus stuffing) and Stuffing bitrate are shown by default. It is also possible to add a bitrate monitoring on specific PIDs. ● First, click Start bitrate monitoring. ● Specify the minimum and/or maximum values defining the range in which your bitrate should be considered as correct. NOTE: Stuffing bitrate corresponds to monitoring the bitrate of PID 0x1FFF (or 8191). This measure is especially useful for monitoring streams on which statistical multiplexing is used. It helps you validate that you net bitrate does not come too close to your overall bitrate allowed. ● If need to monitor one or more specific PIDs, click Add PID. A new line appears, showing a drop-down list contaning all PIDs of the MPEG2-TS. Select a PID, and specify the bitrate range. To add further PIDs, repeat the same operation. To remove a PID monitoring, choose Remove from the drop-down list. ● To access detailed information or keep a trace, it is possible to generate a log message upon each error detected. For that, check the check box located at the right-hand side of the counter. Log message information will include the actual bitrate detected outside the range. ● Monitoring starts as soon as a min or max value has been set. Upon the first value detected out of the defined ranges, LED turns red and counter is set to 1. Upon every further error detected, counter increments. Transport and RF consistency monitoring These alarms are used to check the consistency of the information conveyed on the transport layer and on the transmission layer. If any deviation is detected between both information, an error is detected (first LED turns red, then counter increments upon each error). ● To start this monitoring, click Start checking consistency. ENENSYS DiviCatch RF - Manual Page 17 / 40 DiviCatch RF User Guide ● To access detailed information or keep a trace, it is possible to generate a log message upon each error detected. For that, check the check box located at the right-hand side of the counter. Log message information will include the element on which a deviation has been detected (eg, code rate, hierarchy, etc.). NOTE: NIT and MIP consistency validation scheme is only available if MIP packets are detected (SFN networks). NIT and RF consistency validation scheme is only available for a signal received live. Burst data monitoring Burst data monitoring is only relevant for DVB-H-formatted streams. These alarms help you automatically validate the output of a head-end. ● First, click Start burst data monitoring. ● Specify the minimum and/or maximum values defining the range in which the values should be considered as correct. ENENSYS DiviCatch RF - Manual Page 18 / 40 DiviCatch RF User Guide ● To access detailed information or keep a trace, it is possible to generate a log message upon each error detected. For that, check the check box located at the right-hand side of the counter. Log message information will include actual values detected outside the range as well as the PID on which the error occurred. ● Monitoring starts as soon as a min or max value has been set. Upon the first value detected out of the defined ranges, LED turns red and counter is set to 1. Upon every further error detected, counter increments. Fec presence This alarm checks the presence of FEC data on all bursts. Burst duration This alarms checks the total duration of all bursts. Burst size This alarm checks the total size (MPE + FEC) of all bursts. Off-time This alarm checks the off-time, that means the total time between two bursts on all PIDs. Jitter This alarm checks jitter on all bursts. Following DVB recommendations, jitter should not exceed 10ms in order to maximise power saving on the battery of the receiver. Jitter Alarm is calculated from the minimum claimed delta-t. For further information, refer to page 21. NOTE: This alarm is also useful to detect bursts arriving “too early”, that means bursts arriving before the time interval defined through delta-t information. For that, minimum should be set to 0. MFER This alarm checks value of MPE-FEC Frame Error Rate on all bursts (refer to page 20 for further details). FER This alarm checks value of Frame Error Rate on all bursts (refer to page 20 for further details). DiviCatch RF - DVB-H Analysis NOTE: The DVB-H analysis panel is only available with the DiviCatch RF-T/H device. The DVB-H analysis panel enables real-time bursts visualization, and a smart comparison between values received and those supposed to be received (contained within MPE header). In order to monitor one PID (one DVB-H service), it is necessary to: • place the mouse over the window where bursts are scrolling. From now, scrolling stops. ENENSYS DiviCatch RF - Manual Page 19 / 40 DiviCatch RF User Guide • Select the burst to be monitored (simply place the mouse over it). Information such as off-time, burst duration, Fec columns, etc. will be displayed. Burst structure Select the burst to be monitored MPE/MPE-FEC section analysis Burst duration off-time As seen above, a comparison between theoretical FEC rate and the one received is performed for selected PID: Here, MPE Data Columns = 128 instead of 191, FEC Columns = 63 instead of 64, which results in a error of -0.9%. FER and MFER Frame Error Rate (FER) is the ratio of transmitted bursts containing errors during a specified period. A burst is marked erroneous if any TS-packet within the burst is erroneous. MPE-FEC Frame Error Rate (MFER) is the ratio of uncorrectable MPE-FEC frames received during a specified period. An uncorrectable MPE-FEC frame is a ENENSYS DiviCatch RF - Manual Page 20 / 40 DiviCatch RF User Guide frame in which there are more errors in the MPE section than the number of errors that FEC is actually capable of correcting. Both ratios have become referential indicators of the quality of restitution for each transmitted service and the « degradation point » has been unanimously set to 5% for both ratios. Note that an MFER of 5% means that each 5 minutes there is 15 seconds without any video (based on a time slicing of 3 seconds). FER and MFER are provided real-time and are calculated for each PID. Both criterion are calculated on the last 100 frames. Before the first hundred bursts are actually received, an estimation is done at the beginning of the reception (e.g, it is possible to reach a 50% FER on the first two frames of a given PID if one of both is erroneous). Delta_T information ● To toggle between jitter and burst information on the burst monitored, click the burst on which the mouse is placed. In the “Jitter” tab, an off-time comparison uses the delta-t info embedded within the MPE header to compare actual and theoretical times of burst transmission. The example above shows that delta-t information embedded in the previous burst indicated a 10ms range for the current burst to arrive. The analysis shows that this current burst has actually arrived 9 ms after the minimum claimed delta_t. A DVB-H receiver uses the delta-t information to know when the tuner should be turned on again after the last burst received. Receiver turns back on at the minimum claimed delta_t relative time: If the bursts arrives before that time, the receiver misses it. If the burst arrives too late after that time, it is not critical, burst will be received, but battery power saving capabilities are not optimized. The Alarms feature in the Monitoring & Log panel allows you to also automatically detect “early” or “late” bursts (refer to page 18). ENENSYS DiviCatch RF - Manual Page 21 / 40 DiviCatch RF User Guide RF Analysis The “RF analysis” panel (“RF Cable” for DiviCatch RF-C and “RF-T/H” for DiviCatch RF-T/H) enables the viewing of multiple levels of information: transmission link, signal monitoring. For DiviCatch RF-C, Echos and QAM modulation are also available. All parameters monitored in real-time can be represented in the form of a realtime gauge or as graphs for evolution visualization. To switch to graph representation, click the Monitoring tab in the Analysis section. At any time, it is possible to reset all counters on the monitoring information received by clicking the Reset button. DiviCatch RF-C Transmission link monitoring The RF Cable tab provides information on quality of the digital transmission link. ENENSYS DiviCatch RF - Manual Page 22 / 40 DiviCatch RF User Guide Information is provided on packet transmission and Bit Error Rate. BER is defined as a ratio between the number of erroneous bits transmitted and the total number of bits transmitted. Signal and modulation monitoring The RF Cable tab also provides useful information on signal quality and modulation parameters. The Signal Level is expressed in dBµV and is graphically represented as a gauge for immediate visualization. The Constellation is displayed as soon as the signal is tuned. This screen provides instant graphical representation of the signal quality. If signal is degraded, constellation points become unclear. SNR (Signal to Noise Ratio) is an indicator of the QAM signal quality. It performs a simple comparison between the total noise strength on the signal monitored and the signal power. MER (Modulation Error Ratio) is also an indicator of the QAM signal quality. MER is expressed in dB and is a representation of the distance between constellation points actually measured and theoretical constellation points. It is an indicator of noise, interferences or distortions on the signal. EVM (Error Vector Magnitude) measures the vector magnitude between the constellation point actually measured and the theoretical constellation point. It is an indicator of interferences or distortions on the signal. This value is expressed as a percentage. NOTE: All the parameters measurements can also be displayed in the form of graphs via the Monitoring tab for a time-based evolution view. To obtain minimum, maximum and last values measured since signal lock or last reset on a specific parameter, place your mouse over the legend square at the bottom left. The measure selected is highlighted. To toggle viewing/hiding of a parameter monitoring, click the corresponding colored square. ENENSYS DiviCatch RF - Manual Page 23 / 40 DiviCatch RF User Guide Echo monitoring The Echos tab provides information on echo distortions detected on the signal. When placing the mouse over an echo representation, the following information is available: ● Coefficient: position of the path relative to main path. ● Level: level of the echo on the signal (expressed in dB) ● Delay: delay of the echo relative to the main path (expressed in µs) NOTE: when the Echo information tab is displayed, the RF constellation measurement is stopped. Constellation points will therefore be reset. Monitoring using thresholds and alarms It is possible to configure alarms on parameter values measured for automated monitoring. ● Unlock the Threshold settings area using the button. ● Enter the minimum and maximum values allowed for the parameters you want to monitor. ● Validate the threshold values by clicking the button. The threshold alarm-based settings area is grayed out and monitoring is enabled. ● Automatically, red and green bars appear on the gauges to indicate the range of alarm-raising and normal values respectively. ● As soon as a threshold is passed over, an alarm is raised and transformed into a log event (Information-level logs). ENENSYS DiviCatch RF - Manual Page 24 / 40 DiviCatch RF User Guide DiviCatch RF-T/H Channel information The “Channel info” section provides auto-detected information from the channel locked to. The information provided especially includes the constellation used at QAM level and the Cell ID. Transmission link monitoring The RF-T/H tab provides information on quality of the digital transmission link. Information is provided on packet transmission and Bit Error Rate. BER is defined as a ratio between the number of erroneous bits transmitted and the total number of bits transmitted. Pre-Viterbi BER: This BER is calculated on packets before the Viterbi error correction scheme is applied to the stream. Post-Viterbi BER: This BER is calculated on packets after the Viterbi error correction scheme has been applied to the stream. Post-RS BER: This BER is calculated on packets after the Reed Solomon error correction scheme has been applied to the stream. The number of “Packets Uncorr.” indicates the number of packets that could not ENENSYS DiviCatch RF - Manual Page 25 / 40 DiviCatch RF User Guide be corrected using the RS error correction scheme. Signal monitoring The RF-T/H tab also provides useful information on signal quality. The Signal Level is expressed in dBµV and is graphically represented as a gauge for immediate visualization. SNR (Signal to Noise Ratio) is an indicator of the signal quality. It performs a simple comparison between the total noise strength on the signal monitored and the signal power. It is expressed in dB. Some of the information relating to signal quality cannot be obtained simultaneously with MPEG2-TS processing. To obtain information on Constellation, MER and EVM, it is necessary to specify you want to view that information through the “Further RF measurments” check box. NOTE: Checking this box will have the impact of disabling the MPEG2-TS. That means all information relating to MPEG2-TS will no longer be available. ETR290 and associated PCR jitter, Alarms, recording and decoding of the stream, DVB-H analysis, ESG decoding will be disabled. The Constellation is displayed as soon as the signal is tuned. This screen provides instant graphical representation of the signal quality. If signal is degraded, constellation points become unclear. MER (Modulation Error Ratio) is also an indicator of the OFDM signal quality. MER is expressed in dB and is a representation of the distance between constellation points actually measured and theoretical constellation points. It is an indicator of noise, interferences or distortions on the signal. EVM (Error Vector Magnitude) measures the vector magnitude between the constellation point actually measured and the theoretical constellation point. It is an indicator of interferences or distortions on the signal. This value is expressed as a percentage. NOTE: All the parameters measurements are also displayed in the form of graphs via the Monitoring display for a time-based evolution view. To obtain minimum, maximum and last values measured since signal lock or last reset on a specific parameter, place your mouse over the legend square at the bottom left. The measure selected is highlighted. To toggle viewing/hiding of a parameter monitoring, click the corresponding colored square. ENENSYS DiviCatch RF - Manual Page 26 / 40 DiviCatch RF User Guide Monitoring using thresholds and alarms It is possible to configure alarms on parameter values measured for automated monitoring. ● Unlock the Threshold settings area using the button. ● Enter the minimum and maximum values allowed for the parameters you want to monitor. ● Validate the threshold values by clicking the button. The threshold alarm-based settings area is grayed out and monitoring is enabled. ● Automatically, red and green bars appear on the gauges to indicate the range of alarm-raising and normal values respectively. ● As soon as a threshold is passed over, an alarm is raised and transformed into a log event (Information-level logs). DiviCatch – Record & video panel DiviCatch RF “Record & video display” tab enables: ENENSYS DiviCatch RF - Manual Page 27 / 40 DiviCatch RF User Guide • Recording of a TS stream captured either from ASI or RF input, • Scheduling of recordings (multi files/circular), • Advanced recordings (maximum size), • Viewing of the stream using an external media player, • Re-streaming (either locally for display of A/V services carried on the TS, or to a remote station using UDP streaming). How to record a stream ? • Connect DiviCatch RF to an MPEG2 source. Input selection interface (ASI or RF Front End) is performed automatically. • If the device led blinks green, then DiviCatch RF hardware is synchronized. You can also check the “General” panel in order to see if arrow is blinking green. • Enter a target file name using the button or select the file in which to record. • Recording will start when the button is pressed. Time elapsed since the beginning of the recording is displayed on transport bar. How to schedule recordings? Scheduling recordings means you can record multiple files of a certain duration, or perform circular recordings: • When a target filename is entered, this button becomes activated: • Click this button in order to enable/disable “Scheduler Settings”: NOTE: When unlocking scheduler button, record button is disabled. This is absolutely normal since when scheduling, recordings begin automatically. You can perform the following combinations for advanced or scheduled recording: ENENSYS DiviCatch RF - Manual Page 28 / 40 DiviCatch RF User Guide • Specify Start time (the computer time you want the recording to begin), • Specify Record duration, • Specify Maximum file size in MegaBytes, • Number N of records (default: 1) if you want to record over multiple files, • In case “Infinite looped recording” is checked, as soon as the N recordings are stored on hard drive, they will be automatically overwritten in order to perform an endless recording without saturating hard drive. How to display the stream locally? DiviCatch uses VLC to display the TS stream. DiviCatch RF-C • Check the “Local” check box Monitoring streaming so that captured stream is routed to your local computer. VLC icon becomes VLC icon“Local” becomes activated when is checkedactivated when “Local” is checked • Click the button to launch VLC client software. Selection of a service amongst the list of available ones can be done from VLC Navigation menu. NOTE: If VideoLan is launched for the first time, the user is requested to indicate the path to VideoLan through a browsing window. DiviCatch RF-T/H • Check the “Local” check box Monitoring streaming so that caught stream is routed to your local computer. VLC icon becomes activated when “Local” is checked • Check “Open a .sdp file”. • Click the • Select the SDP file associated to the service you want to display. ENENSYS DiviCatch RF - Manual button. Page 29 / 40 DiviCatch RF User Guide • SDP files contain information on the encoding used and specify IP target addresses for each program in a DVB-H multiplex. Each program has an associated SDP file which is requested by the decoder to properly decode the program. • VLC client software launches and displays the service requested. How to UDP-stream a TS received in input? It is possible to re-route the received TS to another computer using MPEG2 over UDP encapsulation services of DiviCatch. This feature enables easy remote monitoring of a TS: • Connect DiviCatch RF to an MPEG2 source (ASI or RF). • If the device led blinks green, then DiviCatch RF hardware is synchronized. • Check the “Remote TS streaming” box in the TS over UDP streaming field, • Select the required streaming mode and UDP address to be used to stream input TS to: • Press the button to start streaming (press again this button to stop streaming). How to de-encapsulate DVB-H formatted streams? The DiviCatch application is capable, for DiviCatch RF-T/H only, to deencapsulate all IP datagrams and forward them to the network. • Check the “DVB-H de-encapsulation” box in the DVB-H de-encapsulation field, • Choose which PID should be de-encapsulated from the drop-down list or select “All Pids” to de-encapsulate all PIDs simultaneously. • If no PIDs appear, click Update list. • By default all IP datagrams are forwarded to their original IP target (available from the INT table). If need, the IP address to which the IP datagrams are ENENSYS DiviCatch RF - Manual Page 30 / 40 DiviCatch RF User Guide forwarded can be changed. To do so, check “Change destination” and specify the IP adress to be used. • Press the button to start de-encapsulation process on the selected PIDs (press again this button to stop streaming). DiviCatch RF-T/H – ESG panel The ESG panel is only available with DiviCatch RF-T/H. The application is capable of decoding all DVB-CBMS ESGs. Electronic Service Guides are a major component of a DVB-H service. They are the main input interface of the end-user to the Mobile TV service. With that respect it is very important to validate that all elements composing the ESG have been properly transmitted. All ESGs are transmitted to the IP address 224.0.23.14. The only setting that needs to be made is the port to which DiviCatch RF-T/H should listen to in order to acquire bootstrap (ESG entry point). Traditionally, DVB-CBMS ESGs are conveyed to port 3937. But you can set your own port for specific needs. ● To load ESG, press Enter having set the right port for bootstrap or click “Refresh ESG”. ● If ESG is found, Bootstrap state turns to green and ESG displays. ENENSYS DiviCatch RF - Manual Page 31 / 40 DiviCatch RF User Guide ● Use the ESG navigation bar to browse the complete ESG transmitted within the MPEG2-TS. ● When receiving a live signal, it is always possible to go back to the information of the current programs by clicking “Go to current time”. ● To launch decoding of a specific program (unencrypted programs only), select the program through a click on channel logo or name and click to launch VLC. SDP information is automatically extracted from the ESG (if properly transmitted) and decoding starts after a 5-second buffer. NOTE: If VideoLan is launched for the first time, the user is requested to indicate the path to VideoLan through a browsing window. Configurable profiles It is possible to save personalized parametering into a profile that can be then loaded for later use. Profile icons are available at the top left corner of the application, whatever the panel currently active. ● Click the button to save all current settings (Tuning information, RF thresholds, ETR290 settings). A dialog box opens: Save the profile to disk. The profile is saved in the form of an XML file. ● To load a profile including tuning and threshold settings, click the button. A dialog box opens: Select the previously saved XML profile you need to load. All settings are set to the values saved in the profile. ● To restore the profile to default settings, click the button. A previously loaded profile will be unloaded. DiviCatch RF – GPS option NOTE: The GPS panel is only available with the DiviCatch RF-T/H device for which a GPS option has been purchased. The GPS receiver provided in the GPS option is a USB self-powered device. It is equipped with a SIRF III chipset. ● Connect the GPS receiver to a USB port on the computer to which the DiviCatch RF-T/H device is connected: The GPS tab appears and the GPS receiver is automatically detected. ENENSYS DiviCatch RF - Manual Page 32 / 40 DiviCatch RF User Guide NOTE: The GPS receiver will be automatically detected if the GPS drivers have also been installed upon installation (check “GPS drivers” box). If it is not automatically detected, click Scan ports on the “GPS serial connection” section. Select the COM port to which the USB connection of the GPS receiver has been emulated and click “open GPS”. The GPS receiver should be connected to the PC using its own USB port. Do not use a USB hub to connect both the DiviCatch RF-T/H device to the same USB port. The left-hand part of the GPS panel provides the information directly received through the GPS receiver (date and time, position, speed, real-time NMEA frames). The right-hand part lets you configure GPS logging for coverage or drive testing. The GPS log file is a CSV-formatted file to offer maximum interoperability with cartographic applications. ● To start a GPS capture, first enter a path and file name for the GPS log file. It is important to note that the GPS log file is a separate file from the main log file used for standard monitoring. ● If needed, enter a Capture description. The text entered will be used as the first available information upon each entry of the GPS log file. ● Then choose the parameters to be included for the measurement survey. NOTE: Note that it is not necessary to select GPS parameters. This option can also be used to automatically log RF parameters values. By default, when all GPD and RF parameters are checked, the order for the parameters written to the GPS log file is the following: Date, UTC Time, Altitude, Speed over ground, Signal level, SNR, Post-Vit BER, Pre-Vit BER, Post-RS BER, MER, EVM, Lock status, Latitude, Longitude NOTE: Lock status is expressed as a boolean value. 0 means the Front-end is not locked to the signal, 1 means the Front-end is locked to the signal. Two modes of GPS capture are available: Manual capture (Snap) or automatic capture (Periodic). ● Choose “Snap capture” for a manual capture. Click Snap every time a new survey entry must be added to the GPS log file. OR ● Choose “Periodic capture” for an automatic capture. Enter the “Periodicity” at ENENSYS DiviCatch RF - Manual Page 33 / 40 DiviCatch RF User Guide which a new survey entry must be added to the GPS log file. ● If needed, choose a maximum number of entries (or positions) to be written to the GPS log file: Check the “Max Points” box, and specify a maximum number of entries. ● Click “Start” to start the automatic capture. At the end of the measurement survey, click “Stop”. NOTE: MER and EVM measurements are incompatible with MPEG2-TS output. If a GPS log file is started and then MPEG2-TS restarted (by unchecking Further RF measurements in the RF-T/H tab), MER and EVM values in the GPS log file remain at the last measured value. The GPS log file view provides a preview of the current GPS log file being written to disk. External cartographic applications To view a map of the measurement survey, it is possible to export the GPS log file to an external cartographic application. The format of the GPS log file is CSVbased, thus guaranteeing maximum interoperability. However, specific cartographic applications may request a specific formatting as well as a maximum number of positions in the GPS log file. If needed use the Customized log section and the “Max points” option in the periodic capture. ● Check “Customized log” to personalize GPS logs (ie, format the text to be written into the GPS log file). ● Edit the script in the text area. A Script is a combination of text with predefined variables. The table below lists all the available variables. Variables Format Description $DATE (yyyy/mm/dd) Date $TIME (hh:mm:ss:sss) UTC Time $LATITUDE (N/S dd mm.mmmm) Latitude $LONGITUDE (E/W mm.mmmm) $ALTITUDE Meters Altitude $SPEED km/hr Speed over ground ENENSYS DiviCatch RF - Manual ddd Longitude Page 34 / 40 DiviCatch RF User Guide Variables Format Description $SIGNAL dBμV RF Signal level $SNR dB SNR level $PREVITBER n/a Pre-Viterbi BER value $POSTVITBER n/a Post-Viterbi BER value $POSTRSBER n/a Post-RS BER value $MER dB MER value $EVM % EVM value $F_SIGNAL_THRESHOLD 0/1 If '0', signal is out of range $F_SNR_THRESHOLD 0/1 If '0', SNR is out of range $F_PREVITBER_THRESHOLD 0/1 If '0', pre-Viterbi BER is out of range $F_POSTVITBER_THRESHOLD 0/1 If '0', post-Viterbi BER is out of range $F_POSTRSBER_THRESHOLD 0/1 If '0', post-RS BER is out of range $F_MER_THRESHOLD 0/1 If '0', MER is out of range $F_EVM_THRESHOLD 0/1 If '0', EVM is out of range $F_LOCK_STATUS 0/1 If '0', tuner is not locked. If '1', tuner is locked NOTE: “Out-of range” status is based on thresholds definition in the RF-T/H tab. In the GPS log file, the text entered will be output as such, whereas variables will be replaced with the associated value at the time of capture. Sample script #1: Script: Snr = $SNR, Position: ($LATITUDE, $LONGITUDE) Result: Snr = 16,25dB, Position: (N48 7.5033, E1 37.7625) Sample script #2: Script: <Capture><Snr>$SNR</Snr><Signal>$SIGNAL</Signal></Capture> Result: <Capture><Snr>16,25dB</Snr><Signal>61dBμV</Signal></Capture> ● If needed, choose a maximum number of entries (or positions) to be written to the GPS log file: Check the “Max Points” box, and specify a maximum number of entries. ● Click the “Start” button to start the automatic capture. ENENSYS DiviCatch RF - Manual Page 35 / 40 DiviCatch RF User Guide DiviCatch application and device status Clear LEDs appear on the bottom right part of the application, in the status bar, that indicates how communication happens between the application and the device: In case of error, a verbose indication is displayed in the status bar (for instance, “No DiviCatch detected” in case the application is launched while no device is attached to USB port). Notes and remarks Capture with two DiviCatch from the same laptop It is possible to attach two DiviCatch to the same PC. The same number of DiviCatch applications must be launched. Moving DiviCatch from one USB2.0 port to another Driver installation is only valid for the very USB2.0 port the DiviCatch device is connected to. If DiviCatch is connected to any USB2.0 port to which it has never been connected before, Windows system will start another device enumeration and behave as if a new USB device was detected. Companion CD will not be required and Windows re-enumeration wizard will self complete. In order to be able to use the DiviCatch device from any USB2.0 port, installation must be done for each USB2.0 port. Launching DiviCatch application while no device is attached to USB2.0 port DiviCatch application (stream open and analyze) is not workable when no DiviCatch device is connected to the USB2.0 port of the PC. Meaning of LED Colors on device OFF: no driver installed, happens when DiviCatch is plugged for the 1st time. Red: Driver installed and device is recognized Orange: DiviCatch application is launched (SW and device are connected), DiviCatch is ready to play Green: receiving a stream (slow blink=188, fast blink=204 bytes/packet TS) ENENSYS DiviCatch RF - Manual Page 36 / 40 DiviCatch RF User Guide REGULATORY & STATUTORY NOTICES EMC and safety declaration This equipment is a class B digital device. It has been designed and tested to meet the requirements set by the European Community directives and complies with the EN50022 and EN50024 rules as an Information Technology Equipment. It complies with EN55103-1 and 55103-2 rules applying to Audio Video equipments under E1 to E5 environment conditions. To ensure compliance, properly shielded cables shall be used for data I/Os, proper power cable and technical grounding connection shall be used to feed the Network Adapter and device shall be operated as described in that document. This equipment has been tested and found to comply with the limits for a class B digital device, pursuant to Part 15 of the FCC Rules. These limits are designed to provide reasonable protection against harmful interferences in a residential installation. This equipment generates, uses and can radiate radio frequency energy and, if not installed and used in accordance with the instructions, may cause harmful interference to radio communications. However, there is no guarantee that interference will not occur in a particular installation. Operation of this equipment in a residential area is likely to cause harmful interference in which case the user will be required to correct the interference at his own expense. ENENSYS' Digital Network Adapter has been designed to meet the safety of Information Technology Equipment including business equipment from the European EN 60950 and International IEC 950. For safety reasons, do not open the metal housing but contact ENENSYS Technical Support. Environmental specifications Power Voltage Power consumption Operating temperature Dimensions (LxWxH) Weight Storage temperature Storage relative humidity ENENSYS DiviCatch RF - Manual Self powered using USB2.0 bus <2W 0 °C to 40 °C 134.7x27x61.45 mm 156g -10 °C to +70 °C 10 to 80 % at 50 °C - Page 37 / 40 DiviCatch RF User Guide TECHNICAL DATA Interfaces Specifications INPUT INTERFACE SPECIFICATIONS DVB-ASI interface ASI input Data format Connector Max bit rate ASI mode Packet framing MPEG2 Transport Stream (ISO-IEC 61883) ASI (Asynchronous Serial Interface) As per DVB A010 ASI-C, EN50083-9 1x BNC 75 ohms 216 Mbps Burst (packet) or Continuous – autodetection 188 or 204 bytes per packet – autodetection RF Front End interface – DiviCatch RF-C RF input Data format Connector Frequency range Symbol rate range RF sensitivity Packet format ITU J83, Annexes A, B & C MPEG2 Transport Stream (ISO-IEC 61883) As per ETSI EN 300 429, MCNS 2x F 75 ohms (1x input, 1x loopthrough) 1x BNC 75 ohms 50 to 900 MHz (125 kHz step) 0,87 to 7 Msymbols/s -75 to -10 dBm 188 or 204 bytes per packet – autodetection RF Front End interface – DiviCatch RF-T/H RF input Data format Connector Frequency range Channel bandw . RF sensitivity Packet format ENENSYS DiviCatch RF - Manual DVB-T & DVB-H MPEG2 Transport Stream (ISO-IEC 61883) As per ETSI EN 300 429, MCNS 2x F 75 ohms (1x input, 1x loopthrough) 1x BNC 75 ohms 45 to 862 Mhz 5 to 8 Mhz -80 to -8 dBm (@QPSK ½) 188 or 204 bytes per packet – autodetection Page 38 / 40 DiviCatch RF User Guide ANNEX Installation of VideoLan VideoLan is a cross platform media player, it is the one used to display MPEG2 services adapted by DiviCatch. VideoLAN is a software project, which produces free software for video, released under the GNU General Public License. It can be downloaded at the following Web address : http://www.videolan.org/ Equipment return for repair In case of any trouble with one of ENENSYS Technologies' products, please report it to our Technical Support team via email ([email protected]). Your request should specify Part Number and Serial Number as displayed on the bottom label of the equipment, with a description of the defect, reference of Purchase Order if possible, and your full details. When receiving your request, a support engineer will get in touch with you in order to surely identify the source of your problem. If equipment has to be returned for repair, a RMA number (Returned Material Authorization) will be especially created and recorded, and provided to you. You will need to indicate it on the shipment cartons of the faulty equipment, and/or add it in your communication with our support team. Your equipment will be shipped back to you along with a repair report. ENENSYS Technologies Le Germanium 80 avenue des Buttes de Coesmes 35700 Rennes FRANCE ENENSYS DiviCatch RF - Manual Office (+33) 1 70 72 5170 Fax (+33) 2 99 36 03 84 [email protected] Page 39 / 40 DiviCatch RF User Guide About ENENSYS Technologies ENENSYS Technologies is specializing in broadcast solutions for interworking issues. Designed by experienced technical and commercial experts from the Digital TV field, ENENSYS Technologies product lines are “convergence oriented”, aiming at interworking of network/IT and broadcast equipments. The products cover MPEG, DVB, ATSC fields and are providing solutions for DVB-H, DVB-T, T-DMB, TV on mobile, ASI, SSI, SMPTE-310M, GigaEthernet, QPSK… These products are far from these expensive swiss-knife interfacing products that can potentially cope with many formats but run only one. ENENSYS Technologies interfaces are the clean and direct answer to one interfacing need. Secret behind is compactness, portability and professional robustness… ENENSYS' product lines are the real proof that it is no more required to engage new operating expenses to protect your [past or forthcoming] investments. More information on www.enensys.com ENENSYS DiviCatch RF - Manual Page 40 / 40