1
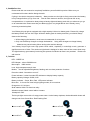
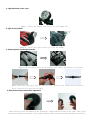
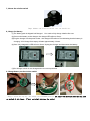
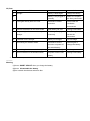
RAY-FI User's Manual 1, Read Before Use Please read this user manual to completely familiarize yourself with this product. Make sure you understand all functions before hitting the trails. Cycling in the dark is dangerous inherently. Always make sure the light is firmly secured and the battery is fully charged before you go for a ride. Like all other electronic devices, the light can fail at any unexpected time. It is advised to always keep a backup light and battery pack with you whenever you go on an extended ride. Please note that your Bikeray light is very bright! Never aim it directly at any oncoming motorists/cyclists. Your Bikeray bicycle light is equipped with a high capacity Lithium-ion battery pack. Please fully charge the battery before first use of the light. While the battery pack is double protected, you should always observe the following: While charging the batteries, never leave it unattended for a long time. Only use the bikeray charger to charge the batteries. Using other chargers to charge bikeray batteries may cause battery failure and/or other serious damage. Your bikeray bicycle light uses high power LEDs which, especially in turbo/high mode, generate a significant amount of heat. The aluminum light-head is designed to draw most of the excess heat away. The light head may get extremely hot during this process if sufficient air flow is not provided. Please use with caution. 2, Technics LED: 3 CREE U2 LED lifespan:above 50,000 hours Max output: 3000 lumens Lens: High transparent acrylic lens Modes: 3-level adjustable brightness, flashing and over-heat protection functions Press the switch 3 seconds to turn off Power indicator: 3-color/4-modes LED indicator to display battery capacity Battery capacity/Voltage: 62WH,16.8V Battery indicator: Green, Blue, Red LED power indicator Burn time: 3+ hours Run time at high lighting modes,12 hours at low Charge time: 3.5~4Hours Shell material: 6061-T6 Aluminum alloy Wireless remote Switch control within 6 meters Waterproof: IP65 The bicycle light comes with a 3 stage power meter. As the battery depletes, the backlit switch button will change color from Green-Blue -Red-Flashing Red. ●Green 100%-75% ●Red 30%-5% ●Blue 75%-30% ●Flashing Red < 5% 3, Light Mounted on the cycle Image1 Choose the Right O ring to fit for your handle bar 4, light on the helmet Image 2 Choose the right O ring to fit for the helmet 5, Battery packed on the right position Image 3 the skid proof piece on the battery case Velcro the battery case tightly Image 4 Plug the light cable into the battery cable. Notice of the inside three connection point .Screw the lid and Lock the cable 6, Match the wireless switch with Light head Image 5 Firstly press the Switch on the light head firmly without turning on the light ,Then, press the wireless switch for 2 seconds. If the light flashes 2 times, the wireless switch matches successfully. 7, Mount the wireless switch Image 6 Mount the wireless switch onto the handle bar 8, Charge the Battery (1)The battery pack is shipped half charged. You need to fully charge it before first use. (2)Connect the battery to the charger- the charger LED will turn Green. (3)Plug the charger into the power outlet – the charger LED will turn Red indicating that the battery is charging. A full charge from empty will take approximately 4 hours. (4)Once fully charged the LED will turn Green. Unplug the charger and disconnect the battery. (5)Our charger is built of over charge and over current protection 9, Change battery on the wireless switch Image 7 screw the top tap and change the New R2032 battery. Do insert the battery from the box side as marked in the image. If not, you might destroy the switch. 10,Form No 1 failure No light 2 3 LED lights directly from Hi to Low caused solution Battery is discharged Charge the battery Battery is not plugged in Make sure all parts correctly are firmly connected Automatic overheat Work under the protection Ventilation environment 4 Runtime decreases on the same mode Near Battery life time Change new battery 5 No green light when connect battery and Full charged or plug Cut off charge or charger incorrectly correct the connection 6 LED flash on the charger Battery full charged Cut off charge 7 No working for wireless switch Interference source Switch again or around or no power of change the battery the switch battery 8 No working for wireless switch completely No match with the light Match again 9 No led indicator on the wireless switch No power of the inside Change new battery battery If you meet other questions exclude the above failures, please contact our retailers for after sell service。 Warning (1)Never SHORT CIRCUIT when you charge the battery (2)Never disassemble the battery (3)Don’t switch the wireless switch too fast