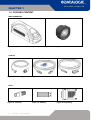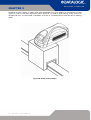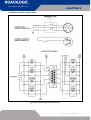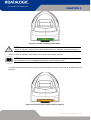
1
USER’S MANUAL
REVISION INDEX
REVISION INDEX
Revision
Date
Number of added or
edited pages
A
2008-04-17
Release
B
2009-02-19
Complete Revision for
Ulyxe 2.0™
C
2009-09-30
Datalogic Automation format
D
2010-03-11
Standards References
E
2010-09-23
Environmental Declaration
Windows® 7 compatibility
Copyright © 2010 Datalogic Automation S.r.l. All right reserved.
This document contents information covered by copyright.
Any information contained in this manual may be subject to change without prior notice. All
product or program names mentioned in this document are registered trademarks owned
by the respective companies. They are only used in this document for editorial purposes.
All projects, information and designs content in this document are property of Datalogic
Automation S.r.l. and they can’t be shown, distributed, modified and/or reproduced through
electronic, mechanical or any other way, without a delivery from Datalogic Automation
S.r.l.
Published 23 September 2010
Printed in Donnas (AO), Italy.
ULYXE™ – User’s Manual
i
FOREWORD
FOREWORD
Information included in the following manual are indicated to a qualified installer able to integrate the
equipment in a system, accomplishing with all the protection systems required from internationals rules and
local legislations.
Following manual is referred to an Ulyxe™ system and its dedicated software Ulyxe Editor in Class 4
configuration.
The manual has been prepared in conformance with the requirements of Directive 2004/108/EEC and
subsequent modifications and integrations and is composed of:
•
Safety regulations for use and maintenance
•
General machine specifications
•
Machine installation
•
Operating modes
•
Repairs and adjustments
•
Electrical and mechanic diagrams
Personnel assigned to operating the machine, in addition to being professionally trained for their specific job
must read the manuals, pay careful attention to safety regulations and the sections pertinent to their job.
Individuals assigned to operating the machine are broken down as follows:
• OPERATOR
assigned to loading the elements to process, visual inspection of the work cycle, unloading of finished
product and cleaning of the machine.
• MAINTENANCE PERSONNEL
assigned to electrical and mechanical maintenance of the machine.
NOTE:
Datalogic Automation S.r.l. shall not be held responsible for any non conforming use of equipment
of its manufacture.
NOTE:
BEFORE INSTALLING AND USING THE LASER, READ CAREFULLY THE CHAPTER
CONCERNING LASER SAFETY “APPENDIX A”.
ii
ULYXE™ – User’s Manual
OVERVIEW
OVERVIEW
We are satisfied of your choice for a Datalogic Automation S.r.l. product and especially for an “ALL IN ONE”
compact system made from experience years in laser marking field.
The marking system Ulyxe™ belongs to a Diode Pumped Solid State (DPSS) Q-switched side pumped laser
category.
Its simple and compact design conveys a versatile, intuitive and easy product to integrate due to its
advanced technology.
Easy to use, it can be the best investment to entry in the laser world without compromises about
performance and to obtain excellent markings.
Ulyxe™ system includes all necessary to operate, a laser source DPSS Q-switched, a galvanometer
scanning head, digital power controls, cooling system and monitoring functions. Entire unit and its
mechanical base are covered by a high technology polyurethane plastic top.
The user can easily interacts and monitors laser status and its functions with an easy use of a LCD touch
screen control display.
Ulyxe™ comprises all safety devices to prevent laser radiation leakage that could be potentially dangerous.
These devices actuation is demanded to the system integrator.
Figure 1: Overview Ulyxe™.
1
2
3
4
5
6
7
8
– Main-switch with led
– Power supply plug
– Interlock plug
– USB plug
– Control Box plug
– RS232 plug
– CAN plug
– Led indicators
9 – Top Cover
10 – Touch screen LCD display
11 – System status led panel
12 – Focus lens
13 – Fan protection grid
ULYXE™ – User’s Manual
iii
OVERVIEW
DESTINATION USE
The Ulyxe™ equipment is destined for identification marking of various metallic and plastic material.
Ulyxe™ DPSS technology makes possible to mark on same variety of organic materials, like paper and buff,
but not on glass and other transparent materials.
IMPORTANT WARNING
Only authorized, qualified, fully-trained personnel and, in any case, only technicians who are fully skilled and
aware of the risks inherent in the maintenance of electric, mechanical and optical components, may be
allowed to access the internal parts of the electric sections and components of this machinery.
Datalogic Automation S.r.l. declines all responsibility and liability for maintenance and repair work carried out
on live parts of this machine by technicians who have not been authorized or trained to perform such.
NOTE:
It’s not allowed modify destination use of the system in different way of its functions.
Datalogic Automation S.r.l. declines any responsibility and liability for irregular and improper use of
the machinery witch it manufactures.
Equipment is previewed in order to work with a low voltage supply 24V DC – 13A.
It’s available as optional the suitable power supply with 100÷240Vac 50/60 Hz voltage input.
iv
ULYXE™ – User’s Manual
OVERVIEW
SYMBOLS
The symbols used in this manual along with their meaning are shown below. The symbols are repeated
within the chapters and/or sections and have the following meaning:
Generic warning:
This symbol indicates the need to read the manual carefully or the necessity of an important
maneuver or maintenance operation.
Electricity Warning:
This symbol indicates dangerous voltage associated with the laser, or powerful enough to constitute
an electrical risk. This symbol may also appear on the machine at the risk area.
Laser Warning:
This symbol indicates the danger of exposure to visible or invisible laser radiation. This symbol may
also appear on the machine at the risk area.
Fire warning:
This symbol indicates the danger of a fire when processing flammable materials. Because there is a
danger of fire, it is indispensable to follow the instructions provided by the manufacturer when
commissioning the machine.
ULYXE™ – User’s Manual
v
USB 2.0 ADVICE
USB 2.0 ADVICE
ULYXE™ exclusively works via USB 2.0 Full Speed only.
Certain hardware configurations and certain operative systems do not fully support the requested
connection.
It is suggested to perform the following checks:
•
Use only USB cables certified “ HIGH SPEED” or quality “USB2.0” cable, not longer than 2 meters.
•
Avoid using any kind of extension cable or any HUB on the cable path.
•
Verify the compatibility of the operative system (see table below).
•
Close all running programs and deactivate anti-viruses during installation.
•
Some computers support only one USB2.0 at a time. On those systems, the use of other devices
(USB memories, external HD, etc…) can disconnect the ULYXE™ peripheral devices (in particular it
is observed that any USB 2.0 peripheral connected for last in temporal order isn’t recognized fro
O.S.)
•
There are some viruses that prevent the correct functioning of the USB devices (For example:
W32.SMALL.R; W32.SMALL.S; WORM_SMALL.HYN, WIN32.SMALL.R; W32.SILLY-FDC,
SILLYFDC-H, and others), It is suggested to use an updated anti-virus program.
•
The computer must support USB 2.0 connection. In order to execute the check, verify the presence
of the wording “USB2 EHC” or “USB2 Enhanced Host Controller” in the settings of the USB
controller (START>CONTROL PANEL>SYSTEM select from hardware menu DEVICE
MANAGER>CONTROLLER
USB
per
WINDOWS®
XP;
START>CONTROL
PANEL>SYSTEM>DEVICE MANAGER per WINDOWS® VISTA and WINDOWS® 7) like figure 2.
Figure 2: Device Manager controller USB.
vi
ULYXE™ – User’s Manual
USB 2.0 ADVICE
In some cases there could be conflicts with the marking software SMARTIST; it is suggested to remove it
form the PC.
OPERATIVE SYSTEMS SUPPORTED
WINDOWS® XP HOME WITH SERVICE PACK 2
WINDOWS® XP PROFESSIONAL WITH SERVICE PACK 2
WINDOWS® VISTA
WINDOWS® 7
ULYXE™ – User’s Manual
vii
WEEE COMPLIANCE – WASTE ELECTRICAL AND ELECTRONIC
EQUIPMENT
Information for the user in accordance with the European Commission Directive 2003/108/ECC.
The electrical and electronic parts container in the laser machine could contain dangerous substances for
health and an inadequate waste in environment could be source of potential damage to human health.
You must not dispose the electrical and electronic parts of the machine as common waste but you must
dispose them as a separate waste.
The electrical and electronic parts, such as printed circuit board, connecting cables and converter, which
have to be disposed or replaced with new parts, must be separate from other parts contained in the machine
and can be sent back to the Distributor or directly to the Manufacturer.
The manufacturer provides for the right waste disposal or other types of recycling as per Standard Rule
2003/108/ECC relevant to electrical and electronic (RAEE) machines waste.
Disposing of the product according to this Directive:
•
Avoids potentially negative consequences to the environment and human health which other wise
could be caused by incorrect disposal;
•
Enables the recovery of material to obtain a significant savings of energy and resources.
Datalogic Automation S.r.l. invites all the users to comply with all the rules related to this case executing the
waste disposal as per Standard Rule.
Datalogic Automation S.r.l. undertakes to do its products – when it is technically possible – respectful of the
current applicable standards and states to be available in case of any doubt or explanation.
For more detailed information about the disposal, contact the supplier that provided you with the product in
question or consult the dedicated section at the website www.automation.datalogic.com.
viii
ULYXE™ – User’s Manual
SUMMARY
SUMMARY
REVISION INDEX
I
FOREWORD
II
OVERVIEW
III
DESTINATION USE
IMPORTANT WARNING
SYMBOLS
iv
iv
v
USB 2.0 ADVICE
VI
WEEE COMPLIANCE – WASTE ELECTRICAL AND ELECTRONIC EQUIPMENT
viii
SUMMARY
IX
1
13
2
: TECHNICAL SPECIFICATIONS AND ACCESSORIES
1.1
TECHNICAL SPECIFICATION
1.2
LABELS IDENTIFICATION
1.2.1 EXTERNAL LABELS LOCATION
1.2.2 INTERNAL LABELS LOCATION
1.3
SEALS
1.4
PACKING CONTENT
1.5
ELECTRICAL SAFETY
1.6
LASER SAFETY
1.6.1 STANDARD REGULATIONS
1.7
ACCESSORIES
1.7.1 BOXED POWER SUPPLY KIT
1.7.2 CONTROL BOX BASIC
1.7.3 CONTROL BOX EVO
1.7.4 FOCUS LENS
1.7.5 SUITCASE
1.7.6 HEAVY DUTY SUITCASE
1.7.7 FOCUS BEAM LASER DIODE
13
15
16
16
17
18
19
19
20
20
20
22
23
25
25
26
26
: INSTALLATION AND SET UP
27
2.1
PREREQUISITES FOR INSTALLATION
2.2
ULYXE™ TRANSPORT
2.3
FIXING AND POSITIONING
2.4
INSTALLATION ENVIRONMENT
2.5
CONNECTIONS
2.5.1 PLUG-IN INTERLOCK CONNECTOR
2.5.2 POWER SUPPLY CONNECTION
2.5.3 CABLING BOXED POWER SUPPLY KIT (OPTIONAL)
2.5.4 PLUG IN SIGNAL KEY CONNECTOR
27
28
28
29
30
30
30
31
31
ULYXE™ – User’s Manual
ix
SUMMARY
2.5.5 CONTROL BOX BASIC CONNECTION (OPTIONAL)
2.5.6 CONTROL BOX EVO CONNECTION (OPTIONAL)
2.6
ULYXE EDITOR SOFTWARE INSTALLATION
2.7
MARKING AREA
2.7.1 PRINCIPLE OF OPERATION
2.7.2 COMPENSATION OF FIELD
2.8
EXAMPLE OF APPLICATIONS AND EXTERNAL CONNECTIONS
2.9
MATERIAL PROCESSING
3
: UTILIZATION AND OPERATIONS
3.1
STARTING PROCEDURE
3.2
EXTERNAL CONTROL SIGNAL
3.2.1 TIMINGS I/O
3.3
MAINTENANCE
4
: TECHNICAL SPECIFICATIONS
4.1
ELECTRICAL UNIT
4.2
EXTERNAL CONNECTORS SPECIFICATIONS
4.2.1 POWER SUPPLY PLUG
4.2.2 POWER SUPPLY CONNECTOR
4.2.3 INTERLOCK SOCKET
4.2.4 INTERLOCK CONNECTOR
4.2.5 SIGNAL KEY PANEL SOCKET (EXTERNAL SAFETIES AND STATUS SIGNALS)
4.2.6 SIGNAL KEY CONNECTOR (EXTERNAL SAFETIES AND STATUS SIGNALS)
4.3
DISPLAY
4.4
TROUBLESHOOTING
4.4.1 LIST OF POSSIBLE MALFUNCTIONS
4.4.2 ERROR MESSAGES
APPENDIX A “SAFETY”
SAFETY
LASER RADIATION
ABSORPTION OF LASER RADIATION
CLASSIFICATION AND DANGER LEVEL
RADIATION VIEWING CONDITIONS
DIRECT VIEWING OF THE LASER BEAM
DIRECT VIEWING OF THE BEAM AFTER MIRROR REFLECTION
DIRECT VIEWING OF THE BEAM OUTPUT BY AN OPTICAL FIBER
DIRECT VIEWING OF THE BEAM AFTER FOCUSING
SCATTERED VIEWING OF THE BEAM AFTER FOCUSING
REAL DNRO DETERMINATION AND O.D. OF PROTECTION GOGGLES
EYES AND SKIN RISKS
GENERAL SAFETY REGULATIONS
COLLATERAL RISKS
SEALS
x
ULYXE™ – User’s Manual
32
32
33
38
38
41
43
46
47
47
51
51
52
53
53
56
56
56
57
57
58
59
60
64
64
66
69
69
69
70
71
72
72
72
72
72
72
73
75
75
75
77
SUMMARY
APPENDIX B
78
DIRECTIVE OF THE EUROPEAN PARLIAMENT:
HARMONIZED EUROPEAN STANDARDS:
AMERICAN STANDARDS:
SAFETY REGULATIONS
INTRODUCTION
PROTECTION SYSTEM
DESIGN DEVICES
REGULATIONS ON GUARDS
SPECIAL MEASURES FOR CLASS 4 LASER
NOTE:
CONTROL AND PLATE POSITIONING
USER REQUIREMENTS; ADMINISTRATIVE PROCEDURES AND S.O.P.
INDIVIDUAL PROTECTIONS, INDIVIDUAL PROTECTION DEVICES (I.P.D.)
REMAINING RISKS THAT THE USER MUST IDENTIFY AND ELIMINATE
WARNINGS
APPENDIX C
78
78
79
79
80
80
80
81
81
82
82
82
83
83
83
84
1
TERMINOLOGY
1.1
MACHINE,
1.2
LASER SYSTEM,
1.3
MANUFACTURER,
1.4
COMPLEX COMPONENT,
1.5
INSTALLED SYSTEM,
1.6
ELECTROMAGNETIC COMPATIBILITY,
1.7
SECOND ENVIRONMENT,
1.8
ON SITE,
1.9
LIMITED DISTRIBUTION,
2
REFERENCE DOCUMENTS AND INDUSTRY STANDARDS
2.1
ELECTROMAGNETIC COMPATIBILITY (EMC);
2.2
LOW VOLTAGE DIRECTIVE;
2.3
CENELEC EN 60204-1 STANDARD;
2.4
CENELEC EN 60825-1 STANDARD;
2.5
CEN EN UNI 12626 STANDARD;
3 COFORMANCE WITH EEC DIRECTIVES AND CE MARKING
3.1
CONDITIONS FOR CONFORMITY TO EMC DIRECTIVES OF ULYXE™ LASER;
DECLARATION OF CONFORMITY
3.2
NOTE FOR THE APPLICATION OF OTHER EEC DIRECTIVES
MANUFACTURER DECLARATION
4 ELECTROMAGNETIC COMPATIBILITY APPLICATION GUIDE
5 GUIDE TO APPLYING LOW VOLTAGE SAFETY
6 GUIDE TO APPLYING LASER RADIATION SAFETY
CONCLUSIONS
FIGURES
84
84
84
84
84
84
84
85
85
85
85
85
85
85
85
85
86
86
86
86
86
87
88
89
89
93
ULYXE™ – User’s Manual
xi
NOTE
xii
ULYXE™ – User’s Manual
CHAPTER 1
1 : TECHNICAL SPECIFICATIONS AND ACCESSORIES
NOTE:
BEFORE INSTALLING AND USING THE LASER, READ CAREFULLY THE CHAPTER
CONCERNING LASER SAFETY “APPENDIX A”.
1.1 TECHNICAL SPECIFICATION
CABINET INFORMATION
Weight
7.5 Kg
Height
170.5 mm
Width
154 mm
Depth
426 mm
IP Grade
20
Figure 3: Ulyxe™ Overall dimensions.
ULYXE™ – User’s Manual
13
CHAPTER 1
STORAGE
Storage temperature
Min. -5°C (23°F) / Max. +55°C (131°F)
Shock and vibrations
The components are not designed to
withstand shocks and vibrations
Maximum sustainable acceleration
0,5 G
ENVIRONMENTAL CONDITIONS FOR OPERATION
Environmental temperature
Min. 15°C (59°F) / Max 35°C (95°F)
Humidity
< 90% without condensation
Altitude
< 1000 m
Suspended matter
< 3 mg/m3
Vibrations
None
POWER SUPPLY
Input Voltage / Power
24V DC / 300W
Current Input
13 A
PERFORMANCE
14
Laser source class
Class 4
Active Mean
Nd:YVO4
Laser source
DPSSL (Diode Pumped Solid State Laser)
Emission radiation
Pulsed
Wavelength
1064 nm
Modulation
Frequency 15KHz ÷ 200KHz
Aiming beam
3 mW @ 635 nm
Power
6 W @ 50KHz
Cooling
Air
Noisiness
< 70 dB
ULYXE™ – User’s Manual
CHAPTER 1
1.2 LABELS IDENTIFICATION
LABEL
DESCRIPTION
Name-plate Ulyxe™.
NOTE:
The name-plate attached to the machine must not be removed
or damaged. For a replacement, please contact the
manufacturer.
Laser radiation. It’s situated close to the structures or objects which
may emit laser radiation. This symbol is placed on the top front cover
close to led bar.
Interlock connector. It’s situated on back panel close to interlock
connector. It informs where is located safety device for emergency stop.
Laser information. This label informs about main laser characteristic:
laser type, aiming beam type, laser class. It is on the back panel of the
system.
Laser class. Warning label inside the machine positioned on the
resonator. It informs about dangerous level of laser radiation.
Laser aperture. Located close to laser output beam. It is positioned at
the bottom of the system close to focusing head.
USB plug. It is located close to USB plug on the back panel.
Voltage input OK. It’s located on back panel close to associated green
led to show presence of right power supply voltage input when the
system is turned on.
Reverse voltage input. It’s located on back panel close to associated
red led to show a fault on power supply voltage input like reversed input
pins.
Alarm/System OK. It’s located on back panel close to associated yellow
led to show that system is ready to mark and shutter is open.
I/O
Power ON. It’s located on back panel and shows where is power on
main switch.
RS232
Serial communication. It’s located on back panel close to RS232, 3
ways, circular mini-connector. It is used for firmware upgrade and debug
tool.
CAN
CAN communication. It’s located on back panel close to CAN, 4 ways,
circular mini-connector. It is used for possible enabled CAN devices.
CONTROL BOX
Control and manage signals. It’s located on back panel close to DB15
connector. It is used for connecting control and manage signals to the
machine.
ULYXE™ – User’s Manual
15
CHAPTER 1
1.2.1 EXTERNAL LABELS LOCATION
Figure 4: External labels location.
1.2.2 INTERNAL LABELS LOCATION
Figure 5: Internal labels location.
16
ULYXE™ – User’s Manual
CHAPTER 1
1.3 SEALS
Ulyxe™ device has seals in the below indicated areas:
Figure 6: Seals position.
The seals must not be broken or removed for any reason. The sealed parts may be opened only by
Datalogic Automation S.r.l. or Trained Technicians allowed by Datalogic Automation S.r.l. Breakage of these
seals by a customer shall result in immediate cancellation of the warranty on the entire product.
ULYXE™ – User’s Manual
17
CHAPTER 1
1.4 PACKING CONTENT
MAIN HARDWARE
Figure 7: Ulyxe™.
Figure 8: Focusing Lens 160 mm.
CABLES
Figure 9: Power supply cable.
Figure 10: USB cable.
Figure 11: RS232 cable.
Figure 13: USB key.
Figure 14: Signal Key.
KEYS
Figure 12: Interlock.
18
ULYXE™ – User’s Manual
CHAPTER 1
1.5 ELECTRICAL SAFETY
Ulyxe™ equipment is powered mean 24 V DC low-voltage, the equipment is designed to operate correctly in
connection of a public low-voltage supply systems, for equipment with rated voltage, frequency and max
over current with conditions specified. This electrical equipment is suitable for the physical environment and
operating conditions of its intended use. See “Appendix A” for more information.
1.6 LASER SAFETY
The following information is provided to comply with the rules imposed by International Authorities and refers
to the correct use of Ulyxe™. See “Appendix A” for more information.
NOTE:
The device is a Class 4 laser product.
Visible and invisible laser radiation can be
diffused. Avoid skin exposure to direct or
reflected radiation.
NOTE:
Direct vision of a laser beam may cause
irreversible damage to eyes.
NOTE:
Wear protection glasses while using the
device!
NOTE:
BEFORE INSTALLING AND USING THE LASER, READ CAREFULLY THE CHAPTER
CONCERNING LASER SAFETY “APPENDIX A”.
ULYXE™ – User’s Manual
19
CHAPTER 1
1.6.1 STANDARD REGULATIONS
This product conforms to applicable requirements of both EN 60825-1-2003, ANSI Z136-2007 and CDRH 21
CFR 1040 at the date of manufacture. This laser is classified as Class 4 laser product according to the EN
60825-1-2003, ANSI Z136.1-2007 regulations and as Class 4 according to the CDRH regulations.
*Regulation EN 60825-1-2003 differs from the CFR 1040 only for Laser Notice No. 50.
CLASS 4 LASER
The following safety devices are required for Class 4 laser:
• Remote interlock connector: when the terminals of the connector are open circuited, the accessible
laser radiation does not exceed Class 1.
• Key Control: it prevents that unauthorized staff could make the laser system working. For this
purpose it is used a removable key in OFF position.
• Safety Stop Device: It prevents human access to laser radiations exceeding Class 2.
• Laser radiation emission warning: When the laser is working the user must be advised and the
equipment produce an audible or visible warning.
Some devices capable to censure job security, through individual protective device (I.P.D.) are at user’s
disposal for kind of laser.
1.7 ACCESSORIES
Following accessories are described only for information purpose and they are not intended in basic machine
package. Minimal content packaging includes main hardware, cables and keys. For any further information
consult paragraph 1.4.
1.7.1 BOXED POWER SUPPLY KIT
AC/DC stabilized power supply with front cover, power inlet plug, power on mains witch and cables.
Figure 15: Power supply and cables.
20
ULYXE™ – User’s Manual
CHAPTER 1
LAMBDA HWS300-24
Output voltage
24V DC, 14A (≈ 300W), Ripple Noise 150mV
Input voltage
85-265 Vac (47-63Hz)
Size
61 x 82 x 165 mm
Withstand Voltage
Input to ground 2.5kVac, Input to Output 3kVac, Output to
ground 500Vac
Isolation voltage
>100MΩ, Output to ground 500Vdc
Mark
CE Mark
EMI compliance
EN55011 / EN55022, FCC, VCCI Class B
Immunity compliance
IEC61000-4-2, -3, -4, -5, -6 (Level 3), -8 (Level 4), -11
Safety Agency Approvals
UL60950-1, CSA60950-1, EN60950-1, EN50178, UL508
Figure 16: Power supply overall dimensions.
ULYXE™ – User’s Manual
21
CHAPTER 1
1.7.2 CONTROL BOX BASIC
Ulyxe™ control and command device to manage laser power on, to open shutter and laser enable, to start
and stop marking and to show DSP status.
Figure 17: Control Box Basic.
1
2
3
4
5
6
7
I/O connection
Connection to Ulyxe™ I/O signals
connector
Shutter Enable
Selector switch with led indicator to
open shutter and laser enable
Alarm / System OK
Led indicator for shutter opened
DSP Busy & Start marking
Start marking command pushbutton
with DSP busy status led indicator
DSP End & Stop marking
Stop marking command pushbutton
with end job status led indicator
DSP Ready
DSP ready for marking led indicator
Key
Selector key to enable the system
Figure 18: Control Box Basic.
22
ULYXE™ – User’s Manual
CHAPTER 1
Figure 19: Control Box Basic overall dimensions.
1.7.3 CONTROL BOX EVO
Ulyxe™ control and command device to manage laser power on, to open shutter and laser enable, to start
and stop marking and to show DSP status.
This device contents also remote LCD, with encoder pushbutton control, and allows to view laser parameters
and to set up aiming and focusing laser beams like Ulyxe™ display onboard.
Figure 20: Control Box Evo.
ULYXE™ – User’s Manual
23
CHAPTER 1
1
2
3
4
5
6
7
8
9
LCD Display
Operative parameters and system status view
Encoder
To select voices on LCD display
Shutter Enable
Selector switch with led indicator to open shutter
and laser enable
DSP Busy & Start marking
Start marking command pushbutton with DSP
busy status led indicator
DSP End & Stop marking
Stop marking command pushbutton with end job
status led indicator
I/O connection
Connection to Ulyxe™ I/O signals connector
DSP Ready
DSP ready for marking led indicator
Alarm / System OK
Led indicator for shutter opened
Key
Selector key to enable the system
Figure 21: Control Box Evo.
Figure 22: Control Box Evo overall dimensions.
24
ULYXE™ – User’s Manual
CHAPTER 1
1.7.4 FOCUS LENS
On request are available various focus lens models to permit different marking areas in order to your best
solution (consult chapter 2.7 for more details).
Focus (internal fixing)
Marking Area
63 (Ø 47mm)
35x35 mm
100 (Ø 47mm)
50x50 mm
160 (Ø 47mm)
100x100 mm
254 (Ø 47mm)
140x140 mm
330 (Ø 90mm)
220x220 mm
Figure 23: Focus lens.
1.7.5 SUITCASE
Plastic material (ABS) simple and ergonomic suitcase with expanded polypropylene material inside worked
to content and protect device and optionals.
Figure 24: Suitcase.
EXTERNAL DIMENSIONS:
WxHxD 500x420x225 mm
INTERNAL DIMENSIONS:
WxHxD 459x420x210 mm
ULYXE™ – User’s Manual
25
CHAPTER 1
1.7.6 HEAVY DUTY SUITCASE
In addition to standard suitcase is available Heavy Duty model for more critical shipment or trip.
Specification
Body
Latch
Lid O-ring
Polypropylene
ABS
Polymer
Foam
Purge
Body
Purge Vent
ABS
3 micron
Hydrophobic
Non-woven
PET
1,3lb
Polyurethane
70 Shore
Nitrile
External Dimensions
LxWxD
Internal Dimensions
LxWxD
524x428x206 mm
468x355x193 mm
Weight
w/Foam
5,4 Kg
Figure 25: Heavy Duty suitcase.
Pins
Stainless
Steel
Purge
O-ring
Weight w/o
Foam
4,8 Kg
Buoyancy
Max.
31,7 Kg
•
Range Temperature: -40°C / 99°C
•
IP67
1.7.7 FOCUS BEAM LASER DIODE
In order to have the right focus on Z axis is possible to request a focusing beam laser diode in addition to
aiming beam laser diode.
Figure 26: Focusing and aiming beams laser diodes.
26
ULYXE™ – User’s Manual
CHAPTER 2
2 : INSTALLATION AND SET UP
NOTE:
ULYXE™ is a class 4 laser. For a right operation in safety mode it’s necessary to convert the
system to a class 1.
Ulyxe™ need to be installed in an appropriate environment, dedicated to laser operations. Laser Safety
Officer must to isolate that area from others work areas and shows with appropriated danger warnings to
inform about access denied to unauthorized personnel to laser marking area. See appendix A – “Safety” for
more details.
2.1 PREREQUISITES FOR INSTALLATION
To be able to work it is necessary to have available:
Figure 27: Prerequisites for installation.
Ulyxe Editor software need to be installed on a PC or a laptop that will be used with Ulyxe™ by an USB 2.0
connection. See chapter 2.6 for installation procedure. To be able to install and operate with Ulyxe Editor on
PC following minimal requirements are needed:
Processor
Intel® Pentium® a 300MHz or equivalent (500MHz recommended)
Operative System
Windows® XP Home, Professional or Windows® Vista e Windows® 7
RAM Memory
32 Mb (64 Mb recommended)
Hard Disk
40 Mb free space
Graphic card
Minimal resolution 800 x 600 (1280 x 1024 recommended)
USB
USB 2.0
Furthers
CD-ROM player
ULYXE™ – User’s Manual
27
CHAPTER 2
2.2 ULYXE™ TRANSPORT
To be able to positioning and wiring Ulyxe™ will be necessary its movement. Ulyxe™ can be easy raised
and transported by a single person thanks to its small dimensions and contained weight.
Figure 28: Ulyxe™ transport.
Be careful to don’t damage the system during the movement. Don’t shake.
2.3 FIXING AND POSITIONING
Ulyxe™ marker need to be positioned in safety mode and fixed and fixed on an appropriate plan, parallel to
floor and absolutely with no vibrations. To prevent marker distortions, install a vibrometer on marking base
plate and check vibrations absence during marking process.
Figure 29: Ulyxe™ fixing points.
It’s very important to fix the machine first of begin to marking because a not capable fixing or positioning can
causes serious damages.
Don’t fix the system in different as shown in figure.
28
ULYXE™ – User’s Manual
CHAPTER 2
Ulyxe™ is equipped with 4 threaded holes and 2 fixing pins.
Screws
M6
Fixing pins
Ø5 H7
Figure 30: Measures, distance threaded holes and fixing pins drivers.
2.4 INSTALLATION ENVIRONMENT
Ulyxe™ need to be installed in an appropriate environment to be able a right air flow on the system and for a
correct cables passage as shown in figure.
Figure 31: Installation environment.
ULYXE™ – User’s Manual
29
CHAPTER 2
2.5 CONNECTIONS
2.5.1 PLUG-IN INTERLOCK CONNECTOR
Plug interlock connector to Ulyxe™. Connector absence defines a stop of the system.
Figure 32: Interlock connector plug.
2.5.2 POWER SUPPLY CONNECTION
Connect power supply cable to Ulyxe™. Check connector right orientation and plug in. Once plugged in
check also right coupling between two connectors parts.
Figure 33: Power Supply cable plug in.
NOTE:
Ulyxe™ needs a safety circuit for emergency. Consult chapter 2.8 for more details.
NOTE:
Ulyxe™ needs a 24V DC stabilized supply voltage 13A max current absorption. It is suggested to
use BOXED POWER SUPPLY KIT option. See following chapter for further information.
30
ULYXE™ – User’s Manual
CHAPTER 2
2.5.3 CABLING BOXED POWER SUPPLY KIT (OPTIONAL)
BOXED POWER SUPPLY KIT contents a switching power supply with 85÷265Vac (47÷63Hz) voltage input
and 24V DC, 14A output and a main lead. For any further information on available accessory options follow
dedicated chapter 2.5.5.
Figure 34: Main lead connector insertion.
NOTE:
Connect Ulyxe™ to PC through USB cable only after Ulyxe Editor software installation. DON’T
CONNECT USB cable until it is not required from installer.
2.5.4 PLUG IN SIGNAL KEY CONNECTOR
Connect Signal Key (laser signals control key) to Ulyxe™ device as shown in figure. In the case of Control
Box Basic or Control Box Evo option is not available consult following chapter.
Figure 35: Plug-in signal key connector.
NOTE:
Signal Key equipped need to be connected inside as shown in chapter 2.8, figure 60. In option it is
possible to use Control Box accessory (chapter 1.7 – Accessories).
ULYXE™ – User’s Manual
31
CHAPTER 2
2.5.5 CONTROL BOX BASIC CONNECTION (OPTIONAL)
Figure 36: Control Box Basic connection.
2.5.6 CONTROL BOX EVO CONNECTION (OPTIONAL)
Figure 37: Control Box Evo connection.
32
ULYXE™ – User’s Manual
CHAPTER 2
2.6 ULYXE EDITOR SOFTWARE INSTALLATION
Ulyxe Editor installer executable file is located on USB pen drive supplied with equipment. Proceed following
below instructions:
1) Insert USB pen drive on the PC that will be used with Ulyxe™;
Figure 38: USB pen drive insertion on PC.
NOTE:
ULYXE™ works only and exclusively with USB 2.0 Full Speed device connections. For any further
information consult USB 2.0 ADVICE chapter.
NOTE:
Administrator rights are required for Windows® 7!
NOTE:
Connect ULYXE™ to PC only after installer software request!
2) Launch executable installer and select NEXT to continue;
Figure 39: Start Wizard installation.
ULYXE™ – User’s Manual
33
CHAPTER 2
3) select I AGREE to accept licence agreement and to continue with installation;
Figure 40: License agreement.
4) choose installation destination folder and select NEXT;
Figure 41: Installation destination folder.
5) Select installation type and proceed with INSTALL;
Figure 42: Installation type options.
NOTE:
Consult Ulyxe Editor manual for more details about installation type options.
34
ULYXE™ – User’s Manual
CHAPTER 2
6) Microsoft® Windows® could show to user that it can’t verify the publisher of software driver and its
compatibility; select CONTINUE to proceed with installation;
Figure 43: Not certified driver supplier warning from Microsoft® (Vista/7 and XP).
7) During installation will be requested to plug ULYXE™ USB cable;
Figure 44: USB cable plug in request.
Insert hence USB cable first on Ulyxe™ device and after to PC.
Figure 45: USB cable to Ulyxe™ connection.
Figure 46: USB cable to PC connection.
ULYXE™ – User’s Manual
35
CHAPTER 2
WARNING: if WINDOWS® VISTA or WINDOWS® 7 is used jump to step 11.
8) Once Ulyxe™ is connected to PC, Operative System shows new hardware found message, choose
option “No, not now” and select NEXT;
Figure 47: New hardware found message window.
9) Select option “Install the software automatically (recommended option)” and continue with NEXT;
Figure 48: Automatic installation of the software.
10) Research function and driver installation will begin. At the end of operation select FINISH;
Figure 49: New hardware installation completed.
36
ULYXE™ – User’s Manual
CHAPTER 2
11) to complete installation select FINISH;
Figure 50: Installation completed.
12) at the end of installation, as last operation, copy LASER.INI file from USB pen drive supplied to
installation directory just created X:\xxxxxx\Ulyxe_Editor2.x\Bin.
Concluded this procedure, Ulyxe™ is ready to use.
At the first start of Ulyxe Editor it is possible that firmware upgrade will be required. This procedure happens
only in case of Ulyxe™ contains a different firmware version than from new installation.
Proceed as follow:
1) To begin firmware upgrade procedure select UPGRADE NOW;
Figure 51: Firmware upgrade request.
2) Once firmware upgrade procedure has finished select DONE;
Figure 52: Firmware upgrade procedure completed.
ULYXE™ – User’s Manual
37
CHAPTER 2
3) After firmware upgrade is completed switch off Ulyxe™ (if it is ON), disconnect USB connector from
PC and select OK;
Figure 53: Disconnect USB cable message.
Reconnect USB connector to PC, turn on Ulyxe™ (see “CHAPTER 3.1: Starting procedure”) and launch
Ulyxe Editor.
2.7 MARKING AREA
2.7.1 PRINCIPLE OF OPERATION
DATA TRANSFER
The commands transferred to the scan head by DSP board are commands for scanning straight line
segments (vectors and polygons).
Each path to be marked by the scan head has to be divided in small line segments.
The commands spooler is transmitted by the PC to the DSP where a double circular buffer is available for
the storage of this data.
After a start signal, data are transferred in analogue mode to the scan head in real time to positioning the
mirrors on the galvanometer scanners.
Spooler commands
The DSP driver offers a set of functions to create and fill the marking spooler with commands for scan head,
laser control and stepper motors control. Some of them are explained in detail hereafter.
The argument of a vector command is always the end point of the vector to be scanned. The start point is
identical whit the end of the preceding vector. Closing the spooler whit the appropriate function causes the
laser focus positioning at the centre of the image field.
Move_to spooler command
A move_to command effects a fast movement of the mirrors. The laser is turned off during a move_to.
The jumping speed has to be defined by the dspSetJumpSpeed(…) function.
Scan_to spooler command
A scan_to command leads the laser focus to mark along a vector with constant velocity. At the beginning of
the scan_to command the laser is tuned on if necessary (only if it was off).
The marking speed has to be defined by the dspSetScanSpeed(…). Usually the marking speed is lower than
the jumping speed.
Each vector executed by the scan head after a move_to or scan_to command is divided in micro steps by
the DSP. This division is necessary as the galvanometer scanners are controlled via analogue regulator
circuits.
The shortest possible output interval is about 3µs (3.2µs on DSP1 and 2.8µs on DSP2.1 board) that means a
maximum rate of about 300K coordinates/s (312.5K on DSP1 and 375K on DSP2.1) at the maximum
resolution (step size = 1).
38
ULYXE™ – User’s Manual
CHAPTER 2
SIZE OF THE MARKING FIELD
The dimensions of the usable marking field are determined by the size of the scan angle and the focal length
of the objective. For the indication of the coordinates 16 bit with sign are available for each axis. The origin of
coordinates is in the centre of the field. The theoretical values for the x and y coordinate of points inside the
image field are between –32768 and +32767.
Y
0,32767
-32768,0
0,
32767,0
X
0,-32768
Theoretical range of values
Usable marking field
Figure 54: Size of the marking field
The interval defining the practicable x and y coordinates is shorter than the theoretical range of values. As
there is no field correction outside the usable image field, the maximum values for the coordinates of points
inside should not be exceeded.
ULYXE™ – User’s Manual
39
CHAPTER 2
According to focal lenses used from Ulyxe™ it is possible to have different marking areas as follow:
FOCUS (mm)
MARKING AREA SIDE
WORKING DISTANCE
63
35
72
100
50
114
160
100
178
254
140
282
330
220
376
Figure 55: Working Area.
WD: Working Distance
MA: Marking Area
40
ULYXE™ – User’s Manual
CHAPTER 2
2.7.2 COMPENSATION OF FIELD
The scanning head used for laser engraving employs electrical drives to set the angular position of two
mirrors and deflect the beam along the two directions X and Y. A simplified diagram is shown below (Fig.
56):
Galvo X
Galvo Y
Laser
X
Y
X
Y
Laser
Figure 56: Scan head.
DISTORSIONS
The picture projected on the engraving surface by the two mirrors is deformed due to the different length of
the optical paths for the different angles. Observe the next diagram (Fig. 57), the point on the plane does not
follow a straight line parallel to the x axis as angle ϑx varies but it rather flows a trajectory which is similar to
a parabola distancing the hypothetical line according to the two angles ϑx and ϑy.
Z
ϑx
ϑy
d
f
h
Y
x
y
X
dy
Figure 57: Field projection.
ULYXE™ – User’s Manual
41
CHAPTER 2
The co-ordinates of the projected point can be computed with the following formula:
⎧ x = f ⋅ tan(ϑ x )
⎪
tan(ϑ y )
⎛
⎞
f
⎨
2
⎪ y = (d + h) ⋅ tan(ϑ y ) = d + f ⋅ 1 + tan (ϑ x ) ⋅ tan(ϑ y ) = ⎜⎜ d + cos(ϑ ) ⎟⎟ ⋅ tan(ϑ y ) ≅ f ⋅ cos(ϑ )
x ⎠
x
⎝
⎩
[
]
The error - i.e. the discrepancy between the real y and the ideal value according to variations of
∆y = f ⋅
ϑx
- is:
tan(ϑ y )
⎞
⎛ 1
− f ⋅ tan(ϑ y ) = f ⋅ tan(ϑ y ) ⋅ ⎜⎜
− 1⎟⎟
cos(ϑ x )
⎝ cos(ϑ x ) ⎠
As a result, the angular correction to be applied to
ϑy
for compensating this distortion is:
⎡
⎛ 1
⎞⎤
⎛ ∆y ⎞
∆ϑ y = tan −1 ⎜⎜ ⎟⎟ = tan −1 ⎢ tan(ϑ y ) ⋅ ⎜⎜
− 1⎟⎟⎥
⎝ f ⎠
⎝ cos(ϑx ) ⎠⎦
⎣
BARREL DISTORSION
The applied objectives for the scanner heads, beside giving the focus on the working plane, apply a
deformation called Barrel, which eliminates the dependency from the tangent.
y = h ⋅ϑ y
The use of this kind of objectives should simplify the job of the software, eliminating the distortions of the
tangent.
According to focal lens used it is necessary to respect right working distance. Marking Area is always a
square field.
42
ULYXE™ – User’s Manual
CHAPTER 2
2.8 EXAMPLE OF APPLICATIONS AND EXTERNAL CONNECTIONS
Handy and simple installation of Ulyxe™ allow to make it easy to use also in line production applications.
Figure 58: Example of external connections.
NOTE:
It is important to install an emergency circuit able to cut 24V DC power supply voltage (or indirectly
on 110/220Vac) switching off Ulyxe™ entirely. This safety circuit needs to be installed from
qualified personnel only.
ULYXE™ – User’s Manual
43
CHAPTER 2
According to have a device in safety mode (see APPENDIX A for more details) we recommend to install
Ulyxe™ in order to limit laser output area, like in figure 59. To obtain a good marking quality, and not to
decrease life time, we recommend a ventilation or suction in a protection box to limit dust due to marking
phase.
Figure 59: Safety mode example.
44
ULYXE™ – User’s Manual
CHAPTER 2
POSSIBLE EXTERNAL CONNECTIONS.
Figure 60: Possible external connections.
ULYXE™ – User’s Manual
45
CHAPTER 2
2.9 MATERIAL PROCESSING
Here below indicative parameters for different material processing (metal, plastic) are specified.
Use the indicated values only as reference parameters:
MATERIAL
PARAMETERS
ANNEALING
COLOR MARKING
ABLATION
Power (W)
70 – 80%
70 – 80%
100%
Frequency (KHz)
75
60 – 80
10 – 20
Speed (mm/s)
100 mm/s
50 – 200 mm/s
> 200 mm/s
Filling
Single 0,05
Single/Cross
0,02 – 0,05
--
Metal
MATERIAL
PARAMETERS
COLOR CHANGE*
FOAMING
Power (W)
Ca. 80%
70 – 80%
Frequency (KHz)
30 - 80
> 40
Speed (mm/s)
> 200 mm/s
--
Filling
--
--
Plastic
* Consider the additives that are added to the plastic.
46
ULYXE™ – User’s Manual
CHAPTER 3
3 : UTILIZATION AND OPERATIONS
3.1 STARTING PROCEDURE
First to proceed with turn on the Ulyxe™, insure to a right device connection like descripted previously.
Check presence of voltage power supply connector, interlock connector, Signal Key connector (or Control
Box) and USB cable. Proceed as follow:
1) power on Ulyxe™ with 24V DC voltage (turn on power supply if present):
Figure 61: Boxed power supply with main switch.
2) press back panel main switch of Ulyxe™:
Figure 62: Ulyxe™ main switch.
ULYXE™ – User’s Manual
47
CHAPTER 3
3) turning on Ulyxe™ the fans cooling system will be powered on and it will be showed LCD firmware version
on display temporarily, then led bar will be lighted on in orange colour until system power on time will be not
completed:
STARTING SYSTEM
Please Wait
Figure 63: Starting system.
4) immediately after led bar is lighted off Ulyxe™ remains in waiting for key start mode and power module is
off:
WAITING FOR START
[turn on the key]
Figure 64: Waiting for key start.
5) enable key signal to start Ulyxe™ and wait for a moment to permit system warm up. After this operation
led bar will come green blinking.
WARM UP
PLEASE WAIT
Figure 65: Waiting for warm up.
6) once warm up is completed Ulyxe™ is ready to use waiting external enable command and led bar comes
green:
Figure 66: System waiting enable command.
48
ULYXE™ – User’s Manual
CHAPTER 3
Figure 67: Led bar: stand-by system status.
NOTE:
If aiming and focusing (optional) beam laser diodes setup are in automatic mode they’ll be light on.
Ulyxe™ is ready for operation. See chapter 4.2 for touch screen display functions.
NOTE:
For information about use of Ulyxe Editor software, see the related manual.
7) activate enable shutter command to open mechanical shutter. Led bar comes orange. ALARM signal will
be active.
Figure 68: Led bar orange: system ready for marking.
ULYXE™ – User’s Manual
49
CHAPTER 3
NOTE:
In this situation Ulyxe™ can emit LASER.
NOTE:
If aiming and focusing (optional) beam laser diodes setup are in automatic mode they’ll be light off.
8) if marking operation starts led bar comes red and on display will be showed laser emission status:
Figure 69: Laser emission.
Figure 70: Red led bar: laser emission.
50
ULYXE™ – User’s Manual
CHAPTER 3
3.2 EXTERNAL CONTROL SIGNAL
To start or stop the current spooler execution externally, two opto-isolated inputs are provided.
The start signal is subdue a software confirmation. The DSP board detects a valid external input signal, the
DSPapi software module queries the user program to perform the desired action. This behaviour is useful to
make some dynamic spooler updates just before the execution starts.
In addition, external system can monitor the laser system status with four open-collector outputs:
• Laser Ready - The spooler is full and software is ready to start.
• Laser Busy
- The current spooler is executing (marking in progress).
• Laser End
- The current spooler execution is terminated.
3.2.1 TIMINGS I/O
The following diagram illustrates the possible timings and settings of these signals:
Laser
Ready
Start
External
Stop
External
Laser
Busy
Laser
End
T1
T2
T3
T4
T5
T6
Figure 71: Timing signals.
The time intervals in the diagram can all be programmed by a resolution of 1 ms.
T1
T2
T3
Start Time
Start Delay
Busy Advance
For setting the minimum acceptable time for the start engraving signal
For delaying engraving start
Busy signal corresponding to mark progress
T4
T5
T6
Stop Time
End Delay
End Time
The minimum time for stop signal to stop the marking process
For delaying the Laser End signal with respect to laser emission
For setting the Laser End activation time
ULYXE™ – User’s Manual
51
CHAPTER 3
3.3 MAINTENANCE
The ordinary maintenance program foresees only. Some operations consist in a mere “check” of the
operating condition.
The maintenance activities must be done in respect of law prescriptions regarding the safety rules during the
operations.
The following parts/functions have to be controlled:
MAINTENANCE PROGRAM
COMPONENT OR FUNCTION
TYPE OF OPERATION
Laser Output
Check
Fan and heat exchanger unit
Check
Figure 72: Cleaning laser output.
52
ULYXE™ – User’s Manual
INTERVALS
Weekly: rub gently with a
cloth tampered with acetone
or ethyl ether
Every 6 months (according to
the place and frequency of
use)
CHAPTER 4
4 : TECHNICAL SPECIFICATIONS
4.1 ELECTRICAL UNIT
PWM MAIN BOARD
The PWM main board communicates with the various elements of the electrical system, centralizing and
sorting operational and management:
•
Temperature control; a peltier cells module is mounted on the base of power laser diode to maintain
ait to constant temperature.
•
Current Driver; manages and controls the current which supplies the laser diode.
•
Supply voltages Devices.
•
Fan thermally control.
•
Aiming Beam.
•
Display LCD with CAN bus.
•
Shutter control inside resonator.
DSP
The electronics, that controls laser system and the relative signals, consists of a board with DSP processor
which has to be connected to a standard PC through an USB cable.
It manages all the operations concerning the marking process; the remote commando from DSP board to
scan head are used for scanning of lines, segments (vectors and polygons) and raster images.
Each element to be marked by scan head has to be divided in small lines and segments.
Spooler command is sent from PC to DSP board where a circular double buffer stores the data. After a Start
signal, data are converted from digital to analog signals inside DSP board through an integrated DAC. After
that they are sent in real time to scanner head.
Q-SWITCH RF DRIVER
The radio frequency driver, driver the electro-optical Q-Switch QS, modulating an output to 40.68 MHz
between 15 KHz and 200 KHz, directly based in the command signals received from DSP card by PWM
connections.
COOLING FANS
Five fans grants a constant air flow for the cooling of the power laser diode and current driver electronics.
SCAN MARKING HEAD (ON BOARD)
Two inclinable mirrors are mounted inside the scan marking head. They are moved by galvo-motors and
controlled by DSP.
I/O INTERFACE
Interfaces control, managing and external/internal status signals generating an insulation between them.
ULYXE™ – User’s Manual
53
CHAPTER 4
LASER DIODE AND PELTIER CELL
The laser diode is installed in the couplet unit. It is supplied about 2 Vdc low voltage and current up to 30A. It
works at a monitored and regulated temperature between 22°C (71,6°F) and 35°C (95°F) and supplies
electro-magnetic energy, the so called “optical pumping”, needed to supply the resonator.
AIMING LASER DIODE
The aiming laser diode, supplied with approximately 3,5-4Vdc low voltage, is installed on the resonator unit.
FOCUSING BEAM (OPTIONAL)
Focusing beam pointer is supplied with approximately 3,5-4Vdc low voltage and it is used to show right focus
distance of marking plain. It is located on right side (front view) of scanner head.
DISPLAY (CAN LCD)
Display (make of CMD board with touch screen) provides information on the status of the laser and is the
first diagnostic tool in the event of a fault.
Q-SWITCH DEVICE
Q-Switch is an acoustic-optical component located inside the resonator unit. It is an active component, it is
directly driven by the radio frequency driver with wave values between 15.000 Hz and 200.000 Hz.
54
ULYXE™ – User’s Manual
CHAPTER 4
OPTICAL UNIT
The principle of physics that the generation of laser light is based on, is the phenomenon of light stimulated
emission. Laser is the acronym of Light Amplification by Stimulated Emission of Radiation. This means that
laser is a light amplified by a chain reaction light emission, starting from an initial photon (light particle) which
by interacting with the energized atomic system, stimulates the emission of two photons and they in turn
interact with other atoms giving rise to a landslide effect.
Energizing the atomic system requires an external energy source, in a suitable form able to start the laser
effect. “Optical pumping” is obtained when the light emitted from a luminous sources hits the active material
(material able to emit laser light) so that the atoms energize by absorbing luminous energy. Amplification of
the laser effect is obtained by making the activated material cross the same light it emits various times.
This is done by placing the material between two opposite mirrors, so crystal and mirrors are centered on an
aligned optical axis. The faces of the crystal, the front mirror and the flat face of the rear mirror are parallel. In
this optical configuration the extraction of laser energy from the resonator is at the maximum, the beam is
circular and the intensity is approximately uniform.
The Q–Switch is a supplementary optical/acoustic–optical device placed between the crystal and front
mirror, it oscillates at a fixed frequency or is driven in radio frequency on.
It acts as an “optical switch” preventing the regular and constant flow of photons: when “closed” it is used to
increase the energetic level of crystal atomic energizing; when “reopened” the useful energy available output
by the resonator is higher than the average value. Once produced, laser radiation can be transferred to any
point by optical fiber to a refocalization telescope, using it for a specific application.
In this specific case of laser system, the following information is also of interest.
The optical part is composed of two modules with different functions. The first is the resonator (described
above) where the laser light is generated. The second is the scanner head, a module able to deviate the light
beam to any point in the work field (previously determined by the selected Lens), which is then used to
engrave any two dimensional geometric figure. The special feature of the solid state, Ulyxe™ laser source
lies in the optical pumping method of the resonator. Unlike the traditional method, in this case “optical
pumping” is effected by a laser diode instead of a flashbulb.
This method is used to obtain an extremely efficient modal and it produces very little heat to be dissipated.
These two features make it very easy to significantly reduce the dimensions of the resonator and electrical
unit which in this case includes the “pumping” laser diode coupler and its cooling system.
ULYXE™ – User’s Manual
55
CHAPTER 4
4.2 EXTERNAL CONNECTORS SPECIFICATIONS
4.2.1 POWER SUPPLY PLUG
Panel socket SOURIAU TRIM TRIO 3 ways, cod.UTG0103SVDE.
Figure 73: Female panel socket cod. UTG0103SVDE (front view).
PIN
SYMBOL
1
2
3
TYPE
DESCRIPTION
+24V
Power supply input
Power supply input +24V DC (13A MAX)
0V
Power supply input
reference
Power supply input reference
Ground - Earth
Earth connection
Table: Pin out power supply inlet
4.2.2 POWER SUPPLY CONNECTOR
Male plug connector SOURIAU TRIM TRIO 3 ways, cod.UTG6103PNVDE, 3 meter length.
Figure 74: Male plug connector cod. UTG6103PNVDE (front view) and wiring.
56
ULYXE™ – User’s Manual
CHAPTER 4
4.2.3 INTERLOCK SOCKET
Panel socket BINDER series 719, 4 ways. The interlock signal has the function of securing le laser case of
danger to the operator. Interlock function involves off the machine. To restore the machine is necessary
restart. For more information see the paragraph "4.4.2 - Error Messages".
Figure 75: Female panel socket cod. 09-9766-30-04 (front view).
PIN
SYMBOL
TYPE
DESCRIPTION
1
Vcc
Output power supply
2
INTERLOCK
Digital input
3
GND
Ground
5Vdc output supply
Environmental Interlock
5Vdc = Connected; 0Vdc = Disconnected
Ground
4
N.C.
-
Not Used
Table: Pin out interlock socket.
4.2.4 INTERLOCK CONNECTOR
Plug connector BINDER series 719, 4 ways
Figure 76: Male plug connector cod. 09-9767-00-04 (front view).
NOTE:
For more information of safety connection, see the next paragraph “4.2.5 - Signal Key Panel
Socket”.
ULYXE™ – User’s Manual
57
CHAPTER 4
4.2.5 SIGNAL KEY PANEL SOCKET
SIGNALS)
(EXTERNAL
SAFETIES AND STATUS
Female panel socket SUB-D 15 ways.
INPUT
OUTPUT
ALARM
INTERLOCK
KEY
DSP READY
ENABLE
DSP BUSY
DSP START
DSP STOP
DSP END
Figure 77: Panel socket (front view) and internal interface.
PIN SYMBOL
TYPE
DESCRIPTION
1, 2
5VDC
Output power supply
3
SHUTTER EN
Digital input (5Vdc)
4
START
Digital input (5Vdc)
5
STOP
Digital input (5Vdc)
6
READY
Open-collector digital
output (max 120mA)
7
BUSY
8
END
5Vdc output supply (max 200mA)
Shutter enable signal
(5Vdc = Enabled; 0Vdc = Disabled)
Start marking external command
(5Vdc pulsed signal)
Stop marking external command
(5Vdc pulsed signal)
Laser Ready signal (active when system is ready and
work mode is ON)
Closed = On; Open = Off
Laser Busy signal (active during marking)
Closed = On; Open = Off
End marking signal (active at the end of marking)
Closed = On; Open = Off
9
CANPOWER
10
KEY
Digital input (5Vdc)
System enable signal (KEY)
(5Vdc = System ON; 0Vdc = OFF)
11
CAN_H
Input/Output
CONTROL BOX EVO
DEDICATED
CAN BUS signal dedicated to Control Box EVO
12
ALARM
Open-collector digital
output (max 120mA)
Main alarm signal (active in “ready to mark” status)
Closed = System ready; Open = System not ready
(Shutter enable OFF or Fault)
13
CAN_L
14
CANGND
15
GROUND
58
Open-collector digital
output (max 120mA)
Open-collector digital
output (max 120mA)
Output power supply
CONTROL BOX EVO
DEDICATED
Input/Output
CONTROL BOX EVO
DEDICATED
CAN BUS Ground
CONTROL BOX EVO
DEDICATED
Ground
ULYXE™ – User’s Manual
CAN BUS signal dedicated to Control Box EVO
CAN BUS signal dedicated to Control Box EVO
CAN BUS signal dedicated to Control Box EVO
Ground
CHAPTER 4
4.2.6 SIGNAL KEY CONNECTOR (EXTERNAL SAFETIES AND STATUS SIGNALS)
Male connector SUB-D15 ways.
Figure 78: Signal Key male connector.
ULYXE™ – User’s Manual
59
CHAPTER 4
4.3 DISPLAY
Figure 79: Display Ulyxe™.
Selection areas Touch Screen.
Figure 80: Selection areas Touch Screen.
60
ULYXE™ – User’s Manual
CHAPTER 4
From display main window where it shows “system ready” it is possible to access to a menu list with more
options to select and view as showed in figure.
System OFF
WAITING FOR START
[turn on the key]
WARM UP
System warm up
Please wait
System standby/ready
Pushing touch-screen
menu selection
SERVICE
home
SYSTEM MONITOR
more
STAND BY
LASER MONITOR
more
home
more
STAND BY
Status system
LcdFW: F30902001_005
TecFW: F30901003_001
Language: English
SERVICE
SETUP
home
more
STAND BY
STAND BY
menu selection
home
home
menu selection
menu selection
menu selection
more
STAND BY
STAND BY
menu selection
SYSTEM MONITOR
home
more
STAND BY
Board Temp.[°C]: 28.22
Input Voltg [V]: 24.00
Heatsink T. [°C]: 26.12
System Temp [°C]: 28.34
STAND BY
STAND BY
Serial: LSVLL123456
Hr Diode: 0001:23:47
menu selection
Diode Temp. [°C]: 25.34
SetPoint
[°C]: 25.00
Diode Curr. [A]: 12.00
Max Current [A]: 30.00
LASER MONITOR
home
Serial: LSVLL123456
Hr System : 0001:23:47
TEC Voltage [V]: 10.00
TEC Current [A]: 06.12
more
STAND BY
STAND BY
STAND BY
ON
menu
OFF
ON
AIMING BEAM
more
menu selection
AUTO
Save
mode
STAND BY
STAND BY
SETUP
home
ON
more
OFF
STAND BY
FOCUSING BEAM
more
STAND BY
ON
AUTO
Save
mode
STAND BY
Figure 81: Display Touch screen menu.
ULYXE™ – User’s Manual
61
CHAPTER 4
menu selection
SERVICE
home
more
STAND BY
menu selection
SYSTEM MONITOR
home
more
STAND BY
menu selection
LASER MONITOR
home
more
STAND BY
menu selection
SETUP
home
more
STAND BY
LcdFW: F30902001_006
TecFW: F30901003_002
Language: English
STAND BY
Board Temp.[°C]: 28.22
Input Voltg [V]: 24.00
Heatsink T. [°C]: 26.12
System Temp [°C]: 28.34
STAND BY
Serial: LSVLL123456
Hr System : 0001:23:47
TEC Voltage [V]: 10.00
TEC Current [A]: 06.12
STAND BY
62
Selection menu to display general SERVICE.
• Press the middle area to select it and display the information.
• Press the bottom left arrow to return to the main screen with the
ULYXE™ logo.
• Press the bottom right arrow to access the next selection menu.
Selection menu to display SYSTEM MONITOR.
• Press the middle area to select it and display the data.
• Press the bottom left arrow to return to the main screen with the
ULYXE™ logo.
• Press the bottom right arrow to access the next selection menu.
Selection menu to display LASER MONITOR.
• Press the middle area to select it and display the data.
• Press the bottom left arrow to return to the main screen with the
ULYXE™ logo.
• Press the bottom right arrow to access the next selection menu.
Selection menu to display the SETUP.
• Press the middle area to select it and display the settings.
• Press the bottom left arrow to return to the main screen with the
ULYXE™ logo.
• Press the bottom right arrow to access the next selection menu.
Data contained in the SERVICE menu.
• LcdFW: FW version of the LCD card.
• TecFW: FW version of the power mainboard.
• Language: language automatically selected through the setting on
ULYXE Editor. If the language is not recognized, it is set on English.
• Press the bottom left arrow to return to the main screen with the
ULYXE™ logo.
Information contained in the SYSTEM MONITOR menu (1 of 2).
• Board Temp. [°C]: Temperature of the mainoard for the power
section.
• Input Voltage [V]: Input power voltage measured on the mainboard.
• Heatsink T. [°C]: Central heatsink temperature.
• System Temp. [°C]: Environment temperature measured inside the
system (at the cooling fans inlet).
• Press the bottom left arrow to return to the main screen with the
ULYXE™ logo.
• Press the bottom right arrow to access the following information.
Information contained in the SYSTEM MONITOR menu (2 of 2).
• Serial: System serial number, visible on the outside label too.
• Hr System: Total time elapsed with system in operation
[hhhh:mm:ss]
• TEC voltage [V]: Voltage on the Peltier module
• TEC Current [A: Current on the Peltier module
• Press the bottom left arrow to return to the main screen with the
ULYXE™ logo.
ULYXE™ – User’s Manual
CHAPTER 4
Serial: LSVLL123456
Hr Diode: 0001:23:47
STAND BY
Diode Temp. [°C]: 25.34
SetPoint
[°C]: 25.00
Diode Curr. [A]: 12.00
Max Current [A]: 30.00
STAND BY
menu
AIMING BEAM
STAND BY
ON
Save
mode
STAND BY
FOCUSING BEAM
more
STAND BY
Information contained in the LASER MONITOR menu (1 of 2).
• Serial: Laser Diode serial number.
• Hr Diode: Total time elapsed with laser diode in emission
[hhhh:mm:ss]
• Press the bottom left arrow to return to the main screen with the
ULYXE™ logo.
• Press the bottom right arrow to access the following information.
Information contained in the LASER MONITOR menu (2 of 2).
• Diode Temp. [°C]: Temperature measured on the laser diode
• SetPoint [°C]: Set-point temperature of the laser diode
• Diode Current [A]: Current measured on the laser diode
• Max current [A]: Max. admissible current on the laser diode
• Press the bottom left arrow to return to the main screen with the
ULYXE™ logo.
Selection menu to set the aiming laser diode.
• Press the middle area to select it and display the settings.
• Press the bottom left arrow to return to the main screen with the
ULYXE™ logo.
• Press the bottom right arrow to switch to the focusing diode.
Selection menu to set the red diode.
• Press the bottom left arrow to confirm the setting and return to the
main screen with the ULYXE™ logo.
• Press the bottom right arrow to change the operating mode
(ON/OFF/AUTO).
ON: always on; OFF: always off; AUTO: on when system is in
stand-by status.
Selection menu to set the focusing diode.
• Press the middle area to select it and display the settings.
• Press the bottom left arrow to return to the main screen with the
ULYXE™ logo.
• Press the bottom right arrow to switch to the pointer diode.
ULYXE™ – User’s Manual
63
CHAPTER 4
4.4 TROUBLESHOOTING
Problems may occur while the machine is in operation due to malfunctions or simple oversights. In both
cases, the display will show messages referred to the type of problem detected. In case of Hardware error,
Ulyxe™ shuts off automatically without signaling the error. Power off the device upstream before you perform
any recovery operation.
The operating limits of Ulyxe™ are subdivided into hardware values and software values. If a software limit is
reached, the machine stays on, the power section is turned off and an error message is displayed. If a
hardware limit is reached, the machine goes into a protection status and shuts off automatically. In this case,
the type of error can be identified only if the malfunction is listed in the following table.
SW LIMIT
HW LIMIT
Laser diode MAX temperature
35°C
40°C
Laser diode MIN temperature
10°C
--
Heat sink MAX temperature
60°C
--
Converter MAX temperature
65°C
72°C
MAX environment temperature
40°C
45°C
MIN environment temperature
10°C
0°C
Laser diode MAX current
25A - 31A
38.5V
Laser diode MAX voltage
2.5V
3.5V
Peltier module MAX current
12A
15A
22,5V
--
MIN input voltage
4.4.1 LIST OF POSSIBLE MALFUNCTIONS
STATUS
CAUSE
ACTION
Red LED bar
blinking
An internal error has occurred
and the system is in software
protection mode
Warning status. The display
shows “DISABLE SHUTTER”
because start sequence is
wrong
Check the error message shown on the display
and refer to paragraph 4.4.2 for the recovery
procedures
If the machine was powered on with the signal
enable shutter active disable it. Ulyxe™ will
automatically go into stand-by mode if the key
signal is activated, otherwise into system-off
status
If enable shutter is already disabled: Ulyxe™
does not supply external power onto I/O
connector (control box). Make sure that there is
5Vdc voltage between pin 1 and pin 15 of
connector DB15. If there is, make sure the
command signals are connected and in
compliance. If there is no voltage, call technical
assistance
Wait for the pre-heating phase to finish before
carrying out any other operation
Orange LED bar
blinking
Green LED bar
blinking
ALARM
output
signal in OFF mode
64
The machine is in warm-up
mode
because
the
key
command has been enabled
The machine is not in Ready
mode
ULYXE™ – User’s Manual
Put the machine in Ready mode. Contact
technical assistance if the problem persists
CHAPTER 4
The machine turns
off when powered on
The
machine
goes
into
hardware
protection
mode
because a parameter does not
comply with specifications
Check compliance with the stated specifications
(input voltage, environment temperature, etc.) Cut
off power supply to the Ulyxe™ and wait 30/60
minutes before restarting. Contact technical
assistance if the problem persists
The machine turns
off after turning the
key
The
machine
goes
into
hardware protection mode due
to a protection in the power
system
The machine turns
off during regular
operation
The
machine
goes
into
hardware protection mode due
to a system malfunction
The USB connection
is not working
No connection between PC and
ULYXE™
The LCD does not
work
The machine does
not turn on
No power on the display
Laser beam emitted
with shutter open
with no emission
commands
The laser beam and
the pointer one do
not move correctly
during emission
The internal RF Q-switch may
be damaged or misaligned, or
its RF driver is not working
properly
The laser beam galvo mirrors
are not driven correctly due to
internal damage
Check compliance with the stated specifications
(laser diode temperature and current, etc.) Cut off
power supply to the Ulyxe™ and wait 30/60
minutes before turning it back on. Contact
technical assistance if the problem persists
Make sure the interlock connector is present. Cut
off power supply to the Ulyxe™ and turn it back
on
Check compliance with the stated specifications
(input voltage, environment temperature, etc.) Cut
off power supply to the Ulyxe™ externally and
wait 30/60 minutes before restarting. Contact
technical assistance if the problem persists
Make sure the right Ulyxe™ USB driver as well
as the connection cable are present. Please refer
to section “INFORMATION ABOUT USB 2.0” for
additional info
Make sure the machine is turned on. Contact
technical assistance if the problem persists
Make sure the Reverse Voltage back panel LED
is active and exchange the power supply cable
pins because they are reversed. Contact
technical assistance if the problem persists
Check to see if you can solve the problem
decreasing thermalization value on Ulyxe Editor
laser settings. Contact technical assistance if the
problem persists
Contact technical assistance if the problem
persists
The input power is not right or
the internal board is broken
ULYXE™ – User’s Manual
65
CHAPTER 4
4.4.2 ERROR MESSAGES
ERROR MESSAGE
DIODE
MAX CURRENT
FAULT
CAUSE
ACTIONS
The laser diode max current software
level was exceeded. The value is
displayed in the Max. Current field in
the LASER DATA section.
Turn off, wait 30/60 minutes and
restart. Read the value displayed in
the Diode Current field in the LASER
MONITOR section and check to see
if it exceeds the Max. Current value.
In case the problem occurs, carry out
the data log with the service tool and
contact technical assistance.
Turn off, wait 30/60 minutes and
restart. Make sure that the cooling
fans unit is working properly and that
the fans are not obstructed in any
way. Read the value displayed in the
Diode Temp. field in the LASER
MONITOR section and check to see
if it deviates from the Set-point value.
In case the problem occurs, carry out
the data log with the service tool and
contact technical assistance.
Turn off, wait 30/60 minutes and
restart. Make sure the room
temperature complies with the
specifications. Read the value
displayed in the Diode Temp. field in
the LASER MONITOR section and
checks to see if it deviates from the
Set-point value. In case the problem
re-occurs, carry out the data log with
the service tool and contact technical
assistance.
Turn off, wait 30/60 minutes and
restart. In case the problem reoccurs, carry out the data log with
the service tool and contact technical
assistance.
SHUT DOWN AND RESTART
DIODE
HIGH TEMP
FAULT
The laser diode max temperature
software level was exceeded. The
value is set at 35°C. The system cuts
off the current on the diode and tries
to bring the laser diode to the proper
temperature.
SHUT DOWN AND RESTART
DIODE
LOW TEMP
FAULT
SHUT DOWN AND RESTART
DIODE
OUTPUT
PROTECTION
SHUT DOWN AND RESTART
TEC
CURRENT
FAULT
SHUT DOWN AND RESTART
66
The laser diode temperature has
fallen
below
the
minimum
temperature software level. The
value is set at 10°C. The system
turns off the entire power section
(laser diode, Peltier module, RF
driver, etc.) since the laser diode
temperature controller is out of
control.
The laser diode voltage software
level was exceeded. The value is set
at 2.5V. The system turns off the
entire power section (laser diode,
Peltier module, RF driver, etc.) since
the laser diode may be broken, its
contacts not connected properly or
the internal card malfunctioning.
The Peltier module current software
level was exceeded. The value is set
at 12A. The system turns off the
entire power section (laser diode,
Peltier module, RF driver, etc.) since
the Peltier module may be broken, its
contacts not connected properly or
the internal card malfunctioning.
ULYXE™ – User’s Manual
Turn off, wait 30/60 minutes and
restart. Read the value displayed in
the TEC Current field in the SYSTEM
MONITOR section. In case the
problem re-occurs, carry out the data
log with the service tool and contact
technical assistance.
CHAPTER 4
TEC
OUTPUT VOLTAGE
FAULT
SHUT DOWN AND RESTART
PWM CARD
TEMPERATURE
FAULT
SHUT DOWN AND RESTART
HEAT SINK
HIGH TEMP
FAULT
SHUT DOWN AND RESTART
SYSTEM
HIGH TEMP
FAULT
SHUT DOWN AND RESTART
SYSTEM
LOW TEMP
FAULT
The Peltier module voltage software
level was exceeded. The value is set
at 10V and it is displayed in the TEC
Voltage field in the SYSTEM DATA
section. The system turns off the
entire power section (laser diode,
Peltier module, RF driver, etc.) since
the internal card is malfunctioning.
The temperature software level on
the power section of the internal card
was exceeded. The value is set at
65 . The system turns off the entire
power section (laser diode, Peltier
module, RF driver, etc.) since the
internal heat cannot be dissipated.
The problem may be caused by
critical environmental conditions
(high
outside
temperature,
insufficient air flowing into the fans,
etc.) or the internal dissipation is not
efficient (poor thermal contact
between the internal devices).
The temperature software level on
the central heat sink was exceeded.
The value is set at 60°C. The system
turns off the entire power section
(laser diode, Peltier module, RF
driver, etc.) since the internal heat
cannot be dissipated. The problem
may
be
caused
by
critical
environmental
conditions
(high
outside temperature, insufficient air
flowing into the fans, etc.) or by a
malfunction of the cooling fans.
The
environment
temperature
software level was exceeded. The
value is set at 40° C. The system
turns off the entire power section
(laser diode, Peltier module, RF
driver, etc.) since the internal heat
cannot be dissipated.
The environment temperature has
fallen
below
the
minimum
temperature software level. The
value is set at 10°C. The system
turns off the entire power section
(laser diode, Peltier module, RF
driver, etc.) since there is a risk of
damaging the optical parts.
Fans are maintained ON to try to
back to right temperature the system
device.
Turn off, wait 30/60 minutes and
restart. Read the value displayed in
the TEC Voltage field in the SYSTEM
MONITOR section. In case the
problem re-occurs, carry out the data
log with the service tool and contact
technical assistance.
Turn off, wait 30/60 minutes and
restart. Make sure the environmental
conditions comply with specifications.
Read the value displayed in the Card
Temp. field in the SYSTEM MONITOR section, checking to see if it
quickly reaches 65°C. In case the
problem re-occurs, carry out the data
log with the service tool and contact
technical assistance.
Turn off, wait 30/60 minutes and
restart. Make sure the environmental
conditions comply with specifications.
Read the value displayed in the Heat
sink T. field in the SYSTEM MONITOR section, checking to see if it
quickly reaches 60°C. In case the
problem re-occurs, carry out the data
log with the service tool and contact
technical assistance.
Turn off Ulyxe™ and make sure the
environment temperature complies
with the specifications before you
turn it back on. Read the value
displayed in the System Temp. field
in the SYSTEM MONITOR section,
checking to see if it is near the 40°C
limit. In case the problem re-occurs,
carry out the data log with the service
tool and contact technical assistance.
Turn off and make sure the
environment temperature complies
with the specifications before you
turn it back on. If it is first installation
wait 30/60 minutes until turn on
again. Read the value displayed in
the System Temp. field in the
SYSTEM MONITOR section, checking to see if it is near the 10°C limit.
In case the problem re-occurs, carry
out the data log with the service tool
and contact technical assistance.
ULYXE™ – User’s Manual
67
CHAPTER 4
INTERLOCK
DISCONNECTED
The interlock connector or its closed
contact is not present upon turning
on the system. The entire internal
electronics is disabled.
Turn off and restore the interlock
connector before you restart the
device. In case the problem reoccurs, carry out the data log with
the service tool and contact technical
assistance.
The internal shutter does not work
properly. Its position is wrong. The
system turns off the entire power
section (laser diode, Peltier module,
RF driver, etc.) since the system may
emit an unwanted laser beam. The
problem may be caused by a
malfunction of the shutter or of its
position sensor, or the internal card
may be malfunctioning.
A wrong power on sequence was
carried out. The system was started
with the enable shutter active.
Turn off, wait 30/60 minutes and
restart. In case the problem reoccurs, carry out the data log with
the service tool and contact technical
assistance.
SHUT DOWN AND RESTART
SHUTTER
FAULT
SHUT DOWN AND RESTART
DISABLE
SHUTTER
CAN
CONNECTION
ERROR
LOW
VOLTAGE
INPUT
The CAN communication between
the internal cards is not working
properly.
The problem may be caused by an
internal connection or a damaged
internal device.
Turn off and restart. In case the
problem re-occurs, carry out the data
log with the service tool and contact
technical assistance.
The inlet power voltage has fallen
below the minimum voltage software
level. The value is set at 20Vdc. The
entire internal electronics is disabled.
Turn off and restore the power
voltage to 24Vdc before you restart.
Read the value displayed in the Input
Voltage filed in the SYSTEM MONITOR section, making sure that the
value displayed is around 24Vdc. In
case the problem re-occurs, carry out
the data log with the service tool and
contact technical assistance.
SHUT DOWN AND RESTART
68
Disable the enable shutter signal and
the system will return to its proper
operating status.
In case the shutter is not disabled,
contact technical assistance.
ULYXE™ – User’s Manual
APPENDIX A
APPENDIX A “SAFETY”
SAFETY
This chapter covers topics related to personnel safety.
The tests performed demonstrate the safety and reliability of the laser when used correctly. It is necessary
that the operator be informed of precautionary regulations aimed at avoiding injury or damage to the
equipment.
LASER RADIATION
Laser radiation is an electromagnetic emission with a micrometric wave length which ranges from the long
infrared (CO2 Laser), close infrared (Laser Nd:Yag, Nd:YVO4), visible (Laser He:Ne or Argon) and ultraviolet
(excimer laser).
It should be considered non-Ionizing Radiation. In Ulyxe™ Lasers, the emission of a crystal bar is stimulated
by “optical pumping” generated by a Diode Laser. The continuous reflection of Photons, between a front
mirror and rear mirror, creates a positive reaction so that their number continues to increase, until reaching
the concentration necessary to produce a beam which projects from the semi-reflecting front mirror. The
radiation (which we can imagine as a “Beam of invisible light”) is then Collimated and Focalized with Lenses
at a point where the intensity becomes high enough to be able to react with various materials producing an
alteration in them due to thermal effect.
The radiation of Ulyxe™ Lasers is invisible, but since it is near the threshold of visibility, the Eye receives it
almost in its entirety without using the natural defense provided by pupil reflex! Added to this is the fact that it
is generally very intense, with the result that it can be very harmful to the eye and present vision problems.
NOTE:
Directly viewing a Laser beam can cause irreversible damage to vision.
To prevent permanent damage to vision, a few precautions must be taken.
All individuals who may be exposed to dangerous levels of laser radiation, must know that the laser is active
and wear protective goggles if necessary.
Due to its high power, the laser integrated in the Datalogic Automation system provokes reflected laser light
from flat surfaces. Reflected light is potentially dangerous for the eyes and skin. Electromagnetic emission
with a micrometric wave length is placed in long infrared, and is therefore invisible, thus it is not clear where
reflected beams are aimed.
NOTE:
It is indispensable to protect yourself from reflected light beams, because they can be
sufficiently intense to create permanent injury to the eyes or skin.
In addition to possible injury to the eyes or skin, direct laser emission can cause flammable materials to burn
like organic solvents (alcohol, acetone) or gasoline and cause fabric and clothing to burn.
NOTE:
This laser is classified as class 4. Class 4 includes lasers which can produce risks, not only from
direct or reflected radiation, but also from scattered radiation! The laser sources may be a
significant risk for the skin and risk of burning flammable materials.
ULYXE™ – User’s Manual
69
APPENDIX A
ABSORPTION OF LASER RADIATION
Human skin absorbs electromagnetic radiation in different ways depending on the wave length of the
radiation. Both the eye and skin have a “predisposition” for accepting certain wave lengths, and are more
unresponsive to absorbing others. In the specific case of the Eye, the Cornea and Crystalline lens let all the
wave lengths from 400 to 1400 nm pass and reach the Retina, even with various attenuations. They include
the range from visible light to IRA infrared. Thus Nd:YVO4 laser radiation (1064 nm wavelength) is included
in this range and leads to direct Retina exposure!
In terms of the Skin, the “biological window” has different absorption percentages but is not dissimilar in
terms of wave length. The maximum exposure values for Skin are much different compared to those
tolerated by the Eye.
Figure 82: Eyeball section.
In terms of the damage mechanism that absorbed radiation can cause, it also depends on the wave length.
Short lengths (ultraviolet: UV-C 180-280nm; UV-B 280-315 nm, UV-A 315-400 nm) generally cause photochemical effects:
•
cataract, or opacification of the crystalline lens.
•
melanic coloring, or reddening of the skin.
Greater wavelengths (infrared: IR-A 780-1400 nm; IR-B 1400 3000 nm; IR-C 3000-10E6 nm) generally cause
thermal effects:
•
detachment or photocoagulation of the retina
•
burning of the skin
The degree of injury obviously depends on the amount of absorbed radiation and the instantaneous
power of the radiation source.
70
ULYXE™ – User’s Manual
APPENDIX A
CLASSIFICATION AND DANGER LEVEL
Regulations have established different classes of Laser danger based on the ability to injure people, from
Laser class 1 (basically safe in all conditions) to Laser class 4 dangerous in various conditions.
Lasers which can produce risks, not only for direct or reflected radiation, but also for scattered radiation
belong to class 4. These Laser sources can also have a significant risk for the Skin and fire risk for
flammable material. For these reasons, the User must put into effect all measures aimed at containing the
radiation to make sure that it is terminated at the end of its useful path. The operator must also be informed
of the risks from exposure to Laser radiation and must wear specific I.P.D. (individual protection devices)
including goggles that protect against radiation and are certified as suitable for this use.
NOTE:
The Ulyxe™ marker laser device contains a class 4 invisible source.
ULYXE™ – User’s Manual
71
APPENDIX A
RADIATION VIEWING CONDITIONS
The Laser output by the resonator is to be considered as a highly collimated and intense monochromatic
light source. Due to these characteristics it can be seen as a “punctiform source” of high luminosity. This
means that its image is then focalized on the Retina in a very small spot with a dangerously high power
density! If the beam becomes divergent and scatters to a non-reflecting screen, then there is an “extended
vision” of the image, with a decisively less dangerous power density. So there are different types of radiation
viewing based on the access to the radiation and consequently different degrees of dangerousness.
DIRECT VIEWING OF THE LASER BEAM
This type of viewing is the most dangerous and can occur at the outlet of the laser aperture after having
removed the lens. It is to be avoided at all costs! No protective goggles represent a valid means against
direct viewing of the beam.
DIRECT VIEWING OF THE BEAM AFTER MIRROR REFLECTION
This may occur by directing the beam on a reflecting surface.
Viewing of a mirror reflected beam from a flat surface is very dangerous and equal to direct viewing.
DIRECT VIEWING OF THE BEAM OUTPUT BY AN OPTICAL FIBER
This happens if an Optical Fiber disconnects from the resonator. Viewing of the beam is dangerous up to a
significant distance. Filters and Goggles do not ensure safety.
DIRECT VIEWING OF THE BEAM AFTER FOCUSING
This occurs if the Laser beam is not extinguished with an opportune absorber at the end of its useful path.
Looking at the beam is dangerous up to a considerable distance. Filters and goggles can ensure safety for
brief exposure, as long as they are the right size and certified.
SCATTERED VIEWING OF THE BEAM AFTER FOCUSING
This is the most frequent viewing, but opportune Filters and Goggles can ensure safety, even for prolonged
exposure.
The Optical Risk Nominal Distance O.R.N.D. for Ulyxe™ laser is over 28,5 m, for direct or mirror
reflected radiation and over 0,5 m for scattered radiation !
Only goggles with an Optical Density (O.D.) over 5 can momentarily protect the eyes against
accidental viewing of damaging laser radiation!
NOTE:
Always use goggles with conformity certificate.
Remember that no goggles can provide prolonged protection from direct radiation!
72
ULYXE™ – User’s Manual
APPENDIX A
REAL DNRO DETERMINATION AND O.D. OF PROTECTION GOGGLES
In order to determinate the characteristics of the protection goggles, it is essential to determine the
characteristics of the radiation, knowing it optical path, the dimensions of the beam and its divergence.
In particular, it is very important to know the diameter of the focal spot (which can be identified with beam
waist 2Wo) and the real divergence of the beam in output from the focalization lens.
With all these optical data it is possible to do the calculations of the nominal distance of optical risk and of
the optical density requested to the protection filters of the laser radiation.
Calculations have been done following the CEI EN 60825-1 (2003) Normative regarding nominal
distance and optical risk in the worst condition and in case of accident exposition of 10s per direct
radiation and 100s for diffused radiation.
ULYXE™
Laser type
Application type
Emission type
Observation type
Subtended angle of the source
Nd:YVO4: 1064 nm
Marking
Pulsed (Q-Switched)
Direct Radiation
Alpha < alphamin
Pulse energy
350 µJ
Pulse duration
20 ns
Repetition frequency
10 KHz
Beam diameter on the lens
2,5 mm
Beam divergence on the lens
1,5 mrad
Focal of the lens
160 mm
Real divergence after the lens
14 mrad
Exposition time
Diameter of the focal spot
10 s
165 µm
ULYXE™ – User’s Manual
73
APPENDIX A
ACCIDENTAL CONDITION OF VISION OF THE DIRECT REFLECTED RADIATION
Distance > 0,5 m and for a maximum exposition period of 10s and supposing that there is a total reflection
without attenuation.
DNRO = 28,5 m
OPTICAL DENSITY OF THE PROTECTION GOGGLES
Case a) Assuming to remove the fix protections and penetrate in the working area to ad just the process
maintaining an observation distance Z of at least 0,5 m from the focal point and presupposing an accidental
exposition of maximum 10s.
The protection goggles must have such an optical density to bear down the radiation under the maximum
permitted value, precedently calculated, according to the here below reported calculation:
D.O.= 4,04 @ 1064 nm D.I.R.
Case b) Supposing to remove focusing head to do measurements on beam alignment, maintaining a Z
observing distance at least to 0,66m from laser aperture, and supposing to use a reduction power of 50%
and a total accidental reflection for a 10s maximum.
The protection goggles must have such an optical density to bear down the radiation under the maximum
permitted value, precedently calculated, according to the here below reported calculation:
D.O.= 5,3 @ 1064 nm D.I.R.
SCALE INDEX OF THE PROTECTION GOGGLES FILTER
The scale index L of the filters indicates the stability to the radiation, that means the ability of the filter to
maintain its characteristics unchanged. This stability is certified by the producer according to the EN 207 with
tests conducted for 10s or 100 pulses.
It is then necessary to verify that the scale index of the adopted filter is stable for this period and foreseen an
adequate over dimensioned in order to make sure that it could last longer than the accidental exposition
period.
Case a) Htl = 62,6 J/m2
Case b) Htl = 6760 J/m2
To which it respectively corresponds a scale index (tab2 UNI EN 207) L5 and L7.
To satisfy completely all prescriptions need to use a filter with optical density OD>6 and scale index L=7.
74
ULYXE™ – User’s Manual
APPENDIX A
EYES AND SKIN RISKS
If exposed to intense Laser radiation, even of a short duration, or a less intense but longer lasting duration,
both the Cornea and the Retina can burn and be damaged irreparably forever. This consequence is
completely realistic in the event of direct viewing of a class 4 Laser beam.
If subject to direct focalized radiation, even the skin can burn. In addition, it is necessary to bear in mind that
a collateral ultraviolet radiation may exist with the main radiation: long exposure may cause skin cancer.
GENERAL SAFETY REGULATIONS
The User must comply with the regulations and work in the best possible safety conditions to prevent
decreasing the degree of machine safety. Therefore it is necessary to develop a Standard Operating
Procedure (S.O.P.) related to maneuvers to effect for turning on and off the equipment. This procedure,
which shall be prepared around the time of installation, shall serve as a reference for the Operator and shall
be written in his/her language.
Training is essential and must include:
•
Familiarization with system operating procedures.
•
Knowledge of the biological effects of radiation on the Eyes and Skin.
•
Understanding of the necessity for Individual Protection Devices (I.P.D.)
COLLATERAL RISKS
If the intended use of the source is changed, for example for material processing applications, collateral risks
may arise represented by the production of fumes and vapors which may be irritating or toxic, if not removed
and adequately filtered before being released into the air again.
NOTE:
It is advisable not to change the intended use without previously contacting the Manufacturer.
An additional risk may be represented by fire caused by processing materials other than those the
equipment is designed for.
NOTE:
When processing flammable material, since there is a fire danger, it is indispensable to follow the
instructions provided by the manufacturer when the machine is commissioned.
NOTE:
Do not subject materials other than those the equipment was designed for to radiation.
ULYXE™ – User’s Manual
75
APPENDIX A
The most serious collateral risk associated with laser equipment, which may be fatal, is electricity.
This may occur when the manufacturer’s warning and procedures are not followed. Unauthorized and
untrained personnel must never do any work on the electrical part. The safety devices must never be
removed and their operation must be periodically checked.
NOTE:
Do not work on the electrical part if you are not trained to do so. Do not remove protection
devices.
NOTE:
When processing flammable material, since there is a fire danger, it is indispensable to follow the
instructions provided by the manufacturer when the machine is commissioned.
For example, during the intended use of the Laser source, if a material being processed undergoes
alterations and produces irritating and/or toxic fumes, it may be necessary to remove the fumes from
processing before releasing them into the air.
An additional risk may be represented by fire caused by processing materials other than those the
equipment was designed for.
NOTE:
Do not subject materials other than those the equipment was designed for to radiation.
NOTE:
When processing flammable material, such as plastic, since there is a fire danger, it is
indispensable to follow the instructions provided by the manufacturer when the machine is
commissioned and follow the instructions in the SAFETY Chapter, in the Collateral Risks section.
76
ULYXE™ – User’s Manual
APPENDIX A
SEALS
The engraving system has seals in some areas. The seals must not be broken or removed for any reason.
The sealed parts may be opened only and exclusively by Datalogic Automation S.r.l. Breakage of these
seals by a customer shall result in immediate cancellation of the warranty on the entire engraving system.
NOTE:
If a customer breaks or removes the seals placed by the manufacturer on the laser system the
warranty on the entire laser system will immediately become null and void.
WARNING!
The manufacturer shall not be held liable for any non conforming use of equipment of its
manufacture.
It is forbidden to operate the equipment before the machine it is intended for has been declared in
conformance with statutory Directives.
NOTE:
Access to the internal parts of the electrical equipment is only permitted for authorized personnel,
who have been trained and instructed on the electrical risks.
Datalogic Automation S.r.l. shall not be held liable for work on electrically charged parts by
inadequately trained personnel!
NOTE:
Access to the internal parts of the resonator is only permitted for authorized personnel, who have
been trained and instructed on the optical risks!
Datalogic Automation S.r.l. shall not be held liable for work on parts by inadequately trained
personnel!
ULYXE™ – User’s Manual
77
APPENDIX B
APPENDIX B “GENERAL SAFETY REGULATION FOR LASER
SYSTEMS DURING OPERATION”
DIRECTIVE OF THE EUROPEAN PARLIAMENT:
EUROPEAN
ORGANIZATION
REFERENCE NUMBER OF THE
DIRECTIVE
The Council of the
European Union
2006/42/EC of 17 May 2006
The Council of the
European Union
2004/108/EC of 15 December 2004
(Repealing directive 89/336)
The Council of the
European Communities
2006/95/EEC of 12 December 2006
(Repealing directive 73/23)
The Council of the
European Communities
2003/108/EC of 8 December 2003
The Council of the
European Union
2006/25/EC of 5 April 2006
REFERENCE DOCUMENT
On machinery and amending directive
95/16/EC
Approximation of the laws of the
Member
States
relating
to
electromagnetic compatibility
Harmonization of the laws of the
Member States relating to electrical
equipments designed for use within
certain voltage limits
Amending directive 2002/96 on waste
electrical and electronic equipment
Minimun
health
and
safety
requirements regarding the exposure of
workers to risks from artificial optical
radiations
HARMONIZED EUROPEAN STANDARDS:
EUROPEAN
STANDARD
ORGANIZATION
Cenelec
Cenelec
Cenelec
Cenelec
CEN / Cenelec
CEN
78
REFERENCE AND TITLE OF THE
STANDARD
EN 61000-6-4:2007
Electromagnetic compatibility(EMC)part 6-4 generic standards - Emission
standard for industrial evironments
EN 61000-6-2:2005
Electromagnetic compatibility(EMC)part 6-2 Generic standards - Immunity
for industrial evironments
EN 60204-1:2001
Safety of machinery: Electrical
equipment of machines - Part 1:
General requirements
EN 60825-1:2003
Safety of Laser products: Part
1:Equipment
classification,
requirements and user’s guide
UNI EN 12626
Safety
of
machinery:
LASER
PROCESSING MACHINES: Safety
requirements
EN ISO 11252
Lasers and laser-related equipmentLaser device - Minimum requirements
for documentation
ULYXE™ – User’s Manual
REFERENCE
DOCUMENT
LIMIT AND
METHODS
CLASS
IEC 61000-6-4
CISPR 11
Group 2 /
ClassA
Tab D.2
2M / 4
IEC 61000-6-2
IEC 204-1
IEC 60825-1 /
A2:2001
ISO 11553
ISO 11252:2004
APPENDIX B
AMERICAN STANDARDS:
AMERICAN
STANDARD
ORGANIZATION
ANSI
ANSI
REFERENCE AND TITLE OF THE
STANDARD
ANSI Z136.1:2007
American National Standard for the safe
use of Lasers
ANSI Z136.4:2005
American
National
Standard
Recommended Practice for Laser safety
Measurements for Hazard Evaluation
REFERENCE
DOCUMENT
LIMIT AND
METHODS
CLASS
Tab.10
2M / 4
4
SAFETY REGULATIONS
EUROPEAN MARKET
Datalogic lasers are partly completed machinery product intended for incorporation as components in laser
processing systems. As supplied by Datalogic, these lasers do not meet all the requirements of EN 60825-1,
without additional safeguards. European Union Directives state that “OEM” laser products which are sold to
other manufacturers for use as components of any system for subsequent sale are are not subject to this
Standard, since the final product will itself be subject to the Standard. This means that Buyers of partly
completed machinery laser components are solely responsible for the assurance that the laser processing
system sold to an end-user complies with all laser safety requirements before the actual sale of the system.
Note that when a partly completed machinery laser component is incorporated into another device or
system, the entire machinery installation may be required to conform to EN 60204-1 and EN292 “safety of
machinery”; The machinery Directive 2006/42/EEC; and /or any other applicable Standards. In cases where
the Buyer is also the end-user of the laser product, the Buyer/end-user must integrate the laser product so
that it complies with all applicable laser safety standards as set forth above.
UNITED STATES MARKET
Datalogic lasers are partly completed machinery product intended for incorporation as components in laser
processing systems. As supplied by Datalogic, these lasers do not meet all the requirements of 21 CFR,
Subchapter J without additional safeguards. In the U.S. it is sold solely to qualified manufacturers who in
their end product, will supply interlocks, indicators, and other required safety features, in full compliance with
21 CFR 1040, and / or other applicable national and local regulations. Under CDRH regulations, the Buyer
must submit a report to the CDRH prior to shipping the system. In cases where the Buyer is also the enduser of the laser product, the Buyer/end-user must integrate the laser so that it complies with all applicable
laser safety standards as set forth above.
Only authorized, qualified, fully-trained personnel and, in certain cases, only technicians fully aware of the
risk connected to the maintenance of electric, mechanical and optical components, are allowed to access the
internal parts of the electric sections and components of UlyxeTM device.
ULYXE™ – User’s Manual
79
APPENDIX B
INTRODUCTION
When faced with the problem of checking the safety of a System, the first step to take is to identify the
dangers connected with operating the System. If a LASER device is installed on the system, in addition to
the Dangers for the type and mode of operation, it is necessary to bear in mind the further Danger
represented by LASER Radiation (electromagnetic radiation, primarily infrared).
The safety of this type of Device is the subject of specific standards, in terms of electricity and radiation (nonionized).
Consequently the technical recommendations offered by these specific Standards must be carefully
observed. They are aimed at reducing the access Risk to Danger at levels presumably in conformance with
the Law.
Observance of these Standards is the responsibility of the Manufacturer of the LASER Source and the
Integrator of the Source in the System and the System User.
Thus, there is not only one way for increasing the safety as various protection systems can be identified.
PROTECTION SYSTEM
A general rule to be observed is that “…where there is danger there should not be a Person and where there
is a Person there should not be danger…”.
This makes it immediately clear that the main path to take involves placing a Guard between the Person and
the danger, this reduces the risk of access to the danger to a minimum. Another path to take is to setup a
series of protective measures which inform individuals of the existence of danger, preventing them from
involuntarily coming into contact with danger. Lastly, there is the necessity of individual protection devices for
any risk which may vary according to the operating conditions.
Three types of protective measures have been identified for LASER equipment:
A - Design Devices
B - Procedural and Administrative
C - Individual Protection
DESIGN DEVICES
These are the most opportune for an industrial environment. They involve a series of steps which during the
design, construction and integration phase of the System, take into account the existing dangers and devices
to minimize risk. When applicable this is effected by equipping the system with specific casing which
encloses both the LASER and the work area. preventing dangerous radiation from reaching the outside of
the casing. This reduces the acceptable emission level (AEL) to a level so that a LASER classified as
dangerous (Class 4) does not emit radiation toward the exterior that is higher than that corresponding to
Class 1, and not considered dangerous.
80
ULYXE™ – User’s Manual
APPENDIX B
REGULATIONS ON GUARDS
Guards, barriers or casing must be able to intercept infrared radiation emitted by a LASER and be able to
withstand perforation.
This requirement is easy to meet (for a LASER with low power) using sheet metal panels which completely
shield the radiation and indefinitely withstand perforation due to radiation not aimed at them. For a high
power LASER it is necessary to establish a perforation time between one inspection and the next or use
active casing, able to withstand perforation (using hollow spaces and adequate sensors).
For Nd:Yag, Nd:YVO4 lasers a metal protection with a thickness over 1.5 mm provides sufficient protection to
indefinitely withstand laser radiation of the incorporated Laser source which is not directly aimed.
The access panels and the safety locks must be designed so there is no access to dangerous radiation.
Depending on the type of process or process intervention, it may be necessary to remove the casing or
panels. In this situation, and if the panels are not attached to the structure by screws which require specific
tools, these removable panels must be equipped with removable safety locks which once engaged reduce
the radiation to permitted levels.
This is normally created using an electric interlock with the LASER energizing power system. The interlock
device, acting as a safety function for individuals, must be in conformance for this type of use and
acceptance tested.
The inspection devices must contain specific attenuation devices able to prevent human access to radiation
over AEL class 1.
There is often a problem of having an Inspection window for observing the interaction between the LASER
ray and the material being processed. The windows must be equipped with Optical Density (O.D.) Filters
able to decrease the radiation to levels which are not dangerous. The O.D. calculation must take the type of
LASER into account, its operation, distance of the focus surface, observation direction, exposure time etc.
The filter, acting as a safety device for individuals must also be acceptance tested and certified.
SPECIAL MEASURES FOR CLASS 4 LASER
Class 4 LASER requires remote control, key control. emission warning and an attenuation device.
For these LASERS the Manufacturer must supply the User with a device used to easily add an external
safety device to the LASER. This is created with a remote locking connector, or a contact which if open
blocks or reduces laser emission.
The start device must prevent unauthorized personnel from operating the LASER. A key control, which can
be removed in the OFF position, is used for this purpose.
When LASER radiation is active it is necessary to warn personnel of its presence. In this case an emission
warning is given (generally a flashing red light).
A device must always be present to temporarily stop the LASER beam. For this, the source Manufacturer
creates a beam attenuating or shutter device.
Other construction requirements are described in table D2 of EN 60825-1:2003 “Safety of Laser products.
Part1: Equipment classification, requirements and user’s guide”.
ULYXE™ – User’s Manual
81
APPENDIX B
NOTE:
Center for Devices and Radiological Health (CDRH) / European Union Requirements of Class 4 Laser safety
features.
FEATURE
LOCATION/DESCRIPTION
CDRH
EN60825-1
Keyswitch
Panel control
On/Off Keyswitch controls power to laser electronics.Key can
non be removed from switch in “On” position
YES
YES
Shutter
Function
Laser control
Functions as a beam attenuator to disable current driver /laser
output when closed
YES
YES
Shutter
Indicator
Panel Indicator (blue)
Illuminates blue to indicate shutter is open
Not yet
NO
Ready
Indicator
Panel Indicator (yellow)
Indicates that the laser has power applied and is capable of
lasing
YES
YES
Laser on
indicator
Panel Indicator (red)
Indicates that the laser is actively lasing
YES
YES
Five seconds
delay
Laser circuit element
Disables current driver/laser output for 5 s after Keyswitch is
turned to “On” or remote reset/restart is applied when
Keyswitch is in “On” position
YES
NO
Power fail
lockout
Laser circuit element
Disables current driver/laser output if input power is removed
then later reapplied (AC or DC power supply failure or remote
interlock actuation) while keyswitch is in “on” position
YES
NO
Remote
Interlock
Panel connection
Disables current driver/laser output when a remote interlock
switch on an equipment door or panel is opened
YES
YES
Warning labels
Exterior
Labels attached to various external housing locations to warn
personnel of potential laser hazard
YES*
YES
* This laser equipment complies with FDA Performance Standards for Laser Products except for deviations
pursuant to Laser Notice N°50, dated July 26, 2001.
CONTROL AND PLATE POSITIONING
According to requirements the controls must be positioned outside of any possibility of radiation access and
opportune and standardized warning labels must be positioned so they are clearly visible.
USER REQUIREMENTS; ADMINISTRATIVE PROCEDURES AND STANDARD
OPERATING PROCEDURE (S.O.P.)
Use requirements which must be observed for correct use of Laser equipment are important in order to
prevent making the Manufacturer’s efforts in terms of safety fruitless. They also force the User to correctly
use the protections provided by the Manufacturer with the addition the User is responsible for, and with the
obligation of developing an in-house procedure aimed at providing individuals with a standard behavior for
the best safety conditions.
82
ULYXE™ – User’s Manual
APPENDIX B
They are also aimed at preventing unauthorized individuals from accessing areas where LASER processing
is effected. A Standard Operating Procedure must be established related to operation for starting and
shutting down the Equipment. This procedure must be displayed near the installation as a reference for the
Operator and must be written in the Operator’s language. Training of personnel is essential and must
include:
a - Familiarization with system operating procedures;
b - Appropriate use of danger control procedures, warning signals etc…;
c - Necessity of individual protection;
d - Biological effects of LASER on eyes and skin;
INDIVIDUAL PROTECTIONS, INDIVIDUAL PROTECTION DEVICES (I.P.D.)
These devices must be viewed as an additional safety measure along with the protection systems indicated
in A and B and not as the main or even only safety measure. They include goggles which must be secure
and conformance certified, they are the final barrier between the eye and radiation! The O.D. calculation of
the goggles must be conducted pursuant to regulatory recommendations based on worst case viewing
conditions.
Remember that no goggles can effectively protect the eyes from direct viewing of the LASER beam!
REMAINING RISKS THAT THE USER MUST IDENTIFY AND ELIMINATE
These are risks related to using the LASER and not from the LASER itself. There is collateral radiation,
associated to the main radiation. It is visible infrared and ultraviolet which can represent a potential danger
due to its intensity.
Due to its high power density (Irradiation) the LASER beam is able to cause the combustion of flammable
substances such as volatile substances (Solvents, gases, ethers, alcohols etc.) as well as metacrylic or
plastic resins.
The interaction of the LASER beam with organic and inorganic material causes the production of fumes and
vapors, which may be harmful and/or toxic in some cases!
A highly flammable solvent which is irritating for the eyes, or if inhaled, is used for cleaning the Lenses.
WARNINGS
The following warnings minimize the remaining risks:
•
Do not aim the LASER at material considered to be flammable.
•
Use appropriate suction devices to eliminate fumes.
•
Filter fumes before releasing them into the air.
•
Do not work with the electrical system on and the guards removed.
•
Do not adjust the Laser while it is operating.
•
Only use professionally trained and authorized personnel.
If all the requirements described to this point are meet, it is possible to reasonably state that operating on a
system containing a LASER source does not involve greater risks than any other activity.
NOTE:
If in doubt contact the source and system manufacturers!
ULYXE™ – User’s Manual
83
APPENDIX C
APPENDIX C “CONFORMANCE TOO EEC DIRECTIVES AND CE
MARKING; ADDITIONAL INSTRUCTIONS FOR THE USER”
1 TERMINOLOGY
International regulations have standardized the terminology related to Lasers, Laser components,
accessories, performance etc. The particularly significant ones and applicable industry regulations have
been provided below.
Definitions according to European standard EN 12626 (ISO 11553) Safety of machinery -Laser processing
machines.
1.1 MACHINE,
a group of connected parts or components, of which at least on is moving, with appropriate actuators,
controls and power circuits combined for a specific application, in particular for processing, treating, moving
or packing material.
1.2 LASER SYSTEM,
machine in which a Laser source is inserted which possesses sufficient energy to interact with the piece
being processed, and such machine has all the operation and safety aspects of a machine ready for use.
1.3 MANUFACTURER,
individual or organization which assembles the laser system.
1.4 COMPLEX COMPONENT,
element used to create a machine, but which cannot in itself be considered a machine as it does not possess
the intrinsic function for final use.
1.5 INSTALLED SYSTEM,
system composed of multiple machines and/or system combined to meet a specific objective but not
destined to be put on the market as a single saleable unit.
1.6 ELECTROMAGNETIC COMPATIBILITY,
(Electro Magnetic Compatibility): suitableness of a machine or system to satisfactorily operate in its own
electro magnetic environment, without introducing electro magnetic disturbance that is unacceptable for
everything found in this environment, including emission requirements (disturbance produced by the
machine) and immunity (insensitivity of the machine) to the disturbances produced by the environment.
84
ULYXE™ – User’s Manual
APPENDIX C
1.7 SECOND ENVIRONMENT,
environment which includes all industrial uses other than those directly connected to a low voltage electrical
supply for building for domestic use.
1.8 ON SITE,
area where the machine is installed for normal use by the final user and where the machine has been tested.
1.9 LIMITED DISTRIBUTION,
sales procedure whereby the manufacturer limits the supply of machines to suppliers, customers or users,
which separately or jointly, have the technical knowledge of requirements related to E.M.C. for the
installation of electric and electronic machinery and which provide, through exchange technical
specifications, for on-site measurement of actual surrounding conditions.
2 REFERENCE DOCUMENTS AND INDUSTRY STANDARDS
2.1
ELECTROMAGNETIC COMPATIBILITY (EMC);
Directive 2004/108/EC of 15 December 2004 related to Electromagnetic Compatibility and subsequent
modifications.
2.2
LOW VOLTAGE DIRECTIVE;
Directive 2006/95/EC of 12 December 2006, concerning electric material destined to be used within certain
voltage limits.
2.3
CENELEC EN 60204-1 STANDARD;
Machine safety. Machine electrical equipment.
2.4
CENELEC EN 60825-1 STANDARD;
Laser equipment safety. User requirements and guide.
2.5
CEN EN UNI 12626 STANDARD;
Laser processing machinery-machine safety.
ULYXE™ – User’s Manual
85
APPENDIX C
3 COFORMANCE WITH EEC DIRECTIVES AND CE MARKING
3.1 CONDITIONS FOR CONFORMITY TO EMC DIRECTIVES OF ULYXE™ LASER
SOURCES;
The conformity of Laser sources defined in the title of this paragraph to the Directives related to Electro
magnetic Compatibility, are only valid for the conditions listed below.
3.1.1 THE SOURCES DEFINED IN THE TITLE OF THIS PARAGRAPH ARE PARTLY COMPLETED
MACHINERY as defined in art.2 (g) of 2006/42/EC; Machinery Directive, SOLD TO BE INCLUDED AS
PART OF A MACHINE OR SYSTEM OR INSTALLED SYSTEM; THEREFORE THE OPERATING
CONDITIONS OF THE SOURCE WITHIN A SYSTEM MUST BE AS DESCRIBED IN PARAGRAPH 4 OF
THIS PUBLICATION.
3.1.2 THE SOURCES DEFINED IN THE TITLE OF THIS PUBLICATION ARE ONLY SOLD BY LIMITED
DISTRIBUTION (As defined in point 1.9); THEREFORE THE INSTALLER AND/OR USER ARE AWARE OF
THE REQUIREMENTS RELATED TO ELECTRO MAGNETIC COMPATIBILITY.
3.1.3 THE SOURCES DEFINED IN THE TITLE OF THIS PARAGRAPH MUST BE INSTALLED
ACCORDING TO THE INSTRUCTIONS INDICATED IN THE PREVIOUS PARAGRAPHS OF THIS
PUBLICATION. IN ADDITION THE INSTRUCTION PROVIDED HEREIN MUST BE COMPLETELY
OBSERVED, INCLUDING ON-SITE TESTING OF FINAL COMPLIANCE WITH THE DIRECTIVES.
3.1.4 THE SOURCES DEFINED IN THE TITLE OF THIS PARAGRAPH ARE ONLY DESTINED FOR USE
IN A SECOND ENVIRONMENT (As defined in point 1.7).
DECLARATION OF CONFORMITY
Datalogic Automation S.r.l. hereby declares that in the conditions described in this document, in particular in
section 3, ULYXE™ series sources are in conformance with EEC Directives related to ELECTRO
MAGNETIC COMPATIBILITY and EEC Directives related to LOW VOLTAGE according to the regulatory
references in section 2.
3.2 NOTE FOR THE APPLICATION OF OTHER EEC DIRECTIVES
LASER sources are not subject to other EEC Directives other than those indicated in section 2. However, for
application purposes, there are references to other Directives, and the following declaration has been
provided in particular to comply with art. 13 of “Procedure for partly completed machinery” FOR THE
PURPOSE OF 2006/42/EC ;machinery Directive.
MANUFACTURER DECLARATION
FOR THE PURPOSE OF MACHINE DIRECTIVE REQUIREMENTS Datalogic Automation S.r.l. hereby
declares that the ULYXE™ sources must be installed pursuant to its own instructions and shall not be put
into operation until the machines where they are incorporated have been declared in conformance with the
above mentioned Directive.
86
ULYXE™ – User’s Manual
APPENDIX C
4 ELECTROMAGNETIC COMPATIBILITY APPLICATION GUIDE
The requirement to comply with precise EMC regulations is die to the increasing use of powerful electronic
devices, which due to the techniques used are the source of disturbances in a very vast field of frequencies
(emission) and at they same time they are also affected by disturbances produced by other devices and thus
require an adequate level of immunity.
4.1
Disturbances are customarily classified as low frequency ( 0< f < 9 kHz) and high frequency ( f > 9
kHz). Low frequency phenomenon which are particularly important are those connected to harmonic
frequencies and electricity frequency. There are other widespread phenomenon such as electrostatic
discharge in air or by contact.
4.2
Disturbances can be transmitted via conductors (conducted disturbances in a field ranging from 0.15
MHz to 30 MHz) and via irradiation (irradiated disturbances ranging from 30 MHz to 1000Mhz).
4.3
Case studies in industrial environments point to conducted disturbances as the main cause of failure
to comply with electro magnetic compatibility! For this reason installation of a Laser Source must be effected
scrupulously following the instructions below.
4.3.1 Connections and wiring. Laser equipment connections to other devices and external sources must
be made taking into account minimization criteria of electro magnetic influences between them. Power circuit
wiring must be physically separated from command and control (signal circuit) circuits, this is effected using
metal channels, metals shields or shielded cables, even for power circuits.
4.3.2 Filter devices. All equipment, which requires supplementary devices to comply with EMC regulations,
must be equipped with such devices, assembled according the Manufacturer instructions. Supplementary
devices include RC units to assemble in parallel to AC relay coils, diodes to assemble in parallel to DC relay
coils, filters for high frequency conducted disturbance to be assembled on the mains input (ask Datalogic
Automation S.r.l for the most suitable type).
4.3.3
Wire shielding. Wire shielding must end as close to the incoming terminal boards as possible.
4.3.4 Metallic panels. All the panels which make up the system must be interconnected so that they
present low impedance to high frequencies. This is obtained by adding numerous screws between the
unpainted walls and using EMC metal seals. All the metallic parts are connected with a good ground
connection.
ULYXE™ – User’s Manual
87
APPENDIX C
5 GUIDE TO APPLYING LOW VOLTAGE SAFETY
5.1
Installation. Only professionally trained individuals can operate in the installation, connection to
external energy sources, and in general, for any type of intervention on the electric part. Dangerous voltage
is present inside the Laser power supply!
5.2
Power cut-off device. Since the laser is designed to be incorporated in a system including other
equipment, it is necessary to install a manually controlled power cut-off device common to the entire system.
This is the installer’s responsibility.
5.3
Stop function. Since the laser is designed to be incorporated in a system including other equipment,
it is necessary to create a category O stop common to the entire system. This is the installer’s responsibility.
5.4
Emergency stop. Since the laser is designed to be incorporated in a system including other
equipment, the emergency stop must be installed based on the technical specifications of the system,
bearing in mind that it may be necessary to let cooling water circulate for a few seconds before
disconnecting the power. The emergency function is the installer’s responsibility.
5.5
Protection category. The “ULYXE™” laser sources have a minimum protection classification of IP54
while the Laser Power supply has a minimum protection category of IP33. To comply with the Machine
Directive and Standard EN 60204, the installer is responsible for placing them in a container according to the
protection category required for the final use.
88
ULYXE™ – User’s Manual
APPENDIX C
6 GUIDE TO APPLYING LASER RADIATION SAFETY
6.1
Information. As required by standard EN 60825-1 it is necessary to provide opportune information on
eye and skin risks to individuals who may come into contact with Laser radiation.
6.2
Training. The operator and all individuals who are assigned to using the laser system must receive
opportune instructions on safely starting and shutting off the system, by means of a Standard Operating
Procedure (SOP) to be followed.
6.3
Confining radiation. As required by the Machine Directive, the Laser radiation must be completely
confined within opportune guards.
6.4
Inspection windows Inspection windows must possess an opportune, clearly identifiable protection
filter for Laser radiation. If equipped with the source, do not replace the filter with another non-original one.
6.5
Laser safety Technician. As indicated in standard EN 60825-1 it is necessary to periodically check
that the safety conditions for using a Laser source are maintained, that the Optical Risk Nominal Distance
(ORND) is observed and that Goggles (IPD) are always available, and if required, that the are regularly
used. Therefore a Laser safety Technician (LST) must be appointed.
6.6
Protection during maintenance. Since some safety measures are lacking during maintenance
operations, it is necessary to establish a class 4 Controlled Laser Area, with access only for professionally
trained and authorized individuals, equipped with specific goggles.
CONCLUSIONS
Datalogic Automation S.r.l, as manufacturer of “Ulyxe™” laser sources, provides a laser device which is not
intended for immediate use, but is to be connected, by others, to other devices which have the final aim of
creating a laser processing system.
Datalogic Automation S.r.l., as manufacturer of a laser source, has built its equipment, considered as a
Partly Completed Machinery, in compliance with current Directives and in keeping with industry regulations.
The system Manufacturer must ensure the safety of the laser processing Machine according to other
Directives (for example Machine Directive) including, as required by the Directive, the analysis of risks,
implementation of safety measures, certifications and testing of safety measures and the production of
adequate information for safe use of the machine.
Datalogic Automation S.r.l. is available for providing the machine Manufacturer with all the information in its
possession to help the Manufacturer comply with the Directives.
ULYXE™ – User’s Manual
89
APPENDIX C
90
ULYXE™ – User’s Manual
APPENDIX C
ULYXE™ – User’s Manual
91
APPENDIX C
92
ULYXE™ – User’s Manual
FIGURES
FIGURES
Figure 1: Overview Ulyxe™............................................................................................................................... iii
Figure 2: Device Manager controller USB .........................................................................................................vi
Figure 3: Ulyxe™ Overall dimensions ............................................................................................................. 13
Figure 4: External labels location .................................................................................................................... 16
Figure 5: Internal labels location...................................................................................................................... 16
Figure 6: Seals position ................................................................................................................................... 17
Figure 7: Ulyxe™
Figure 8: Focusing Lens 160 mm ................................................................................. 18
Figure 9: Power supply cable
Figure 12: Interlock
Figure 10: USB cable Figure 11: RS232 cable ............................................ 18
Figure 13: USB key Figure 14: Signal Key................................................................... 18
Figure 15: Power supply and cables ............................................................................................................... 20
Figure 16: Power supply overall dimensions................................................................................................... 21
Figure 17: Control Box Basic........................................................................................................................... 22
Figure 18: Control Box Basic........................................................................................................................... 22
Figure 19: Control Box Basic overall dimensions............................................................................................ 23
Figure 20: Control Box Evo ............................................................................................................................. 23
Figure 21: Control Box Evo ............................................................................................................................. 24
Figure 22: Control Box Evo overall dimensions. ............................................................................................. 24
Figure 23: Focus lens ...................................................................................................................................... 25
Figure 24: Suitcase.......................................................................................................................................... 25
Figure 25: Heavy Duty suitcase....................................................................................................................... 26
Figure 26: Focusing and aiming beams laser diodes...................................................................................... 26
Figure 27: Prerequisites for installation. .......................................................................................................... 27
Figure 28: Ulyxe™ transport............................................................................................................................ 28
Figure 29: Ulyxe™ fixing points....................................................................................................................... 28
Figure 30: Measures, distance threaded holes and fixing pins drivers. .......................................................... 29
Figure 31: Installation environment. ................................................................................................................ 29
Figure 32: Interlock connector plug. ................................................................................................................ 30
Figure 33: Power Supply cable plug in. ........................................................................................................... 30
Figure 34: Main lead connector insertion. ....................................................................................................... 31
Figure 35: Plug-in signal key connector. ......................................................................................................... 31
Figure 36: Control Box Basic connection ........................................................................................................ 32
Figure 37: Control Box Evo connection ........................................................................................................... 32
Figure 38: USB pen drive insertion on PC. ..................................................................................................... 33
Figure 39: Start Wizard installation.................................................................................................................. 33
Figure 40: License agreement......................................................................................................................... 34
Figure 41: Installation destination folder.......................................................................................................... 34
Figure 42: Installation type options.................................................................................................................. 34
Figure 43: Not certified driver supplier warning from Microsoft (Vista/7 and XP)............................................ 35
ULYXE™ – User’s Manual
93
FIGURES
Figure 44: USB cable plug in request.............................................................................................................. 35
Figure 45: USB cable to Ulyxe™ connection. ................................................................................................. 35
Figure 46: USB cable to PC connection. ......................................................................................................... 35
Figure 47: New hardware found message window. ........................................................................................ 36
Figure 48: Automatic installation of the software............................................................................................. 36
Figure 49: New hardware installation completed. ........................................................................................... 36
Figure 50: Installation completed..................................................................................................................... 37
Figure 51: Firmware upgrade request. ............................................................................................................ 37
Figure 52: Firmware upgrade procedure completed. ...................................................................................... 37
Figure 53: Disconnect USB cable message.................................................................................................... 38
Figure 54: Size of the marking field ................................................................................................................. 39
Figure 55: Working Area.................................................................................................................................. 40
Figure 56: Scan head ...................................................................................................................................... 41
Figure 57: Field projection ............................................................................................................................... 41
Figure 58: Example of external connections. .................................................................................................. 43
Figure 59: Safety mode example..................................................................................................................... 44
Figure 60: Possible external connections........................................................................................................ 45
Figure 61: Boxed power supply with main switch............................................................................................ 47
Figure 62: Ulyxe™ main switch. ...................................................................................................................... 47
Figure 63: Starting system............................................................................................................................... 48
Figure 64: Waiting for key start........................................................................................................................ 48
Figure 65: Waiting for warm up. ...................................................................................................................... 48
Figure 66: System waiting enable command. ................................................................................................. 48
Figure 67: Led bar: stand-by system status. ................................................................................................... 49
Figure 68: Led bar orange: system ready for marking. ................................................................................... 49
Figure 69: Laser emission. .............................................................................................................................. 50
Figure 70: Red led bar: laser emission............................................................................................................ 50
Figure 71: Timing signals ................................................................................................................................ 51
Figure 72: Cleaning laser output. .................................................................................................................... 52
Figure 73: Female panel socket cod. UTG0103SVDE (front view)................................................................. 56
Figure 74: Male plug connector cod. UTG6103PNVDE (front view) and wiring.............................................. 56
Figure 75: Female panel socket cod. 09-9766-30-04 (front view)................................................................... 57
Figure 76: Male plug connector cod. 09-9767-00-04 (front view) ................................................................... 57
Figure 77: Panel socket (front view) and internal interface ............................................................................. 58
Figure 78: Signal Key male connector............................................................................................................. 59
Figure 79: Display Ulyxe™ .............................................................................................................................. 60
Figure 80: Selection areas Touch Screen. ...................................................................................................... 60
Figure 81: Menu Display Touch screen........................................................................................................... 61
Figure 82: Eyeball section ............................................................................................................................... 70
94
ULYXE™ – User’s Manual