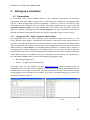
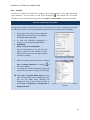
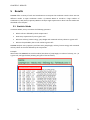
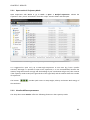
1
RAMMS::ROCKFALL User Manual RAMMS rapid mass movements system A numerical model for rockfall in research and practice User Manual v1.6 Rockfall WSL-Institut für Schnee- und Lawinenforschung SLF WSL Institut pour l‘étude de la neige et des avalanches SLF WSL Instituto per lo studio della neve e delle valanghe SLF WSL Institute for Snow and Avalanche Research SLF Title picture: Rockfall at Viznau (LU), Werner Gerber, 2003 Contributors (alphabetical order) SLF/WSL: Perry Bartelt Claudia Bieler Yves Bühler Marc Christen Lisa Dreier Werner Gerber James Glover Maike Schneider Centre of Mechanics ETH Zurich: Christoph Glocker Remco Leine Adrian Schweizer Manuscript update May 2015 2 Table of Content 1 2 Introduction ........................................................................................................................ 6 1.1 Motivation .................................................................................................................. 6 1.2 RAMMS ........................................................................................................................ 6 1.3 RAMMS::ROCKFALL Model .......................................................................................... 7 Installation and Setup ......................................................................................................... 9 2.1 System requirements .................................................................................................. 9 2.2 Installation ................................................................................................................... 9 2.3 Licensing .................................................................................................................... 16 2.3.1 Personal license request file .............................................................................. 16 2.3.2 Getting the personal license key ..................................................................... 17 2.4 3 Update ....................................................................................................................... 18 Theory ............................................................................................................................... 19 3.1 Overview .................................................................................................................... 19 3.2 Modelling Rock Shape............................................................................................ 21 3.3 Free Flight Motion with Gravity and Gyroscopic Forces ........................................... 23 3.4 Contact forces............................................................................................................ 23 3.5 Friction forces ........................................................................................................... 24 3.6 Impulsive forces (Rebound)...................................................................................... 25 3.7 Contact Friction and Drag ......................................................................................... 26 3.7.1 Coulomb Friction and Slippage......................................................................... 27 3.7.2 Viscoplastic Ground Drag ................................................................................... 29 3.8 Forest/Vegetation...................................................................................................... 30 3.9 Terrain Material ......................................................................................................... 31 3.10 Terrain Model ............................................................................................................ 36 4 Setting up a simulation ..................................................................................................... 37 4.1 Preparations ............................................................................................................. 37 3 4.1.1 Topographic data - Digital Elevation Model (DEM)....................................... 37 4.1.2 Project and Scenarios ........................................................................................ 38 4.2 Preferences .............................................................................................................. 38 4.3 Creating a new project .............................................................................................. 41 4.4 Working with the interface ....................................................................................... 45 4.4.1 Moving, resizing, rotating, viewing ................................................................... 45 4.4.2 Colorbar .............................................................................................................. 47 4.4.3 Changing maps and remote sensing imagery ................................................... 48 4.4.4 How to save input files and program settings .............................................. 48 4.4.5 About RAMMS................................................................................................... 50 4.5 4.5.1 Rockfall starting zone ........................................................................................ 51 4.5.2 Rock builder ....................................................................................................... 54 4.6 Terrain/Forest Input ................................................................................................. 57 4.6.1 Terrain material ................................................................................................. 57 4.6.2 Forested area ................................................................................................... 59 4.7 5 Rock Input ................................................................................................................ 51 Running a simulation .............................................................................................. 60 4.7.1 General ............................................................................................................... 60 4.7.2 Terrain ................................................................................................................ 60 4.7.3 Forest.................................................................................................................. 61 4.7.4 Release ............................................................................................................... 61 4.7.5 Rock .................................................................................................................... 62 4.7.6 Exercise how to run a simulation ....................................................................... 63 4.7.7 Scenario Preparation and Simulation Process ................................................... 67 Results ............................................................................................................................... 71 5.1 Statistic Mode.......................................................................................................... 71 5.1.1 Quantile Values .................................................................................................. 72 5.1.2 Statistic Vocabulary ............................................................................................ 73 5.2 Statistic Mode ............................................................................................................ 75 4 5.2.1 Summary Plot .................................................................................................... 78 5.2.2 Barrier Plot ......................................................................................................... 79 5.2.3 Number of Rocks ................................................................................................ 81 5.2.4 Number of Deposited Rocks............................................................................... 81 5.2.5 Reach probability ............................................................................................... 81 5.3 6 Trajectory Mode ........................................................................................................ 82 5.3.1 Open results in Trajectory Mode ....................................................................... 83 5.3.2 Visualize different parameters ........................................................................... 83 5.3.3 Working with trajectories .................................................................................. 86 5.3.4 Rock Trajectory XY Plot ...................................................................................... 88 5.3.5 Line profile.......................................................................................................... 89 5.3.6 Trajectory Data Log File ..................................................................................... 91 5.3.7 Rock trajectory animation .................................................................................. 92 5.3.8 Creating an image or a GIF animation................................................................ 92 References and further reading .................................................................................... 93 6.1 References ................................................................................................................ 93 6.2 Publications .............................................................................................................. 94 List of figures……………………………………………………………………………………………………………………….96 List of tables.……………………………………………………………………………………………………………………….99 5 CHAPTER 1 : INTRODUCTION 1 Introduction 1.1 Motivation Mitigation of natural hazards relies increasingly on numerical process models to predict the area inundated by rapid geophysical mass movements. These movements include • • • • • snow avalanches, torrent based debris flows and hillslope debris flows, mudslides, ice avalanches and glacier lake outbreaks rockfalls and rock avalanches. Process models are used by engineers to predict the speed and reach of these hazardous movements in complex terrain. The preparation of hazard maps is a primary application. The models are especially helpful when proposing technical mitigation measures, such as dams and embankments or rockfall protection barriers. The models allow hazard engineers to optimize limited financial resources by studying the influence of different hazard scenarios on defense options. 1.2 RAMMS The RAMMS (RApid Mass Movements System) software system contains three process modules: • • • RAMMS::AVALANCHE RAMMS::DEBRISFLOW RAMMS::ROCKFALL The RAMMS::AVALANCHE and RAMMS::DEBRISFLOW modules are designed for flow phenomena containing fast moving particulate debris of snow and rocks. In the avalanche module, the interstitial fluid is air, whereas in the debris flow module the interstitial fluid is mud. The RAMMS::AVALANCHE and RAMMS::DEBRISFLOW models are used to calculate the motion of the movement from initiation to runout in three-dimensional terrain. The models use depth-averaged equations and predict the slope-parallel velocities and flow heights. This information is sufficient for most engineering applications. Information in the slope-perpendicular direction (e.g. mass and velocity distribution) is lost; however, this is seldom of practical interest. Both models require an accurate digital representation of the terrain. Engineers specify initial conditions (location and size of the release mass) and friction parameters, depending on terrain (e.g. roughness, vegetation) and material (e.g. snow, ice or mud content of the debris flow). The RAMMS::ROCKFALL module is used to study the rigid body motion of falling rocks. The model predicts rock trajectories in general three-dimensional terrain. Rock trajectories are governed by the interaction between the rock and ground. The model contains six primary state variables: three translational speeds and three rotational velocities of the falling rock. From these, kinetic energy, runout distance and jump heights can be derived. Generalized rock shapes are modeled. Rock orientation and rotational speed are included in the rock/ground interaction. The RAMMS::ROCKFALL module is therefore fundamentally different from the RAMMS::AVALANCHE and RAMMS::DEBRISFLOW modules because it is based on hard-contact, rigid-body Lagrangian 6 CHAPTER 1 : INTRODUCTION mechanics, not Eulerian flow mechanics. It also differs from existing rockfall modules because the rock/ground interaction is not governed entirely by simple rebound mechanics, but frictional (dissipative) rock/ground interactions. These govern the onset of rock jumping. The RAMMS::ROCKFALL module predicts all rigid-body motions – rock sliding, rolling, jumping and skipping. The RAMMS::ROCKFALL module was coupled to the same user-friendly visualization tool used in the RAMMS::AVALANCHE and RAMMS::DEBRISFLOW modules. The visualization tool allows easy preparation, execution, visualization and interpretation of simulations. In all RAMMS modules, new constitutive models have been developed and implemented, thanks to calibration and verification at full scale test sites such as St. Léonard/Walenstadt (rockfall, mitigation measures), Vallée de la Sionne (snow avalanches) and Illgraben (debris flow). At present, two new scientific RAMMS modules are under development: RAMMS::AVAL_EXTENDED and RAMMS::DBF_EXTENDED. The RAMMS web page http://ramms.slf.ch provides useful information such as a moderated discussion forum, frequently asked questions (FAQ) or recent software updates. Please visit this web page frequently to stay up to date. 1.3 RAMMS::ROCKFALL Model The RAMMS::ROCKFALL model was developed by the Centre of Mechanics at the ETH Zurich and the RAMMS program team of the WSL Institute for Snow and Avalanche Research SLF. This joint project was supported by the Swiss National Science Foundation (Grant: SNF 200021-19613). The Centre of Mechanics was responsible for the development of the simulation code in close contact with geological, geophysical and software engineering experts from the SLF/WSL to discuss modeling issues specific to rockfall mechanics. The SLF/WSL calibrated and validated the simulation code and provided rock shapes. The RAMMS program team of the SLF/WSL integrated the simulation code in an extensive and easy-to-use graphical user interface (GUI). This manual describes the features of the RAMMS program, allowing beginners to get started quickly as well as serving as a reference to expert users. 1.4 Learning by doing This manual provides an overview of RAMMS::ROCKFALL. Exercises exemplify different steps in setting up and running a RAMMS simulation especially in Chapter 4 ‘Setting up a simulation’. However, to get the most from the manual, we suggest reading it through while simultaneously having the RAMMS program open, learning by doing. We assume RAMMS users to have a basic level of familiarity with windows-based programs, commands and general computer terminology. We do not describe the basics of windows management (such as resizing or minimizing). RAMMS windows, click options and input masks are similar to other windows based programs and can be used, closed, reduced or resized in the same way. 7 CHAPTER 1 : INTRODUCTION DISCLAIMER RAMMS is intended to be used as a tool to support experienced users. The interpretation of the simulation results has to be done by a rockfall expert who is familiar with the local as well as with the topographic and geological situation of the investigation area. In no event shall SLF/WSL be liable for any damage or lost profits arising, directly or indirectly, from the use of RAMMS. Swiss law applies. Court of jurisdiction is Davos. If you encounter problems, please contact [email protected]. 8 CHAPTER 2 : INSTALLATION AND SETUP 2 Installation and Setup 2.1 System requirements We recommend the following minimum RAMMS::ROCKFALL: • system requirements for running Operating System: Windows 7 (64-bit) or Windows 8 (or Windows Virtual Machine VM) • • • RAM (memory): 2 GB (more recommended) CPU: Intel Pentium 1 GHz (multi core recommended), only 64-bit supported! Hard disk: ca. 185 MB 2.2 Installation Please download the RAMMS::ROCKFALL setup file “ramms_rock_user_setup_64.zip” from http://ramms.slf.ch (Downloads section). Please make sure that you have a 64-bit Windows system. Direct download link: http://ramms.slf.ch/ramms/downloads/ramms_rock_user_setup_64.zip Please do the following steps before beginning to install RAMMS: • • • • • Click on the path given above or copy the path to any browser. A window pops up and the automatic download of the file ramms_rock_user_setup_64.zip starts after clicking Yes. Unzip the file to a temporary location. You must have Administrator privileges on the target machine. If you do not have such privileges, the installer cannot modify the system configuration of the machine and the installation will fail. Note that you do not need Administrator privileges to run RAMMS afterwards. Read first, install afterwards! Please read the whole installation process once, before you begin the installation. Start the file “ramms<version>_rock_user_setup_64.exe”. 9 CHAPTER 2 : INSTALLATION AND SETUP Step 1: Welcome The welcome dialog introduces you to the English setup program and will guide you through the installation process. Click Next to continue. Figure 2.1 Installation - welcome dialog window. Step 2: Readme Short introduction to RAMMS. Click Next to continue. Figure 2.2 Installation - readme dialog window. 10 CHAPTER 2 : INSTALLATION AND SETUP Step 3: Accepting the license agreement Read the license agreement carefully and accept it by activating the check box in the lower left corner. If you do not accept the license agreement, you are not able to proceed with the installation. After accepting the license agreement, click Next to continue the installation. Figure 2.3 Installation - license agreement dialog window. Step 4: Select destination directory Choose your destination directory. This dialog shows the amount of space available on your hard disk and required for the installation. Click Next to start the installation process. Figure 2.4 Installation - destination directory dialog window. 11 CHAPTER 2 : INSTALLATION AND SETUP Step 5: Installing the files RAMMS is copying the files to the destination location. The window shows the installation progress. Figure 2.5 Installation - installing files dialog window. Step 6: Finished installing the files RAMMS finished copying the files. Click Next to finish the installation process. Figure 2.6 Installation - finished installing files dialog window. 12 CHAPTER 2 : INSTALLATION AND SETUP Step 7: RAMMS installation finished! RAMMS successfully finished the installation. Click Finish. Figure 2.7 Installation - finished installation dialog window. Step 8: Welcome to IDL Visual Studio Merge Modules To ensure that all important system libraries are installed on your target machine follow the instructions below: The welcome dialog introduces you to the English setup program and will guide you through the installation process of the IDL Visual Studio Merge Modules. Click Next to continue. Figure 2.8 IDL Visual Studio Merge Modules - welcome dialog window. 13 CHAPTER 2 : INSTALLATION AND SETUP Step 9: Ready to install the program Click Next to continue. Figure 2.9 IDL Visual Studio Merge Modules - ready to install the program. Step 10: Installing IDL Visual Studio Merge Modules The wizard is installing the files. Please wait until it is finished. Figure 2.10 IDL Visual Studio Merge Modules - installing... 14 CHAPTER 2 : INSTALLATION AND SETUP Step 11: InstallShield Wizard Completed The wizard completed the installation. Click Finish. Figure 2.11 Installation - destination directory dialog window. After having successfully installed RAMMS and the necessary files on your personal computer, you will notice the RAMMS icon on your desktop (for all users): Figure 2.12 RAMMS icon. Additionally, a new application folder is created in Start → Programs (for all users): • RAMMS Rockfall → Run RAMMS Rockfall • RAMMS Rockfall → Uninstall RAMMS Rockfall Figure 2.13 RAMMS program group 15 CHAPTER 2 : INSTALLATION AND SETUP 2.3 Licensing Access to RAMMS is controlled by a personal use license. Personal use licenses are time limited licenses tied to a single personal computer. This method of licensing requires a machine’s unique host ID to be incorporated into a license request file. After the license request file is sent to SLF/WSL, you will receive a license key. Entering the license key on a personal computer enables full RAMMS functionality for the specific personal computer. For more information please visit http://ramms.slf.ch. Double-click the RAMMS icon or use Start → Programs → RAMMS Rockfall → Run RAMMS Rockfall to start RAMMS for the first time. Whenever you start RAMMS, the splash screen below will pop up: Figure 2.14 RAMMS start window. Click on the image. It will disappear and RAMMS will start up. The following dialog window appears: Figure 2.15 RAMMS licensing window 2.3.1 Personal license request file Click the button to create your personal license request file. In Figure 2.16 enter your full name and the name of your company. 16 CHAPTER 2 : INSTALLATION AND SETUP Figure 2.16 Enter user name and company name. In the next dialog window, choose the destination directory of your personal license request file and save it to your target machine. Your personal license request file should look similar to Figure 2.17. Figure 2.17 2.3.2 Personal license request file RAMMS_ROCK_request_Muster.txt Getting the personal license key You find an order form on the RAMMS web page (Order Form or Demo Order Form) at http://ramms.slf.ch. Fill in all your personal information, choose the license period, license type and number of licenses you wish to order, attach your personal license request file(s), accept the license agreement and click Submit Order. An order confirmation email is sent to your email address. We then process your order and send you an invoice. As soon as we received your payment, we will send you your personal license key. Your personal license key is named similar to ROCK_Muster_Test_RAMMS.txt. Open the file in a text editor. It should look similar to Figure 2.18. Figure 2.18 Personal license key file RAMMS_license_Muster Test.txt 17 CHAPTER 2 : INSTALLATION AND SETUP Now, restart RAMMS (as explained before). The IDL splash screen appears (Figure 2.14) and then the dialog window of Figure 2.15 shows up (RAMMS - Licensing). Copy the license key (in this example: ROCKFALL ebei-flhl-ilkq-behe-1i5m) and paste it at the field LICENCE KEY (see Figure 2.15). Notice that there might be the prefix ROCKFALL. This prefix is part of the license key and has to be inserted as well! If RAMMS accepts your installation key, you successfully finished the installation. 2.4 Update When you start RAMMS it will automatically check for updates on the internet. This can lead to an error message, if your firewall blocks the executable idlrt.exe (this file starts the IDL-Virtual Machine you need to run RAMMS). Please unblock this file for your firewall. You can also disable the AutoWebUpdate-function by unchecking Help → Advanced... → AutoWebUpdate. In the same way you can enable the AutoWebUpdate-function by checking Help → Advanced... → AutoWebUpdate. 18 CHAPTER 3 : THEORY 3 Theory 3.1 Overview The RAMMS::ROCKFALL model utilizes a hard- contact, rigid-body approach to model rockfall trajectories in general three-dimensional terrain (Leine et al., 2013). The program is designed to be used by hazard engineers to predict rockfall velocity and runout for hazard mapping and planning of rockfall mitigation measures. The calculation engine and user interface were developed as part of a joint research project between the WSL Institute for Snow and Avalanche SLF and the Institute of Mechanics, Swiss Federal Institute of Technology (ETHZ) between the years 2010-2013. The rockfall model is the third RAMMS module, following the RAMMS::AVALANCHE and RAMMS::DEBRISFLOW modules and offers many of the same user-friendly features. The RAMMS::ROCKFALL model was officially released after a period of calibration and application testing in April, 2015. To date most rockfall models utilize simple rebound mechanics to describe the complex interaction between the rock and the ground (Bourrier et al. 2012; Dorren 2003; Dorren and Seijmonsbergen 2003; Schweizer 2015, Volkwein et al. 2011). Rock geometries consisted of simplified shapes, mostly spheres or ellipsoids. The rock-ground interaction was parameterized using apparent restitution coefficients to model the rock jumping. To account for the wide variation of possible jump distances and heights (even in homogenous terrain, see Glover 2015), random, stochastic methods were used to define the bandwidth of possible restitution coefficients. Rockfall modeling was therefore both quasi-deterministic and quasi-stochastic. In RAMMS the rock-ground interaction is parameterized by frictional operators that act at the rock surface. Compared to rebound models (that employ apparent restitution coefficients to model entire ground-rock interaction), the hard-contact, rigid-body approach applies contact forces to the rock’s edges and corner points. The primary advantage of using hard-contact approach is that the role of rock shape is accounted for in the ground-rock interaction. This facilitates a natural modeling of the four primary modes of rock motion: sliding, rolling, skipping and jumping – without the use of random, stochastic methods to define the rebound parameters. All four modes of rock propagation are modeled in RAMMS. Long and widespread rock runout is generally associated with the jumping mode; however, rock stopping requires a transition from jumping to a rolling/sliding mode. Modelling all four modes is essential for a realistic, self-consistent and risk-based rockfall hazard analysis. The natural variation of jumps is defined automatically by the rock shape and orientation at impact. The statistical spread of rockfall runout and dispersion is generated only by changing the initial conditions. Ground parameters are not random: they are deterministic in the sense that one material type is assigned to describe hardness and the general tendency of the terrain to react to a rock impact. In RAMMS the clear separation between stochastic initial conditions and deterministic boundary conditions simplifies and enhances the construction of engineering based hazard scenarios and the interpretation of model results. At present, the RAMMS rockfall model contains six ground categories: soft, medium soft, medium, medium hard and hard. A seventh category snow has been introduced to model rockfall motion on snow in high mountain terrain. Applying RAMMS to a rockfall problem necessitates that rocks of different shapes and sizes can be easily specified. In RAMMS::ROCKFALL the rock-body is modelled as a convex hull polyhedron. The 19 CHAPTER 3 : THEORY shape of rock bodies are user defined by providing a point cloud, defining the surface geometry of the rock. Shapes can be simple geometric forms, such as equant, platy or columnar. A unique feature of RAMMS is that real rock geometries obtained from laser scans during field investigations can be used in a modeling application. Over time, the user can build-up and manage a rockfall library containing rock shapes representative of different geologic settings. At present, the rocks are considered indestructible; that is, they do not fragment or change form during the analysis. Over and above weathering processes, the geometric relationships of rock-mass discontinuities (joints, fractures, contacts, bedding, asperities and schistosity) govern block shape, size and release mechanism (Jaboyedoff, 2011). With RAMMS::ROCKFALL preconditioning the shape and size and number of possible release orientations of detachable rocks is an essential part of the analysis. The observation that different basic geological settings produce characteristic rock shapes has been well documented by Fityus et al. 2013, among others. Some commonly encountered rock shapes and the associated geological setting are given below (Figure 3.1). Figure 3.1: Photographs of rock masses and their aggregate forms. Top left: An example of equant cubic rock forms generated in a sequence of sandstones exposed to an extensional deformation regime, the primary joint sets are near equally spaced and orthogonal to one another. Topright: The complex joint of this granodioritic rock mass result in highly irregular and angular rock block forms. Bottom left: The uplifted and folded limestone sequence is well bedded producing distinguished slabs which detach as pronounced platy rock forms. Bottom right: Distinguished columnar jointed basalt sequence produces the characteristic elongate rock forms (Glover 2015). The specification of general rock geometries will be discussed in the next section 3.2. Another feature of the RAMMS::ROCKFALL model is the inclusion of rock rotations in both the airborne phase and during the interaction with the ground. The RAMMS::ROCKFALL model includes 20 CHAPTER 3 : THEORY gyroscopic forces induced by rock rotations. These forces are necessary to model wheel-like rock skipping and jumping modes that are often responsible for extreme runout. To model ground interaction considering rocks with arbitrary geometry and rotational speed requires methods to accurately track the rock orientation relative to the ground. RAMMS::ROCKFALL employs quaternion algebra for this purpose. This method tracks rotation sequences even when non-linear contact forces change the translational and rotational direction of the rock. Modelling the rock-ground contacts in this way permits the entire mechanics of an impact to be simulated deterministically. The moment arms and torques responsible for how different rock-shapes convert translational movement into angular momentum and influence rebound heights are computed, and therefore allows an accurate modeling of rolling, skipping, sliding and jumping. The three-dimensional motion equations including rock rotations and gyroscopic forces will be presented in section 3.3. Complex mountain terrain is modelled using a high resolution digital elevation model (DEM). The specification of the DEM will be discussed in more detail in section 3.10. 3 . 2 Modelling Rock Shape Rock bodies are introduced into the simulation domain coordinate frame with origin (O) as a cloud of points based in a coordinate system of their own with origin (K). The coordinate frame (K) serves to map the rotations of the rock-body. Points are given in x, y, z format as *.pts files, and can be artificially generated or gathered from a laser scan of rock deposits (Figure 3.1 and Figure 3.2). A convex hull of the rock-body’s point cloud is created, in doing so an entirely convex body is created; concavities are closed over in the process. The next step is to calculate the center-of-mass of the body, for which the density is assumed homogeneous. Finally the inertial tensor of the body is calculated finding the three principal moments of inertia; the origin is the rock’s gravity center (S). The translations of the rock-body in the simulation domain are mapped using coordinate frame S in relation to O (Figure 3.3). The rock’s mass m is given from its volume calculated from the convex hull of the point cloud and a density ρ which is user defined (typically 2700 kg m−3 ). The rock has three translational (linear momentum) and three rotational degrees of freedom (spin) to describe the rocks mass center position qT = ( X , Y , Z ) any time t in the terrain coordinate frame O . Rotational motions capture the orientation of the rock’s external geometry in space. At time t = 0 the rock is released from position q0 = ( X 0 , Y0 , Z 0 ) , which, of course, must T be located some distance above the terrain Z 0 > Z m , and thus the release height h0 is h0 = Z 0 − Z m . 21 CHAPTER 3 : THEORY Figure 3.2: Laser scans of real rocks are captured in the field. The point cloud representing the rocks geometry are then used by the rockfall model to create a convex-hull polyhedron representative of the rock-body. Figure 3.3: Rock is generated from a point cloud and converted into a rigid-body polyhedral. 22 CHAPTER 3 : THEORY 3.3 Free Flight Motion with Gravity and Gyroscopic Forces In free flight, the governing equation of motion is (see Leine et al., 2013) Mu − h(q, u ) = 0 (3.1) where M is the constant and diagonal mass matrix (containing the mass and three moments of inertia I ). The vector u contains the rock’s three translational and three rotational velocities. The rock-body’s motion is governed by a number of forces which can determine its trajectory. Gravitational force (Fg) acts globally; a drag force (D) is implemented to represent the effects of trees, undergrowth and soil deformation. Along with gyroscopic forces G which can cause rocks of irregular shape to become upright and rotate about a rolling axis. All force terms h are a function of the rock’s position q and velocity u forming the force vector h: F + D h ( q, u ) = g G (3.2) 3.4 Contact forces On contact detection between the rock-body and the terrain, contact forces λ and frictional contact forces (Fc ) act about the point of contact. These forces can be considered as external forces that change the direction of the falling rock. The contact of the rigid rock-body is detected by continually measuring the vertical gap length g N between the rock-body’s corner points (P) and the terrain projections (Q) (Figure 3.4). The gap length is defined as g N ( X , Y , Z ) = Z − Z m ( X m. , Ym ) (3.3) Then, when g N > 0 there is no contact; when g N ≤ 0 there is contact and the contact forces λ , acting at the contact point P, are computed. (The contact forces are denoted using the Greek letter lambda because the contact forces are Lagrangian multipliers that enforce the non-penetration constraint). Minimal penetration with the terrain is permitted to allow the assessment of the contact condition (Eq. 3.3).This is a non-physical penetration and purely for numerical purposes. Contact forces are modeled as hard unilateral constraints with Coulomb friction using nonsmooth contact dynamics approaches (see Acary and Brogliato, 2008, Glocker, 2001 and Moreau, 1988). For the case of contact, the governing equations of motion now become Mu − h(q, u ) = λW (q ) (3.4) 23 CHAPTER 3 : THEORY where the direction of the contact forces is given by W (q ) . There can be a number of active contact forces depending on the rock-body’s configuration at the point of contact. Ultimately it is the combination of these forces λ (and force directions W (q ) ) that allows the complex rotations and trajectory deviations that are inherent to rockfall to be simulated. Figure 3.4: Contact detection. Definition of gap length, gN. The advantage of this hard-contact rigid-body approach is that the contact forces are applied directly about these contact points, respecting the configuration (orientation and kinetics) of the impact. This is achieved by considering the contact pair (Q, P) within the contact frame C = (n,t1 , t2 ) which is attached to the terrain surface at contact point Q (Figure 3.5). 3.5 Friction forces The contact frame C has a normal contact force component λN and two tangential components λT1 , λT2 . The contact force λN guarantees the unilaterality of the contact, i.e. the non- penetration constraint. The tangential force components are due to Coulomb friction and are governed by the contact laws. 24 CHAPTER 3 : THEORY Figure 3.5: Contact frame C at point Q detected with the gap function gN. The normal force component λN is resolved with a contact cone differential inclusion in which the transient normal force vector over the finite contact period can be computed. Over the contact period this is a set-valued normal force considering all periods of contact identified with the gap function gN. The tangential force component λT is assumed to obey spatial Coulomb’s friction law (see Figure 3.6). Stiction of the contact γT = 0 occurs so long as the magnitude of the tangential force ‖𝑘𝑘𝑇‖ is less than µλN in which λN is the applied normal force and µ the friction coefficient. The direction is also resolved with a normal cone inclusion projecting a friction disc on to the surface (Figure 3.6). The formulation covers both sticking and sliding cases. 3.6 Impulsive forces (Rebound) Impulsive contact forces occur whenever the gap function detects contact with negative velocity 𝛾𝑁− < 0 that is to say that the point would theoretically move through the terrain surface if not treated with the impulsive contact force. This requires a velocity jump such that the post impact normal velocity is non-negative 𝛾𝑁+ < 0. This impact law is based on Newtonian impact law in which the relative normal velocities of the contact pair before and after impact are governed by 𝜀𝑁 the normal restitution coefficient. 𝜀𝑁 = 1 corresponds to complete restitution of normal velocity while a smaller 𝜀𝑁 dissipates energy. Generally speaking this value is set very low. Newton’s action-reaction law is always fulfilled. 25 CHAPTER 3 : THEORY Figure 3.6: Friction forces at the contact point. γ N+ + εγ N− = 0 (3.5) Impulsive normal forces can also induce impulsive tangential forces. While this is mainly seen in the elastic impacts of superballs (Cross, 1999), and therefore in the rockfall model εT is set at εT = 0 since these effects are absent. To determine the resultant force direction acting on the rock-body the configuration of the impact must be computed. This requires finding the relative velocity between the contact points P and the terrain Q. Importantly, the velocity of contact point P is composed of the translational velocity with respect to the body’s center of mass vS and its angular velocity KΩ in the fixed body frame (K); for which P also has a fixed position vector relative to the center of mass S. That is, the contact algorithm in the rigid-body approach considers the rotational speed of the rock at contact. Because the forces are then applied at points away from the center of mass, and with a direction respecting the impact configuration, to a body with three degrees of translational and rotational freedom, torques and moment arms can act generating rotations and rebounds that represent the true mechanics of an impact. 3.7 Contact Friction and Drag Two physically different forces oppose the motion of a falling rock: sliding friction and drag. Sliding friction acts at points of the rock’s surface that are in contact with the ground; it is Coulomb-type friction associated with the distance the rock slides on the ground. When the rock is no longer in contact, this friction no longer acts. However, because this friction acts on a point on the rock’s surface, it will generate torques that initiates rotational movements. The parameterization of the friction force is of great importance because it controls when the rock 26 CHAPTER 3 : THEORY slides, rolls or jumps. Drag, on the other hand, acts at the rock’s center of mass and therefore creates no additional rotational moments. It acts in the direction opposite to the rocks movement (velocity). There are two drag forces in the RAMMS::ROCKFALL model. The first accounts for vegetation drag; the second accounts for the viscoplastic drag due to terrain deformation during ground contact. 3.7.1 Coulomb Friction and Slippage The mechanical contact law considers hard contacts between the rigid-body and the terrain. In principle, this is only representative of extremely hard rock-on-rock contacts. In reality rockground interaction occurs on a range of different materials with differing deformation properties. In an extreme case, the rock contact can be with soft soils that easily deforms under contact. In such contacts there is a compliance of the soft soil terrain and a degree of penetration and sliding of the rock-body as it ploughs into the earth cover accumulating material behind it leaving behind distinctive impact scars in the terrain (Figure 3.7). Figure 3.7: Rock impact scar on soft soil; the scar morphology is tapered widening towards the accumulation of earth at the scar end were an earth ramp structure is formed. This is modeled as a climbing friction from the beginning of the scar s = 0 at first contact which tends towards high friction at the end of the scar. To simulate ground deformation within the framework of a hard contact model requires introducing a slip (s) dependent friction that acts during sliding and accounts for the increase in friction due to material accumulation behind the rock- body as it slides through the impact (Figure 3.7 and Figure 3.8). The slip dependent friction is an extension of the Coulomb friction model in which the friction value µ is made dependent on the slip distance (s) travelled by the center of mass µ(s) (Figure 3.8). 27 CHAPTER 3 : THEORY Figure 3.8: Sliding friction in RAMMS is governed by a slip-dependent material law. At rock impact slip is s=0 and sliding friction is given by µmin; with s>0, friction increases according to the coefficient κ. At some point s the maximum friction µmax is reached. After contact, the friction exponentially decreases with coefficient β. Therefore β describes the duration of the friction as the rock is leaving the scar (ramping). Moreover, λT = µ ( s)λ N (3.6) force λN enforces the non-penetrability constraint; the force λT acts tangentially on the terrain surface (see Figure 3.6). The dependence of the friction coefficient on the slip distance (s) is: m ( s ) = m min + 2 π ( m min − m max ) arctan(κs ) (3.7) where µmin, µmax and κ are parameters of the friction model. The initial friction encountered at the contact where s = 0 is µmin. Over the slip period, µ tends toward µmax for large slip values, see Figure 3.8. The parameter κ controls how quickly the friction increases from µmin to µmax. Typically µmin < µmax meaning that the friction increases the longer the rock is in contact with the ground. It is entirely possible that there are brittle ground materials where the opposite behavior (µmax > µmin) is encountered. 28 CHAPTER 3 : THEORY The slip distance (s) is a transition state variable having a time evolution which is described by a simple differential equation: v s = s − β s if g N ≤ 0 gN > 0 (3.8) The parameter β controls how quickly the friction is released as the rock departs the ground scar. If β is large, friction is immediately removed as the rock moves away from the ground. Conversely, when β is small, sliding friction can act, even after the rock is no longer in contact with the ground. The parameter β is linked to the penetration depth of the rock into the ground. Larger penetration depths (softer materials) are associated with smaller β values. 3.7.2 Viscoplastic Ground Drag An additional slip dependent drag force is introduced to account for the viscoplastic deformation that occurs in soft soils under rock impact. Large viscoplastic deformations are also encountered in harder substrate materials such as scree, where rubbing between scree granules dissipates energy. Viscoplastic ground drag is given by: Fv = − m C v v s2 2 (3.9) Ground drag acts when the rock is in contact with the ground (gN < 0) as the rock is sliding on the terrain surface (s > 0). The drag force Fv is proportional to the square of the rock velocity v s2 as well as the mass of the rock m . That is, heavier and faster moving rocks will experience more drag than smaller, slower moving rocks, as they penetrate the ground surface. The drag force is proportional to the rock’s total kinetic energy. The drag coefficient Cv varies between 0.0 m-1 (hard) and 1.0 m-1 (soft). 29 CHAPTER 3 : THEORY 3.8 Forest/Vegetation Forest drag is given by (Figure 3.9): Fdf = −C f v s θ if Z ≤ Z h Cf = f 0 Z > Zh (3.10) The idea behind forest drag is that a resisting force acts on the rock’s center of mass when it is located below the drag layer height Zh. This force is linearly proportional to the rock velocity v s . The forest is parameterized by the effective height of the vegetation layer Zh as well as the drag coefficient θ f . The effective height Zh roughly corresponds to the height of the forest but in some cases, for example old forests, the drag force in the tree crowns might be negligible and therefore the effective height could be smaller than the real tree height. The model does not account for a Zdependency in forest structure as it assumes a homogeneous layer with mean drag properties. Typical values for Zh are between 5 m and 30 m (default value is 30m); typical values for θ f range between 100 kg/s and 1’000 kg/s. Three different forest types are implemented in RAMMS::ROCKFALL for now: • • • Open Forest 20 m2/ha forest drag = 250 kg/s Medium Forest 35 m2/ha forest drag = 500 kg/s Dense Forest 50 m2/ha forest drag = 750 kg/s This model description is a simplified summary of a more complete and detailed explanation provided by Leine et al. (2013) in which the time stepping methods are also explained. While it is possible with the rigid-body approach to model multi-body interaction of many particles, and it would be possible to include a fragmentation law in the model, these features are not yet implemented in the model and remain as future additions to the model. 30 CHAPTER 3 : THEORY Figure 3.9: Forest drag Fdf is implemented to act on the center of gravity of the rock-body at height Z. 3.9 Terrain Material The terrain material has considerable influence on the simulation result. Shapefiles are used to delimit terrain areas with specific terrain materials. Eight predefined terrain categories are listed in Table 3.1. These are: • • • • • • • • Extra Soft Soft Medium Soft Medium Medium Hard Hard Extra Hard Snow 31 CHAPTER 3 : THEORY Selection of the appropriate terrain material model is the primary task of the hazard engineer when using RAMMS. If there is uncertainty about the specific terrain material we recommend the user to compare the results of different terrain scenarios. Please consider the examples in Table 3.1 as a preliminary suggestion. Table 3.1: Ground Categories in RAMMS::ROCKFALL Category Picture Description Example Extra Soft Very wet ground. Cannot cross without deep sinkin. No high vegetation. Moor, turf, gley Soft Soft ground with many deep soil layers. Ground contains no large rock fragments. Often very moist. Foot inundations remain and are visible. Wet and deep surface soil. Moist meadow Medium Soft Rocks penetrate meadow surface leaving impact scars. Soil is deep, few rock fragments. Rank vegetation. Meadow 32 CHAPTER 3 : THEORY Medium Medium Hard Hard Meadow is deep, but contains rock fragments. The meadow can be covered with vegetation. Soil structure of a medium deepness. Rank vegetation. Penetration depths are small. Ground is flat. Rocky debris is present. Shallow surface soil. Usually little (initial) vegetation. Rocks jump over ground. Mixture of large and small rocks. Usually without any vegetation. Meadow Non-paved mountain roads, mountain meadow, pebble Rock scree, pebble, coarse rock, paved roads 33 CHAPTER 3 : THEORY Ground is very hard and is marginally deformed by rocks. No vegetation and no surface soil. Extra Hard Bedrock, cliff Rocks slide on snow surface. Snow Snow The used parameters for every terrain material are explained in the table below: Table 3.2: Ground parameters default values. Terrain Mu_Min Mu_Max Beta Kappa Epsilon Drag Extra Soft 0.2 2 50 1 0 0.9 Soft 0.25 2 100 1.25 0 0.8 Medium Soft 0.3 2 125 1.5 0 0.7 Medium 0.35 2 150 2 0 0.6 Medium Hard 0.4 2 175 2.5 0 0.5 Hard 0.55 2 185 3 0 0.4 Extra Hard 0.8 2 200 4 0 0.3 Snow 0.1 0.35 150 2 0 0.7 34 CHAPTER 3 : THEORY With this deterministic modeling approach, the influences of rock-shape on the dynamics and persistence of runout can be simulated. This is important because the model is highly sensitive to rock shape, which in the case of rebound approaches has to be treated with stochastic methods (Bourrier et al., 2009). The role of rock-shape in runout dynamics is crucial in determining the rotational and rebound behavior. For specific rock-shapes characteristic of geological zones, distinctive runout behavior such as extreme jump heights and runout distances are observed. Dynamics of this kind are decisive for hazard mapping and rockfall protection structures; and with full three-dimensional data of rock position, velocities, rotations and energies (see Table 3.3 for a full list), rockfall management and the design of protection structures can be optimized. The listed data (Table 3.3) are available as *.log files which can be generated from simulations. The application of rigid-body theory to rockfall modeling has advanced the capacity to include detailed and hazard specific information on rock-shapes and sizes. This allows the inclusion of lithology and geological setting to establish realistic initial conditions for a hazard simulation. Table 3.3: RAMMS::ROCKFALL dynamic data. Data symbol Description Units t time s x X coordinate CoM (CoM = Center of mass) m y Y coordinate CoM m z Z coordinate CoM m p0 Quarternion p1 Quarternion p2 Quarternion p3 Quarternion vx Velocity (X) CoM ms−1 vy Velocity (Y) CoM ms−1 vz Velocity (Z) CoM ms−1 wx Angular velocity about inertial axis (X) rot · s−1 wy Angular velocity about inertial axis (Y) rot · s−1 wz Angular velocity about inertial axis (Z) rot · s−1 Etot Total energy including potential energy with kJ respects to the lowest point in simulation domain Ekin Total kinetic energy kJ Ekintrans Translational kinetic energy kJ Ekinrot Angular kinetic energy kJ zt Height position of lowest point on rock-body’s m Fn surface Normal contact force kN Ft Tangential contact force kN Slippage Slippage distance m µs Coulomb friction value µ = tanθ vres Absolute velocity ms−1 wres Absolute angular velocity rot · s−1 jumpH Jump height, plumb-vertical distance of CoM to m projDist the terrain surface Projected distance traced over ground from release m point 35 CHAPTER 3 : THEORY Data symbol Description Units Jc Distance to the center of SD m J HJ c Distance between SD at Jc to CoM m SD Distance between two impacts m 3.10 Terrain Model The RAMMS::ROCKFALL model simulates the trajectories of falling rocks in three-dimensional terrain using a high-resolution digital elevation model. The terrain coordinate system is taken as the simulation frame O. Terrain elevation Zm is specified for each coordinate pair (Xm , Ym ), for which four coordinate pairs define the vertices of planes constructing the tessellated terrain surface (Figure 3.10). The planes are flat, while their orientation is different because the Zm elevation of each coordinate pair can differ. The distance between coordinates (Xm , Ym ) defines the model terrain resolution and therefore the accuracy with which the terrain morphology is represented. Typically, a resolution between 1 m and 10 m is employed for simulations, as this accurately models important terrain features such as gullies and cliffs. The properties of each plane can be varied to take into account variable surface properties, such as hardness and roughness. For example, forests are defined to be planes with enhanced drag. Figure 3.10: High resolution three dimensional terrain model, forms simulation frame O in which the four sided planes form the tessellated terrain surface with which the rock-body can come into contact with. 36 CHAPTER 4 : SETTING UP A SIMULATION 4 Setting up a simulation 4.1 Preparations To successfully start a new RAMMS project, a few important preparations are necessary. Topographic input data (DEM in ASCII format), project boundary coordinates and georeferenced maps or remote sensing imagery should be prepared in advance (.tif format and .tfw-file, maps and imagery are not mandatory, but nice to have). Georeferenced datasets have to be in the same Cartesian coordinate system (e.g. Swiss CH1903 LV03) as the DEM. Polar coordinate systems in degree (e.g. WGS84 Longitude Latitude) are not supported. For more information about specific national coordinate systems please contact the national topographic agency in your country. 4.1.1 Topographic data - Digital Elevation Model (DEM) The topographic data is the most important input requirement. How a rock moves (i.e. final runout distance, jump heights, translational and rotational velocities and total energy content of the rock) is strongly influenced by the interaction with the terrain. Therefore the simulation results depend strongly on the resolution and accuracy of the topographic input data. We recommend a DEM resolution of 5 m or better for meaningful rockfall simulations in complex terrain. However if such high spatial resolution DEM data is not available, the user has to keep in mind that important terrain features may not be correctly represented by the DEM. This can lead to unrealistic simulation results. Before you start a simulation make sure all important terrain features are represented in the input DEM. RAMMS is able to process the following topographic data: • • ESRI ASCII grid (Figure 4.1) ASCII X, Y, Z single space data (Figure 4.2) These data types are also available e.g. from www.swisstopo.ch. Because RAMMS needs the topographic data as an ESRI ASCII grid, ASCII X, Y, Z data can be converted within RAMMS into an ESRI ASCII grid. At this stage no other data types are processable. The user must therefore prepare the topographic data according to this limitation. The header of an ESRI ASCII grid must contain the information shown in Figure 4.1. Figure 4.1 Example ESRI ASCII grid. Figure 4.2 Example ASCII X, Y, Z single space data. 37 CHAPTER 4 : SETTING UP A SIMULATION Conversion into ESRI ASCII grid An ESRI ASCII grid can be created in ArcGIS with the function ArcToolbox → Conversion Tools → From Raster → Raster to ASCII. In RAMMS it is possible to import ASCII X, Y, Z single space data and convert the data into an ESRI ASCII grid (using Track → New... → Convert XYZ to ASCII Grid ). 4.1.2 Project and Scenarios A project is defined for a region of interest. Within a project, one or more scenarios can be specified and analyzed. For every scenario, a calculation can be executed. A project consists therefore of different scenarios (input files) with different input parameter files (release and friction files). The basic topographic input data is the same for every scenario. If you want to change the topographic input data (e.g. change the input DEM resolution or the project boundary coordinates) you have to create a new project. Other input parameters (like rock shape, surface information, end time, time step etc.) can be changed for every scenario. Figure 4.3 The same project extent (area of interest) can be used to calculate different scenarios with different input parameters. 4.2 Preferences To ease the file handling we recommend setting the preferences prior to start with simulations. The preferences set the path to the working directory and the necessary files such as DEM, maps and orthoimagery. If the path to the maps and the imagery files is set correctly in the preferences, RAMMS will automatically open the georeferenced data when you generate a project. Use Track → Preferences to open the RAMMS preferences window or click the button resetting the general preferences use Help → Advanced… → Reset General Preferences. . For 38 CHAPTER 4 : SETTING UP A SIMULATION Figure 4.4 General tab of RAMMS preferences. Figure 4.5 Rockfall tab of RAMMS preferences. General Tab Setting Purpose Working Directory Set your working directory VERY IMPORTANT: DO NOT USE BLANKS in the working directory path! Set the folder where you place your georeferenced digital maps (consists of a .tif file and a corresponding .twf file (world-file). Set the folder where you place your digital georeferenced orthophotos (aerial picture, consists of a .tif file and a corresponding .twf file (world-file). Set the folder where you place the Digital Elevation Models (format ASCII grid) Map Directory Orthophoto Directory DEM Directory Rockfall Tab Setting Purpose Nr of Colorbar Colors Set default number of colorbar colors. Rock Magnification *X GIF-Animation Interval [s] Set values between 1 and 100 for magnification of the rock size in the visualization. Set interval for GIF animation images in seconds. Background Color Set background color. Animation Delay [s] Set animation delay to the animation speed. The following exercise Working directory shows how to choose a new working directory. All further settings can be changed in a similar manner. The settings are saved, until they are changed again manually. 39 CHAPTER 4 : SETTING UP A SIMULATION Exercise 4.1 : Working directory Choosing the right working directory is very useful and saves a lot of time searching for files and folders. VERY IMPORTANT: Do NOT use blanks or special characters in the path names! • • Click (or use Track → Preferences or Ctrl+P) to open the RAMMS preferences window. Click into the field Working directory. A window pops up where you can choose your new working directory. Click OK in both windows. Do this also for other directories if necessary. Figure 4.6 RAMMS preferences Figure 4.7 Browse for the correct folder. 40 CHAPTER 4 : SETTING UP A SIMULATION 4.3 Creating a new project A new project is created with the RAMMS Project Wizard, shown in the exercise below. The Wizard consists of four steps: Exercise 4.2: How to create a new project • • Click or Track → New... → Project Wizard to open the RAMMS Project Wizard. The following window pops up. Figure 4.8 RAMMS Rockfall Project Wizard Step 1 of 4 41 CHAPTER 4 : SETTING UP A SIMULATION Continuation of exercise 4.2: How to create a new project Step 1: • Enter a project name (1) • Add some project details (2) • The project location (3) suggested is the current working directory. To change the location click into the Location field. A second window appears and you can browse for a different folder (see figure below, VERY IMPORTANT: Do NOT use BLANKS or special characters in the project location path!). • Click Next (4) Figure 4.9 Step 1 of the RAMMS Project Wizard Project Information. Figure 4.10 Window to browse for a new project location. Step 2: • Click into the Select DEM-file field to browse for the DEM file. Locate your DEM file in the folder set in the RAMMS preferences. • The Grid Resolution field shows you the dimension of a single grid cell. • Click Next. Figure 4.11 Step 2 of the RAMMS Project Wizard: GIS Information. 42 CHAPTER 4 : SETTING UP A SIMULATION Continuation of exercise 4.2: How to create a new project Step 3: Enter the X- and Y-coordinates of the lower left and upper right corner of your project area, using the Swiss Coordinate System CH1903 LV03 (or another Cartesian coordinate system), as it is shown below for the Vallée de la Sionne area. Figure 4.12 Project coordinates: lower left and upper right corner of project area. Figure 4.13 Step 3 of the RAMMS Project Wizard: Project Boundary Coordinates. Step 4: • Check the project summary, especially if a DEM-file was found. • To make changes click Previous, to create the project click Create Project. • If several matching .tif-files exist, RAMMS shows a list with all these files. Figure 4.14 Step 4 of the RAMMS Project Wizard: Project Summary. Project creation: The creation process can take a while. Different status bars will pop up and show the progress of the project creation process. 43 CHAPTER 4 : SETTING UP A SIMULATION The following files will be created in the project folder. Figure 4.15: Files and directories created with a new RAMMS::ROCKFALL project. Table 4.1: Listing of files and directories created with a new RAMMS::ROCKFALL project. File / Folder Purpose doc (folder) Folder containing input and output log files logfiles (folder) Project creation and calculation log files output (folder) Folder containing calculated scenarios rocks (folder) Folder to save rock files (.pts) dhm.asc ASCII grid with altitude values dhm.sav Internal binary file containing DEM information slope.asc Calculated slope angles of DEM curvidl.asc Calculated planar curvatures of DEM _.xml Input file _.xyz Topographic data used in RAMMS 44 CHAPTER 4 : SETTING UP A SIMULATION 4.4 Working with the interface Once the project is created, there are several useful tools which can be helpful when working with RAMMS. They are explained in the exercises below. 4.4.1 Moving, resizing, rotating, viewing Exercise 4.3a: Moving and resizing the model a. Terrain model has a dimension of 100% or smaller: • By clicking on the arrow the model can be moved and resized. Figure 4.16 Active project with lines and corners for resizing. • • To move the model without changing size or aspect ratio, move the cursor to the model and check if the cursor turns to . Then click and hold the left mouse button and drag the model to the desired position. To resize the model without changing the aspect ratio, use the mouse wheel to zoom in or out. Alternatively, you can resize the model by changing the percentage value in the horizontal toolbar . b. Terrain model has a dimension > 100%: • • All steps explained above are still possible. In addition to this, the white hand right next to the rotation button becomes active as well. After clicking on this so-called view pan button the model. , it is also possible to move 45 CHAPTER 4 : SETTING UP A SIMULATION Exercise 4.3b: Rotating the model After activating the rotation button , the model can be rotated along the rotation axis, by moving the cursor directly on one of the axis until the cursor changes from Otherwise a freehand rotation in any direction is possible. to . Figure 4.17 “Active” project with rotation axes. Exercise 4.3c: How to switch between 2D and 3D mode Click to switch from 3D to 2D view. This button then changes to will return to 3D view. Figure 4.18 3D view of example model. and by clicking again, you Figure 4.19 2D view of example model. In 2D mode you have all possibilities that work for the 3D mode. It works for input files as well as for simulations. For the following functions of RAMMS it is necessary to switch from 3D to 2D view: INPUT: OUTPUT: Draw New Release Points Draw Line Profile Draw New Release Line Draw New Polygon Shapefile 46 CHAPTER 4 : SETTING UP A SIMULATION 4.4.2 Colorbar As soon as a parameter is shown in the project, the colorbar appears on the right side of the main window. It can be turned on and off by clicking on . The colorbar can be moved anywhere in the screen (and can get lost). Use Project → Get Colorbar to find a lost colorbar. Exercise 4.3d: Editing the colorbar Changing the minimum and maximum values of the colorbar as well as changing the number of colors used is done in the panel ROCKFALL (right of the map window) in the tab Display. • • • • • Simply type a new value into the respective field and hit the return key on the keyboard. The display will be refreshed. To view the underlying topography or image, you can change the transparency. ATTENTION Values < x.xxx are not displayed! The cut off depends on the min and max values as well as on the number of colors. Make sure that you have the range of values you want to display! Figure 4.20 The Display tab. Open the editing window by either choosing Edit → Colorbar Properties or clicking in the vertical toolbar. To change the colorbar properties simply click into the field you want to change, then click OK. Under Edit → Colorbar White Color the textcolor of the colorbar can be changed to white. This can be useful when changing the background color of your project to black or white Track → Preferences → Rockfall Tab → Background Color. Figure 4.21 : The Colorbar Properties window. 47 CHAPTER 4 : SETTING UP A SIMULATION 4.4.3 Changing maps and remote sensing imagery It is possible to change the map or imagery of a project anytime. Take into account, that the corresponding .tfw-file (world-file) has to be in the same folder as the actual map (.tif ). If this is not the case, the map will not be found! Exercise 4.3e : How to add or change maps a. Add or change a map: • • Go to Extras → Map… → Add/Change Map or click . If more than one map is found, the following window pops up, listing the maps found: Figure 4.22 Window to choose map image. • • Information on the image dimensions (x-Dim and y-Dim, pixel) and size (in MB) are provided and might be a selection criterion. Select the map you wish to add and click Load selected map. b. Map not found: • If the question "No map found, continue search?" appears, you either don’t have an appropriate map, the map-folder directory is set wrong or the map is saved in a different folder. In the second case click Yes and choose the correct folder. • Click No to cancel search or click Yes to continue search. • A window pops up to browse for the correct map location and file. c. Change remote sensing imagery: • Go to Extras → Image… → Add/Change Image or click . 4.4.4 How to save input files and program settings Once a project is created, it is saved under the name and location you entered during step 1 of the RAMMS::ROCKFALL Project Wizard (Figure 4.8). The created input file has the ending .xml. The second situation, in which the input file is saved automatically, is when a simulation is started. The saved input file has the same name as the created output file. 48 CHAPTER 4 : SETTING UP A SIMULATION Exercise 4.3f : How to save input files and program settings manually a. Input file: • In case you want to save the input file manually before running a simulation, go to Track → Save. This is helpful, when for example a release line was loaded but you wish to close the project before doing the simulation. • If you wish to save a copy of your file under a new name, go to Track → Save • • Copy As or click . A window pops up to choose an old file which should be overwritten or to type in a new name, then click Save. Continue working on the original file, not the just saved one. b. Position settings • If you have moved and/or or rotated your project for a better view, you can save this position by going on Extras → Save Active Position. • You can now get back to this position anytime by choosing Extras → Reload Position. Exercise 4.3g : How to open an input file Close any active project file • • • • . Go to Track → Open → Input File or click . A window opens to browse for a rockfall input file (.xml). Click Open after the file name was selected. The project will be opened. Exercise 4.3h : How to load an optional shapefile • • • To load a shapefile go to GIS → Import Shapefile or click A window opens to browse for a shapefile (.shp). Click Open after the file was selected. . 49 CHAPTER 4 : SETTING UP A SIMULATION Exercise 4.3i : How to open an output file/rockfall simulation Close any active project file • • • • • . Go to Track → Open... → Rockfall Scenario or click . Choose a scenario in the output folder. Click OK. Choose the File Name Filter, click OK. Click No if you will open only the chosen scenario, Yes if you will open another scenario. Go to Track → Open... → Rockfall Simulation Files (Ctrl+A) A window opens to browse for rockfall simulation files (.rts). Click OK. Go to Track → Open... → Rockfall Trajectories (Ctrl+T) A window opens to browse for rockfall simulation files (.rts). Click OK. The simulation(s) will be opened. 4.4.5 About RAMMS Some information about the RAMMS installation on your computer is found here: Help → About RAMMS. Figure 4.23: About RAMMS::ROCKFALL 50 CHAPTER 4 : SETTING UP A SIMULATION 4.5 Rock Input 4.5.1 Rockfall starting zone A rockfall starting zone can be specified by setting a release point, drawing a release line (containing many release points) or defining a release area (polygon). The definition and localization of a rockfall starting zone has a strong impact on the results of RAMMS simulations. Therefore we recommend using reference information such as photography, GPS measurements or field maps to define release points, release lines and release areas. This should be done by persons with experience concerning the topographic, geological and meteorological situation of the investigation area. The release points, lines and areas can only be drawn in 2D mode. Release Point There are two possibilities to set a new release point: 1. Click or use Input → Release... → Set New Release Point, move the cursor to the desired position and click with the left mouse button at the position of the release point. 2. Use Input → Release... → Enter Coordinates (X/Y) to manually enter the coordinates (X/Y) of a release point. Save your release point location with Input → Release... → Save Point Location. See exercise 4.4a below for more details. Release Line Draw a new release line by clicking or use Input → Release... → Draw New Release Line. Draw the line by clicking points with your left mouse button and finish the line by a click on your right mouse button. There are two possibilities to load an existing release line: 1. 2. Use Input → Release... → Load Existing Release Line Use the file-tree in the General tab in the ROCKFALL panel on the right side. Click on the appropriate shapefile to load the release line into the visualization (see Figure 4.24). Click Refresh Tree to refresh the file-tree. Figure 4.24 File-tree at the bottom of the right tab. 51 CHAPTER 4 : SETTING UP A SIMULATION Release Area Draw a new release area by clicking or use Input → Polygon Shapefile... → Draw New Polygon Shapefile. Finish the release polygon with right-click. It is possible to define several release areas within the same shapefile. There are two possibilities to load existing release areas: 1. Use Input → Polygon Shapefile... → Load Existing Polygon Shapefile 2. Use the file-tree in the General tab in the ROCKFALL panel on the right side. Click on the appropriate shapefile to load the release area into the visualization. Click Refresh Tree to refresh the file-tree. Exercise 4.4a : How to define a release point • • Switch to 2D mode by clicking . Activate the project by clicking on it once. • • Click . Click into the project where you want to define your rockfall release point (1). Figure 4.25 Define a release point and find its coordinates. • • The lower right status bar then displays the position of the release point within the terrain (2). To save the coordinates of the release point go to Input → Release → Save Point Location and enter a file name. 52 CHAPTER 4 : SETTING UP A SIMULATION Exercise 4.4b : How to load an existing release point • Activate the project by clicking on it once. • • Click . The mouse cursor changes to an arrow. Click on the project with the middle button. Select release point file .txt and click open. The release point appears in the project. Exercise 4.4c : How to create a new release line • • Switch to 2D mode by clicking . Activate the project by clicking on it once. • • Click . Click into the project where you want to start drawing the outline of the release line. Continue drawing the release line by moving the cursor and clicking the left mouse button. If you would like to delete one step of the drawing, click the middle mouse button. To end the release line, click the right mouse button. • • Figure 4.26 Project with emerging release lines. Before the release line is created, you have to answer the following questions: • Add more polylines? You can either answer with Yes and create a second release line as explained above or answer with No and continue with the next step. • Choose a new release line file name: e.g. line_rel, the addition _rel helps the user to run a simulation because the model recognizes the shapefile as a release line. 53 CHAPTER 4 : SETTING UP A SIMULATION Exercise 4.4d : How to load an existing release line • • Choose Input → Open Point/Line/Area File. Select the release file (.shp) and click Open. The release line appears in the project. • Or simply click the name of the selected release file (.shp) in the file tree in the ROCKFALL panel (see Figure 4.27). The release line immediately appears in the project. Figure 4.27 File Tree. 4.5.2 Rock builder RAMMS offers the Rock Builder to create realistic point cloud files from predefined rock shapes. We strongly recommend using the Rock Builder instead of using spheres or cuboids for rockfall simulations as the rock shape has major impact on the output of the rockfall simulations with RAMMS. There are already several realistic rock shapes included in the library. Exercise 4.5 demonstrates how to create a realistic rock shape with the Rock Builder tool. The rock mass and volume for realistic rocks have to be defined in the Rock Builder and have to be saved in the rock .pts file. You cannot change the rock volume or mass afterwards. 54 CHAPTER 4 : SETTING UP A SIMULATION Exercise 4.5 : How to create a rock with the Rock Builder • Click to open the Rock Builder. Figure 4.28 Rock Builder • Select a predefined rock shape from the rock library (1) or select a .pts-file of a rock shape from another source (2). • By pressing the left mouse button and moving the mouse you can move the 3D visualization of the rock interactively and look at it from any direction (3). • The rock has predefined initial rock characteristics (4). When changing the rock density, the Rock Builder automatically calculates the new mass of the rock. After changing the mass of the rock, click to adjust the volume and the dimensions (X/Y/Z) of the rock. Enter a new rock volume and click adjust the rock mass as well as the rock dimensions (X/Y/Z). • to Enter a file name or use the suggested name and click to save the new .pts-file (5). RAMMS automatically creates a rocks folder in your project directory. It’s strongly 55 CHAPTER 4 : SETTING UP A SIMULATION recommended to save your new rocks in this directory. • Click Close to close the Rock Builder window. Once a rockfall simulation has been finished and opened in RAMMS, you can find additional information on the rock for every trajectory in the ROCKFALL panel, tab Rock, see Figure 4.29. Use the left mouse to move the visualization rock in any direction. Please consider that you have to be in the trajectory mode and activate a specific trajectory to get information about the rock. Figure 4.29 Rock Information 56 CHAPTER 4 : SETTING UP A SIMULATION 4.6 Terrain/Forest Input After you successfully created a new project and defined the rock input, two more topics have to be considered before starting a rockfall simulation: • • Terrain Material Forest areas 4.6.1 Terrain material Define a global terrain category and optionally draw or import polygon shapefiles for areas with differing terrain types (from extra soft to extra hard with several steps between). Choose appropriate filenames for the different shapefiles while generating them so there is no confusion which shapefile belongs to which terrain type. Exercise 4.6a below demonstrates how to specify the terrain types. Each terrain category defines the parameters of the rockfall slippage friction law as well as a ground drag value. The ground drag value accounts for the viscoplastic drag due to terrain deformation during ground contact. The terrain classes are described in detail in Table 3.1. The friction parameters and drag forces should be defined for every terrain material shapefile. The list below gives an overview on some possible terrain materials. You can choose between the categories: Snow, Extra Soft, Soft, Medium Soft, Medium, Medium Hard, Hard and Extra Hard. The used values have a large impact on the simulation results and therefore it is important to critically think about the chosen parameters. The Exercise 4.6b shows how to define these terrain material parameters. Table 3.3 gives an overview on the different predefined parameters that are used for the categories. Please use these parameters with the awareness that they are currently based on case studies. It remains an ongoing research task to reassure these parameters rigorously. ASCII-files exist for every friction parameter µmin, µmax, β (average gradient from µmax to µmin after ground contact of a rock), κ (average gradient from µmin to µmax after ground contact of a rock) and drag, if the shapefiles in the friction tab or forest tab are specified. If only the overall terrain material is specified (and no friction and forest shapefiles) no ASCII-files will be created and used. 57 CHAPTER 4 : SETTING UP A SIMULATION Exercise 4.6a : How to create a shapefile with specific terrain characterization • • Switch to 2D mode by clicking . Activate the project by clicking on the map once. • • • Click Draw New Polygon Shapefile . Click into the project where you want to start drawing the outline of the shapefile. Continue drawing the shapefile by moving the cursor and clicking the left mouse button. Finish the polygon by clicking the right mouse button. The polygon will be closed automatically. Figure 4.30 Project with emerging polygon shapefile. Before the polygon shapefile is created, you have to answer the following questions: • Add more polygons? You can either answer with Yes and create a second polygon as explained above or answer with No and continue with the next step. • Choose a new polygon file name: Enter a new name, according to the terrain material represented by the polygon(s) (e.g. bedrock). The ending *.shp is added automatically. The polygon shapefile will now be created and opened directly. • Create polygon shapefiles as described above for all the different and important terrain materials inside the area of interest. These polygons can then be loaded in the run a simulation dialogue. • Alternatively you can draw the polygon shapfiles in a GIS software and load them directly in the Run a simulation dialogue. 58 CHAPTER 4 : SETTING UP A SIMULATION 4.6.2 Forested area Forest has a major impact on runout and velocities of rockfalls. To include forested areas into a RAMMS simulations you need to specify the areas as polygon shapefiles as described in Exercise 4.6a. The same applies for rivers, lakes and swamps. Choose appropriate filenames for the shapefiles (see Exercise 4.6b below) and specify a forest type for every shapefile. It is possible to consider a gap while generating really detailed shapefiles on a small scale. RAMMS::ROCKFALL will apply a linear viscous drag force, which is acting only within the forest areas. Detailed information about the forest drag forces can be found in Chapter 3.8. Three different forest types are implemented in RAMMS::ROCKFALL: • • • Open Forest 20 m2/ha Medium Forest 35 m2/ha Dense Forest 50 m2/ha The difference between the forest types considers the stem wood area per hectare (basal area). The drag force is calibrated according to the NAIS document (“Nachhaltigkeit und Erfolgskontrolle im Schutzwald, Frehner et al. 2005). This document describes the silvicultural management of protection forests for different forest habitats and specific natural hazards. The revised requirement profile of a rockfall protection forest includes numbers of trees and other information. Please consider that the rock mass is essential for the protective effect of a forested area. This simple but efficient forest representation applied in RAMMS::ROCKFALL will be further developed in the future at SLF/WSL. User feedback or comments are very welcome. Please contact [email protected] for any ideas or suggestions. 59 CHAPTER 4 : SETTING UP A SIMULATION Exercise 4.6b : How to create a shapefile to represent a specific surface cover • • Switch to 2D mode by clicking . Activate the project by clicking on the map once. • • Click . Trace the forest, river, lake or swamp outline by creating as many area polygons as necessary (proceed as in Exercise 4.6a "How to create a shapefile with specific terrain characterization.") and name your new shapefile according to the surface cover it represents (e.g. lake). A new shapefile with the ending *.shp is saved. Figure 4.31 Project with emerging polygon shapefiles which represent forested areas. • Create polygon shapefiles as described above for all the areas with different and important surface covers inside the area of interest. 4.7 Running a simulation To run a simulation you have to complete the steps described in the chapters above. If you wish to take into account different terrain materials and surface covers the corresponding shapefiles have to be created in advance as described in Exercise 4.6. Release lines and release shapefiles have to be generated in advance too as shown in Exercise 4.5. Exercise 4.7 “How to run a simulation” leads you through the required steps to run a rockfall simulation. The following tabs have to be completed subsequently: 4.7.1 General In this tab you specify the name of the output folder and the dump step (time interval between different dumps saved to disk). 4.7.2 Terrain Here you specify the overall terrain type and load the additional terrain shapefiles, specify their terrain type and load them to the list. The available terrain types are: 60 CHAPTER 4 : SETTING UP A SIMULATION • • • • • • • • Extra soft Soft Medium soft Medium Medium hard Hard Extra hard Snow A detailed description of the terrain types is given in Table 3.1. Please make sure that the selected shapes are depicted in the list otherwise they will not be considered in the simulation. 4.7.3 Forest Here you load the forest shapfiles and specify the forest type and/or the type Lake/River/Moor to stop rocks immediately. The available types are: • • • • Open Forest 20 m2/ha Medium Forest 35 m2/ha Dense Forest 50 m2/ha Lake/River/Moor A detailed description of the terrain types is given in Table 3.1. Please make sure that the selected shapes are depicted in the list otherwise they will not be considered in the simulation. 4.7.4 Release Here you specify the release type and load the according shapefile(s): • • • Point Line/Multipoint Area In the number of points field you can choose how many individual release points are nestled along the line or polygon. You can optionally give the rocks initial velocities and initial rotation velocities along all three axis (x, y, z). To set the rock offset (initial fall height of the rocks measured from the center of mass) you have two options. RAMMS can automatically calculate the minimal offset that is necessary to start the rock (Automatic). Alternatively you can set the rock offset manually. This offset should be high enough so that the rock is not sticking in the terrain and cannot start. 61 CHAPTER 4 : SETTING UP A SIMULATION 4.7.5 Rock In the Rock tab you can choose between three different types of rocks: • Artificial sphere (defined by the radius) • Artificial cuboid (defined by the x, y and z dimension) • Real rocks (defined in the Rock Builder) You can also choose a folder containing different rocks. You have to fill the folder with rocks generated with the Rock Builder in advance. All rocks in the specified folder will be calculated. To introduce variability into the rockfall simulation you can specify the number of random initial orientations of the rocks. This number multiplied with the number of rocks to calculate equals the number of total simulations to perform. This number is automatically updated and displayed in the Run ‘XXX’ Simulations button. 62 CHAPTER 4 : SETTING UP A SIMULATION 4.7.6 Exercise how to run a simulation Exercise 4.7 : How to run a simulation • • To run a simulation choose Run → Run Rockfall Simulation or click The RAMMS|Run Simulation window opens. Before clicking Run Simulation, you should check the input parameters. General Tab: (1) Select a specific output filename. If more than one trajectory is simulated, this filename corresponds to the basic scenario name. RAMMS automatically adds the different parameter variations to this name. 1 (2) Dump step(s) is preset by RAMMS to a default value of 0.02. This value is twice the time step. This means the data of every second time step is saved in the output. If you want the data of every time step you need to set the dump step to 0.01. If you want to save storage capacity you can set the dump step higher. (3) The Stop criterion is set automatically and depends on rock mass and rock stop velocity. The rock stop velocity ROCK_STOP_VEL may be set in RAMMS via Help → Advanced... → Additional Preferences... → Edit. Additionally you may choose an End time (s) to stop your simulation after a given time. The simulation stops at the first stop criterion to reach. 2 3 4 5 Figure 4.32 Tab General (4) Digital Elevation Model Information shows you which DEM is used for the simulation. (5) Activate the box Stop at first contact only if you wish to stop your simulation as soon as the rock reaches the terrain. 63 CHAPTER 4 : SETTING UP A SIMULATION Terrain Tab (1) Choose the category of the overall terrain material of your simulation area. (2) Click into the field to select a terrain material shapefile and choose the corresponding category of the specific terrain material. 1 2 (3) Click for each selected shapefile to add it to the list (only shapefiles in the list are considered in the calculation!). 3 4 (4) All defined shapefiles are listed. You can delete single shapefiles from the list. Figure 4.33 Tab Terrain Forest Tab (1) Click into the field to select a terrain material shapefile and choose the corresponding category of the specific terrain material. (2) Click for each selected shapefile. (3) All defined shapefiles are listed. You can delete single shapefiles from the list. 2 1 3 Please note: When loading multiple shapefiles for different terrain materials and surface covers be aware that the order of specification matters: the last shapefile dominates the others. Figure 4.34 Tab Forest 64 CHAPTER 4 : SETTING UP A SIMULATION Rock Tab → Rock (1) You can directly go back to the Rock Builder to change your rocks 1 (2) Choose rock type: Click Rock to run a simulation with a real rock shape which you produced before in the Rock Builder (Exercise 4.5). 2 3 (3) Select the .pts file of the rock you wish to simulate. A visualization of the selected rock is then shown in the rock window. Use your mouse to move the rock in any direction. The rock’s characteristics and dimensions are shown on the right side. (4) You can select the rocks folder in your scenario folder. The number of .pts files in the folder will be shown. On the right side you can check which rocks the folder includes. Select a file from the list to look at the rock in the window. 4 Figure 4.35 Rock Tab → Rock Rock Tab → Cuboid / Sphere 1 2 (1) Choose rock type: Click Cuboid / Sphere to run a RAMMS simulation with a cuboid / sphere. (2) Specify the volume of the cuboid by defining the length of the three axes X, Y and Z (m). Specify the Rock Radius of your rock sphere. Use your mouse to move the cuboid / sphere interactively in any direction. You find the rock characteristics and dimensions on the right side of the Rock tab. Figure 4.36 Rock Tab → Cuboid 1 2 Figure 4.37 Rock Tab → Sphere 65 CHAPTER 4 : SETTING UP A SIMULATION Release Tab for Point release (1) Enter the number of orientation per release point. random (2) Choose release type: For a calculation with a release point, click Point. Rock position: The coordinates of your release point are shown automatically. If not, or if you want to change them, simply type in the correct values manually. (3) Define the Initial Velocity (m/s) and the Initial Rotational Velocity (rad/s) of the rock-body at release time. This can be useful for cases where the values are known or specific situations should be simulated. 1 2 (4) Select Rock Z-Offset Automatic: RAMMS defines the Z-offset so that the starting of the rock is guaranteed. Select Rock Z-Offset Manual: Type in a value (m) to define the release height of a rock above the terrain. Select Use Multi to release several rocks at the same point but different release heights. Delta specifies the heights (m) and Steps defines how often Delta is applied. 3 4 5 Figure 4.38 Tab Release (5) RUN “XXX” SIMULATIONS shows how many rocks will be simulated in the defined scenario. Click on the button and the simulation will start. 66 CHAPTER 4 : SETTING UP A SIMULATION Release Tab for Line / Area release (1) Choose release type: For a calculation with a release line, click Line. For a calculation with a release area, click Area. (2) Select a release polyline or release area file you created before. For the rock starting points within a line, RAMMS uses the line points specified during the creation of the release line (see Exercise 4.4c). Within the release area, the starting points (Grid Points) are automatically calculated by RAMMS. (3) The Nr of Grid Points show how many rocks will be simulated in minimum (within one orientation). You can vary the number of used grid points and with it the number of simulated rocks in minimum. How to select the number of random orientations is described in the Release tab for Point release section. Figure 4.39 Line Release Tab Figure 4.40 Area Release Tab 4.7.7 Scenario Preparation and Simulation Process If the scenario already exists, RAMMS will ask you if you want to overwrite the scenario: Figure 4.41 Scenario already exists dialogue. If you click No or Cancel, you will be able to rename your scenario in the General tab. Click Yes, and the old scenario is deleted (all the files and subdirectories within the scenario folder). Before RAMMS can start the simulation process, it will show you the following window: 67 CHAPTER 4 : SETTING UP A SIMULATION Figure 4.42: Rockfall simulation information window. This window shows the number of planned rockfall simulations (95 in this example, red field), as well as the number of CPU’s that your PC offers (8, green field). In the field below (blue field) you can enter the number of CPU’s you want to use simultaneously for this rockfall scenario. The more you specify, the faster your scenario will be calculated. It is best practice to specify one less than the number of CPU’s available (if you click OK with an empty field, this will happen). Scenario Preparation If you specified both terrain and/or forest shapefiles, RAMMS will gather the data and show one of the following windows: Figure 4.43: Scenario Preparation - Gathering Data window. After that, RAMMS creates all the input files for this scenario… Figure 4.44: Scenario Preparation - Preparing Scenario window. …and then starts the simulations: Figure 4.45: Scenario Preparation - Start Simulation window. 68 CHAPTER 4 : SETTING UP A SIMULATION For every rock trajectory, RAMMS generates an output file (.rts). After the completion of all simulations or if the user clicks Cancel, RAMMS will open the simulation files in Statistic Mode, see next chapter, and present the Scenario Logfile: Figure 4.46 RAMMS Scenario Logfile 69 CHAPTER 4 : SETTING UP A SIMULATION If some of the rocks could not release, because the specified Z-offset was not big enough, RAMMS will show a message like this: Figure 4.47 Message about rocks that could not release. 70 CHAPTER 5 : RESULTS 5 Results RAMMS offers a variety of tools and visualizations to interpret the simulation results. There are two different modes to open simulation results: a) Statistic Mode to visualize a large number of simulations (> 100) and b) Trajectory Mode to analyze single trajectories in detail. The two modes are described in this chapter. 5.1 Statistic Mode In Statistic Mode, we try to answer the following questions: • Which cells are affected by which trajectories? • How many trajectories fly over a given cell? • What are velocity, kinetic energy, jump height and rotational velocity values in a given cell? • What is the probability that a rock reaches a given cell? RAMMS analyses every trajectory and then saves jump height, velocity, kinetic energy and rotational velocity values in the cells affected by the trajectories. Example: We assume that RAMMS has saved 63 values (63 values of jump height, 63 values of velocity, etc. ) in a given cell, see figure below (showing only part of the 63 values): Figure 5.1 Trajectory values in a given cell 71 CHAPTER 5 : RESULTS RAMMS then calculates the following statistic values for this given cell out of the 63 values (e.g. Jump Height): • Mean value (mean) → 3.54 m • Median value (50%) → 3.49 m • 90% Quantile value (90%) → 5.17 m • 95% Quantile value (95%) → 6.26 m • 99% Quantile value (99%) → 6.72 m • Maximum value (max) → 6.72 m Figure 5.2 Statistic values of a given cell 5.1.1 Quantile Values The default quantile values in RAMMS::ROCKFALL are 90%, 95% and 99%. These three values can be changed by the user, see details below. The Mean, Median and Max values are fixed and cannot be changed. How to change the Quantile Values Use Help → Advanced… → Additional Preferences… → Edit or use the button Preferences) in the lower left toolbar. (Additional 72 CHAPTER 5 : RESULTS ………. Figure 5.3 Additional Preferences: Quantile Values Find the keyword QUANTILE_VALUES, change the values accordingly and press the Save button. Changing these values results in adjusted statistical analyses and dropdown menus, according to the values the user entered (and saved!). Figure 5.4 Adjusted quantile values in Statistic Mode; Left: Statistic Summary Plot, Right: Quantile dropdown menu in upper right toolbar of GUI. 5.1.2 Statistic Vocabulary Probability Density Function (PDF): Wikipedia: “The probability density function (PDF), or density of a continuous random variable, is a function that describes the relative likelihood for this random variable to take on a given value. The probability of the random variable falling within a particular range of values is given by the integral of this variable’s density over that range—that is, it is given by the area under the density function but above the horizontal axis and between the lowest and greatest values of the range. The probability density function is non-negative everywhere, and its integral over the entire space is equal to one.” 73 CHAPTER 5 : RESULTS Cumulative Distribution Function (CDF): Wikipedia: “In probability theory and statistics, the cumulative distribution function (CDF), or just distribution function, describes the probability that a real-valued random variable X with a given probability distribution will be found to have a value less than or equal to x.” Boxplot: Wikipedia: “In descriptive statistics, a box plot or boxplot is a convenient way of graphically depicting groups of numerical data through their quartiles. Box plots are non-parametric: they display variation in samples of a statistical population without making any assumptions of the underlying statistical distribution. The spacings between the different parts of the box indicate the degree of dispersion (spread) and skewness in the data, and show outliers.” Minimum Value Maximum Value Figure 5.5 Boxplot Explanations (Q1: lower quartile = 25 %, Q3: upper quartile = 75 %, IQR: interquartile range). 74 CHAPTER 5 : RESULTS 5.2 Statistic Mode Open a simulation scenario with Track → Open… → Rockfall Scenario or click then choose a scenario in a project’s output folder. in the toolbar and Figure 5.6 Browse for Scenario Folder. Click OK to choose the selected scenario. Figure 5.7 The file name filter shows information about the scenario that you are opening. You can enter a file string or click OK to open all files. Enter a file name filter for the specific results or click OK, if you are interested in all the simulations in the scenario folder. Click OK to proceed. 75 CHAPTER 5 : RESULTS Figure 5.8 Open more Scenarios? If you would like to open several scenarios, click Yes to choose another scenario from the output folder. It is important that the scenarios are saved in the same project folder. Click No if you want to analyze only the results from one scenario. RAMMS will open the scenario and show the 95%-Quantile of the kinetic Rock Energy (kJ). The 95%Quantile is the default selection of the quantile dropdown menu in the upper right toolbar. You can change the default selection in the Additional Preferences (Keyword: QUANTILE, values between 0 - 5 correspond to the position of the quantile in the dropdown menu, see Figure 5.4). The ROCKFALL tab on the right shows useful Statistic Mode information. The trajectory mode should be OFF – you are in the statistic mode. You find general information about the selected scenario: • Nr of Trajectories and Average Slope (=Pauschalgefälle: min, mean, max) Figure 5.9 StatisticStatistic Mode information is shown in the panel. (Min, Q1, parameter Mean, • 8-Point information ofright ROCKFALL the selected Median, Q3, Max, IQR, StdDev). In Statistic Mode, only Jump Height (H), Rock Velocity (V), Resultant Rotational Rock Velocity and Kinetic Rock Energy (E) results are available ( ). 76 CHAPTER 5 : RESULTS Figure 5.10 Statistics Mode: Dropdown menu Results All other results are available in Trajectory Mode only. For the visualization of the parameters you can choose between the values Mean, Median, 90%, 95%, 99% or Max values. The dropdown is located in the upper toolbar . The menu Statistics offers the following functions: Figure 5.11 Statistics Mode: Menu Statistics. • Summary Plot (statistics summary of the selected parameter) • Barrier Plot (statistics of line profile or polygon area of selected parameter) • Nr of Rocks • Nr of Deposited Rocks • Reach Probability (Source) • Reach Probability (Total) 77 CHAPTER 5 : RESULTS In the horizontal toolbar you can find the following functions: • Barrier Plot • Line Profile • Cell Info File • Quantile dropdown menu 5.2.1 Summary Plot Choose the result parameter that you are interested in (e.g. Jump Height, Rock Velocity, Kinetic Rock Energy or Resultant Rotational Rock Velocity). The results appear in the main window. Exercise 5.1 shows how to produce and analyze a Summary Plot. Exercise 5.1 : How to analyze the Statistics Summary Plot. • Switch to 2D mode by clicking • Activate the project by clicking on it once. Be sure that you are in the Statistics Mode . (Trajectory Mode = OFF in the right toolbar). • Go to Statistics → Summary Plot. • A window opens, displaying the Statistics Summary Plot. You can save, print or edit the plot by clicking one of the buttons on the lower left corner. . 78 CHAPTER 5 : RESULTS 1 2 3 4 Figure 5.12: Statistics Summary Plot. (1) (2) (3) (4) 5.2.2 Data information Probability Density Function PDF Boxplot Cumulative Distribution Function CDF Barrier Plot If you need to analyze special areas (region of a dam, planned or realized rockfall nets, etc.) then the Barrier Plot is a good choice. A Barrier Plot can be created for a line profile or a polygon region (line profile and polygon are shapefiles). A Barrier Plot contains the same statistical information as a Summary Plot, but for a certain region of interest (line or polygon). Barrier Plot from new Line Profile Draw a line profile by clicking (e.g. a dam or places that you are specifically interested in e.g. a place where several trajectories pass through). RAMMS opens both a Line Profile Plot and the Barrier Plot for the line: 79 CHAPTER 5 : RESULTS Figure 5.13 Line Profile Plot Figure 5.14 Barrier Plot of a line profile. Scenario and line profile name are marked in the upper right corner (red box). 80 CHAPTER 5 : RESULTS Barrier Plot from file Use Statistics → Barrier Plot or the horizontal toolbar button shapefile you wish to create a Barrier Plot from. to select a polyline or polygon A window opens, displaying the Statistics Barrier Plot (see figure above). In the Data information part of the Barrier Plot you find the information about the selected scenario and the name of either the polyline or the polygon shapefile. Additionally you will find a statistical summary with the most important statistic values. Figure 5.15 Data information part of Barrier Plot 5.2.3 Number of Rocks Number of rocks that passed through a given cell. 5.2.4 Number of Deposited Rocks Number of rocks that stopped in a given cell. 5.2.5 Reach probability Source: The probability that a rock arrives in a given cell. The release cells (source) feeding a given cell are taken into account when calculating the Source reach probability. Total: Same as above, but release cells are not taken into account; Total reach probability is calculated from total released rocks. 81 CHAPTER 5 : RESULTS 5.3 Trajectory Mode To analyze simulation results in more detail, the rocks can be opened in Trajectory Mode. This mode enables a detailed analysis of single trajectories of specific rocks. No statistic is available in Trajectory Mode. Figure 5.16 Rockfall trajectories; different colors depict different kinetic rock energies (KJ). 82 CHAPTER 5 : RESULTS 5.3.1 Open results in Trajectory Mode Open trajectories with Ctrl+T or go to Track → Open → Rockfall Trajectories. Choose the trajectories that you are interested in from the output scenario folder and click Open. Figure 5.17 Open trajectories dialog window It is suggested to open only up to 100 single trajectories at one time (e.g. from a specific scenario). Although it is possible to open more trajectories, it is not recommended, because the memory usage will increase strongly and the handling of your visualization will get very slow. Control if the trajectory mode is ON (in the general tab of the right field) and the toolbar shows the number of trajectories. The buttons the simulation. provide quick access to Jump Height, Velocity and Kinetic Rock Energy of 5.3.2 Visualize different parameters The drop down menu Results offers the following functions in the trajectory mode: 83 CHAPTER 5 : RESULTS Figure 5.18 Trajectory Mode: Dropdown menu Results • Jump Height • Rock Velocity • Rotational Rock Velocity X, Y, Z, Resultant • Total Rock Energy (kin + pot) • Kinetic Rock Energy • Kinetic Rock Energy (translational) • Kinetic Rock Energy (rotational) • Tangential Contact Force • Perpendicular Contact Force • Slippage • Friction Value 84 CHAPTER 5 : RESULTS Exercise 5.2a: Displaying calculation values. Figure 5.19 Results Velocity Figure 5.20 Results Jump Height Figure 5.21 Results Kinetic Rock Energy The values of Jump Height, Rock Velocity and Kinetic Rock Energy give a good overview of the dimension of the rockfall event in the trajectory mode. You can choose the parameters in the horizontal toolbar under Results. 85 CHAPTER 5 : RESULTS 5.3.3 Working with trajectories Select a trajectory with the mouse: Select with mouse Information is refreshed Figure 5.22 Trajectory information – General tab. The information (filename, start position of trajectory, etc.) is refreshed in the General tab on the right side. Additionally, the Rock tab indicates the rock used for the selected trajectory (see next figure). 86 CHAPTER 5 : RESULTS Select with mouse Rock Viewer Figure 5.23 Trajectory information – Rock tab. The menu Trajectory offers the following functions: Figure 5.24 Trajectory Mode: Menu Trajectory. • View Trajectory XY Plot • View Trajectory Data Log File • View Trajectory Standard Output Log File • View Input File (xml) In the horizontal toolbar you can find the following functions: • Rock Trajectory XY Plot • Line Profile 87 CHAPTER 5 : RESULTS 5.3.4 Rock Trajectory XY Plot Click on a rock trajectory. You can find the function View Trajectory XY Plot in the horizontal toolbar (button ) or in the menu Trajectory → View Trajectory XY Plot. If you want to analyze a trajectory in detail, the XY plot of a trajectory is the way to go. The graph shows the currently active parameter (you can change it by clicking one of the buttons in the upper horizontal toolbar or by selecting another result parameter via the Results menu). You can keep the Trajectory XY Plot by saving it, see Exercise 5.2b below ”How to create a Trajectory XY Plot”. Exercise 5.2b : How to create a Trajectory XY Plot • Switch to 2D mode by clicking • Activate the project by clicking on it once. Then click on the specific rock trajectory you want to . plot. • Go to Trajectory → View Trajectory XY Plot or click . Figure 5.25: Trajectory XY Plot. • A window opens, displaying the Trajectory XY Plot. • You can save, print and modify the plot with the tools in the upper toolbar or open another plot. Plot explanations: Brown line: terrain surface (scale on the left side). Black line: rock trajectory added to the terrain surface (altitude in m a.s.l., scale on the left side). Green line: active parameter (scale on the right side). Blue dot: actual rock position(according to the dump step shown in your simulation). 88 CHAPTER 5 : RESULTS Red dots: points of contact (consider the time step of your simulation – missing contact points are possible if time steps are too large). Bottom scale: projected profile distance (m). 5.3.5 Line profile Go to Extras → Profile... → Draw Line Profile or click to draw a line profile. The line profile function provides a graph of the currently active parameter along a specific line through the rockfall area. This is helpful when it is of interest to know the values and maximum values at these places (e.g. close to a road or dam). Line profiles are saved in the file profile.txt in the project directory. If you want to keep a line profile, you have to save it, see Exercise 5.2c ”How to draw a line profile”. Exercise 5.2c : How to draw a line profile (1) Draw a new line profile: • Switch to 2D mode by clicking • Activate the project by clicking on it once, then click . or choose Extras → Profile… → Draw New Line Profile. • Define the line profile in the same way you specify a new release line (see Exercise 4.4c “How to create a new release line”). Finish the line profile with a right-click on the mouse button. Figure 5.26: Line Profile Plot • A window opens, displaying the Line Profile. 89 CHAPTER 5 : RESULTS Plot explanations: Black line: track profile (altitude, scale on the right side). Red line: active parameter (multiplied by 10) added to the track profile (altitude, scale on the right side). (You may change the Profile Parameter Exaggeration under Help → Advanced… → Additional Preferences… → Edit Grey line: active parameter (scale on the left side). Bottom scale: projected profile distance (m). If you change the active parameter or the Min and Max values in the Display tab • in RAMMS, the plot will be directly updated. You can start the simulation ( ) and then watch the time variations in your line profile plot. To save the coordinates of the points belonging to the line profile, select Extras → Profile… → Save Line Profile Points and enter a file name. • To save the line profile parameter’s data (distance (m) and the active parameter, e.g. the jump height (m)) at the current dump step, select Extras → Profile… → Export Line Profile Plot Data and enter a file name. (2) Load an existing line profile: • Switch to 2D mode by clicking • Activate the project by clicking on it once, then click . or choose Extras → Profile… → Draw New Line Profile. • Click the middle mouse button once. • A window pops up and you can browse for the line profile you wish to open. 90 CHAPTER 5 : RESULTS 5.3.6 Trajectory Data Log File To see the exact values of the simulation results, check the Trajectory Data Log File which shows the results for every dump step of a single trajectory. After running a simulation click on a rock trajectory in the trajectory mode and go to Trajectory → View Trajectory Data Log File to open it. Further information of a simulation run is available under Trajectory → Standard Output Log File and Trajectory → View Input File (xml). Figure 5.27 Trajectory Data Log File. 91 CHAPTER 5 : RESULTS 5.3.7 Rock trajectory animation It is possible to start an animation of all trajectories. Switch to 3D mode by clicking is working as well). (2D mode Start the animation (Alternative: F8) Pause the animation (Alternative: F8) Stop/Restart the animation (Alternative: F9) Change the speed of the animation in the Display tab on the right side (speed slider from fast to slow). Figure 5.28 Animation speed control slider. 5.3.8 Creating an image or a GIF animation Image It is possible to export your results as an image in different formats (e.g. .png, .jpg, .gif, .tif etc.). Click or choose Track → Export… → Image File and define a file name with the corresponding extension. An image of the visible part in the viewer will then be exported. GIF animation Creating a GIF animation is only possible in output mode. Click or choose Track → Export... → GIF Animation. Enter a file name and location and wait until the simulation stopped. As soon as the simulation finished, the GIF animation file is saved. In the Preferences you can define the interval for the GIF animation (GIF animation interval (s)) in the Rockfall tab. 92 CHAPTER 6 : REFERENCES AND FURTHER READING 6 References and further reading 6.1 References Maps and aerial images All topographic base maps and aerial images are reproduced © 2015 swisstopo(JA100118). Literature Acary, V. and Brogliato, B., 2008: Numerical Methods for nonsmooth Dynamical Systems; Applications in Mechanics and Electronics. In: Dynamics of Non-Smooth Systems. Lecture Notes in Applied and Computational Mechanics, 35, Springer, Berlin. Bourrier, F., Dorren, L., Nicot, F., Berger, F., and Darve, F., (2009): Toward objective rockfall trajectory simulation using a stochastic impact model. Geomorphology, 110(3-4): 68-79. Bourrier, F., Berger, F., Tardif, P., Dorren, L., and Hungr, O., 2012: Rockfall rebound: comparison of detailed field experiments and alternative modelling approaches. Earth Surface Processes and Landforms, 37(6): 656-665. Cross, R., (1999): The bounce of a ball. American Journal of Physics, 67(3):222–227. [8] Fityus, S., Giacomini, A., and Buzzi, O., (2013): The significance of geology for the morphology of potentially unstable rocks. Engineering Geology, 162(0): 43-52. Dorren, L., 2003: A review of rockfall mechanics and modelling approaches. Progress in Physical Geography, 27(1):6987. Dorren, L. K. A. and Seijmonsbergen, A. C. 2003: Comparison of three GIS-based models for predicting rockfall runout zones at a regional scale. Geomorphology, 56(1-2):49 - 64. Fityus, S., Giacomini, A., and Buzzi, O. 2013: The significance of geology for the morphology of potentially unstable rocks. Engineering Geology, 162:43 - 52. Frehner, M., Wasser, B., Schwitter, R. 2005: Nachhaltigkeit und Erfolgskontrolle im Schutzwald. Wegleitung für Pflegemassnahmen in Wäldern mit Schutzfunktion. Bern: Bundesamt für Umwelt. 564p. Glocker, Ch., 2001: Set-Valued Forces Laws. In: Dynamics of Non-Smooth Systems. Lecture Notes in Applied and Computational Mechanics, 1, Springer, Berlin. Glover, J., (2015): Rock-shape and its role in rockfall dynamics. Doctoral thesis, Durham University. 93 CHAPTER 6 : REFERENCES AND FURTHER READING Latham, J.-P.; Munjiza, A.; Garcia, X.; Xiang, J. and Guises, R., 2008: Three-dimensional particle shape acquisition and use of shape library for DEM and FEM/DEM simulation. In: Minerals Engineerings, Elsevier, 797-805. Leine, R. I.; Schweizer, A.; Christen, M.; Glover, J.; Bartelt, P. and Gerber, W., 2013: Simulation of rockfall trajectories with consideration of rock shape. Submitted to Multibody System Dynamics. Moreau, J.J., 1988: Unilateral contact and dry friction in finite freedom dynamics. In: NonSmooth Mechanics and Applications, Springer, Berlin, 1-82. Jaboyedoff, M., (2011): Slope tectonics. Geological Society London. Schweizer, A. 2015: Ein nichtglattes mechanisches Modell für Steinschlag. Dissertation ETH Zürich. Volkwein, A., Schellenberg, K., Labiouse, V., Agliardi, F., Berger, F., Bourrier, F., Dorren, L. K. A., Gerber, W., and Jaboyedoff, M. 2011: Rockfall characterisation and structural protection a review. Natural Hazards and Earth System Science, 11(9):2617 - 2651. 6.2 Publications The development of RAMMS is based on scientific findings published in international scientific journals. A list of the most important scientific publications about RAMMS and its applications is given below (chronological order): • Bartelt, P.; Bühler, Y.; Buser, O.; Christen, M. and Meier, L., 2012: Modeling massdependent flow regime transitions to predict the stopping and depositional behavior of snow avalanches. In: J. Geophys. Res., 117, F01015, doi:10.1029/2010JF001957. • Christen, M.; Bühler, Y.; Bartelt, P.; Leine, R.; Glover, J.; Schweizer, A.; Graf, C.; McArdell, B.W.; Gerber, W.; Deubelbeiss, Y.; Feistl, T. and Volkwein, A., 2012: Integral hazard management using a unified software environment: numerical simulation tool "RAMMS" for gravitational natural hazards. In: Koboltschnig, G.; Hübl, J.; Braun, J. (eds.) 12th Congress INTERPRAEVENT, 23-26 April 2012 Grenoble - France. Proceedings. Vol. 1. Klagenfurt, International Research Society INTERPRAEVENT, 77 -86. • Christen, M.; Gerber, W.; Graf, Ch.; Bühler Y.; Bartelt, P.; Glover, J.; McArdell, B.; Feistl, T.; Steinkogler, W., 2012: Numerische Simulation von gravitativen Naturgefahren mit "RAMMS" (Rapid Mass Movements). In: Zeitschrift für Wildbach-, Lawinen-, Erosionsund Steinschlagschutz. 169, 282 - 293. 94 CHAPTER 6 : REFERENCES AND FURTHER READING • Bühler, Y.; Christen, M.; Kowalski, J. and Bartelt, P., 2011: Sensitivity of snow avalanche simulations to digital elevation model quality and resolution. In: Annals of Glaciology, 52(58), 7280. • Christen, M.; Kowalski, J. and Bartelt, P., 2010: RAMMS: Numerical simulation of dense snow avalanches in three-dimensional terrain. In: Cold Regions Science and Technology, 63, 1 - 14. • Christen, M.; Bartelt, P. and Kowalski, J., 2010: Back calculation of the In den Arelen avalanche with RAMMS: Interpretation of model results. In: Annals of Glaciology, 51(54), 161 - 168. • Sartoris, G. and Bartelt, P., 2000: Upwinded finite difference schemes for dense snow avalanche modelling. In: International Journal for Numerical Methods in Fluids, 32, 799 821. • Bartelt, P.; Salm, B. and Gruber U., 1999: Calculating dense-snow avalanche runout using a Voellmy-fluid model with active/passive longitudinal straining. In: Journal of Glaciology, 45(150), 242 – 254. 95 List of Figures FIGURE 2.1 INSTALLATION - WELCOME DIALOG WINDOW. .......................................................................... 10 FIGURE 2.2 INSTALLATION - README DIALOG WINDOW. ........................................................................... 10 FIGURE 2.3 INSTALLATION - LICENSE AGREEMENT DIALOG WINDOW........................................................ 11 FIGURE 2.4 INSTALLATION - DESTINATION DIRECTORY DIALOG WINDOW................................................. 11 FIGURE 2.5 INSTALLATION - INSTALLING FILES DIALOG WINDOW. .............................................................. 12 FIGURE 2.6 INSTALLATION - FINISHED INSTALLING FILES DIALOG WINDOW. .............................................. 12 FIGURE 2.7 INSTALLATION - FINISHED INSTALLATION DIALOG WINDOW. .................................................. 13 FIGURE 2.8 IDL VISUAL STUDIO MERGE MODULES - WELCOME DIALOG WINDOW. ................................... 13 FIGURE 2.9 IDL VISUAL STUDIO MERGE MODULES - READY TO INSTALL THE PROGRAM.......................... 14 FIGURE 2.10 IDL VISUAL STUDIO MERGE MODULES - INSTALLING... ............................................................. 14 FIGURE 2.11 INSTALLATION - DESTINATION DIRECTORY DIALOG WINDOW................................................. 15 FIGURE 2.12 RAMMS ICON. ............................................................................................................................. 15 FIGURE 2.13 RAMMS PROGRAM GROUP ........................................................................................................ 15 FIGURE 2.14 RAMMS START WINDOW............................................................................................................ 16 FIGURE 2.15 RAMMS LICENSING WINDOW..................................................................................................... 16 FIGURE 2.16 ENTER USER NAME AND COMPANY NAME. ............................................................................... 17 FIGURE 2.17 PERSONAL LICENSE REQUEST FILE RAMMS_ROCK_REQUEST_MUSTER.TXT ............................. 17 FIGURE 2.18 PERSONAL LICENSE KEY FILE RAMMS_LICENSE_MUSTER TEST.TXT ........................................ 17 FIGURE 3.1: PHOTOGRAPHS OF ROCK MASSES AND THEIR AGGREGATE FORMS. TOP LEFT: AN EXAMPLE OF EQUANT CUBIC ROCK FORMS GENERATED IN A SEQUENCE OF SANDSTONES EXPOSED TO AN EXTENSIONAL DEFORMATION REGIME, THE PRIMARY JOINT SETS ARE NEAR EQUALLY SPACED AND ORTHOGONAL TO ONE ANOTHER. TOPRIGHT: THE COMPLEX JOINT OF THIS GRANODIORITIC ROCK MASS RESULT IN HIGHLY IRREGULAR AND ANGULAR ROCK BLOCK FORMS. BOTTOM LEFT: THE UPLIFTED AND FOLDED LIMESTONE SEQUENCE IS WELL BEDDED PRODUCING DISTINGUISHED SLABS WHICH DETACH AS PRONOUNCED PLATY ROCK FORMS. BOTTOM RIGHT: DISTINGUISHED COLUMNAR JOINTED BASALT SEQUENCE PRODUCES THE CHARACTERISTIC ELONGATE ROCK FORMS (GLOVER 2015). ........................... 20 FIGURE 3.2: LASER SCANS OF REAL ROCKS ARE CAPTURED IN THE FIELD. THE POINT CLOUD REPRESENTING THE ROCKS GEOMETRY ARE THEN USED BY THE ROCKFALL MODEL TO CREATE A CONVEX-HULL POLYHEDRON REPRESENTATIVE OF THE ROCK-BODY. ............................................................................... 22 FIGURE 3.3: ROCK IS GENERATED FROM A POINT CLOUD AND CONVERTED INTO A RIGID-BODY POLYHEDRAL. ............................................................................................................................................... 22 FIGURE 3.4: CONTACT DETECTION. DEFINITION OF GAP LENGTH, GN. ................................................................ 24 FIGURE 3.5: CONTACT FRAME C AT POINT Q DETECTED WITH THE GAP FUNCTION GN. .................................. 25 FIGURE 3.6: FRICTION FORCES AT THE CONTACT POINT. .................................................................................... 26 FIGURE 3.7: ROCK IMPACT SCAR ON SOFT SOIL; THE SCAR MORPHOLOGY IS TAPERED WIDENING TOWARDS THE ACCUMULATION OF EARTH AT THE SCAR END WERE AN EARTH RAMP STRUCTURE IS FORMED. 96 THIS IS MODELED AS A CLIMBING FRICTION FROM THE BEGINNING OF THE SCAR S = 0 AT FIRST CONTACT WHICH TENDS TOWARDS HIGH FRICTION AT THE END OF THE SCAR. ................................... 27 FIGURE 3.8: SLIDING FRICTION IN RAMMS IS GOVERNED BY A SLIP-DEPENDENT MATERIAL LAW. AT ROCK IMPACT SLIP IS S=0 AND SLIDING FRICTION IS GIVEN BY µMIN; WITH S>0, FRICTION INCREASES ACCORDING TO THE COEFFICIENT κ. AT SOME POINT S THE MAXIMUM FRICTION µMAX IS REACHED. AFTER CONTACT, THE FRICTION EXPONENTIALLY DECREASES WITH COEFFICIENT β. THEREFORE β DESCRIBES THE DURATION OF THE FRICTION AS THE ROCK IS LEAVING THE SCAR (RAMPING). .......................................... 28 FIGURE 3.9: FOREST DRAG Fdf IS IMPLEMENTED TO ACT ON THE CENTER OF GRAVITY OF THE ROCK-BODY AT HEIGHT Z. ...................................................................................................................................................... 31 FIGURE 3.10: HIGH RESOLUTION THREE DIMENSIONAL TERRAIN MODEL, FORMS SIMULATION FRAME O IN WHICH THE FOUR SIDED PLANES FORM THE TESSELLATED TERRAIN SURFACE WITH WHICH THE ROCKBODY CAN COME INTO CONTACT WITH. ................................................................................................... 36 FIGURE 4.1 EXAMPLE ESRI ASCII GRID. ................................................................................................................. 37 FIGURE 4.2 EXAMPLE ASCII X, Y, Z SINGLE SPACE DATA. ...................................................................................... 37 FIGURE 4.3 THE SAME PROJECT EXTENT (AREA OF INTEREST) CAN BE USED TO CALCULATE DIFFERENT SCENARIOS WITH DIFFERENT INPUT PARAMETERS. .................................................................................. 38 FIGURE 4.4 GENERAL TAB OF RAMMS PREFERENCES. ......................................................................................... 39 FIGURE 4.5 ROCKFALL TAB OF RAMMS PREFERENCES. ........................................................................................ 39 FIGURE 4.6 RAMMS PREFERENCES ....................................................................................................................... 40 FIGURE 4.7 BROWSE FOR THE CORRECT FOLDER. ................................................................................................ 40 FIGURE 4.8 RAMMS ROCKFALL PROJECT WIZARD STEP 1 OF 4 ............................................................................ 41 FIGURE 4.9 STEP 1 OF THE RAMMS PROJECT WIZARD PROJECT INFORMATION. ................................................ 42 FIGURE 4.10 WINDOW TO BROWSE FOR A NEW PROJECT LOCATION. ................................................................ 42 FIGURE 4.11 STEP 2 OF THE RAMMS PROJECT WIZARD: GIS INFORMATION. ...................................................... 42 FIGURE 4.12 PROJECT COORDINATES: LOWER LEFT AND UPPER RIGHT CORNER OF PROJECT AREA. ................. 43 FIGURE 4.13 STEP 3 OF THE RAMMS PROJECT WIZARD: PROJECT BOUNDARY COORDINATES. .......................... 43 FIGURE 4.14 STEP 4 OF THE RAMMS PROJECT WIZARD: PROJECT SUMMARY. .................................................... 43 FIGURE 4.15: FILES AND DIRECTORIES CREATED WITH A NEW RAMMS::ROCKFALL PROJECT. ............................ 44 FIGURE 4.16 ACTIVE PROJECT WITH LINES AND CORNERS FOR RESIZING. ........................................................... 45 FIGURE 4.17 “ACTIVE” PROJECT WITH ROTATION AXES. ...................................................................................... 46 FIGURE 4.18 3D VIEW OF EXAMPLE MODEL. ........................................................................................................ 46 FIGURE 4.19 2D VIEW OF EXAMPLE MODEL. ........................................................................................................ 46 FIGURE 4.20 THE DISPLAY TAB. ............................................................................................................................. 47 FIGURE 4.21 : THE COLORBAR PROPERTIES WINDOW. ........................................................................................ 47 FIGURE 4.22 WINDOW TO CHOOSE MAP IMAGE. ................................................................................................ 48 FIGURE 4.23: ABOUT RAMMS::ROCKFALL............................................................................................................. 50 FIGURE 4.24 FILE-TREE AT THE BOTTOM OF THE RIGHT TAB. .............................................................................. 51 97 FIGURE 4.25 DEFINE A RELEASE POINT AND FIND ITS COORDINATES. ................................................................. 52 FIGURE 4.26 PROJECT WITH EMERGING RELEASE LINES. ..................................................................................... 53 FIGURE 4.27 FILE TREE. ......................................................................................................................................... 54 FIGURE 4.28 ROCK BUILDER .................................................................................................................................. 55 FIGURE 4.29 ROCK INFORMATION ........................................................................................................................ 56 FIGURE 4.30 PROJECT WITH EMERGING POLYGON SHAPEFILE. ........................................................................... 58 FIGURE 4.31 PROJECT WITH EMERGING POLYGON SHAPEFILES WHICH REPRESENT FORESTED AREAS. ............ 60 FIGURE 4.32 TAB GENERAL ................................................................................................................................... 63 FIGURE 4.33 TAB TERRAIN .................................................................................................................................... 64 FIGURE 4.34 TAB FOREST ...................................................................................................................................... 64 FIGURE 4.35 ROCK TAB → ROCK ........................................................................................................................... 65 FIGURE 4.36 ROCK TAB → CUBOID ....................................................................................................................... 65 FIGURE 4.37 ROCK TAB → SPHERE........................................................................................................................ 65 FIGURE 4.38 TAB RELEASE ..................................................................................................................................... 66 FIGURE 4.39 LINE RELEASE TAB............................................................................................................................. 67 FIGURE 4.40 AREA RELEASE TAB ........................................................................................................................... 67 FIGURE 4.41 SCENARIO ALREADY EXISTS DIALOGUE. ........................................................................................... 67 FIGURE 4.42: ROCKFALL SIMULATION INFORMATION WINDOW. ........................................................................ 68 FIGURE 4.43: SCENARIO PREPARATION - GATHERING DATA WINDOW. .............................................................. 68 FIGURE 4.44: SCENARIO PREPARATION - PREPARING SCENARIO WINDOW. ....................................................... 68 FIGURE 4.45: SCENARIO PREPARATION - START SIMULATION WINDOW............................................................. 68 FIGURE 4.46 RAMMS SCENARIO LOGFILE ............................................................................................................. 69 FIGURE 4.47 MESSAGE ABOUT ROCKS THAT COULD NOT RELEASE. .................................................................... 70 FIGURE 5.1 TRAJECTORY VALUES IN A GIVEN CELL ............................................................................................... 71 FIGURE 5.2 STATISTIC VALUES OF A GIVEN CELL .................................................................................................. 72 FIGURE 5.3 ADDITIONAL PREFERENCES: QUANTILE VALUES ................................................................................ 73 FIGURE 5.4 ADJUSTED QUANTILE VALUES IN STATISTIC MODE; LEFT: STATISTIC SUMMARY PLOT, RIGHT: QUANTILE DROPDOWN MENU IN UPPER RIGHT TOOLBAR OF GUI. ............................................................ 73 FIGURE 5.5 BOXPLOT EXPLANATIONS (Q1: LOWER QUARTILE = 25 %, Q3: UPPER QUARTILE = 75 %, IQR: INTERQUARTILE RANGE). ............................................................................................................................. 74 FIGURE 5.6 BROWSE FOR SCENARIO FOLDER. ...................................................................................................... 75 FIGURE 5.7 THE FILE NAME FILTER SHOWS INFORMATION ABOUT THE SCENARIO THAT YOU ARE OPENING. YOU CAN ENTER A FILE STRING OR CLICK OK TO OPEN ALL FILES................................................................ 75 FIGURE 5.8 OPEN MORE SCENARIOS? .................................................................................................................. 76 FIGURE 5.9 STATISTIC MODE INFORMATION IS SHOWN IN THE RIGHT ROCKFALL PANEL. (MIN, Q1, MEAN, MEDIAN, Q3, MAX, IQR, STDDEV). ............................................................................................................... 76 FIGURE 5.10 STATISTICS MODE: DROPDOWN MENU RESULTS ............................................................................ 77 FIGURE 5.11 STATISTICS MODE: MENU STATISTICS. ............................................................................................. 77 98 FIGURE 5.12: STATISTICS SUMMARY PLOT. .......................................................................................................... 79 FIGURE 5.13 LINE PROFILE PLOT ........................................................................................................................... 80 FIGURE 5.14 BARRIER PLOT OF A LINE PROFILE. SCENARIO AND LINE PROFILE NAME ARE MARKED IN THE UPPER RIGHT CORNER (RED BOX). ............................................................................................................... 80 FIGURE 5.15 DATA INFORMATION PART OF BARRIER PLOT ................................................................................. 81 FIGURE 5.16 ROCKFALL TRAJECTORIES; DIFFERENT COLORS DEPICT DIFFERENT KINETIC ROCK ENERGIES (KJ). . 82 FIGURE 5.17 OPEN TRAJECTORIES DIALOG WINDOW .......................................................................................... 83 FIGURE 5.18 TRAJECTORY MODE: DROPDOWN MENU RESULTS ......................................................................... 84 FIGURE 5.19 RESULTS VELOCITY ........................................................................................................................... 85 FIGURE 5.20 RESULTS JUMP HEIGHT .................................................................................................................... 85 FIGURE 5.21 RESULTS KINETIC ROCK ENERGY ...................................................................................................... 85 FIGURE 5.22 TRAJECTORY INFORMATION – GENERAL TAB. THE INFORMATION (FILENAME, START POSITION OF TRAJECTORY, ETC.) IS REFRESHED IN THE GENERAL TAB ON THE RIGHT SIDE. ADDITIONALLY, THE ROCK TAB INDICATES THE ROCK USED FOR THE SELECTED TRAJECTORY (SEE NEXT FIGURE). .............................. 86 FIGURE 5.23 TRAJECTORY INFORMATION – ROCK TAB. ....................................................................................... 87 FIGURE 5.24 TRAJECTORY MODE: MENU TRAJECTORY. ....................................................................................... 87 FIGURE 5.25: TRAJECTORY XY PLOT. ..................................................................................................................... 88 FIGURE 5.26: LINE PROFILE PLOT .......................................................................................................................... 89 FIGURE 5.27 TRAJECTORY DATA LOG FILE. ........................................................................................................... 91 FIGURE 5.28 ANIMATION SPEED CONTROL SLIDER. ............................................................................................. 92 List of tables TABLE 3.1: GROUND CATEGORIES IN RAMMS::ROCKFALL.................................................................................... 32 TABLE 3.2: GROUND PARAMETERS DEFAULT VALUES. ......................................................................................... 34 TABLE 3.3: RAMMS::ROCKFALL DYNAMIC DATA. ................................................................................................. 35 TABLE 4.1: LISTING OF FILES AND DIRECTORIES CREATED WITH A NEW RAMMS::ROCKFALL PROJECT. ............. 44 99