1
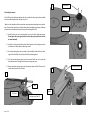
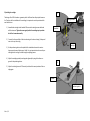
User manual THALES EASY
Dear user
Thank you for using the THALES EASY. This tonearm is designed differently than all other tonearms. If you follow this manual accurately the most precise analogue playback is ensured.
Take your time to assemble, install and adjust the EASY. Please remember to work carefully
and to follow the instruction manual step by step. Beware of using high forces or hits to this
micromechanical unit.
You will find actual information about our products one www.tonarm.ch.
Seite 1 / 6
1) Content
1) Positioning device
Please open the packaging and take out the tool-box placed on top, containing:
1) Postitioning device to install the tonearm on your turntable and to adjust the
cartridge correctly.
2) Hex key wrenches (0,9 / 1,3 / 2,0 / 2,5) for installation and adjustment.
3) All screws needed for the installation incl. some spares.
Please prepare all the tools for the installation. Under the top layer of the packaging unit, you
will find the following content:
2) Hex key 0,9 / 1,3 / 2,0 / 2,5
4) Tonearm: Main tonearm unit incl. tonearm-lift and internal wiring. While handling
this unit, please take special care on the thin and very flexible internal wiring.
5) Base-ring: this item is to be installed on the turntable and includes the locking-screw
for the VTA adjustment.
4) Tonearm
6) Counter-weights: The EASY is delivered with two different counter-weights to balance a wide range of cartridges.
5) Base-ring
6) Counter-weights
Seite 2 / 6
1
Screws-Base
2) Installing the tonearm
If the EASY has been delivered together with our turntable, the base-ring has been installed
on the turntable already and you can skip step 1 to 4.
Base-ring
Make sure the turntable and the tonearm-base are manufactured according to our specifications. Please ask your dealer for any further information. Remember that a proper installation
of the tonearm is absolutely necessary for the perfect tracking of the EASY.
Tonearm-base
1) Install the base-ring on the tonearm-base by using the three fitting base-screws.
Please tighten the screws gently so that the base-ring stays in position but still can
be moved manually.
2) Carefully set the tonearm-shaft inside the base-ring and use the locking-screw to fix
the tonearm ca. 20mm above the base-ring surface.
3) Set the positioning-device on the spindle of the turntable’s platter. Move the basering until the shaft fully fits into the profile of the positioning device.
4) Turn the positioning device away from the tonearm. Make sure not to move the
base-plate anymore. Fully tighten the three mounting screws now.
5) Please release the locking-screw and set the tonearm down until the VTA-screw is fitted into the intended hole in the base.
Positioning-device
3
102
Shaft
Spindle
VTA-Screw
Locking-screw (Hex 2,5)
Seite 3 / 6
3) Adjusting the VTA
The tonearm should always be parallel to the record-surface. The VTA (Vertical Tracking
Angle) has an influence on the sound. It can be adjusted easily and precisely, even while
playing.
1) Please release the locking-screw and make sure the tonearm-unit moves up and
down freely.
2) Use the VTA-Screw to adjust the vertical position of the tonearm. If the length of the
pre-installed screw does not fit, change it for another length. It’s three VTA-screws
delivered with the tonearm in total.
3) Tighten the locking-screw again. Do not forget to do this, as it has an audible influence on the sound (dynamics).
VTA-Screw (Hex 2,0)
Locking-screw (Hex 2,5)
4) Adjusting the azimuth
The azimuth (Horizontal Tracking Angle) can be adjusted by moving the bearing unit around a
pivot. The azimuth has been set carefully at our workshop. If the cartridge is manufactured
correctly, there is no adjustment needed. We do not recommend adjusting the azimuth, except if you have a problem with the channel separation.
Pivot
1) Loose the two locking-screws. Make sure not to take away the screws but just untighten them.
2) Adjust the azimuth by carefully push the bearing unit to be turned around the pivot .
3) Tighten the two locking-screws again. Do not forget to do this, as it has an audible influence on the sound (dynamics).
Seite 4 / 6
2x Locking-screw
5) Installing the cartridge
1
The design of the EASY is based on a geometry which is different from all principles known so
far. Therefore, for the installation of the cartridge, it is important to use the protractor delivered with the arm.
1) Assemble the cartridge to the headshell. Please use the cartridge-screws delivered
with the tonearm. Tighten the screws gently so that the cartridge stays in position
but still can be moved manually.
2)
cartridge-screws
Headshell
Connect the four small clips of the internal wiring to the internal wiring. Take special
care on the very thin wiring.
cartridge
3) Set the positioning device on the spindle of the turntable and move the countershape precisely around the tonearm’s shaft. It is very important to make sure the positioning device is suiting the shaft during the adjusting process.
4) Adjust the cartridge position (overhang and alignment) by using the hairlines engraved in the positioning device.
3
5) Adjust the tracking force and VTA correctly and check the correct position of the cartridge again.
spindle
positioning-device
Seite 5 / 6
6) Setting the tracking force
With the Easy we deliver two counter-weights, fitting for light or heavy cartridges. The
counter weight is moved by screwing it towards the bearing unit to decrease the tracking
force and vice versa. Please use a proper tonearm-gauge to measure the tracking force.
1) Choose the counter weight fitting for your cartridge: large for heavy, small for light
cartridges.
2) Screw the counter-weight carefully on the thread until the tonearm is in balance.
Make sure the side with the visible black circle is facing the bearing unit.
3) Set the tracking force by turning the counter weight.
4) Check the tracking force at three points all over the platter-surface: outer (1), medium (2) and inner (3) diameter of the record surface. Correct the position of the
counter-weight until the tracking force is as constant as possible at all three points.
Because of the unique design of the EASY, small variation in tracking force (±0,05g)
are normal and within the intended tolerances.
3
2
Seite 6 / 6
1
counter-weight
thread