1
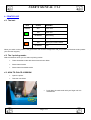
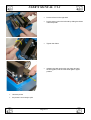
USER’S MANUAL V1.3
USER’S MANUAL
GOMARO s.a. - Z.I. La Rosaire 5 - CH - 1123 Aclens
e-mail : [email protected]
Tél.: 021 - 869 97 70 - Fax : 021 - 869 96 02
Web : http://www.gomaro.ch
Page 1/10
USER’S MANUAL V1.3
FCC Radio Frequency Interference Statement:
This equipment has been tested and found to comply with the limits for a Class B digital device,
pursuant to Part 15 of the FCC Rules. These limits are designed to provide reasonable protection
against harmful interference in a residential installation. This equipment generates, uses and can
radiate radio frequency energy and, if not installed and used in accordance with the instructions,
may cause harmful interference to radio communications. However, there is no guarantee that
interference will not occur in a particular installation. If this equipment does cause harmful
interference to radio or television reception, which can be determined by turning the equipment off
and on, the user is encouraged to try to correct the interference by one or more of the following
measures:
-- Reorient or relocate the receiving antenna.
-- Increase the separation between the equipment and receiver.
-- Connect the equipment into an outlet on a circuit different
from that to which the receiver is connected.
-- Consult the dealer or an experienced radio/TV technician for
help.
The changes or modifications not expressly approved by the party responsible for compliance
could void the user's authority to operate the equipment.
Safety instructions if the unit must be connected to protective earth:
NO: "Apparatet må tilkoples jordet stikkontakt"
SE: "Apparaten skall anslutas till jordat uttag"
Warning : all information contained in this document are subject to change without notice.
Page 2/10
USER’S MANUAL V1.3
CONTENTS
1.
INTRODUCTION ........................................................................................................................................................................ 4
2.
CHARACTERISTICS.................................................................................................................................................................. 4
3.
INSTALLATION.......................................................................................................................................................................... 5
3.1
CONNECT THE SERIAL CABLE ....................................................................................................................................................5
3.2
CONNECT THE POWER SUPPLY...................................................................................................................................................5
3.3
USE OF THE CD-ROM ..............................................................................................................................................................6
3.3.1
Opreating system ............................................................................................................................................................ 6
3.3.2
Autorun ........................................................................................................................................................................... 6
3.3.3
CD-ROM contents........................................................................................................................................................... 6
4.
PRINTER USE.............................................................................................................................................................................. 7
4.1
4.2
4.3
4.4
4.5
5.
THE LEDS ..................................................................................................................................................................................7
THE 3 PRINTING MODES ............................................................................................................................................................7
HOW TO PLACE A RIBBON ................................................................................................................................................7
CARD INSERTION.......................................................................................................................................................................9
REMOVE THE RIBBON ................................................................................................................................................................9
WARNINGS ................................................................................................................................................................................ 10
Page 3/10
USER’S MANUAL V1.3
1. INTRODUCTION
Contents of the package :
•
A Quick Start sheet
•
A printer
•
A power supply with its power cord
•
A CDROM
•
A serial cable
2. CHARACTERISTICS
Resolution :
300 dpi
Printing technologies :
Thermal transfert
Direct thermal
Direct thermal rewritable
Interface :
serial RS232C
Card insertion :
manual
Consumables :
Plastic cards
ABS, PVC, PET
Thermochromic, leuco dye erasable cards
Thickness :
0,3 mm up to 0,8 mm
1mil up to 3 mils’
Size : ISO 7810
for thermal transfer printing (500 cards)
Ribbon
Power supply :
INPUT :
100-240 V
50-60Hz
consommation : max. 70W
operating conditions :
temperature :
Humidity :
Dimensions
185 x 132,5 x 160 mm (W x D x H)
(7.28’’ x 5.21’’ x 6.30’’)
Weight :
2,2 Kg (4.80 Lbs)
Approvals :
CE, FCC class B, UL
25°C recommended
20 to 80% without condensation
Page 4/10
USER’S MANUAL V1.3
3. INSTALLATION
3.1 Connect the serial cable
Only use the serial cable supplied with the printer
•
Connect the 8 way mini-DIN connector to the printer
•
Connect the DB9 connector to your PC serial port COM1 or COM2
3.2 Connect the power supply
THE PRODUCT SAFETY IS WARRANTED ONLY WHEN USED WITH THE
EXTERNAL POWER SUPPLY DELIVERED WITH THE PRINTER
The wall plug must be easily accessible and close to the printer. The product
safety is only warranted with standart power connector (NFC15-100 or CEI364).
•
Connect the JACK connector to the printer
Page 5/10
USER’S MANUAL V1.3
•
Connect the JACK connector to the printer
•
Connect the power cord to the power supply
•
Connect the other end of the power cord to the wall
plug
•
The printer is now ready
The printer power ON / OFF is done by plugging / unplugging the jack connector.
3.3 Use of the CD-ROM
Warning : the supplier assumes no responsibility for any damage, liability or other loss resulting from the use of
these CD-ROM.
3.3.1 Operating system
•
•
Windows 95/98/ME/2000/XP
Windows NT 4.0
3.3.2 Autorun
•
Insert the CD-ROM into the CD-ROM drive and follow the instructions
or
•
open the index.htm file which is on the CD-ROM then follow the instructions
3.3.3 CD-ROM contents
•
•
•
•
The WINDOWS driver
The user’s manual
The print head replacement method
Tools software for boot, test and print head setup
Page 6/10
USER’S MANUAL V1.3
4. PRINTER USE
4.1 The leds
LED
STATE
MEANING
GREEN
OFF
Printer OFF
ON
Printer ON
BLINKING
ORANGE
Data loading
OFF
Stand by mode
ON
Waiting for a card insertion
BLINKING
Error
When you switch on the printer, if the green led is OFF and the orange led is ON your printer is in the boot mode (contact
your technical support).
4.2 The 3 printing modes
With the Windows driver you can select 3 printing modes:
•
Thermal transfert mode with thermal monochrom ribbon
•
Direct thermal mode
•
Direct thermal rewritable mode
4.3 HOW TO PLACE A RIBBON
•
Open the printer
•
Take the new ribbon
•
Push down the card carrier with your finger until it is
locked down
Page 7/10
USER’S MANUAL V1.3
•
close the printer
•
the printer is now ready to print
•
Put the full reel on the right side
•
Put the empty reel on the left side by sliding the ribbon
under the printer
•
Tighten the ribbon
•
maintain the card carrier with your finger and pull
the string plate, until the card carrier gets in upper
position
Page 8/10
USER’S MANUAL V1.3
4.4 Card insertion
•
When the orange led is on, the printer is waiting for a card
insertion
•
Insert the card
•
Push until the roll takes it
•
Wait until end printing
•
If you insert a card and remove it, the printer will go to error
state
•
If you do not insert a card enought to be taken by the roll, after
a timeout the printer will go to error state
4.5 Remove the ribbon
•
Open the printer
•
Push down the card carrier with your finger until it is
locked down
•
Remove the empty reel
•
Remove the full reel
Page 9/10
USER’S MANUAL V1.3
•
•
maintain the card carrier with your finger and pull
the string plate, until the card carrier gets in upper
position
close the printer
5. WARNINGS
•
Use only clean dry cards
•
Cleanning the print header : see Maintenance/tools menu on the CDROM
•
Cleanning the outside of the printer : do not use volatile solvents such as alcohol, paint thinner, gasoline,
benzine, etc. Use only a clean dry cloth
GOMARO s.a. - Z.I. La Rosaire 5 - CH - 1123 Aclens
e-mail : [email protected]
Tél.: 021 - 869 97 70 - Fax : 021 - 869 96 02
Web : http://www.gomaro.ch
Page 10/10