1
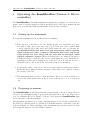
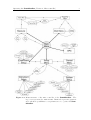
SnowMicroPen
a high resolution snow micro penetrometer
User Manual
Version
Rev.
3.0
3
Davos Dorf
March 2006
SnowMicroPen-Team
Contents
1 Operating the SnowMicroPen (Version 2, Microcontroller)
1
1.1
Setting up the instrument . . . . . . . . . . . . . . . . . . . . . . . . .
1
1.2
Preparing to measure . . . . . . . . . . . . . . . . . . . . . . . . . . . .
1
1.3
Measuring . . . . . . . . . . . . . . . . . . . . . . . . . . . . . . . . . .
2
2 Transferring the data and evaluation
4
2.1
Installing the software . . . . . . . . . . . . . . . . . . . . . . . . . . .
4
2.2
Transferring data . . . . . . . . . . . . . . . . . . . . . . . . . . . . . .
4
2.3
Evaluation . . . . . . . . . . . . . . . . . . . . . . . . . . . . . . . . . .
5
3 GPS
5
3.1
Monitoring the GPS . . . . . . . . . . . . . . . . . . . . . . . . . . . .
5
3.2
GPS and measurements . . . . . . . . . . . . . . . . . . . . . . . . . .
5
3.3
GPS options . . . . . . . . . . . . . . . . . . . . . . . . . . . . . . . . .
5
4 Special hints
5
4.1
Setting instrument back to default parameters . . . . . . . . . . . . . .
5
4.2
Download program from computer to controller . . . . . . . . . . . . .
6
4.3
Control of tip temperature . . . . . . . . . . . . . . . . . . . . . . . . .
6
4.4
Local coordinates . . . . . . . . . . . . . . . . . . . . . . . . . . . . . .
6
5 Important notice
7
6 Check list
8
6.1
Before measurements . . . . . . . . . . . . . . . . . . . . . . . . . . . .
8
6.2
After measurements . . . . . . . . . . . . . . . . . . . . . . . . . . . . .
8
Operating the SnowMicroPen (Version 2, Microcontroller)
1
Operating the SnowMicroPen (Version 2, Microcontroller)
1
The SnowMicroPen is the first instrument measuring the bonding force between snow
grains, with both high spatial resolution and high speed. This short manual should
help you to perform successful measurements. Please read it carefully.
1.1
Setting up the instrument
To setup the instrument in snow takes about ten minutes.
1. Take the motor and drive rods out. Buckle up the rods, fasten the steel wire
and pull it tight. Above the end of the top rod this wire can be pulled until
a screw appears. Hold this screw and gently fasten the wire by screwing the
nut.Attention! Make sure there is no gap between the rods by twisting
them against each other, it must be absolutely free of any gap! If not
tight enough, the gear wheel and the rods will be damaged, which
requires expensive repairs! (When detaching the rods, unscrew the nut by
holding the screw, so that the wire does not twist inside the rods.) Insert the two
standing poles into the mounting holes on the motor box. For the snow road or
ski track version, only position the sled at the point to be measured.
2. Connect the cables of the motor, the force sensor and the temperature sensor.
Each cable has a unique diameter and pin, so they will not be confused. Connect
the battery cable last.
3. The instrument is now ready to start measuring. The force sensor is always covered by the white plastic tube at the bottom of the motor box, do not move it
out.
1.2
Preparing to measure
The SnowMicroPen should always measure perpendicular to the snow layers, therfore
on slopes, the instrument must be positioned perpendicular to the slope. This can be
done by adjusting the poles. Figure 1.1 shows a well prepared SnowMicroPen right
before the start of the measurement.
The measuring parameters (e.g. depth of measurement) are set via the touch panel on
the LCD. Use a plastic pencil or your fingers. The menu structure of the microcontroller
is shown in figure 1.3. After switching on the instrument (green button), the following
screen appears (figure 1.2), if the MMC is inserted:
2
1.3 Measuring
Figure 1.1: SnowMicroPen in the field before a measurement
Figure 1.2: Screen after startup of the SnowMicroPen. The appearance may differ
depending on the program version of the SnowMicroPen.
You can navigate through the menus by touching the corresponding field. Before measuring, go to Setup → Experiment. In this menu the filename (which consists of 4
characters and an incremented number) and the length to measure can be changed.
1.3
Measuring
To measure, go to the Main-menu and touch the field Measure. The motor stops either
when:
• the intended length to measure is reached
• an overload condition occurs (force at the tip higher than 40 N, 400 N for ski
track and snow road version)
• the LCD screen is touched in the lower two thirds.
Operating the SnowMicroPen (Version 2, Microcontroller)
Figure 1.3: Menu structure of the microcontroller of the SnowMicroPen . The
big boxes represent the main menus. Diamonds represent questions
and ovals show possibilities to set parameters or to operate the SnowMicroPen.
3
4
After the measurement, the data is written to the disk, the sensor moves to the home
position and the signal is shown on the screen. If another measurement is necessary,
go back to the Main-menu and touch again the Measure field. The parameters of the
last measurement are taken as template for the next.
2
Transferring the data and evaluation
2.1
Installing the software
The data transfer from the MultiMediaCard (MMC) is done either via notebook PCCard slot or with the OmniDrive, a general purpose PC-card reader.
Version notebook PC-Card slot in notebook Connect the Hardlock to the parallel port of your notebook and switch power on. Insert the SoftDrive Win2000 CD-Rom
and follow the on-disk installation hints. Restart notebook! Usually the system should
be ready to read the MMC. Otherwise consult the on-disk manual. From the SnowMicroPen CD-Rom copy the folder SnowMicroPen somewhere to your file-system.
Version OmniDrive (USB or parallel port) Connect OmniDrive to the USB or
parallel port. Install OmniDrive software. See readme.htm on CD for details. From the
SnowMicroPen CD-Rom copy the folder SMP somewhere to your file-system.
2.2
Transferring data
After completing the measurements, the data has to be transferred from the MultiMediaCard (MMC) to the PC. Open the large red plastic screw on the SnowMicroPen
controller, and pull out the MMC (push / eject / pull ). For notebook, check if the
hardlock for softdrive is plugged into the parallel port before switching on the notebook.
Insert the PC-Card adaptor in the PC-Card slot of your notebook or into OmniDrive
and insert the MMC in the PC-Card adaptor. Copy the directory mmcread to the place
where your data should be stored. (Directory is usually in folder SMP). This directory
contains the files:
• mmcread.lnk
• mmcread.exe
• CsmDll.dll
Double-click mmcread.lnk, and a terminal window will open. Type on the command
line mmcread, this will give you a start help notice with all the commands. Type on the
command line mmcread a to get information about the status of the PC-Card. Type
mmcread r on the command line and all files on the MMC will be extracted. After
that, move all data files (*.pnt) to a final directory.
Special hints
2.3
5
Evaluation
The files can be viewed, and printed with the program PeneWin. PeneWin has also
the possibility to export the data in an Excel compatible format.
3
GPS
Some SnowMicroPen instruments are equipped with a global positioning system
(GPS). The GPS can be turned on and off from the Control-menu. Before turning
the GPS on the antenna has to be attached to the SnowMicroPen. If the instrument
does not have a GPS, ”GPS not available” is shown in the Control-menu.
3.1
Monitoring the GPS
To monitor the GPS go to the GPS -menu. There the status of the GPS and the position
is shown. Latitude and longitude are given in degrees and the GPS height is given in
meters. If the rectangle behind the word Valid is filled in the position estimate is valid.
Otherwise the GPS receiver has not yet calculated and fixed the actual position. Also
the fixmode and dilution of precision (dop) are given when the position is fixed.
3.2
GPS and measurements
If the GPS is turned on when a measurement is taken, the SnowMicroPen will wait
for a GPS fix before automatically starting the measurement. After the measurement
the GPS data will be stored in the header of the *.pnt-file. If the user does not want
to wait for a fix of the GPS the measurement can be started manually.
3.3
GPS options
In the GPS -menu the height of the SnowMicroPen can be entered manually and fixed
to improve the precision of the position measurement. Also the GPS receiver can be
reset. It should be noticed that the GPS may need up to 30 minutes to calculate its
position after a reset because the almanac has to be reloaded from the satellites.
4
4.1
Special hints
Setting instrument back to default parameters
Go into the Disk menu and choose Format Disk. All data on the disk will be
erased! After disk is formatted, switch controller off and on again. On display Check
setup wait 5sec appears. Now the instrument is set back to the default parameters.
Check setup wait 5sec always appears if power is switched on and MMC is empty.
6
4.2
4.2 Download program from computer to controller
Download program from computer to controller
Check if controller is switched off while still connected to the battery. Connect controller
to your computer (COM 1) with the 9-pin RS232 cable. Make a DOS bootable disk
and copy the 2 files (flash.exe and myflash.bat) from folder SMP/Flash to disk. Boot
computer with this disk. At DOS-prompt type myflash. After a few seconds you’ll be
asked to switch the SnowMicroPen on; if this is done, download begins. When finished,
switch controller off and on again. Now the program is installed and it’s best to do a
Format Disk now.
4.3
Control of tip temperature
In spring it may occur that the temperature of the SnowMicroPen tip is above 0◦ C.
This means that snow crystals in contact to the tip may melt. This may influence
the measurement, e.g. when water enters the force sensor unit and refreezes blocking
the sensor tip. Therefore a warning message is displayed if the temperature of the
sensor is above 0◦ C when a measurement is taken. The operator can choose between
three options: Ignore temp suppresses the warning message until the SnowMicroPen
is restarted. Proceed continues the measurement but the warning message will be displayed when the next measurement is taken and the temperature is still above 0◦ C.
Cancel will cancel the measurement.
4.4
Local coordinates
If the local grid is activated via the Experiment-Menu the operator is advised to enter
local coordinates before a measurement is taken. The variables x, y, z and theta can
be entered. If a variable is not set it will be initialized with zero. The local coordinates
are stored in the header of the *.pnt-file.
Important notice
5
7
Important notice
• If the force sensor is not connected, always put on the short circuit connector,
otherwise the amplifier can be destroyed!
• The instrument may not be operated in horizontal or upside-down position. Otherwise the geared rods can be damaged, which requires expensive repairs.
• When tightening the rods together, make sure there is no gap between the rods
by twisting them against each other. It must be absolutely free of any gap! If
not tight enough, the gear wheel and the rods will be damaged, which requires
expensive repairs!
• The O-Ring version of sensor tip is maintenance free. In case of tip or O-Ring
replacement, handle the unit very carefully. No lateral force and no force to
tighten the tip should be applied!
• Operate the SnowMicroPen only with battery power ! If you operate the unit
directly with the charging supply (e.g. for laboratory use), connect the Power
Ground to a good earth point. Otherwise the metal parts will be charged statically
up to 90 VAC!
• To insert the MMC simply push card in (label upper side) - to release MMC
push, card will be ejected a bit, then pull MMC out. (SMP6 and higher)
• Handle the sensor cables with care! (Don’t bend them too much!)
• In case of malfunction check fuses:
– 10A main fuse (access from outside)
– 1A fuse on power supply board (inside box)
– there’s also a 10A fuse inside the battery pack.
• When opening the SnowMicroPen controller, wear an anti-static wrist wrap to
prevent electrostatic discharges to the electronics.
• Water condensing inside the front part of the penetration shaft may cause a drift
of the force signal. Therefore the penetration shaft containing the force sensor
has to dry out well after measurements.
• Be careful while measuring close to hard surfaces (rocks or frozen earth). The
penetration shaft is driven back automatically when an overload of 41 N occurs.
Don´t put additional weight onto the motor unit while the shaft is driven back.
The sensor can be destroyed if an overload of 150 N is reached.
8
6
Check list
6.1
Before measurements
• Check if O-Ring of sensor tip is not damaged
• Is the MMC inserted into the controller unit? Is there enough free memory space
for the measurements?
• Has the battery been recharged?
• Don´t forget: controller unit, motor unit, battery, battery cable and the two fixing
poles.
6.2
After measurements
• Read out data from MMC and format MMC afterwards.
• After measurements in wet conditions let the SnowMicroPen dry out well (especially all the electronics and also the penetration shaft containing the force
sensor).
• Pull out penetration shaft manually (approx. 10cm). Clean everything and place
it somewhere warm and dry to dry out.
• Recharge battery.