1
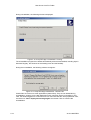
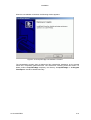
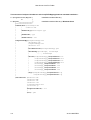
NIPSON User Guide CompTiffToNpp . User Guide CompTiffToNpp SOFTWARE Document release April April 2008 2009 22 A2 70NS REV1 Creation Modification Revision V01.00.00 Revision V01.00.01 © NIPSON 2009 All rights reserved PC is an IBM Corporation trademark. Suggestions and criticisms concerning the form, content and presentation of this manual are invited. A form is provided at the end of this manual for this purpose. This document is issued for information purpose only. It does not involve NIPSON responsibility in case of damage resulting from its implementation. Corrections or modifications will be made without prior notice and brought to the knowledge of subscribers by appropriate updating. ii 22 A2 70NS REV1 Preface The software CompTiffToNpp allows TIFF files to be printed on NIPSON printers. It converts TIFF files in NPP printer protocol. This software is a part of the printing server offer NIPSON PrintServer Version 5.0. It can be used in two different ways : in external composer (thus manual), in integrated composer : In this case, the CompTiffToNpp application becomes a composer controlled automatically by the composition spooler of Nipson PrintServer. 22 A2 70NS REV1 iii USER GUIDE COMPTIFFTONPP iv 22 A2 70NS REV1 Table of contents Preface ......................................................................................................................iii 1. Introduction ................................................................................................. 1-1 2. Installation ................................................................................................... 2-1 2.1 Hardware and software requirements.................................................................................. 2-1 2.2 CompTiffToNpp installation .................................................................................................. 2-2 2.3 starting of CompTiffToNpp Composer................................................................................. 2-9 2.4 Uninstallation........................................................................................................................ 2-10 3. Configuration and Customization .............................................................. 3-1 3.1 General .................................................................................................................................... 3-1 3.2 Concept of logical composer................................................................................................ 3-3 3.3 3.3.1 3.3.2 Logical Composer Configuration ......................................................................................... 3-4 New logical composer creation ................................................................................................ 3-7 Editing a logical composer ....................................................................................................... 3-9 3.4 Nipson PrintServer connection Configuration.................................................................. 3-13 3.5 3.5.1 3.5.2 Principle of CompTiffToNpp composer ............................................................................. 3-16 Types of processed TIFF files................................................................................................ 3-16 TIFF files numbering .............................................................................................................. 3-16 3.6 3.6.1 3.6.2 Composition Parameters..................................................................................................... 3-17 Composition parameters files Manager for TIFF_TO_NPP................................................... 3-17 TIFF_TO_NPP Composition Parameters .............................................................................. 3-19 4. Using Composer.......................................................................................... 4-1 4.1 Start a logical composer ....................................................................................................... 4-1 4.2 4.2.1 4.2.2 4.2.3 4.2.4 Logical Composer States ...................................................................................................... 4-6 ‘Disconnected’ State ................................................................................................................ 4-6 ‘Ready’ State ............................................................................................................................ 4-7 ‘Working’ State ......................................................................................................................... 4-8 ‘Error’ State ............................................................................................................................ 4-10 4.3 Manual composition ............................................................................................................ 4-11 22 A2 70NS REV1 v USER GUIDE COMPTIFFTONPP vi 22 A2 70NS REV1 Figures list Figure 2-1 CompTiffToNpp installation: Product contents ................................................................................. 2-2 Figure 2-2 CompTiffToNpp installation: Installation files extraction ................................................................. 2-2 Figure 2-3 CompTiffToNpp installation: Language selection ............................................................................. 2-3 Figure 2-4 CompTiffToNpp installation: Initialization........................................................................................ 2-3 Figure 2-5 CompTiffToNpp installation: Stop Composers .................................................................................. 2-3 Figure 2-6 CompTiffToNpp installation: Welcome.............................................................................................. 2-4 Figure 2-7 CompTiffToNpp installation: Installation directory selection ........................................................... 2-5 Figure 2-8 CompTiffToNpp installation: Chosen configuration.......................................................................... 2-6 Figure 2-9 CompTiffToNpp installation: Installation in progress....................................................................... 2-7 Figure 2-10 CompTiffToNpp installation: Installation finished .......................................................................... 2-8 Figure 2-11 Start Menu........................................................................................................................................ 2-9 Figure 2-12 CompTiffToNpp uninstallation : Remove program........................................................................ 2-10 Figure 2-13 CompTiffToNpp uninstallation: Initialization................................................................................ 2-10 Figure 2-14 CompTiffToNpp uninstallation: Stop Composers .......................................................................... 2-11 Figure 2-15 CompTiffToNpp uninstallation: Starting ....................................................................................... 2-11 Figure 2-16 CompTiffToNpp uninstallation: Running....................................................................................... 2-12 Figure 2-17 CompTiffToNpp uninstallation : Shared Files ............................................................................... 2-12 Figure 2-18 CompTiffToNpp uninstallation: Finished ...................................................................................... 2-13 Figure 3-1 CompTiffToNpp in Composers Manager mode ................................................................................. 3-4 Figure 3-2 System Menu in Composers Manager mode ...................................................................................... 3-5 Figure 3-3 ‘About’ Dialog Box ............................................................................................................................ 3-5 Figure 3-4 ‘CompTiffToNpp Composer Configuration’ Dialog Box................................................................... 3-6 Figure 3-5 ‘CompTiffToNpp Composer Configuration’ Dialog Box................................................................... 3-6 Figure 3-6 New logical composer........................................................................................................................ 3-7 Figure 3-7 CompTiffToNpp in Composers Manager mode ................................................................................. 3-9 Figure 3-8 CompTiffToNpp in Composers Manager mode ............................................................................... 3-10 Figure 3-9 Delete a logical composer................................................................................................................ 3-10 Figure 3-10 Editing a logical composer ............................................................................................................ 3-11 Figure 3-11 CompTiffToNpp in Composers Manager mode ............................................................................. 3-12 Figure 3-12 CompTiffToNpp in Composers Manager mode ............................................................................. 3-12 Figure 3-13 External Composer Configuration................................................................................................. 3-13 Figure 3-14 CompTiffToNpp local Configuration ............................................................................................. 3-14 Figure 3-15 CompTiffToNpp network Configuration ........................................................................................ 3-14 Figure 3-16 CompTiffToNpp Configuration : Step 1 Access Test...................................................................... 3-15 Figure 3-17 CompTiffToNpp Configuration : Step 2 Access Test...................................................................... 3-15 Figure 3-18 CompTiffToNpp Configuration : Step 3 Access Test...................................................................... 3-15 Figure 3-19 TIFF_TO_NPP composition parameters files list ......................................................................... 3-17 Figure 3-20 Incorrect access to Nipson PrintServer ......................................................................................... 3-18 Figure 3-21 Access to Nipson PrintServer failed............................................................................................... 3-18 Figure 3-22 Parameters file : 'Main Parameters' tab........................................................................................ 3-19 Figure 3-23 Parameters file : Network path ...................................................................................................... 3-20 Figure 3-24 Parameters file : 'Imposition Parameters' tab ............................................................................... 3-22 Figure 3-25 Automatic VPPSLayout parameters file......................................................................................... 3-24 Figure 3-26 Selection of job resolution.............................................................................................................. 3-24 Figure 3-27 Parameters file : 'Tiff Parameters' tab........................................................................................... 3-26 Figure 3-28 Parameters file : 'Personalization' tab........................................................................................... 3-28 Figure 3-29 Mark object selected ...................................................................................................................... 3-29 Figure 3-30 Several Mark objects selected........................................................................................................ 3-29 Figure 3-31 Edit a Mark object ......................................................................................................................... 3-30 Figure 3-32 Select the Object Type.................................................................................................................... 3-30 Figure 3-33 Select the position of the object...................................................................................................... 3-31 Figure 3-34 Object positioned on the sheet number 12 ..................................................................................... 3-31 Figure 3-35 Object positioned every 6 sheets .................................................................................................... 3-31 Figure 3-36 Select the unit................................................................................................................................. 3-32 Figure 3-37 Select the Mark Type..................................................................................................................... 3-32 22 A2 70NS REV1 vii USER GUIDE COMPTIFFTONPP Figure 3-38 Parameters file : 'Request Parameters' tab.................................................................................... 3-33 Figure 4-1 Logical Composer in the task bar ...................................................................................................... 4-1 Figure 4-2 CompTiffToNpp in Composers Manager mode ................................................................................. 4-1 Figure 4-3 Disconnected Logical Composer ....................................................................................................... 4-3 Figure 4-4 System Menu ...................................................................................................................................... 4-4 Figure 4-5 System Menu ...................................................................................................................................... 4-4 Figure 4-6 ‘About’ Dialog Box ............................................................................................................................ 4-4 Figure 4-7 Editing a logical composer ................................................................................................................ 4-5 Figure 4-8 Stop - Start waiting for connection .................................................................................................... 4-5 Figure 4-9 CompTiffToNpp in ‘Disconnected’ State ........................................................................................... 4-6 Figure 4-10 CompTiffToNpp in ‘Ready’ State ..................................................................................................... 4-7 Figure 4-11 CompTiffToNpp in ‘Working’ State ................................................................................................. 4-8 Figure 4-12 CompTiffToNpp in ‘Ready’ State ..................................................................................................... 4-9 Figure 4-13 CompTiffToNpp in ‘Error’ State.................................................................................................... 4-10 Figure 4-14 CompTiffToNpp in ‘Disconnected’ state........................................................................................ 4-11 Figure 4-15 Select Job to be composed’ ............................................................................................................ 4-12 Figure 4-16 Select a Composition parameters file ............................................................................................ 4-12 Figure 4-17 Select the job to be composed ........................................................................................................ 4-12 Figure 4-18 External composition in progress’ ................................................................................................. 4-13 Figure 4-19 End of manual composition............................................................................................................ 4-14 Figure 4-20 Disconnected state with connection disabled................................................................................. 4-15 viii 22 A2 70NS REV1 1. Introduction CompTiffToNpp is an easy-to-use software, the purpose of which is to print TIFF files on NIPSON printers. It thus takes a TIFF file as inputs and produces an NPP file understandable by NIPSON printers. Contents of this document: Chapter 2, « Installation », explains how to install or remove the product. Chapter 3, « Configuration and Customization », details how to configure the product. Chapter 4, « Composer Using », explains how to use the CompTiffToNpp composer. 22 A2 70NS REV1 1-1 USER GUIDE COMPTIFFTONPP 1-2 22 A2 70NS REV1 2. Installation 2.1 HARDWARE AND SOFTWARE REQUIREMENTS Hardware You require a PC computer with at least the following hardware specifications: - A Pentium 4 processor minimum 2 GHz. 1024 MB amount of RAM. A local hard disk with 40 gigabytes space. A CDROM drive. A network connection. A bi-processors PC is recommended if Nipson PrintServer and CompTiffToNpp products are installed on the same station. Software The computer must run on Microsoft Windows 2000 with service pack 4 at least or Microsoft Windows XP or Microsoft Windows Server 2003 or Microsoft Windows Vista. All the products are to be installed as SPOOLADM (account with Administrator rights). If this account doesn't exist, it must be created. 22 A2 70NS REV1 2-1 USER GUIDE COMPTIFFTONPP 2.2 COMPTIFFTONPP INSTALLATION The CompTiffToNpp product are to be installed from CD-ROM VPServer. Starting the installation of CompTiffToNpp product: On the CD-ROM VPServer, go to the directory: \UTSP076-d\Windows To start installation, click on CompTiffToNpp(5.0.0.0)_5.0.0.0.exe (or higher version). At the installation start which is an auto-extractible file, a first window appears indicating the product contents: Figure 2-1 CompTiffToNpp installation: Product contents During installation files extraction, the following window is displayed: Figure 2-2 CompTiffToNpp installation: Installation files extraction 2-2 22 A2 70NS REV1 Installation At the start of the installation, a first window makes it possible to select the installation language : Figure 2-3 CompTiffToNpp installation: Language selection During initialization of the installation, the following window is displayed: Figure 2-4 CompTiffToNpp installation: Initialization A message is displayed then recalling that any other NIPSON composer should imperatively be stopped : Figure 2-5 CompTiffToNpp installation: Stop Composers 22 A2 70NS REV1 2-3 USER GUIDE COMPTIFFTONPP The following window indicates that one is ready to start the installation: Figure 2-6 CompTiffToNpp installation: Welcome Click on the ‘Next’ button to show the dialog box ‘Choose Destination Location’. 2-4 22 A2 70NS REV1 Installation By default, the destination folder: 'C:\Program Files\Nipson\CompTiffToNpp' is proposed. If you have no specific reason to install the product elsewhere, maintain this proposed Destination Folder. In the case of Windows Vista, it is disadvised to install NIPSON products in the directory 'C:\Program Files’ pointed out above. In that case, the directory : 'C:\Nipson\CompTiffToNpp' is proposed. If this destination folder is appropriate, click on ‘Next’, else use ‘Browse…’ to select another folder (CompTiffToNpp can be installed on another disk than disk C:). Figure 2-7 CompTiffToNpp installation: Installation directory selection If you choose another installation place, it is recommended to keep tree members 'Nipson\CompTiffToNpp' in your new installation directory. Example : ‘D:\My Installation\Nipson\CompTiffToNpp’ It should be noted that it is also under this directory that will be placed at the time of the installation a 'Documentation' directory containing all the documentation of the CompTiffToNpp composer. Click on the ‘Next’ button to continue. 22 A2 70NS REV1 2-5 USER GUIDE COMPTIFFTONPP A dialog box summarizes information about the CompTiffToNpp installation, for example: Figure 2-8 CompTiffToNpp installation: Chosen configuration To modify the previous choices, press on 'Back' button. To start the installation, press on 'Next' button. 2-6 22 A2 70NS REV1 Installation The following window shows the progress report of installation. Figure 2-9 CompTiffToNpp installation: Installation in progress 22 A2 70NS REV1 2-7 USER GUIDE COMPTIFFTONPP When installation is finished, the following window is displayed: Figure 2-10 CompTiffToNpp installation: Installation finished Click on the ‘Finish’ button to finish and quit installation program. 2-8 22 A2 70NS REV1 Installation 2.3 STARTING OF COMPTIFFTONPP COMPOSER To run CompTiffToNpp composer, use the CompTiffToNpp command of Start menu: Start->Programs->NIPSON Tools->CompTiffToNpp->CompTiffToNpp It is also possible to use CompTiffToNpp icon on the desktop. The menu : Start->Programs-> NIPSON Tools->CompTiffToNpp created during installation looks as: Figure 2-11 Start Menu CompTiffToNpp: It’s the Composer application allowing the integration of CompTiffToNpp application with Nipson PrintServer. It can be started also with the shortcut ‘CompTiffToNpp’ created on the desktop. User Guide is a shortcut allowing to access directly to the documentation file UGCompTiffToNpp.pdf. 22 A2 70NS REV1 2-9 USER GUIDE COMPTIFFTONPP 2.4 UNINSTALLATION To remove the CompTiffToNpp product, use standard tool of Windows Add/Remove programs. Select CompTiffToNpp in the list and then click on 'Remove' button. Figure 2-12 CompTiffToNpp uninstallation : Remove program The following window is displayed during initialization: Figure 2-13 CompTiffToNpp uninstallation: Initialization 2-10 22 A2 70NS REV1 Installation A message is displayed then recalling that any other NIPSON composer should imperatively be stopped : Figure 2-14 CompTiffToNpp uninstallation: Stop Composers Then, a window of confirmation is displayed: press on 'OK' to start the uninstallation. Figure 2-15 CompTiffToNpp uninstallation: Starting 22 A2 70NS REV1 2-11 USER GUIDE COMPTIFFTONPP During uninstallation, the following window is displayed: Figure 2-16 CompTiffToNpp uninstallation: Running The uninstallation program then deletes automatically all that it had installed, including keys in Windows Registry, the shortcuts of the Starting menu and the Desktop. During the uninstallation, the following window can appear : Figure 2-17 CompTiffToNpp uninstallation : Shared Files Certain files are common to other applications (shared files); They are not deleted during uninstallation, except if it is the last application which uses them which is unintalling. In this case, this window appears to confirm that one can remove these files. Except particular case, check the box `Don’t display this message again' and answer `Yes' to continue the uninstallation. 2-12 22 A2 70NS REV1 Installation When the uninstallation is finished, the following window appears: Figure 2-18 CompTiffToNpp uninstallation: Finished The uninstallation program does not delete the files created after installation, as for example traces files, composition parameters files. Thus directories containing these files remain. To delete product CompTiffToNpp completely, the directory 'CompTiffToNpp' in 'C:\Program Files\Nipson' should be deleted manually. 22 A2 70NS REV1 2-13 USER GUIDE COMPTIFFTONPP 2-14 22 A2 70NS REV1 3. Configuration and Customization 3.1 GENERAL As indicated in the preface, CompTiffToNpp application can be associated with Nipson PrintServer in two different ways : Either in external Composer : In this case, one uses the CompTiffToNpp composer manually to execute the composition of TIFF files in NPP. At the end of the composition, it is possible to generate automatically a printing request for Nipson PrintServer. It is enough for that to parameterize the request generation in the composition parameters. Either in integrated Composer: In this case, CompTiffToNpp application becomes a composer controlled automatically by the composition spooler of Nipson PrintServer. To compose TIFF files in NPP, a composition request should be generated at Nipson PrintServer level. The CompTiffToNpp application is in fact composed of two elements : The CompTiffToNpp.exe application which is the visible part of the composer for the user. The TiffToNpp.exe application which is the composition module properly speaking. It is its which execute the conversion of the TIFF files in NPP. This application does not have a user interface. The following page shows the tree structure of the Nipson PrintServer and Composer CompTiffToNpp applications standard installation with the principal directories and files of the installation. The ‘Common’ directory and its sub-directories are common with all NIPSON composers. This ‘Common’ directory contains in particular : The ParamComp5.dll dll whose principal functions are : - Creation, modification, deleting of composition parameters files for the different NIPSON composers, - Printing request creation for Nipson PrintServer when one works in external composer mode, - The configuration of the Nipson PrintServer access (VPServer.ini file). The other objects of ‘common’ directory are not used in the case of CompTiffToNpp composer. 22 A2 70NS REV1 3-1 USER GUIDE COMPTIFFTONPP Tree structure of a Nipson PrintServer and CompTiffToNpp applications standard installation : C:\Program Files\Nipson \ Installation standard directory or | C:\Nipson_______________\ Installation standard directory if Windows Vista ___________________| | \Common \Bin \ParamComp5.dll | | \ihmtool.dll | | | \EnhConfig\EnhConfigClr.pqf | | | \EnhParam\*.pqf | | | \EnhScreens\*.scn | \CompTiffToNpp \CompTiffToNpp.exe | \TiffToNpp.exe | \CompTiffToNpp.ini | \VPServer.ini | | | \Documentation\UGCompTiffToNpp.pdf | | | \ParamComp \ParamComp1, ParamComp2 | | \..., ParamCompn | | | \Traces \CompTiffToNpp_ComposerName1.txt | | \CompTiffToNpp_ComposerName1.old | | \CompTiffToNpp_ComposerName2.txt | | \CompTiffToNpp_ComposerName2.old | | \TiffToNpp_ComposerName1.txt | | \TiffToNpp_ComposerName1.old | | \TiffToNpp_ComposerName2.txt | | \TiffToNpp_ComposerName2.old | | | \Logs \CompTiffToNpp_ComposerName1.log | \CompTiffToNpp_ComposerName2.log | \PrintServer \VPServer.exe \VPServer.mdb \VPServer.txt \VPServer.old \ConvVPDataBase.dll \StartView.js | \RequestsOffLine\*.rol | \Doc\*.pdf 3-2 22 A2 70NS REV1 Configuration and Customization 3.2 CONCEPT OF LOGICAL COMPOSER In integrated composer mode, the composer is a composition server for Nipson PrintServer. This server is listening to a connection on a TCP/IP Port. A logical name is associated with this port number : This defines a logical composer. It is thus possible to create on a same station several logical composers, different names being associated to different TCP/IP port number. That implies that one can execute several instances of the composition module. It is the case for the CompTiffToNpp composer. The CompTiffToNpp application can be executed in two different ways : Start without parameter in the command line : In this case, CompTiffToNpp starts in ‘TIFF_TO_NPP Composers Manager’ mode (Configuration mode). Start with a parameter which is the name of a defined logical composer : In this case, CompTiffToNpp starts in ‘logical composer’ mode and is a composition server for Nipson PrintServer. 22 A2 70NS REV1 3-3 USER GUIDE COMPTIFFTONPP 3.3 LOGICAL COMPOSER CONFIGURATION To start the CompTiffToNpp composer in ‘TIFF_TO_NPP Composers Manager’ mode use the menu : Start->Programs->NIPSON Tools->CompTiffToNpp->CompTiffToNpp One can also use the shortcut ‘CompTiffToNpp’ created on the desktop at the time of installation. These two shortcuts start the application CompTiffToNpp without parameter. At the first start, there is the following window : Figure 3-1 CompTiffToNpp in Composers Manager mode This dialog box contains two parts : The logical composers list with name and associated comment, and the following buttons : - ‘New…’ allows to create a new logical composer. ‘Edit…’ allows to edit the logical composer selected in the list. ‘Delete’ allows to delete the logical composer selected in the list. ‘Start’ allows to start the logical composer selected in the list. ‘Close’ allows to close the dialog box. A Configuration - Edition area with the following buttons : 3-4 - ‘Nipson PrintServer Access…’ allows to access to the dialog box ‘Nipson PrintServer Access Configuration’ : Configuration of the connection parameters to Nipson PrintServer. (See chapter 3.4). - ‘Composition Parameters…’ allows to access at the dialog box ‘Composition parameters file Manager’. These parameters files are selected and used for the composition (See chapter 3.6). - ‘Print Quality Files…’ allows to access to the dialog box ‘Print Quality parameters Manager for Nipson printers’: Parameters files for the images processing : Report to UG_PQF_FilesManager.pdf document. 22 A2 70NS REV1 Configuration and Customization Click on the icon on the left in title bar shows the system menu : Figure 3-2 System Menu in Composers Manager mode The system menu allows to access to the application ‘About’ dialog box, this one making it possible to see the application version. Figure 3-3 ‘About’ Dialog Box 22 A2 70NS REV1 3-5 USER GUIDE COMPTIFFTONPP The system menu also allows to access to the ‘CompTiffToNpp Composer Configuration’ dialog box, this one making it possible to select the language of the application. Figure 3-4 ‘CompTiffToNpp Composer Configuration’ Dialog Box When the ‘Ok’ button is pressed, the following message appears . Figure 3-5 ‘CompTiffToNpp Composer Configuration’ Dialog Box 3-6 22 A2 70NS REV1 Configuration and Customization 3.3.1 New logical composer creation Click on the ‘New…’ button shows the following window : Figure 3-6 New logical composer Logical Composer Name : This parameter is mandatory. Give a name to the logical composer. It can be judicious to give it the same name as the composer defined in Nipson PrintServer, but it is not obligatory. The name is limited to 32 characters. This name is that which it is necessary to pass in parameter to CompTiffToNpp to start the composer. Comment : Comment allowing to specify the characteristics of the composer. This comment appears in the logical composers list. Listening Port Number : The composer being a server application, will be with listening on this port (Socket) waiting for a Nipson PrintServer application connection. If the port proposed by default (1260) is not used on the station, keep this value. If one created several composers on the same station, it is necessary to use different port number. Shortcut in the ‘Startup menu' : Check this checkbox so that a shortcut is created in the ‘Startup menu' if it be wished that the logical composer created starts automatically with the session opening. This shortcut is in fact the command : CompTiffToNpp.exe ComposerName where ComposerName is the name given to the logical composer. Trace Level and Maximum size for trace file : The CompTiffToNpp application can generate a traces file. 4 levels of traces can be selected : - No trace. Error Traces. 22 A2 70NS REV1 3-7 USER GUIDE COMPTIFFTONPP Normal Traces. All Traces. - Traces are placed in a file named ‘CompTiffToNpp_ComposerName.txt’ in the directory : C:\Program Files\Nipson\CompTiffToNpp\Traces where ComposerName is the name given to the logical composer. The maximum size of this file can be defined between 1 and 10 Mbytes. When the maximum size is reached, the traces file is renamed in ‘CompTiffToNpp_ComposerName.old’ and a new file ‘CompTiffToNpp_ComposerName.txt’ is created. Composition Module View Mode : At the composition time, the CompTiffToNpp application starts the composition module itself, here the TiffToNpp.exe application. This parameter indicates how this composition module appears on the screen. It can be : - 3-8 Visible Nomal : The TiffToNpp.exe application will appear in a Windows console type window. Visible Iconic : The TiffToNpp.exe application will be visible only in the form of icon in the taskbar. A click on this icon then makes it possible to visualize the application. Not Visible : The TiffToNpp.exe application is not visible, it is executed without its user interface. 22 A2 70NS REV1 Configuration and Customization 3.3.2 Editing a logical composer After creation of a logical composer or at the CompTiffToNpp starting in the case where a logical composer is already created, there is the following window : Figure 3-7 CompTiffToNpp in Composers Manager mode Note that if no logical composer is selected in the list, the ‘Start’, ‘Edit…’, ‘Delete’ buttons are disabled. Note also that the ‘New…’ button is enabled, because in the case of CompTiffToNpp, like already previously explained, several logical composers can be created on a given station. 22 A2 70NS REV1 3-9 USER GUIDE COMPTIFFTONPP To edit the logical composer parameters, select it in the list. There is then the following window : Figure 3-8 CompTiffToNpp in Composers Manager mode A logical composer being selected, the ‘Start’, ‘Edit…’, ‘Delete’ buttons are enabled. Click on the ‘Delete’ button shows the following window : Figure 3-9 Delete a logical composer And if one answers yes, the logical composer is deleted. Note that if a shortcut has been created in the ‘Startup’ menu for this logical composer, it will be automatically deleted. 3-10 22 A2 70NS REV1 Configuration and Customization Click on the ‘Edit…’ button of the ‘TIFF_TO_NPP Composers Manager’ dialog box shows for example the following window : Figure 3-10 Editing a logical composer It is the same dialog box as that of the ‘New…’ function described above. 22 A2 70NS REV1 3-11 USER GUIDE COMPTIFFTONPP It is possible to create several logical composers on the same station by using different port number. Example with two logical composers : Figure 3-11 CompTiffToNpp in Composers Manager mode In this example, the logical composer Tiff_2 is selected, the buttons ‘Start’, ‘Edit…’, ‘Delete’ are enabled. The ‘External Composer …’ button is disabled, because the composer Tiff_Local was started. It is what indicates the following window in which one selected the logical composer Tiff_Local : the ‘Start’, ‘Edit…’, ‘Delete’ buttons are disabled. Figure 3-12 CompTiffToNpp in Composers Manager mode 3-12 22 A2 70NS REV1 Configuration and Customization 3.4 NIPSON PRINTSERVER CONNECTION CONFIGURATION In the dialog box 'TIFF_TO_NPP Composers Manager', use ’External Composer…’ button to open the 'External Composer Configuration' dialog box : Figure 3-13 External Composer Configuration This dialog box allows to define the connection parameters to a Nipson PrintServer application. If one wants to use a connection with a Nipson PrintServer application in External CompTiffToNpp mode, it is necessary to define the following parameters: 1. 'IP Address or Server Name' : Give here the IP address or the station name on which the Nipson PrintServer application is installed. If this station is the same one as the CompTiffToNpp station, this parameter also should be defined. 2. 'Port Number' : This communication port number, 1100 by default, must be the same one as the listening port number defined in the Nipson PrintServer application. 3. 'OffLine Requests Directory' : This field allows to define the OffLine Requests directory: This directory is Nipson PrintServer application directory in which CompTiffToNpp writes the requests being submitted in files (.rol extension) when it could not be connected to the Nipson PrintServer application (for example, if this one is stopped). This makes it possible to not lose the requests, this one being automatically taken into account by the Nipson PrintServer application when it starts. This directory has as a name RequestsOffLine and is in the case of a standard installation of the Nipson PrintServer product in the directory: C:\Program Files\Nipson\PrintServer\ browser button to search this directory directly. If the Nipson Use the PrintServer application and the CompTiffToNpp application aren't on the same station, this directory must be shared on the network. Select it by using navigation on the network. 22 A2 70NS REV1 3-13 USER GUIDE COMPTIFFTONPP The following figures show two cases of Nipson PrintServer connection parameters: Figure 3-14 CompTiffToNpp local Configuration In this first example, it acts of a configuration where CompTiffToNpp and Nipson PrintServer are on the same station. Figure 3-15 CompTiffToNpp network Configuration In this second example, it acts of a configuration where CompTiffToNpp and Nipson PrintServer are on different stations. In the example, NPrintServer is the name of the station on which Nipson PrintServer is installed. 3-14 22 A2 70NS REV1 Configuration and Customization When these parameters are defined, the 'Access Test' button makes it possible to check that connection with the Nipson PrintServer application is Ok. For that, the Nipson PrintServer application must be running. The test proceeds in 3 phases with showing a message for each one of it : Step 1 : Figure 3-16 CompTiffToNpp Configuration : Step 1 Access Test In the first phase, CompTiffToNpp establishes a connection with Nipson PrintServer and request the version number of the application. Step 2 : Figure 3-17 CompTiffToNpp Configuration : Step 2 Access Test In the second phase, CompTiffToNpp requires of Nipson PrintServer the defined destinations list (Groups or printing Queues) and memorizes them locally to use them in the requests parameters dialog box. (See chapter 3.6.2). Step 3 : Figure 3-18 CompTiffToNpp Configuration : Step 3 Access Test In the third phase, CompTiffToNpp requires of Nipson PrintServer the defined papers list and memorizes them locally to use them in the requests parameters dialog box. (See chapter 3.6.2). 22 A2 70NS REV1 3-15 USER GUIDE COMPTIFFTONPP 3.5 PRINCIPLE OF COMPTIFFTONPP COMPOSER The CompTiffToNpp composer allows to gather in a single NPP job a succession of TIFF formatted files present in an input directory. Each file directly represents either the contents of a sheet of the job, or the contents of a logical page which will be integrated in a sheet defined by the composition parameters (VPPSLayout Parameters). 3.5.1 Types of processed TIFF files The CompTiffToNpp composer processes only the TIFF monochrome files (1 bit per pixel). To have the best performance at the processing time, it is recommended to use CCITT Group 4 (T4 or T6) in monostrip coding. In this case, the composition module does not need to decompress the bitmap, then to compress it to code it in NPP, from where an important time saving. If one is not in this ideal case, (coding multistrips for example), the composition module must decompress the bitmap, then to compress it to code it in NPP, from where an important waste of time. 3.5.2 TIFF files numbering So that the CompTiffToNpp composer functions correctly, the TIFF files numbering must comply with the following rules : The TIFF files name must comprise a fixed part ending in a digital part constituting the file number. Examples : Demo0.tif, Demo1.tif, ……, Demo1499.tif : Job made up of 1500 numbered files from 0 to 1499. In this example, the digital part has a variable width (from 1 to 4 digits). Demo0000.tif, Demo0001.tif, ……, Demo1499.tif : Job made up of 1500 numbered files from 0 to 1499. In this example, the digital part has a fixed width (4 digits). In these two examples, the fixed part `Demo' will constitute the name of the Job. For a given job, don’t mix digital parts of variable width and fixed width. Choose a format. There should not be hole in numbering, if not the composer will finish its process on the first missing file. One can begin numbering with any number, for example: Demo250.tif, Demo251.tif, ……, Demo1499.tif : Job made up of 1250 numbered files from 250 to 1499. In this example, if there are files with numbers lower than 250, they will not be processed. To note however that if one works with Nipson PrintServer in integrated mode and HotFolder input directory, numbering must start from 0 or 1. 3-16 22 A2 70NS REV1 Configuration and Customization 3.6 COMPOSITION PARAMETERS The composition parameters files TIFF_TO_NPP are files without extension stored in the directory : ‘C:\Program Files\Nipson\CompTiffToNpp\ParamComp’ 3.6.1 Composition parameters files Manager for TIFF_TO_NPP In the dialog box 'TIFF_TO_NPP Composers Manager', use ’Composition Parameters…’ button to open the 'Composition parameters files Manager for TIFF_TO_NPP' dialog box : This command opens the following dialog box : Figure 3-19 TIFF_TO_NPP composition parameters files list At the time of the dialog box opening, if a connection with a Nipson PrintServer application is defined (case of an external CompTiffToNpp), the composer tries to connect itself to this application to obtain and update the printing request destinations list and the papers list. If the connection is possible and is successful, the message above is viewed when opening the dialog box. 22 A2 70NS REV1 3-17 USER GUIDE COMPTIFFTONPP If the connection with Nipson PrintServer isn't defined or is incorrect, the message below is viewed when opening the dialog box. Figure 3-20 Incorrect access to Nipson PrintServer If the connection with Nipson PrintServer isn't possible (Nipson PrintServer stopped or network not available), the message below is viewed when opening the dialog box. Figure 3-21 Access to Nipson PrintServer failed The window 'Composition parameters files Manager for TIFF_TO_NPP' displays the list of existing parameters files with an associated comment. It allows to create, delete and edit the parameters files. To create a new parameters file, use the 'New…' button. In this case, a default parameter setting is used to initialize the parameters for a new file. To create a new parameters file, it is also possible to select an existing file and to create a copy of these parameters using the 'Copy…' button. The 'Edit…' button allows to modify the selected file. The 'Delete' button allows to delete the selected file. 3-18 22 A2 70NS REV1 Configuration and Customization 3.6.2 TIFF_TO_NPP Composition Parameters The parameters dialog box appears as indicated in the figure hereafter. The parameters are gathered in five tabs : the main composition parameters, the imposition specific parameters, the specific parameters for the TIFF into NPP composition, the parameters for personalization and finally, the parameters for the printing request generation to be submitted to a Nipson PrintServer application. It should be noted that the tabs Main Parameters, Imposition Parameters and Request Parameters are common to all composer types; A certain number of parameters are disabled because they do not have utility in the case of the CompTiffToNpp composer. The first tab 'Main Parameters' : Figure 3-22 Parameters file : 'Main Parameters' tab Note that the 'Save' button in this dialog box is replaced by a 'Save As…' button when it is a new parameters file (Access by 'New…' or 'Copy…'). 22 A2 70NS REV1 3-19 USER GUIDE COMPTIFFTONPP The first tab 'Main Parameters' allows to define the following parameters: Comment : It allows to associate a comment to the parameters file. This comment appears in the parameters files list of the dialog box 'Composition parameters file Manager for TIFF_TO_NPP' and it makes the identification of the parameters file better. The maximum length of this comment is 255 characters. Output file path and name allows to select the output directory for NPP files generated by the composition module. It is possible to indicate: - a directory on a local disk (for example : d:\Jobs\JobNpp) if Nipson PrintServer is installed on the same station - a directory identified with its network name (for example : \\NPrintServer\Job\JobNpp) if Nipson PrintServer is installed on an another station that the composer. Figure 3-23 Parameters file : Network path Add then manually the name of the output file in File name or check Use input job name as output (recommended option) ; The output file has then the same name as input file with .npp extension. Caution: If Use job name as output option is checked, if the name of the input file contains a name with space characters or some special characters, those are automatically replaced by the character '_' or ‘x’ so that the name of the output file is compatible with its use in the printer or other NIPSON software. In particular, the NPP files names should not contain 'space' characters. Volumes segmentation : The two parameters 'Maximum Size (in MBytes) of Job Volumes' and ‘Maximum Number of Pages in Job Volumes’ make it possible to define the maximum size of volumes (files) NPP according to two criteria: either a size of file, or a number of pages. At the composition time, as soon as the current volume size or number of pages of current volume reaches the maximum value indicated, volume is closed and another is created. For the volume size, use values going from 10 to 500 MBytes. 200 Mbytes size is a good value. For the number of pages of a volume, use values going from 50 to 10000. 1000 pages is a good value. One can also specify a zero value to disable this parameter (In this case, only the size is used for segmentation). Composition module traces : While NPP composition, a traces file can be asked. 4 levels of traces can be selected : - No Trace. Error Traces. Normal Traces. All Traces. The traces are stored in a file named ‘TiffToNpp_ComposerName.txt’ in the directory : C:\Program Files\Nipson\CompTiffToNpp\Traces where ComposerName is the logical composer name. The maximum size of this file can be defined between 1 and 10 Mbytes. When the maximum size is reached, the file of traces is renamed in ‘TiffToNpp_ComposerName.old' and a new file ‘TiffToNpp_ComposerName.txt' is created. 3-20 22 A2 70NS REV1 Configuration and Customization Caution : Concerning the NPP file names, at the composition time of a new job, if the required NPP file name already exists, this one isn't overwritten, but a new file is created while adding to the required name an automatic indexing '_n' where n is an automatically incremented number. 22 A2 70NS REV1 3-21 USER GUIDE COMPTIFFTONPP The second tab 'Imposition Parameters' : Figure 3-24 Parameters file : 'Imposition Parameters' tab The second tab 'Imposition Parameters' allows to define the following parameters: Bitmap processing : . Advanced trimming : This function allows to optimize the coding of the NPP bitmaps so as to improve the performances of the machine during printing , but if one wants a maximum performance with the composition, it is recommended not to use this functionality. . Print Quality Parameters File : allows to select the .pqf file to use for the processing of images coded in colors or in grey levels. The combo box gives the list of all the .pqf files created with the button 'Print Quality Files…' of the composer in Composers Manager mode. In the case of the actual CompTiffToNpp composer, only TIFF monochrome files are processed, therefore the only parameters used in the .pqf file are parameters concerning the erosion. It is recommended not to use this functionality if one wants a maximum performance with the composition. The button ‘PQF Files Manager…’ allows to access directly to the Print Quality 3-22 22 A2 70NS REV1 Configuration and Customization parameters Manager. The button ‘Edit the file…’ allows to access directly to the edition of .pqf file selected in the combo box. (See the document UG_PQF_FilesManager.pdf for more information on PQF files). 22 A2 70NS REV1 3-23 USER GUIDE COMPTIFFTONPP VPPSLayout Parameters File : This mandatory parameter allows to choose a parameters file representing the imposition of logical pages made up of TIFF files stream (1 TIFF file = 1 logical page). The combo box contains an imposition parameters files list created by the NIPSON VPPSLayout application. These imposition files represent the sheet size used, the position of the logical pages in the sheet, the printing mode (Simplex or Duplex), the staple mode, the overlays associated with sheets and logical pages. See the documentation UG VPPSLayout.pdf for a detailed description of this application. The extension of the VPPSLayout parameters file indicates the resolution (density) in which the job must be composed. Note that in this case, the combo box ‘Resolution’ is disabled. When a file of the list is selected, the ‘Edit the file…’ button allows to start automatically the VPPSLayout application to see or edit the contents of the corresponding parameters file. The combo box contains two particular names : #DuplexAuto and #SimplexAuto (figure below) which do not correspond to parameters files created by VPPSLayout. These two items are in fact commands of automatic imposition to be used in cases where the imposition is already made at the TIFF files level by the application which generated the TIFF. In these two cases, the sheet size is equal to that of the logical page contained in the TIFF file. They use #DuplexAuto if they want a Duplex job or #SimplexAuto if they want a Simplex job. Figure 3-25 Automatic VPPSLayout parameters file In these two cases also, the combo box 'Resolution' which is normally disabled becomes enabled (figure below) and allows to choose the resolution in which the job must be composed. Note also that in this case, the ‘Edit the file…’ button is disabled. Figure 3-26 Selection of job resolution Caution: Choose a parameter list corresponding to the target printer. In particular, use a list having the resolution according to the printer’s one. 3-24 22 A2 70NS REV1 Configuration and Customization Page ordering : This parameter is a complement of the VPPSLayout parameters file. It allows to define the order in which the logical pages provided by TIFF files must be imposed. Attention, this one must be coherent with the VPPSLayout parameters file. Examples : 3;2;1 with imposition of 3 logical pages per sheet side and Simplex mode 3;2;1;6;5;4 with imposition of 3 logical pages per sheet side and Duplex mode 21436587 with imposition of 4 logical pages per sheet side and Duplex mode To separate the page numbers, one can use character ';' or space character. They can have a page ordering table longer than the number of logical pages described in the VPPSLayout parameters file, but in that case, the number of logical pages in the ordering table must be a multiple of the logical pages number per sheet side. Example : 9;7;5;3;1;2;4;6;8 with imposition of 3 logical pages per sheet side and Simplex mode Page copy : This parameter allows to duplicate the same logical page provided by a TIFF file a certain number of times (From 1 to 32). This number must be a sub-multiple of the logical pages number per sheet side or equal to this number. Pages : . All : If checked, the output file contains the whole pages of the input job. If not it is possible to select an interval of pages to be composed by indicating the numbers of the first and the last page. 22 A2 70NS REV1 3-25 USER GUIDE COMPTIFFTONPP The third tab 'Tiff Parameters' : Figure 3-27 Parameters file : 'Tiff Parameters' tab The third tab 'Tiff Parameters' allows to define the following parameters: Input directory management : 3-26 Waiting time before file processing : Allows to define how long the composition module waits to take into account a TIFF file present in the input directory. The file must be stable (size and date) since at least this time to be taken into account. This avoids problem when the composition module processes TIFF files as another process creates them. Timeout for End of Job : Allows to define how long the composition module waits before it issues that it is the end of the job when there is no more TIFF file to process in the input directory. 22 A2 70NS REV1 Configuration and Customization Automatic deleting of the processed files (except the first) : Allows to define what the composition module does with processed TIFF files. If the checkbox is checked, the composition module immediately deletes the processed file, if not it leaves it in the input directory. 22 A2 70NS REV1 3-27 USER GUIDE COMPTIFFTONPP The fourth tab 'Personalization' : Figure 3-28 Parameters file : 'Personalization' tab The fourth tab 'Personalization' allows to define different objects for job personalization. In the case of CompTiffToNpp composer, the only available personalization objects are objects of ‘Mark’ type. On this tab, the list of the defined objects appears. The name of these objects is automatically defined ‘OBJ_MK_n’ for ‘Mark’ type objects, n being an object number. In the list, the objects appear with an (optional) ’Comment’ allowing to the user to specify the role of this object and with an indication 'Sheet‘ specifying on which sheets of job the object is positioned. 3-28 22 A2 70NS REV1 Configuration and Customization The list of objects is accompanied by a buttons line allowing to manipulate these objects : - ‘New…’ allows to create a new object. ‘Edit…’ allows to edit the selected object in the list. ‘Copy…’ allows to do a copy of the selected object in the list and to edit it to create a new one. ‘Delete’ allows to delete the selected object in the list. If no object is selected, only the ‘New…’ button is enabled. If an object is selected, all buttons are enabled as indicated in the figure below : Figure 3-29 Mark object selected If several objects are selected, the buttons ‘New…’ and ‘Delete’ are enabled, the buttons ‘Edit…’ and ‘Copy…’ are disabled as indicated in the figure below : Figure 3-30 Several Mark objects selected 22 A2 70NS REV1 3-29 USER GUIDE COMPTIFFTONPP Edit an object : The edit an object dialog box come as follows : Figure 3-31 Edit a Mark object Parameters of an Mark object : Comment associated with the object : Allows to the user to specify the role of this object. Object Type : As indicated previously, in the case of CompTiffToNpp composer, only objects of ‘Mark’ type can be defined. The combo box contains only a single type of object. Figure 3-32 Select the Object Type 3-30 22 A2 70NS REV1 Configuration and Customization Object positioned on sheet : Allows to select on which sheet(s) of the job the object must be positioned. Figure 3-33 Select the position of the object If the job is simplex type, the Mark objects defined for back sheets are not generated. In case they choose item 'Number', an edit control appears to enter the desired sheet number : Figure 3-34 Object positioned on the sheet number 12 In case they choose item ‘Modulo’, an edit control appears to enter the desired modulo : Figure 3-35 Object positioned every 6 sheets In the example above, the Mark object will be positioned on sheets 6, 12, 18, 24, … 22 A2 70NS REV1 3-31 USER GUIDE COMPTIFFTONPP Position and size of the object : The four edit control : ‘X Position’, ‘Y Position’, ‘Width’ and ‘Height’ allow to define the size and the position of the Mark object in one of 4 units proposed in the combo box ‘Unit’ : Figure 3-36 Select the unit Mark Type : The combo box ‘Mark Type’ allows to choose between two possibilities : - Either the X position of the Mark object is Sheet relative (default value), therefore is interdependent with job data, - or the X position of the Mark object is Printing heads relative, and in this case, is independent of job data. Figure 3-37 Select the Mark Type 3-32 22 A2 70NS REV1 Configuration and Customization The fifth tab 'Request Parameters' : Figure 3-38 Parameters file : 'Request Parameters' tab This fifth tab 'Request Parameters' allows to define the needed parameters for the printing request generation to be submitted to a Nipson PrintServer application. Use this parameters only if you defined a connection with a Nipson PrintServer application and that CompTiffToNpp is used manually as External CompTiffToNpp. In the case of integrated CompTiffToNpp, even if this parameter setting exists, it is not taken into account at the composition time since the request already exists on Nipson PrintServer : Composition request which will become automatically printing request at the end of the job composition. This tab allows to define the following parameters: Send Printing Request to Nipson PrintServer : Check this item allows to enable the printing request generation to be submitted to a Nipson PrintServer application. When this item isn't checked, all the other items in the tab are grayed, these parameters being unused if one doesn't generate a printing request. Anticipated Request (After first volume composition) : If this item isn't checked, the request will be generated by the composer at the end of complete job composition. If this item is checked, the request will be generated by the composer as soon as the first 22 A2 70NS REV1 3-33 USER GUIDE COMPTIFFTONPP volume of the job is composed. This makes it possible to anticipate the request and thus the printing before the end of the composition. This anticipation will occur obviously only if the size of the job is such as this one is cut out in several volumes. Number of copies : Allows to define the number of job copies to print. Destination : Allows to choose the request destination in the drop-down list. This destination can be: 3-34 - a printer (or Queue) whose name appears in the list in the form 'name - (Q)', - a group of printers whose name appears in the list in the form 'name - (G)' : in this case, the job will be printed on the first available printer in the group, - the named 'Default Queue' printer: in this case, the job will be printed on the printer defined as the default printer at the Nipson PrintServer application level. Paper : Allows to choose in the drop-down list the paper which must be mounted on the printer for the job printing. This paper can be: - a paper whose name appears in the list, - the paper whose name appears in the list in the form '- None -' : In this case, the job will be printed without holding account of the mounted paper on the printer. Activation : Allows to define the initial state of the request at the time of its submitting to Nipson PrintServer. 3 cases are possible: - Immediate : In this case, the request will be created on Nipson PrintServer in the 'Wait for printing' state; It will be automatically printed as soon as the destination printer is available. - Hold : In this case, the request will be created on Nipson PrintServer in the 'Hold' state; The operator will have to intervene on Nipson PrintServer to activate this request. - By default (Queue) : In this case, initial request state isn't defined here; This state will be that which was defined at the printer (or Queue) level on Nipson PrintServer. Restart Mode : Allows to choose the operating mode in the event of incident on the printer requiring a restart of the printing. 5 cases are possible: - Automatic + At a sheet : Automatic restart at the sheet. - Automatic + At a copy : Automatic restart at the copy. - Manual + At a sheet : Manual restart at the sheet. - Manual + At a copy : Manual restart at the copy. - By default (Queue) : In this case, the restart mode will be determined by the equivalent parameter of the destination printer at the moment of printing on Nipson PrintServer. Keep Mode : Request keep mode after printing: Allows to define what becomes a request when it is completely printed. 4 cases are possible: - Dont' keep : Don't keep the request: The request is automatically deleted in the 5 minutes which follow its printing end. - Keep indefinitely : Keep the request indefinitely: The request isn't deleted after its printing end. - Keep n hour(s) or day(s) : Keep the request n hour(s) or day(s): The request can be kept from 1 to 50 hours or days after its printing end before being deleted. - By default (Queue) : In this case, the keep mode will be determined by the equivalent parameter of the destination printer at the end of printing on Nipson PrintServer. 22 A2 70NS REV1 Configuration and Customization Delete printing files when deleting request : Allows to define what become the .npp files associated with a request when this one is manually deleted by the operator or automatically after his keep time. 3 cases are possible: - Don't delete : Don't delete the job NPP files when the request is removed. - Delete : Delete the job NPP files when the request is removed. - By default (Queue) : In this case, the .npp files delete mode will be determined by the equivalent parameter of the destination printer at the end of printing on Nipson PrintServer. For more details on the definition and the using of request parameters, refer to the documentation of the Nipson PrintServer application. 22 A2 70NS REV1 3-35 USER GUIDE COMPTIFFTONPP 3-36 22 A2 70NS REV1 4. Using Composer 4.1 START A LOGICAL COMPOSER Click on the ‘Start…’ button of the ‘TIFF_TO_NPP Composers Manager’ dialog box allows to start the logical composer selected. The CompTiffToNpp application leaves then the configuration mode and becomes a logical composer application. Its name becomes ‘CompTiffToNpp_ComposerName’ (where ComposerName is the name given to the logical composer), ‘CompTiffToNpp_Tiff_Local’ in our example. The logical composer ‘CompTiffToNpp_Tiff_Local’ is iconized in the task bar at the launch time because under normal operation, it is not necessary that the ‘CompTiffToNpp_Tiff_Local’ window appears on the screen. Figure 4-1 Logical Composer in the task bar If one validated the creation of the shortcut for logical composer automatic start at the opening session, there is nothing to do to start the logical composer. It also appears in the task bar like above. When the logical composer is started, one can execute the CompTiffToNpp application in configuration mode, but in this case, one will have the following window : Figure 4-2 CompTiffToNpp in Composers Manager mode 22 A2 70NS REV1 4-1 USER GUIDE COMPTIFFTONPP A logical composer ‘CompTiffToNpp_Tiff_Local’ being selected, the ‘Start’, ‘Edit…’, ‘Delete’ buttons remain disabled : Indeed, it is not possible any more to execute these functions on a logical composer which is under operation. For the same reasons, one does not have any more access to the button of composer configuration in external mode. 4-2 22 A2 70NS REV1 Using Composer If one clicks on the ‘CompTiffToNpp_Tiff_Local’ icon of our example, the dialog box associated with this application appears. As long as an Nipson PrintServer application is not connected to this logical composer, this one is presented as follows : Application title and state Configure the application Start a composition in external mode Application state area Application messages area Close the composer application Figure 4-3 Disconnected Logical Composer The title bar contains the application name ‘CompTiffToNpp_Tiff_Local’ followed by current state of the application : here `Disconnected'. See chapter 4.2 for a description of other states. In the `Disconnected' state, two buttons are accessible : A ‘Configuration’ button that allows to access at the same dialog box ‘TIFF_TO_NPP Composer Parameters Edition’ as that accessible by the ‘Edit…’ button of the ‘TIFF_TO_NPP Composers Manager’ dialog box. A ‘Composition’ button that allows to launch a composition manually in external mode. See chapter 4.3 for a description of this function. 22 A2 70NS REV1 4-3 USER GUIDE COMPTIFFTONPP Click on the icon on the left in title bar shows the system menu : Figure 4-4 System Menu A click with the right button of the mouse on the application icon in the task bar also shows the system menu : Figure 4-5 System Menu The system menu allows to access to the application ‘About’ dialog box, this one making it possible to see the application version. Figure 4-6 ‘About’ Dialog Box The last menu item allows to start the composer in ‘TIFF_TO_NPP Composers Manager’ mode. 4-4 22 A2 70NS REV1 Using Composer Click on the ‘Configuration’ button shows for example the following window : Figure 4-7 Editing a logical composer It is the same dialog box as that of the ‘New...' or ‘Edit...' functions described previously, except with regard to the logical composer name which it is not possible to modify since it is started. All the other parameters are modifiable and are taken into account immediately after validation by the ‘OK’ button. It should be noted that as soon as one opened this dialog box, the logical composer suspends waiting for connection to a Nipson PrintServer application on the listening port. Waiting for connection is reactivated as of the closing of dialog box. It is what the messages say which appear in the application messages area. Figure 4-8 Stop - Start waiting for connection 22 A2 70NS REV1 4-5 USER GUIDE COMPTIFFTONPP 4.2 LOGICAL COMPOSER STATES As explained in the preceding chapter, under normal operation, the logical composer ‘CompTiffToNpp_Tiff_Local ' is iconized in the task bar, and its state is indicated only in the icon of the application. If the window of the application is visualized, one can follow the jobs composition in progress. 4.2.1 ‘Disconnected’ State The window of the application is presented as follows : Figure 4-9 CompTiffToNpp in ‘Disconnected’ State In this state, the logical composer ‘CompTiffToNpp_Tiff_Local’ is waiting for a connection with a Nipson PrintServer application. In this state, the ‘Configuration’ button is available ; it is not it in all the other states. 4-6 22 A2 70NS REV1 Using Composer 4.2.2 ‘Ready’ State The window of the application is presented as follows : Figure 4-10 CompTiffToNpp in ‘Ready’ State In this state, a connection has been established between CompTiffToNpp application and Nipson PrintServer application. In this case, CompTiffToNpp is waiting for a job composition command coming from Nipson PrintServer. At the time of the passage to the ‘Ready' state, CompTiffToNpp sends the list of the 'Composition parameters files' of composer to Nipson PrintServer, in manner that one can select them for the composition requests creation in Nipson PrintServer. 22 A2 70NS REV1 4-7 USER GUIDE COMPTIFFTONPP 4.2.3 ‘Working’ State At composition start, the window of the application is presented as follows : Figure 4-11 CompTiffToNpp in ‘Working’ State This state with the animated image indicates that an job composition command was received from Nipson PrintServer and that a job is currently in composition. It is in this state that CompTiffToNpp launches automatically the execution of the composition module TiffToNpp with the necessary parameters. The message area shows the principal commands received from Nipson PrintServer and the information returned to Nipson PrintServer such as for example the composed file name created by composition module TiffToNpp. This information makes it possible Nipson PrintServer to update the request to be able to print it after the composition. At the top of the message area, there are information concerning the composition request in progress : 4-8 - Its ID (Nipson PrintServer request number), - the first TIFF file job name in process, (in fact here, the first Tiff file of the Job) - the ‘ParamComp' used by TiffToNpp for the composition, - the current page number in process on TiffToNpp. 22 A2 70NS REV1 Using Composer As soon as the job composition is finished, the CompTiffToNpp application returns automatically in the ‘Ready’ state; the window is presented then as follows : Figure 4-12 CompTiffToNpp in ‘Ready’ State CompTiffToNpp is newly available for a new composition command from Nipson PrintServer. 22 A2 70NS REV1 4-9 USER GUIDE COMPTIFFTONPP 4.2.4 ‘Error’ State In the case where an fatal error occurs at CompTiffToNpp composer level, the application window can in certain cases be presented as follows : Figure 4-13 CompTiffToNpp in ‘Error’ State In the case of a fatal error on the composer, CompTiffToNpp passes in the ‘Error' state. The request which was processed at this time also passes in error. According to the nature of the error, CompTiffToNpp can reinitialize itself in a few seconds and automatically returns in the ‘Ready' state, but in certain cases, one will need a manual intervention of the user to correct the error in the applications. It should be noted that if a fatal error occurs on the job in composition, the request passes in error, but not the composer. In this case, the request is automatically removed from the composer and this one returns in the ‘Ready' state. 4-10 22 A2 70NS REV1 Using Composer 4.3 MANUAL COMPOSITION As considering previously, in the ‘Disconnected' state, a ‘Composition' button is accessible and allows to launch a composition in external mode manually. The window application is presented as follows : Figure 4-14 CompTiffToNpp in ‘Disconnected’ state 22 A2 70NS REV1 4-11 USER GUIDE COMPTIFFTONPP To execute a manual composition in external mode, click on the ‘Composition’ button. The dialog box ‘Select job to be composed’ is presented as follows : Figure 4-15 Select Job to be composed’ In the ‘Composition Parameters File’ Combobox, select a file in the list. Figure 4-16 Select a Composition parameters file Select then the first TIFF file of the job to be composed by using the browser button. Figure 4-17 Select the job to be composed Click on OK button to start the composition. 4-12 22 A2 70NS REV1 Using Composer During the composition, the application window is presented as follows : Figure 4-18 External composition in progress’ It is in fact the same window as the ‘working’ window in connected to Nipson PrintServer mode. The only differences are : The job ID is always equal to 0. The presence of a 'Cancel Composition' button which makes it possible to stop the composition in progress if necessary. At the end of composition, CompTiffToNpp returns to ‘Disconnected’ state instead of the ‘Ready' state when one is connected to Nipson PrintServer. 22 A2 70NS REV1 4-13 USER GUIDE COMPTIFFTONPP At the end of the composition, the application window is presented as follows : Figure 4-19 End of manual composition 4-14 22 A2 70NS REV1 Using Composer When one is in a disconnected state, and that one clicked on the ‘Configuration' button to open ‘TIFF_TO_NPP Composer Parameters Edition' dialog box or that one clicked on the ‘Composition' button to open ‘Select job to be composed' dialog box, the application window is presented as follows : Figure 4-20 Disconnected state with connection disabled This state indicates that the logical composer suspended waiting for connection of a Nipson PrintServer application on the listening port. 22 A2 70NS REV1 4-15 USER GUIDE COMPTIFFTONPP 4-16 22 A2 70NS REV1 Vos remarques sur ce document / Technical publications remarks form Titre / Title : User Guide CompTiffToNpp N° référence / Reference number : 22 A2 70NS REV1 Date / Dated : ERREURS DETECTEES / ERRORS IN PUBLICATION : AMELIORATIONS SUGGEREES / SUGGESTIONS FOR IMPROVEMENT TO PUBLICATION : Vos remarques et suggestions seront attentivement examinées. Si vous désirez une réponse écrite, veuillez indiquer ci-après votre adresse postale complète. Your comments will be promptly investigated by qualified technical personnel and action will be taken as required. If you require a written reply, furnish your complete mailing address below. DATE / DATED : NOM / NAME : SOCIETE / COMPANY : ADRESSE / ADDRESS : Remettez cet imprimé à un responsable NIPSON ou envoyez le directement à l’adresse ci-dessous. Please give this technical publications remarks form to your NIPSON representative or mail to address below. NIPSON SAS 28, rue E. Thierry-Mieg – BP 257 – 90005 Belfort Cedex – France Tél.: +33 (0)3 84 54 50 00 – Fax: +33 (0)3 84 54 52 18 http://www.nipson.com – e-mail: [email protected] . .