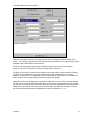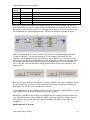
1
TransSECS™ Reference and User Guide
ErgoTech Systems, Inc.
190 Central Park Square
Los Alamos, NM 87544
+1 505.662.5156
http://www.ergotech.com
© 2001,2002 ErgoTech Systems, Inc.
TransSECS and ErgoVU are trademarks of ErgoTech Systems, Inc. Java and JavaBeans are registered trademarks of Sun
Microsystems, Inc. in the United States and world-wide. Other trademarks are trademarks of their respective companies.
TransSECS Reference and User Guide
Copying or duplicating of this manual or any part thereof is a violation of the United States copyright
law. No part of this manual may be reproduced or transmitted in any form by any means, electronic
or mechanical, including but not limited to photocopying and recording, for any purpose without the
express written permission of ErgoTech Systems, Inc.
Virtual Instrumentation Beans, VIB, VIBLaces, ErgoVU and TransSECS are trademarks of
ErgoTech Systems, Inc.. Java, JavaBeans, and JavaSoft are trademarks of Sun Microsystems Inc.
All other trademarks are trademarks of their respective organizations.
ErgoTech has tried to make the information contained in this manual as accurate and reliable as
possible, but assumes no responsibility for errors or omissions. ErgoTech disclaims any warranty
of any kind, whether express or implied, as to any matter whatsoever relating to this manual,
including without limitation the merchantability or fitness for any particular purpose. In no event
shall ErgoTech be liable for any indirect, special, incidental or consequential damages arising out of
purchase or use of this manual or the information contained herein. ErgoTech will from time to time
revise the software described in this manual and reserves the right to make such changes without
obligation to notify the purchaser.
TransSECS™ Reference and User Guide
TransSECS ............................................................................................................................. 3
Deployment Options .............................................................................................................. 3
Running TransSECS............................................................................................................... 4
Menu Buttons and Options .................................................................................................... 5
Importing SML...................................................................................................................... 5
Message Tree ...................................................................................................................... 5
Tool Right-Click Menu ........................................................................................................... 6
Add Message.................................................................................................................... 6
Message Attributes: .......................................................................................................... 7
Item Editing.......................................................................................................................... 8
Element Attributes: ........................................................................................................... 9
Repeat ........................................................................................................................... 10
Optional.......................................................................................................................... 10
Fixed Length Lists ........................................................................................................... 11
Right-Click Item Menu ..................................................................................................... 11
Building and Running the Application.................................................................................... 11
A Sample Tool..................................................................................................................... 12
Testing Messages In TransSECS .......................................................................................... 18
TransSECS Simulators ....................................................................................................... 18
Using the Simulator and TransSECS on the Same Computer.................................................. 21
HSMS (TCP/IP)............................................................................................................... 21
SECSI (RS232)............................................................................................................... 21
Testing Messages From TransSECS .................................................................................... 22
Equipment Characterization.............................................................................................. 23
Copying and Pasting from the Log Window ........................................................................ 23
Receiving Messages and Distinguishing Incoming Messages .............................................. 23
SECS Interface Design and Application Development with VIBLaces................................. 25
Equipment Applications....................................................................................................... 25
Simple Example .............................................................................................................. 25
Using the SecsMsgFilter Manipulator................................................................................. 26
Adding Messages to the Logic.......................................................................................... 27
Adding Data to Messages ................................................................................................ 28
Using Data From OPC and PLC Servers............................................................................ 29
Extracting Information from Messages............................................................................... 30
Chaining Messages ......................................................................................................... 30
Logging .......................................................................................................................... 30
Host Applications ............................................................................................................... 32
Deploying Applications to ErgoVU from VIBLaces.................................................................. 32
Using the SECS OPC Server ................................................................................................ 34
Starting the SECS OPC Server ............................................................................................ 34
Testing the OPC Server....................................................................................................... 34
Run a Simulator and Test the Transactions ........................................................................... 35
Test with Your OPC Client ................................................................................................... 36
Extracting Data from Messages ........................................................................................... 36
Redeployment and the TransSECS Code Generation Process ................................................ 37
Appendix A. Details of Sending and Receiving Messages................................................... 38
Sending Primaries .............................................................................................................. 38
Receiving A Message.......................................................................................................... 39
Making a Messages Unique ................................................................................................. 40
Appendix B. What TransSECS Generates............................................................................ 41
For VIBLaces ..................................................................................................................... 41
For the SECS OPC Server................................................................................................... 41
Appendix C. Known Bugs and Other Miscellany.................................................................. 44
.
TransSECS Reference and User Guide
TransSECS
2
TransSECS Reference and User Guide
TransSECS
TransSECS™ provides a completely graphical environment for building SECS applications. These can
be host applications, for example applications for equipment monitoring, or they can be recipe
management or equipment applications. With TransSECS you can build the entire SECS interface for a
piece of equipment graphically, without any programming. A simple option allows the SECS interface
generated by TransSECS to provide GEM compatibility.
Installation Note: Do not install TransSECS in a directory with spaces (blanks) or decimals (dots) in
the directory name. Directories so specified will be detrimental to the code building process. The default
locations (ErgoTech/TransSECS or TransSECSEval) have been so designated to avoid this problem.
TransSECS runs under Microsoft Windows® or on UNIX (i.e., Linux) platforms. TransSECS is a pure
Java™ application that provides an editor to allow graphical definition of SECS messages. It generates
and builds Java code from the defined messages. TransSECS is built on ErgoTech’s ESECS (ErgoTech
SECS Library) and supports HSMS or SECSI communication.
Deployment Options
TransSECS is distributed with one of two options: with the VIB/VIBLaces/OPC Gateway suite, or with
the SECS OPC Server. When TransSECS generates code for the defined SECS interface, deployed to
one or the other of these packages. Information pertinent to only one or the other of these deployment
options will be indicated in this manual with one of two symbols as shown in the table below:
TransSECS package with VIB, VIBLaces, and the OPC Gateway
TransSECS package with SECS OPC Server
?
VIBLaces Deployment
TransSECS includes ErgoTech’s “Virtual Instrumentation Beans™” (VIB™), which adds the capability of
accessing plant-wide data from OPC and PLC devices, as well as other legacy devices. VIB also
provides the ability to perform logical operations on the message beans, including the ability to build a
rudimentary workflow engine. TransSECS message beans and VIB components are manipulated
graphically with ErgoTech’s VIBLaces™ JavaBean editor. Code generated with VIBLaces can be
executed on any platform with Java 1.1 or later.
TransSECS generates Java code (JavaBeans™) from the defined messages. These JavaBeans are
deployed as a jar into the VIBLaces directory to be used with any other VIB components to design the
“back-end” logic for your SECS interface.
SECS equipment applications are deployed with ErgoTech’s ErgoVU™, which provides a web server,
user authentication, database access, alarming and other features necessary for a full-featured system.
Most importantly, ErgoVU provides a 24x7 run-time engine to execute the SECS interface.
More detailed information on the accessory applications and components (VIBLaces, VIB, and ErgoVU)
can be found in the installed documentation for these applications. Full API (JavaDocs) documentation
is available for the ESECS and VIB software with the commercial distributions (not with the Trial
TransSECS
3
TransSECS Reference and User Guide
versions).
?
SECS OPC Server Deployment
The SECS interface(s) built in TransSECS are automatically deployed to ErgoVU™ which provides a
24x7 run-time engine to execute the SECS code and to handle SECS message transactions. ErgoVU
for the SECS OPC Server automatically runs the OPC Server service so that data items from these
messages and the ability to send messages are available from your OPC client software.
Running TransSECS
The general layout of TransSECS is shown below for a sample project:
The TransSECS window consists of a top panel, with menus and icons and the bottom panel where
creation, editing and testing of messages is performed. Tools and messages are grouped into projects.
A project can have many tools, and when loaded each of the tools will have its own tool tab. All loaded
tools will be saved to the project and restored when the project is reloaded. Clicking on any of the tabs
will bring up the window for that tool. The left panel of the tool window always contains the tree of
messages (Message Area). The right window contains context-sensitive editors that allow modification
of the elements of the tree (Attributes Area). Right clicking on any element in the tree may also bring
up a context sensitive menu that allows additional operations.
TransSECS
4
TransSECS Reference and User Guide
Menu Buttons and Options
New Project (File->New Project). This creates a new empty project.
New Tool (File->New Tool). This creates a new empty tool and adds it to the current project.
Use Edit->Edit Tool Label to change the name of the tab created with the tool.
Open Project (File->Open Project). This opens and existing project (xpj file)
Close Project (File->Close Project). This closes the currently open project (xpj file)
Save Project (File->Save Project). This saves the project and all modified tools.
Open Tool. (File->Open Tool). This opens an existing tool file and adds it to the project.
Tools are stored as xml files.
Remove Tool. (File->Remove Tool). This removes an existing tool from the project. This
does not delete the tool from your workstation. It does however delete any generated code
from the project so it will not be deployed.
Delete Tool. (File->Delete Tool). This deletes the tool file from the workstation disk.
WARNING: Use with care, this will destroy saved xml tool files.
Save Tool. (File->Save Tool). This will save the current tool. The tool is also automatically
saved after a successful compilation. Tools are stored as xml files.
Build. (Project->Build). This will build the current tool and change to test mode if the files
are compiled successfully. This will recreate source code for modified messages and rebuild
any changed files.
Compile All (Project->Compile All). This will delete all existing source and class files and
then recreate and recompile them.
Sort By Name (Edit->Sort Editor Tree By->Name). Sorts the messages alphabetically by the
name assigned to the message.
Sort By Type (Edit->Sort Editor Tree By->Type). Sorts the messages by Stream and
Function.
Ascending/Descending Sort (Edit->Sort Editor Tree By->Ascending/Descending). Inverts the
sort order, for example alphabetic becomes reverse-alphabetic.
Importing SML
There are some functions of TransSECS that can only be assessed through the pull down menus. Most
significant of these is the ability to import SML files. This is accessed through the Edit -> Import
selection. You will be presented with a file browser to load an SML file. Once loaded all the defined
messages will appear in the message tree area. See also: copying and pasting SML from the log
window on page 23.
Message Tree
The root of the message tree is the equipment definition node. Clicking on that node will bring the editor
for that node into the right window
TransSECS
5
TransSECS Reference and User Guide
The Tool Attributes:
Tool Name
Host/Equip
Equip. Uses GEM
Host
Model
Soft Rev.
Device ID
Port
Baud Rate
T1-T7
The name you assign to this tool. This will become the Equipment Node
name, and when you save the Tool, it will be the Tool name (xml file name).
Whether the project is a host application or an equipment application. Note
that equipment applications are “passive” and host applications are “active”.
Check this to build GEM equipment or to enable GEM for testing.
The host name to connect to for a host or which is running the simulator.
This is the MDLN required by GEM
This is the SOFTREV required by GEM
This is the SECS device Id.
The port number. If this number is less than 128 we assume the connection
is SECSI (RS232) otherwise it is assumed to be HSMS. It is a necessity that
each tool in TransSECS uses a unique port number when you have multiple
tools loaded.
(SECSI only) The baud rate of the connection.
The time outs defined by the SECS standard. The defaults are usually fine for
these. If the connection is extremely slow, it may be necessary to increase
the response timeout (T3).
Tool Right-Click Menu
If you right-click on the tool node, the following menu will be displayed:
This performs the following functions:
Add Message
Add SVIDs
This will add a new message.
This will add a node for creating SVIDs for GEM. Only one node of this type
can be created.
Add Message
Clicking Add Message will create a new message and adds it to the tree. Clicking on the new message
node will show the Message Attributes Editor in the right panel.
TransSECS
6
TransSECS Reference and User Guide
Message Attributes:
Name
Response
Message
Stream &
Function
Expects
Reply
Standard
Message
Peep Only
The name you assign to this message. This name should be alphanumeric and start
with a character.
This allows you to choose a response to this message. The drop-down list will
present any message that you have created that do not expect a reply. This means
that the response must be created before it can be used. Setting a response
message in this field turns the message into an "Auto Response" message. When
an Auto Response message is received, TransSECS will respond it to automatically
and there is no possibility to modify the value of the response (See Sending and
Receiving Messages for more information).
These are the SECS Stream and Function of the message.
Whether the message expects a response. If this box is checked, the message
will be set with the "wait" bit set, as defined in the SEMI standard.
Whether the message is a standard message. If the message matches the SECS
definition for the message, then it can be created as a standard message and will
be checked for validity on reception. This is most useful when configuring
TransSECS to make sure that you are not creating invalid messages. If the
message is not standard, un-check this box and no validity checking will be
performed.
Peep only is used when a Voyeur Link has been created. A Voyeur application is
an equipment application that also has a link to a host. Messages from the
equipment that have been configured in TransSECS are normally handled by
TransSECS and not passed through the Voyeur link to the host. Unknown
messages are passed on unhandled. The "Peep Only" option allows TransSECS to
extract the data from the message but also pass it to the host.
If the message is a "header only" message such as S1F1, then it is complete. For most messages
items are added in a defined structure to complete the message. Right-Clicking on the Message Node
brings up the following menu that allows the addition of items within the message.
This menu provides the following features:
TransSECS
7
TransSECS Reference and User Guide
Add Item
Remove
Message
Add a new item to this message.
Remove this entire message from the tree.
The Move options are described below under Item Editing. The messages can be reordered manually
using these options, but this will not be retained when a different sort order is applied.
Item Editing
After a new Item is added, it defaults to a list. The list editor has one option, to change the format of the
item from a list to some other type.
Messages are allowed to have only one element. In the case of complex messages, this single
element must be a list, so frequently the first element added to any message is a list. Right clicking on
the list node allows more items to be added. Once a node is added to a list, the option to change the
type is unavailable and removed. The editor for a list is then blank.
Selecting a type other than a "List" from the
"Type" selection list will bring up a different
editor.
TransSECS
8
TransSECS Reference and User Guide
These editors are all very similar, for
example, this is the editor for a 4-byte
float.
Element Attributes:
Name
Type
Default Value
Type Length
and Fixed
Length
Key
Publish
TransSECS
The name assigned to this item. This will also be used as the tag name in VIBLaces or
the OPC item name in the SECS OPC Server if the item is published.
The type of this item. The choice of types is:
List - SECS Format 00 (a list of items).
Binary - SECS Format 10 ( binary type). The default value for this type can be a single
value or a comma delimited list of values.
Boolean - SECS Format 11. For the default value, zero is considered false and any
non-zero value is true.
String - SECS Format 20. This is the normal way to use text strings.
Integer (1,2,4,8) SECS Formats 30, 31, 32, 34. The signed integer data types. Float
(4,8) SECS Format 40 and 44. Four byte and eight byte real values.
Unsigned Integer (1,2,4,8) SECS Formats 50, 51, 52, 54. The unsigned integer data
types.
Any. This will match any data type. It is used when the data type of the message is
unknown at the time it is defined.
The default value for this item. This will be used whenever an initial value is required.
This value may change when the underlying interface logic changes the value (using
VIBLaces generated applications) or through an OPC client (for the SECS OPC
Server).
If the "Type Length" field is checked then TransSECS will use the default, or normal
length of the item when sending. This means that numeric types will use their
assigned lengths (1,2,4,8 bytes). For Strings the length of the item will be the actual
length of the string. For Binary arrays, the item will have the actual length of the array.
If the "Type Length" field is unchecked then the length of the item will be the value
entered in the "Fixed Length" field. The item will be EXACTLY the length stated and
will be padded or truncated if necessary. If the item is a String, and option to specify
that the padding should be at the right (Left Justify) or the left (Right Justify) is also
provided.
When TransSECS receives a message it needs to be able to uniquely identify the
message received. The message structure is not always sufficient to do this; for
example, there could be multiple event messages that are received that have the same
structure. In this case, one or more "key" fields can be defined. When a message is
received its structure is checked first. If the structure of the message matches, then
the key fields are checked to see if the value entered in the "Default Value" field
matches the value received in the message. If the structure and all the key fields
match then the message is assumed to be a match, if any of these fail then the
message is not considered a match.
Check the "Publish" check box for any data field that you want exposed to the interface
logic. This will be exposed as an OPC item in the SECS OPC Server or will be
available to the TransSECS logic when the message is used in VIBLaces.
9
TransSECS Reference and User Guide
Repeat
If the value in the "repeat" is greater than zero, TransSECS will expect to see exactly that number of
elements at that location. If the number of repeats is set to zero then TransSECS will expect to see at
least one element of that type in that location and will continue searching until no more messages at
that location match the requested type.
Repeat count can be applied to an items or a list. If applied to a list, then the entire list must repeat at
that location.
Optional
If the "optional" check box is checked then TransSECS will ignore this element if it does not exist. An
element can be optional and have a repeat count. In this case, TransSECS will attempt to match the
element only up to the repeat count. For example, if an element is marked as optional with a repeat
count of 5, and 5 or less elements appear at that location, then the element will match. If 6 elements
appear, then the first 5 will be matched, and the 6th will not.
Optional can be applied to both items and lists.
TransSECS attempts to match optional elements until the first mandatory item. This allows for flexible
repeated lists, but can be a little confusing. It is also important to distinguish between optional and
mandatory elements. Consider the following situations.
A message consists of a list containing an integer (I4) a float (F4) and a string (A). Suppose the
integer and float are optional, giving a message that looks like this:
F4 - Optional
I4 - Optional
A - Mandatory
It's easy to distinguish the elements, because the types are different. In all these cases, an incorrect
type would cause the matching to abort and the message not to match. Any list sent that includes at
least the string will match this list. TransSECS does not necessarily match the optional elements in the
order specified, that is, a list containing an integer followed by a float (followed by a string) would match
this list.
The situation becomes a little more confusing if repeats are added:
F4 - Optional - repeats
I4 - Optional -repeats
A - Mandatory - only one
Now any list that contains any combination of floats and integers and ends with a single string will
match. For example:
[1.2, 3, "First"] and [1.2, 1.3, 3,4, "Second"] obviously match. However, [1.2, 3, 1.3, 4, "Third"] will also
match. Similarly, if a repeat count is put on the string, then any combination of floats, integers and
strings would match until the required repeat count on strings has been reached.
TransSECS
10
TransSECS Reference and User Guide
Fixed Length Lists
While slightly counter intuitive, this is generally the desired behavior. In order to refine the matches,
further "key" fields are used. In the case of items, the "key" field behaves as it always does, that is, the
value received must be exactly what is in the field received. For a list the "key" is associated with the
length. In order to set a key for a list, uncheck the check box labeled "Type Length" and enter a value
in the text field labeled "List Length is". When a list is received the length of the list will be compared to
the length in the text field. If the two do not match no further matching of the list is performed. If the
list was marked as "Optional" then matching will continue. If the list was mandatory, then this message
will be rejected as a potential match for the incoming message.
Right-Click Item Menu
The item right-click menu for items is
similar to the message right-click
menu.
Add Item
Remove Item
Move Up/Move
Down
Move
Above/Below
Adds an item to the message. If this item is a list then the item is added into the
list. If this item is not a list then the item is added into the parent list below the
current item.
Removes the current item. If this item is a list the entire tree is removed.
Moves the item up or down. This option will move the item into a list if there is a
list immediately above or below the current item.
Moves the item up or down. This option will move the item over a list if there is a
list immediately above or below the current item.
Building and Running the Application
Once all messages are defined the TransSECS application can be build by pressing
the "Build" button. The "Build" option will generate the source code and compile any
features that have been changed.
“Build” will not destroy any files, so if messages have been deleted then the "Compile All"
button should be used instead. "Compile All" deletes all files and then regenerates and
rebuilds them. After "Compile All" press the "Build" button to enter Test Mode.
When all the files have been built the Tool file (XML) is automatically saved and
TransSECS goes into "Test" or “Run” mode. TransSECS will act as a SECS host for
testing purposes.
Note: if you are generating a SECS host application with TransSECS and you want to test this host,
you will need to shut down TransSECS at this point. Otherwise the deployed application (either the
application generated in VIBLaces or the SECS OPC Server) as well as TransSECS will behave as the
SECS host and connection conflicts will occur.
TransSECS
11
TransSECS Reference and User Guide
A Sample Tool
Start TransSECS. We will be creating a new tool as an exercise, but you may want to load the Sample
tool (SampleTool.xml) for guidance. There is also a more complex tool, called ComplexTool. The sample
SimpleTool automatically loads the first time you run TransSECS. You will need a SEMI SECS manual
(at least the E5 reference) for message design.
After TransSECS is launched, press the “New Tool” button to create a NewTool tool. You will
see a default tool created as shown below.
TransSECS
12
TransSECS Reference and User Guide
Enter properties for the tool: at the very least, enter Tool Name, Host, Devi ce ID, and Port. The screen
below displays a sample Tool called “Implanter” with tool attributes entered.
Note: By default the Tool Attributes designate this as an “equipment” application. This means that the
application will be passive. If you were to design a “host” application by choosing “Host”, the application
would be active. A passive application does not initiate communication with the host. The significance of
this will become apparent when we test the messages in VIBLaces in the next section. Also note: the
equipment is not GEM compliant by default. If you want this equipment to be GEM compliant, you will
need to designate: Equip. Uses GEM and you will need to define SVIDs.
Next we will set up two SECS messages: S1F1 and its response S1F2. First, add a message by right
clicking on the selected tool name, Implanter. Select “Add Message” and an empty message will be
added, as shown below:
TransSECS
13
TransSECS Reference and User Guide
For this example, we will create a simple primary message, an S1F1. S1F1 is a simple, standard
header-only message, and for this example we will make it expect a reply if it is sent. The message
name is arbitrary, but it should be indicative of the intent of the message. In this case, we will call it
“AreYouThere”.
Next we will define its response, an S1F2 message. An S1F2 message is more complex because it is
constructed with a couple of data items. Add a new message by selecting “Implanter” and right clicking.
Set the basic message attributes for the S1F2 as shown below. Note that this message does not
expect a reply. Again, the name is arbitrary, but it should reflect the intent of the message.
TransSECS
14
TransSECS Reference and User Guide
Next we will add two data items to the message. Right click on the AreYouThereResponse and select
“Add Item”. You will get a blank list (<L>) item. This is a required element for SECS messages with
data. Right click on the <L> and create another blank <L> item.
This will need to be typed as a String, so go to the Element Attributes and use the pull down list to
change the default List to a String. You will get a default element name (which may not have the same
number as the figure below).
TransSECS
15
TransSECS Reference and User Guide
Fill in the information for the first data field of the S1F2, as for example, in the figure below. Remember
that the Name can be used as a VIB tag name when the code is generated (for VIB interfaces in
VIBLaces) or it will be used as the OPC item name in the SECS OPC Server. The default values will be
necessary if this message is to be used as an auto-response. If the values are left blank it is expected
that they will be filled in by TransSECS logic (as defined in VIBLaces) before the message is sent.
Note however that the data for “Auto Response” messages cannot be modified in VIBLaces and so must
be defined in TransSECS. Auto Response messages are described in more detail below.
Next, add the second String data element. For example, as in the figure below:
The default value will be displayed to the right of <A SoftRev> in the message tree when the carriage
return is pressed to finish the entry.
TransSECS
16
TransSECS Reference and User Guide
To set this S1F2 message as the auto response to the S1F1 message, select the S1F1 node again and
use the Response Message pull down list to select “AreYouThereResponse”. The final configuration will
look similar to the figure below:
You are ready to build the code to test this simple message set. When the Build button is pressed, the
tool will be saved (Implanter.xml) and source code will be generated in the “source” directory. Following
this, the code will be compiled into JavaBean class files ready for VIBLaces to use. If VIBLaces is
running you will want to close it and restart it to load these new Beans.
The next topic will describe how to send and receive messages using TransSECS in Test Mode and
how to use the TransSECS simulator.
TransSECS
17
TransSECS Reference and User Guide
Testing Messages In TransSECS
In Test Mode the right window in TransSECS changes from an editor to a test window. The test window
allows you to send SECS messages and view the outgoing messages and the received responses.
Since the TransSECS Message Editor always acts as a SECS host (an active entity), you can only use
it as a tool to test against equipment applications (passive entities). The next section describes how to
use the equipment simulators generated by TransSECS. These equipment simulators (as passive
entities) are designed to be used either with TransSECS running as the host, or with the TransSECS
generated code (if you are building a host application). The procedure for using and testing the
TransSECS generated code depends on whether you are using the SECS OPC Server or the
VIB/VIBLaces/OPC Gateway version of TransSECS. Each of these cases will be a subject of a
separate section in this manual.
?
SECS OPC Server
After TransSECS has built the code and is in Run mode, the Java code has been deployed for use in
the ErgoVU run-time engine. If ErgoVU (the SECS Run-Time, a.k.a the SECS OPC Server) is running,
the messages will be available to your OPC Client. If the SECS Run-Time is not running, you may start
it now. If you are generating a host application you can only run the SECS OPC Server or the
TransSECS Message Editor at any one time. This is because both will attempt to make active SECS
connections (as they both are acting as SECS hosts).
TransSECS Simulators
To send and receive messages you need both host and equipment. TransSECS always behaves as the
host but also provides a number of options for equipment. When the code is built in TransSECS, each
tool generates its own “simulator”. These simulators are started from batch files or shell scripts called
XXXX_simulator.bat or XXXX_simulator.sh, where XXXX is the tool name (for example,
Sample_simulator.bat).
For simple testing, and especially when using TransSECS to build a host application, the generated
TransSECS simulators can be used to send and receive the SECS messages you have defined. These
also provide GEM compatibility for testing host applications against GEM compliant equipment. If you
are building a SECS interface to equipment, the simulator is also useful for initial testing of the SECS
messages defined; however, most extensive testing should be against the logic created in VIBLaces or
with your OPC client through the SECS OPC Server.
The simulator window is similar to the TransSECS test panel.
TransSECS
18
TransSECS Reference and User Guide
At the top of this window is a panel that allows you to simulate GEM behavior for the control and
communications states. Unless you are running GEM tests you probably do not need these. The
buttons indicate the state that GEM will transition to when the button is pressed. The labels indicate
the current state of the GEM model. For non-GEM equipment, these can be ignored.
Below this panel, the "Primary" and "Reply" drop-down lists let you select messages and the behavior
of the simulator when the message is received. The "Primary" and "Reply" drop-down list, lists all
messages except those that are the responses to "Auto Response" messages. The "Reply" can also
be set to "ERROR" or "NONE". "ERROR" will generate an S9F5 (or S9F3) response; NONE will cause
no response to be sent. Since the "Reply" could also be a primary message it is possible to use the
simulator to chain messages. For example, if the S1F1 message is set to automatically respond, it
would send an S1F2, it could also be used to send another message back to the host, say an event
report. This allows some simple testing from the simulator.
Note: these simple simulators always return a response for a received message if the message was
defined with an auto response in TransSECS. This is true even if <NONE> or <ERROR> is selected for
the response.
Below the drop-down lists is an editor panel that allows you to enter parameters for message that will be
sent if the message has data items (is not a header-only message). One such example is shown below
for a message with several data elements. These parameters can be configured at any time and
messages of that type will be sent with the parameters entered. The editor is context sensitive and
depends upon the message you selected from the "Primary" drop-down list.
TransSECS
19
TransSECS Reference and User Guide
Whenever a message is received, the output is placed in the log window towards the bottom of the
screen. The "Primary" drop-down list is also changed so that it displays the incoming message and the
parameter panel is filled with the values received.
Finally, the "Send Message" button allows unsolicited primaries to be sent from the simulator.
Whenever the button is pressed, the currently selected primary will be sent.
The Reply for any Primary received can be selected from the pull-down list. With this simple simulator,
any Reply may be selected for any Primary (replies used as auto-responses are not in the list,
however). As noted above, a message that has been defined with an auto-response in TransSECS will
always respond with the reply designated as the auto-response message.
Parameters for the reply messages are configured by selecting them in the “Primary” list and changing
the data values in the same way that the data values for the Primary message data items are changed.
For example, to change the ACK value for the StartCycle response (StartResponse), Start Response is
selected in the Primary list, and the ack value is entered. When the StartCycle message is received,
the simulator auto-responds with the StartResponse and the ack field has a “7” in it.
TransSECS
20
TransSECS Reference and User Guide
Using the Simulator and TransSECS on the Same Computer
The simulator and TransSECS can run on either the same or different computers. Testing is often
easier if all the applications are on the same computer, but there are a few considerations when using
this configuration.
HSMS (TCP/IP)
If you are using TCP/IP (HSMS) to send messages the simulator will always simulate a passive
(equipment) connection. TransSECS will always create an active (host) connection. The simulator
uses "Single Session" (HSMS-SS) so will accept only one connection from a host. This is the normal
configuration for testing, and no special considerations are required, however, as noted below, as you
begin to build logic you will need to ensure that only one host and equipment application are open at
any time.
If you want to run the equipment simulator on a different system, you can change the IP address of the
“Host” from “localhost” to the desired value in TransSECS. The code does not need to be rebuilt since
this only effects the host (in this case, the TransSECS message editor).
SECSI (RS232)
The simulator can be used to test SECSI connections. To do this on a single computer you will need a
system with at least two free serial ports. Configure TransSECS to use one of the ports (for example,
port 0) before you generate the tool code. You then need to modify the simulator start-up file to use a
different free port. Open the startup batch file on Windows in a text editor such as Notepad. Add "-p"
and the port number to the end of the line. For example, if the original line said “simulator
deploy.Sample”, change this to “simulator deploy.Sample –p 1”. Port numbers in TransSECS are
enumerated starting a zero -- com1 is usually zero, com2 is 1, etc. However, some Windows
machines re-number the ports (by the Windows OS) so some experimentation can be necessary.
Additionally, SECSI requires that the Java-COMAPI is installed on the system. This is installed as part
of TransSECS on Windows development systems. These are described more thoroughly in the ESECS
manual.
Once you have configured the software, it is necessary to connect between the two ports using a "Null
Modem" serial cable. By making this connection you have effectively done the following: the TransSECS
TransSECS
21
TransSECS Reference and User Guide
message editor will send and receive SECSI messages through port 0 (as originally configured); but the
equipment simulator will be communicating through port 1. Since port 0 is connected to port 1 though
the null-modem cable, it will appear to the host (TransSECS) that it has a direct connection to the
equipment through port 0.
If you can test SECSI between two separate computers and you have a serial cable between port 0 of
both these systems, you can use TransSECS as a host on one computer and run the equipment
simulator on the second system. For this configuration you would not need to make any changes to the
simulator batch or shell script.
Testing Messages From TransSECS
Although not too sophisticated, the simulator allows the testing of messages from TransSECS. At any
point while defining messages, they can be simply tested. TransSECS enters "Test" mode by pressing
the "Build" button on the top icon bar. The “Attributes” area of the TransSECS window becomes the
“Test” window.
The TransSECS test window
consists of two panels; the top
panel allows you to modify the
parameters of outgoing
messages, and the bottom
panel logs all outgoing and
incoming messages. For
example, the test screen for
an S5F1 message may look
like this:
Testing is simple. Modify the parameters if required and press the "Send Message" button. The
outgoing message, and the response to the message (if any) are shown in the log window. Remember
that if the equipment is GEM compliant some initial configuration may be required, in particular, the
equipment may need to be placed into "Communicating" mode by sending an S1F13 message.
Each message can be tested and viewed. The validity of the message can be examined from the
output. TransSECS will also generate messages when a message is received if the format is invalid.
TransSECS will only test received messages for validity and only messages that have been marked as
"Standard Message" in the editor panel. The simulator performs similar tests.
TransSECS
22
TransSECS Reference and User Guide
?
Testing in VIBLaces
Once the messages have been defined and passed preliminary tests they are ready to be used to
create the interface logic using VIBLaces. If you are generating an equipment application, remember
that the interface is passive; so if you want to send messages from it to TransSECS you will need to
send an initial message (S1F1for example) from TransSECS to establish communications before you
can send a message back to TransSECS from VIBLaces.
If you are generating a host application, you may establish communications to the equipment simulator
by sending (for example) an S1F1 message from VIBLaces.
Only one passive connection on a specific port (the equipment port) may be running on one computer at
any time. If you are running TransSECS and the simulator on the same computer, and if you are
building an equipment application, it is advisable to close the simulator to test the equipment in
VIBLaces. If you are building a host application you should close TransSECS, since it is currently
connected to the simulator and the simulator will only accept one connection (either SECSI or HSMSSS). You can re-open TransSECS at a later time, but you should have only one passive (equipment)
and one active (host) connection open at a time.
Equipment Characterization
The ability to rapidly create and send messages using TransSECS makes it ideal for equipment
characterization. In particular, the equipment can be characterized in small pieces, adding messages
as required. The ability to copy messages from the log window and paste them into the tree of
messages makes characterizing equipment responses particularly easy.
To begin characterization, create one or more primary messages and press the "Build" button to go into
"Test" mode. Choose one of the primaries and press the "Send Message" button to send it. The
response to the message (if any) will be displayed in the log window. The message responses can be
copied and pasted to the message tree to add complete messages to the tree that can be edited later.
Copying and Pasting from the Log Window
To add the message to the message tree, select the message in the log window. This is done in the
usual way, by marking the entire message -- from the line after the "RECEIVED:" to the closing ">".
Press Ctrl-C (or Edit->Copy) to copy the message. Select on the root of the tree in the left window.
Press Ctrl-V (or Edit->Paste) to paste the message. You message will be called "messageXX" where
XX is a number which depends on how many messages are already defined. Each of the names of the
items within the message is assigned a default. Once pasted, the message can be edited as usual. In
particular, it is probably desirable to change the name of the message and the names of the items
within the message. Once complete the message can be used as any other message within the
application.
Receiving Messages and Distinguishing Incoming Messages
The major challenge of building host applications is distinguishing amongst the wide range of messages
that can be sent by equipment. When the messages from the equipment have a fixed format the task is
fairly easy. Usually defining one or more "key" fields will allow TransSECS to distinguish between the
messages so that data can be published correctly or the messages used in logic. Where variations are
slight, it is often simple enough to create multiple messages with all the possible variation and allow
TransSECS to distinguish between them. It is not always necessary to distinguish all messages
completely. For instance, if an event message has a variable list of data, but the list is of no interest, or
only the first few elements are of interest and are fixed then the end of the list need not be included in
the message. By default, TransSECS does not check the lengths of lists, and will ignore the remaining
TransSECS
23
TransSECS Reference and User Guide
elements in a list once it has matched all the specified elements. This means that if a list with no
elements is specified, any list in that location in the message will be considered a match.
If a message, or messages, cannot be matched using these simple techniques, more comprehensive
solutions are available.
TransSECS
24
TransSECS Reference and User Guide
?
SECS Interface Design and Application Development with VIBLaces
Note: This section (through page 33) only applies to TransSECS with VIB/VIBLaces and the OPC
Gateway).
VIBLaces is used with TransSECS to build either equipment or host applications. To build and test
equipment applications in VIBLaces, TransSECS is used as the host. To build and test host
applications, the TransSECS generated equipment simulator(s) are used to act as simulated equipment
interfaces when testing the host application in VIBLaces.
Equipment Applications
Simple Example
Finish defining messages and responses in TransSECS. You will want to be sure to define all the
Primaries in TransSECS before you start this step. This following exercise uses the sample SimpleTool
provided in the TransSECS installation. It defines an S1F1 with an auto response (S1F2), an S5F1and a
S5F2 response, as well as an S2F41 and its response. You will also need to have built the TransSECS
project. Any other primaries and responses which are defined will also be available for your use as
JavaBeans in VIBLaces (after the TransSECS project is built). VIBLaces is used to design the logic
and graphical displays for the equipment application. To test your application you will use TransSECS
to establish the communication link to VIBLaces, and to send and receive messages from VIBLaces.
Make sure TransSECS is running and is in “Run” mode. The arrow icon indicates Run Mode. If
the Build mode icon (the hammer) is displayed, TransSECS is not in Run mode. Unless
TransSECS is in “Run” mode you will not be able to send messages from it, but it will receive
messages in any mode once the connection is established.
When you start VIBLaces there will be three new tabs added to the Beans Palette. These will be called
XXXX Primaries, XXXX Responses, and XXXX Auto, where XXXX is the name of the equipment from
TransSECS (the “Tool Name”). The XXXX Auto tab contains the messages with auto responses (not
changeable by configuration in VIBLaces). For example, this could be “Sample Primaries”
More information about how to use VIBLaces and VIB can be found in the product documentation and
tutorials. If you are not familiar with VIBLaces and the VIB components it may help to have these
reference guide and training material available.
As an example of using the message Beans, drag a Box and a Button into the VIBLaces Design
Window. Select the Box and change its “Fill Direction” property to “None” and its Panel to “Well Panel”.
The Box will be used to display the results from the message transaction. Select the Button and change
both the labels for On and Off to “SEND”. This Button will be used to trigger the message sending for this
exercise. Type “CNTL-A” to copy the representation of these Beans to the Diagram Window. Move the
Box to the right side of the Diagram Window and the Button to the left side.
SECS Interface Design in VIBLaces
25
TransSECS Reference and User Guide
Locate the Auto tab on the Palette and select the
S1F1 “Are You There” message from the Palette and
drag and drop it into the Diagram Window. Move it to
a position between the Button and the Box. Put the
VIBLaces Diagram Window into “connection” mode.
Wire from the Button to the S1F1 icon, and from the
S1F1 icon to the Box. This Button is used to trigger
sending the message. All SECS messages in
VIBLaces need to be triggered (via valueChanged) to
be sent unless it is a designated auto response.
Before you can test the equipment, you need to make sure TransSECS (acting as the “active” host) is
ready to make a connection. TransSECS will not automatically try to make a connection while you are
preparing the equipment application (because the equipment is passive). To force TransSECS to a
connection state to the VIBLaces application, go to TransSECS and send a message. For simplicity,
select S1F1. You should see an S1F2 auto-response in the logging window (with the data you already
defined in TransSECS for the S1F2 response).
Note: You will need to repeat the process of establishing the connection from TransSECS to VIBLaces
each time you stop and restart TransSECS. You might need to do this routinely while developing
applications in VIBLaces.
Go back to your VIBLaces Design Window and
put VIBLaces into “Run” mode. Press the Button
and you will send an S1F1 from VIBLaces to
TransSECS. You should see a notification of the
message received in the TransSECS message
log panel. The default data for the S1F2 message
in this example is shown in the result.
The Box in VIBLaces will display the return status of the message (0 indicates no error). The next
exercise will demonstrate how to use the return value for further logic and event processing.
Using the SecsMsgFilter Manipulator
The SecsMsgFilter can be used to apply logic to the transaction return results. SecsMsgFilter is a
Manipulator JavaBean which takes the message return value as an input and passes that value if the
specified return value matches (otherwise nothing is passed). A simple example of handling an “OK” as
one case (through one SecsMsgFilter), and all other errors (through another SecsMsgFilter) as another
case will be described below.
The return values of the SECS message transactions are shown in the table below. The Return Values
would be displayed in the Box in the example above. The SecsMsgFilter provides a means by which
you can react to error conditions.
SECS Interface Design in VIBLaces
26
TransSECS Reference and User Guide
Return
Value
0
1
2
3
4
-1
Key
OK
TIMEOUT
S9ERROR
F0ERROR
CANNOTSEND
UNSOLICITED
Description
No error
Transaction completed with a T3
Transaction completed with a Stream 9 message
Function error, transaction completed with a Function 0 message
Message could not be sent, maybe due to no connection
An unsolicited message was received
Start with the simple screen design in the Simple Example above. Go to the Diagram Window and
disconnect the Box from the S1F1 output. Add two SecsMsgFilters to the Diagram and two SetValue
Manipulators. Connect from the S1F1 to the SecsMsgFilters as shown in the figure, and from each of
the SecsMsgFilters to one SetValue Manipulator. Connect both SetValues to the Box as shown.
Select one SecsMsgFilter and set its Condition to OK. Select the other SecsMsgFilter and set its
condition to “All Errors”. This means that whenever an error condition is returned by the S1F1
transaction, this SecsMsgFilter will pass that condition on to its listeners. If the transaction occurs
without errors (OK), the other SecsMsgFilter will trigger its listeners. To continue this example, select
the SetValue Manipulator that is connected from the “OK” SecsMsgFilter and set its “Set Value” to
“S1F1 Check OK”. Select the other Set Value Manipulator and set its “Set Value” property to “S1F1
Check Not OK”.
Now when you press the Button, and the S1F1 message is received by the Host (TransSECS) you will
see “S1F1 Check OK” in the Box. You can force an error by stopping TransSECS and pressing the
Button again. You will see “S1F1 Check Not OK” in the Box.
The SecsMsgFilter can be used to detect any one or all of the errors listed in the table above. Once the
error is detected you may choose to handle this in any way you want.
Normally you might want to form a SECS error message when the message transaction results in an
error. This requires using an S5F1 template and filling it in with valid data for the condition. The next
lesson will cover how you use VIBLaces to compose messages with data (non-auto response
messages).
Adding Messages to the Logic
SECS Interface Design in VIBLaces
27
TransSECS Reference and User Guide
The TransSECS application you are designing in VIBLaces will automatically respond to messages sent
for which “auto-response” messages have been defined. You do not need to explicitly add these
messages to the Diagram Window (the logic design). For example, the application will respond to an
S1F1 (if it has been assigned a Response Message), even if you do not drag and drop the S1F1 into the
logic.
Receiving Messages
If you want something to happen or an event to be triggered in response to a message being received, or
if you simply want to check the disposition of the message, then you will want to drag and drop this
message into the logic design (the VIBLaces Diagram Window). You can connect from this message
Bean to a VIB manipulator, such as the SECS Message Filter (see page 26), or to factory automation
device drivers (OPC or PLC data sources, for example). When the message is received, it will send its
auto-response message, if one is designated. If an auto response was not defined in TransSECS, and
the primary was defined with “expects reply”, you should drag a response bean into VIBLaces and have
it triggered by the primary message bean (or by some other string of logic triggered by the receipt of the
primary).
When an unsolicited primary messages is received, the normal output from the Bean is a -1,
“unsolicited message”.
Sending Messages
Primary messages added to the VIBLaces Diagram Window are triggered by events. They are triggered
by any data transition (high to low or low to high). For example, a VIB Button press will trigger the
message for both the On->Off transition and the Off->On transition. The message can be triggered from
any other VIB data source, including manipulators, other SECS Beans, and from factory automation
devices through OPC or PLC drivers. When primary messages are sent, the value of the Bean will be
set to one of the numbers in the table on page 33.
You can send response messages as discussed above under “Receiving Messages”. Response
messages are sent in the same manner as primaries, except that the receipt of the primary triggers the
sending of these messages.
Adding Data to Messages
Data can be inserted into messages by “hooking” the data fields to VIB data sources or by entering
static data into the fields. As an example of adding data to messages, we will add an S5F1 to the
equipment application. Go to the Diagram Window of VIBLaces and drop in an S5F1 (Alarm Message).
You can fill in the other data in this message in VIBLaces before it is sent. The default data set when
the message was defined in VIBLaces will be used if this data is not changed, except the text of the
message (The S5F1 message will be triggered by the events produced by pressing the Button; the
S5F1 message will only be sent (ALTX), so you should set this data before the message is sent (either
by typing @”message text”, or using another VIB data source to fill this in dynamically.
For this example we will set a static string to the data of the S5F1 message. Select the S5F1 and set
its ALTX property to “S1F1 Alarm”. When the message is sent to the Host, the ALTX will be set to
“S1F1 Alarm”.
To test this, you will need to remove the auto response from the S1F1 message (select “None” instead
of the designated S1F2 message). Make sure the “expects response” is still checked off. This
combination will prevent the S1F1 from receiving a response from the Host, thereby producing an error
condition.
The TransSECS code will need to be recompiled and TransSECS will need to be restarted. VIBLaces
will need to be stopped and restarted too so be sure to save the screen design.
SECS Interface Design in VIBLaces
28
TransSECS Reference and User Guide
After restarting VIBLaces, pressing the Button on the user interface sends the S1F1 but the message
response is an error since there is no S1F2 sent from the Host (and this is expected). TransSECS will
receive the S1F5 with the data you have designated for this error.
Using Data From OPC and PLC Servers
Data from other VIB data sources, such as OPC servers or Modbus servers, can be used to fill in the
message elements before the message is sent. This can be done through VIBLaces quick connects or
by entering the tag name of the data source into the selected Server List property of the message.
For example, an S6F11 message defined in TransSECS has several data fields that can be set by VIB
data sources.
An example of quick connecting
the data from OPC servers to a
couple of data fields of the
S6F11 message in VIBLaces is
shown in this figure. The
message is not sent until it is
triggered, and then it will be sent
with the current data.
SECS Interface Design in VIBLaces
29
TransSECS Reference and User Guide
Extracting Information from Messages
Data within the message responses from the Host can be used in VIBLaces as you would use data
from other data sources. For example, going back to the first simple example, send an S1F1 from
VIBLaces (the equipment application) and receive an S1F2 back. The S1F2 contains data (the MDLN
and the SoftRev), which you may want to use in your equipment application. If these are marked as
“publish” in TransSECS these data values will be accessible in VIBLaces. For this exercise, make sure
that both the MDLN and the SoftRev of the S1F2 auto response to this S1F1 are published. The name
given to the data element when the message was defined is used as the tag name of the published
data.
As an example of using the message data, start with the simple first example, and add an additional
Box to the Design Window. This Box will hold the result from the MDLN of the S1F2 response. To make
the Box display this value, type “MDLN” into the Attached Servers of the Box. After you press the
Button to send an S1F1, you will see the published MDLN value in the Box. You may do the same to
display the SoftRev value.
Chaining Messages
Messages can be chained; for example, if the result from sending the S1F1 is OK (from a
SecsMsgFilter) the output of the SecsMsgFilter can trigger another SECS message. As has already
been shown, if the result of sending the S1F1 is not OK (again, through a SecsMsgFilter) an error
message can be sent.
Logging
Messages can be logged (in SML format) and viewed using a VIB Swing Text Area.
Note: Other components can be used to display the logged text, but the VIB Swing Text Area is
scrollable, and is therefore the most useful graphical component to use. To enable using he VIB
Swing components you will need to exit VIBLaces, activate the stencils file by removing the
“.hide” from the stencils name (stencils_swing.ini), and restart VIBLaces. However, using Swing
components in your graphical display limits the viewer to ErgoVU (front panel) or Web browsers
with Java 2 capability (such as Internet Explorer with the Sun JRE Plug In installed).
The loggers are automatically created with specific tag names to use in the “Attached Servers” property
of any VIB component (but Swing Text Area is recommended). These tag names correspond to the type
of data you wish to log. All tag names begin with the tool name plus “.Passive” (or “.Active” for host
applications) and is followed by one of these:
.InMsg
.InBytes
.OutMsg
.OutBytes
For example, Implantert.Passive.OutMsg would log the messages sent from the Implanter tool to the
host as SML, and Implanter.Passive.InMsg would log the messages received by the Implanter tool. To
display the raw byes (not SML) use .InBytes and/or .OutBytes.
To test this, use the simple example with an S1F1 message and the S1F2 auto response. Add a Swing
Text Area to the screen design (to the Design Window).
Select the Swing Text Area and type: “Implanter.Passive.OutMsg” Into its Attached Severs property, as
shown below:
SECS Interface Design in VIBLaces
30
TransSECS Reference and User Guide
Note: The “Passive” in the logger refers to the “passive” equipment connection made from the host to
the equipment. If you are working on a host application you will want to use the “Active” logger, thereby
logging the messages to and from the equipment.
An example of what you will see when you send the S1F1 message is shown in the next figure:
You can use several tag names in the “Attached Servers” (separated by [blank]:[blank]), for example to
display both the sent and received messages:
SECS Interface Design in VIBLaces
31
TransSECS Reference and User Guide
This will display both the sent and received messages:
Host Applications
Host applications are designed and tested in much the same way as equipment applications. The only
difference is that the simulator applications generated by TransSECS are executed to simulate the
equipment for testing purposes. VIBLaces and the logic you design in the Diagram Window is run
against the simulator, not the main TransSECS application.
Deploying Applications to ErgoVU from VIBLaces
TransSECS applications can be easily deployed to ErgoVU using VIBLaces (generate an ErgoVU
application). Be sure to read the ErgoVU Quick Start Guide or Training Guide to learn how to start
ErgoVU. ErgoVU is also a Java application. You will not need to run TransSECS or VIBLaces once the
application is deployed to ErgoVU. Because your ErgoVU TransSECS application will be running the
equipment controller and is passive, you need to make sure VIBLaces (and any TransSECS simulators)
are not running while the ErgoVU application is running. To ensure this:
SECS Interface Design in VIBLaces
32
TransSECS Reference and User Guide
1.
2.
3.
Start ErgoVU
Download the TransSECS screens from VIBLaces to ErgoVU
Stop VIBLaces, stop ErgoVU, and restart ErgoVU
If you need to restart VIBLaces to continue development work, be sure to stop ErgoVU before starting
VIBLaces. You will need to repeat the three steps above when you are ready to deploy to ErgoVU
again.
The reason for the caution related to stopping and starting applications running equipment controllers is
that there is only one connection from host to equipment. When building in VIBLaces, VIBLaces has
the connection, when downloading to ErgoVU it will not get the connection until VIBLaces is stopped
and ErgoVU is restarted. When attempting to continue development ErgoVU, has the connection and
must be stopped before VIBLaces can get it.
SECS Interface Design in VIBLaces
33
?
Using the SECS OPC Server
Note: This section (through page 37) is only relevant to TransSECS with the SECS OPC Server.
Starting the SECS OPC Server
The SECS OPC Server is started from ErgoVU (the “SECS Run-Time”). This can be started from the
desktop shortcut that was created when you installed TransSECS, or it can be started from the shortcut
in the Windows Programs “Start” Menu.
If you look at the console window when you start the SECS OPC Server for the first time, you will see
(after some other text output):
Started ErgoVU on port 8082
ErgoVUController : bound
Creation Date: Sep 16, 2002 12:56:53 PM
Warning:Can't load the persistent properties for "Sample"
TransSECSVoyeur "Sample" Connecting to Equipment:
Port 6124 Device ID 1 Host localhost
at ip address localhost
Passive Port set to: -1
Registering C:\ErgoTech\TransSECS\bin\jre\bin\ErgoOPC.dll
Succeeded
You will also see the lines referring to “ErgoVU will run for 2 hours for evaluation” if you are running Trial
software. Also, this output was for a SECS host application – if you are running an equipment interface
you will see “TransSECS” in place of “TransSECSVoyeur”.
Testing the OPC Server
Using any OPC Client you can see that the OPC Server is running and that the message data items are
present as OPC items. The SECS OPC Server is called “ErgoTech.OPCServer”. For example, using the
Kepware (http://www.kepware.com)? OPC Quick Client, you can browse for the ErgoTech.OPCServer
and add it as a server (use Edit -> New Server Connection…). Next you need to add an OPC “Group”
(this is an arbitrary name, but we will use “SECS”). Use “Edit > Add Group” to add the group.
The illustration below shows the Kepware Quick OPC Client with the ErgoTech.OPCServer and SECS
group. To the group we can add OPC Items. Use “Edit > New Item …” to add the SECS message
items. Browse through the ErgoTech.OPCServer “sample” tool items until you find the “areyouthere”
message. Add both of the data times (“sendmessage” and “responsestatus”). The full OPC item names
for these two are “sample.areyouthere.sendmessage” and “sample.areyouthere.responsestatus”. You
can see this in the Quick Client screen shot on the next page.
?
The OPC Quick Client is part of the Kepware KEPServerEx Suite, available as demo software. The
OPC Quick Client is a full OPC Client (not a demo).
The SECS OPC Server
34
TransSECS Reference and User Guide
Save the Quick Client configuration so you can come back to it later to add more tags. For example,
save it as “SECS” (the Kepware software will save it as SECS.otc).
Run a Simulator and Test the Transactions
To test the OPC Server as a SECS host interface, you will need to run a simulator for the equipment
(passive) connection. This must run on the port number designated when you designed the tool
interface in TransSECS (this is HSMS port 6124 by default for the Sample tool). When you generated
code in TransSECS, an equipment simulator was also generated. To start this simulator you must
browse through the TransSECS_Editor directory and find the batch file called “Sample_simulator.bat”. If
you double click on this batch file the tool simulator will start. You may run as many tool simulators as
you would like to test. Each simulator will be called “XXXX_simulator.bat”, where “XXXX” is the tool
name.
Note: You may also use any other third party SECS simulator acting as equipment (passive)
on the designated port and device id.
Also Note: The example in this section is for a SECS host application. If you are building and
testing an equipment interface you will test this against a host application such as TransSECS
in “Run” mode instead of against the equipment simulator.
After you have started the equipment simulator, the first thing you want to do is establish
communications between the host (the OPC Server) and the tool. To do this, just choose the
sample.areyouthere.sendmessage OPC item from the OPC client and send to the sample equipment by
writing a non-zero value to the OPC item. For example, select the “sample.areyouthere.sendmessage”
item in the Kepware client and right click to bring up a panel of choices. Choose either the synchronous
or asynchronous write and type a “1” (without the quotes) into the “Write Value” field, then press OK. If
you watch your equipment simulator, you should see an S1F1 message be received. If you are using
the TransSECS generated equipment simulator, an S1F2 response will be automatically returned to the
host.
After you successfully establish contact with the equipment, you may test sending messages from the
equipment simulator to the TransSECS interface. You can examine the published data values from the
SECS messages by using your OPC client and accessing these values from the SECS OPC Server.
The SECS OPC Server
35
TransSECS Reference and User Guide
The return values of the SECS message transactions are shown in the table below. The OPC data items
called XXXX.YYYY.responsestatus (where XXXX is the tool name, i.e. “sample”, and YYYY is the
message name, i.e. “areyouthere”).
Return
Value
0
1
2
3
4
-1
Key
OK
TIMEOUT
S9ERROR
F0ERROR
CANNOTSEND
UNSOLICITED
Description
No error
Transaction completed with a T3
Transaction completed with a Stream 9 message
Function error, transaction completed with a Function 0 message
Message could not be sent, maybe due to no connection
An unsolicited message was received
Note: It is advisable to routinely set the responsestatus to a known value (outside the range of
expected return values) before you send a message so that you can clearly distinguish when a return
value of 0 or some other value is set. For example, set the returnvalue to “99” before you send the
message. Then it will change to 0 upon the completion of a successful transaction.
Test with Your OPC Client
Start your OPC Client Application. At this point, you should have your HMI application running (which is
your OPC Client). Connect to the SECS OPC Server (“ErgoTech.OPCServer). Create a test data
variable in your application and connect to the SECS OPC Server item called
“Sample.areyouthere.sendmessage”. Also add the
“Sample.areyouthere.messageresponse” item. You may also add the response items so you
can see the values of the data items when you receive the response. For example, add
“Sample.areyouthereresponse.MDLN” and “Sample.areyouthereresponse.SoftRev”. Use
your application to send a value to the SECS OPC Server to set the
“Sample.areyouthere.messageresponse” to “99”.
Start the equipment simulator if you have not done so. To start the Sample tool, use
Sample_simulator.bat. Send a message to the equipment simulator from your OPC client. Since this is
a host application, you must initiate communication to the equipment. You can send any message to
do this, but usually an S1F1 is used as a simple “Are You There ?”. To send this message, write a nonzero value (Boolean true) to the item “Sample.areyouthere.sendmessage”. You should
immediately get a response from the simulator (it will automatically send an S1F2). You will only see
this response values if you have connected to any of the response items, for example
“Sample.areyouthereresponse.MDLN” .
Extracting Data from Messages
It is easy to connect to data items that you have marked as “publish” in TransSECS. These will be
available as OPC data items. For example, the S6F11 message has a “position” data item. We can set
this value in the equipment simulator for testing. Select the LimiteEventMessage S6F11 message and
make the panel for the equipment simulator much wider than its default so you can see this data item.
Change the “0” to “45.7” and send the message. If you have connected to the
“Sample.limiteventmessage.position” OPC item to your OPC Client, you will see this number
update in your OPC Client. The S6F12 response to this messages is automatically sent by the SECS
run-time since this is designated as an “auto-response” to the S6F11 message.
The SECS OPC Server
36
TransSECS Reference and User Guide
Adding Data to Messages
You can “fill in” messages by using the individual data items that compose the message. For example,
the LimitEventMessageResponse (S6F12) has an ACK value that you can fill in with a value to be sent
with the message. This S6F12 will be received by the equipment or simulator with this value whenever
your host receives an S6F11. To test this, use your OPC client to attach to the
“Sample.eventreponse.ack” and set this value to a “5”. When the equipment simulator sends an
S6F11 to your SECS interface, the S6F12 response sent to the simulator will contain a “5” for the ACK
value.
Redeployment and the TransSECS Code Generation Process
Note: Only data items of the messages that are marked as “publish” will be available through the OPC
Sever. Also, messages that are used as auto-responses are never exposed in the OPC Server except
for their published data values (i.e, you cannot send a response that is designated as an auto-response,
but you can change the data in the message).
When you build the messages in TransSECS, it will automatically build a deployment jar that is sent to
the SECS Run-Time (ErgoVU) for use in the OPC Server. On Windows NT/2000 (and not guaranteed on
Win9X), the SECS run-time should automatically load this jar every time you deploy to it. You can
observe the process in the SECS Run-Time console window. The SECS OPC Server is not re-started
each time you re-deploy from TransSECS. If you do stop and restart the OPC Server, your OPC Client
will be disconnected and you must restore the connection as advised in the documentation of your HMI
application.
The SECS OPC Server
37
Appendix A. Details of Sending and Receiving Messages
Sending Primaries
After generating code in TransSECS and building an application in VIBLaces or your OPC client, you
can send the primary by triggering it as discussed in the appropriate section of this manual.
When the disposition of the transaction has been determined, the primary will set a code as its output
that indicates this disposition. The possible dispositions are:
Disposition
OK
UNSOLICITED
TIMEOUT
S9ERROR
F0ERROR
CANNOTSEND
Return
Code
0
-1
1
2
3
4
Property Value (Used
in SesMsgFilter)
O.K.
UnSolicited
Time Out Errors
S9 Errors
Function Error
Cannot Send
The specifics are:
NO_ERROR
Indicates that the transaction completed successfully and that both the request
and response message are valid. The response is valid only if the message
expected a reply.
TIMEOUT_ERROR
Indicates that the transaction completed with a T3. NOTE: on T3 (timeout) errors
the system will automatically send an S9F9 as required by the spec.
S9_ERROR
Indicates that the transaction completed with a Stream 9 message. The content
(MHEAD) of the S9 message must match the system bytes of the outgoing
message, so this message must have caused the S9.
F0_ERROR
Indicates that the transaction completed with a Function 0 message. The
stream of the message must match the stream of this message. All messages
of this stream will be terminated.
CANNOT_SEND
Indicates that the message could not be sent. This will occur, for example if
there is no connection to the host or to the equipment.
UNSOLICITED This indicates that an unsolicited message was received.
The disposition of the message in VIBLaces logic can be determined by using the "SecsMsgFilter"
which will allows the trigger from the message to be "split" to determine either whether there was an
error, or the exact nature of the error. See Using VIBLaces with TransSECS for an example of using the
SecsMsgFilter. It can also be used to determine whether the message was unsolicited or whether the
whole transaction was correct (message sent and response received correctly).
The disposition of the message transaction in the SECS OPC Server is observed by monitoring the
corresponding “responsestatus” OPC data item.
The SECS OPC Server
38
TransSECS Reference and User Guide
The primary can have an "auto response" message set in TransSECS. It is appropriate to set an auto
response when the response to the message has a fixed, static structure. Typically this includes
messages that have a simple "ACK" as a response, and many others. The advantage of setting an auto
response message in this case is that TransSECS will guarantee that the data is published from the
auto response message, that is, there is no possibility of it matching another message and the naming
will be correct.
Data is always published before notification (notification of the state of the transaction). TransSECS
data is “published” if it is designated as Publish in the element attributes.
If there is no auto response message then the normal message receive procedure is used (see
Receiving a Message). That is, the incoming message is checked against the message structures and
the defined "keys" for each message. The messages are searched until a message matches, then the
data is published and searching stops (see Making Messages Unique).
In all these cases, there is no reason to put the secondary on the VIBLaces Diagram Window (for the
TransSECS logic). In the case of "auto response" messages, messages placed in the logic are
ignored. These auto-response secondaries are never available as “sendmessage” items in the SECS
OPC Server.
Receiving A Message
All message reception goes through the same procedure. The steps are as follows:
1) If the message is a secondary (response) message it is checked against the list of primaries that
have been sent, but which have not yet been closed. That is, the message is waiting for a response,
T3, F0 or S9, as described above. If the incoming message matches one of these and the primary has
an auto response message defined, a new message of the auto response type is created and the data
is published against that message. The primary message bean is then notified (with an OK) and the
transaction is closed.
2) If the message is not a secondary, or the waiting primary does not have an auto response message
defined, then TransSECS attempts to match the message against messages that have been defined.
It will first look through the list of messages that have auto response messages defined. TransSECS
goes through a copy of each message sequentially and attempts to "publish" the data. The publish
data routine checks the stream and function of the message -- if they match the incoming message
then it will check the structure of the message against the incoming message. If the structure matches
then it will check the key fields to make sure that the values of the key fields match the values in the
received message. Note that the structure of the incoming message can be a super-set of the defined
message. For example, a large incoming S6F11 (event report) message will match the definition of an
S6F11 that has only the CEID and the DATAID defined. In this case it is likely that the CEID will be the
key to matching the incoming event reports.
If a message with an auto response is found, then, after publishing, the response is sent and processing
is complete.
Auto response messages are used where the response to the incoming primary is fixed, for example,
responding to an incoming S6F11 with an ACK of zero in an S6F12.
If no message with an auto response is found then all other messages are searched. The procedure for
searching these messages is the same as the auto response messages, that is, an attempt to
"publish" the data is made against a copy of the message. If the publish is successful and the
message is a primary that expects a reply, then the message is noted as a "dangling primary" and then
the message is notified.
Appendices
39
TransSECS Reference and User Guide
To complete this transaction successfully, the notification of the received primary must trigger the
sending of a response. The response must therefore be in the logic in VIBLaces (in the Diagram
Window). The data in this response message can be customized by hooking servers to the response
bean (see Using VIBLaces with TransSECS); for the SECS OPC Server this is done by writing data to
the response data items from your OPC client.
If no messages match the incoming message, TransSECS passes the message forward to any other
user or system message handlers for processing. If no message handlers process the message the
system will respond with either an S9F5 or an S9F3 message; the stream of the incoming message
determines what is sent. If an SxF0 message matching the incoming stream exists then an S9F5
(unknown function) is returned. If the F0 does not exist, then an S9F3 (unknown stream) is returned.
Making a Messages Unique
Messages are unique if they are the only defined message of a specific type, or if there is more than
one message of that type, messages are only unique when a key is used (see description of Key in
Element Attributes). Messages designated as an auto response to a primary ensure that that message
will be sent without any concern of it being unique or not.
Appendices
40
TransSECS Reference and User Guide
Appendix B. What TransSECS Generates
For VIBLaces
TransSECS converts SECS messages to Java classes. While the details of this operation are not
usually important, this section describes what files are created, where and why. This is provided for
advanced users, and it assumed that you have some familiarity with Java and JavaBeans.
TransSECS is, in the barest view, a JavaBean generator. It takes the complex structure of a SECS
message and generates a single JavaBean for each message. In so doing it "flattens" the structure of
the message. The message begins as a tree, but within the bean, each item is accessed simply by the
name provided for that item. All the source code is generated into the "source" directory. The package
name for the beans is formed by taking the tool name and pre-pendinding "deploy" to it. So the
package for "MyTool" would be deploy.MyTool. Each bean within the package is named for the
message, for example, the "AreYouThere" message will generate a Java file called "AreYouThere.java".
If the name provided for any message, or any item within the message is invalid, it will be replaced by
an underscore "_". So a message called "Are You There" will create a Java file called
"Are_You_There.java". These Java files are regenerated each time the message is modified and the
Java files themselves should not be changed manually.
For each message a "BeanInfo" file is also created and two images are also created. These images are
16x16 and 32x32 Jpeg images and are used by the BeanInfo as icons. The BeanInfo's are used in code
building tools, such as VIBLaces, for customizing the Bean properties. The icons are also used in the
logic screens of VIBLaces to identify the Beans for making data connections.
A file, always called "EquipmentController.java" is also created to contain the SECS related parameters
of the interface. These are the parameters defined in the Tool Editor. Selecting the root of the message
tree when you are not in “Test” mode accesses the Tool Editor.
The Java files are compiled using "Ant". Ant is a Java "make" utility and is part of the Apache project
(see http://www.apache.org). While a detailed description of the build process is beyond the scope of
this document, the build is controlled by the Ant build file, EndeployAntProject.xml. This file should
never be modified, nor should the ant scripts.
The Java class files are built into the "beans" directory. A “stencils” file is also generated by TransSECS
when the beans are built. The stencils file is used by VIBLaces to designate beans that should be
loaded into the beans palette. VIBLaces load the beans in the beans directory so you can use them to
build the logic. A jar containing the beans is also created and placed in the "deployment" directory.
This jar is used at runtime when the beans are deployed.
It is recommended that you allow TransSECS to manage this process and the files created. The major
cause of user problems with TransSECS is unnecessary intervention in these operations. The
classpaths set in the scripts (batch files or shell scripts) should never be changed. Do not add or
remove jars from the VIBLaces jars directory or deployment directory unless you are specifically
instructed to by ErgoTech. Both VIBLaces and TransSECS use their own class loaders based on class
files it finds in specific locations, and setting duplicate jars and classes on the classpath will interrupt
this process.
For the SECS OPC Server
TransSECS generates a single run-time jar (called VIBLogic.jar) which contains all the JavaBeans for
the defined messages and reponses, as well as supporting SECS transaction classes. This jar is
copied to the ErgoVU htmlroot directory when TransSECS deploys the code to the SECS Run-Time
environment. When ErgoVU detects a new jar, it loads it into the SECS OPC Server and the code is
Appendices
41
TransSECS Reference and User Guide
executed and available to your OPC client applications.
Appendices
42
TransSECS Reference and User Guide
Appendix C. Notes on Using TransSECS on Windows 9X platforms
Windows 9X (95/98/ME) must prepare the batch file environments for all of the installed batch files that
start various applications needed for TransSECS. There is a “read-me” file installed in the VIBLaces
installation directory that also covers these details. Windows 9X does not allocate enough environment
space to run the batch files that launch VIBLaces, TransSECS, the TransSECS simulators, and
ErgoVU. Therefore, special care must be taken to set this environment space before these can be
started. To do this, find each of the .bat files installed under VIBLaces and right click on the .bat file.
You must choose properties, and then the “memory” tab and pull down the “initial environment” option
and set this to at least 2048.
Every time a tool is generated a new tool simulator batch file will be generated. You will need to set the
environment for each of these.
To launch the applications you will need to use the “pif” file generated during the environment setting
procedure. These are the files generated by Windows and have a short 7 character name with a “~” as
the last character.
These batch files will need to be set: run.bat, run.console.bat, transsecs.bat, simulator.bat, ErgoVU’s
run_logic.bat and the run_http.bat under TiniHttpServer. You will also need to set each simulator batch
file as it is generated during the build processs.
None of the preceding applies for Windows NT or 2000.
Appendices
43
TransSECS Reference and User Guide
Appendix C. Known Bugs and Other Miscellany
Occasional Occurrences
Occasionally, when closing a tool, the remaining tool panel will only display the message tree and
cannot be resized to show the attributes area. Close the project and reload it to recover from this
situation.
Panel Width
The left panel (the message tree) does not always resize larger when you drag the resize bar (the
dividing bar). If you want to resize this larger, resize the whole TransSECS window, then resize the
message area.
Windows 9X
When compiling a new tool (or after doing a clean re-build) Windows 9X will display an error panel
saying it could not find the EquipmentController class. This can be ignored (just close the panel). Most
likely the code has been built properly and you can check this by looking at the beans>deploy>toolname directory under VIBLaces.
Appendices
44