1
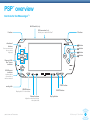
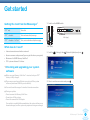
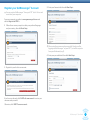
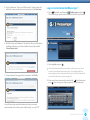
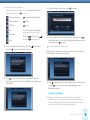
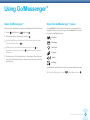
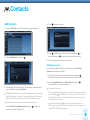
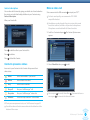
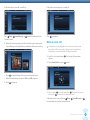
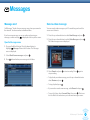
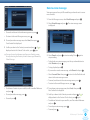
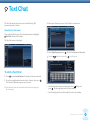
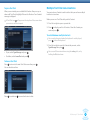
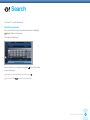
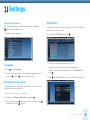
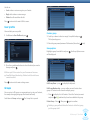
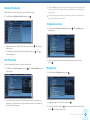
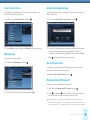
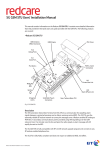
User Guide
Contents
PSP™ (PlayStation® Portable)
overview
3
Text Chat
18
To start a Text Chat
18
Quick Start Guide
4
Multiple Text Chat conversations
19
Get started
5
Services
20
Getting the most from Go!Messenger™
5
Online Help
20
What else do I need?
5
My Account
20
Search
21
Settings
22
Checking and upgrading your
system software
5
Downloading the Go!Messenger™
software
6
Language
22
Register your Go!Messenger™ Account
7
Disconnect from service
22
Log on and activate Go!Messenger™
8
Call History
22
Using Go!Messenger™
10
User profile
23
Open Go!Messenger™
10
Groups
23
Open the Go!Messenger™ menus
10
Blocked Contacts
24
Set Presence
24
Contacts
11
Contacts sorting
24
Add Contacts
11
Ringtones
24
Contacts presence status
12
Save to sent items
25
Make a video call
12
Microphone
25
Make a voice call
13
Adjust message storage
25
Receiving calls
14
Re-verify Account
25
Messages
15
Remove Stored Password
25
Message alert
15
Further help
26
Send a video message
15
Send a voice message
16
Storing messages
17
Go!Messenger™ User Guide
2
PSP overview
™
Controls for Go!Messenger™†
WLAN switch (top)
USB connector (top)
L button
R button
Enables you to attach a Go!Cam™
directional
buttons
button
Use to move around
the on-screen
keyboard
button
button
button
Memory Stick
Duo™ access
indicator
WLAN access
indicator
Lights up when
connected to a
wireless network
START button
analog stick
HOME button
SELECT button
Displays the PSP™ Home Menu
Volume buttons
Display button
Adjust the volume level during
video/audio chat
† Model shown is PSP™ Slim and Lite
Go!Messenger™ User Guide
3
Quick Start Guide
The basic steps to get up and running – for more detail please see the rest of this document
What do I need?
3 Register your Go!Messenger™ Account
• Internet connection and wireless network
• bt.com username and password (you can get this when you register)
You can register Go!Messenger™ from your PSP™ but it’s faster and
easier from your computer.
• Minimum of a 32MB Memory Stick Duo™
• From your computer, go online to www.gomessenger.bt.com.
• PSP™ system software 3.9 or later
• Click on Register for FREE > and follow the on-screen instructions.
• Headset (optional)
4 Log on and activate Go!Messenger™
• Go!Cam™ (optional)
• Using your PSP™, select
(Network), scroll down to
Go!Messenger and press . The Go!Messenger™ splash screen is
displayed, then the Log On-screen.
1 Checking and upgrading your
system software
Make sure your Memory Stick Duo™ is inserted, your PSP™ battery is
fully charged and you are within range of a wireless Internet connection.
• Switch on the WLAN button.
• Scroll to
(Settings), then
(Network Update) and press
• Select a wireless connection and press
.
.
If you have not got a wireless connection saved, select New Connection.
• If new system software is found, press
to download it, then
again to install the update. After updating, you can delete the data
from your Memory Stick Duo™.
2 Downloading the Go!Messenger™ software
• Select
(Network) from the Home menu.
• Scroll down to
Go!Messenger and press
.
• Select Log On and press
.
• Select a network connection and press
.
• Enter your bt.com username then scroll to the
and press .
(Enter) button
• Enter your bt.com password then scroll to the
press . Your account should be verified.
(Enter) button and
• Press
to store your profile.
• Press
to continue.
• Press to select the default Message Storage setting. The Contacts
screen is displayed and Go!Messenger™ checks for new messages.
• Press
to download any new messages or to continue without
downloading (you can download them later).
Your Go!Messenger™ account is activated.
• Follow the on-screen instructions.
Go!Messenger™ User Guide
4
Get started
Getting the most from Go!Messenger™
PSP™ only
Text chat
PSP™ + headset
Text and voice chat/message
1 Switch on the WLAN switch.
PSP™ (top)
PSP™ + headset + Go!Cam™
Text, voice and video chat/messaging
What else do I need?
• Internet connection and wireless network
PSP™ (side)
2 Scroll to
(Settings), then
(Network Update) and press
.
• bt.com username and password (you can get this when you register)
• Minimum of a 32MB Memory Stick Duo™
• PSP™ system software 3.9 or later
1 Checking and upgrading your system
software
Make sure your Memory Stick Duo™ is inserted and your PSP™
battery is fully charged.
Please ensure you have sufficient space to install the system
software (minimum 23MB of space available).
3 Select a wireless connection and press
.
You must be within range of a wireless Internet connection.
During an update:
• Do not remove the Memory Stick Duo™.
• Do not turn off the system.
• Do not disconnect the AC Adaptor.
If an update is cancelled before completion, the system software may
become damaged, and the system may require servicing or exchange.
Go!Messenger™ User Guide
5
If you have not got a wireless connection saved, select New Connection
and enter the network details. See Network section of your PSP™ Quick
Reference guide.
The system checks your connection.
When a successful connection is made, the green wireless connection
indicator
lights up.
4 Network Update checks for new system software. Press
download the new system software.
to
Downloading the Go!Messenger™ software
With the right system software installed, you can now download the
Go!Messenger™ software to your PSP.
Please make sure you have at least 23MB memory available on
your Memory Stick Duo™.
1 Select
(Network) from the Home menu.
2 Scroll down to
Go!Messenger and press . You will see a
confirmation screen to start the browser, select Yes and press
to start.
3 The Network screen will ask you to select your Connection.
Scroll to select a network and press .
For additional help on connecting to wireless networks, please see
our ‘Getting Connected to a Wireless Network’ section on page 26.
5 Once downloaded, press
to install the update.
4 A screen opens displaying the terms and conditions. (These must
be accepted before download.) Press
to accept the terms and
conditions, then select download and press .
5 Select Yes and press
Memory Stick Duo™.
. Two files will now be downloaded to the
6 Once the download is completed you are taken back to the download
page. Press to confirm and again to exit the browser. You will
need to press for Yes to confirm you are exiting the browser.
The Go!Messenger™ application is now downloaded. Selecting
and pressing will start Go!Messenger™.
After updating, you can delete the data from your Memory Stick Duo™.
For other ways to upgrade your system software, see Updating the
System Software section of your PSP™ Quick Reference guide.
Go!Messenger™ User Guide
6
Register your Go!Messenger™ Account
3 Enter your Account info then click Next Step>.
You can register Go!Messenger™ from your PSP™ but it’s faster and
easier from your computer.
From your computer, go online to www.gomessenger.bt.com and
click on Register for FREE >.
1 Follow the on-screen prompts to select your preferred language
and your country, then click Next Step>.
Please note the username and password will also be used for
logging into Go!Messenger™ on your PSP™, but will be separate
from your Nickname (step 5).
4 Enter your personal details then click Next Step>.
2 Register for your free bt.com account.
If you have one already, click I HAVE a bt.com account> to enter your
username and password.
Otherwise, click I DON’T have an account>.
Go!Messenger™ User Guide
7
5 Create a Nickname. This is your Go!Messenger™ Contact name and
will be the name your friends use to contact you. Click Next Step>.
Log on and activate Go!Messenger™
1 Select
(Network), scroll down to
Go!Messenger and press .
The Go!Messenger™ splash screen is displayed, then the Log On screen.
6 Read the Terms and Conditions. Then tick the Terms and Conditions
checkbox (and keep up-to-date checkbox if you wish) and click
Submit Registration>.
2 Select Log On and press
7 Congratulations! Your registration is complete. Click Finish.
.
If not already connected to your wireless network, you are asked
to select your network connection again. For additional help on
connecting to wireless networks please see our ‘Getting Connected
to a Wireless Network’ section on page 26.
3 Enter your bt.com username then scroll to the (Enter) button and
press . (See next page for help using the on-screen keyboard.)
You will receive two email confirmations with your username
and password. You can then access Go!Messenger™ on your PSP™.
Go!Messenger™ User Guide
8
Using the on-screen keyboard
6 On the Message Storage screen, press
to continue.
When the keyboard is displayed: Use the directional buttons to
highlight a key and press to select it.
Accented characters
Cancel and close keyboard
Other characters
Delete
CAPS lock
Space
Shift
Backspace
Enter
Use the L button and R button to
move the cursor left and right
Pressing
Pressing
4 Enter your bt.com password then scroll to the
and press . Your account should be verified.
highlights the key.
again selects it.
(Enter) button
5 Press
to store your profile. This is recommended as it will
make logging in easier in the future. The Message Storage screen
is displayed.
7 Set the required amount of storage space for messages. Press for
the default setting, or press the left and right buttons for your own
setting, then press to apply.
The default will store 20 messages.
Go!Messenger™ then connects and your Contacts screen is displayed.
Go!Messenger™ checks for new messages.
8 Press to download any messages and display the Contacts screen.
Or press to go to Contacts without downloading (you can
download them later).
Activation is complete.
Your Log On details are only required on first activation of
Go!Messenger™, unless you have not stored your profile to your
Memory Stick Duo™. After that you may be prompted for them
periodically but this is for security purposes only.
Go!Messenger™ User Guide
9
Using Go!Messenger™
Open Go!Messenger™
Open the Go!Messenger™ menus
Once you have registered your account and logged on for the first time:
Press and hold the L button and use the up or down buttons to
highlight the menu you want to open. Then release the L button
to open the highlighted menu.
1 Select
, scroll down to
and press
2 Select your wireless connection and press
.
.
For best performance look for at least two bars on the wireless
signal strength indicator
.
Go!Messenger™ may check for new messages. Press to
download any messages, or press to continue and download
them later.
3 The first menu – the Contacts screen – is displayed. From here you
can access all the main features, shown in the menu bar on the left
of the screen.
Contacts
Messages
Text Chat
Services
Search
Settings
Use the directional buttons to select the options within the menu.
To exit Go!Messenger™, press
, select Yes and press
.
Go!Messenger™ User Guide
10
Contacts
Add Contacts
4 Press
to close the screen.
1 Open the Contacts menu. All Contacts (if any) are displayed.
2 Select <Add Contact> and press
5 Press
to add the new Contact to your Contacts list,
to
continue editing or
to return to Contacts without saving.
.
6 Your Contact(s) have to accept your request.
Edit/delete Contacts
Once you have added Contacts to your Contacts list, the Contact
Options menu becomes available.
1 Scroll to the Contact you want to edit or delete and press .
The Contact Options menu opens from the right of the screen.
2 Scroll to View/Edit Contact or Delete Contact and press
Then follow the on-screen instructions.
3 Enter the details for your Contact. As a minimum requirement you
must include the Contact’s Nickname.
The Nickname is the one your Contact entered when first registering
their Go!Messenger™ account. You must exchange your Nickname
with your friends in order for you to be able to call one another.
Maximum 15 characters for the Forename and Surname.
• Select View/Edit Group Membership and press
Contact to a Group (see page 23).
to add your
.
Blocked and Subscribe
• Selecting Blocked prevents your Contact from seeing you when
you are online ( is Not Blocked). You cannot see or make calls to
each other when blocked. You will still see their presence updates
but they will not see yours.
• De-selecting Subscribe ( ) means you will see this Contact as
offline ( is Subscribed). You will no longer receive their presence
updates but they will receive yours.
Go!Messenger™ User Guide
11
Contact subscription
Make a video call
You can also add a Contact by giving your details to a friend and when
they invite you to be their buddy, add them to your Contacts using
Contact Subscription.
Slot a camera into the USB connector
When your friend calls:
on top of your PSP™.
For best sound quality, we recommend a PSP-2000
compatible headset.
Headphones can be plugged in for extra privacy but cannot
be used in isolation, to make a call you need a microphone.
Microphones are included with Go!Cam or headsets.
1 Scroll to a Contact and press
appears.
Press
to add the caller to your Contacts list.
Press
to decline.
Press
to block the Contact.
Contacts presence status
2 Select Video Chat then press
. The Contact Options menu
to dial.
Icons next to your Contacts in the Contacts list represent their
online status.
Online
Online and available – you can call
Offline
Not available to be called
Busy
Online but not available
Busy call
Busy on a Go!Messenger™ call
Busy video
Busy on a Go!Messenger™ video chat
Unknown
Status currently unknown – not available
You can press to cancel, then either if you want to leave a
message or to return to the Contacts screen.
To set your own presence status, see ‘Set Presence’ on page 24.
You will see when a Contact comes online via the ticker bar at the
bottom of the screen.
Go!Messenger™ User Guide
12
If the caller rejects your call, you will see:
Press
Retry,
Contacts screen.
Leave Message, or
If the other person hangs up, you will see:
to cancel and return to the
3 When the receiver accepts your call your video image is connected.
The small image on the right shows you what the other person is seeing.
• Press
Press
to continue.
Make a voice call
Headphones can be plugged in for extra privacy but cannot
be used in isolation, to make a call you need a microphone.
Microphones are included with Go!Cam or headsets.
1 Scroll to a Contact and press
appears.
. The Contact Options menu
2 Select Voice Chat then press
to dial.
to switch between full screen and standard screen.
• Adjust the volume by pressing the VOL- and VOL+ buttons.
4 Press
to hang up.
You can press to cancel, then either if you want to leave a
message or to return to the Contacts screen.
If the caller rejects your call, press
Retry,
to cancel and return to the Contacts screen.
Leave Message, or
Go!Messenger™ User Guide
13
3 When the receiver accepts your call the Connected screen
is displayed.
Receive a Voice call
• Adjust the volume by pressing the VOL- and VOL+ buttons.
4 Press
to hang up.
If the other person hangs up, press
to continue.
Receiving calls
When you are called, you receive the incoming call message.
Receive a Video call
Press
to accept the call or
leaving a message.
During a call, press
to reject. The caller has the option of
to hang up.
Missed call alert
If you miss a call, the screen shows:
Press
to accept the video call or
voice only.
to accept and send your
As a voice call you will see your Contact’s video but they will get
a blank video of you.
Press
to reject the call. The caller has the option of leaving
a message.
During a call, press
Press
to open the Missed Calls tab – showing your list of missed calls
– or
to return to your current application.
to hang up.
Go!Messenger™ User Guide
14
Messages
Message alert
Send a video message
Go!Messenger™ checks for new messages every time you connect to
the network. You choose when to download them.
You can record a video message up to 15 seconds long and send it to
one or more Contacts.
If you have new messages, or you are online and receive new
messages, a white envelope
is displayed at the top of the screen.
1 Press the up or down buttons to select New Message and press
Open the Messages menu
.
2 Press the up or down buttons to select Video Message and press
The Video message screen is displayed.
.
1 Press and hold the L button. Press the down button to
highlight
Messages. Release the L button. The Messages
screen is displayed.
2 Select Check for new messages and press
3 Press
.
to download any new messages to the Inbox.
3 Select Record and press
stop recording.
to start recording. Press
again to
• To play back your video message, press the up or down buttons to
select Review and press .
• To stop playback, press
.
• If you want to record a new message, select Record and press
.
• To save it for later, select Save and Close, then press . This stores
it in the Drafts tab and returns you to the main messages screen.
Go!Messenger™ User Guide
15
Send a voice message
Voice messages can be up to 30 seconds long and can be sent to one or
more Contacts.
1 From the Messages screen, select New Message and press
2 Select Voice Message and press
is displayed.
• To cancel and return to the video message screen, press
• To return to the main Messages screen, press
.
. The voice message screen
.
.
4 To send your video message now, select Send, then press
Your Contact list is displayed.
5 Scroll up or down to the Contact you want and press . A
displayed next to the Contact. To de-select, press
again.
.
is
You can also send a video message from your Contacts menu,
directly selecting the Contact you wish to message followed by
Video Message.
3 Select Record and press
stop recording.
to start recording. Press
again to
• To play back your voice message, press the up or down buttons to
select Review and press .
• To stop playback, press
.
.
• If you want to record a new message, select Record and press
• Select Save and Close then press
to store it in the Drafts tab and
return to the main messages screen.
• To cancel, and return to the voice message screen, press
• To return to the main Messages screen, press
• To add more Contacts to your send list, scroll to another Nickname
and press .
• To send your video message, press
• To cancel press
.
.
.
.
4 To send your voice message now, select Send, then press
Your Contact list is displayed.
5 Scroll up or down to the Contact you want and press . A
displayed next to the Contact. To de-select, press
again.
.
is
• To add more Contacts to your send list, scroll to another Nickname
and press .
• To send your voice message, press
• To cancel press
.
.
Go!Messenger™ User Guide
16
Storing messages
Drafts – Contains messages you have created and saved without sending.
When the Messages screen is displayed, press left or right to select
from the following tabs.
Select a message, press
• Play the message.
Inbox – Contains your downloaded messages.
• Send – to one or more people in your Contacts list.
Select a message, press
then choose an option:
• Play the message.
then choose an option:
• View Recipients – see who you intended sending the message to
(blank if no recipient selected).
• Delete the message.
• Reply – with either video or voice message.
• Forward – to one or more people in your Contacts list.
• Delete the message.
• Voice Chat – to make a voice call.
Pending – Contains messages stored on the Go!Messenger™ server
which have not yet been picked up by your Contact.
Select a message, press
then choose an option:
• Video Chat – to make a video call.
• View Status – see which of your Contacts has yet to download
your message.
Sent items – Contains messages you have sent, stored on your
• Delete the message – it will not be sent to anyone who has yet to
download it.
™
Memory Stick Duo .
Select a message, press
then choose an option:
• Play the message.
To save space on Go!Messenger™ you can delete old
unread messages.
• Forward – to one or more people in your Contacts list.
• View Recipients – see who you have sent the message to.
• Delete the message.
Outbox – Contains messages you have created but not sent,
for example, when offline.
Select a message, press
then choose an option:
• Play the message.
• Send – to one or more people in your Contacts list.
• View Recipients – see who you have sent the message to.
• Delete the message.
Go!Messenger™ User Guide
17
Text Chat
3 When your Contact joins your Text Chat, the screen shows:
The Text Chat menu lets you have an Instant Message (IM)
conversation with a Contact.
Open the Text Chat menu
Press and hold the L button. Press the down button to highlight
Text Chat. Release the L button.
The Text Chat screen is displayed.
4 Select Type Message and press
Use the
. The Text Chat keyboard is displayed.
button to enter and
to add a space.
To start a Text Chat
1 Press
to select Invite Contact. Only online Contacts are listed.
2 Press the up and down buttons to select a Contact, then press
The Contact’s Nickname appears next to yours.
Your Contact does not receive the invite until you type your
first message.
.
• Use the keyboard to type your message, select (Enter) and
press . The message appears in the text window.
• Use the analog stick to scroll through the text in the window.
Go!Messenger™ User Guide
18
To join a Text Chat
Multiple Text Chat conversations
When you are invited, press and hold the L button. Now press up or
down until Text Chat is highlight. Release the L button. Your Contact’s
message is displayed.
You can invite one Contact to each text chat but you can have multiple
text chats at one time.
A Text Chat icon will appear on the top line of the screen when
you receive a new chat request.
When you are on a Text Chat with your first Contact:
1 Press left or right to open a separate tab.
2 Press
to display your list of Contacts. Select the Contact you
want and press .
To switch between multiple Contacts
You can only change tab when the keyboard is not displayed,
press to close the keyboard.
1 Press left or right to open the Contact tab you want, select
Type Message then press .
• To join, select Type Message and press
• To decline, select Leave Chat and press
You can scroll the main windows using the analog stick, or by
holding the R button down.
.
.
To leave a Text Chat
Press
to return to the main Text Chat screen then press
You are asked to confirm.
Press
to confirm or
.
to cancel and return to chat.
Go!Messenger™ User Guide
19
Services
Open the Services menu
My Account
Press and hold the L button. Press the down button to highlight
Services. Release the L button.
1 Press the up or down buttons to highlight My Account then press
Follow the on-screen prompts to continue.
The Services screen is displayed:
2 When asked, enter your bt.com username and password.
.
In My Account you can:
• View latest News about Go!Messenger™.
• View and change your Personal account details.
• View and change your Security details.
• View and change your Service details.
Online Help
Press the up or down buttons to highlight Online Help then press
Follow the on-screen prompts to continue.
.
On the Help Forum, you can search for answers to questions about
almost anything to do with Go!Messenger™.
There are also FAQs and Video Help sections.
Go!Messenger™ User Guide
20
Search
Use Yahoo!® to search the Internet
Open the Search menu
Press and hold the L button. Press the down button to highlight
Search. Release the L button.
The keyboard is displayed:
Type in what you are searching for and click
screen is displayed.
(Enter). The results
To return to the keyboard at any time, press
You can use the
.
button for the Enter key.
Go!Messenger™ User Guide
21
Settings
Open the Settings menu
Call History
Press and hold the L button. Press the down button to highlight
Settings. Release the L button.
View Missed, Incoming, Outgoing and All calls. Calls are sorted by date,
with the most recent at the top.
The Settings menu is displayed:
1 Scroll down to Call History and press
Language
• Press the left and right buttons to select a tab.
1 Press
• To delete all entries in the highlighted tab, select Delete All and
.
press
.
• Press the up and down buttons to scroll through the list.
to open Language.
2 Press the left or right buttons to highlight the language you want
and press . Or press
to return without change.
2 Press
on a highlighted entry to see the Call Record message box.
Disconnect from service
This option connects or disconnects you from the service, so you can
switch between online and offline.
Useful if you lose wireless connection.
1 Scroll down to Disconnect from service and press
2 If you are online, press
to reconnect. Or press
.
to disconnect. If you are offline, press
to cancel.
Go!Messenger™ User Guide
22
Use this to:
• Send a video or voice message to your Contact.
• Reply with a video or voice message.
• Delete the call record from the list.
Press
to return to the main Calls list screen.
User profile
View and edit your user profile.
Create a group
1 Scroll down to User Profile and press
.
1 Scroll up or down to select an empty Group field and press
The keyboard appears.
2 Enter the group name (maximum 12 characters) then select
.
(Enter).
Group options
Highlight a group from the list and press
will be displayed.
, the Group Options menu
2 Press the up and down buttons to select the detail you want to
change and press .
Enter up to 15 characters for your Forename or Surname.
View/Edit Group Membership, Blocked and Subscribe boxes
cannot be edited.
Press
to return to the main settings screen.
Groups
You can set up to 10 groups as a convenient way to sort your Contacts,
for example arranging into groups like friends and family.
Scroll down to Groups and press
. The Groups list is opened.
Edit Group Name – press
to display the keyboard.
Edit Group Membership – you can add or remove Contacts from
groups. A Contact can be stored in multiple groups.
• Press
to display a list of Contacts. Select the Contact you want
and press . A
confirms they have been added to the group.
Delete Group – Press
. Then press
again to confirm.
Deleting a group will not delete the Contacts within that group,
just the group itself.
Go!Messenger™ User Guide
23
Blocked Contacts
Select <Empty> to display the keyboard for you to write your own
custom status. This displays after your Nickname on your friend’s
contact list.
Block Contacts so they cannot see your online presence.
1 Scroll down to Blocked Contacts and press
If you have already written an online message, this will appear on
your Status Options next to X.
.
Contacts sorting
1 Scroll down to Contacts Sorting and press
is displayed.
• To block a Contact, scroll to the Contact, and press
is displayed.
• To unblock a Contact, scroll to the Contact and press
icon is displayed.
. The
icon
. The
Set Presence
You can change how others see your online status.
1 Scroll down to Set Presence and press
is displayed.
. The Sorting menu
. The Status Options menu
2 Select the option you want. This will appear next to your name on
other users’ Contact screens. Your online presence is also shown on
the top line of the screen.
2 Scroll up and down to select the sorting option you want and
press .
Ringtones
1 Scroll down to Ringtones and press
.
2 Highlight Video or Voice calls and press
.
3 Select an option and press . You hear a short clip of each option.
Press
to close the option box.
Go!Messenger™ User Guide
24
Save to sent items
Adjust message storage
Select whether your messages are stored or not stored in the Sent
Items list after they have been sent.
Change the amount of memory allocated for saved messages on your
Memory Stick Duo™.
1 Scroll down to Save to Sent Items and press
1 Scroll down to Adjust Message Storage and press
.
2 Select Enable to store messages or Disable not to store messages.
Microphone
1 Scroll down to Microphone and press
2 Press the left and right buttons to set the storage space. Depending
on how much space is available on your Memory Stick Duo™ a
maximum of up to 200 messages/64MB of storage can be allocated.
Press
Adjust the microphone volume.
.
.
to cancel without changing the setting.
Re-verify Account
Confirm that your account is valid by checking your username and
password with those stored on the server.
Scroll down to Re-verify Account and press
.
Remove Stored Password
Delete your account from Memory Stick Duo™.
1 Scroll down to Remove Stored Password and press
2 Press the left and right buttons to select Low or High.
.
2 Press
to confirm or
to cancel. If you remove your password
you will need to re-verify your account to use it again.
Removing your stored password will delete your account from
the Memory Stick Duo™. You should only need to do this if you are
passing on your PSP™ to someone else, or moving to a new account.
Go!Messenger™ User Guide
25
Further help
Useful Web videos, a full list of FAQs
and the Sony user forum are available
online at www.gomessenger.bt.com
Getting Connected to a Wireless Network
Please ensure your WLAN switch is ON and that you are near the
access point.
1
2
If you are doing this from home you may require the password
security settings if these were used when you set up your wireless
network. These password settings will use either a WEP key or a
WPA-PSK key.
Select
(Network Settings) under
(Settings) from the Home
Menu on the PSP™ and press the
button
3
Select Infrastructure Mode and press
4
Select New Connection and press
5
You will be presented with three available options: Scan, Enter
Manually and Automatic. The Scan option (press ) searches for
nearby wireless networks or WiFi hotspots and will pick up your
home wireless network if you have one. These available networks
will be listed, with the networks named under the SSID (Service Set
Identifier) column.
.
.
6
Using the up and down buttons on your PSP™ highlight the
network you want to use and confirm by pressing .
7
Choose the SSID setting you want to use and again use the right
button to continue.
8
You then need to select your WLAN security settings. Your choice
of option will be based on the information used when the home
wireless network was set up.
9
If you press
for the edit button, you will be taken to a virtual
keyboard which you can use to enter the security code you have.
This code will be either the WEP key security code or the WPA-PSK
security code.
10 When you have entered the details press
again to enter.
11 Next you will be presented with the Address Settings option.
Most home networks can be configured using the Easy option.
12 Next you will be presented with the Connection name settings.
Renaming the network connection is handy if you use your PSP™
in a number of different WiFi environments.
13 Use the virtual on-screen keyboard to edit the connection name,
pressing
when you have finished. To continue press the right
button.
14 The next screen is a summary of your connection settings. If they
are correct press the right button.
15 Next you will be prompted to save your settings by pressing
button.
16 Finally you will be offered the option of testing your connection.
If you are unable to make a successful connection please visit
playstation.com.
Go!Messenger™ User Guide
26
Offices worldwide
The services described in this publication are subject to availability and
may be modified from time to time. Services and equipment are supplied
subject to British Telecommunications plc’s respective standard conditions
of contract. Nothing in this publication forms any part of a contract.
© British Telecommunications plc 2008.
Registered Office: 81 Newgate Street, London EC1A 7AJ.
Registered in England No. 1800000.
Designed and produced by The Art & Design Partnership Ltd.
Issue 1 / ADP02-08
PHME 55051
“2”, “PlayStation”, “khjl”, “7”, and “PSP” are trademarks or registered trademarks of Sony Computer Entertainment Inc.
Go! Messenger™ © 2008 Sony Computer Entertainment Inc. Published by Sony Computer Entertainment Europe.
Go!Messenger is a trademark of Sony Computer Entertainment Europe. All rights reserved.