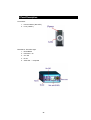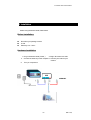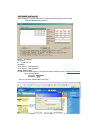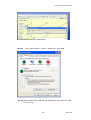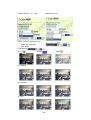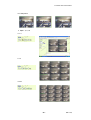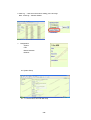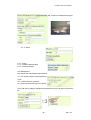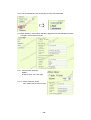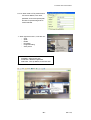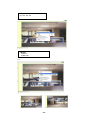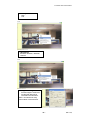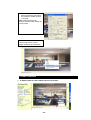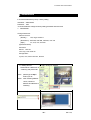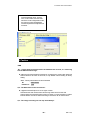
1
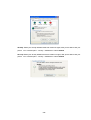
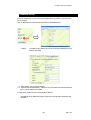
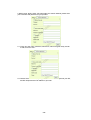
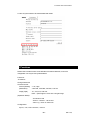
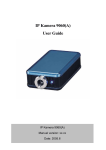
IP Kamera 9000
User Guide
IP KAMERA 9000 USER MANUAL
User Guide
IP Kamera 9000
Manual version: 2.0
Date: FEB 20, 2004
-1-
VER. 1.0.0,
Caution: Any changes or modifications not approved by the party
responsible for compliance could void the user’s authority to operate the
equipment.
Note: This equipment has been tested and found to comply with the limits
for FCC and CE. These limits are designed to provide reasonable
protection against harmful interference when the equipment is operated in
commercial environment.
Important Notice
1. IP Kamera 9000 is for indoor use. Note that the CMOS lens can be
damaged permanently if the camera lense is exposed directly to
sunlight. (We will not hold any responsibility if CMOS lens is damaged
by sunlight)
2. IP Kamera 9000 us not water proof. Therefore we will not hold any
damage responsibility if the camera is used under raining
condition.
3. Be sure to use the DC adapter that is provided by your dealer. We will
not hold any responsibly if wrong DC adapter is in use.
4. Be caution in handling IP Kamera 9000 for physical shocks may
occur serious damage.
5.
If IP Kamera 9000 does not operate properly, please contact your
local dealer for after sale service. In all cases, you are prohibited to
disassemble the product. If so, Aviosys does not hold any
responsibility for mal-function nor service warranty.
-2-
IP KAMERA 9000 USER MANUAL
Table of Contents
1. PRODUCT OVERVIEW ...............................................................................................4
FEATURES
.......................................................................................................
2. PHYSICAL DESCRIPTION..........................................................................................5
SPECIFICATION...................................................................................................................
SYSTEM MINIMUM REQUIRNMENT........................................................................................
3. PANEL DESCRIPTION…………………………………………………………………6
FRONT PANEL………………………………………………………………………………
BACK PANEL………………………………………………………………………………..
4. INSTALLATION………………………………………………………………………..9
PREPERATION ....................................................................................................................
HARDWARE INSTALLATION ..................................................................................................
5. INTERNET SET UP....................................................................................................13
LAN SET UP ........................................................................................................................
INTERNET SET UP ...............................................................................................................
6. FUNCTION…………………………………………………………………………….13
SIMPLE FUNCTION..............................................................................................................
VIDEO ADJUSTMENT………………………………………………………………………..
SECURITY SETTING .............................................................................................................
MOTION DETECTION FUNCTION ...........................................................................................
7. OTHER FUNCTIONS………………………………………………………………….22
8. AOUTHORITY………………………………………………………………………….23
ADMINISTRATOR .................................................................................................................
NORMAL USER....................................................................................................................
9. CAUTION ...................................................................................................................25
ADDITIONAL INFORMATION
ADDITIONAL INFORMATION
A : SPECIFICATION..............................................................
B : FAQ ...................................................................................
-3-
VER. 1.0.0,
1. Product Overview
IP Kamera 9000 is an IP camera that has a digital web server in camera.
This camera can put up live image on-line and make remote locations
immediately accessible through standard web browsers.
IP Kamera 9000 is equipped with cutting edge technology, includes a
digital camera, web server, and optimized hardware for image
compression, and physical Ethernet connection. Therefore it does not
need to plug in front of computer, users can simply just plug into an
internet line and start oberserving from any where in the world.
FEATURES
IP Kamera 9000 features:
:
1. Embedded Web Server - No need PC for camera.
2. Pass image to Displays - TV, PDP, HDTV. LCD TV
3. Multiple Cameras Supported
4. Multi - video from different area.
5. Layout 1x1, 2x2, 3x3, 4x4
6. Resolution - True 640x480, 352x288, 320x240, 176x144,
7. Video Quality - Low, High
8. Color adjustment: Brightness, Contrast, Hue, and Saturation
9. Motion Detection - Three-Sensitivity Level.
10.E-mail the Detected Images to preset e-Mail address.
11. FTP the Detected Images to preset FTP server.
12. Support Network - Fixed IP, DHCP or PPPoE.
13. Default HTTP Port supported14. Changed to fit different network.
15. Browser by Internet - IE & Netscape.
16. Support Java Applet support and Active X control.
17. A Linux based server
•10/100BT LAN supported
•Built in JPEG Decoder
•Motion detection
•User able to monitor any place if select this Web Cam by using
any of Internet Browser.
•User may setup his email address in the system, let the system
notice the user when an event occur
•Provide some GPIOs for different application
-4-
IP KAMERA 9000 USER MANUAL
2. Physical Description
BOX CONTENT
IP Kamera package content:
!
1 x IP Kamera 9000
!
1 x Tripot
!
1 x RJ 45 internet line
!
1 x DC adopter
!
1 x Composite Video cable
!
1 x CD ( a. IP Editor program b. User Manual book)
!
1 x Quick Installation Guide
Minimum Requirement
≥300MHz Intel Pentium II and above
Windows 98 / SE / 2000 / ME / XP, or LINUX, MAC system
≥64MB memory
VGA Card:support Hi - Colors and above and direct draw
Internet card - RJ 45 +CAT 5
Internet Hub
Internet : one set of IP provided by your ISP
EX: xxx.xxx.xxx.xxx
-5-
VER. 1.0.0,
3. Panel Description
Front Panel :
1. Power indicator ( blue LED )
2. Lens ( CMOS )
Back Panel : from left to right:
1. Reset Button
2. DC Power - 5V
3. On / Off
4. RJ 45
5. Video Out – composite
-6-
IP KAMERA 9000 USER MANUAL
4. Installation
Before using IP Kamera 9000, follow bellow:
Before installation:
Reconfirm your package content
A Hub
Electricity 110 ~ 240 V
Hardware installation
1. Plug in IP Kamera 9000 ( Power )
2. Plug in RJ 45 line to a HUB
3. Connect the other way to the computer 4. Connect your Hub into your
modem
5. Turn you computer on
INTERNET
-7-
VER. 1.0.0,
SOFTWARE INSTALLER
After connecting your power and RJ 45 line, please use IPEDIT program that provided
by Aviosys to find IP KAMERA 9000’s address.
區域設定
NAME: IP KAMERA
GETEWAY:
IP: IP address now
NETMASK:
HTTP PORT1:sending address
HTTP PORT2:sending address
Set up : Step by step
st
1 step: In IE ( Internet Explorer ) / Nescape’s IP EDIT IP please type your IP: XXX.XXX.XXX.XXX
Factory setting default.
Username: administrator
Password : 1234
then you can find IP Kamera 9000’s web page.
nd
2 step: Press on the icon Active X Vision
-8-
IP KAMERA 9000 USER MANUAL
* Security protection warning ( follow step 2 )
2th step: tools > internet option > security > default level > select Low
3rd step Switch default level to “low” then you will be able to see” IP Kamera 9000”
in your own eye.
-9-
VER. 1.0.0,
4th step Switch your security default level back to medium or higher, after you are able to view your
picture. tool > internet option > security > default level > select medium
5th step Switch your security default level back to medium or higher, after you are able to view your
picture. tool > internet option > security > default level > select medium
- 10 -
IP KAMERA 9000 USER MANUAL
5. Network Set up
From our Network set up, users can view live video from any where in the world, with
just a computer.
Click on Network set up: this area is authorized by administrator only.
1. Still IP :
Provided by ISP, with this IP you can connect this address from any
where in the world.
1-1 : Using Still IP: list your still IP address
1-2 : Choose “Reboot immediately”. Please close your browser and reboot again and
type in your IP address once again.
If using DHCP, please choose‘ Automatically by DHCP”
*And please use IP EDITOR program (Find users exact IP) that’s included in the
CD ROM
- 11 -
VER. 1.0.0,
2. DHCP setup- ADSL / xDSL: ISP will provide your exact IP address, please enter
your Username and password for your provider.
2-1 Enter your user name, password, mail server, mail name (pass word), sender
e-mail, receiver e-mail.
2-2 Choose Save & Dial Now, by using PPPoE it can automatically dial to your ISP,
and ISP will provide exact IP address in your mail.
- 12 -
IP KAMERA 9000 USER MANUAL
2-3 turn off your browser of IP Kamera 9000 and restart
6. Functions
Please refer to all the function on the left side of IP Kamera 9000 AP, most of its
configuration can only be use by Administrator.
Functions:
-IP address
Change Password
Camera Control:
Picture (Quality) - Low, High
(Resolution)
- 640*480, 352*288, 320*240, 176*144
Image (Split)
- 1x1, 2x2, 4x4, and 9x9.
Note – split image are focus into a single image.
(Operation Mode):
- Continues mode
- Period – refresh 1 - 60 second
- View Log : check on visitors IP
Configuration:
System, User, Motion detection, Network
- 13 -
VER. 1.0.0,
1.Picture Quality: Low , High
2.Resolution set up
3.Color: contrast, Sharpness, Hue,
Brightness, Saturation
STD –Setup
3-1 Brightness
Dark
Default
Bright
3-2 contrast
3-3 Saturation
3-4 Hue
- 14 -
IP KAMERA 9000 USER MANUAL
3-5 Sharpness
4. Splits - 4, 9, 16
4-1: 4
4-2: 9
4-3:16
- 15 -
VER. 1.0.0,
5. View Log – view which IP has been visiting your Live image
Note: View/Log / Camera Window
1. Configuration:
System
User
Motion Detection
Network
6-1 System Set up
6-1-1 : Camera name, time and date setup
- 16 -
IP KAMERA 9000 USER MANUAL
Note: maximum 18 English characyters
6-1--2 : Setup
6-1-3 : Reset:
6-1-4 : Restart IP Kamera 9000
6-1-5 : Renew its position
User Management:
Can choose user authorization require optional
6-2 - can choose if viewers needs a password
or not.
Yes - Viewers needs a password
No - Open to all viewer who logs in to users IP
6-2-2: Add user by adding a username and a password and you can add a current users
list.
- 17 -
VER. 1.0.0,
6-2-3: You can also delete a user by selecting its name and press delete.
6-3: Motion detection: when motion detection is triggered, it will automatically send video
or image to user E-mail or FTP site.
6-3-1: Choose motion detection:
Disable Enable: choose – low / mid / high
6-3-1-1: Motion Detection Setup:
Fill in sender mail and receiver mail.
- 18 -
IP KAMERA 9000 USER MANUAL
6-3-1-2: When send to FTP, please fill in its
FTP server address, user name,
password, account and upload path,
and click on Upload images when
motion detected.
7. When right click mouse , it can also use :
- View
- Splits
- Rotate
- Resolution
- Image Recording
- Save picture
7-1 View
- Resizable : adjust screen size.
- Actual size : default to original size.
- Status Bar : show ip address, and screen size.
7-1
- 19 -
VER. 1.0.0,
7-2 Splite
- 1x1, 2x2, 3x3, 4x4
7-2
7-3 Rotate
- Rotate 0
- Rotate 180
7-3
Rotate 0
Rotate 180
- 20 -
IP KAMERA 9000 USER MANUAL
7-4 Quality
- High
- Low
7-4
7-5 Resolutioin
- 640x480, 320X240, 352X288,
176X144
7-5
7-5 Image Recording
- Record lmages to JPEG and
AVI file. Both files can be
recorded in the same time.
JPEG : can select how many
pictures taken. And time frame.
- 21 -
VER. 1.0.0,
7-5-1 Recording AVI
- Select save as AVI, then select
the maximum number of frame
in each file.
Note: If select No limit, it will
continue recording until it used up all
memory space.
7-6 Save current picture as
- Take a snap shot on current
images showed on IP Kamera AP.
7. Other Functions
1. IP Kamera 9000 can view 9 different IP at the same time.
- 22 -
IP KAMERA 9000 USER MANUAL
8. Authorization
In IP Kamera 9000 factory set up : factory setting
Username : administrator
Password : 1234
*Is recommended to change its factory setting password and user name
1. Administrator:
Change Password:
Camera Control:
(Quality) -
Low, High, Advance
(Resolution) - 640*480, 352*288, 320*240, 176*144
(Split) -
1x1, 2x2, 4x4, and 8x8
(Operation Mode):
Continues
Period : 1-60 sec
View Log: view visitor IP
Configuration:
System, User, Motion detection, Network
.基
基1-1 Adding camera
A. Add in another IP address
Please add in a different IP in
“ Watching and press enter”
Note1: please type in http://
before your IP.
Note2: when selecting different
views, it will show
different IP addresses in
Watching.
B. Press AD”
C. Another view open up
- 23 -
VER. 1.0.0,
1-2 When cancel camera, please
select the camera you want to
delete and select
“Delete Camera
2. Visitor Authorization:
Change its own passward
View log: check other visitors IP address
Add / delete camera
2-1 USER:
- When non-administrator entered ip
addresses to view its AP, it will ask
for a user ID and PASSWORD.
2-2
-
Users entered IP Kamera
9000’s AP, it will automatically
request for Administrator’s
Password. If user or other
visitors don’t have the rights to
use Administrator authorization
password, press, “CANCEL” to
ignore the inquiry.
# Note : IP Kamera AP confirming
Administrator
- 24 -
IP KAMERA 9000 USER MANUAL
2-3
- Non administrator enter “system,
user, motion detect, and net work”
which are under configuration mode,
are require to enter administrator
name and password to adjust these
functions.
9. Caution
FAQ
Q 1 : I forgot the ID and password for the administrator account, so I cannot log
into the Administration Page.
A : Make sure IP Kamera 9000 is powered on and press the “reset” button behind IP
Kamera 9000 for at least 10 seconds, to help default camera setting to factory
setting.
*Note : Factory Administrator ID and Password
ID:
administrator
Password : 1234
Q 2 : The Web Kamera does not launch?
A : Upgrade Internet Explorer to 5.0 or higher version.
Sometimes the web camera base cannot bring 'index.html' from the web
Camera when the Internet Explorer version is under 4.0. And remember to adjust
internet default level to low when launching IP Camera’s AP for the first time.
Q 3 : The Image recording can not stop immediately?
- 25 -
VER. 1.0.0,
A : If your IP is virtual IP, than it will not be happened. If your IP is true IP (EX: PPPoE
or FIX IP….),than it might be happened. You need to wait for a second and it will
be return to normal.
- 26 -