1
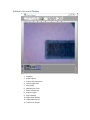
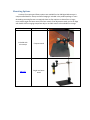
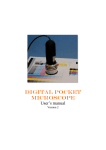
USB Digital Microscope User Guide
USB Digital Microscopes are entire imaging platforms in single, compact packages. The
illumination, imaging optics, and a USB camera are contained in a slim, 4.5” long by 1.25” diameter
container. USB Digital Microscopes offers a wide range of lighting techniques for a variety of imaging
applications including assembly and quality control, forensics, dermatology, and lab and hobbyist
use.
The imaging software and product operation is completely plug-and-play; simply insert the
software CD and follow the installation instructions. Once installed and opened, the USB digital
microscope will automatically be detected. The MicroViewer software allows the user to capture
images and record video. The user can also compare live images with a picture or video, or compare
two pictures side by side. Additionally, the user can freeze live images on the screen and take
measurement lines, circles, and angles. Digital zooming is an option, and ranges from 1X – 6X.
There is a full video setup board to change video settings such as zoom, white balance, or autogain.
The video setup button allows the user to change a variety of digital settings:
1. Source – allows a user to choose the image source if there is more than one
microscope connected to the PC
2. Video Format – supports two options: 640 x 480 and 1480 x 1024
3. Video Adjust – changes the video values for brightness, contrast, and saturation
4. AVI – designates the video saving location and file name
5. Time Lapse – allows the user to select frames at a set rate
6. BMP – designates the picture saving location and file name (can also save as
JPEG)
7. Always on Top – Sets the MicroViewer windows so that it is always on the top
layer of all software windows
8. Record on the Fly – records the video immediately
9. Play on the Fly – plays the latest video immediately
10. Show snapshot BMP – shows preview window after snapshot
11. Use AVIDecompressor – fixes image problems seen when used with operating
systems below Windows XP SP2
12. Use Intel 8xxG/9xxG VGA – fixes error caused by some Intel chips in which live
zone displays abnormal images
13. Full Screen Mode – starts software in full screen setting
Software Overview/Display
1.
2.
3.
4.
5.
6.
7.
8.
9.
10.
11.
12.
Snapshot
Video Capture
Side by Side Comparison
Freeze Image Feed
Copy Image
Measurement Tools
Zoom In/Zoom Out
Acquire Images
Digital Settings
Digital Zoom Display
Image/Video Library
Trashcan for Images
Mounting Options
A variety of mounting and fixture options are available for the USB Digital Microscope. A
compact stand ideal for startup and initial imaging is included in the product package. If more
demanding mounting fixtures are required, there are four options to choose from: a larger,
more robust single arm boom stand; a flex arm stand; a fine adjustment stand; and an XY stage
with backlit LED for imaging transparent objects. A cradle stand is also available for storage.
Stock Number
Description
Included with
microscope
Compact stand
#86-170
Single arm boom
stand
Image
#86-171
Flex arm stand
#86-173
Fine adjustment
stand
#86-174
XY Stage with Backlit
LED
Minimum Magnification and Maximum Magnification of an EO Business Card