1
SAFETY INFORMATION
INTRODUCTION
SYSTEM CONNECTION
USING THE SET TOP BOX
1-3
4-6
7
8-22
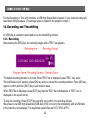
First Time Installation
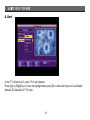
Volume Control
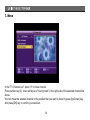
Channel Select
Favorites Channel List
Rename
Sort
Move
Channel Scan
Setup Menu
Timer
Tools
EPG(Electronic Program Guide)
Media Player
Recording and Timeshifting
8
8
9
10
12
13
14
15
16
18
19
20
21
22
TROUBLESHOOTING
SPECIFICATIONS
25
26-27
1
SAFETY INFORMATION
Double insulation
This is class II apparatus
where the MAINS plug is used as the disconnect device, the disconnect device shall remain
readily operable.
Warning: "batteries (battery pack or batteries installed) shall not be exposed to excessive heat
such as sunshine, fire or the like.
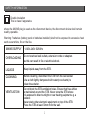
MAINS SUPPLY
~220V-240V 50/60Hz
OVERLOADING
Do not overload wall outlets, extension cords or adapters
as this can result in fire or electrical shock.
LIQUIDS
Keep liquids away from the STB.
CLEANING:
Before cleaning, disconnect the STB from the wall socket.
Use a cloth lightly dampened with water(no solvents) to
clean the exterior.
Do not block the STB ventilation holes. Ensure that free airflow
is maintained around the STB. Never store the STB where
it is exposed to direct sunlight or near heating euipment e.g. a
radiator.
Never stack other electronic equipment on top of the STB.
Place the STB at least 30mm from the wall.
VENTILATION:
2
SAFETY INFORMATION
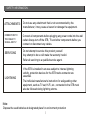
ATTACHMENTS:
Do not use any attachment that is not recommended by the
manufacturer; it may cause a hazard or damage the equipment.
CONNECTION TO
THE CABLE TV
SIGNAL AND TV:
Connect all components before plugging any power cords into the wall
outlet. Always turn off the STB, TV and other components before you
connect or disconnect any cables.
SERVICING
LIGHTNING
Do not attempt to service this product yourself.
Any attempt to do so will make the warranty invalid.
Refer all servicing to a qualified service agent.
If the STB is installed in an area subject to intense lightning
activity, protection devices for the STB mains connector are
essential.
The individual manufacturer's instruction for safeguarding other
equipment, such as TV set, Hi-Fi, etc., connected to the STB must
also be followed during lightning storms.
Note:
Dispose the used batteries at designated place for environment protection
3
4
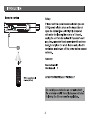
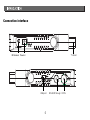
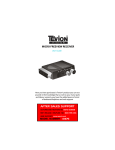
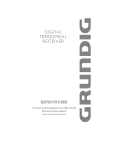
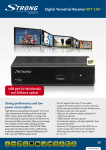
Connection interface
IR Receiver Power in
TV Scart
USB port
5
RF LOOP through RF IN
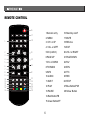
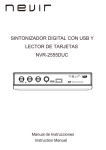
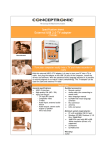
REMOTE CONTROL
16
17
1
2
3
18
19
4
5
20
6
7
8
9
21
10
11
12
13
14
15
22
23
24
25
26
27
28
1.Numeric entry
16.Stand-by on/off
2. MENU
17.MUTE
3. CH+ or UP
18.RECALL
4. VOL- or LEFT
19.EXIT
5.OK (confirm)
20.VOL+ or RIGHT
6.PAGE UP
21.PAGE DOWN
7.CH- or DOWN
22.FAV
8.TV/RADIO
23.EPG
9.INFO
24.TTX
10.AUDIO
25.REC
11.SUB T
26.STOP
12.PLAY
27.Blue Button/PVR
13.PAUSE
28.Yellow Button
14.Red Button/FB
15.Green Button/FF
6
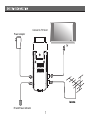
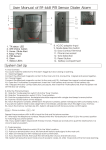
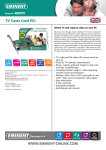
Connect to TV Scart
Power adapter
IR and Power indicator
7
8
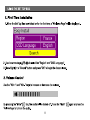
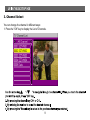
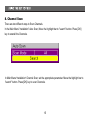
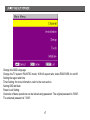
3. Channel Select
You can change the channel in different ways:
1. Press the "OK" key to display the List of Channels.
9
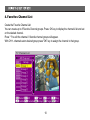
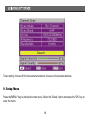
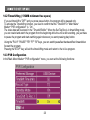
4. Favorites Channel List
Create the Favorite Channel List
You can create up to 8 Favorite Channel groups. Press OK key to display the channels' list and set
on the desired channel.
Press "1" to edit the channel. 8 favorite channel groups will appear.
With CH+/- channels seton desired group press "OK" key to assign the channel to that group.
10
11
5. Rename
In the "TV Channel List", press "1" to edit the channel.
Pressing number [5] key, it will show a "Rename"window and you can rename the highlightedchannel.
Press [Up][Down][Left][Right] key to move thehighlight in "Rename" window. Press [OK] to inputchar.
Move the highlight to "OK" and press [OK] key tosave the modification.
Move the highlight to "ESC" and press [OK] key to cancel the operation.
12
6. Sort
In the "TV Channel List", press "3" to sort channel.
Press [Up] or [Right] key to move the highlight and press [OK] to select sort type such as Default/
Name(A-Z)/ Name(Z-A)/ FTA/ Lock.
13
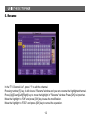
7. Move
In the "TV Channel List", press "4" to move channel.
Press number key [4] , there will show a "moving mark" in the right side of the selected channel like
above.
You can move the selected channel to the position that you want to place by press [Up/Down] key.
And press [OK] key to confirm your decision.
14
8. Channel Scan
There are two different ways to Scan Channels.
In the Main Menu*Installation*Auto Scan, Move the highlight bar to "search" button. Press [OK]
key to scanall the Channels.
In Main Menu*Installation*Channel Scan,set the appropriate parameter. Move the highlight bar to
"search" button. Press [OK] key to scan Channels.
15
Tuner setting: choose off for home external antenna; choose on for powered antenna.
9. Setup Menu
Press the"MENU" key to activate the main menu. Select the "Setup" option and press the "OK" key to
enter the menu.
16
Change the OSD Language
Change the TV system: PAL/NTSC mode; 16:9/4:3 aspect ratio; video RGB/CVBS; lcn on/off.
Setting the region and time
Timer Setting: for more information, refer to the next section.
Setting OSD attribute
Parent Lock Setting:
Channels or Menu operations can be locked using password. The original password is "0000".
The universal password is "3330".
17
10. Timer
In Main Menu * Setup *Timer Setting, there are two options: Program Timer and Sleep Timer.
With CH+/- and VOL+/- buttons you can enter the submenus and adjust the settings.
Program Timer:
In this section, it is possible to set up to max 8 timer which allows the unit automatically turn on
and recording.
Timer Number: it is possible to set up to 8 timer
Timer Mode: it is possible to set timer (once - daily - weekly - monthly - off)
Timer Service: set TV service or Radio service
Wakeup Channel: set the channel you want the unit to turn it on and/or recording
Month: set the month
Date: set the date
18
Day: set the day of the week
Nota: month, date, day are active based on Timer mode
Time: set the time
Auto Record: set ON/OFF
Record Duration: in recording mode set to ON set the duration, press OK and adjust the time with
numeric buttons then press OK button again to confirm, press Exit to exit and save the inserted data.
Sleep Timer: In this menu, you can set a time duration before the Set Top Box get into Standby mode.
The time duration is from 10min to120min.
OSD setting:
Subtitle display: set subtitles On/Off (the function must be supported by the TV channel)
OSD transparency: it is possible to set the OSD transparency from 10 to 50% or set to Off.
Load default OSD setting: press OK to return to default OSD settings.
Parent lock:
in parent lock mode press OK button, you will be asked a password ("0000" or "3330") a windown will
pop up where you can lock a menu or a channel.
It is also possible to change the default password with a new one, in case you forgot the new password
set you can insert again the default password.
11.Tools
Receiver info: technical data about the receiver
Game: there are three games (Tetris, Snake, Othello)
Load default settings: insert the new password or default one and confirm to return to default settings.
Software Upgrade: the upgrade file will be available on www.dicra.com website only when the unit will
need it.
19
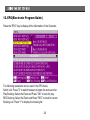
12. EPG(Electronic Program Guide)
Press the "EPG" key to display all the information of the Channels.
The following operations can be used in the EPG menu:
Switch List: Press "2" to switch between program list and event list
Play Booking: Select the Event and Press "OK" to book for play
REC Booking: Select the Event and Press "REC" to book for record.
Booking List: Press "1" to display the booking list
20
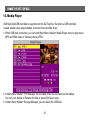
13. Media Player
USB flash disk/USB hard disk is supported on this Set Top Box. But when a USB hard disk
is used, please use a power adapter to connect the hard disk driver.
1. When USB disk is mounted, you can enter Main Menu*Media+*Media Player menu to play music,
MP3 and WMA,video or browse pictures JPEG.
2. In Main Menu*Media+*PVR Manage, the recorded video files are listed on the display.
You can Lock, delete or Rename the files or press [OK] key to play.
3. In Main Menu*Media+*Storage Manager, you can select the USB disk .
21
For the Recording or Time shift functions, a USB High Speed disk is needed. 1 hour video recording will
need about 2Gbytes space. (The storage space is related to the program content.)
14. Recording and Timeshifting
An USB disk is needed to record and to use the timeshifting function.
14.1. Recording
After pressing the [REC] key, the recording begins and a "REC" bar appears.
The default recording duration is 2 hours. When "REC" bar is displayed, press "REC" key, and a
"Record Duration box" appears, press [OK] key and you can set the recording duration. Press [OK] key
again to confirm and then [EXIT] key to exit duration setup.
When "REC"Bar is displayed, press [EXIT] key then the "REC" bar will disappear. A "REC" icon is
displayed on the up-left corner.
To stop the recording, Press [STOP] key and after you confirm, the recording will stop.
We advise to use USB high speed item(USB disk or HD) to record, the compatibility with all USB itehs
in the market is not warranted. The supported system files are FAT, FAT32, NTFS.
22
14.2 Timeshifting ( 512MB minimum free space)
If you set timeshift to "OFF" and you press pause button, the program will be paused only.
To activate the Timeshifting function, you need to confirm that the "TimeShift" in "Main Menu*
Media+*PVR configuration* is "On".
The video data will be stored in the "Timeshift Buffer". When the Set Top Box is in timeshifting mode,
you can rewind and watch the program from the beginning while the unit is still recording, you just have
to pause the program and start watching again whenever you want pressing play button.
Using the "PLAY" "PAUSE" "FB" "FF" "SF"keys, you can watch/pause/fast backward/fast forward/slow
forward the program.
Pressing the"STOP" key, will exit the timeshifting mode and return to the to live program.
14.3 PVR Configuration
In the"Main Menu*Media+*PVR configuration" menu, you can set the following functions:
23
1. Preferred Storage: USB partition (select the logic unit tostore the datas)
2. TimeShift Time (min): you can reserve the time of Timeshifting. From 10 to 60 minutes.
3. Record Type:
"TS"*Transport Stream format(*.dvr). This format can only be played in Set Top Box.
"PS"*Program Stream format(*.mpg). This format can be played in your computer.
4. Stand-by mode: In this mode it is possible to record and/or watch a program.
5. TimeShift To Rec:
"On"*When you press "REC" key, the data in timeshift buffer will be stored in the recorded file.
"Off"*When you start to record, it just records from the current time.
6. TimeShift:
"On"enable the Timeshifting
"Off"disable the Timeshifting
Disc format: System file FAT or NTFS.
Note:
Please don't remove the recording device before it is unmounted.
24
25
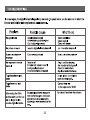
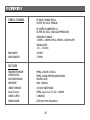
TUNER & CHANNEL
RF INPUT CONNECTOR x1
(D-TYPE, IEC169-2, FEMALE)
RF OUTPUT CONNECTOR x1
(D-TYPE, IEC169-2, MALE (LOOPTHROUGH))
FREQUENCY RANGE:
174MHz ~230MHz (VHF) & 470MHz ~862MHz (UHF)
SIGNAL LEVEL:
-10 ~ -70 dbm
BAND WIDTH
DEMODULATOR
7/8 MHZ
COFDM
DECODER
TRANSPORT STREAM
PROFILE LEVEL
DECODER MODULE
INPUT RATE
VIDEO FORMATS
Audio Format
MPEG-2 ISO/IEC 13818-1
MPEG-2 MAIN PROFILE @MAIN LEVEL,
PAL-NTSC-AUTO
MAX. 15Mbit/s
4:3/16:9 SWITCHABLE
MPEG Layer I & II, 32 / 44.1 / 48KHz
VIDEO OUTPUT
CVBS,RGB
JPEG*BMP*MP3*MPG(MPEG2)
MEDIA PLAYER
26
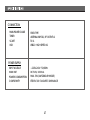
CONNECTION
MAIN POWER CABLE
TUNER
SCART
USB
FIXED TYPE
ANTENNA INPUTx1, RF OUTPUT x1
TV x1
USB2.0 HIGH SPEED X1
POWER SUPPLY
INPUT VOLTAGE
MAIN UNIT
POWER CONSUMPTION
~220V-240V 50/60Hz
DC5V IN, 1000mA
MAX. 5W (1W STAND-BY MODE)
CONFORMITY
ETSI EN 300 744 DVBT COMPLIANCE
27