1
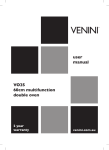
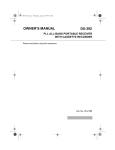
User Manual of RF-668 PIR Sensor Dialer Alarm
1
2
3
5
4
6
9
10
11
12
Keypad
13
Sender unit
7
Master unit
14
8
1. TX status LED
2. Off/ Chime button
3. Home / Mute Alert
4. Away / Panic
5. PIR Sensor
6. Siren
7. Status LED's
AC/DC adaptor
Input
AC/DC
8. 8. adaptor
input
9.
Mode
Selection
9. Mode
selection switch Switch
10.
Door T
Contact
10. Door
Contact
erminal Terminal
11.
Phone
1. Line
1 ConnectionLine socket
Tone Selection
Tone
12. 12.
Selection
switch
Reset Button
13. 13.
Reset
button
9V
14.battery
compartment
14. Battery
compartment
System
Set Up
Setting
A: Door Contact:
System
Set up
You could make the selection for the alarm trigger but door closing or opening.
1.
Open
the battery compartment (14) and insert a 9 Volt battery . Close the compartment again.
A1. Opening Trigger:
2.
Connect
Ac/DCmagnetic
power adaptor
the main
mainunit
power
unit. and
(Green
LEDtogether.
comes ON)
Connect the the
attached
contact to
to the
(10).and
And the
put master
the magnet
sensor
3.
Set
the
mode
selection
switch
(9)
to
Alarm
or
Mute
position.
A2. Closing Trigger:
(Alarm
Mode
= Systemmagnetic
will activate
the to
dialer
and unit(10).
siren when
was
triggered.
Connect
the attached
contact
the main
And alarm
keep the
magnet
contact separate.
Mute
Mode
System
ONLY
will dial out Insert
the preset
number
quietly
.)
A3. Open
the=
9 Volt
battery
compartment,
the 9 Volt
battery
and connect
to the battery clip.
Hits:
if skipped
door system
contact and
selection
procedure,
then insert
the 9 Volt battery first, then the system will
4.
Check
yourthe
phone
set the
Tone or Pulse
position.
set the door as "closing
Learn Code
B.Entry
theconnected
Phone Numbers:
5.
Once
the power, system will goto "Learn Mode" automatically .
B1. Slide the "mode selection switch" (9) to the "Prog." Position.
6. Push your remote button once, it will transmission a radio signal to the main unit.
B2. Slide the "Tone selection switch"(12) to "Tone" position.
7.
System will respond with 4 beep sound as code learnt confirmation.
B3. Push the number buttons, the keypad should be respond with a single short beep for every button.
8.
If
youthe
had
2nd remote
key
learn, then push the "Disarm/chime" button on your 2nd remote key.
B4. Push
"STORE"
button on
thetokeypad.
9.
System
will
leave
the
learn
code
after
it learnt
codes, Or,
afterwill
first
10 second
power
B5. Key in the phone numbers. (While key
in the
phone2numbers,
system
respond
with a of
short
beepup.
tone.)
If your phone system need to dial a digit first for line release, please also key in this digit to your memory.
Entry
thein Phone
number
B6. Key
the memory
numbers (ie.M1). System will respond with tones sound as confirm signal.
10. You could entry different phone number. (M1, M2, M3)
Store
+ Phone
number
11.
Push
"Store"
Key, + M1 = M1
12. Key in the phone numbers.
Repeat
thethe
procedure
B4 to B5 to(I.e.
input
the.2nd
and 3rd
phone number.
13.
Key in
memoryofnumbers.
M1)
System
will respond
a tones sound as confirm signal.
B7. After input the telephone numbers. Please switch the "tone selection switch"(12) to the correct position
toStore
matching
phone
+your
Phone
Nr. system.
+ M1
=M1
Hits: If your system didn't respond with the key in tones. Please use a small pin to push the reset button (13)
Repeat
to 8system.
to set your 2nd and 3rd. phone number.
once to step
reset 6your
(In case your phone system need to dial digit 9 or 0 to get the phone line . Please include this digit to
the
memory
setting. )
C. Code
Learning
14.
key"Mode
in the Selection
phone number,
the
pad will
respond with a short beep sound.
C1.While
Slide the
switch"(9)
to key
the "Mute"
position.
C2.IfPush
your fail
remote
buttonthe
once,
the remote
send a radio
signal
to theuse
main
unit. pin to push the
15.
setting
or without
sound
keypadwillrespond
sound
, please
a small
C3.
Main
unit
will
respond
with
4
beeps
as
learnt
confirmation.
reset key once. (Reset key will clean the memory , then need to entry all the three phone number again.)
C4.After
If youprogram
had 2nd remote,
thennumber.
push the System
remote button
offor
youruse.
2nd remote once.
16.
the phone
is ready
Hits: System will leave the learn mode once it receipt 2 codes. Or, after 10 seconds of the first code learning.
Installation
Wall mount hanger
Wall mount bracket slot
Door Contact
Line socket
Battery compartment
Back view
1. Connect the door contact switch to the door or window with the provide double side sticker .
2. Connect the wires of the door contact to the main unit.
3. Connect the telephone line to the main unit.
4. Hang it on the wall by screw. Or,
5. Hang it on some where as you want but the mounting bracket.
(Hits. The PIR sensor should be always watching on the direction you want to be protect.
Such as main entry.)
Operation with remote
Disarm
Chime :
Code /Learning
You
activate
the visitor chime
function
the system
at the disarm mode by push the "Disarm/Chime"
17. could
Push the
"Disarm/chime"
button
(2) onwhile
the remote
unit.
button.
18. Main unit will respond with a "beep sound" as code confirmed.
18.1. If you had the 2nd key. Then push the remote button of 2nd remote to learn the code.
Activate the Chime by door opening(closing)
18.2. If push the 1st key again, 2nd remote will be skipped.
a. Push the "Disarm/Chime" button on your remote unit once. System will respond with one "ding dong" sound.
(Hits. If no 2nd key or confirm signal with in next 10 seconds after 1st code learnt. System will
Now, the chime is activated, it will sound the bell when the door open or close.
exit the learn mode automatically.)
19.
Now,the
your
remote
ready for use.
Activate
Chime
by PIRis movement
sensor
b.Door
Push Contact
the "Disarm/Chime"
Set Up button twice, system will respond with two "Ding Dong" sound.
Now, The chime is activated, It will blast the bell when the sensor detected the movement in the detection
System could be set up for Door Closing or Door Opening trigger.
area.
A. Trigger by Door Opening:
Disable
the chime: the door contact switch to the main unit. And close the door.
A.1. Connected
Push the "Disarm/chime" button once. You will hear the system respond with the disarm beep.
A.2. Insert the 9Volt battery to the main unit.
Hits: this function is special design for small shop, office as an visitor chime or simple entry alert .
Then, system will trigger while the door opening.
B. Trigger by Door Closing
B.1. Connected the door contact switch to the main unit. And open the door.
B.2. Power up the main unit.
Then, system will trigger while closing the door.
Visitor Chime Set Up
You could turn your system to a visitor chime by push the "Disarm/Chime" button once at
the "DISARM" mode.
C. Activate the door chime by door opening
C.1. Push the "Disarm/Chime" button once, system will respond with a door chime "Ding
Dong" sound once as signal confirmation.
C.2. You success change the system to visitor chime. Every time door open will activated
the door chime.
D. Activate the door chime by PIR Sensor
D.1. Push the "Disarm/Chime" button twice, system will respond with 2 x Ding Dong sound
as signal confirmation.
D.2. System will activated the door chime upon detect the movement.
Cancel the visitor chime function by push the "Disarm/Chime" button once.
This function is special design for the small shop, office as an visitor chime or simple alert
reminder.
Home Mode (disable the PIR sensor) --- Use the system while you stay at home:
21. Push the "Home/Mute Alert" button once.
22. System will respond with 3 beep sound and start the exit delay ( 15 seconds), the status
LED (red) will flashing.
23. A long beep sound will activate after the exit delay.
24. System will go into the "Arm" mode automatically after the exit delay.
25. System will disable the PIR sensor to allow free movement inside the house or you leave
your pets at home.
26. System will activate while the door contact was triggered.
27. System will start the entry delay with an entry alert beep (40 seconds).
28. System could be stop within the entry delay by push the "disarm" button once.
29. System will respond with 2 beep sound.
30. If no disarm signal, then system will dial the pre-set phone number M1, M2, M3.
31. After the phone dialling, system will release the telephone line and back to "ARM" mode.
Hits: if you set the mode switch to "Alarm" position, then system will blast the siren sound for
60 seconds after the dialling. Then stay at the "ARM" mode again.
Away Mode
32. Push the "Away" button once to arm the system.
33. System will start the exit delay and go to "ARM" mode after the exit delay.
34. System will be triggered by the PIR sensor or door contact.
35. System will start the entry delay and entry alert beep while detected the movement or
a opening door or window.
36. Disarm the system by push the "Disarm" button within the entry delay.
37. System will dial the pre-set phone numbers M1, M2, M3 and release the line after dialling.
Disarm
38. You could disarm the system by push the "disarm" button at any time.
39. You could stop the dialling at any time by push down the "disarm" button.
40. You could stop the siren at any time by push down the "disarm" button.
Mute Alert
System designed with manual mute alert function.
40. Push and hold the "Home/Mute alert" button for 3 seconds. It will activate the dialer system
automatically .
41. System will dial the pre-set phone number quietly .
Panic
42. You could blast the siren at any time by push and hold the "Away/Panic" button for 3 seconds.
Live Listening
Once the alarm was triggered. System will dial out the pre-set numbers and provide 30 seconds live
listening to the outsider, Outsider could hear / listening what's happen inside the house (office).
During this 30 seconds , the outsider will hear a silght warnning beep tone every 5 seconds.
Important Hits:
You MUST advanced the owner of your calling list about the system operation. Therefore they will
know you need their help while they get such phone call.